Skip to content
DisclaimerTerms Of UseGDPR PolicyCookie Policy

So Yum Recipes

  • Home
  • Drinks
  • Appetizers
  • Dinner
  • Dessert
  • About
  • Contact
  • Privacy Policy
DisclaimerTerms Of UseGDPR PolicyCookie Policy

Chloe

To make lemon garlic roasted asparagus, start with fresh asparagus. Choose a pound of bright green, firm stalks. Look for tips that are tightly closed and vibrant. This ensures you get the best flavor and crispness. Trim the tough ends of the asparagus before cooking. This step is key for a tender bite. The magic of this dish lies in its simple seasonings. Here’s what you need: - 3 tablespoons olive oil - 4 cloves garlic, minced - Zest of 1 lemon - 2 tablespoons fresh lemon juice - 1 teaspoon sea salt - 1/2 teaspoon black pepper - 1/4 teaspoon red pepper flakes (optional) - 2 tablespoons grated Parmesan cheese (or a vegan alternative) - Fresh parsley, chopped (for garnish) These ingredients create a burst of flavor. The lemon adds brightness, while garlic brings depth. The olive oil helps everything roast beautifully. You can customize this recipe by adding a few optional ingredients. If you like a little heat, use red pepper flakes. For a cheesy touch, sprinkle more Parmesan before serving. You can also swap in nutritional yeast for a vegan option. Each change adds a unique flair to the dish. First, set your oven to 400°F (200°C). This heat helps the asparagus roast well. Next, take 1 pound of fresh asparagus. Trim the ends to remove any tough parts. You want only the tender stalks. Rinse the asparagus under cold water to clean it. Pat it dry with a towel. This step helps the marinade stick better. In a large mixing bowl, add 3 tablespoons of olive oil. Then, add 4 cloves of minced garlic. The garlic gives a strong flavor that pairs well with the asparagus. Next, add the zest of 1 lemon and 2 tablespoons of fresh lemon juice. These ingredients brighten up the dish. Now, sprinkle in 1 teaspoon of sea salt, 1/2 teaspoon of black pepper, and 1/4 teaspoon of red pepper flakes if you like a bit of heat. Mix everything well until combined. Now, add the trimmed asparagus to the bowl. Toss it gently to coat each piece with the lemon garlic mixture. Spread the asparagus onto a baking sheet lined with parchment paper. Make sure the stalks are in a single layer. This helps them roast evenly. Place the sheet in the preheated oven. Roast for 12-15 minutes, or until the asparagus is tender and slightly crispy. In the last 2 minutes, sprinkle 2 tablespoons of grated Parmesan cheese on top. This adds a creamy touch. Once done, take it out and let it cool for a minute. Finish by garnishing with fresh parsley. Enjoy this dish straight away! For the full recipe, check the details above. When choosing asparagus, look for firm, bright green stalks. The tips should be tightly closed and fresh. Avoid any that feel soft or limp. Thicker stalks provide a meatier bite, while thinner ones cook faster. I prefer medium-sized asparagus for balance in texture and flavor. To get the best results, start with a hot oven at 400°F (200°C). This high heat helps the asparagus caramelize and become crispy. Make sure the asparagus is in a single layer on the baking sheet. Overcrowding can lead to steaming, which makes them soggy. Toss them in the lemon garlic marinade well for even flavor. You can easily boost flavors in this dish. Add a splash of balsamic vinegar for a sweet touch. Try mixing in some herbs like thyme or rosemary for an earthy tone. If you want heat, sprinkle extra red pepper flakes. For a nutty flavor, consider toasted pine nuts or slivered almonds as a topping. Each addition brings a new twist to the classic lemon garlic taste. You can find the full recipe for lemon garlic roasted asparagus for more ideas. {{image_2}} You can easily make this dish vegan and dairy-free. Simply skip the Parmesan cheese or use a vegan cheese alternative. Nutritional yeast adds a cheesy flavor without dairy. It’s a great option to keep the taste rich and satisfying. Feel free to play with the seasonings. Try adding a bit of balsamic vinegar for a sweet touch. You can also use herbs like thyme or rosemary for added depth. If you enjoy spice, add more red pepper flakes. This gives a nice kick to the dish. You don’t have to stop at asparagus. Add other veggies like bell peppers, zucchini, or carrots. Cut them into similar sizes to ensure even cooking. Mix them with the asparagus in the marinade. This way, you get a colorful and tasty veggie medley. For the complete cooking experience, check out the Full Recipe. Enjoy experimenting with these variations! After you enjoy your lemon garlic roasted asparagus, store any leftovers in the fridge. Place the cooled asparagus in an airtight container. This keeps them fresh for up to three days. If you want to keep them longer, consider freezing them. To reheat your asparagus, use the oven or a skillet. Preheat your oven to 350°F (175°C). Spread the asparagus on a baking sheet and heat for about 10 minutes. If using a skillet, add a bit of olive oil and heat on medium for about five minutes. This keeps the flavor and texture nice. Freezing asparagus is simple but needs a few steps. First, blanch the asparagus in boiling water for two minutes. Then, immediately transfer them to ice water to stop the cooking. Drain and dry them well. Next, place the asparagus in a freezer bag and remove as much air as possible. They can stay good for up to six months in the freezer. When you’re ready to use them, just thaw in the fridge overnight before cooking. Roast asparagus for about 12-15 minutes at 400°F (200°C). Check for tenderness. It should be bright green and slightly crispy. The exact time can vary based on the thickness of the asparagus. Thinner stalks cook faster, while thicker ones may need more time. Yes, you can use frozen asparagus. However, I recommend thawing it first. This helps to keep the texture from becoming mushy. Pat it dry to remove excess moisture. Using fresh asparagus will give the best flavor and crunch. Lemon garlic roasted asparagus pairs well with many dishes. Try serving it with grilled chicken, fish, or steak. It also complements pasta dishes and grains like quinoa or rice. For a lighter meal, enjoy it with a fresh salad. Absolutely! Asparagus is low in calories and high in nutrients. It contains vitamins A, C, and K. The olive oil provides healthy fats, and garlic has many health benefits. This dish is a great way to add greens to your meals. For the full recipe, you will need: - 1 pound fresh asparagus, trimmed - 3 tablespoons olive oil - 4 cloves garlic, minced - Zest of 1 lemon - 2 tablespoons fresh lemon juice - 1 teaspoon sea salt - 1/2 teaspoon black pepper - 1/4 teaspoon red pepper flakes (optional) - 2 tablespoons grated Parmesan cheese (or a vegan alternative) - Fresh parsley, chopped (for garnish) Follow the steps in the recipe to create this tasty side dish! This blog post covered how to make lemon garlic roasted asparagus from start to finish. We explored fresh ingredients, seasoning suggestions, and step-by-step instructions. Tips for perfect roasting and flavor enhancement were included. We also talked about vegan options and proper storage methods. In summary, this dish is simple and versatile. It's healthy and tasty, making it a great choice for any meal. Use the information here to create your delicious lemon garlic roasted asparagus today!

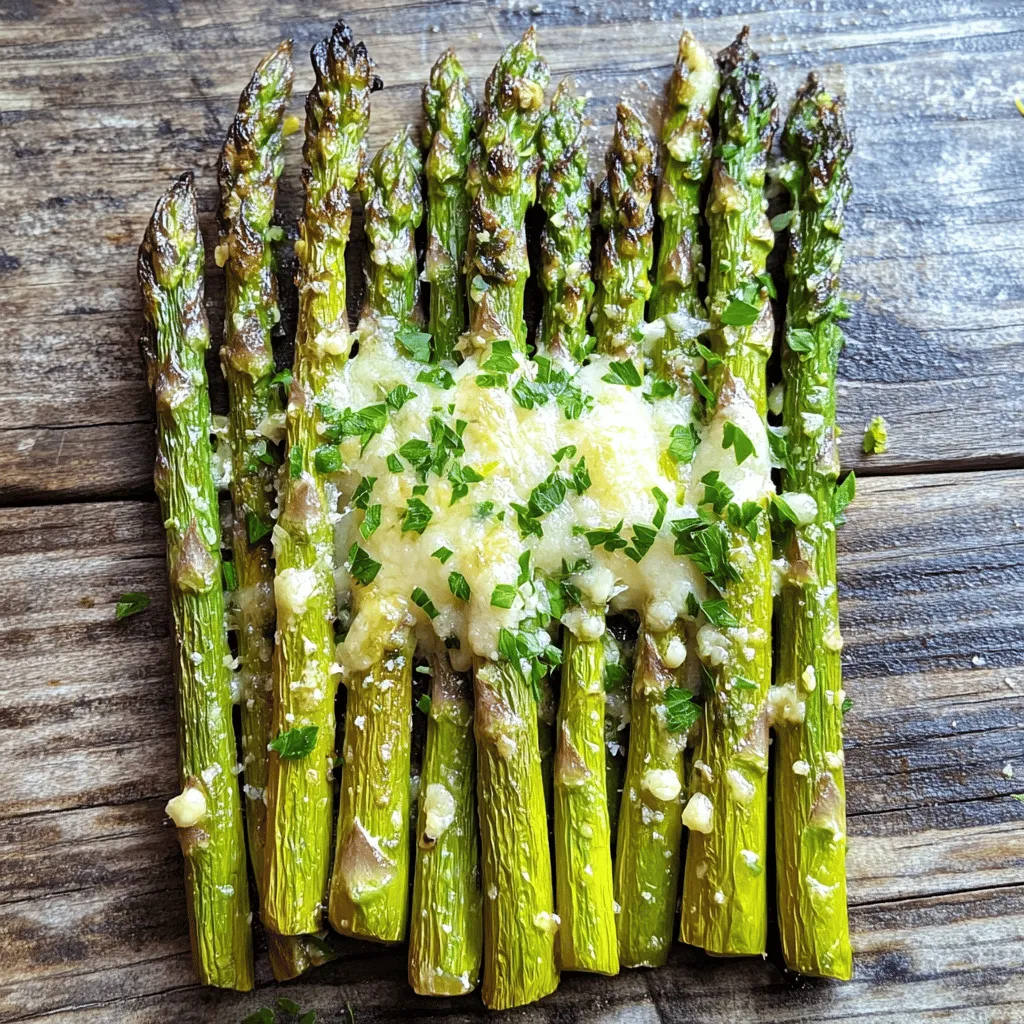
Lemon Garlic Roasted Asparagus Tasty and Easy Recipe

Looking for a simple side dish that bursts with flavor? This Lemon Garlic Roasted Asparagus recipe is your answer. I’ll

To create these amazing pumpkin spice pancakes, you need simple ingredients. Here’s what you’ll need: - 1 cup all-purpose flour - 1/2 cup canned pumpkin puree - 1 tablespoon baking powder - 1 tablespoon pumpkin pie spice - 1/4 teaspoon salt - 1 tablespoon brown sugar - 1 large egg - 1 cup milk (can substitute with almond or oat milk) - 2 tablespoons melted butter (plus extra for cooking) These ingredients come together to bring that warm, cozy taste of fall to your breakfast table. You can easily adjust these pancakes to fit your dietary needs. Here are some swaps: - Use gluten-free flour in place of all-purpose flour. - Swap the egg for 1/4 cup of applesauce for a vegan option. - Use almond or oat milk instead of cow's milk for a dairy-free choice. These substitutions keep the flavor intact while meeting your unique needs. While these pancakes taste great on their own, toppings can add extra delight. Here are some ideas: - A dollop of whipped cream for a creamy touch. - Drizzle maple syrup for sweetness. - Sprinkle chopped pecans or walnuts for crunch. - Add a dash of extra pumpkin pie spice for more flavor. These options make your pumpkin spice pancakes even more fun and tasty! Remember to check the [Full Recipe] for all the details. Start with a large mixing bowl. Add the following dry ingredients: - 1 cup all-purpose flour - 1 tablespoon baking powder - 1 tablespoon pumpkin pie spice - 1/4 teaspoon salt - 1 tablespoon brown sugar Whisk these dry ingredients together until they blend well. This mix gives the pancakes their great flavor and rise. In another bowl, mix the wet ingredients: - 1/2 cup canned pumpkin puree - 1 large egg - 1 cup milk (you can use almond or oat milk) - 2 tablespoons melted butter Stir these until the mixture is smooth. The pumpkin adds moisture and flavor, making the pancakes special. Now, heat a non-stick skillet or griddle over medium-low heat. Add a little melted butter to coat the surface. Pour about 1/4 cup of the batter onto the skillet for each pancake. Cook until bubbles form on the surface, about 2-3 minutes. When the edges look set, flip the pancake and cook for another 2 minutes until golden brown. Repeat with the rest of the batter, adding butter as needed. Serve the pancakes warm. Top with whipped cream and maple syrup for a true fall treat. For the full recipe, check the previous section. Enjoy your delicious pumpkin spice pancakes! To get the best pumpkin spice flavor, use fresh spices. Ground cinnamon, nutmeg, and ginger are key. Avoid using old spices; they lose their punch. You can also add a dash of vanilla extract for depth. Mix your spices well with the flour. This ensures even flavor in every bite. Cook your pancakes at medium-low heat. If the skillet is too hot, the outside burns while the inside stays raw. I recommend using a non-stick pan for easy flipping. Pour about 1/4 cup of batter per pancake. Wait until bubbles form on the surface before flipping. This usually takes about 2-3 minutes. Cook for another 2 minutes after flipping, until golden brown. One common mistake is over-mixing the batter. Stir until just combined; lumps are fine. Another mistake is not letting the skillet preheat enough. If it’s not hot enough, pancakes won’t rise well. Lastly, don’t skip the melted butter for cooking. It adds great flavor and keeps pancakes from sticking. For a complete guide, check the Full Recipe. {{image_2}} You can easily make gluten-free pumpkin spice pancakes by swapping flour. Use a gluten-free flour blend instead of all-purpose flour. Look for blends that include xanthan gum; they help with texture. Mix the dry ingredients as usual. Follow the rest of the recipe steps. These pancakes will be just as tasty. To make vegan pumpkin spice pancakes, replace the egg and milk. Use a flax egg instead of a chicken egg. To make a flax egg, mix one tablespoon of ground flaxseed with three tablespoons of water. Let it sit for five minutes until thick. For milk, use almond or oat milk. Your pancakes will still taste great! You can add fun flavors to your pancakes! Try mixing in chocolate chips or pecans for crunch. You can also add a splash of vanilla extract to the wet ingredients for extra flavor. If you want a spicier kick, add a pinch of cayenne pepper. These twists make each pancake a new treat! For the complete recipe, check out the Full Recipe section. After making these pumpkin spice pancakes, you may have some left. To store them, place the pancakes in an airtight container. Layer them with parchment paper to prevent sticking. Keep them in the fridge for up to three days. If you want to enjoy them later, this method keeps their flavor fresh. When you're ready to eat your leftover pancakes, reheating is easy. You can use a microwave, but I prefer a skillet for better texture. Heat a non-stick skillet over low heat. Add a small pat of butter. Place the pancakes in the skillet and warm them for about one minute on each side. This keeps them soft and adds a nice buttery flavor. Freezing is a great option for these pancakes. Start by letting them cool completely after cooking. Then, stack them with parchment paper in between each pancake. Place the stack in a freezer bag or airtight container. You can freeze them for up to three months. When you crave a tasty breakfast, just reheat them as mentioned. Enjoy your pumpkin spice pancakes anytime! Yes, you can use fresh pumpkin. First, cook the pumpkin until it's soft. Then, blend or mash it to a smooth puree. This fresh puree can add a more vibrant flavor. It may also change the texture slightly, so adjust your liquid as needed. To make fluffier pancakes, try these tips: - Use fresh baking powder; it should be active. - Don't over-mix the batter; leave some lumps. - Let the batter rest for a few minutes before cooking. This helps the pancakes rise better while cooking. Leftover pumpkin puree has many uses. You can: - Add it to smoothies for a healthy boost. - Stir it into oatmeal for extra flavor. - Use it in baked goods like muffins or bread. These options let you enjoy pumpkin in different ways! Find the full recipe for pumpkin spice pancakes to enjoy this fall treat. These pumpkin spice pancakes blend warm spices with simple steps for tasty treats. We explored key ingredients, options for dietary needs, and ways to top your pancakes. I shared tips to boost flavor and avoid common mistakes during cooking. We also discussed fun variations for gluten-free and vegan diets. Lastly, we looked at easy storage and reheating methods. Enjoy these pancakes at breakfast or any time! Happy cooking!

Pumpkin Spice Pancakes Irresistible Fall Breakfast Treat

Fall is here, and what better way to celebrate than with Pumpkin Spice Pancakes? These fluffy treats capture the season’s

- 8 oz. pasta (fusilli or penne) - 1 cup cherry tomatoes, halved - 1 cup fresh mozzarella balls, halved - 1 cup fresh basil leaves, roughly chopped - 1/4 cup extra virgin olive oil - 2 tablespoons balsamic vinegar - Salt and pepper to taste - 1 tablespoon honey - 1/4 cup pine nuts, toasted (optional) When making Caprese pasta salad, fresh ingredients make a big difference. The pasta should be cooked al dente. This gives it the right texture. Cherry tomatoes add a burst of flavor. Halved fresh mozzarella balls bring creaminess. The basil leaves add a lovely aroma. Together, these ingredients create a fresh and tasty dish. With extra virgin olive oil and balsamic vinegar, you get a rich dressing. Honey balances the acidity perfectly. Salt and pepper enhance all the flavors. Toasted pine nuts add a nice crunch. You can skip them if you want. For a complete guide, check the Full Recipe. Each ingredient works together to make this salad shine! To make Caprese pasta salad, start by cooking the pasta. Boil water in a large pot. Add 8 oz. of pasta and cook until it is al dente. This usually takes about 8 to 10 minutes. Drain it and rinse with cold water to stop cooking. This step helps keep the pasta firm. Next, prepare the fresh ingredients. Halve 1 cup of cherry tomatoes and 1 cup of fresh mozzarella balls. You want these pieces to be bite-sized. Then, chop 1 cup of fresh basil leaves roughly. This adds a fragrant touch. Now, it’s time to mix the salad. In a large bowl, combine the cooked pasta, halved tomatoes, and mozzarella. Then, add the chopped basil to the bowl. To make the dressing, whisk together 1/4 cup of extra virgin olive oil, 2 tablespoons of balsamic vinegar, 1 tablespoon of honey, and salt and pepper. This mixture brings a sweet and tangy flavor. Drizzle this dressing over the salad. Toss gently to coat all the ingredients evenly. Let the salad sit for about 15 minutes at room temperature. This allows the flavors to blend. It makes each bite more delicious. For balancing flavors, taste the salad after it sits. You can add more salt, pepper, or a splash of olive oil. If you want extra crunch, sprinkle 1/4 cup of toasted pine nuts on top. This adds a nice texture and flavor. Enjoy your Caprese pasta salad fresh and vibrant! For the full recipe, check out the details above. - Overcooking pasta: Keep an eye on the pasta. Cook it until it is al dente. This means it should have a little bite to it. - Not using fresh ingredients: Fresh basil, tomatoes, and mozzarella make a big difference. Use the best quality you can find for great taste. - Importance of letting flavors meld: After mixing, let the salad sit for 15 minutes. This time allows the flavors to blend. It makes each bite taste better. - Using high-quality olive oil and balsamic vinegar: Don’t skimp here! Good olive oil adds richness. A fine balsamic vinegar brings a sweet tang that enhances the whole dish. - Presentation tips: Serve in a large bowl or individual portions. Garnish with fresh basil leaves and a balsamic drizzle for a lovely look. - Pairing with other dishes: This salad goes well with grilled meats or seafood. It also pairs nicely with crusty bread for a full meal. For the complete recipe, check out the Full Recipe section! {{image_2}} You can easily change your Caprese pasta salad to fit your taste. Adding proteins can make the dish heartier. Try grilled chicken for a mild flavor or shrimp for a seafood twist. Both options add a nice protein boost. You can also switch up the veggies. Avocado adds creaminess, while bell peppers bring a sweet crunch. These small changes create a unique spin on the classic recipe. If you need gluten-free options, use gluten-free pasta. Many brands offer excellent alternatives that taste great. For a vegan version, swap fresh mozzarella with vegan cheese or tofu. You can also skip the cheese entirely and still enjoy a fresh salad. These swaps ensure everyone can enjoy this dish. Caprese pasta salad can change with the seasons. In spring, add asparagus or peas for brightness. Summer is perfect for sweet corn or zucchini. In fall, roasted butternut squash adds warmth. Winter allows for hearty greens like kale or spinach. Always try to use local produce. This not only supports farmers but also gives your salad the freshest flavors. To keep your Caprese pasta salad fresh, start by using an airtight container. This prevents air from spoiling the ingredients. Make sure the salad is cool before sealing the container. If you have extra dressing, store it separately. This keeps the pasta from getting soggy. You can serve this salad cold or at room temperature. If you want to warm it, use the microwave. Heat in short bursts, about 15 seconds. Stir the salad gently between bursts to avoid hot spots. This method helps maintain texture without cooking the fresh ingredients. Your Caprese pasta salad lasts about 3 days in the fridge. Keep an eye on the tomatoes and basil, as they spoil first. Signs of spoilage include a slimy texture, off smells, or discoloration. If you notice any of these signs, it’s best to toss the salad. Enjoy your meal knowing you can make it last with these simple tips! For the complete dish, check the Full Recipe. Caprese Pasta Salad is a fresh dish that mixes pasta, tomatoes, mozzarella, and basil. It brings together classic Caprese flavors in a new way. The salad is colorful and tasty, making it a hit for any meal. Yes, you can prepare Caprese Pasta Salad ahead of time. Cook the pasta and cool it. Mix the other ingredients in a bowl, but add the dressing just before serving. This keeps the salad fresh and crunchy. Store it in the fridge for up to two days. You can add many things for extra flavor! Here are some ideas: - Grilled chicken for protein - Avocado for creaminess - Bell peppers for crunch - Olives for brininess - Pesto for a herby twist You can also try different dressings like Italian or lemon vinaigrette. Yes, Caprese Pasta Salad can be healthy. It has fresh veggies, healthy fats, and protein. Here’s a quick breakdown: - Calories: About 250 per serving - Fats: Healthy fats from olive oil - Proteins: Protein from mozzarella - Carbs: Carbs from pasta This salad is also a good source of vitamins and minerals. To make Caprese Pasta Salad gluten-free, use gluten-free pasta. Many options are available, like rice or chickpea pasta. Also, check labels for other ingredients, like dressings, to ensure they are gluten-free. Caprese Pasta Salad is best served cold. The flavors blend well when chilled. If you prefer it warm, serve it right after mixing. Just keep in mind that the texture may change. Enjoy it however you like! For the full recipe, check out the Caprese Pasta Salad with a Balsamic Drizzle. This Caprese Pasta Salad is a tasty, simple dish. You learned the best ingredients and how to mix them. I shared tips to avoid mistakes and enhance flavors. You can also customize the salad to fit your tastes. Remember, using fresh ingredients makes all the difference. Store leftovers properly to keep them fresh. Enjoy your delicious creation and make it again for friends! This dish can be healthy and fun with many options. Now, it's time to get cooking!

Caprese Pasta Salad Fresh and Flavorful Recipe

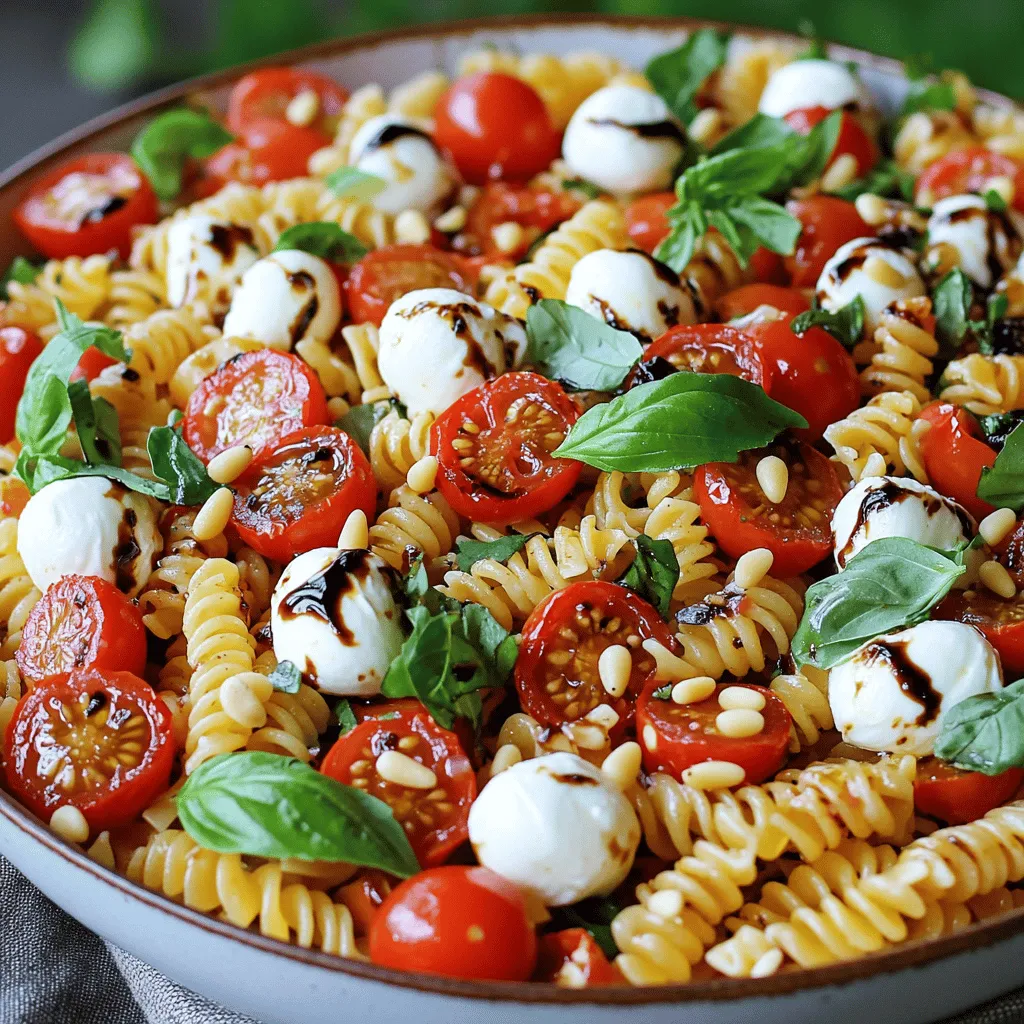
Are you ready to make a dish that bursts with flavor and freshness? My Caprese Pasta Salad is the perfect

- 1 cup rolled oats - 2 cups almond milk (or alternative milk) - 2 ripe bananas (one mashed and one sliced) - 1/4 cup creamy peanut butter - 2 tablespoons maple syrup (or honey) - 1 teaspoon vanilla extract - 1/2 teaspoon ground cinnamon - A pinch of salt - Optional toppings (chopped peanuts, extra banana slices) In this recipe, each ingredient plays a key role in flavor and texture. The rolled oats provide a hearty base. They soak up the almond milk, creating a creamy consistency. I love using almond milk, but you can choose any milk you enjoy. Ripe bananas are vital. One banana is mashed into the mix for sweetness. The other is sliced for topping. Creamy peanut butter adds rich flavor. It also brings healthy fats and protein. The maple syrup or honey gives a touch of sweetness. You can adjust the amount based on your taste. Vanilla extract brings warmth to the oats. Ground cinnamon adds a cozy spice. A pinch of salt balances the sweetness. For extra crunch, consider adding chopped peanuts or more banana slices on top. This combination creates a simple yet delightful meal. You will love how easy it is to make. Just mix the ingredients, chill, and enjoy a tasty breakfast. For the full recipe, check out the details above. First, you need a large mixing bowl. Add 1 cup of rolled oats. Pour in 2 cups of almond milk. Then, mash one ripe banana and mix it in. Next, add 1/4 cup of creamy peanut butter. This gives a rich, smooth taste. Stir in 2 tablespoons of maple syrup. For extra flavor, add 1 teaspoon of vanilla extract and 1/2 teaspoon of cinnamon. Finally, add a pinch of salt. Mix everything well until smooth. This base will be your tasty foundation. Now, it’s time to fill your jars. Take the mixture and divide it evenly into two or four jars. This depends on how many servings you want. Make sure each jar gets a good amount. Once filled, you can add a fun touch. Top each jar with sliced banana. Next, sprinkle some chopped peanuts on top. This adds crunch and flavor. Your jars should look inviting and colorful. After filling the jars, seal them tightly. Place them in your fridge overnight. This step is crucial. It allows the oats to absorb the milk and soften. If you’re short on time, let them soak for at least four hours. The longer they chill, the better the taste. In the morning, just stir the oats. You can enjoy them cold or warm them in the microwave. You now have a delicious breakfast ready to go! For the full recipe, check out the details above. To make your overnight oats just right, you can play with sweetness. If you want it sweeter, add more maple syrup or honey. If you prefer less sweetness, reduce the amount. Start with two tablespoons and adjust to your taste. Oat consistency is key for a good texture. Use rolled oats for the best result. Quick oats will get too mushy. If you like a creamier feel, you can mash the bananas really well. This helps the oats soak up all the flavors. You can enjoy your oats straight from the fridge or warm them up. Both ways taste great! If you heat them, do it for about 30 seconds in the microwave. This warms them without losing texture. For a beautiful look, layer your jars. Start with the oats, then add sliced bananas. Drizzle with extra peanut butter on top. Sprinkle cinnamon and chopped peanuts for a fun crunch. This makes your breakfast not just tasty, but also pretty! Not a fan of dairy? You can use different milk types. Almond milk works well, but soy or oat milk are great too. Just pick what you like best. If you want a change from peanut butter, try almond butter or cashew butter. Each nut butter gives a new flavor twist. This keeps your breakfast exciting and fresh! You can find the full recipe for more details on making this dish delicious. {{image_2}} You can easily change up the taste of your overnight oats. One fun option is to add cocoa powder. This gives your oats a rich chocolate flavor that pairs well with the banana. Just mix in about one tablespoon of cocoa powder when you combine your ingredients. You can also toss in berries or other fruits. Fresh strawberries, blueberries, or even chopped apples add a burst of color and extra nutrition. If you want a healthier bowl, try reducing sweeteners. You can use less maple syrup or honey. Another option is to use sugar alternatives like stevia or agave. This way, you can enjoy your oats without too much sugar. You can also boost protein by adding seeds or nuts. Chia seeds or chopped almonds are great choices. Just a tablespoon can make a big difference. For those following a vegan diet, check your ingredients to ensure they all meet your needs. Instead of almond milk, you can use oat milk, soy milk, or coconut milk. These options keep your recipe plant-based and delicious. If you want a nut-free version, sunflower seed butter is a great alternative to peanut butter. It gives you that creamy texture without any nuts. You can keep your peanut butter banana overnight oats in the fridge for up to five days. This makes them great for meal prep. To maintain freshness, store them in airtight containers. This helps keep out air and moisture. Always check for any changes in smell or texture before eating. You can freeze your prepared overnight oats if you want to save them for later. Just pour them into freezer-safe containers. Leave some space at the top, as the oats will expand when frozen. To eat frozen oats, thaw them in the fridge overnight. You can also warm them in the microwave after thawing. When it comes to reheating, you have two main options: microwave or stovetop. For the microwave, place oats in a bowl and heat for about one minute. Stir halfway through to avoid hot spots. If you choose the stovetop, pour oats into a pan over low heat. Stir often to keep the texture smooth. Add a splash of milk if they become too thick. Following these tips will help you enjoy your oats just like fresh! Yes, you can make overnight oats without milk. Use yogurt or a dairy-free option like coconut yogurt. The oats will still soak up the liquid and soften. You can also try fruit juice or nut milk alternatives. Just ensure you have enough liquid to cover the oats completely. You can store peanut butter banana overnight oats in the fridge for up to five days. Keep them in airtight containers to stay fresh. The oats may thicken over time, so stir them before eating. For the best taste and texture, eat them within three days. If you want to swap out peanut butter, try almond butter or cashew butter. Sunflower seed butter is a great nut-free choice. Each option brings its own flavor, so pick one you enjoy. You can also use tahini for a unique twist. Yes, you can prepare these oats without bananas. Just leave out the mashed banana and sliced banana. You could replace it with applesauce or another fruit like berries. This change will keep the oats moist and flavorful. Peanut butter banana overnight oats are packed with nutrition. The oats provide fiber, which helps digestion. Bananas add potassium, which is good for your heart. Peanut butter offers protein and healthy fats, keeping you full longer. This meal is balanced, tasty, and easy to make. For the full recipe, check out the Peanut Butter Banana Bliss Overnight Oats. Peanut Butter Banana Overnight Oats are easy and tasty. We covered the key ingredients, like oats, bananas, and peanut butter. I showed you how to mix, chill, and serve your oats. You now know tips for customizing flavors and storing them well. Remember, you can adjust this dish to fit your needs. Experiment with different fruits and nut butters. Enjoy making and sharing these oats. They make for a great start to your day!

Peanut Butter Banana Overnight Oats Simple Delight

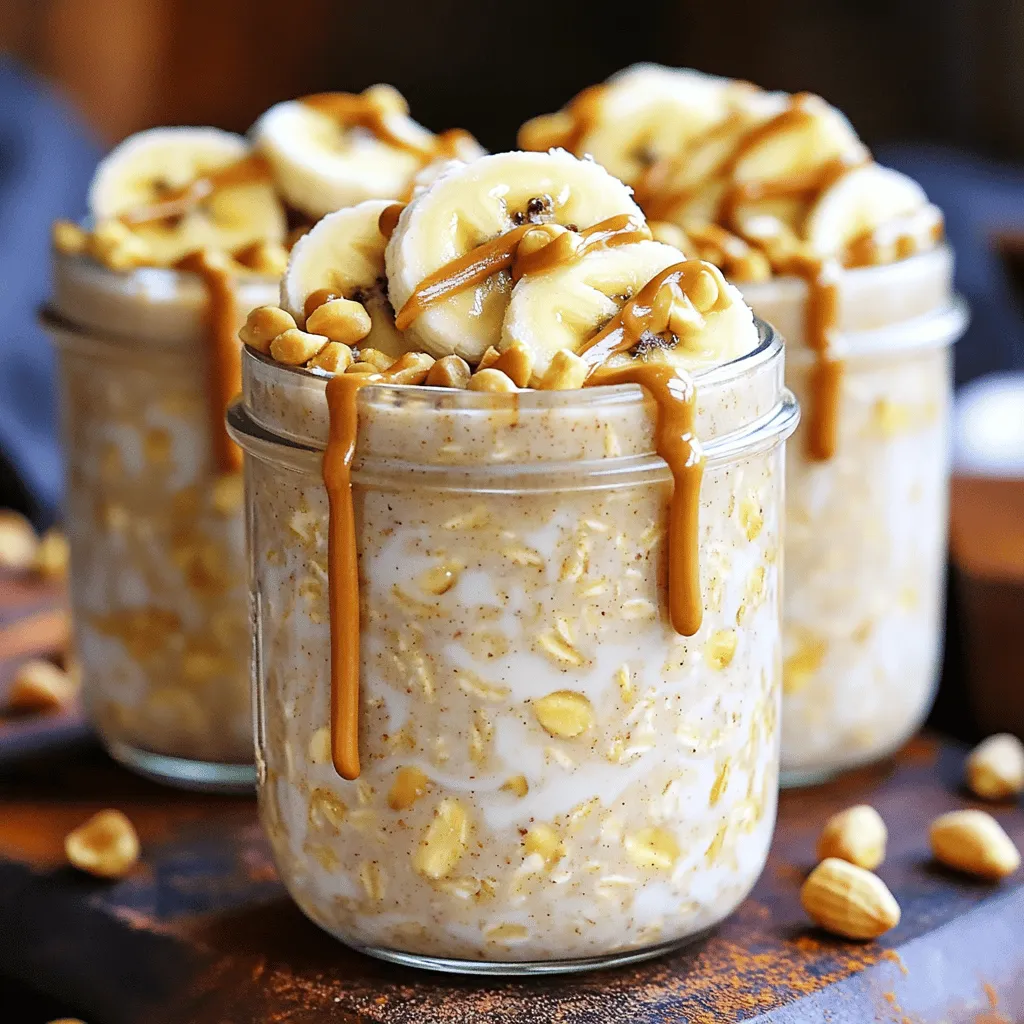
Start your day right with Peanut Butter Banana Overnight Oats! This simple delight gives you energy and taste in one

- 4 medium bell peppers (any color) - 1 cup cooked quinoa - 1 can (15 oz) black beans, drained and rinsed - 1 cup corn kernels (fresh or frozen) - 1 cup diced tomatoes (canned or fresh) - 1 teaspoon cumin - 1 teaspoon smoked paprika - 1 teaspoon garlic powder - Salt and pepper to taste - ½ cup shredded cheddar cheese (optional) - ¼ cup fresh cilantro, chopped - Lime wedges for serving Stuffed bell peppers are not only tasty but also very healthy. The bell peppers provide vitamins A and C. Quinoa offers protein and fiber, making this dish filling. Black beans add extra protein and iron. Corn gives a nice sweetness and crunch to the mix. You can adjust the spices to fit your taste. If you like it spicy, add some chili powder. If you prefer mild, skip the heat. The choice is yours! Feel free to mix in other ingredients too. You can add spinach for more greens or even some ground meat for a heartier meal. Using fresh herbs like cilantro adds great flavor. And don’t forget the lime wedges! They really brighten up the dish. For a complete recipe, check out the Full Recipe section. Enjoy these stuffed bell peppers as a main dish or a side. They are sure to impress! - Preheat the oven to 375°F (190°C). - Cut the tops off the bell peppers and remove the seeds and membranes. This keeps the peppers tender and helps the filling shine. - Combine all filling ingredients in a bowl. You can use cooked quinoa, black beans, corn, diced tomatoes, cumin, smoked paprika, garlic powder, salt, and pepper. Mix well until everything is blended. - Stuff each pepper with the filling mixture. Press down a bit to pack it in, ensuring a hearty bite. - Place peppers in a baking dish and add water. This helps steam the peppers while they bake, making them soft and juicy. - Cover with foil and bake for 25 minutes. Then uncover and bake for an additional 10 minutes. This browns the tops and melts the cheese if you added it. Check out the Full Recipe for more details on making these delicious stuffed bell peppers. - Use fresh ingredients for maximum flavor. Fresh bell peppers give the best taste. - Adjust spice levels according to preference. Add more cumin or chili for heat. - Pair with a side salad or rice. This adds more texture and taste. - Add a dollop of sour cream or yogurt on top. This adds creaminess and coolness. - Bell peppers are high in vitamins A and C. They boost your immune system. - Quinoa offers protein and fiber. This helps you feel full and satisfied. - Each serving has about 300 calories. Adjust based on added toppings like cheese. {{image_2}} You can switch up the stuffing in many ways. If you want a different taste, swap quinoa for rice or another grain you like. Rice gives a softer texture and works well. For a heartier option, add ground turkey or sausage to the mix. This choice packs in more protein and flavor, making it a filling meal. If you prefer a plant-based dish, you can easily modify the recipe. Omit the cheese entirely for a vegan option. You can also include more veggies like spinach or zucchini. These additions boost the nutrition and add color to your plate. The flavors blend well with the other ingredients, creating a tasty dish that everyone will enjoy. When cooking for special diets, stuffed peppers can be quite flexible. For gluten-free options, ensure your grains and sauces are certified gluten-free. You can use quinoa, which is naturally gluten-free, as a great base. Always check ingredient labels to avoid hidden allergens. This way, you can enjoy stuffed peppers safely and deliciously! To store leftover stuffed bell peppers, let them cool down first. Place them in a container with a tight lid. You can refrigerate them for up to four days. If you want to keep them longer, freeze the peppers. Use freezer-safe bags or containers. They can last for up to three months in the freezer. Just remember to label the bags with the date. This way, you won't forget when you made them. When reheating stuffed peppers, you want to keep them moist. The best way to do this is in the oven. Preheat your oven to 350°F (175°C). Place the peppers in a baking dish. Add a splash of water at the bottom of the dish. Cover it with foil. Heat for about 20 minutes. If you use a microwave, place the pepper on a microwave-safe plate. Add a little water and cover it with a damp paper towel. Heat in short bursts of 1-2 minutes. Check to make sure they don’t dry out. Enjoy your tasty meal again! For the full recipe, check out the earlier section. To choose the best bell peppers, look for ones that are firm and shiny. They should feel heavy for their size. The color can vary, but red, yellow, and green all work well. Pick peppers with no soft spots or blemishes. The size matters too; medium peppers fit well in most baking dishes. Yes, you can prepare stuffed peppers in advance. You can stuff them and then store them in the fridge. Just cover them tightly with plastic wrap. They can stay fresh for up to two days. When you're ready to bake, take them out and let them sit at room temperature for about 30 minutes. To add heat to stuffed peppers, you can mix in chopped jalapeños or diced green chilies. You can also add red pepper flakes to the stuffing. If you enjoy hot sauce, drizzle it on top before baking. Experimenting with spices can lead to a fun flavor boost. Many cheeses work well for stuffed peppers. Cheddar is a popular choice because it melts nicely. You can also try mozzarella for a gooey texture. Feta adds a tangy flavor, while pepper jack gives a spicy kick. Choose any cheese that you enjoy for a tasty topping. Stuffed peppers are a healthy, tasty dish you can easily make. We covered key ingredients, simple steps, and tips for cooking. You learned how to tailor the recipe to fit your taste. Remember, stuffing options are endless, so get creative! Whether you prefer classic or spicy, the choice is yours. Enjoy experimenting and sharing this dish with friends and family. It’s a fun way to eat well and make mealtime special. Dive into stuffed peppers today and savor every bite!

Stuffed Bell Peppers Flavorful and Nutritious Dish

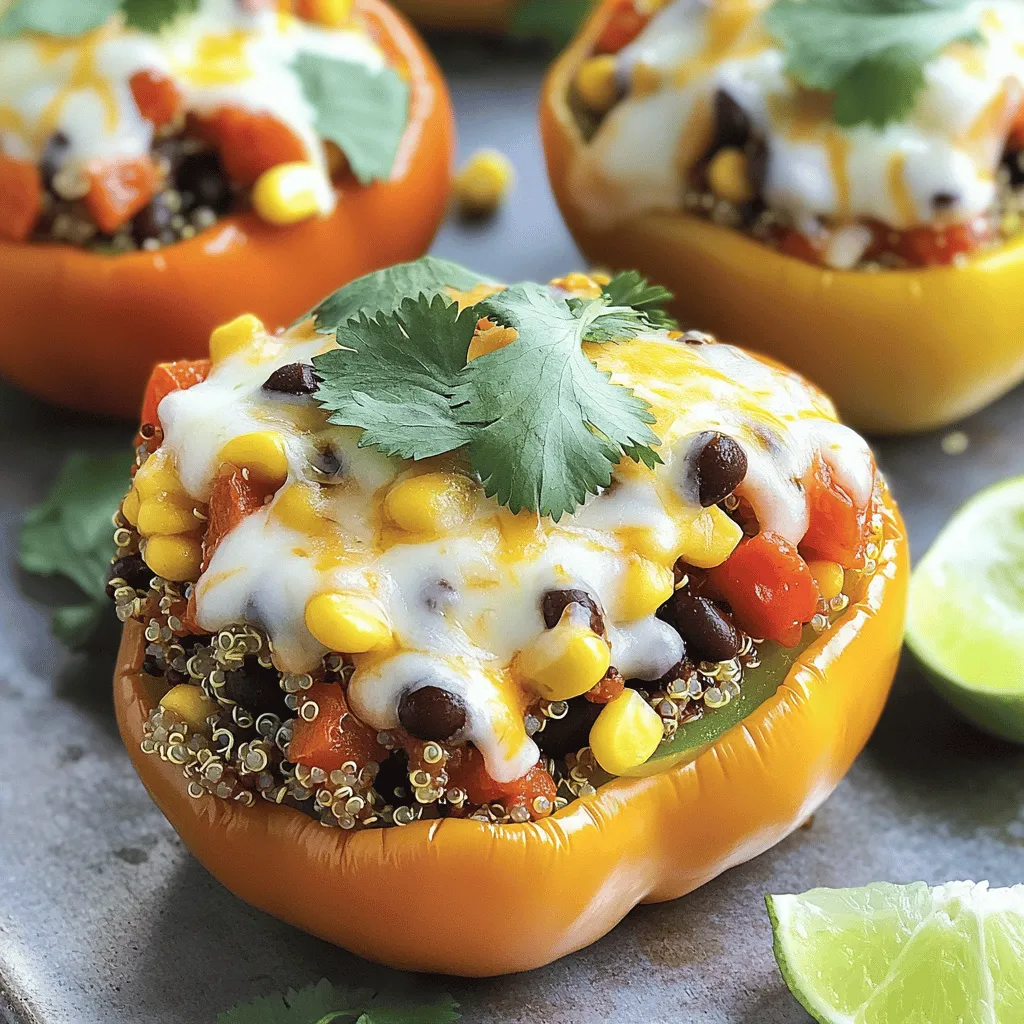
Are you ready to transform your meals with a colorful and tasty dish? Stuffed bell peppers are not only visually

To make Maple Glazed Brussels Sprouts, gather these ingredients: - 1 lb Brussels sprouts, halved - 3 tablespoons pure maple syrup - 2 tablespoons olive oil - 1 tablespoon balsamic vinegar - 1 teaspoon garlic powder - Salt and pepper to taste - 1/4 cup chopped pecans (optional) - 1 tablespoon fresh thyme leaves (optional) This list gives you all you need for a tasty dish. You can easily swap some ingredients if you want. Here are a few ideas: - Use honey instead of maple syrup for a different sweetness. - Replace olive oil with avocado oil for a lighter flavor. - Try apple cider vinegar instead of balsamic vinegar for a fruity twist. - If you don’t have garlic powder, fresh minced garlic works well too. - For a nut-free option, leave out the pecans. Feel free to mix and match based on what you have. When picking Brussels sprouts, fresh is usually best. Fresh sprouts taste better and have a nice crunch. Look for bright green, firm sprouts. Frozen Brussels sprouts can work in a pinch. They are pre-washed and cut, making them convenient. However, they may not have the same flavor and texture as fresh ones. If you choose frozen, cook them longer to get rid of extra moisture. Aim for a nice brown color when roasting. To start, you need to preheat your oven to 425°F (220°C). This step helps caramelize the Brussels sprouts. Next, take a large bowl and add the halved Brussels sprouts. Pour in the olive oil and maple syrup. Add the balsamic vinegar, garlic powder, salt, and pepper. Toss everything well to coat the sprouts evenly. This mixture gives them a sweet and savory flavor. Now, spread the coated Brussels sprouts on a baking sheet. Make sure they are cut side down. This position helps them brown nicely. Roast the Brussels sprouts in the preheated oven for about 20 to 25 minutes. At the halfway point, stir the sprouts to ensure even cooking. They should become tender and start to brown. If you want a crunch, you can add chopped pecans during the last 5 minutes of roasting. This step gives an extra layer of flavor and texture. You’ll know your Brussels sprouts are done when they are golden brown and tender. The edges should look crispy, and a fork should easily pierce them. This texture makes them perfect for serving. Once they are ready, take them out and sprinkle fresh thyme leaves if you desire. This adds a fresh touch. Finally, transfer them to a serving dish and drizzle any leftover glaze over the top for added flavor. Enjoy your delicious maple glazed Brussels sprouts! For a complete recipe, check [Full Recipe]. To get the best flavor from your Maple Glazed Brussels Sprouts, start with fresh sprouts. Look for bright green, firm Brussels sprouts. Halve them for a more even cook and better glaze coverage. Use pure maple syrup for the best taste. It brings a rich sweetness that pairs well with the sprouts. Toss them well in oil and syrup to coat every piece. This ensures each bite bursts with flavor. One common mistake is overcrowding the baking sheet. If you pile too many sprouts, they will steam instead of roast. Give them space to caramelize properly. Another mistake is not preheating the oven. Roasting at 425°F (220°C) gives you crispy, browned edges. Also, avoid skipping the stirring step. This helps them cook evenly and prevents burning. For this recipe, you need a few basic tools. A large mixing bowl makes combining the ingredients easier. Use a sharp knife for halving the Brussels sprouts. A baking sheet lined with parchment paper helps with cleanup. A spatula is great for stirring the sprouts halfway through roasting. If you choose to add pecans, a small pan can help toast them lightly during the last few minutes. For the full recipe, check the complete guide. {{image_2}} You can change the flavor of your maple glazed Brussels sprouts easily. Here are a few fun ideas: - Citrus zest: Add lemon or orange zest for a fresh kick. - Spicy kick: Mix in a pinch of red pepper flakes for heat. - Cheese: Sprinkle with Parmesan cheese right before serving for a savory touch. - Bacon: Add crispy bacon bits during the last five minutes of roasting for a smoky flavor. This recipe is already vegan and gluten-free. You can keep it that way by using pure maple syrup and olive oil. Make sure your balsamic vinegar is gluten-free. This way, everyone can enjoy this tasty dish! You can mix in other vegetables for a seasonal twist. Here are some ideas: - Sweet potatoes: Dice them and roast with the Brussels sprouts for sweetness. - Carrots: Slice carrots into thin sticks and roast them with the sprouts. - Root veggies: Try parsnips or turnips. They add great texture and flavor. - Cauliflower: Toss in some cauliflower florets for extra crunch. With these variations, you can keep your maple glazed Brussels sprouts exciting and fresh each time you make them! For the complete recipe, check out the [Full Recipe]. To keep your Maple Glazed Brussels sprouts fresh, place them in an airtight container. You can store them in the fridge for up to three days. Make sure they cool down before sealing the container. This helps prevent sogginess. When reheating, use an oven or an air fryer. Preheat the oven to 350°F (175°C). Spread the sprouts on a baking sheet. Heat for about 10 minutes until they are warm and crisp. If using an air fryer, set it to 350°F and cook for about 5 minutes. You can freeze Maple Glazed Brussels sprouts if you want longer storage. Place the cooled sprouts in a freezer-safe bag. Remove as much air as possible before sealing. They can last up to three months in the freezer. When you are ready to eat, thaw them in the fridge overnight before reheating. For the best taste, use them fresh whenever you can. For the full recipe, check out the complete guide above. You can cook Brussels sprouts on the stovetop. Start by steaming the halved Brussels sprouts for about 5-7 minutes. This softens them. Then, heat olive oil in a skillet over medium heat. Add the steamed sprouts. Drizzle with maple syrup and balsamic vinegar. Sprinkle garlic powder, salt, and pepper on top. Sauté for 5-10 minutes until they are golden. This method gives you a tasty dish without using the oven. Yes, you can prepare Brussels sprouts ahead of time. You can wash and cut the sprouts a day in advance. Store them in a sealed container in the fridge. You can also mix the glaze ingredients in a bowl and keep it covered. On the day you plan to serve them, toss the sprouts in the glaze and cook them. This keeps your meal prep simple and stress-free. Brussels sprouts are very healthy. They are low in calories and high in fiber. This helps with digestion. They also have vitamins C and K, which are good for your immune system and bones. Additionally, Brussels sprouts contain antioxidants. These help protect your body from damage. Eating Brussels sprouts can help you stay healthy and strong while enjoying delicious flavors. Maple glazed Brussels sprouts offer a delicious way to enjoy this nutritious veggie. We covered the key ingredients, cooking steps, and helpful tips for great taste. I shared variations to suit different diets and seasons. Proper storage and reheating methods keep your leftovers tasty. With these insights, you can create a flavorful dish, impressing both family and friends. Enjoy the journey of making maple glazed Brussels sprouts and the joy they bring to your table.

Maple Glazed Brussels Sprouts Flavorful and Easy Recipe

If you’re searching for a fun and tasty way to enjoy Brussels sprouts, you’ve landed in the right place! My

To make the Banana Oatmeal Pancakes, you need the right ingredients. Each one plays a key role in making these pancakes fluffy and tasty. Here’s what you will use: - Rolled oats - Ripe banana - Almond milk (or milk of choice) - Baking powder - Vanilla extract - Salt - Maple syrup (optional) - Cinnamon (optional) - Cooking spray or oil Using rolled oats is important. They give the pancakes their texture. Make sure your banana is ripe. This adds natural sweetness and moisture. Almond milk keeps the recipe dairy-free, but feel free to swap it out for regular milk. Baking powder helps the pancakes rise, while vanilla and salt boost flavor. Cinnamon adds warmth, though it’s optional. You can drizzle maple syrup on top for extra flavor. Finally, cooking spray or oil keeps the pancakes from sticking to the pan. For the full recipe, you can check the details above. First, take your rolled oats and place them into a blender. Blend until they look like a fine flour. This oat flour will be the base for your pancakes. The key is to make sure the oats are ground evenly. If the flour is too coarse, the pancakes may be gritty. A fine texture helps create that fluffy feel. In a large bowl, mix the oat flour with baking powder, salt, and cinnamon. Start by adding the baking powder and salt for lift and flavor. The cinnamon adds warmth and sweetness. Stir until everything is well combined. This step is important for even flavor throughout your pancakes. Next, take a ripe banana and mash it in a separate bowl. A fork works great for this. Then, add almond milk, vanilla extract, and maple syrup if you want extra sweetness. Whisk these ingredients together. This mixture will bring moisture and flavor to your pancakes. Now, pour the wet mixture into the dry ingredients. Stir gently until just combined. It’s okay if the batter is a little lumpy. Let it sit for about five minutes. This helps the batter thicken, which makes for fluffier pancakes. Heat a non-stick skillet over medium heat. Lightly grease it with cooking spray or oil. Pour about 1/4 cup of batter for each pancake onto the skillet. Cook for 2-3 minutes. Look for bubbles on the surface and edges that are set. Flip the pancake and cook for another 1-2 minutes until golden brown. Repeat this with the remaining batter. Adding more oil or spray as needed will help prevent sticking. Follow these steps, and you’ll have delicious Banana Oatmeal Pancakes! For the full recipe, check out the recipe section. To make the fluffiest banana oatmeal pancakes, start with the right heat. Use medium heat on your skillet. If it's too hot, the pancakes may burn. If it's too low, they won’t cook well. You want a nice golden brown color. Next, don’t over-mix the batter. Mix just until the wet and dry ingredients combine. Some lumps are okay. Over-mixing can make the pancakes tough. Let the batter rest for about five minutes. This helps it thicken and creates a better texture. For toppings, go classic with maple syrup. It pairs perfectly with banana flavors. Add banana slices on top for a fresh touch. A sprinkle of cinnamon also adds great flavor and looks nice on the plate. For a beautiful presentation, stack two or three pancakes high. Drizzle maple syrup over the top and let it cascade down the sides. You can add a few banana slices on the side for color. This will make your dish look as good as it tastes. For the full recipe, check out the details above. Enjoy your cooking! {{image_2}} You can easily boost the health of your banana oatmeal pancakes. Adding chia seeds or flaxseeds is a great choice. - Chia seeds: Just one tablespoon adds fiber and omega-3 fatty acids. These seeds also help bind the batter. - Flaxseeds: Ground flaxseeds are perfect too. They add fiber and healthy fats. They can replace eggs if needed. You can also switch up the milk you use. Almond milk is great, but you can try other options too. - Cow's milk: This adds protein and creaminess. - Soy milk: A great choice for extra protein. - Oat milk: It gives a smooth texture and adds flavor. Adding spices can take your pancakes to the next level. Nutmeg and vanilla work well together. Just a pinch of nutmeg adds warmth, while vanilla gives a sweet aroma. - Nutmeg: Use a little for a cozy taste. - Vanilla extract: A teaspoon can amplify sweetness. Mix-ins can make each bite exciting. You can add berries or chocolate chips for variety. - Berries: Fresh blueberries or raspberries add a pop of tartness. - Chocolate chips: Mini chips melt perfectly and add sweetness. These variations can help you create a pancake that suits your taste. For the complete recipe, check the Full Recipe. To keep your banana oatmeal pancakes fresh, store them in an airtight container. You can stack them with parchment paper between each pancake. This helps to prevent sticking. Make sure the pancakes cool down before you store them. They will stay fresh in the fridge for up to three days. When it's time to eat, reheating is key. For the best texture, use a skillet over low heat. Heat each pancake for about one minute on each side. You can also use a microwave, but this may make them a bit chewy. If you choose the microwave, heat them for 15-30 seconds at a time. Freezing pancakes is a great way to have them ready anytime. Start by letting the pancakes cool completely. Then, place a piece of parchment paper between each pancake. This will stop them from sticking. Wrap the stack tightly in plastic wrap or put them in a freezer bag. They can stay in the freezer for up to three months. To thaw, take the pancakes out of the freezer and leave them in the fridge overnight. If you're in a hurry, you can also use the microwave. Heat them for 30-60 seconds. This way, your pancakes will taste fresh and fluffy. For the perfect breakfast, remember to check out the Full Recipe for more tips! You can use mashed banana or unsweetened applesauce. Both work well to bind the pancakes. A quarter cup of either will replace one egg. This keeps your pancakes moist and adds a hint of sweetness. If you want more protein, try using silken tofu or yogurt. Yes, you can use quick oats, but the texture will change. Quick oats blend into a finer flour. This may make your pancakes denser. Rolled oats give a heartier texture and a pleasant chew. If you choose quick oats, keep an eye on the cooking time. You can use any milk of your choice. Dairy milk, soy milk, oat milk, or coconut milk all work great. Each type of milk adds its own flavor. If you need a nut-free option, stick with oat milk or soy milk. Look for bubbles forming on the surface. This shows that they are cooking through. The edges will also look set. When you flip them, they should be golden brown. Cook for an extra minute if needed. Enjoy your pancakes warm! For the complete recipe, check the [Full Recipe]. You now have a clear guide for making delicious oat pancakes. We discussed each ingredient and how they work together for great taste and texture. I shared step-by-step instructions to mix and cook your pancakes, plus tips to make them perfect. You can even explore variations to customize your pancakes. Remember, storing leftovers and freezing can keep your pancakes fresh. With this knowledge, you can enjoy healthy, tasty pancakes whenever you want. Get cooking and enjoy your tasty creations!

Banana Oatmeal Pancakes Perfectly Fluffy Recipe

Looking for a delicious and healthy breakfast option? Try my Banana Oatmeal Pancakes! They are perfectly fluffy and easy to

The main items for nut-free granola bars are simple and easy to find. You will need: - 2 cups rolled oats - 1/2 cup puffed rice cereal - 1/2 cup sunflower seeds - 1/2 cup pumpkin seeds - 1/2 cup honey or maple syrup - 1/4 cup coconut oil, melted - 1 teaspoon vanilla extract - 1/2 teaspoon cinnamon - 1/2 cup mini chocolate chips (dairy-free if desired) - A pinch of salt These ingredients come together to create a tasty snack. Oats provide texture and fiber. The seeds add crunch and protein, while honey or maple syrup give sweetness and moisture. You can easily customize your granola bars. Here are some fun add-ins you might enjoy: - Dried fruits (like cranberries or raisins) - Flaxseeds or chia seeds - Coconut flakes - Spice variations (like nutmeg or ginger) These add-ins can change the taste and texture. Mix and match to find your favorite combination. Nut-free granola bars are a balanced snack. They offer healthy fats, protein, and fiber. Each serving contains: - Calories: About 180 - Protein: 4g - Carbohydrates: 28g - Fat: 7g - Fiber: 3g These bars give energy and keep you full. They are great for a quick breakfast or a midday snack. Enjoy them anytime! If you want to see the full recipe, check out the Crunchy Chocolate Chip Nut-Free Granola Bars. Start by preheating your oven to 350°F (175°C). This helps get your bars nice and crispy. Next, line an 8x8 inch baking dish with parchment paper. Leave some paper hanging over the sides. This makes it easy to lift the bars out later. In a big mixing bowl, add the rolled oats, puffed rice cereal, sunflower seeds, pumpkin seeds, and cinnamon. Mix these dry ingredients together well. In another small bowl, whisk together the honey or maple syrup, melted coconut oil, vanilla extract, and a pinch of salt. Pour this wet mixture over your dry mix. Stir until everything is coated. Fold in the mini chocolate chips gently. Now, transfer this mixture to your baking dish. Press it down firmly using a spatula or your hands. This helps the bars hold together while baking. Bake for 20-25 minutes, until the edges turn golden brown. When mixing, make sure to coat all dry ingredients well. This ensures every bite is tasty. Use your hands to compact the mixture in the pan. The firmer you press, the better the bars will hold together. If the mixture feels too dry, you can add a touch more honey or oil. This will help bind everything better. Remember, mixing too much can break the puffed cereal. So, be gentle when folding in the chocolate chips. Once baked, take the pan out of the oven. Let the bars cool in the pan for about 10 minutes. Use the parchment paper to lift them out and let them cool on a wire rack. This cooling step is important. It helps the bars firm up. Once they are cool, use a sharp knife to cut them into bars or squares. You can cut them into any size you like. For a fun touch, arrange the bars on a wooden board. Sprinkle some extra chocolate chips and seeds on top for a nice look. Enjoy these bars as a healthy snack! Remember, you can find the full recipe to guide you through the process. When making nut-free granola bars, avoid using too much liquid. This can make the bars soggy. Also, ensure you press the mixture firmly in the pan. If you don’t compact it well, the bars may crumble when cut. Lastly, be careful with baking time. Overbaking can lead to tough bars, while underbaking may cause them to fall apart. To enhance flavor, try adding a pinch of sea salt. It brings out the sweetness of the honey or maple syrup. You can also mix in dried fruits like cranberries or raisins for a chewy texture. Experiment with spices too! A dash of nutmeg or ginger can add warmth to the bars. Use high-quality chocolate chips for a richer taste. The right texture is key for great granola bars. Use a mix of rolled oats and puffed rice cereal for crunch. Adding seeds like sunflower and pumpkin gives a nice bite. The coconut oil helps bind everything without making it greasy. After baking, let them cool completely before cutting. This step ensures they hold their shape. Follow these tips for a perfect snack every time! You can find the Full Recipe above. {{image_2}} You can easily change the taste of your nut-free granola bars. Try adding dried fruit like cranberries or apricots. These fruits add sweetness and a chewy texture. You can also use spices like nutmeg or ginger for a warm flavor. For a tropical twist, add shredded coconut or banana chips. Sometimes, you may not have all the ingredients on hand. If you don't have sunflower seeds, use sesame seeds instead. You can swap pumpkin seeds for chia seeds for a different crunch. If you want a sweeter taste, use agave syrup in place of honey or maple syrup. This gives you more options to fit your pantry. Want chewy bars? Add more honey or maple syrup to make them stickier. This helps hold the mixture together. For crunchier bars, bake them a bit longer until the edges turn golden brown. You can also use less syrup and increase the oats for a firm texture. Adjusting these elements can help you find your perfect snack. If you want to try this recipe, check out the Full Recipe for the exact steps! To keep your nut-free granola bars fresh, store them in an airtight container. You can use a glass or plastic container with a tight lid. If you want, you can also wrap each bar in parchment paper. This method makes it easy to grab a snack on the go. When stored properly, these granola bars last about a week at room temperature. If you put them in the fridge, they can last up to two weeks. Just check for any signs of spoilage, like off smells or changes in texture. If you want to store them for longer, freezing is a great option. Wrap the bars tightly in plastic wrap, then place them in a freezer bag. They can last for up to three months in the freezer. When you're ready to eat one, just take it out and let it thaw at room temperature. You can even microwave it for a few seconds for a warm treat. Yes, granola bars can be healthy. They provide energy and nutrients. My nut-free granola bars use oats, seeds, and honey. These ingredients give you fiber and healthy fats. They are a great snack for kids and adults. Just watch the sugar content in store-bought bars. Making them at home lets you control the ingredients. Yes, you can! Honey and maple syrup work well in this recipe. You can also try agave syrup or brown rice syrup. Each sweetener will give a unique taste. Just keep the amount the same as the recipe states. This way, your bars will still hold together. You can make nut-free granola bars without oats by using puffed rice or quinoa flakes. These grains will still give you that chewy texture. Substitute the oats with 2 cups of puffed rice cereal. Then, follow the same steps in the recipe. You will have a tasty, nut-free snack! You can find nut-free granola bars at many grocery stores. Look in the snack aisle or health food section. Some stores have special sections for allergy-friendly foods. You can also shop online. Brands often label their products as nut-free. Always check the label to ensure they meet your needs. For the full recipe, check out the Crunchy Chocolate Chip Nut-Free Granola Bars section! In this article, we explored making nut-free granola bars from scratch. We discussed key ingredients, optional add-ins, and their nutritional values. You learned step-by-step instructions for prep, baking, cooling, and cutting. We shared tips to avoid common mistakes and enhance flavor. Finally, you discovered different flavor profiles and storage information. Making granola bars at home lets you control ingredients and flavors. Enjoy experimenting with variations that fit your taste and needs. Now, you have the tools to create delicious, nut-free snacks!

Nut-Free Granola Bars Easy and Healthy Snack Recipe

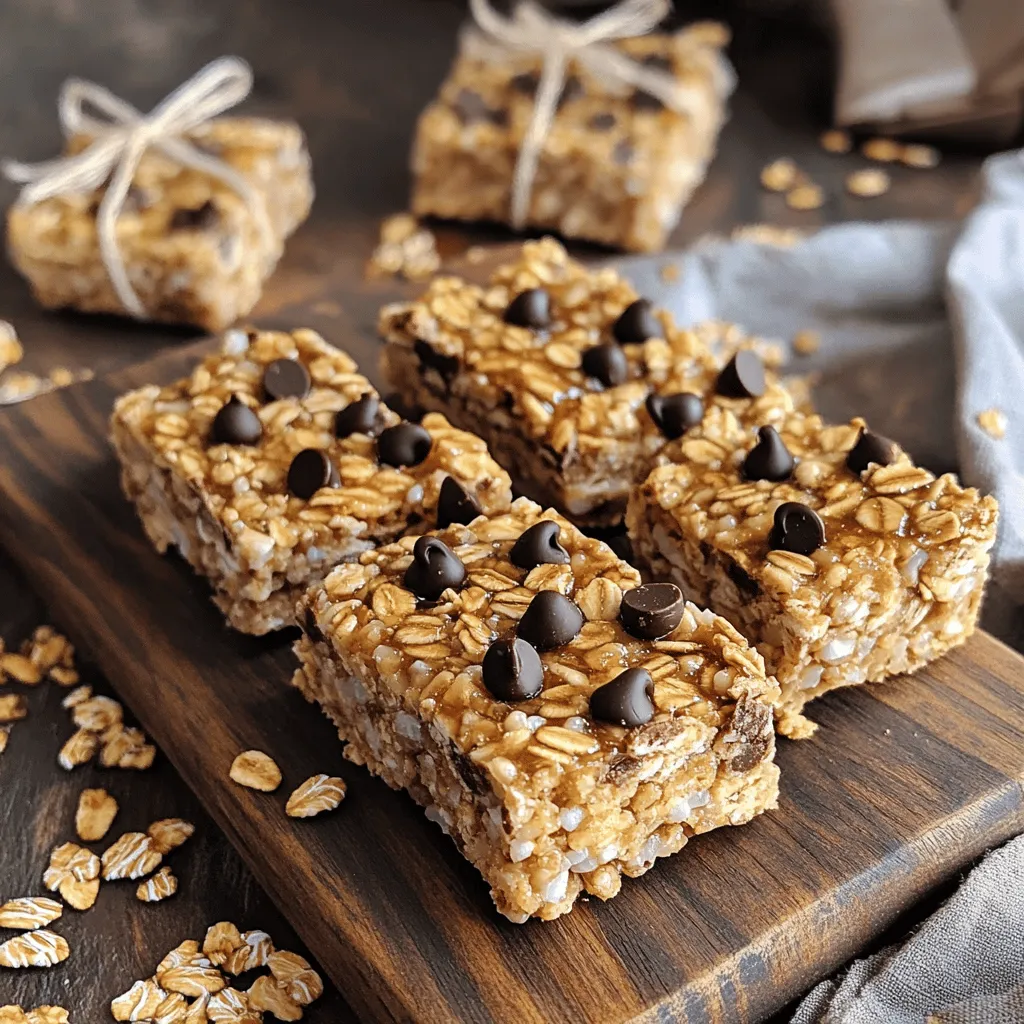
Are you looking for a delicious snack that everyone can enjoy? My nut-free granola bars are the perfect answer! Packed

- 2 medium eggplants, sliced into 1/2 inch rounds - Salt for sweating eggplants - 1 cup all-purpose flour - 3 large eggs, beaten - 2 cups breadcrumbs (preferably Italian seasoned) - 1 cup marinara sauce - 2 cups shredded mozzarella cheese - 1 cup grated Parmesan cheese - 1 tablespoon dried oregano - 1 tablespoon fresh basil, chopped (or 1 teaspoon dried basil) - Olive oil spray or a few tablespoons of olive oil for frying To make the best Eggplant Parmesan Bites, start with fresh eggplants. Choose firm ones without blemishes. The salt helps remove bitterness from the eggplant. It also improves the taste. After sweating the eggplant, rinse it well and pat it dry. This step is key for crispy bites. You will need a breading station for coating the eggplant. Set out three shallow bowls: one with flour, one with beaten eggs, and one with breadcrumbs mixed with oregano. This setup makes breading easy and quick. As you prepare the other ingredients, preheat your oven to 375°F (190°C). This ensures it’s hot when you're ready to bake your bites. Gather your marinara sauce, cheeses, and herbs for layering. You will love how these flavors come together! Using mozzarella and Parmesan gives the bites a rich and creamy taste. Fresh basil adds a nice touch. If you want a little more flavor, feel free to add spices to the breadcrumbs. For frying, you can use olive oil spray or pour a few tablespoons into a skillet. This helps the eggplant become crispy and golden. These ingredients work together to create a delicious snack that everyone will enjoy. For the full recipe, check out the detailed instructions and enjoy making these savory Eggplant Parmesan Bites! - Sprinkle salt on the eggplant slices and let them sweat. This step helps draw out moisture and bitterness. - After 30 minutes, rinse the slices under cold water and pat them dry with paper towels. - Arrange three bowls in a row. - Fill one with flour, another with beaten eggs, and the last with breadcrumbs mixed with dried oregano and a pinch of salt. - Take each eggplant slice and dip it into the flour first. Shake off any extra flour. - Next, dip it into the egg to coat it. - Finally, press it into the breadcrumbs, ensuring it is well covered. - Heat olive oil in a skillet over medium heat. - Once hot, fry the breaded eggplant slices in batches. Cook until they are golden brown and crisp on both sides, about 4-5 minutes per side. - Drain them on paper towels to absorb any excess oil. - Preheat your oven to 375°F (190°C). - In a large baking dish, spread a layer of marinara sauce on the bottom. - Place a layer of fried eggplant bites over the sauce. - Top each slice with a spoonful of marinara, shredded mozzarella, and a sprinkle of Parmesan cheese. - Repeat layering until all eggplant slices are used. - Finish with a generous layer of mozzarella and Parmesan on top. - Sprinkle fresh basil for added flavor. - Bake in the preheated oven for about 20-25 minutes, until the cheese is bubbly and golden. Following this simple guide will help you create delicious Eggplant Parmesan Bites. For the full recipe, refer to the earlier section. To get the best breading on your eggplant bites, start with the right technique. Make sure you coat each slice evenly. First, dip it in flour. This helps the egg stick better. Then, cover it with the beaten egg. Finally, roll it in the breadcrumbs. Press gently to ensure it sticks well. This process gives you that perfect crispy crust. Frying can be tricky. Keep the oil at the right temperature. If the oil is too hot, the outside burns before the inside cooks. If it’s too cool, the bites soak up oil and get soggy. Aim for medium heat. You can test the oil by dropping in a small piece of bread. If it bubbles and sizzles, you’re ready to fry your eggplant bites. Want to add a twist? Try mixing in spices or herbs with your breadcrumbs. Oregano adds a nice touch, but you can also experiment with garlic powder or crushed red pepper for heat. Fresh herbs like basil can add a burst of flavor. These simple tweaks can transform your eggplant bites into a unique snack that everyone will love. For the full recipe, check out the details above. {{image_2}} You can easily make these bites gluten-free. Simply swap out the all-purpose flour and breadcrumbs. Use almond flour or a gluten-free flour blend instead of regular flour. For the breadcrumbs, try crushed gluten-free crackers or gluten-free panko. This keeps the texture crisp while being safe for those with gluten sensitivities. Want a plant-based twist? Replace the eggs and cheese with vegan options. Use a flaxseed egg made from one tablespoon of ground flaxseed mixed with three tablespoons of water. Let it sit for a few minutes to thicken. For cheese, try vegan mozzarella or cashew cheese. This way, you enjoy the same great taste without animal products. Eggplant Parmesan Bites are great on their own, but you can enhance them further. Serve them with a side of marinara for dipping. A fresh salad pairs well too. For a twist, try adding a sprinkle of red pepper flakes for a spicy kick. Each option brings a unique flavor to your snack. To keep your Eggplant Parmesan Bites fresh, store them in airtight containers. This helps avoid sogginess. Place a paper towel in the container to absorb moisture. Seal it tightly and put it in the fridge. They stay good for about 3 to 4 days. To reheat without losing crispiness, use the oven. Preheat it to 350°F (175°C). Place the bites on a baking sheet. Heat for about 10 to 15 minutes. You can also use an air fryer. This method keeps them crispy and warm. Avoid using a microwave. It makes them soggy. You can freeze Eggplant Parmesan Bites for later. Let them cool completely first. Arrange them in a single layer on a baking sheet. Freeze for 1 to 2 hours until firm. Then, transfer them to a freezer bag. This way, they won't stick together. To thaw, place them in the fridge overnight. Reheat in the oven or air fryer for best results. Eggplant Parmesan Bites can last about three to four days in the fridge. To store them, place the bites in an airtight container. This keeps them fresh and safe to eat. When you're ready to enjoy them again, just reheat. Yes, you can make Eggplant Parmesan Bites ahead of time. You can prepare the eggplant and bread it a day before. Just store the breaded bites in the fridge until you are ready to fry or bake them. This saves time for a busy day. Eggplant Parmesan Bites can be healthy. Eggplants are low in calories and high in fiber. They also have vitamins like B6 and K. However, frying increases the fat content, so consider baking for a lighter option. The best dipping sauce is marinara sauce. It adds a nice, tangy flavor that complements the bites. You can also try pesto or a creamy garlic sauce for a twist. These options enhance the overall taste. Yes, you can bake Eggplant Parmesan Bites for a healthier version. Preheat your oven to 375°F (190°C). Place the breaded bites on a baking sheet lined with parchment paper. Spray them lightly with olive oil. Bake for about 20-25 minutes, until golden and crisp. Enjoy a guilt-free snack! For the full recipe, check out the detailed instructions on how to make these tasty bites. Eggplant Parmesan Bites are simple yet delicious. We discussed the key ingredients, from eggplants to cheese. Following the step-by-step guide, you learned how to prepare, bread, and fry them. Tips for crispiness and flavor add extra value. Variations show options for gluten-free and vegan diets, making this dish flexible. Finally, proper storage and reheating keep leftovers tasty. Enjoy your cooking adventure, and remember: these bites are both fun to make and eat!

Savory Eggplant Parmesan Bites Easy and Tasty Snack

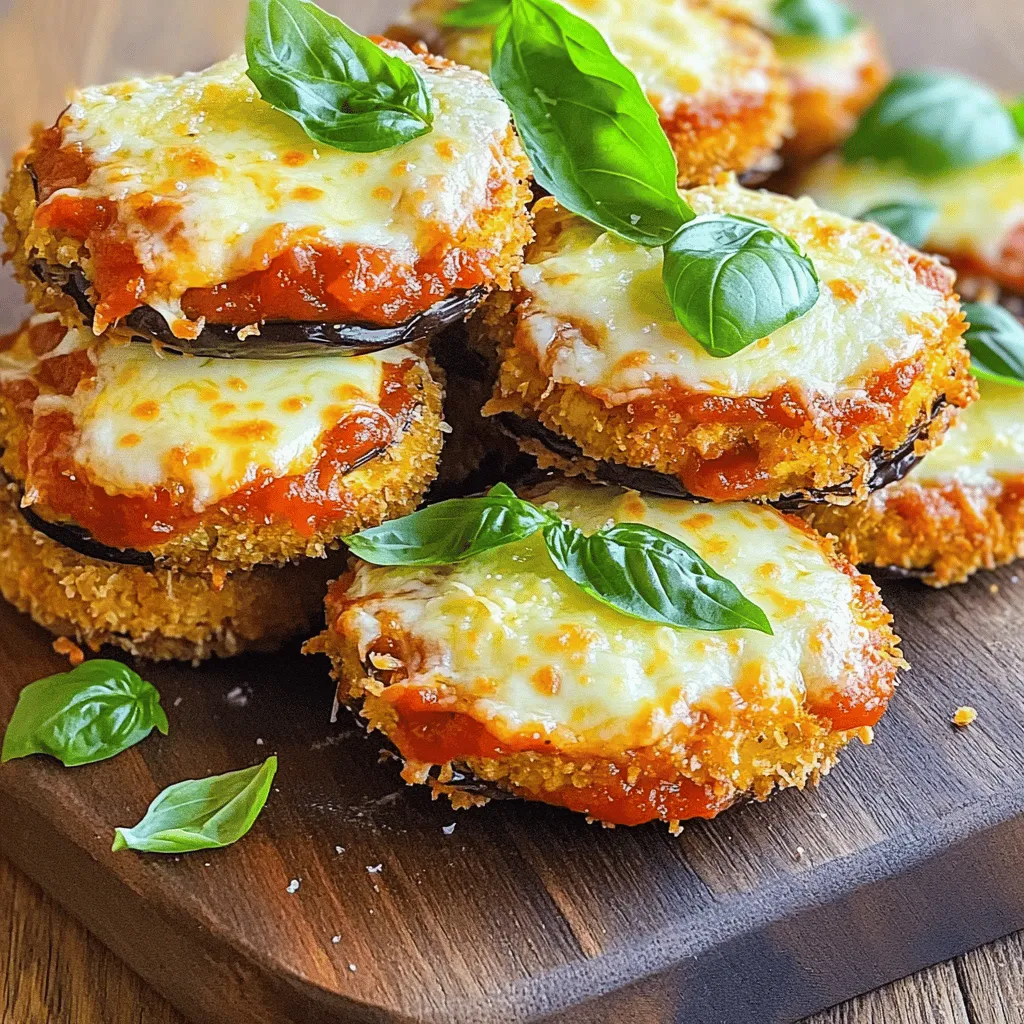
Are you craving a tasty snack that packs a punch? Let me introduce you to my savory Eggplant Parmesan Bites!

To make a tasty Crispy Chickpea Salad, you need a few key ingredients. Here’s what you’ll gather: - Canned Chickpeas - Olive Oil - Spices: Smoked Paprika & Garlic Powder - Fresh Vegetables: Mixed Greens, Cherry Tomatoes, Cucumber, Red Onion - Optional Ingredients: Avocado & Feta Cheese - Dressing Ingredients: Tahini & Lemon Juice Each ingredient plays an important role. The chickpeas give protein and crunch. Olive oil adds flavor and helps with roasting. Smoked paprika and garlic powder create a warm, savory taste. Fresh vegetables bring color and nutrition. Avocado and feta cheese are great add-ins that boost creaminess and richness. The tahini dressing with lemon juice ties everything together with a zesty kick. When you gather these ingredients, you set yourself up for a fresh and flavorful salad. This dish is not just healthy; it is also fun to make and share. Check out the Full Recipe to get all the details! - Draining and Rinsing Start by opening the can of chickpeas. Pour the chickpeas into a strainer. Rinse them under cold water. This removes excess salt and makes them cleaner. Let them drain well for a few minutes. - Seasoning and Tossing In a bowl, add the drained chickpeas. Pour in 2 tablespoons of olive oil. Then, sprinkle 1 teaspoon of smoked paprika and 1 teaspoon of garlic powder on top. Season with salt and pepper to taste. Toss everything together until the chickpeas are well coated. - Oven Temperature and Timing Preheat your oven to 400°F (200°C). Spread the seasoned chickpeas on a baking sheet. Make sure they are in a single layer. Bake them for 20-25 minutes. This will make them golden and crispy. - Tips for Crispy Texture Halfway through baking, shake the pan gently. This helps the chickpeas cook evenly. Keep an eye on them. They should be crunchy, not burnt. - Chopping Vegetables While the chickpeas bake, chop your veggies. Dice 1 cucumber and halve 1 cup of cherry tomatoes. Thinly slice 1/4 red onion. These add freshness and crunch to your salad. - Mixing the Salad Ingredients In a large bowl, combine the mixed greens, chopped cucumber, tomatoes, and red onion. Toss the veggies gently to mix them. This forms the vibrant base of your salad. - Whisking the Ingredients In a small bowl, add 2 tablespoons of tahini and 1 tablespoon of lemon juice. Whisk these together until smooth. This will be the creamy dressing for your salad. - Adjusting Consistency If the dressing is too thick, add a little water. Whisk again until you reach your desired texture. The dressing should be pourable but not too runny. - Adding Chickpeas and Optional Ingredients Once the chickpeas are crispy, let them cool for a few minutes. Add them to the salad bowl. You can also add 1/2 sliced avocado and 1/4 cup of crumbled feta cheese if you want. - Tossing and Serving Drizzle the tahini dressing over the salad. Toss everything together gently. Serve immediately and enjoy the fresh flavors of your crispy chickpea salad! You can find the Full Recipe for more details. To get the best crispy chickpeas, you must dry them well. - Oven Techniques: Preheat your oven to 400°F (200°C). Drain and rinse the canned chickpeas. Pat them dry with a kitchen towel. Toss them with olive oil and spices. Spread them in a single layer on a baking sheet. Bake for 20-25 minutes. Shake the pan halfway for even cooking. They should be golden and crunchy. - Alternative Methods (e.g., Air Fryer): You can also use an air fryer. Preheat it to 375°F (190°C). Place the seasoned chickpeas in the basket. Cook for about 15-20 minutes. Shake the basket halfway to ensure even crisping. To make your chickpeas pop, add more spices. - Additional Spices to Consider: Try cumin for warmth, or chili powder for heat. You can also use onion powder for a savory kick. Experiment with dried herbs like oregano or thyme. - Popular Add-ins for Extra Flavor: Add nuts or seeds for crunch. Roasted sunflower seeds or sliced almonds work well. You can also mix in fresh herbs like parsley or cilantro for a fresh taste. Present your salad in a way that is as tasty as it is pretty. - Best Pairings with Other Dishes: This salad pairs well with grilled chicken or fish. Serve it alongside a warm pita or in a wrap. It also goes great with a side of hummus for more flavor. - Presentation Ideas for Serving: Use a large bowl to show off the colorful ingredients. Layer the salad with greens at the bottom and chickpeas on top. Garnish with lemon wedges for a bright touch. You could also sprinkle some extra feta on top for a stunning finish. Don't forget to check out the Full Recipe for more details! {{image_2}} Vegan Considerations This salad is already vegan since it uses chickpeas and fresh veggies. If you skip the feta, you stay true to vegan values. You can also add more plant-based proteins like quinoa or lentils for extra nutrition. Gluten-Free Options Crispy Chickpea Salad fits gluten-free diets. All the ingredients are naturally gluten-free. Just make sure any dressings or extras you use are also gluten-free. Other Legumes or Proteins You can swap chickpeas for black beans or kidney beans. Both options add great taste and texture. For a protein boost, think about adding grilled chicken or tofu. Seasonal Vegetables Use seasonal veggies to keep the salad fresh. In summer, add bell peppers or corn. In fall, think about roasted sweet potatoes or squash. Each change brings new flavors. Alternative Dressings to Try If tahini isn’t your thing, try a balsamic vinaigrette. You can mix olive oil with lemon juice for a tangy taste. A yogurt-based dressing can also add creaminess. Flavor Profiles to Experiment With Add spices like cumin or curry powder for a new twist. Fresh herbs like basil or cilantro can brighten your salad. Mix and match until you find your favorite combo. For the complete recipe, check the [Full Recipe]. To keep your crispy chickpea salad fresh, store it in an airtight container. This helps keep the veggies crunchy and the flavors bright. Avoid mixing the chickpeas with the salad if you plan to eat it later. Instead, keep them separate until you serve. Use a glass or plastic container with a tight lid for best results. This will help maintain the salad’s taste and texture. You can freeze crispy chickpeas, but the salad does not hold up well. If you freeze the chickpeas, store them in a freezer-safe bag. When ready to eat, thaw them in the fridge and reheat them in the oven at 400°F (200°C) for about 10 minutes. This will bring back their crunch. However, I do not recommend freezing the salad itself. The fresh veggies will lose their crispness. Your salad lasts about 3 days in the fridge. Store it in the airtight container I mentioned earlier. If you see any wilting greens or soggy veggies, it's time to toss it. Look for signs like a bad smell or discoloration. These signs mean your salad is no longer fresh. Enjoy it while it’s still vibrant and tasty! To make crispy chickpeas, start with canned chickpeas. Drain and rinse them well. Pat them dry with a towel. Toss them in a bowl with olive oil, smoked paprika, garlic powder, salt, and pepper. Spread the chickpeas on a baking sheet. Bake at 400°F (200°C) for 20-25 minutes. Shake the pan halfway through for even cooking. When they turn golden and crunchy, they are done. Yes, you can use dried chickpeas. Soak them overnight in water. Cook them until soft, then drain and dry them well. The method for seasoning and baking remains the same. Just make sure they are fully cooked and dry before baking. You can add many toppings to this salad. Here are some great options: - Sliced radishes - Chopped herbs like parsley or cilantro - Toasted nuts or seeds - Grated carrots - A dollop of yogurt These toppings add flavor and texture. To make the salad more filling, consider adding protein. Grilled chicken or chickpeas work well. You can also add quinoa or farro for extra carbs. Adding more avocado or nuts can help too. These ingredients will keep you full longer. Crispy Chickpea Salad is healthy and packed with nutrients. Chickpeas provide protein and fiber. Mixed greens offer vitamins and minerals. Tomatoes add antioxidants, while avocados give healthy fats. The dressing with tahini adds more nutrients. Overall, this salad is a balanced meal, rich in flavor and good for you. For the full recipe, check out the details above. In this blog post, we covered how to make a tasty Crispy Chickpea Salad. I shared the key ingredients and step-by-step instructions for preparing the salad. I also included helpful tips for achieving crispy chickpeas and variations to suit dietary needs. Storing leftovers properly ensures the salad stays fresh longer. Remember, this salad is not just delicious; it is also versatile. You can change the flavors and ingredients based on your taste. Enjoy making and sharing this healthy dish!

Crispy Chickpea Salad Fresh and Flavorful Delight

Are you ready to whip up a delicious dish? This Crispy Chickpea Salad is a fresh and flavor-packed delight. With

Older posts
Newer posts
← Previous Page1 … Page72 Page73 Page74 … Page82 Next →

dsad

© 2025 So Yum Recipes • Built with GeneratePress

Our Policies

  • Copyright Policy
  • Cookie Policy
  • GDPR Policy
  • Privacy Policy
  • Disclaimer
  • Terms Of Use

More Information

  • Home
  • About
  • Contact
  • Appetizers
  • Dessert
  • Dinner
  • Drinks
©2025, So Yum Recipes About Back To Top