Skip to content
DisclaimerTerms Of UseGDPR PolicyCookie Policy

So Yum Recipes

  • Home
  • Drinks
  • Appetizers
  • Dinner
  • Dessert
  • About
  • Contact
  • Privacy Policy
DisclaimerTerms Of UseGDPR PolicyCookie Policy

Chloe

For a tasty vegetable stir-fry, gather these fresh ingredients: - 1 cup broccoli florets - 1 cup bell peppers (red, yellow, and green), sliced - 1 cup snap peas, trimmed - 1 medium carrot, julienned - 1 small zucchini, sliced These condiments and oils add flavor to your dish: - 3 cloves garlic, minced - 1 inch ginger, grated - 2 tablespoons soy sauce (low sodium) - 1 tablespoon sesame oil - 1 tablespoon olive oil Want to boost the flavor? Try these optional ingredients: - 1 tablespoon sesame seeds (for garnish) - Salt and pepper to taste - Cooked rice or quinoa for serving With these ingredients ready, you can whip up a colorful crunchy vegetable stir-fry. For the full recipe, check out the details above. To start, wash all the vegetables well. This helps remove dirt and pesticides. Chop the broccoli into bite-sized florets. Slice the bell peppers into strips. Trim the snap peas and julienne the carrot. For the zucchini, slice it into half-moons. Mince the garlic and grate the ginger. Having everything ready will make cooking quick and easy. Next, heat olive oil and sesame oil in a large skillet. Use medium-high heat until the oil shimmers. Add the minced garlic and grated ginger. Sauté them for about 30 seconds. You want the kitchen to smell great! Now, add the broccoli and carrots first. Stir-fry these for about 2-3 minutes. They should be bright and a bit tender. Then, toss in the bell peppers, snap peas, and zucchini. Keep stir-frying for another 3-4 minutes. The veggies should be vibrant and still crisp. Pour the soy sauce over the stir-fry. Season with salt and pepper. Stir well to mix everything. Cook for another minute to let the flavors combine. Once done, remove the skillet from the heat. Transfer the stir-fry to a serving dish. Sprinkle sesame seeds on top for some crunch. Serve this colorful dish hot over cooked rice or quinoa. For the full recipe, check the details above. Enjoy your quick and tasty meal! To get crisp vegetables, keep the heat high. Use a large skillet or wok. When the pan is hot, add the oil. Then, add the garlic and ginger first. This will bring out their flavors. Next, add your veggies in stages. Start with the harder ones, like broccoli and carrots. After a few minutes, add the softer ones, like zucchini and snap peas. This method ensures each vegetable stays bright and crunchy. For a great stir-fry, you need the right tools. A large skillet or wok is best. The wide surface area allows for even cooking. Use a spatula or wooden spoon for stirring. A good cutting board and sharp knife will speed up prep time. If you have a lid, keep it handy. Covering the pan briefly can help steam the veggies without overcooking them. Prep your vegetables ahead of time. Wash and chop them the night before. Store them in airtight containers in the fridge. You can also use frozen veggies for quick meals. They are pre-washed and chopped, saving you time. Keep a stash of cooked rice or quinoa ready. This way, you can serve your stir-fry right away. Follow the [Full Recipe] for a quick meal that comes together in just 20 minutes. {{image_2}} You can add protein to your stir-fry to make it filling. Chicken, shrimp, or tofu work well. For chicken, cut it into small pieces and cook it first. For shrimp, add them after the garlic and ginger. If you prefer tofu, use firm tofu and cube it. Sauté it until golden before adding veggies. This adds flavor and makes your meal more balanced. Feel free to mix up the vegetables based on what you have. Cauliflower, green beans, or mushrooms are great choices. You can also try bok choy or eggplant for a twist. Just remember to cut them into similar sizes. This helps them cook evenly. Use whatever is fresh and in season for the best taste. You can change the sauce for a new flavor each time. Try teriyaki sauce for a sweeter taste. If you like heat, add sriracha or chili paste. You can also use oyster sauce for a rich flavor. Mix a little lime juice for brightness. Just remember to adjust the salt since some sauces can be salty. These changes keep your stir-fry exciting and delicious. For the full recipe, check out the details above. After you enjoy your colorful crunchy vegetable stir-fry, save any leftovers. Let the stir-fry cool to room temperature first. Then, place it in an airtight container. You can keep it in the fridge for up to three days. This way, you can enjoy a quick meal later in the week. When you're ready to eat your leftovers, reheating is easy. Use a skillet over medium heat. Add a splash of water or oil to help steam the veggies. Stir often until heated through, about five minutes. You can also use the microwave. Heat in short bursts, stirring in between. This keeps the veggies crisp. If you want to prep meals for later, freezing works well too. Freeze the stir-fry in single servings. Use freezer-safe bags or containers. It will last up to three months in the freezer. To reheat, let it thaw in the fridge overnight. Then, use the skillet method to warm it up. This makes busy nights easier! Check out the full recipe for more tips. Yes, you can make this stir-fry ahead of time. Cook it, let it cool, then store it in the fridge. To keep the veggies fresh, use an airtight container. You can reheat it in a pan or microwave when you're ready to eat. Just remember, fresh veggies taste best! Stir-fry pairs well with many side dishes. Here are a few ideas: - Steamed jasmine rice - Quinoa for a nutty flavor - Noodles for a heartier meal - Simple salad with light dressing - Spring rolls for a crunchy bite These sides complement the veggies and add different textures. To make this stir-fry gluten-free, switch soy sauce with tamari or coconut aminos. Both options taste great and are safe for those with gluten issues. Always check the labels to ensure no hidden gluten in your ingredients. Enjoy your meal worry-free! This blog post walked you through making a delicious stir-fry. We covered fresh produce, essential condiments, and optional add-ons for flavor. You learned step-by-step instructions on prepping, cooking, and serving. I shared tips for perfect crispness and time-saving tricks. We explored variations for proteins and vegetables and discussed storage methods. Stir-fry is fun and quick. It lets you be creative with your favorite ingredients. Enjoy making it your own!

Quick and Easy Vegetable Stir-Fry for Busy Nights

Are you busy but still want a healthy meal? This Quick and Easy Vegetable Stir-Fry is just what you need.

- 2 slices of whole-grain bread - 1 ripe avocado - 2 large eggs - 1 tablespoon lemon juice - Salt and pepper to taste - 1/2 teaspoon red pepper flakes (optional) - Fresh herbs (such as cilantro or chives) for garnish - Olive oil for drizzling To make savory avocado toast with poached egg, you need the right ingredients. Whole-grain bread forms a hearty base. Ripe avocado gives a creamy texture and rich flavor. Fresh eggs provide protein and a lovely runny yolk. You can adjust the taste with lemon juice, salt, and pepper. Red pepper flakes add a kick, but they are optional. Fresh herbs enhance the dish's look and taste. A drizzle of olive oil adds a touch of luxury. These ingredients not only taste great together, but they also offer nutrition for a balanced meal. For the full recipe, check out our steps on how to prepare this delightful dish. You will enjoy the blend of flavors and textures, making it a perfect choice for breakfast or brunch. Start by toasting the whole-grain bread slices until they turn golden brown and crispy. This gives your toast a nice crunch and a warm base for the avocado. Next, heat a pot of water over medium heat. Add a splash of vinegar to help the eggs hold their shape. Crack each egg into a small bowl and gently slide them into the simmering water. Poach for 3-4 minutes. You want the whites set, but the yolks should still be soft. While the eggs are cooking, take a ripe avocado and mash it in a bowl. Mix in one tablespoon of lemon juice and season with salt and pepper. You can also add red pepper flakes for a little heat if you like. Once your bread is toasted, spread the mashed avocado generously on each slice. Now, using a slotted spoon, lift the poached eggs from the water. Let any extra water drain off, then place one egg on each slice of avocado toast. Drizzle a bit of olive oil over the top and sprinkle with fresh herbs. You can add more salt, pepper, and red pepper flakes for extra flavor. This simple yet delightful dish combines creamy avocado with a perfectly poached egg, making it a favorite for breakfast or brunch. For the complete recipe, check out the [Full Recipe]. To make great poached eggs, use fresh eggs. Fresh eggs hold their shape better. Add a splash of vinegar to the water. This helps the whites stay together while cooking. Heat your water to a gentle simmer, not a rolling boil. This way, your eggs cook evenly and do not break apart. When mashing your avocado, aim for a smooth or chunky texture, depending on your taste. I like to mix in lemon juice for a zesty touch. Try adding minced garlic or crumbled feta cheese for a flavor boost. These extras can take your avocado mash to the next level. Remember to season with salt and pepper for the best taste. Garnish your toast with fresh herbs, like cilantro or chives, for a pop of color. A sprinkle of red pepper flakes adds a little heat. For a complete meal, serve your toast with a side salad or juicy cherry tomatoes. The freshness balances the richness of the avocado and egg. Enjoy the mix of flavors and colors on your plate! {{image_2}} You can easily swap whole-grain bread for other options. Try sourdough for a tangy flavor. Gluten-free bread works well too, making this dish inclusive for all diets. Elevate your avocado toast by adding more flavors. Smoked salmon gives a nice, rich taste. Crispy bacon adds a crunchy texture. Feta cheese brings a creamy, salty kick. Mix and match these toppings for fun. If you prefer a vegan option, you can still enjoy this dish. Replace the eggs with tofu or chickpea scramble. Both options provide protein and keep the meal satisfying. You won't miss the eggs at all! For the full recipe, check out the complete instructions above. Store leftover avocado in an airtight container with lemon juice to prevent browning. The acid in the lemon juice helps keep the avocado fresh and green. Use a fork to mash the avocado, then add the lemon juice. Mix well, then cover it tightly. This method keeps it tasty for about one day. Toast can be reheated but is best fresh. To maintain crispness, use the oven or toaster. If you reheat in the microwave, it may get soggy. For the oven, set it to 350°F (175°C) and heat for about 5 minutes. For the toaster, simply pop it back in until it warms up. Poached eggs are best enjoyed immediately. However, if you need to store them briefly, place them in cold water. This keeps them moist. You can store them for up to one hour in the fridge. When ready to eat, just reheat them in warm water for about 2 minutes. This helps them stay soft and delicious. For the full recipe, check out the steps for a perfect avocado toast with poached egg delight! To poach an egg well, start with fresh eggs. Fresh eggs hold their shape better. Use a pot of water heated to a gentle simmer, not a boil. Add a splash of vinegar. The vinegar helps the egg whites stay together. Crack each egg into a small bowl first. This makes it easier to slide it into the water. Poach the eggs for 3 to 4 minutes. The whites should be set, while the yolk stays runny. Use a slotted spoon to lift them out and let them drain. You can use frozen avocado, but it may change the texture. Thaw it in the fridge overnight or in cold water for a quicker option. Once thawed, check for brown spots. They can affect taste and look. If the color is okay, mash it up and mix it with lemon juice. This will help keep it fresh. Remember, fresh avocado has a creamier texture. To lower the calories in this dish, consider a few swaps. Use only one egg instead of two. You can also use less avocado if you want. Try using a lighter bread, like a low-calorie whole-grain option. Instead of olive oil, sprinkle on some lemon juice for flavor without the added fat. You can also skip the red pepper flakes if you prefer less spice. Adjusting these ingredients can help fit your needs without losing taste. This recipe combines wholesome ingredients like whole-grain bread, avocado, and eggs. You learned to toast bread, poach eggs, and mash avocado. I shared tips for perfecting each step and suggested fun variations. This dish is versatile and easy to make. Enjoy experimenting with flavors and toppings. Simple changes can create a new experience each time. Keep these tips in mind, and you’ll master this tasty meal!

Savory Avocado Toast with Poached Egg Delight

Are you ready to elevate your breakfast game? This Savory Avocado Toast with Poached Egg Delight combines crisp whole-grain bread,

To make these tasty fries, you'll need: - 2 medium zucchinis - 1 cup breadcrumbs (preferably panko for extra crunch) - 1/2 cup grated Parmesan cheese The right spices make these fries pop. Use: - 1 teaspoon garlic powder - 1 teaspoon onion powder - 1/2 teaspoon paprika - Salt and pepper to taste To keep everything together, grab: - 2 large eggs - 1/2 cup all-purpose flour - Olive oil spray (optional, for extra crispiness) Each ingredient plays a role in making your zucchini fries crunchy and full of flavor. The zucchini gives a nice base, while the panko breadcrumbs add that perfect crunch. The Parmesan cheese adds a rich taste, and the spices give it a kick. Eggs and flour help everything stick together for a great bite. For the full recipe, check out the detailed steps above. Start by preheating your oven to 425°F (220°C). This high heat helps the fries become golden and crispy. While the oven warms, line a baking sheet with parchment paper. This makes for easy cleanup and prevents sticking. Now it’s time to slice the zucchinis. Take two medium zucchinis and cut them into long, thin strips. Aim for about 1/4 inch thick. This size helps them cook evenly and gives that fry-like shape we all love. Next, prepare for the coating. Set up three bowls. In the first bowl, add 1/2 cup of flour, seasoned with salt and pepper. In the second bowl, crack and whisk two large eggs. In the third bowl, mix together 1 cup of breadcrumbs, 1/2 cup of grated Parmesan cheese, 1 teaspoon of garlic powder, 1 teaspoon of onion powder, 1/2 teaspoon of paprika, salt, and pepper. Now, take each zucchini strip. First, dip it into the flour, shaking off any extra. Next, coat it in the egg wash, allowing the excess to drip off. Finally, roll the strip in the breadcrumb mix, pressing gently to help it stick. Place each coated zucchini fry in a single layer on your baking sheet. If you want extra crunch, lightly spray them with olive oil. Once everything is arranged, slide the baking sheet into the oven. Bake for 20-25 minutes. About halfway through, flip the zucchini fries. This helps them cook evenly and get crispy on both sides. When they turn golden brown and delicious, pull them out and let them cool for a few minutes. Enjoy your crispy baked zucchini fries as a tasty snack or side dish. Check out the Full Recipe for more details! To make your zucchini fries really crispy, I recommend using panko breadcrumbs. Panko is lighter and airier than regular breadcrumbs. This helps create a crunchier texture. You can find panko in most grocery stores. When you coat your zucchini, the panko sticks well and gives it that extra crunch you desire. Using olive oil spray can also help. A light mist of olive oil over the fries before baking enhances their crispiness. It promotes browning without adding too much fat. Just a few quick sprays will do the trick! Spices can transform your zucchini fries. If you want to switch things up, try using smoked paprika instead of regular paprika. This adds a smoky flavor. You can also experiment with cumin or chili powder for a spicy kick. Don’t be afraid to mix and match! Adding fresh herbs like oregano or thyme can enhance the taste too. Just chop them finely and mix them into your breadcrumb mixture. This adds a fresh, aromatic twist to each bite. Dipping sauces can elevate your zucchini fries. A classic choice is marinara sauce, which pairs well with the crunchy texture. Ranch dressing is another fun option; its creaminess balances the crispiness. For a kick, try a spicy aioli or sriracha mayo. These fries also make a great side dish. They pair well with grilled chicken or fish. You can even serve them with a big salad for a light meal. Enjoy your delicious creation! Don't forget to check out the Full Recipe for more details. {{image_2}} You can easily make these fries gluten-free. Use gluten-free breadcrumbs and flour instead of regular ones. This way, you can enjoy a tasty snack without worrying about gluten. Just check the labels to ensure they meet your needs. To make these fries vegan, you need to swap out the eggs. You can use flaxseed meal mixed with water or a commercial egg replacer. Both options work well for coating. For a cheesy taste, try dairy-free cheese. There are many great brands that melt nicely and add flavor. Want to spice things up? Add cheese to the breadcrumb mix for extra flavor. You can also try different seasonings like cayenne pepper or Italian herbs. Mixing in other veggies like carrots or sweet potatoes can give you fun new tastes and colors. Get creative and blend flavors to suit your taste! To keep your crispy baked zucchini fries fresh, use an airtight container. Glass or plastic containers work well. Store them in the fridge for up to three days. Make sure they cool down before sealing them. This step helps avoid sogginess. To maintain the crispiness of your fries, use an oven or an air fryer. Preheat the oven to 400°F (200°C). Place the fries on a baking sheet and heat for about 10 minutes. If using an air fryer, set it to 375°F (190°C) and cook for about 5 minutes. Avoid using the microwave, as it makes them soft. You can freeze your zucchini fries for longer storage. First, arrange the uncooked fries in a single layer on a baking sheet. Freeze for about two hours until firm. Then, transfer them to a freezer-safe bag. They can stay in the freezer for up to three months. When ready to cook, bake them straight from the freezer for about 25-30 minutes, adding a few more minutes if needed. To make your zucchini fries crispy, follow these tips: - Use panko breadcrumbs. They offer a great crunch. - Make sure to slice zucchinis thinly. Aim for about 1/4 inch thick. - Coat each fry well. Dip in flour, then egg, and finally the breadcrumb mix. - Bake at a high temperature, around 425°F (220°C). - Flip the fries halfway through baking for even crispiness. Yes! You can use other vegetables like: - Eggplant - Sweet potatoes - Carrots - Asparagus Each of these will give a different taste and texture. Some great dips include: - Ranch dressing - Marinara sauce - Garlic aioli - Spicy ketchup These sauces enhance the flavor of your crispy fries. Zucchini fries last up to 3 days in the fridge. Store them in an airtight container to keep them fresh. Reheat them in the oven for the best texture. Yes, this recipe is great for meal prep! You can: - Cut and coat the zucchinis in advance. - Store them in the fridge until you’re ready to bake. - Bake them fresh when you want a snack. For the full recipe, check out the Crispy Baked Zucchini Fries section above. Enjoy! Crispy baked zucchini fries are easy and fun to make. We covered ingredients, steps, and tips to achieve perfect fries. You can even explore gluten-free and vegan options. Experiment with seasoning and dips to make them your own. Don't forget to store leftovers properly for fresh taste. Enjoy your tasty, crisp snacks anytime!

Crispy Baked Zucchini Fries Easy and Delicious Snack

Are you ready to crunch into something delicious? These crispy baked zucchini fries are the perfect snack! They’re easy to

To make the Vegan Animal Fries, you need simple, hearty ingredients. Here is the list of what you'll need: - 4 large russet potatoes - 1 cup vegan cheese (shredded) - 1 cup plant-based beef crumbles - 1 cup vegan ranch dressing - 1/4 cup diced onions - 1/4 cup sliced pickles - 2 tablespoons olive oil - 1 teaspoon garlic powder - 1 teaspoon smoked paprika - Salt and pepper to taste - Fresh chives, chopped (for garnish) These ingredients create a dish that is both filling and full of flavor. The russet potatoes provide a great base. They are starchy and crispy when baked right. Vegan cheese melts beautifully, adding creaminess. Plant-based beef crumbles mimic the texture of meat, making it satisfying. The ranch dressing adds a tangy kick, while the onions and pickles give a nice crunch. Don’t forget the spices! Garlic powder and smoked paprika enhance the taste. You can find many of these items at your local grocery store. If you're looking for a twist, try different vegan cheeses. Also, fresh chives add brightness and freshness to the dish. For a full guide on how to prepare these delicious fries, check out the Full Recipe. 1. Preheat your oven to 425°F (220°C). 2. Wash the russet potatoes well. Slice them into thin fries. Make sure they are even. 1. In a large bowl, toss the fries with olive oil. 2. Add garlic powder, smoked paprika, salt, and pepper. Mix until all fries are coated. 3. Spread the fries out on a baking sheet. Make sure they are in a single layer. 4. Bake for 25-30 minutes, flipping halfway through. Look for a golden brown color and crispiness. 1. While the fries bake, heat a pan over medium heat. 2. Add the plant-based beef crumbles and cook as directed on the package. Add a pinch of salt and pepper for flavor. 3. Once fries are done, take them out of the oven. 4. Sprinkle the hot fries with vegan cheese and cooked beef crumbles. 5. Put them back in the oven for 5 more minutes. This melts the cheese nicely. 6. Finally, drizzle vegan ranch dressing over the top. Add diced onions and sliced pickles. 7. Garnish with fresh chives for a pop of color. This is how you make Vegan Animal Fries. Enjoy your savory creation! For the full recipe, check out the details above. Soaking potatoes helps make them crispy. When you soak, you remove excess starch. This gives fries that nice crunch. Even slicing is key for cooking. If you cut fries uneven, some will cook too fast. Aim for uniform thickness. For great taste, use garlic powder and smoked paprika. They add depth and warmth. You can also try adding chili powder for a kick. Explore toppings like avocado or salsa. These can bring fresh flavors. Don't hesitate to mix and match! For vegan cheese, look for brands that melt well. Options like cashew cheese or vegan mozzarella work great. They add creaminess to your fries. If you want to make your own ranch dressing, blend cashews with lemon juice and herbs. It’s simple and flavorful. This adds a personal touch to your dish. For the complete recipe, check out the Full Recipe section. {{image_2}} You can use different types of cheese in your Vegan Animal Fries. Cashew cheese is creamy and rich. It melts well and adds a nice flavor. You can make cashew cheese at home or find it in stores. Store-bought vegan cheese is easy and quick. Many brands offer great flavors. Just check the labels for added ingredients. Nutritional yeast is another tasty option. It gives a cheesy flavor without dairy. Sprinkle it on top after you bake the fries. It adds a nice touch and boosts the nutrients. Spice up your Vegan Animal Fries with fun toppings. Adding jalapeños gives it heat. You can use sliced or diced jalapeños, fresh or pickled. They add a nice kick to the dish. Instead of ranch, try guacamole. Guacamole brings a creamy, fresh taste. It pairs perfectly with the fries. You can even make your own guacamole for a personal touch. You can cook your Vegan Animal Fries in many ways. Air frying is one method. It gives you crispy fries with less oil. Just set the air fryer to the right temperature and watch them cook. Baking is the classic way. It takes a bit longer but gives great results. Grilling your potatoes is another option. It adds a smoky flavor that is hard to beat. Just slice the potatoes and grill them until they are soft and have nice grill marks. Each method offers a unique taste. Try them all to find your favorite! For the full recipe, check out the instructions above. To keep your Vegan Animal Fries fresh, you should refrigerate them right away. Place the fries in an airtight container. This helps prevent sogginess and keeps the flavor intact. Make sure to cool them to room temperature before sealing them. If you have toppings left, store them separately. This way, the fries won’t get soggy. To enjoy crispy fries again, you must reheat them properly. The best way is to use an oven. Preheat your oven to 400°F (200°C). Spread the fries on a baking sheet in a single layer. Bake for about 10 minutes. This will help restore their crunch. For the toppings, heat them in a pan over medium heat. Stir gently to avoid losing flavor. You can also microwave the toppings, but be careful. Microwaving can make them lose texture. Yes, you can freeze baked fries! To do this, let them cool completely. Spread them on a baking sheet in a single layer. Freeze until solid, then transfer them to a freezer bag. This helps save space. When it’s time to eat, thaw the fries in the fridge overnight. Reheat them in the oven for the best texture. This method helps keep them crispy. You can enjoy your Vegan Animal Fries even after freezing! For the full recipe, check out the steps to create these tasty fries. Vegan Animal Fries are a tasty twist on classic loaded fries. They feature crispy fries topped with plant-based ingredients. Common ingredients include: - Large russet potatoes - Vegan cheese (shredded) - Plant-based beef crumbles - Vegan ranch dressing - Diced onions - Sliced pickles These ingredients come together to create a flavorful and satisfying dish. Yes, you can make Vegan Animal Fries gluten-free. Use gluten-free beef crumbles. Look for brands that do not contain wheat. For the ranch dressing, choose a gluten-free version or make your own. Replace regular seasoning with gluten-free options. Always check labels to ensure all ingredients are safe for gluten-free diets. Many vegan-friendly places serve Vegan Animal Fries. Some popular chains and local spots include: - Plant-based burger joints - Vegan diners - Gourmet fry shops Check local listings or apps for vegan options in your area. Many restaurants post their menus online. You can make Vegan Animal Fries healthier with a few simple swaps. Try these tips: - Use less oil when baking the fries. - Opt for low-fat vegan cheese. - Add more veggies, like fresh tomatoes or spinach. - Serve with a lighter dressing or homemade yogurt dip. These changes can help reduce calories and fat while keeping the taste delicious. Enjoy the full recipe for a delightful experience! This article covered how to make delicious vegan animal fries. We discussed the key ingredients, from russet potatoes to plant-based beef crumbles and vegan cheese. I shared step-by-step instructions and helpful tips for perfect fries. We explored variations and storage tips to keep your meal fresh. In closing, vegan animal fries are tasty, fun, and easy to customize. Enjoy experimenting with different toppings and flavors!

Vegan Animal Fries Delightful and Flavorful Recipe

Are you ready to take your fries to the next level? My Vegan Animal Fries recipe mixes crispy potatoes with

- 1 lb ground beef or Italian sausage - 1 medium onion, chopped - 3 cloves garlic, minced - 1 can (28 oz) crushed tomatoes - 4 cups beef broth - 2 teaspoons dried basil - 1 teaspoon dried oregano - 1 teaspoon salt - ½ teaspoon black pepper These main ingredients create a rich and hearty base for the soup. Ground beef or sausage gives it depth. The onion and garlic add sweetness and aroma. Crushed tomatoes bring acidity and color, while beef broth provides a savory backdrop. The herbs and spices tie everything together, making each bite flavorful. - 1 cup ricotta cheese - 1 cup shredded mozzarella cheese - ½ cup grated Parmesan cheese - 8 lasagna noodles, broken into pieces Cheese is a key part of lasagna soup. Ricotta adds creaminess, while mozzarella melts beautifully on top. Parmesan gives a salty bite that balances the dish. The lasagna noodles, broken into pieces, mimic the traditional dish while soaking up all the flavors. - Fresh basil leaves for garnish - Possible substitutions like turkey or vegetable broth You can customize your soup with fresh basil for a pop of color and taste. If you want a lighter option, consider using ground turkey. For a vegetarian version, swap beef broth with vegetable broth. These changes let you enjoy lasagna soup in different ways, making it your own. For the complete recipe, check out the [Full Recipe]. To make Easy Lasagna Soup, follow these steps carefully. They will help you create a tasty meal. 1. Sautéing onions and garlic: Heat a splash of olive oil in a large pot over medium heat. Add the chopped onion. Cook it for about five minutes until it turns soft and clear. Then, add the minced garlic. Cook it for one more minute. The smell will be amazing! 2. Browning the meat and draining fat: Stir in the ground beef or Italian sausage. Break it apart with a wooden spoon. Cook it until it is brown all over. If there is extra fat in the pot, drain it out. This keeps the soup light and flavorful. 1. Adding tomatoes and broth: Pour in the crushed tomatoes and beef broth. Stir everything together. The mixture will look rich and colorful. 2. Seasoning the soup: Now, add the dried basil, oregano, salt, and black pepper. Mix well. This will give the soup a warm, comforting flavor. Bring the pot to a boil, then lower the heat. Let it simmer for about ten minutes. 1. How long to cook lasagna noodles: Take the broken lasagna noodles and add them to the pot. Cook them for about ten to twelve minutes. You want them to be tender but not mushy. 2. Tips for achieving the right texture: Stir the noodles a few times while they cook. This helps them not stick together. Keep an eye on them. You can taste one to check if it is just right. Now you're ready to enjoy a warm bowl of Easy Lasagna Soup! For the complete instructions and ingredients, check the Full Recipe. To make your easy lasagna soup truly pop with flavor, focus on building layers. Start by cooking your onions and garlic until soft. This step gives your soup a rich base. Avoid mushy noodles by adding them at the right time. Break the lasagna noodles into smaller pieces. This helps them cook evenly. Add them in the last 10 minutes of cooking. This ensures they stay firm and not overcooked. Pair your lasagna soup with some fresh bread. Garlic bread or a simple side salad works well. They add crunch and balance the dish. For the perfect cheese topping, use a mix of cheeses. Ricotta, mozzarella, and Parmesan blend nicely. Add a spoonful of ricotta on top when serving. Then sprinkle mozzarella and Parmesan for that gooey finish. To make ahead, prepare the soup but don’t add the noodles. Store the soup in the fridge for up to three days. When ready to eat, reheat it on the stove. Add noodles and cook until tender. Use airtight containers for storage. Glass or plastic containers work great. They help keep your soup fresh. If you want to freeze it, leave out the noodles. This keeps the texture nice. Reheat and add noodles when ready to enjoy your meal. {{image_2}} You can easily change the recipe to fit your needs. If you need gluten-free options, swap regular lasagna noodles for gluten-free ones. Many brands offer these now. They work just as well in the soup. For those who prefer a vegetarian dish, consider adding more veggies. Spinach, mushrooms, or zucchini can all add great flavor. You can also use beans for protein. They will make your soup hearty and filling. Want to spice things up? Add red pepper flakes to your soup. This small touch can lift the flavor to new heights. Start with a pinch and add more as you like. You can also play with herbs and sauces. Try adding fresh basil or thyme for a fresh taste. A splash of balsamic vinegar can bring a rich depth. These small changes can transform the entire dish. If you love creaminess, consider adding heavy cream or cream cheese. This will give your soup a rich texture. It makes each bite feel indulgent and warm. Not a fan of ricotta? No problem! You can use mascarpone or cream cheese instead. Both options work well and add a different flavor profile. This way, you can enjoy a creamy lasagna soup just the way you like it. For the full recipe, check out the easy lasagna soup instructions. You can store lasagna soup in the fridge for about 3 to 5 days. To keep it fresh, let it cool down first. Avoid putting hot soup directly in the fridge. Use a big bowl to cool it off before sealing. This helps prevent sogginess and keeps the flavors intact. To freeze lasagna soup, follow these simple steps. First, let it cool completely. Then, pour it into freezer-safe containers. Leave some space at the top, as soup expands when it freezes. Seal the containers tightly to avoid freezer burn. For thawing, place the soup in the fridge overnight. When ready to reheat, use a pot on low heat. Stir often to warm it evenly. Check for signs of spoilage before eating. If the soup smells sour or looks strange, throw it away. To maintain its taste and texture, avoid reheating more than once. Always cover the soup when storing. This keeps the flavors fresh and prevents drying out. Enjoy your tasty lasagna soup, knowing it stays delicious for days! Making Easy Lasagna Soup is quick and simple. It takes about 15 minutes to prep and 20 minutes to cook. So, you can have this comforting dish on the table in just 35 minutes. Yes, you can use store-bought sauces for convenience. They save time and effort. However, homemade sauces let you control the flavors. Store-bought can lack depth and freshness. I recommend trying both to find what you like best. Lasagna soup pairs well with garlic bread or a crisp salad. You can also add a side of roasted vegetables for a healthy touch. These sides balance the rich flavors of the soup. They make your meal feel complete and satisfying. Lasagna soup is a warm and satisfying dish. We explored the key ingredients, like meat, tomatoes, and cheese, along with easy steps to prepare it. I shared tips for cooking noodles perfectly and ways to add flavor and creativity. Don’t forget the storage tips to keep your soup fresh. With variations for different diets, there’s something for everyone. Whether you're cooking for family or prepping meals, this soup can fit your needs. Dive in, enjoy the process, and savor the rich tastes of your creation!

Easy Lasagna Soup Flavorful Comfort in a Bowl

Warm up your kitchen with my Easy Lasagna Soup, where comfort meets flavor! This dish combines all the best elements

- 1/2 cup shelled pistachios (preferably unsalted) - 2 1/2 cups milk (whole or 2%) - 1/2 cup sugar - 1/4 cup cornstarch - 1/4 teaspoon salt - 1/2 teaspoon vanilla extract - 2 tablespoons unsalted butter - Whipped cream for topping (optional) - Extra pistachios for garnish (optional) To make my pistachio pudding, you need simple but key ingredients. Start with shelled pistachios for that rich flavor. I prefer unsalted ones for better control over the taste. You’ll also need milk, sugar, and cornstarch. The cornstarch helps thicken the pudding. A pinch of salt balances the sweetness and enhances the flavors. Vanilla extract adds a warm note that pairs well with pistachios. The unsalted butter gives the pudding a silky finish. You can top it with whipped cream for a creamy touch. Add extra pistachios as a garnish to make your dessert look fancy. With these ingredients, you will create a creamy delight that is sure to impress. For the full recipe, check the section above. Now, let's get cooking! - First, measure 1/2 cup of shelled pistachios. Make sure they are unsalted for the best flavor. - Place the pistachios in a food processor. Blend them until they turn into a fine powder. - Be careful here. You want a powder, not a paste. Stop blending when you reach the right texture. - In a medium saucepan, add 1/2 cup of sugar, 1/4 cup of cornstarch, and 1/4 teaspoon of salt. - Mix these dry ingredients well with a whisk. - Next, stir in the ground pistachios you prepared earlier. This helps distribute the flavor. - Gradually whisk in 2 1/2 cups of milk. Do this slowly to avoid lumps. - Turn the heat to medium and cook the mixture. Keep stirring continuously with a wooden spoon or whisk. - Watch closely as it cooks. You want it to thicken and start bubbling. This should take about 5 to 7 minutes. - Once thickened, remove the saucepan from heat. - Add 2 tablespoons of unsalted butter and 1/2 teaspoon of vanilla extract. Stir until smooth and creamy. - Pour the pudding into a bowl or individual cups. Let it cool to room temperature. - Cover the pudding with plastic wrap directly on the surface to stop a skin from forming. Refrigerate for at least 2 hours before serving. For the Full Recipe, check the earlier section that lists all ingredients and steps! To get a creamy texture, add the milk slowly. If you pour it all at once, lumps can form. Stir the mixture constantly while it cooks. This helps the pudding thicken evenly. It usually takes about 5 to 7 minutes for it to bubble up and thicken. Using quality vanilla extract makes a big difference. It adds a warm, rich flavor to the pudding. For extra fun, try different toppings. You can use whipped cream, chocolate shavings, or even fresh berries. Each adds a new taste and texture. One common mistake is over-blending the pistachios. If you blend them too much, they can turn into paste. You want a fine powder instead. Another mistake is not letting the pudding cool properly. Cooling helps set the flavor and texture. Be patient; it’s worth the wait! For the full recipe, check out the complete guide. {{image_2}} If you need a nut-free option, use sunflower seed butter instead of pistachios. This gives you a similar creamy texture without nuts. You might also need to adjust the sweetener types if your sunflower seed butter is sweetened. Check the taste and tweak the sugar as needed. For a vegan version, swap out dairy with plant-based milk like almond or coconut milk. Use vegan butter to keep it creamy. Instead of regular sugar, try agave syrup or maple syrup for sweetness. This way, everyone can enjoy the pudding, no matter their diet. Don’t be afraid to get creative! You can experiment with flavors by adding almond or coconut extract. If you're feeling adventurous, try mixing in chocolate or fruit purées. These additions give a fun twist to your pistachio pudding. Remember, flavor is all about what you enjoy! For a full recipe, check the details above! To keep your creamy pistachio pudding fresh, store it in the fridge. Use an airtight container or cover the bowl tightly with plastic wrap. Press the wrap directly onto the pudding's surface. This helps avoid a dry skin. The pudding stays fresh for about 3 to 5 days in the fridge, so you can enjoy it over several days. If you want to save some for later, you can freeze the pudding. Use a freezer-safe container or a resealable plastic bag. Make sure to leave some space at the top, as the pudding may expand when frozen. For best texture, thaw the pudding slowly in the fridge overnight. After thawing, give it a good stir before serving to restore its creamy goodness. Yes, you can make this pudding a day in advance. Store it in the fridge for up to three days. Just cover the top with plastic wrap to keep it fresh. If you don't have cornstarch, you can use arrowroot or tapioca starch. Both work well to thicken the pudding. Just use the same amount as cornstarch in the recipe. To avoid a skin, cover the pudding directly. Press plastic wrap onto the surface before chilling. This keeps moisture in and prevents a skin from forming. Using salted pistachios can change the flavor. It may make the pudding taste too salty. If you want to use salted ones, reduce the added salt in the recipe. Yes, you can try other nuts! Almonds or cashews can add unique flavors. Just make sure to grind them finely, like the pistachios in the recipe. For the best taste, pick nuts you enjoy. For the full recipe, check out the [Full Recipe]. This post walked you through making pistachio pudding from scratch. We discussed key ingredients, preparation steps, and essential tips for a creamy and delicious result. You learned about variations for dietary needs and how to store your pudding properly. Ultimately, this treat is customizable and easy to make. Enjoy experimenting with flavors, and don’t hesitate to share your own versions! Happy cooking!

From-Scratch Pistachio Pudding Creamy Delight Recipe

Craving a sweet treat that stands out? This From-Scratch Pistachio Pudding Creamy Delight Recipe is your perfect solution! With its

To make the Overnight Croissant Breakfast Casserole, you need: - 6 large croissants, torn into bite-sized pieces - 6 large eggs - 2 cups whole milk - 1 cup shredded cheddar cheese - 1 cup cooked and crumbled sausage (optional) - 1/2 cup diced bell peppers (red and green) - 1/2 cup chopped green onions - 1 teaspoon garlic powder - 1 teaspoon dried thyme - Salt and pepper to taste - Fresh parsley for garnish Adjust the ingredient amounts based on how many servings you want. For a smaller dish, you can cut the recipe in half. If you have more guests, double the recipe. You can also swap out ingredients. If you don't have croissants, use day-old bread instead. If you want a lighter option, use egg whites and low-fat milk. Choosing the right croissants matters. Fresh croissants give a soft texture. Look for ones with a golden brown crust. If using frozen croissants, let them thaw before using. Fresh vegetables add flavor. Choose vibrant bell peppers and crisp green onions for best results. To start, gather your ingredients. You will need croissants, eggs, milk, cheese, and veggies. Tear the croissants into bite-sized pieces. This makes it easy for everyone to enjoy. Toss them in a large bowl with the diced bell peppers and green onions. If you want meat, add the crumbled sausage. Mix well and set this aside. Next, let’s make the egg mixture. In another bowl, whisk the eggs and whole milk. Add the garlic powder, thyme, salt, and pepper. Mix until it is smooth and creamy. Now, pour the egg mixture over the croissant mix. Gently fold the croissants into the egg mix. This helps each piece soak up that tasty egg. After that, stir in half of the cheddar cheese. This adds a nice cheesy flavor. Time to transfer everything to a baking dish. Grease a 9x13 inch dish before adding the mixture. Spread it out evenly. Cover it tightly with plastic wrap. You can let it chill in the fridge overnight. If you are in a hurry, chill it for at least four hours. When ready to bake, preheat your oven to 350°F (175°C). Take the dish out of the fridge. Let it sit for about 15 minutes to reach room temperature. This helps it bake evenly. Sprinkle the remaining cheddar cheese on top. Bake uncovered for 35 to 40 minutes. Look for a golden brown top and puffy center. When done, take it out and let it cool for 5 to 10 minutes. This makes slicing easier and prevents burning. Enjoy your delicious Overnight Croissant Breakfast Casserole! For the full recipe, check the earlier section. To get the best overnight croissant breakfast casserole, you need to soak the croissants well. First, tear the croissants into bite-sized pieces. Then, mix them with your veggies and meat. When you pour the egg mixture over, make sure every piece is soaked. This helps create a creamy texture. If you skip this step, the casserole won't be as flavorful. To avoid a soggy casserole, use stale croissants if you can. Fresh croissants might soak up too much liquid. You can also let the casserole sit in the fridge for at least four hours. This way, it has time to soak without becoming mushy. When serving your casserole, think about what to pair it with. Fresh fruit, like berries or sliced oranges, brightens up the plate. You can also serve it with a side of crispy bacon or sausage. These add a nice crunch to the soft casserole. For drinks, fresh juice or coffee works great. A light tea can also complement the dish well. Plating your casserole nicely makes a big difference. Use a large, colorful platter to display it. Cut the casserole into squares for easy serving. Sprinkle fresh parsley on top for a pop of green. This not only adds color but also fresh flavor. You could also add a dollop of sour cream or yogurt for a creamy touch. A pretty presentation makes breakfast feel special. {{image_2}} You can change the flavor of your Overnight Croissant Breakfast Casserole easily. Adding meats like ham or bacon gives a hearty touch. If you prefer no meat, try mushrooms or spinach for a veggie option. Cheese is another great place to play. Swap cheddar for Swiss or feta for a tangy twist. If you have dietary needs, don't worry! You can make gluten-free versions. Use gluten-free croissants or bread. For dairy-free, almond or oat milk works well. You can also replace eggs with mashed bananas or flaxseed meal for a vegan option. Using seasonal veggies can bring new life to the casserole. Try adding zucchini in summer or butternut squash in fall. For festive times, think about cranberries or pumpkin spice to make the dish special. You can truly make this meal fit any season or occasion. To store leftovers, let the casserole cool to room temperature. Then, cover it tightly with plastic wrap or foil. This helps keep it fresh. You can also use an airtight container. The casserole lasts in the fridge for 3 to 4 days. Make sure to check for any signs of spoilage before eating. Yes, you can freeze the casserole. It’s best to freeze it before baking. Wrap it tightly in plastic wrap and then in foil to prevent freezer burn. To reheat frozen portions, let them thaw overnight in the fridge. Then, bake at 350°F (175°C) for about 25-30 minutes, or until heated through. Check the center to ensure it's hot. Preparing the dish ahead of time is easy. You can assemble everything the night before. Just cover it well and store it in the fridge. Use a glass or plastic container that seals tightly. This keeps flavors locked in and makes for a quick breakfast. You will love how simple it is to have a delicious meal ready in the morning! For the full recipe, check out the details above. Yes! This casserole shines when you prepare it overnight. You mix all the ingredients, then let it sit. This allows the croissants to soak up the egg mixture. Just cover the dish and place it in the fridge. In the morning, bake it for a warm, tasty breakfast. While croissants are the star, you can use other breads. Consider using brioche or challah for a soft texture. Even day-old bread works well. Just make sure to tear the bread into pieces for even soaking. Absolutely! Get creative with your own twists. Add different meats like bacon or ham. You can also swap out the cheese for something like mozzarella or feta. For a veggie boost, add spinach or mushrooms. Make it your own! This blog covered how to make a delicious casserole with croissants, eggs, and cheese. It included tips on measuring ingredients, choosing quality items, and perfecting your bake. We discussed variations to suit different tastes and diets, plus storage methods for leftovers. You can easily adapt this recipe to fit any meal. I hope you feel ready to create your own tasty twist on this dish! Enjoy your time in the kitchen, and share your results with others.

Overnight Croissant Breakfast Casserole Delight

Wake up to a delightful surprise with my Overnight Croissant Breakfast Casserole! This dish turns simple croissants into a warm,

To make your Caprese sandwich shine, use fresh ingredients. Here’s what you need: - 1 ciabatta roll or focaccia bread, sliced in half - 1 large ripe tomato, sliced - 1 ball of fresh mozzarella, sliced - Fresh basil leaves - 2 tablespoons balsamic glaze - 1 tablespoon extra virgin olive oil - Salt and freshly cracked black pepper to taste - Optional: 1 avocado, sliced for added creaminess Fresh tomatoes and mozzarella bring a vibrant taste to your sandwich. Choose ripe tomatoes for the best flavor. The mozzarella should be soft and creamy. To boost the taste, I recommend adding a drizzle of balsamic glaze. This adds a sweet and tangy kick. The olive oil gives a rich depth. A sprinkle of salt and pepper enhances all the flavors. If you want more creaminess, add avocado slices. They pair well with the other ingredients. This Caprese sandwich is not just tasty; it offers great nutrition too. Here’s a quick look: - Calories: About 450 (without avocado) - Protein: 20 grams - Fat: 25 grams (mostly healthy fats) - Carbohydrates: 40 grams The sandwich provides good fats from the olive oil and mozzarella. The tomatoes offer vitamins and antioxidants. This dish is both delicious and healthy, making it a great choice for lunch or a light dinner. First, grab your ciabatta roll or focaccia bread. Slice it in half, creating a top and bottom. This bread gives a nice crunch that holds the filling well. Next, mix extra virgin olive oil with a pinch of salt and freshly cracked black pepper. Brush this mixture on the inside of both bread halves. This step adds flavor and helps the sandwich stay moist. Now, let’s build your sandwich. Start with the bottom half of the bread. Layer the sliced tomatoes in a nice pattern, slightly overlapping them. Add a sprinkle of salt to boost the tomato flavor. Then, place the slices of fresh mozzarella on top of the tomatoes. Make sure you spread them out evenly. Next, add the fresh basil leaves. Feel free to pile them high for that fresh taste. If you want a creamier bite, add sliced avocado on top of the basil. Finish by drizzling balsamic glaze over everything. This adds a sweet and tangy kick. To make your sandwich warm and melty, grill it. Use a skillet or a panini press. Heat it over medium heat. Place your sandwich in the skillet and press down gently. Grill it for 2-3 minutes on each side. You want the bread to turn golden and the cheese to melt. Once grilled, slice the sandwich in half. Serve it right away for the best taste. Enjoy your fresh Caprese sandwich! For the full recipe and more details, check the Full Recipe. To make a great Caprese sandwich, use fresh bread. I love ciabatta rolls or focaccia. They have a nice crust and soft inside. This helps hold all the tasty fillings. If you want a lighter option, try a baguette. Just ensure the bread is not too hard, or it may hurt your mouth. Feel free to switch up the ingredients. You can add extra basil for more flavor. If you like spicy, add red pepper flakes. Want more creaminess? Add avocado slices. You can even change the cheese. Try goat cheese or feta for a twist. Make this sandwich your own! To keep your sandwich fresh, store ingredients properly. Keep tomatoes at room temperature, not in the fridge. The cold can change their taste. For mozzarella, keep it sealed in the fridge. Use it within a few days for the best flavor. Basil should be in a glass of water, like a flower. This keeps it fresh and vibrant. If you have leftover bread, wrap it tightly. This will help keep it from getting stale. {{image_2}} You can take the classic Caprese sandwich up a notch by grilling it. Grilling adds a warm, crispy exterior. To make a grilled version, follow the same steps in the full recipe. After assembling your sandwich, grill it for 2-3 minutes on each side. The cheese melts beautifully, and the bread turns golden brown. This method gives your sandwich a nice crunch and smoky flavor. If you need a quick meal, try a Caprese wrap. It’s simple and portable. Use a large tortilla or flatbread as your base. Spread the olive oil mixture like in the full recipe. Then layer the tomato slices, mozzarella, and basil inside the wrap. Roll it tightly and slice in half. This wrap is perfect for lunch or a picnic and tastes just as good as the sandwich. You can easily make a vegan Caprese sandwich. Swap the fresh mozzarella for a plant-based cheese or avocado. Use a vegan balsamic glaze to keep it dairy-free. The rest of the ingredients stay the same. This variation retains the fresh flavors while being kind to those on a vegan diet. You won’t miss the cheese with all those vibrant tastes. To keep your sandwich ingredients fresh, store them in separate containers. Wrap the tomato slices in plastic wrap. This prevents them from drying out. Keep the mozzarella in its liquid if possible. This helps maintain its flavor and texture. Place basil leaves in a damp paper towel and seal them in a bag. This keeps them fresh and vibrant. Store the balsamic glaze and olive oil in airtight containers. They can last for weeks in a cool, dark place. Bread is best stored at room temperature. Place it in a paper bag, not plastic. Plastic traps moisture, which can make bread soggy. If you have extra bread, freeze it. Wrap it tightly in foil or freezer bags. This keeps it fresh for up to three months. When you want to use frozen bread, thaw it at room temperature. You can also warm it in the oven for a few minutes. If you have leftover sandwiches, reheat them to enjoy warm. Preheat your skillet over medium heat. Place the sandwich in the skillet for about 3-4 minutes on each side. This helps the bread get crispy while warming the cheese. If you prefer, use an oven. Wrap the sandwich in foil and heat it at 350°F for about 10 minutes. This method keeps the bread soft while melting the cheese perfectly. For the best flavor, eat your sandwich right after reheating. I love using ciabatta rolls or focaccia bread. They are soft yet sturdy. This helps hold all the tasty layers inside. The crust adds a nice crunch. You can also use a baguette for a different texture. Just make sure it is fresh! Yes, you can make a Caprese sandwich ahead of time. It’s best to store it in the fridge until you’re ready to eat. If you do this, keep the balsamic glaze separate. This keeps the bread from getting soggy. You can assemble it just before serving for the freshest taste. I recommend a light side salad with mixed greens. A simple cucumber salad works well too. You could also serve it with crispy chips or roasted veggies. For a refreshing drink, try iced tea or lemonade. These sides enhance the sandwich's bright flavors. In this blog post, we discussed how to make a delicious Caprese sandwich. We explored fresh ingredients that enhance flavor and vital nutrition. I shared step-by-step instructions for preparation and grilling. You also learned tips on choosing the right bread and adjusting flavors to suit your taste. Remember, there are fun variations, like the grilled Caprese or quick wraps. Store leftovers properly for the best taste. With this knowledge, you can create your own tasty versions of this classic sandwich. Enjoy making and sharing your Caprese creations!

Fresh Caprese Sandwich Flavorful and Simple Recipe

If you crave a fresh and flavorful meal, the Caprese sandwich is for you. This easy recipe shines with ripe

To make a tasty Lemon Tiramisu, you need the following ingredients: - 1 cup mascarpone cheese - 1 cup heavy whipping cream - 1/2 cup granulated sugar - Zest of 2 lemons - 1/4 cup fresh lemon juice - 1 teaspoon vanilla extract - 12 ladyfinger cookies - 1 cup brewed lemon herbal tea, cooled - Fresh mint leaves for garnish Using quality ingredients makes a big difference in taste. Fresh lemons give the best flavor. High-quality mascarpone adds creaminess. Choose fresh mint for garnish to brighten your dish. If you can't find mascarpone cheese, you can use cream cheese. Mix it with a bit of sour cream for smoothness. For gluten-free options, look for ladyfingers made from almond flour or gluten-free bread. If you want to replace sugar, consider honey or agave syrup. However, reduce the amount since they are sweeter than sugar. To start, gather your ingredients for the lemon mascarpone mixture. In a large bowl, mix the mascarpone cheese, heavy whipping cream, granulated sugar, lemon zest, lemon juice, and vanilla extract. Use an electric mixer. Begin at a low speed to avoid splatter. Gradually increase the speed to medium. Whip until soft peaks form. This should take about 3-5 minutes. The cream should be thick and smooth, not runny. Next, prepare to layer your dessert. Pour the cooled lemon herbal tea into a shallow dish. Dip each ladyfinger quickly into the tea. Make sure they are damp but not soggy. Too much tea will ruin the texture. Arrange half of the soaked ladyfingers at the bottom of a rectangular dish in a single layer. Spread half of the lemon mascarpone mixture over the ladyfingers. Use a spatula to smooth it out. Repeat with the second layer of ladyfingers and the remaining mascarpone mixture. Chilling is key for flavor. Cover the dish with plastic wrap. Refrigerate for at least 4 hours, but overnight is best. This allows the flavors to meld together. Use a clean kitchen towel to cover the dessert if you lack plastic wrap. When ready to serve, top with fresh mint leaves and more lemon zest for a bright finish. Enjoy your delicious Lemon Tiramisu Delight! For the complete process, refer to the Full Recipe. To make your Lemon Tiramisu shine, always choose fresh ingredients. Use real lemons, not bottled juice. Fresh zest adds bright notes to the dish. For the best taste, balance sweetness with acidity. The sugar should complement the lemon, not overpower it. Adjust the sugar based on your lemon's tartness. Serve the Lemon Tiramisu in fun ways. You can layer it in clear cups or small jars. This way, guests will see the lovely layers. For garnishing, add fresh mint leaves on top. A sprinkle of lemon zest also brightens the look. These touches make your dessert more inviting. If your mascarpone mixture splits, whip it again on low speed. This can help bring it back together. If you find your ladyfingers soggy, try a quicker dip in the tea. Too long will make them overly wet. Aim to just moisten them for the right texture. {{image_2}} You can switch up the flavor of your Lemon Tiramisu by using other citrus fruits. Think about adding orange or lime for a fresh twist. These fruits give the dessert a new taste while keeping it light. If you want an adult version, add flavored liqueurs. Limoncello or orange liqueur can elevate the flavor and add a fun kick. Have you thought about making Lemon Tiramisu in different shapes? You can create Lemon Tiramisu cupcakes. Just layer the ingredients in cupcake liners. This makes them easy to serve at parties. Another fun idea is mini servings in glasses or jars. These individual portions are cute and perfect for sharing. If you want a vegan Lemon Tiramisu, simply use coconut cream instead of mascarpone cheese. You can also use almond milk and a vegan sugar substitute. For those on a low-carb diet, swap regular sugar with a low-carb sweetener. This way, you can enjoy this delightful dessert without the carbs. For the full recipe, check out the complete details provided above. You can store Lemon Tiramisu in the fridge for up to 3 days. Make sure to cover it well with plastic wrap or a lid. This keeps it fresh and prevents it from absorbing other flavors. I like to use a glass or plastic container with a tight seal. It helps maintain the dessert's light texture and zesty taste. If you want to save leftovers, you can freeze Lemon Tiramisu. Cut it into portions, and place them in an airtight container. Wrap each piece in plastic wrap first. This prevents freezer burn and keeps flavors intact. To thaw, move the dessert to the fridge for a few hours or overnight. Avoid using a microwave, as it can ruin the creamy layers. Enjoy it cold for a refreshing treat! Making Lemon Tiramisu takes about 20 minutes of active prep time. After that, it needs to chill for at least 4 hours. I recommend overnight chilling for the best flavor. The longer it chills, the better the flavors blend together. Yes, you can use other herbal teas. Chamomile or ginger tea works well too. They add nice flavors and keep the dessert light. Just make sure the tea is cooled before dipping the ladyfingers. I love serving Lemon Tiramisu with fresh berries or a light salad. For drinks, try sparkling water or a fruity spritzer. These pair well and make the meal feel special. You can explore more pairing ideas in the full recipe. Lemon Tiramisu offers a fresh twist on a classic dessert. We covered essential ingredients and substitutions, ensuring everyone can enjoy it. The step-by-step instructions make preparation easy, while tips improve flavor and presentation. You can explore variations, dietary modifications, and proper storage methods for your treats. In the end, this dessert is versatile and fun. With fresh lemons and a little creativity, you can impress everyone. Enjoy creating your own version!

Lemon Tiramisu Delightful and Refreshing Dessert Recipe

If you crave a dessert that’s both zesty and creamy, then this Lemon Tiramisu is for you. Imagine a light,

You need some key items for this dish. Here are the essentials: - 1 lb shrimp, peeled and deveined - 2 tablespoons olive oil - 1 teaspoon chipotle powder - 1 teaspoon cumin - 1/2 teaspoon smoked paprika - Juice of 2 limes - Salt and pepper, to taste - 2 cups cooked quinoa - 1 cup black beans, rinsed and drained - 1 cup cherry tomatoes, halved - 1 avocado, diced - 1/4 cup chopped fresh cilantro - 1/4 cup corn (fresh or canned) - Lime wedges for serving These ingredients make a flavorful meal. The shrimp shines with spices and lime juice. Fresh ingredients make a big difference. Use fresh shrimp for the best taste. Look for shrimp that smells clean and briny. Fresh limes add zest. Squeeze the juice right before using it. This keeps the flavor bright. Use ripe avocados for creaminess. They add a rich texture. Chopped cilantro gives a fresh burst. It enhances the dish beautifully. You can add toppings for your taste. Here are some ideas: - Sliced jalapeños for heat - Sour cream for creaminess - Feta cheese for a salty bite - Sliced radishes for crunch - Chopped green onions for freshness Feel free to be creative. Each topping adds a unique twist to your bowl. For the full recipe, you can check out the instructions that follow. To start, you need to mix the shrimp marinade. In a large bowl, combine these ingredients: - 1 lb shrimp, peeled and deveined - 2 tablespoons olive oil - 1 teaspoon chipotle powder - 1 teaspoon cumin - 1/2 teaspoon smoked paprika - Juice of 2 limes - Salt and pepper, to taste Toss the shrimp in the bowl. Make sure each piece is well-coated. This step adds a lot of flavor. Let the shrimp marinate for 15-20 minutes. This wait helps the spices soak in. Next, heat a large skillet over medium-high heat. Once hot, add the marinated shrimp. Cook them for about 2-3 minutes on each side. You want them to turn pink and opaque. This shows they are done. Remove the skillet from heat. The shrimp will be juicy and full of flavor. Now it's time to build your bowl. Start with a base of cooked quinoa. Use about 2 cups of quinoa for four servings. Next, add the following toppings: - 1 cup black beans, rinsed and drained - 1 cup cherry tomatoes, halved - 1 avocado, diced - 1/4 cup corn (fresh or canned) - 1/4 cup chopped fresh cilantro Place the cooked shrimp on top. Finish it off with lime wedges for squeezing. This adds a fresh zing to the dish. Serve it all in colorful bowls. You can find the full recipe for more details. Enjoy your meal! To cook shrimp just right, start with fresh or thawed shrimp. Heat your skillet to medium-high. Add a bit of oil for flavor. Place the shrimp in the skillet. Cook them for 2-3 minutes on each side. Watch for them to turn pink and opaque. This shows they are done. Remove them from heat to avoid overcooking. Overcooked shrimp can become rubbery, and nobody wants that! For a stunning presentation, use colorful bowls. Layer the ingredients neatly. Start with cooked quinoa as the base. Next, add black beans and cherry tomatoes. Place the shrimp on top for a nice pop of color. Dice the avocado and sprinkle it on. Finish with fresh cilantro and lime wedges. This layout looks bright and fresh. It makes the meal fun to eat! To save time, you can prep your shrimp ahead. Marinate the shrimp and store it in the fridge. It can stay fresh for about a day. Cooked quinoa can also be made in advance. Store it in an airtight container. The other ingredients can be chopped the night before. Just keep them in the fridge. This way, you can whip up your Chipotle Lime Shrimp Bowl in no time. Follow the full recipe for more details. {{image_2}} You can change the base of your Chipotle Lime Shrimp Bowl. Instead of quinoa, try brown rice or cauliflower rice. Both options add unique tastes and textures. Brown rice gives a nutty flavor, while cauliflower rice keeps it light. You can also use lettuce for a low-carb twist. A bed of greens adds crunch and freshness. Feel free to mix in different veggies. You can add bell peppers, zucchini, or spinach. Each vegetable brings its own flavor and nutrients. Fresh corn adds sweetness, while black beans give fiber. The more colors you have, the better your bowl looks and tastes. Explore seasonal vegetables for even more variety. You can easily adjust the spice level in your bowl. If you like it hot, add more chipotle powder or some diced jalapeños. For a milder taste, use less chipotle powder. You can also add sour cream or yogurt to cool down the heat. This way, everyone can enjoy their perfect bowl. For the full recipe, check out the Chipotle Lime Shrimp Bowl. To store leftovers from your Chipotle Lime Shrimp Bowl, first let them cool down. Place the shrimp and other ingredients in an airtight container. Make sure to separate the shrimp from the quinoa and veggies to keep everything fresh. Store the container in the fridge for up to three days. If you want to enjoy the dish later, keep the ingredients apart to maintain flavor and texture. Reheating is simple. You can use a microwave or stovetop. If using a microwave, place the leftovers on a microwave-safe plate. Heat in short bursts of 30 seconds, stirring in between. This helps to warm evenly. If using the stovetop, add a splash of water to the pan while heating. This keeps the shrimp moist and tasty. Avoid heating too long to prevent the shrimp from turning rubbery. Freezing is a great option for meal prep. To freeze, pack shrimp, quinoa, and veggies in separate freezer-safe bags. Remove as much air as possible to prevent freezer burn. They can last up to three months in the freezer. When you're ready to eat, thaw overnight in the fridge. Then reheat using the methods above. This keeps your meal fresh and delicious. Enjoy the flavors of your Chipotle Lime Shrimp Bowl anytime! If you want the complete recipe, check the Full Recipe. You can use brown rice or couscous instead of quinoa. Both options cook easily and taste great. If you want a low-carb choice, try cauliflower rice. It adds a nice texture and absorbs flavors well. Each option keeps the meal healthy and filling. Shrimp cooks quickly. It is done when it turns pink and opaque. You should also check the shape; it should curl into a “C” shape. Avoid overcooking, which makes shrimp tough. If you see them starting to firm up, it is time to remove them from the heat. Yes! You can prepare the shrimp and quinoa in advance. Store them in separate airtight containers. Keep the shrimp in the fridge for up to two days. Quinoa can last longer, about four days. When you are ready to eat, just reheat and assemble your bowl. For the best taste, add fresh toppings right before serving. For the full recipe, check the detailed instructions above. This blog post covered how to create a tasty Chipotle Lime Shrimp Bowl. We discussed key ingredients, helpful tips, and fun variations. Cooking shrimp well and using fresh items boosts flavor. You can mix toppings for your unique twist. Remember to store leftovers right and know when shrimp is done. With these tips, you can enjoy a delicious meal anytime. Try it out and share your bowl creations!

Chipotle Lime Shrimp Bowl Flavorful and Simple Meal

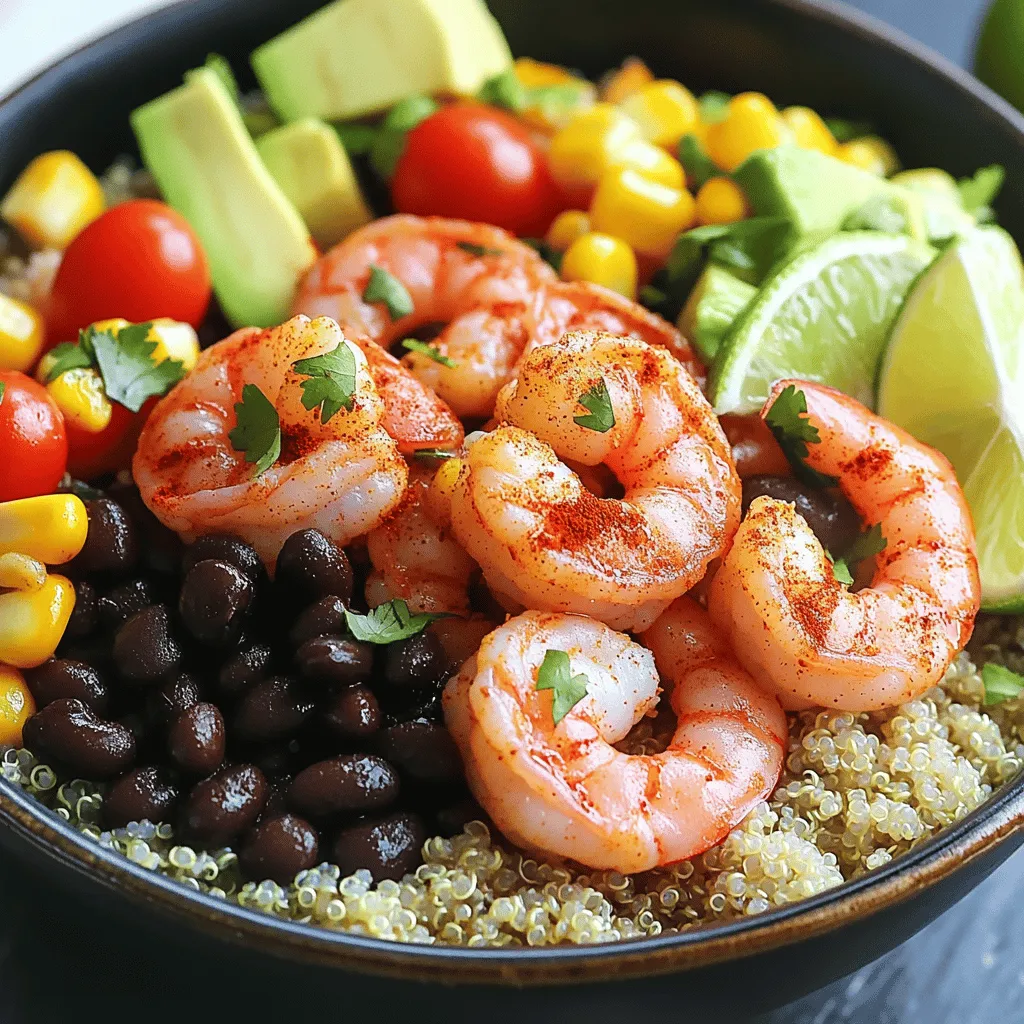
Looking for a tasty yet simple meal? The Chipotle Lime Shrimp Bowl is perfect for you! Packed with flavor, it’s

Older posts
Newer posts
← Previous Page1 … Page62 Page63 Page64 … Page85 Next →

dsad

© 2025 So Yum Recipes • Built with GeneratePress

Our Policies

  • Copyright Policy
  • Cookie Policy
  • GDPR Policy
  • Privacy Policy
  • Disclaimer
  • Terms Of Use

More Information

  • Home
  • About
  • Contact
  • Appetizers
  • Dessert
  • Dinner
  • Drinks
©2025, So Yum Recipes About Back To Top