Meal Prep for Busy Weeks: Simple Quinoa Bowls
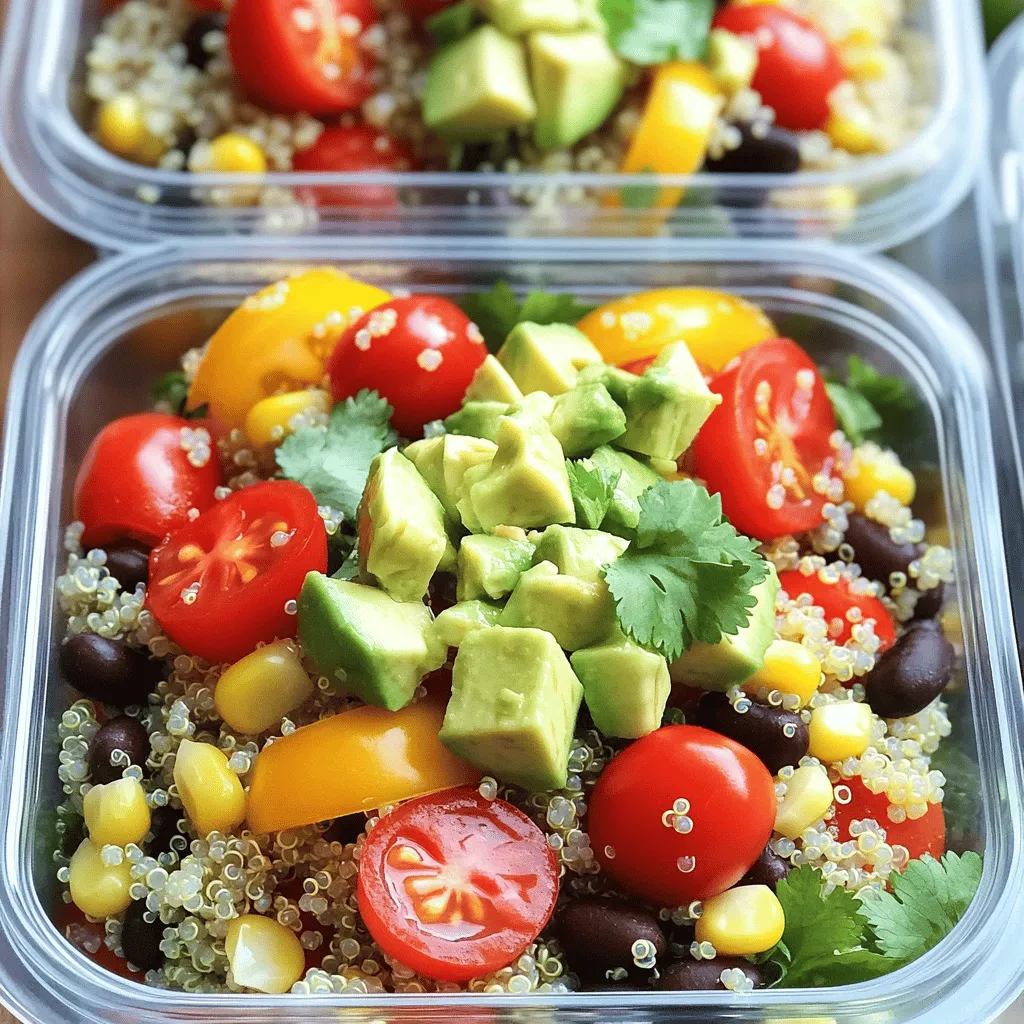
Are you tired of scrambling for dinner ideas each busy week? I get it! Meal prep can save you time
Are you tired of scrambling for dinner ideas each busy week? I get it! Meal prep can save you time
![When making a chocolate pistachio cake, you need the right ingredients to get the rich flavor. Here’s what you will need: - 1 ½ cups all-purpose flour - 1 cup granulated sugar - ½ cup unsweetened cocoa powder - 1 teaspoon baking powder - ½ teaspoon baking soda - ½ teaspoon salt - 1 cup buttermilk (or plant-based milk) - ½ cup vegetable oil - 2 large eggs - 1 teaspoon vanilla extract - 1 cup finely chopped roasted pistachios (plus extra for garnish) - ½ cup dark chocolate chips These ingredients create a moist and tasty cake that everyone will love. The combination of rich chocolate and crunchy pistachios makes each bite special. Make sure to get good quality cocoa powder and dark chocolate chips for the best taste. You can find the full recipe in the article to guide you step by step. - Preheat the oven to 350°F (175°C). - Grease and flour a 9-inch round cake pan. You can also use parchment paper for easy removal. - In a large bowl, combine the dry ingredients: flour, sugar, cocoa powder, baking powder, baking soda, and salt. Mix until there are no lumps. - In another bowl, whisk together the wet ingredients: buttermilk, vegetable oil, eggs, and vanilla extract. It should be smooth and creamy. - Gradually add the wet mix to the dry mix. Stir gently until just combined. A few lumps are fine! - Fold in the chopped pistachios and dark chocolate chips. This adds flavor and texture. - Pour the batter into the prepared cake pan. Smooth the top with a spatula. - Bake for 25-30 minutes. Check for doneness by inserting a toothpick in the center. If it comes out clean, the cake is ready. - Once baked, let the cake cool in the pan for about 10 minutes. Then transfer it to a wire rack to cool completely. - For frosting, try a light chocolate ganache or whipped cream. Both pair well with the cake's rich flavors. - Garnish the top with more chopped pistachios. This makes the cake look stunning and adds a nice crunch. For the full recipe, refer back to the ingredients list above. - Avoid over-mixing: Mix just until wet and dry ingredients blend. Over-mixing makes the cake tough. - Ensuring even baking: Rotate the cake halfway through baking. This helps it bake evenly. - Adding spices or extracts: A pinch of cinnamon or almond extract can add depth. These small changes can brighten the cake's rich taste. - Chocolate chip variations: Swap dark chocolate chips for milk or white chocolate. Each type gives a unique twist to the flavor. - Decorative garnishes: Sprinkle extra chopped pistachios on top. This adds color and crunch. - Serving styles: Serve slices with a dollop of whipped cream or chocolate ganache. This enhances both flavor and looks. For the full recipe, check out the Chocolate Pistachio Cake section. {{image_2}} You can make this cake fit your needs with some simple swaps. For a gluten-free option, use gluten-free flour blends. They work well in this recipe. Check the blend for xanthan gum. This helps with texture. If you want a dairy-free cake, use plant-based milk. Almond milk or oat milk both work great. You can also substitute buttermilk with a mix of plant milk and vinegar. This creates a similar tangy flavor. To change the taste, think about using different nuts. Chopped walnuts or hazelnuts add a nice twist. They give a new texture and flavor while pairing well with chocolate. Another option is to use flavored chocolate. Instead of dark chocolate chips, try mint or orange-infused chocolate. This will add a fun twist to your cake, making it unique. You don’t have to stick to a regular cake. Try a layered chocolate pistachio cake. Bake two or three layers and add frosting in between. This gives you a stunning dessert for special occasions. If you want bite-sized treats, make cupcakes instead. Use the same batter but fill cupcake liners. Bake for about 20 minutes. These are perfect for parties or snacks. For the full recipe, check the section above. To keep your chocolate pistachio cake fresh, store it at room temperature. Wrap it in plastic wrap or foil. This helps to keep it moist. If you live in a hot area, consider refrigeration. Place the wrapped cake in the fridge to avoid spoilage. However, this may change the texture slightly. Freezing is a great way to save leftover cake. To freeze slices, wrap each piece in plastic wrap. Then place them in a freezer bag. Be sure to press out the air before sealing. For thawing, simply remove a slice from the freezer. Let it sit at room temperature for about an hour. You can also thaw it in the fridge overnight for a slower option. Stored properly, your cake lasts about 3 to 5 days at room temperature. If refrigerated, it can last up to a week. In the freezer, it stays good for about 2 to 3 months. Check for spoilage by looking for mold or an off smell. If it looks or smells bad, it’s time to toss it. Enjoy your baking! For the full recipe, check out the earlier section. Can I substitute buttermilk? Yes, you can. Use plant-based milk with a bit of vinegar or lemon juice. This mix will mimic buttermilk's tanginess. You can also use regular milk, but it won't be as rich. What can I use instead of eggs? You can replace eggs with applesauce or mashed bananas. Use 1/4 cup per egg. Flaxseed meal mixed with water is another great option. Mix one tablespoon of flaxseed with three tablespoons of water. Let it sit for a few minutes to thicken. How do I know when the cake is done? Stick a toothpick into the center of the cake. If it comes out clean, the cake is ready. If it has batter on it, bake for a few more minutes. Cake is too dry If your cake is dry, you may have over-baked it. Keep an eye on the baking time. Also, ensure you measured your ingredients accurately. Adding a bit more oil or buttermilk next time can help too. Cake is too dense A dense cake can come from over-mixing the batter. Mix just until combined. Another reason could be too much flour. Make sure to spoon it into the measuring cup rather than scooping it. How many servings does this recipe yield? This recipe makes about 8 to 10 servings. Each slice is rich and satisfying. Can I scale the recipe up or down? Yes, you can! To make more, simply double the ingredients. For fewer servings, halve the amounts. Just adjust your baking time if you change the pan size. For the full recipe, check out the [Full Recipe]. You now know how to make a delicious cake with pistachios and chocolate. We covered the key ingredients, step-by-step baking instructions, and tips for perfect results. Don't forget about variations and storage tips to keep your cake fresh. Experiment with flavors to make it your own. Follow the easy steps for a delightful treat. Enjoy baking this dessert that impresses every time!](https://soyumrecipes.com/wp-content/uploads/2025/05/4ebbba8e-2fdf-4baf-bcd0-42ed12ce30d8.webp)
If you’re craving a dessert that bursts with rich chocolate flavor and crunchy pistachios, you’re in the right place! This
![- Fresh or frozen cheese ravioli - Cherry tomatoes - Asparagus - Olive oil - Garlic For this dish, you need a few key items to create a tasty meal. First, get fresh or frozen cheese ravioli. You can find this at most grocery stores. Next, grab some cherry tomatoes. Their sweetness adds a great flavor boost. A bunch of asparagus brings crunch and color to the mix. Don't forget olive oil. It helps cook the veggies and adds richness. Lastly, garlic is a must. It gives the dish a warm, inviting aroma. - Dried basil - Dried oregano - Salt and pepper - Grated Parmesan cheese - Fresh basil leaves Now, let’s talk about seasoning. Dried basil and oregano add depth to the dish. You’ll want to sprinkle in salt and pepper to enhance the flavors. For a finishing touch, use grated Parmesan cheese. It melts beautifully and makes everything taste amazing. Fresh basil leaves are great for garnish too. They add a pop of color and freshness. For the full recipe, check out the [Full Recipe]. Start by bringing a large pot of salted water to a boil. The salt helps add flavor. Once the water is bubbling, gently add your ravioli. If you use fresh ravioli, it usually cooks for about 3-5 minutes. If you go with frozen, it can take a bit longer, around 7-10 minutes. Watch closely, as overcooked ravioli can become mushy. While the ravioli cooks, heat 2 tablespoons of olive oil in a large skillet over medium heat. Add 2 minced garlic cloves. Sauté them for about 30 seconds until they smell great. Next, toss in the asparagus pieces. Cook them for about 3-4 minutes. You want them tender but still a little crisp. After that, add 1 cup of halved cherry tomatoes, 1 teaspoon of dried basil, and 1 teaspoon of dried oregano. Season with salt and pepper to taste. Cook everything for another 3-4 minutes until the tomatoes soften slightly. When your ravioli finishes cooking, use a slotted spoon to transfer it to the skillet with your veggies. Gently toss everything together. This allows the ravioli to soak up all the delicious flavors. Once combined, remove from heat. Serve it in a bowl and sprinkle with grated Parmesan cheese. Garnish with fresh basil leaves for that extra touch. For the full recipe, check the section above. To get the best texture from your vegetables, time is key. Cook the asparagus until it is bright green and tender but still a bit crisp. This usually takes about 3-4 minutes in the skillet. Don’t forget to add the tomatoes after the asparagus! They only need a few minutes to soften. When cooking ravioli, follow the package instructions closely. Fresh ravioli cooks fast, usually in 3-5 minutes. Frozen ravioli takes longer, around 7-10 minutes. Keep an eye on them to avoid overcooking. Overcooked ravioli can become mushy and lose their charm. Adding herbs can boost the taste of your dish. Consider using fresh basil or parsley for a vibrant touch. You can also try a pinch of red pepper flakes for some heat. This adds a nice kick without overpowering the dish. Flavor pairings can change the whole meal. Lemon zest brightens the taste, while toasted pine nuts add crunch. You can also mix in some sautéed mushrooms for earthiness. These additions make the dish more exciting and unique. When serving, presentation matters. Use a large bowl and gently toss the ravioli with the veggies. This helps distribute the flavors evenly. Sprinkle the grated Parmesan cheese on top, and add fresh basil leaves for color. For sides, a light salad pairs well with this dish. A simple arugula salad with lemon vinaigrette refreshes the palate. Garlic bread also makes a great side and complements the flavors. If you want to explore more, check the Full Recipe for step-by-step details! {{image_2}} You can make this dish even better with protein. Here are two tasty options: - Adding grilled chicken: Slice cooked chicken breast into strips. Toss the chicken with the ravioli, asparagus, and tomatoes. This adds flavor and makes it heartier. - Incorporating shrimp: Sauté shrimp in the skillet after the garlic. Cook them until they turn pink, then add the asparagus and tomatoes. Shrimp pairs well with the dish and adds a nice touch. You can easily adjust this dish for different diets: - Cheese alternatives for a vegan recipe: Use vegan cheese or nutritional yeast instead of Parmesan. This keeps the flavor while making it vegan. - Alternative vegetable combinations: You can swap asparagus for zucchini or bell peppers. Try mixing in spinach or kale for extra nutrients and color. The sauce makes a big difference in flavor. Here are two ideas: - Creamy sauce suggestions: Add heavy cream or a plant-based cream to the skillet. Stir it in after the veggies cook. This creates a rich and smooth sauce that coats the ravioli perfectly. - A light lemon vinaigrette: Mix olive oil, lemon juice, salt, and pepper in a bowl. Drizzle this over the finished dish for a fresh, zesty taste. It brightens the flavors and adds a refreshing twist. For the full recipe of Ravioli with Tomatoes & Asparagus, check out the details above. After enjoying your ravioli, you may have some leftovers. Store them in an airtight container. Glass or plastic containers work well. Make sure to cool the dish before sealing. This helps keep the ravioli fresh. You can store it in the fridge for up to three days. When it's time to enjoy your leftovers, reheating is key. The best way is to use a skillet. Heat on low and add a splash of water. This will help steam the ravioli. Stir gently to avoid mushy pasta. You can also use the microwave. Use a microwave-safe dish and cover it loosely. Heat in short bursts, stirring in between. If you want to save your ravioli longer, freezing is a great option. First, let the dish cool completely. Then, transfer it to a freezer-safe bag or container. Remove any excess air to prevent freezer burn. Ravioli can last up to three months in the freezer. When you're ready to eat frozen ravioli, thaw it in the fridge overnight. For reheating, follow the skillet method to keep it tasty. Enjoy your delicious meal again! For the complete recipe, check out the Full Recipe. Cooking cheese ravioli usually takes about 3 to 5 minutes. If you use frozen ravioli, it may take a little longer. Always check the package for exact times. Fresh ravioli cooks quickly, while dried ravioli needs more time. You want them soft but not mushy. Yes, you can use different ravioli types. Try meat or vegetable ravioli for a twist. Each type will add new flavors. Just adjust the cooking time if necessary. The key is to enjoy what you like. You can use green beans or broccoli instead of asparagus. Both give nice crunch and taste. You can also try zucchini or peas for a different flavor. Just make sure to adjust cooking times as needed. This recipe is great for meal prep! You can make it ahead and store it. Keep the ravioli and sauce separate to avoid sogginess. Store in airtight containers in the fridge for up to four days. Reheat gently to keep flavors fresh. To make this dish gluten-free, use gluten-free ravioli. Many stores offer this option today. You can also make your own from rice flour or other gluten-free grains. Just ensure all other ingredients, like broth and seasonings, are gluten-free too. Check the labels for safety. For the full recipe, check out Ravioli Delight with Fresh Tomatoes & Asparagus. This recipe for ravioli with tomatoes and asparagus is simple yet flavorful. You learned about the main ingredients, how to cook, and tips for perfecting your dish. Customizing your meal adds fun and variety. Feel free to play with proteins or sauces to match your taste. Store your leftovers properly and enjoy later. Cooking can be easy and enjoyable. Trust these methods to create a dish that pleases everyone. Now, gather your ingredients and start cooking!](https://soyumrecipes.com/wp-content/uploads/2025/05/6570a29f-3956-435c-b78e-72a5efdcb3f3.webp)
Are you ready to savor a dish that bursts with flavor? In this blog post, I’ll guide you through making
![- 4 large russet potatoes - 1 tablespoon olive oil - 1 cup shredded cooked ham - 1 cup pulled seasoned chicken (or shredded pork) - 1/2 cup dill pickles, sliced - 1 cup Swiss cheese, shredded - 1/4 cup yellow mustard - Fresh cilantro, for garnish Cuban sandwich potato skins blend flavor and fun. These tasty bites use classic Cuban flavors. Start with large russet potatoes. They are perfect for holding all the fillings. The olive oil helps create a crispy skin. You need shredded cooked ham and pulled chicken or pork. Both meats add great flavor and texture. Don't forget the dill pickles. They bring a nice crunch and tang. Swiss cheese melts well and ties everything together. Yellow mustard gives it that classic Cuban kick. Finally, fresh cilantro adds brightness to your dish. - Salt and pepper to taste - Options for additional toppings Season your ingredients with salt and pepper. This simple step enhances all the flavors. You can also try different toppings. For instance, add jalapeños for heat or avocado for creaminess. Each variation can make your potato skins unique. You can find the full recipe above to guide you through making these delicious bites. Start with clean potatoes. Wash 4 large russet potatoes under cold water. Use your hands to scrub away any dirt. After washing, pierce each potato several times with a fork. This helps steam escape while baking. Next, rub 1 tablespoon of olive oil over each potato. Sprinkle salt all around them. This step adds flavor and helps the skin crisp up nicely. Preheat your oven to 400°F (200°C). Place the prepared potatoes on a baking sheet. Bake them for 45-60 minutes. Check if they are tender by piercing with a fork. When done, take them out and let them cool for a bit. This makes them easier to handle later. Once the potatoes cool, cut each one in half lengthwise. Use a spoon to scoop out some flesh from the center. Leave a thin wall to hold the shape. You can save the scooped-out potato for later, like making mashed potatoes. Preheat your broiler now. Spread a thin layer of yellow mustard on the inside of each potato skin. Then, layer in the shredded cooked ham and pulled chicken or shredded pork. Add a few dill pickle slices on top. Lastly, sprinkle shredded Swiss cheese generously over everything. Place them under the broiler for about 5-7 minutes. Watch closely so they don’t burn. When the cheese is melted and bubbly, take them out. Let them cool for a minute and add fresh cilantro for a nice touch. Enjoy this fun dish! For the full recipe, check out the [Full Recipe]. Choosing the right potatoes is key. I like to use large russet potatoes. They have thick skin and a fluffy inside. This makes them perfect for holding all the tasty toppings. Look for potatoes that feel heavy for their size. Avoid those with soft spots or green patches. To get that crispy finish, follow these steps: - Wash and dry the potatoes well. - Rub them with olive oil to coat. - Sprinkle with salt for extra flavor. - Bake until soft, then scoop out the flesh carefully. Keep some for later. To make your Cuban sandwich potato skins even better, consider these extras: - Top with fresh jalapeños for a spicy kick. - Add slices of avocado for creaminess. - Mix in some sautéed onions for sweetness. For spices and herbs, I suggest: - A dash of smoked paprika for depth. - Fresh cilantro for a bright finish. - Black pepper for a bit of heat. These simple changes will make your potato skins fun and flavorful! For the full recipe, check out the [Full Recipe]. {{image_2}} You can switch up the meats in your Cuban sandwich potato skins. Instead of ham or chicken, try using turkey or beef. These meats can add a nice twist to the classic flavor. Turkey works well, as it is lean and absorbs flavors nicely. Beef brings a hearty taste that makes each bite satisfying. Just remember to use the same cooking methods for an even bake. If you prefer a meat-free dish, you have great options. You can use plant-based proteins like jackfruit, tempeh, or lentils. Jackfruit shreds like pulled pork, making it a fun choice. Tempeh adds a nutty flavor and is full of protein. Lentils can give you a hearty texture that holds up well in potato skins. Top them with cheese or a vegan alternative for creaminess. Get creative with toppings to elevate your potato skins. You can add sliced jalapeños for spice or fresh tomatoes for a burst of freshness. A drizzle of aioli or chipotle sauce can bring extra flavor. Consider adding avocado slices for creaminess. You can also sprinkle fresh herbs like chives or parsley for color and taste. The options are endless! To store leftovers properly, let the potato skins cool first. Place them in an airtight container. They can last in the fridge for up to three days. If you stack them, separate layers with parchment paper. This keeps them from sticking together. For the best taste, reheat in the oven. Set your oven to 350°F (175°C). Place the potato skins on a baking sheet. Heat them for about 10-15 minutes. This helps the cheese get melty and keeps the potatoes crispy. You can also use a microwave, but it may make the skins soft. If you do, heat in short bursts to avoid drying them out. Enjoy your Cuban Sandwich Potato Skins! For the full recipe, check earlier in the article. Making Cuban Sandwich Potato Skins takes about 1 hour and 15 minutes. Here’s how it breaks down: - Prep time: 15 minutes - Cooking time: 45-60 minutes You spend time washing, baking, and then broiling the skins to melt the cheese. Yes, you can prep these potato skins ahead of time. Here are my tips: - Bake the potatoes and scoop them out. - Store the skins in the fridge for up to 24 hours. - Assemble the toppings just before broiling to keep them fresh. This way, you save time when you’re ready to eat. Russet potatoes are the best choice for potato skins. They have a thick skin and a fluffy interior. Other good options include: - Yukon Gold: Creamy and buttery taste. - Red potatoes: Thin skin, but they stay firm. Each type offers a unique flavor and texture, so pick what you like! Yes, you can freeze these potato skins. Here’s how: - Assemble the skins without broiling. - Wrap them tightly in plastic wrap and place in a freezer bag. - They last up to 3 months in the freezer. To enjoy, thaw them overnight and broil until heated through and crispy. Cuban sandwich potato skins are a tasty and fun dish to make. We covered the main ingredients, from russet potatoes to flavorful toppings. You saw how to prep, bake, and assemble them step by step. Remember the tips for crispy skins and creative options. Whether you stick to the classic or add your twist, these skins will impress. Enjoy them fresh or save leftovers with easy storage tips. Dive into this dish and share your favorite variations. Your perfect potato skins await!](https://soyumrecipes.com/wp-content/uploads/2025/05/f489074c-0397-45f4-a58e-ecad338145b3.webp)
If you love a good Cuban sandwich, you’ll adore these Cuban Sandwich Potato Skins! This fun dish combines crispy potato
. To make the marinade, you need to combine several key ingredients. In a mixing bowl, add the following: - 2 tablespoons gochujang - 1 tablespoon honey - 1 tablespoon soy sauce - 1 teaspoon sesame oil - 2 cloves garlic, minced - 1 teaspoon fresh ginger, grated - 1 tablespoon rice vinegar Whisk these together until the mixture is smooth. This marinade brings a sweet and spicy kick that you will love. Now, it’s time to marinate the shrimp. Take 1 pound of large shrimp, peeled and deveined. Add the shrimp to the marinade. Make sure each shrimp is well coated. Let them rest for at least 15 minutes. This time allows the flavors to soak in fully. For cooking, heat a large skillet over medium-high heat. Once the skillet is hot, carefully add the marinated shrimp. Do not overcrowd the pan; this helps them cook evenly. Cook the shrimp for about 2-3 minutes on one side. You will see them turn pink. Now, flip the shrimp and cook for another 2-3 minutes. They should look fully cooked and slightly caramelized. Toss the shrimp in the sauce as they cook. This gives them extra flavor. Once done, remove from heat. Enjoy your Sweet & Spicy Gochujang Shrimp with jasmine rice! For the full recipe, check the earlier section. When picking shrimp, you have two choices: fresh or frozen. Fresh shrimp can taste great, but frozen shrimp often works better. They stay fresh until you need them. Make sure to look for shrimp that appear moist, firm, and have a clean smell. Size matters too! For this recipe, large shrimp are best. They cook evenly and stay juicy. You want shrimp that are about 16-20 per pound. This size holds up well in the pan and gives you that perfect bite. Cooking shrimp can be tricky. You want them tender, not tough. To avoid overcooking, keep an eye on the color. Cook shrimp for just 2-3 minutes on each side. When they turn pink, they are ready. Remove them from heat as soon as they finish cooking. Caramelization adds flavor. To achieve this, don’t overcrowd the pan. Give shrimp space to sear. This helps them brown nicely and enhances the taste. Want more heat? Add extra gochujang to the marinade. You can also mix in chili flakes or fresh sliced chili peppers. This will spice things up for those who love a kick. Vegetables make this dish even better! Bell peppers, snap peas, or zucchini all work well. Sauté them along with the shrimp. They add color and crunch to your meal. For the full recipe, check the above section. {{image_2}} You can add fun veggies to your gochujang shrimp. Here are some tasty options: - Bell peppers - Zucchini - Broccoli - Snap peas - Carrots These veggies bring crunch and color to the dish. You can sauté them in the same skillet as the shrimp. This method makes it quick and easy. If you want to change things up, try different marinades. Here are some sweet and savory ideas: - Use brown sugar for a richer sweetness. - Mix in some pineapple juice for a fruity twist. - Add a splash of lime juice for tang. These changes can give your shrimp a new taste. Feel free to experiment with flavors that you enjoy. Pair your gochujang shrimp with the right sides. Here are my favorite options: - Steamed jasmine rice - Quinoa for a nutty flavor - Crisp salad to add freshness - Roasted sweet potatoes for a sweet touch Each of these sides complements the shrimp well. They make your meal more filling and satisfying. For the full recipe, check out the details above! To keep your Sweet & Spicy Gochujang Shrimp fresh, put leftovers in an airtight container. Place the container in the refrigerator. They will stay good for up to three days. Make sure to cool the shrimp to room temperature before sealing them up. This helps avoid moisture build-up. When you’re ready to eat your leftovers, reheating is key. The best method is to use a skillet. Heat the skillet over medium heat. Add a splash of water or a little oil to keep the shrimp moist. Cook for about 3-4 minutes until warmed through. Stir gently to avoid overcooking. This keeps the shrimp tender and flavorful. If you want to keep your Sweet & Spicy Gochujang Shrimp for longer, freezing is a great option. First, let the shrimp cool completely. Then, place them in a freezer-safe bag. Remove as much air as possible before sealing. They will last for up to three months. When ready to eat, transfer the shrimp to the fridge to thaw overnight. After thawing, reheat in a skillet as mentioned above for the best taste. Gochujang is a Korean chili paste. It has a thick texture and a deep red color. The taste is a mix of sweet, spicy, and savory. This unique flavor comes from fermented soybeans, rice, and chili powder. Many cooks use gochujang in marinades, sauces, and soups. It adds a rich depth to dishes like our Sweet & Spicy Gochujang Shrimp. You can also blend it with other ingredients for dips or dressings. Yes, you can use other proteins. Chicken, tofu, and pork are great options. Cut chicken breasts or thighs into bite-sized pieces. For tofu, choose firm tofu and press it to remove excess water. Pork should be thinly sliced for quick cooking. These proteins will soak up the gochujang flavor just like shrimp. Adjust cooking times based on the protein you choose. To make the dish milder, reduce the amount of gochujang. You can start with one tablespoon and taste as you go. Adding honey can also balance the heat. If you prefer more spice, add more gochujang or a pinch of red pepper flakes. Always taste your dish as you cook. This way, you can find the perfect level of heat for your taste buds. This blog post covered everything you need for a great gochujang shrimp dish. We explored the key ingredients like shrimp, the spicy gochujang, and the sweet honey. You learned how to make the marinade and cook the shrimp perfectly. I shared tips to enhance flavors and variations to try. Remember, cooking should be fun. Experiment with different veggies or spices. Store your leftovers properly to enjoy later. With these tips, you can make a tasty meal any day. Enjoy your cooking journey!](https://soyumrecipes.com/wp-content/uploads/2025/05/8a12d306-98f4-4c6e-a7d3-2a868ce19daa.webp)
Craving a dish that bursts with flavor? Try my Sweet & Spicy Gochujang Shrimp! This fun recipe pairs large shrimp

Do you want a show-stopping dip for your next party? Buckeye Dip is a creamy delight that everyone will love!
![To make a tasty Cheese Tortellini Caesar Salad, gather these ingredients: - 1 package (9 oz) cheese tortellini - 4 cups romaine lettuce, chopped - 1 cup cherry tomatoes, halved - ½ cup shredded Parmesan cheese - ¼ cup Caesar dressing (store-bought or homemade) - ¼ tsp garlic powder - ¼ tsp black pepper - 1 cup croutons - Fresh basil leaves for garnish (optional) Using fresh ingredients makes a big difference. Select firm cherry tomatoes and crisp romaine lettuce. For cheese, choose high-quality Parmesan. If you want a lighter option, swap the tortellini for whole wheat or spinach tortellini. You can also try other greens like kale or arugula for a different taste. Store-bought Caesar dressing can save time, but homemade dressing packs more flavor. For homemade, blend garlic, anchovy paste, lemon juice, Dijon mustard, egg yolks, and olive oil. This dressing will taste fresher. Use it if you have the time. If you're short on time, don’t hesitate to grab a bottle from the store. Both options will give your salad a great taste. To start, bring a large pot of salted water to boil. Add the cheese tortellini to the pot. Cook them until they are al dente, usually around 3 to 5 minutes. Drain the tortellini in a colander. Rinse them under cold water to stop the cooking. This step also cools them down, making them perfect for your salad. In a large mixing bowl, combine the chopped romaine lettuce, halved cherry tomatoes, and shredded Parmesan cheese. These fresh ingredients add great flavor and texture. Next, add the cooled tortellini to the bowl. Drizzle your Caesar dressing over the mixture. Sprinkle with garlic powder and black pepper. Toss the salad gently to coat everything evenly. When it’s time to serve, add croutons to the salad. Toss lightly one last time to keep the croutons crunchy. For a lovely touch, garnish your salad with fresh basil leaves. This adds color and an extra burst of flavor. Enjoy your vibrant Cheese Tortellini Caesar Salad! For the complete recipe, check [Full Recipe]. To cook tortellini just right, start with a large pot of water. Add salt for flavor. Bring the water to a rolling boil. Add the cheese tortellini and stir gently. Follow the time on the package until the pasta is al dente. This usually takes about 3 to 5 minutes. Drain the tortellini and rinse it under cold water. This step cools the pasta and stops the cooking. Perfectly cooked tortellini should be soft but still firm. While Caesar dressing is classic, you can try other dressings too. A simple vinaigrette adds a tangy taste. You might use balsamic or lemon vinaigrette for freshness. For a creamier option, ranch or blue cheese dressings work well. You can even mix yogurt with herbs for a lighter version. Each dressing brings its own flavor. Feel free to experiment and find your favorite! To keep your salad fresh, wash and dry greens well. Store them in a salad spinner or wrap in paper towels. Add the dressing right before serving. This helps keep croutons crunchy and greens crisp. For tomatoes, choose firm, ripe ones. Store them at room temperature, away from direct sunlight. Fresh basil should stay in a glass of water in the fridge. This keeps its vibrant color and taste. Enjoy your Cheese Tortellini Caesar Salad at its best with these tips! {{image_2}} You can easily boost your Cheese Tortellini Caesar Salad by adding proteins. Grilled chicken adds a nice texture. Shrimp brings a sweet, briny flavor. If you prefer a plant-based option, chickpeas are a great choice. They add protein and fiber. You can use canned chickpeas for ease. Just rinse them and toss them in! If you want to mix it up, try different greens. Kale or spinach work well in place of romaine. Both add a nutrient punch and a new texture. You can also add veggies like bell peppers, cucumbers, or avocados. These add crunch and flavor. Roasted vegetables can also give a warm, hearty touch. Herbs and spices can take your salad to the next level. Fresh basil brings a nice aroma. You can also sprinkle in some chopped parsley for freshness. If you want a kick, try adding red pepper flakes. A squeeze of lemon juice brightens the dish. Experiment with these flavors to find your perfect mix! For the full recipe, check out the Cheese Tortellini Caesar Salad. To keep your Cheese Tortellini Caesar Salad fresh, store it in a sealed container. Avoid mixing in croutons until you are ready to eat. Croutons can get soggy in the dressing and lose their nice crunch. If you have extra dressing, store it separately. This way, you can dress your salad just before serving. When stored properly in the fridge, this salad stays fresh for about three days. After that, the tortellini may become mushy, and the greens can wilt. If you notice any off smells or colors, it’s best to toss it. Always trust your senses when it comes to food safety. If you want to enjoy your tortellini salad warm, reheat the tortellini in the microwave. Place it in a bowl, add a splash of water, and cover it. Heat for one minute, then stir and check the temperature. For a cold salad, just serve it straight from the fridge. Remember to add fresh greens and croutons right before serving for the best taste and texture. Check out the Full Recipe for more tips. Yes, you can use frozen cheese tortellini. Just cook it according to the package directions. It will taste great in the salad. Frozen tortellini is a quick option, and it saves time. You can use ranch dressing or a yogurt-based dressing. These provide a creamy texture without the strong flavor of Caesar dressing. You could also mix olive oil, lemon juice, and Dijon mustard for a lighter option. To make this salad vegan, swap the cheese tortellini for a vegan version. Use a plant-based Caesar dressing or make your own with cashews. For gluten-free, choose gluten-free tortellini. Always check labels for hidden gluten. This recipe yields four servings. It is perfect for a small gathering or a family meal. You can easily double the recipe for a larger group. Enjoy sharing this fresh and tasty salad! This blog post covered everything you need for a tasty Cheese Tortellini Caesar Salad. We explored ingredient choices, cooking steps, and tips for perfect results. You learned how to keep your salad fresh and vibrant. We even discussed fun variations to make it your own. Now you can enjoy a delicious, easy-to-make meal that impresses everyone. Remember, the right ingredients and preparation can elevate your dishes. Try it out, and enjoy your tasty creation!](https://soyumrecipes.com/wp-content/uploads/2025/05/70c43dfd-1821-4399-8737-433a628372f3.webp)
Looking for a fun twist on a classic dish? This Cheese Tortellini Caesar Salad is your answer! I’ll show you

Are you ready to treat your taste buds? My Parmesan Crusted Chicken recipe packs a crunchy, cheesy punch that promises
![To create the delightful grilled s'mores quesadillas, you need just a few simple ingredients. Here’s what you’ll need: - 4 large flour tortillas - 1 cup mini marshmallows - 1 cup chocolate chips (milk or dark chocolate) - 1/2 cup crushed graham crackers - 2 tablespoons unsalted butter, softened - 1 teaspoon vanilla extract - Optional: fresh strawberries or banana slices for extra flavor These ingredients combine to bring the classic s'mores taste into a fun, easy-to-eat quesadilla. The flour tortillas act as a warm, soft shell that holds all the tasty fillings. Mini marshmallows and chocolate chips melt perfectly together, creating a gooey texture. The crushed graham crackers add a nice crunch, making each bite satisfying. Using unsalted butter helps to enhance the flavor and crispiness of the tortillas when grilling. The vanilla extract gives a sweet hint that ties everything together. If you want to take it up a notch, fresh strawberries or banana slices add a fruity twist that pairs well with the chocolate and marshmallow. With just these few ingredients, you can whip up a treat that feels special but is also simple to make. For the full recipe, check the detailed instructions to create this sweet and simple delight. - Preheat grill or skillet over medium heat. - Mix chocolate chips, mini marshmallows, and graham crackers in a bowl. - Optional: Add vanilla extract for flavor. - Butter one side of a tortilla and place it on the grill. - Add the chocolate and marshmallow mixture evenly on the tortilla. - Include optional fruits like strawberries or banana slices if desired. - Top with another tortilla and butter the top side. - Grill until golden brown, then flip and continue cooking. - Remove from heat, cool slightly, and slice into wedges. - For crispy quesadillas, set your grill to medium heat. - Use a light coat of oil on the grill grates to prevent sticking. The right temperature helps achieve a golden crust. Medium heat ensures the chocolate and marshmallows melt evenly. If you find your quesadilla sticking, try using a non-stick spray or brush the grill with oil before cooking. - Place quesadilla wedges on a colorful serving platter. - Garnish with crushed graham crackers and powdered sugar. The way you present food makes it more inviting. A sprinkle of graham crackers adds texture. A dusting of powdered sugar gives a sweet touch that catches the eye. Consider serving mini marshmallows on the side for added fun. - Try different chocolates like mint or caramel-flavored. - Add a pinch of cinnamon or a drop of almond extract for extra flavor. Using flavored chocolate can surprise your taste buds. A hint of cinnamon brings warmth to the dish. The right spices can elevate your grilled s'mores quesadillas and make them truly special. {{image_2}} You can choose between milk chocolate and dark chocolate. I love milk chocolate for its creamy taste. Dark chocolate adds a rich flavor that many enjoy. You can also use chocolate spreads like Nutella. It brings a smooth texture that melts beautifully in the quesadilla. This choice adds a fun twist to the classic s'mores. Seasonal fruits can brighten your quesadillas. Strawberries, bananas, and even raspberries work well. These fruits add freshness and a juicy burst. You can mix different fruit flavors too. Try combining strawberries and bananas together. It creates a delightful blend that enhances the sweet experience. For gluten-sensitive diets, you can use alternative tortillas. Corn tortillas are a great choice. They stay crispy and hold the filling well. You can also modify other ingredients. Ensure the chocolate and marshmallows are gluten-free. This way, you can enjoy a tasty treat without worry. To keep your grilled s'mores quesadillas fresh, store them in an airtight container. Place parchment paper between the wedges to prevent sticking. This method keeps the texture nice. They last about 3 days in the fridge. After that, they may lose their flavor. For reheating, use a skillet over medium heat. This method helps maintain the crispy texture. You can also use a microwave, but be aware it may make them soggy. Heat the quesadillas for about 30 seconds to 1 minute. Flip them halfway through to ensure even heating. If you want to freeze quesadillas, wrap them tightly in plastic wrap. Place them in a freezer bag to avoid freezer burn. They can last up to 2 months in the freezer. To defrost, leave them in the fridge overnight. Then, reheat them as mentioned above for best results. Freezing is a great way to prepare for future meals. For the full recipe, check out the details above. Grilled s'mores quesadillas are quick to make. The prep time is just 10 minutes. Cooking takes about 5-6 minutes. In total, you can enjoy these tasty treats in about 15 minutes. Yes, you can prepare these quesadillas in advance. Mix the chocolate, marshmallows, and graham crackers. Store this mix in an airtight container. You can also butter the tortillas before grilling. Keep them in the fridge for a short time. When you are ready, grill them fresh. There are many fun sides to pair with these quesadillas. Here are some ideas: - Fresh fruit like strawberries, bananas, or raspberries - Ice cream or whipped cream for dipping - A drizzle of chocolate syrup or caramel sauce - A side of yogurt for a creamy touch For the complete recipe, check out the [Full Recipe]. This blog post covered how to make delicious grilled s'mores quesadillas. We shared the key ingredients, easy steps, and tips for perfecting your dish. You can get creative with flavors and toppings, like fruits or different chocolates. In the end, these quesadillas are fun to make and enjoy. They suit any gathering or snack time. Try them today and explore your favorite flavors!](https://soyumrecipes.com/wp-content/uploads/2025/05/ebb475b2-0dea-4da5-968a-220edc3af31c.webp)
If you love s’mores and want a quick treat, you’re in for a real treat! Grilled S’mores Quesadillas are the
![- 2 ribeye steaks (about 1-inch thick) - 8 oz shrimp, peeled and deveined - 2 tablespoons butter - 2 cloves garlic, minced - 1/2 cup heavy cream - 1/4 cup grated Parmesan cheese - 1 tablespoon fresh parsley, chopped - 1 tablespoon Worcestershire sauce - Salt and pepper to taste - Lemon wedges for serving The ribeye steaks are rich and juicy. They add a great depth of flavor to this dish. Shrimp brings a sweet and tender bite. Together, they create a wonderful mix of land and sea. Butter adds richness and helps cook the garlic. Garlic gives a warm, savory touch to the sauce. For the creamy sauce, heavy cream makes it smooth and rich. Parmesan cheese adds a nice salty bite. Fresh parsley brightens the dish with color and flavor. Worcestershire sauce enhances all the flavors, making them pop. Salt and pepper balance everything perfectly. Lastly, lemon wedges add a refreshing zing to each bite. You can find the full recipe to make this delicious Surf and Turf dish. Each ingredient works together to create a meal that impresses anyone. - Seasoning and resting First, take your ribeye steaks. Season them well with salt and pepper on both sides. This adds great flavor to the meat. Let the steaks sit at room temperature for about 30 minutes. This helps them cook evenly. - Cooking time for doneness Heat a large skillet over medium-high heat. Add 1 tablespoon of butter and let it melt. Place the seasoned steaks in the skillet. Cook for about 4-5 minutes on each side for medium-rare. If you want them more cooked, leave them longer. Once done, remove the steaks and cover them with aluminum foil to keep them warm. - Using the same skillet Now, you’ll use the same skillet for the shrimp. This adds extra flavor from the steak. Add the remaining tablespoon of butter to the skillet. Let it melt. - Cooking tips for shrimp Once the butter is melted, add minced garlic and the shrimp. Sauté the shrimp for about 3-4 minutes. They should turn pink and look opaque. This means they are ready! - Combining sauce ingredients Lower the heat. Add Worcestershire sauce and heavy cream to the skillet. Stir well. Then, mix in the grated Parmesan cheese. Cook for 2-3 minutes until the sauce thickens slightly. - Tips for a thick sauce To make the sauce thicker, let it simmer a bit longer. You can also add more cheese if you like it extra creamy. Lastly, stir in chopped parsley and season with salt and pepper to taste. For the complete recipe, visit the [Full Recipe]. To cook your steak just right, aim for the perfect doneness. Use a meat thermometer for accuracy. For medium-rare, the internal temperature should be 135°F. For medium, aim for 145°F. Remember to let your steaks rest after cooking. This step allows juices to redistribute, making each bite juicy and tender. To make your creamy sauce pop, add flavors and spices. A pinch of cayenne or smoked paprika can add a nice kick. Fresh herbs like thyme or chives also enhance the taste. You can try adding a splash of white wine for depth. For creamy sauce variations, consider using blue cheese or goat cheese for a tangy twist. Presentation makes your meal look inviting. Use warm plates to keep your food hot. Slice your steak and fan it out on the plate. Spoon the creamy sauce over the steak and shrimp. For garnishing, sprinkle fresh parsley on top. A lemon wedge on the side adds color and a zesty touch. For a final flourish, drizzle some extra sauce around the plate for a restaurant-style finish. {{image_2}} You can swap shrimp with other seafood. Scallops, lobster, or crab work well. Each adds unique flavors. For example, scallops have a sweet taste. Lobster adds a rich, buttery note. Crab meat brings a mild sweetness. Combining different seafood can create a fun twist. Mix shrimp with scallops for a great flavor blend. Try different cuts of steak for variety. Filet mignon is tender and buttery. New York strip has bold flavor. You can even use flank steak for a leaner option. Each cut offers a unique taste and texture. Cooking methods matter too! Grilling adds a smoky flavor. Broiling gives a nice char without needing a grill. Sauce can change the whole dish. You can make it spicy by adding red pepper flakes. An herb-infused sauce with thyme or basil is also tasty. You can even mix in vegetables like spinach or mushrooms. These add color and nutrition. Just sauté them before adding to the sauce. For a twist, try adding a splash of white wine for depth. For the full recipe, check out the link above. To store any leftovers, use airtight containers. Glass or plastic containers work well. Be sure to let the dish cool before sealing. This helps to keep moisture in while avoiding sogginess. Place the container in the fridge. Leftovers stay fresh for up to three days. When reheating seafood and steak, do it gently. Use a skillet over low heat for the best results. Add a splash of water or broth to keep the dish moist. Stir often to avoid burning. For steak, you can also use the microwave. Just cover it with a damp paper towel to maintain moisture. If you want to freeze the cooked dish, let it cool completely first. Then, place it in a freezer-safe container. Be sure to remove as much air as possible. This keeps the flavors locked in. The dish can last for about three months in the freezer. To thaw, move it to the fridge overnight. You can also use the microwave for quick thawing if needed. To know if your steak is cooked just right, check its doneness levels. Here’s a quick guide: - Rare: 125°F (51°C) – cool red center - Medium-rare: 135°F (57°C) – warm red center - Medium: 145°F (63°C) – pink center - Medium-well: 150°F (66°C) – slightly pink center - Well done: 160°F (71°C) – no pink, fully cooked Use a meat thermometer for best results. Insert it into the thickest part of the steak. Remember, the steak will continue cooking after you take it off the heat. Let it rest for a few minutes before cutting. This helps keep the juices inside. Yes, you can make the sauce in advance. Here are some tips for preparing it ahead of time: - Make it early: Cook the sauce up to a day before. - Store properly: Keep it in an airtight container in the fridge. - Reheat gently: Warm it on low heat when ready to serve. Stir well to combine. This way, you save time when you cook the steak and shrimp. Yes, using frozen shrimp is fine. Here’s how to thaw and cook them properly: - Thawing: Place shrimp in a bowl of cold water for about 15-20 minutes. This helps them thaw quickly. - Cooking: Cook thawed shrimp as you would fresh shrimp. They will still taste great in the creamy sauce. Frozen shrimp can be very handy and save time. Just make sure to thaw them correctly before cooking. In this post, I covered how to make a delicious ribeye and shrimp dish. We explored the main ingredients like steaks, shrimp, and creamy sauce. I shared step-by-step instructions to cook perfect steaks and sauté shrimp. I included tips for presentation and variations to customize your dish. Remember, good food brings joy. Experiment with flavors and enjoy your cooking journey. With the right steps, you can impress anyone at the table!](https://soyumrecipes.com/wp-content/uploads/2025/05/0209dd7f-321f-4730-856f-0f57ce94f7d3.webp)
If you’re ready to elevate your dinner game, look no further! This Savory Surf and Turf Steak with Creamy Sauce
