Skip to content
DisclaimerTerms Of UseGDPR PolicyCookie Policy

So Yum Recipes

  • Home
  • Drinks
  • Appetizers
  • Dinner
  • Dessert
  • About
  • Contact
  • Privacy Policy
DisclaimerTerms Of UseGDPR PolicyCookie Policy

Chloe

- 2 cans (14 oz each) of diced tomatoes - 1 medium onion, chopped - 2 cloves garlic, minced - 2 cups vegetable broth - 1 cup heavy cream (or coconut cream for a non-dairy option) For creamy tomato soup, start with diced tomatoes. They give the soup a rich base. Next, add a chopped onion and minced garlic. Both bring great flavor. Then, pour in vegetable broth for added depth. Finally, stir in heavy cream or coconut cream for that perfect smoothness. - 4 slices of your favorite bread (sourdough or whole grain recommended) - 1 cup shredded sharp cheddar cheese - Butter for grilling For the grilled cheese, choose your bread. Sourdough or whole grain works best. Spread butter on the outside of the bread slices. This helps achieve a golden crust. Add sharp cheddar cheese inside. It melts beautifully, making every bite a delight. - 1 teaspoon sugar (to balance acidity) - Fresh herbs for garnishing You can add sugar to balance the soup's acidity. It enhances the tomato's sweet flavor. Fresh herbs like basil or parsley add a nice touch. They brighten the dish and make it look lovely. You can find the full recipe in the earlier section. 1. Sautéing vegetables: Start by heating olive oil in a large pot over medium heat. Add the chopped onion and diced carrot. Cook for about 5-7 minutes until they soften. This step builds a great base for flavor. 2. Adding tomatoes and broth: Next, stir in minced garlic and cook for one more minute. Then, pour in the canned diced tomatoes and vegetable broth. Add dried basil and sugar if you want to balance the acidity. Bring it all to a gentle simmer. Let it cook for 15-20 minutes. This will help the flavors mix nicely. 3. Blending for creaminess: Use an immersion blender to blend the soup until it's smooth. If you don’t have one, carefully transfer the soup in batches to a blender. Once blended, return the soup to the pot and stir in heavy cream. Heat gently over low heat and season with salt and pepper to taste. 1. Buttering the bread: Take four slices of your favorite bread. Butter one side of each slice. This butter will help create a crispy, golden crust. 2. Layering cheese and grilling: Place shredded cheddar cheese on the unbuttered side of two slices. Top with the other slices, buttered side up. 3. Achieving golden brown perfection: Heat a skillet over medium heat. Grill the sandwiches for about 3-4 minutes on each side. Look for a nice golden brown color and make sure the cheese melts. Remove from heat and slice the sandwiches in half. 1. How to serve the soup and grilled cheese: Ladle the creamy tomato soup into bowls. Arrange the grilled cheese halves neatly on the side. 2. Presentation tips for a visual appeal: For a lovely touch, drizzle a bit of heavy cream or olive oil on the soup. Garnish with fresh basil leaves. This adds color and makes your meal look amazing. Enjoy every spoonful of this creamy tomato soup with grilled cheese delight! For the complete recipe, check out the Full Recipe. Using fresh herbs adds bright taste. I love fresh basil in tomato soup. It gives a sweet, aromatic touch. Dried herbs work too, but fresh ones shine brighter. Spices can deepen the flavor. Try a pinch of red pepper flakes for heat or oregano for earthiness. Experiment with what you have. For a smooth soup, blend it well. An immersion blender works great. If using a regular blender, let the soup cool a bit first. This prevents splatters. You can adjust creaminess by adding more or less heavy cream. For a lighter option, use less cream or substitute with coconut cream. Grill your cheese at medium heat. This ensures the bread toasts while the cheese melts. If the heat is too high, bread burns before the cheese melts. To prevent soggy bread, butter the outside only. This keeps it crispy. Grilling on low heat for longer can help too, giving time for that perfect melt. For the full recipe, check out Creamy Tomato Bliss Soup with Grilled Cheese Delight. {{image_2}} You can change up your tomato soup in fun ways. One great option is to use roasted tomatoes. Roasting adds a rich, sweet flavor. Just toss fresh tomatoes with olive oil and roast them until they are soft and slightly charred. This will make your soup taste even better. If you want a vegan or dairy-free version, simply swap out the heavy cream for coconut cream. This will give your soup a lovely, creamy texture without any dairy. You can also use vegetable broth to keep it plant-based. When it comes to grilled cheese, the cheese you use can make a big difference. While sharp cheddar is classic, try mozzarella or gouda for a twist. Each cheese brings its own flavor and melts differently, which can change each bite! You can also add extra ingredients to your grilled cheese. Slices of fresh tomato can brighten things up, while avocado adds creaminess. Spinach or pesto can also boost flavor and nutrition. Get creative with what you have! While grilled cheese is a classic side, you have other tasty options. Try pairing your soup with a crunchy salad for freshness. A simple green salad with lemon dressing works well. You can also serve crunchy breadsticks or homemade croutons with your soup. They add texture and make each bite exciting. Dip them in the soup for a fun experience. For the full recipe, check out Creamy Tomato Bliss Soup with Grilled Cheese Delight. Store leftover creamy tomato soup in a sealed container. This keeps it fresh and safe. It’s best to refrigerate the soup within two hours of cooking. When done right, the soup stays tasty for about three to four days. If you want to keep it longer, freeze the soup. Use freezer-safe containers or bags to prevent freezer burn. For reheating, warm the soup on the stove over low heat. Stir often to keep it smooth. You can also use a microwave, but cover it to avoid mess. For leftover grilled cheese, let the sandwiches cool first. Wrap them in foil or place them in a sealed bag. This keeps them from drying out. You can store them in the fridge for up to two days. If you want to keep them longer, freeze the sandwiches. To reheat grilled cheese, place it in a skillet over medium heat. This method helps it get crispy again. You can also use an oven set at 350°F (175°C) for about 10-15 minutes. Refrigerated creamy tomato soup lasts about three to four days. If you freeze it, aim to use it within three months. Always label your containers with the date. This helps you track how long it’s been stored. For grilled cheese, eat it within two days if kept in the fridge. If frozen, try to consume it within a month for the best taste. You can use several options instead of heavy cream. Coconut cream works great for a non-dairy choice. It gives a nice richness to the soup. You can also try cashew cream for a similar texture. If you want a lighter option, use whole milk or half-and-half. Just note that the soup may not be as thick. Each choice adds its unique flavor, so feel free to experiment! Yes, you can make the soup ahead of time! It tastes even better after sitting. Make the soup and let it cool. Store it in an airtight container in the fridge. It will last for about three days. When you are ready to eat, reheat it on the stove over low heat. Stir well to get the creaminess back. If it seems too thick, add a splash of broth or water. To keep your grilled cheese crispy, start by using dry bread. Butter the outside well before grilling. Cook over medium heat to avoid burning. If you cook too fast, the inside may not melt while the outside gets too brown. You can also place a lid on the skillet briefly to help melt the cheese. This method keeps the bread toasty while ensuring a gooey center. Enjoy your grilled cheese with the creamy tomato soup for a delightful meal! This blog post covered the key ingredients for both creamy tomato soup and grilled cheese. I shared steps to cook both dishes and tips for great flavors and texture. You learned about variations and storage methods to enjoy these meals later. Remember to experiment with fresh herbs and spices as you cook. With this guide, you can create cozy meals that satisfy. Enjoy making and sharing these tasty comfort foods!

Creamy Tomato Soup with Grilled Cheese Delight

Do you crave the warm comfort of creamy tomato soup paired with crispy grilled cheese? You’re not alone! This classic

- 1 pound Brussels sprouts, trimmed and halved - 3 tablespoons olive oil - 1 teaspoon sea salt - ½ teaspoon black pepper - 1 tablespoon honey or maple syrup - 3 tablespoons balsamic vinegar - 2 cloves garlic, minced - ¼ teaspoon red pepper flakes (optional) The main ingredients create a great base for crispy Brussels sprouts. The Brussels sprouts bring a nutty flavor. Olive oil helps them roast perfectly. Sea salt and black pepper add simple seasoning. The sweetness from honey or maple syrup balances the tangy balsamic vinegar. Garlic gives depth to the dish, while red pepper flakes add a hint of heat. - Honey or maple syrup - Red pepper flakes for heat Using honey or maple syrup is optional but recommended. Both add a sweet touch to the glaze. Red pepper flakes are also optional. They spice things up and make the dish brighter. - Fresh parsley, chopped Chopped fresh parsley is a must for garnish. It adds color and freshness to the dish. Plus, it makes your plate look beautiful. I always sprinkle it on before serving. You can find the full recipe above for all the details. Enjoy making these crispy Brussels sprouts with balsamic glaze! Preheat your oven to 425°F (220°C). This high heat helps make the Brussels sprouts crispy. Next, line a baking sheet with parchment paper. This step keeps them from sticking. In a large bowl, add 1 pound of halved Brussels sprouts. Pour in 3 tablespoons of olive oil, 1 teaspoon of sea salt, and ½ teaspoon of black pepper. Toss well to coat every piece. Spread the Brussels sprouts on the baking sheet, cut side down. Roast them for 20 to 25 minutes. Flip them halfway through for even cooking. They should be golden brown and crispy when done. While the Brussels sprouts cook, you can make the glaze. In a small saucepan, mix 1 tablespoon of honey or maple syrup, 3 tablespoons of balsamic vinegar, 2 minced garlic cloves, and ¼ teaspoon of red pepper flakes, if you want some heat. Simmer this mixture over medium heat for about 3 to 5 minutes. It should thicken slightly. When your Brussels sprouts are ready, drizzle the glaze over them. Toss gently to coat. Finally, transfer them to a serving plate and garnish with fresh parsley. For the full recipe, check the earlier sections. To get those Brussels sprouts nice and crispy, follow these steps: - Dry them well: After washing, pat the sprouts dry. Moisture can make them soggy. - Cut size matters: Halving them helps cook evenly. Smaller pieces get crispy faster. - Single layer: Spread them out on your baking sheet. Crowding them traps steam. - High heat: Roasting at 425°F (220°C) creates a nice crunch. You can boost the flavor of your Brussels sprouts easily. Here are some ideas: - Spices: Try adding garlic powder or smoked paprika for depth. - Herbs: Fresh thyme or rosemary gives a lovely aroma. - Cheese: A sprinkle of Parmesan adds a salty kick. - Nuts: Toasted walnuts or pecans add crunch and richness. Present your crispy Brussels sprouts beautifully for gatherings: - Serving platter: Use a large, colorful platter to show off the dish. - Garnish: Fresh parsley not only looks great but adds freshness. - Pairing: Serve with roasted meats or as part of a vibrant salad. - Family style: Let guests help themselves from the platter for a warm feel. For the complete guide, check out the Full Recipe for all the details. {{image_2}} You can easily make this dish vegan. Simply swap honey for maple syrup. Maple syrup gives a sweet flavor that works well with the balsamic glaze. This change keeps the recipe plant-based while still being delicious. Feel free to get creative with your veggies. You can add carrots, sweet potatoes, or bell peppers. Just cut them to match the size of the Brussels sprouts. Toss them all together with the olive oil and seasonings. Roasting different veggies adds color and flavor to your dish. You can explore other sauces too. Try a soy sauce glaze for a savory kick. Or use a lemon vinaigrette for a fresh twist. If you want a spicy touch, add some sriracha or chili sauce. Each glaze brings a new taste, making the dish unique every time. For the full recipe, check out the Crispy Brussels Sprouts with Sweet Balsamic Glaze. To store leftovers, let the Brussels sprouts cool first. Place them in an airtight container. They will stay fresh for about 3 days in the fridge. Avoid stacking them too high to keep them crispy. The best way to reheat these Brussels sprouts is in the oven. Preheat your oven to 375°F (190°C). Spread the sprouts on a baking sheet. Heat for about 10 minutes until they are warm and crispy again. You can also use an air fryer for a quick reheat. You can freeze crispy Brussels sprouts, but they may lose some crunch. If you want to freeze them, place them in a single layer on a baking sheet. Freeze until solid, then transfer to a freezer bag. They will keep for up to 3 months. When ready to eat, bake them straight from the freezer for a bit longer to regain some crispiness. You can use frozen Brussels sprouts, but fresh is better. Frozen sprouts change texture. They can become mushy when cooked. This mushiness affects the crunch you want. If you must use frozen, thaw them first. Pat them dry to remove excess moisture. This helps achieve some crispiness when you roast them. Brussels sprouts can taste bitter, but there are ways to fix this. First, trim the stems and remove any yellow leaves. This reduces bitterness. Second, try soaking them in cold water for 30 minutes. This helps to draw out some bitterness. Lastly, roasting them with a sweet glaze, like balsamic, balances the flavors. The sweetness helps mask the bitterness. Balsamic glazed Brussels sprouts pair well with many dishes. Try serving them with roasted chicken or pork. Their flavor complements these meats nicely. You can also serve them alongside grains, like quinoa or rice. Add a sprinkle of feta cheese for extra flavor. For a vegetarian option, pair them with a hearty grain salad. This makes a colorful, tasty meal. Check out the Full Recipe for more ideas! In this post, we explored how to make crispy balsamic glazed Brussels sprouts. You learned about key ingredients, from fresh sprouts to tasty garnishes. The step-by-step instructions guide you in cooking and making a delicious glaze. Tips on crispiness and flavor enhancements help you create a perfect dish. For storage, I shared methods to keep leftovers fresh. Overall, these Brussels sprouts can impress anyone at your next meal. Enjoy experimenting with variations and serving suggestions!

Crispy Brussels Sprouts with Balsamic Glaze Recipe

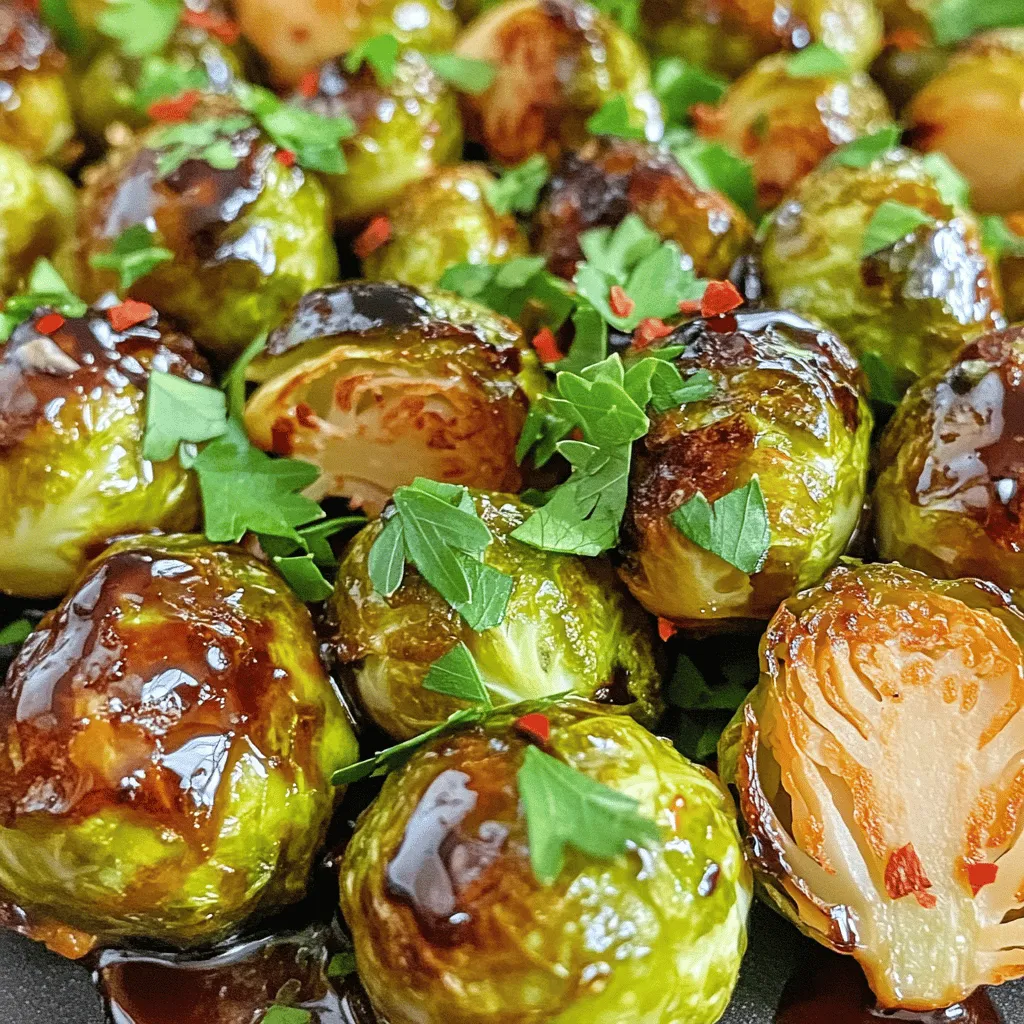
If you’re tired of boring side dishes, let me introduce you to Crispy Brussels Sprouts with Balsamic Glaze! These little

- 4 large bell peppers (red, yellow, or green) - 1 cup quinoa, rinsed and drained - 2 cups vegetable broth - 1 can (15 oz) black beans, rinsed and drained - 1 cup corn kernels (fresh or frozen) - 1 medium onion, chopped - 2 cloves garlic, minced - 1 teaspoon cumin - 1 teaspoon chili powder - 1 tablespoon olive oil - 1 cup diced tomatoes (canned or fresh) - Salt and pepper to taste - 1 cup shredded cheese (optional) - Fresh cilantro, chopped (for garnish) These ingredients work together to create a tasty and healthy meal. Each serving of these stuffed peppers is packed with protein, fiber, and vitamins. Quinoa is a complete protein, making it great for vegetarians. Black beans add even more protein and fiber. Bell peppers are full of vitamins A and C, which are good for your health. - Bell peppers: Low in calories, high in vitamins. - Quinoa: Gluten-free, rich in protein and fiber. - Black beans: Good source of protein, keeps you full. - Corn: Adds sweetness and fiber. - Onion and garlic: Boost flavor and offer health benefits. - Cilantro: Adds freshness and is rich in antioxidants. These ingredients not only taste great, but they also contribute to a balanced meal. If you want to make a hearty dish, this combination will not disappoint. For the full recipe, refer to the instructions above. 1. Preheat your oven to 375°F (190°C). This helps cook the peppers evenly. 2. Rinse and drain the quinoa. Use 1 cup of quinoa. It adds great texture and protein. 3. Bring 2 cups of vegetable broth to a boil in a saucepan. This broth adds flavor. 4. Add the rinsed quinoa to the boiling broth. Cover the pan, lower the heat, and simmer for 15 minutes. The quinoa will be fluffy when done. 5. Chop 1 medium onion and mince 2 cloves of garlic. These add a wonderful aroma and taste. 1. Heat 1 tablespoon of olive oil in a large skillet over medium heat. This will prevent sticking. 2. Sauté the onion and garlic until the onion is clear, about 5 minutes. Stir often to avoid burning. 3. Add 1 teaspoon of cumin and 1 teaspoon of chili powder to the skillet. This will create a warm, spicy flavor. 4. Stir in 1 cup of diced tomatoes. Cook for another 2-3 minutes until the tomatoes soften. This mixture is the base of our filling. 5. In a large bowl, combine the cooked quinoa, 1 can of black beans, and 1 cup of corn. Then add the onion-tomato mix. Season with salt and pepper to taste. 1. Cut the tops off 4 large bell peppers and remove the seeds. Choose red, yellow, or green for color. 2. Arrange the peppers upright in a baking dish. They should stand straight for even cooking. 3. Stuff each pepper with the quinoa mixture. Press down gently to pack it in well. 4. If you like cheese, sprinkle it on top. It adds a nice golden layer. 5. Pour about 1/4 cup of vegetable broth into the bottom of the baking dish. This keeps the peppers moist. 6. Cover the dish with aluminum foil. Bake for 25-30 minutes, then remove the foil. 7. Bake for an additional 10-15 minutes. The peppers should be tender and the tops golden. 8. Let them cool for a few minutes. Garnish with fresh cilantro before serving. Enjoy your flavorful stuffed peppers! For the complete recipe, check the [Full Recipe]. When stuffing peppers, start with fresh, firm peppers. Choose large bell peppers, as they hold more filling. Cut off the tops and remove the seeds carefully. You want enough space to pack in the filling. A spoon or your hands works best for stuffing. Press the mixture down gently to avoid gaps. This helps keep everything together while cooking. A few tools can make your cooking easier. Use a sharp knife for cutting the peppers. A sturdy cutting board helps keep your workspace neat. A large skillet is great for cooking the filling. A measuring cup ensures you use the right amounts. Finally, a baking dish holds the stuffed peppers well. Cover it with aluminum foil to keep the moisture in while baking. To boost flavor, try adding herbs and spices. Fresh cilantro brings a bright taste. You can also use lime juice for a zesty kick. If you like heat, diced jalapeños can spice things up. For a richer taste, add smoked paprika or a dash of hot sauce. Mixing in some nuts or seeds gives a nice crunch. These easy tweaks make your stuffed peppers more exciting. For the full recipe, check out the complete guide. {{image_2}} You can easily swap ingredients in this dish. If you don’t have quinoa, try rice or couscous. Use lentils for a protein boost instead of black beans. You can also replace bell peppers with zucchini or eggplant for a different shape. For a gluten-free option, ensure your broth and any sauces are certified gluten-free. The filling offers endless possibilities. You could add chopped spinach or kale for extra greens. For a Mediterranean twist, use feta cheese and olives. If you want a more Italian flavor, add Italian herbs and marinara sauce. You can even mix in nuts or seeds for crunch. The goal is to balance flavors and textures. Adjust the spice level to fit your taste. For mild peppers, skip the chili powder. Add fresh jalapeños for heat if you like it spicy. You could also mix in hot sauce or red pepper flakes. Remember, you can always add more spice later, but it’s hard to take it out once added! After enjoying your tasty stuffed peppers, store any leftovers in the fridge. Place them in an airtight container. They stay fresh for about three to five days. To keep them from drying out, cover them with plastic wrap before sealing the container. This method keeps flavors strong and the texture nice. To reheat your stuffed peppers, use the oven for best results. Preheat your oven to 350°F (175°C). Place your stuffed peppers in a baking dish. Add a splash of vegetable broth to maintain moisture. Cover them with foil and heat for about 15 to 20 minutes. If you want crispy tops, remove the foil for the last five minutes. You can also reheat them in the microwave. Heat on high for about two minutes, checking every 30 seconds. This method works well but may change the texture. If you have extra peppers, freezing is a great option. First, let them cool completely. Then, wrap each pepper tightly in plastic wrap. Place them in a freezer-safe bag or container. They can last up to three months in the freezer. When you’re ready to enjoy them, thaw in the fridge overnight. Bake them at 350°F (175°C) until heated through. This method keeps the flavors intact and makes for an easy meal later. For the full recipe, check out the details above. Yes, you can make stuffed peppers ahead of time. You can prepare the filling and stuff the peppers. Then, cover and store them in the fridge for up to 24 hours. This saves time on busy days. When you're ready to bake, just pop them in the oven. If baking from cold, add a few extra minutes to the cooking time. You can tell the peppers are done when they are soft and slightly wrinkled. They should be tender but not mushy. The filling should be hot and the cheese, if used, should be melted and a bit golden. Check by gently piercing a pepper with a fork. If it goes in easily, they are ready to eat. Absolutely! You can use kidney beans, pinto beans, or even chickpeas in your stuffed peppers. Each type adds a different flavor and texture. Just make sure to rinse and drain canned beans before using them. This keeps the dish fresh and tasty. Feel free to experiment for your favorite mix! For a complete recipe on preparing these delicious stuffed peppers, check out the Full Recipe. Stuffed peppers are a simple and tasty dish. We covered the key ingredients, like quinoa and black beans, and their health benefits. You learned step-by-step how to prepare, cook, and bake them perfectly. I also shared tips for flavor and storage options. In the end, stuffed peppers are fun to make and easy to customize. Try different fillings or spice levels to suit your taste. Enjoy experimenting in the kitchen!

Vegetarian Stuffed Peppers Flavorful and Nutritious Dish

Looking for a wholesome meal that bursts with flavor? These Vegetarian Stuffed Peppers deliver just that! You’ll love how simple

To make spicy Thai noodles, you need some key ingredients. These make the dish tasty and colorful. Here is a list of what you will use: - 8 oz rice noodles - 2 tablespoons vegetable oil - 3 cloves garlic, minced - 1 tablespoon fresh ginger, grated - 1 red bell pepper, thinly sliced - 1 cup snap peas, trimmed - 1 cup carrots, julienned - 1 cup bean sprouts - 3 tablespoons soy sauce - 2 tablespoons fish sauce (or soy sauce for a vegetarian option) - 1 tablespoon chili paste (adjust to taste) - 1 teaspoon brown sugar - 2 green onions, chopped - Fresh cilantro, for garnish - Lime wedges, for serving These ingredients give the noodles their bold flavors and vibrant colors. The rice noodles are the base, while the veggies add crunch and nutrients. You can make some swaps in this recipe. If you don’t have rice noodles, you can use egg noodles or even whole wheat noodles. For the fish sauce, a splash of soy sauce works great for a vegetarian version. If you can’t find snap peas, you can use green beans or broccoli. The garlic and ginger can be fresh or powdered. Using powdered will still add flavor, but fresh gives a better taste. The spice level is up to you. If you like it mild, use less chili paste. You can start with a half tablespoon and add more if you want more heat. Adding lime juice can also help balance the spice. For a mild dish, leave out the chili paste and add a touch of honey instead. This will give you a sweet and tangy flavor without the heat. Feel free to play with these options to make the dish your own! You can find the full recipe for Fiery Thai Noodle Delight in the earlier section. Start by boiling water in a big pot. Once it bubbles, add the rice noodles. Cook them as the package says, usually about 4 to 6 minutes. When they are soft, drain them and rinse under cold water. This stops the cooking. Set them aside for later. Now, heat the vegetable oil in a large skillet or wok over medium-high heat. Add minced garlic and grated ginger to the hot oil. Stir for about 30 seconds until you smell a nice aroma. Next, toss in the sliced red bell pepper, snap peas, and julienned carrots. Stir-fry these vegetables for 3 to 4 minutes. They should be tender but still a bit crispy. Add the cooked rice noodles to the skillet with the vegetables. In a small bowl, mix soy sauce, fish sauce, chili paste, and brown sugar. Pour this sauce over the noodles and vegetables. Toss everything together to coat well. Finally, stir in the bean sprouts and cook for another 1 to 2 minutes to heat through. Remove from heat and fold in the chopped green onions. Serve your dish hot, topped with fresh cilantro and lime wedges on the side for squeezing. For the full recipe, check out the details in the earlier section. To get the best noodle texture, use rice noodles. They cook quickly and soak up flavors well. Follow the package instructions closely. After boiling, rinse them in cold water. This stops cooking and keeps them firm. If they clump, toss them with a bit of oil. This keeps them separate and easy to stir. To make your dish pop, add fresh herbs like cilantro. Lime juice also brightens the dish. You can adjust the heat by adding more chili paste. For a twist, try using sesame oil instead of vegetable oil. It adds a nutty flavor that works well with the spices. Don’t forget to taste as you go! Adjust the soy, fish sauce, and sugar until it’s just right. A common mistake is overcooking the noodles. This can make them mushy. Always cook them to just al dente. Another mistake is not heating the oil enough. If your oil isn’t hot, the garlic and ginger won’t sizzle. This step is key for good flavor. Finally, don’t skip the garnish! It adds color and freshness to your dish. For the full recipe, check out the complete instructions above. {{image_2}} You can add protein to your spicy Thai noodles for extra flavor and texture. Chicken, tofu, and shrimp are great options. For chicken, use boneless pieces cut into strips. Cook them in the skillet before adding the vegetables. Tofu adds a nice crunch. Use firm tofu and sauté it until golden brown. Shrimp cooks quickly, so add it just after the vegetables. Each protein brings its unique taste to the dish. If you're vegetarian or vegan, you can easily modify this dish. Replace fish sauce with extra soy sauce or a vegan fish sauce. This keeps the savory taste without meat. Use tofu or tempeh for protein. You can also add more vegetables like mushrooms or zucchini for added nutrition. These swaps keep your meal tasty and satisfying. Feel free to experiment with vegetables. Broccoli, bell peppers, and bok choy all work well. Green beans and baby corn can also add color and crunch. Using a mix of colorful veggies makes your dish more appealing. Each vegetable adds a different taste and texture, making your spicy Thai noodles exciting every time you cook them. For the full recipe, check out Fiery Thai Noodle Delight . After enjoying your spicy Thai noodles, store any leftovers in an airtight container. Make sure to let the noodles cool down first. They can last in the fridge for up to three days. Keep any sauces separate if you like your noodles saucy. This way, they stay fresh and tasty. To reheat your noodles, use a skillet for the best results. Add a splash of water or oil to prevent sticking. Heat over medium heat, stirring gently. This helps keep the noodles soft. You can also use the microwave. Place the noodles in a bowl, cover them, and heat for one to two minutes. Stir halfway through for even heating. If you want to save some for later, freezing is a great choice. Place cooled noodles in a freezer-safe bag. Squeeze out the air and seal tightly. They can last for up to three months in the freezer. When ready to eat, thaw in the fridge overnight. Reheat as mentioned above. Enjoy your spicy Thai noodles any time! For the full recipe, check the section above. To make spicy Thai noodles less spicy, you can reduce the chili paste. Start with half a tablespoon instead of one. You can also add more sugar to balance the heat. Another way is to add more vegetables, which can dilute the spice. If you like creamy textures, try mixing in coconut milk. It tones down heat while adding a rich flavor. Yes, you can use different noodles. While rice noodles are best for this dish, you can try egg noodles or even whole wheat noodles. Each type of noodle gives a unique flavor and texture. Just remember to cook them according to their package instructions. This way, they blend well with the sauce and veggies. You can find the full recipe for Fiery Thai Noodle Delight in the recipe section above. This recipe shows you how to make a quick and tasty meal. It includes details on cooking times and all the ingredients you need. Enjoy preparing this flavorful dish! In this blog post, I covered key ingredients and their substitutions for the dish. I shared step-by-step instructions on how to cook rice noodles and sauté vegetables. Tips on achieving the perfect noodle texture and enhancing flavors were also included. We explored variations, like adding protein and adapting for vegans. Lastly, I provided important storage info for leftovers and answers to common questions. Cooking is fun and rewarding. With these tips, you can create delicious meals your way. Enjoy your cooking journey!

Spicy Thai Noodles Flavorful and Easy to Prepare Dish

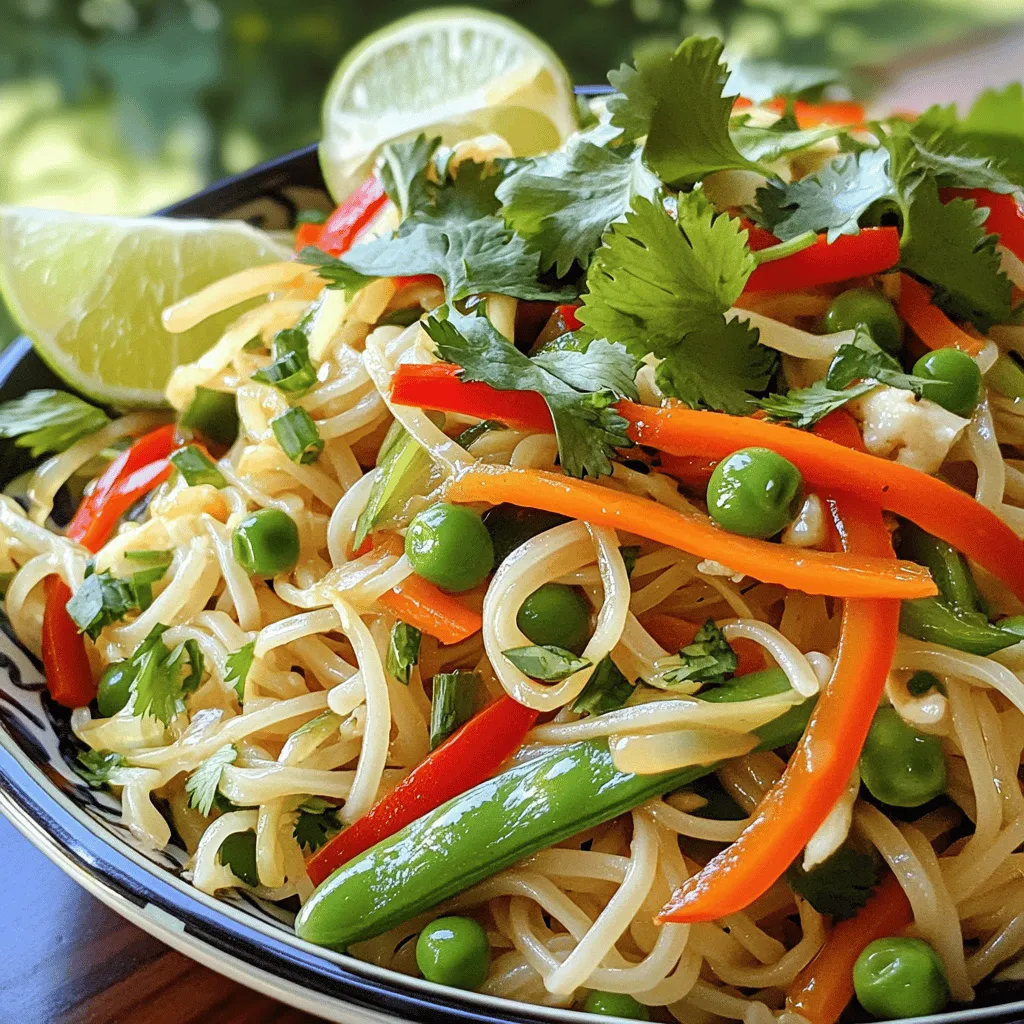
Welcome to the world of Spicy Thai Noodles, where flavor meets simplicity! You can whip up this delicious dish in

- Ripe mango - Black beans - Red bell pepper - Red onion - Corn kernels - Avocado - Fresh cilantro - Lime juice - Olive oil - Ground cumin - Chili powder - Salt and pepper When making Mango Black Bean Salad, choose fresh, ripe ingredients. The ripe mango adds a sweet, juicy flavor. Black beans provide protein and fiber. I love using a red bell pepper for its crunch and color. The red onion gives a nice bite. Add corn kernels for sweetness and texture. Avocado makes the salad creamy and rich. Fresh cilantro adds a burst of flavor. Lime juice brightens the dish. Olive oil gives it a smooth finish. Spices like ground cumin and chili powder enhance the salad's unique flavor. Don’t forget salt and pepper to taste. - Additional cilantro - Lime wedges Garnish with extra cilantro for a fresh touch. Lime wedges are great for serving too. They let your guests add more sour flavor if they wish. - Calories per serving - Macronutrient breakdown This salad is not just tasty; it is also healthy. Each serving has about 210 calories. You get protein from the black beans and healthy fats from the avocado. The salad is rich in vitamins and fiber. It’s a great choice for a light meal or a side dish. For the full recipe, you can check out the detailed steps to create this fresh and flavorful delight. First, gather your ingredients. You need a ripe mango, black beans, a red bell pepper, a red onion, corn, and an avocado. Start by dicing the mango into small cubes. Then, chop the red bell pepper and onion. Dice the avocado last. This way, it stays fresh longer. Next, rinse and drain the black beans. This removes excess salt and helps with flavor. In a large bowl, combine all the diced ingredients. Add the black beans, corn, and chopped cilantro. The colors will pop! Gently fold in the diced avocado. This adds creaminess and balances the flavors. In a small bowl, whisk together the lime juice, olive oil, ground cumin, and chili powder. This dressing brings a zesty kick. Add salt and pepper to taste. Make sure everything mixes well. Pour the dressing over the salad mixture. Toss everything gently. Be careful not to mash the avocado. Taste the salad and adjust the seasoning as needed. If you like it tangy, add more lime juice. Let the salad sit for about 10 minutes. This allows the flavors to meld together beautifully. For the full recipe, check out the [Full Recipe]. Enjoy your fresh and flavorful mango black bean salad! To select a ripe mango, look for a fruit that feels slightly soft. It should smell sweet at the stem. The skin color can vary. Some ripe mangoes are green, while others are yellow or red. If you can’t find mangoes, try peaches or nectarines. They bring a similar sweetness and juicy texture. For best results, store leftover salad in an airtight container. Keep it in the fridge. This way, the flavors stay fresh. The salad lasts for about two days. If you add avocado, eat it sooner. Avocado can brown quickly. This salad pairs well with grilled chicken or fish. It also goes great with tacos or burritos. For picnics, pack it in a cooler. At barbecues, serve it in a big bowl. Guests will love the bright colors and fresh taste. You can find the full recipe for this delightful dish to try at home. {{image_2}} For those with specific diets, this salad has great options. It's vegan and gluten-free. You can enjoy it without any animal products. Black beans provide protein and fiber. This makes it a perfect meal for everyone. If you want a creamier texture, add some diced avocado. You can even swap the lime juice for an apple cider vinegar if you prefer a tangy twist. Want to make the salad heartier? Add chicken or shrimp. Simply grill or sauté them first. Dice them up and mix them in. This adds protein and makes the dish more filling. If you want vegetarian options, consider adding quinoa or chickpeas. Both provide extra protein and texture. Experiment with spices for more flavor. Try adding smoked paprika or cayenne pepper for a kick. You can also switch out ingredients for new tastes. For instance, use pineapple instead of mango for a tropical twist. Or, swap the red bell pepper for jalapeños for some heat. The options are endless, so have fun with it! For the complete recipe, check out the [Full Recipe]. To keep your mango black bean salad fresh, store it in the fridge right after making it. Use an airtight container to seal in the flavors. A glass or plastic container works well. Glass containers are great for keeping things fresh and clean. Can you freeze it? Yes, but I do not recommend it. The mango and avocado can become mushy when thawed. If you choose to freeze it, place the salad in a freezer-safe bag. Remove as much air as possible before sealing. To thaw, place it in the fridge overnight and eat it the next day. How long does it last in the fridge? Your salad stays fresh for about 2 to 3 days. After that, the avocado may start to brown and the flavors can fade. Eating it sooner keeps it tasty and vibrant. Always check for any signs of spoilage before enjoying your salad. You can use many beans instead of black beans. Great options include: - Kidney beans: They have a mild taste and nice color. - Pinto beans: These are creamy and add a different flavor. - Chickpeas: They offer a nutty taste and great texture. - Lentils: These are small, quick to cook, and healthy. Choose any of these to keep your salad tasty and fun. Yes, you can prepare this salad ahead of time. Here are some tips: - Chop the veggies and store them in separate containers. - Mix the dressing and keep it in the fridge. - Combine everything just before serving for best taste. This way, you save time and still have fresh flavors. To keep avocado fresh, follow these tips: - Squeeze lime juice on the cut surface. This helps slow browning. - Store avocado in an airtight container. - If you have leftover salad, cover tightly and eat it soon. These methods will keep your salad looking bright and yummy. Yes, this salad works great for meal prep! Here are my suggestions: - Divide the salad into meal prep containers. - Keep dressing separate until you're ready to eat. - It lasts well in the fridge for 3-4 days. This way, you can enjoy it throughout the week. For serving, I love these ideas: - Use a big bowl for family-style sharing. - Serve in individual cups for a fun touch. - Add extra cilantro and lime wedges on top for flair. These serving styles make your salad eye-catching and tasty. For the full recipe, check out the details above! This blog post covers a vibrant and tasty salad filled with fresh ingredients. You learned how to prepare ripe mango, black beans, and colorful veggies. We discussed helpful tips on choosing ingredients and suggested ways to store leftovers. I shared variations that suit different diets, all while keeping it fun and easy. Enjoy creating this salad at home. It is perfect for any gathering or a healthy snack. Remember, the right mix of flavors keeps it exciting. Dive into the recipe and savor the health benefits it brings!

Mango Black Bean Salad Fresh and Flavorful Delight

Looking for a colorful and tasty dish? You’re in the right place! This Mango Black Bean Salad is packed with

To make Spicy Sriracha Ramen Noodles, gather these key items: - 2 packets of instant ramen noodles (discard the seasoning packets) - 4 cups vegetable broth - 2 tablespoons Sriracha sauce - 1 tablespoon soy sauce - 1 tablespoon sesame oil - 1 cup bok choy, chopped - 1 carrot, julienned - 1 red bell pepper, sliced - 2 green onions, chopped - 1 tablespoon ginger, minced - 2 cloves garlic, minced These ingredients blend together to create a bold and tasty meal that warms you up. The Sriracha sauce adds heat, while the vegetable broth gives depth. Instant ramen noodles cook quickly, making this dish easy to whip up. You can add more flair to your ramen with these optional garnishes: - Sesame seeds for a nutty crunch - Fresh cilantro for a burst of freshness These garnishes not only enhance the taste but also make your dish look pretty. Feel free to get creative with your toppings! This dish serves two people and packs a good nutritional punch. Each serving provides: - Calories: Approximately 350 - Protein: 10g - Carbohydrates: 50g - Fat: 12g This recipe is a great balance of flavors and nutrients. You get a filling meal without too many calories. Enjoy the blend of spice and freshness! For the full recipe, check the provided link. Start by gathering your vegetables. You need bok choy, carrot, red bell pepper, garlic, and ginger. Chop the bok choy into bite-sized pieces. Julienne the carrot into thin strips. Slice the red bell pepper into thin pieces. Mince the garlic and ginger finely. In a large pot, heat 1 tablespoon of sesame oil over medium heat. Add the minced ginger and garlic. Sauté for about 30 seconds until fragrant. Next, toss in the sliced red bell pepper and julienned carrot. Cook these for 3 to 4 minutes until they soften just a bit. Pour in 4 cups of vegetable broth. Bring this to a boil. Once boiling, add 2 tablespoons of Sriracha sauce and 1 tablespoon of soy sauce. These ingredients give your broth a spicy kick. Stir well to mix everything. Now, add the chopped bok choy and let it simmer for 3 to 5 minutes. This makes sure the bok choy is tender but still bright green. While the broth cooks, prepare your ramen noodles. In a separate pot, boil water and add 2 packets of instant ramen noodles. Cook them according to the package instructions, but stop cooking just before they finish. Drain them and set aside. After the broth is seasoned to your taste, add the cooked ramen noodles into the pot. Stir everything well to combine. Let it simmer for another minute to meld the flavors. Serve your ramen in bowls. Garnish with chopped green onions, sesame seeds, and fresh cilantro. Enjoy your spicy Sriracha ramen noodles! For the full recipe, check out the detailed instructions. To make the best ramen broth, focus on flavor. Use fresh ingredients. Sauté garlic and ginger in sesame oil first. This builds a solid base. Then add your vegetable broth. Let it simmer for at least 10 minutes. This allows the flavors to blend well. Don’t rush this step. You want a tasty, aromatic broth. Cook your ramen noodles separate from the broth. Follow package instructions, but stop cooking a minute early. This keeps the noodles firm. Drain them well to prevent sogginess. Add the noodles to the broth just before serving. This way, they soak up all the delicious flavors without losing texture. Want more heat? Add more Sriracha! Start with one tablespoon and taste. You can always add more. If it’s too spicy, balance it with extra broth or a splash of soy sauce. For a milder option, use less Sriracha or mix in a bit of coconut milk. Adjust to your taste for the perfect kick. {{image_2}} You can easily make spicy Sriracha ramen vegetarian or vegan. Just swap the vegetable broth for a rich homemade broth. Use mushrooms and seaweed for umami flavor. For a protein boost, add tofu. Firm tofu works best. Cut it into cubes, sauté, and toss it in just before serving. This keeps it crisp and tasty. If you want to add protein to your ramen, try chicken, shrimp, or pork. Thinly slice chicken breast and cook it in the broth. For shrimp, add them just a few minutes before serving. They cook fast and stay juicy. If you like pork, use thin slices of tender pork belly for a rich, savory flavor. Feel free to mix up the veggies. Spinach, snap peas, or mushrooms add new textures. You can also play with seasonings. Try adding lime juice for brightness. A dash of sesame seeds or chopped peanuts can add crunch. This keeps your ramen fresh and exciting each time you make it. For the [Full Recipe], refer back to the main article for all the details. To store leftover ramen, let it cool first. Place the noodles and broth in separate airtight containers. This keeps the noodles from getting too soggy. Store them in the fridge for up to three days. If you mixed the ingredients, eat it within two days for best taste. To reheat your ramen, first, heat the broth in a pot over medium heat. Once it simmers, add the noodles. Stir gently for a few minutes until they are warm. You can also use a microwave. Just put the ramen in a bowl with broth and cover it. Heat for one to two minutes, then stir. If you want to freeze ramen, do it before cooking. Store the broth and chopped veggies in freezer-safe bags. They can last for up to three months. When you want to eat it, thaw the broth overnight in the fridge. Cook the noodles fresh to enjoy the best texture. Be sure to make the full recipe for a delicious meal now and later! Yes, you can use various noodles. Fresh egg noodles, udon, or rice noodles work well. Each type gives a different taste and texture. For a fun twist, try soba noodles. Cook them according to package directions. They can add a new flavor to your Spicy Sriracha ramen noodles. You can find Sriracha sauce at most grocery stores. Look in the Asian food aisle. Many stores stock it near hot sauces. You can also buy it online. There are many brands, but the classic Huy Fong is popular. It has a bold taste that works great in this recipe. To make this recipe gluten-free, swap the ramen noodles for gluten-free noodles. Rice noodles or gluten-free pasta works well. Check the soy sauce label, as it often contains wheat. Use tamari sauce instead for a gluten-free option. This way, you can still enjoy your Spicy Sriracha ramen noodles without gluten. In this article, we explored how to make spicy Sriracha ramen noodles. We covered key ingredients, cooking steps, and tips to enhance your dish. You learned how to customize your ramen with various options and store leftovers for later use. Ramen is versatile and fun to make, so experiment with flavors and spices. Enjoy the process of creating your perfect bowl of ramen. There are no limits to what you can try. Get cooking and enjoy your spicy creation!

Spicy Sriracha Ramen Noodles Bold and Tasty Recipe

Are you ready to spice up your dinner routine? Our Spicy Sriracha Ramen Noodles are here to excite your taste

To make Baked Chicken Parmesan Meatballs, here’s what you need: - 1 lb ground chicken - 1/2 cup grated Parmesan cheese - 1/2 cup breadcrumbs - 1/4 cup fresh parsley, chopped - 1 teaspoon garlic powder - 1 teaspoon onion powder - 1/2 teaspoon dried oregano - 1 teaspoon salt - 1/4 teaspoon black pepper - 1 large egg - 1 cup marinara sauce - 1 cup shredded mozzarella cheese - Fresh basil leaves for garnish These ingredients blend together to make a dish that is tasty and wholesome. I recommend using fresh ingredients when possible. Fresh parsley and cheese enhance the flavor. Frozen meat or cheese can work, but they may alter the texture. You want your meatballs to be moist and flavorful. Using fresh ensures they turn out just right. If you are missing an item, don’t worry! Here are some easy swaps: - Ground chicken can be replaced with ground turkey or lean beef. - Use almond flour instead of breadcrumbs for a gluten-free option. - If you don’t have Parmesan cheese, try using Pecorino Romano for a similar taste. - Fresh parsley can be switched with dried parsley, but use less. These substitutions give you flexibility while keeping the great taste of Baked Chicken Parmesan Meatballs. For the complete recipe, you can check the full recipe. Before you start, gather all your ingredients. You need 1 pound of ground chicken, Parmesan cheese, breadcrumbs, and fresh parsley. You also need garlic powder, onion powder, oregano, salt, black pepper, and a large egg. Don’t forget marinara sauce and mozzarella cheese for topping. Make sure your oven is ready by preheating it to 400°F (200°C). Line a baking sheet with parchment paper for easy cleanup. 1. In a large bowl, mix the ground chicken with Parmesan cheese and breadcrumbs. 2. Add chopped parsley, garlic powder, onion powder, oregano, salt, black pepper, and the egg. 3. Use your hands to combine the ingredients. Make sure not to overmix; this keeps the meatballs nice and tender. 4. Form the mixture into meatballs the size of golf balls. Place them on the baking sheet with some space between each one. 5. Bake the meatballs in your preheated oven for about 20 minutes. They should be golden brown and fully cooked. 6. Once done, take them out and spoon marinara sauce over each meatball. 7. Sprinkle shredded mozzarella cheese on top. 8. Put them back in the oven for about 5 more minutes until the cheese melts. 9. Let the meatballs cool slightly before serving. 10. Finish by garnishing with fresh basil leaves. To get the best meatballs, ensure your oven is at the right temperature. Space the meatballs evenly on the baking sheet to help them cook evenly. If you want extra flavor, you can add more herbs or spices to your mix. Be careful not to overbake them; a little pink in the middle is okay if you check the temperature. Use a meat thermometer to ensure they reach 165°F (74°C). For more details, check the Full Recipe. To get tender meatballs, mix the ingredients gently. Overmixing can make them tough. Use your hands to combine the ground chicken, cheese, and spices. Adding an egg helps bind the meatballs and keeps them moist. Another tip is to chill the mixture before forming meatballs. This helps them hold their shape while baking. One common mistake is not measuring the salt. Too much salt can overpower the flavor. Another mistake is baking them too long. Keep an eye on the oven to avoid dry meatballs. Also, don’t skip the marinara sauce and cheese topping. This step adds flavor and moisture. To boost flavor, try adding chopped garlic or onion. Fresh herbs like basil or oregano give a fresh taste. You can also mix in chopped spinach for added nutrition. If you enjoy a bit of heat, add red pepper flakes to the meat mixture. These small changes can make a big difference in flavor. {{image_2}} You don’t have to stick to marinara sauce. Try different flavors to change things up. Here are a few ideas: - Alfredo Sauce: Creamy and rich, it adds a nice twist. - Pesto: This green sauce brings a fresh taste and herby notes. - Barbecue Sauce: For a smoky, sweet flavor, this is a fun option. Each sauce adds its own touch, making the meatballs new every time. Want to get creative? You can mix in extra goodies. Here are some tasty add-ins: - Chopped Spinach: Adds nutrients and color. - Feta Cheese: Crumbles of feta give a tangy flavor. - Chopped Sun-Dried Tomatoes: These add sweetness and a chewy texture. Feel free to mix and match based on what you love. If you need to make changes for dietary needs, it’s easy. Here’s how: - Gluten-Free: Use gluten-free breadcrumbs or almond flour instead. - Low-Carb: Substitute breadcrumbs with crushed pork rinds or cauliflower rice. These swaps keep the taste while fitting your diet. Enjoy your meal without worry! After you enjoy your baked chicken Parmesan meatballs, let them cool down. Place the meatballs in an airtight container. Store them in the fridge for up to three days. This keeps them fresh and tasty. If you want to keep them longer, freezing is a great option. To reheat your meatballs, use the oven for the best results. Preheat your oven to 350°F (175°C). Place the meatballs on a baking sheet. Cover them with foil to keep them moist. Heat for about 15 minutes, or until warm. You can also use the microwave. Just place them on a microwave-safe plate. Heat for about 1-2 minutes, checking often to avoid overcooking. If you want to save your meatballs for later, freezing works well. First, let the meatballs cool completely. Then, place them on a baking sheet. Freeze them for a few hours until firm. After that, transfer them to a freezer bag. Label the bag with the date. These meatballs can last up to three months in the freezer. When you are ready to eat, thaw them in the fridge overnight before reheating. Check the full recipe for more tips! Baked Chicken Parmesan Meatballs last about 3 to 4 days in the fridge. Make sure to store them in an airtight container. If you want to keep them longer, you can freeze them. Yes, you can make these meatballs ahead of time! You can prepare the meatball mixture and form them into balls. Then, store them in the fridge for up to 24 hours. You can also freeze them for up to 3 months before baking. Just remember to thaw them before cooking. These meatballs pair well with many sides. Here are some ideas: - Spaghetti or any pasta - Garlic bread for a crunchy side - A fresh salad with greens - Steamed veggies for a healthy touch - A side of extra marinara for dipping For the complete recipe, check out the Full Recipe. This post covered everything about making Baked Chicken Parmesan Meatballs. We discussed key ingredients, cooking steps, and tips for tender meatballs. You learned variations, storage info, and answers to common questions. Remember, using fresh ingredients boosts flavor. With careful prep and cooking, you'll enjoy delicious meatballs. Don’t be afraid to experiment with the recipe. Enjoy your cooking journey and delight in every bite!

Baked Chicken Parmesan Meatballs Easy Family Dinner

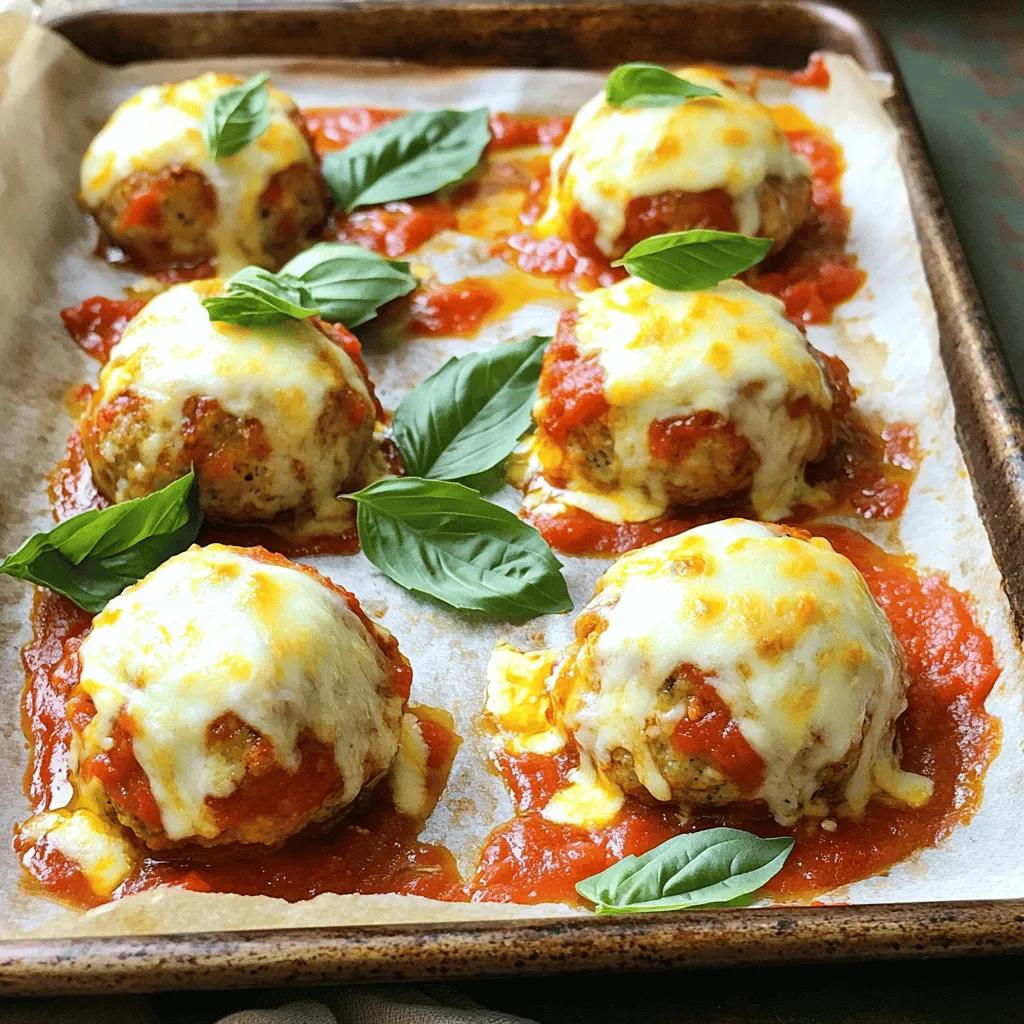
Looking for a quick and tasty dinner that your family will love? You’re in the right place! Baked Chicken Parmesan

- 1 cup all-purpose flour - 1/4 cup powdered sugar - 1/2 cup unsalted butter, softened - 1/4 teaspoon salt - 2 large eggs - 1 cup granulated sugar - 1/4 cup fresh lemon juice - Zest of 1 lemon - 1 cup fresh raspberries - 1 tablespoon cornstarch - Additional powdered sugar for dusting (optional) To make these raspberry lemonade bars, you need simple and fresh ingredients. The all-purpose flour forms a solid base for the crust, while powdered sugar adds sweetness. Unsalted butter brings richness to the mix, and salt enhances the overall flavor. Eggs and granulated sugar create a smooth lemon filling. Fresh lemon juice and zest provide a bright, zesty taste that lifts the dessert. Fresh raspberries add a burst of color and flavor, making these bars delightful. Cornstarch helps to thicken the filling and keep it firm. Finally, you can dust the bars with more powdered sugar for a sweet finish. This recipe is a great way to enjoy summer flavors. You can find the full recipe above. 1. First, preheat your oven to 350°F (175°C). Grease an 8x8 inch baking dish. Line it with parchment paper. Leave some paper hanging out for easy removal later. 2. In a mixing bowl, add 1 cup of all-purpose flour, 1/4 cup of powdered sugar, 1/2 cup of softened unsalted butter, and 1/4 teaspoon of salt. 3. Mix these ingredients together until the mixture looks crumbly. 4. Press the crumbly mixture firmly into the bottom of the prepared baking dish. Make sure it covers the whole bottom. Bake this crust for 15 minutes, or until it's lightly golden. 1. While the crust bakes, take a large bowl and whisk together 2 large eggs and 1 cup of granulated sugar. Mix until the mixture is frothy. 2. Next, add in 1/4 cup of fresh lemon juice and the zest of 1 lemon. Stir until fully combined. 3. In another bowl, toss 1 cup of fresh raspberries with 1 tablespoon of cornstarch. This will help the raspberries hold their shape. 4. Gently fold the coated raspberries into the lemon mixture. Be careful not to crush them. 1. When the crust is ready, pour the raspberry-lemon mixture over the hot crust. 2. Put the baking dish back into the oven. Bake for an additional 20 to 25 minutes. Check if the filling is set and slightly jiggly in the center. 3. Once baked, let the bars cool completely in the pan. After that, refrigerate for at least 2 hours to set. 4. Finally, lift the bars out of the pan using the parchment paper. Cut them into squares or rectangles. Dust with more powdered sugar if you like. For the complete guide, check out the Full Recipe. To make your raspberry lemonade bars great, focus on the crust. Bake it until golden brown. This step gives the bars a nice crunch. If the crust is undercooked, it will be soggy. Keep an eye on it while it bakes. Next, mix your filling gently. Overworking the mixture can make it tough. Combine the eggs and sugar until frothy, then add lemon juice and zest. When you fold in the raspberries, do it softly. This keeps the fruit intact and juicy. For a smooth texture, whisk carefully. Ensure no lumps remain in your filling. A smooth mixture helps the bars set evenly. You want each bite to be creamy and delicious. When it comes time to serve, dust your bars with powdered sugar. This adds a lovely touch and makes them look elegant. Use a fine sieve to get an even coating. Consider adding garnishes like fresh mint or lemon slices. These not only look pretty but also add flavor. You can serve the bars with a scoop of ice cream or a dollop of whipped cream. These pairings enhance the sweet and tart flavors perfectly. For a twist, enjoy them with a refreshing glass of lemonade. The combination is perfect for a summer day. When you set your table, these little touches make your raspberry lemonade bars shine. For the full recipe, check the section above. {{image_2}} You can change the taste of your Raspberry Lemonade Bars by using different fruits. Try blueberries for a sweet twist or strawberries for a classic flavor. Each fruit gives a unique taste and color. You can also add herbs or spices. Mint adds a fresh kick, while basil gives a nice depth. For those who need a gluten-free option, substitute the all-purpose flour with almond or coconut flour. These alternatives work well and keep your bars tasty. If you want a vegan version, replace eggs with flaxseed meal or applesauce. Both options help bind your bars together. For low-sugar or sugar-free versions, use a sugar substitute like stevia or erythritol. This keeps the flavor bright without the added sugar. You can also swap out the butter for coconut oil or a vegan butter. These simple changes make your Raspberry Lemonade Bars fit many diets while keeping them delicious. To keep your raspberry lemonade bars fresh, store them in the fridge. Use an airtight container to prevent them from drying out. They will stay good for about 5 days. If you want to save them for longer, freezing is a great option. Wrap each bar tightly in plastic wrap, then place them in a freezer bag. This way, they can last up to 3 months. When you’re ready to enjoy them, thaw the bars in the fridge overnight. If you prefer, you can also reheat them in the oven at 350°F for about 10 minutes. This warms them up and enhances their flavor. To ensure the best taste, check your bars for freshness. Signs they have gone bad include a change in color or a sour smell. If they feel dry or hard, it’s best to toss them. For the best flavor, enjoy your bars within the first week. The taste is always better when they are fresh! For the full recipe on how to make these delicious treats, check out the Full Recipe. Can I use frozen raspberries instead of fresh? Yes, you can use frozen raspberries. Just make sure to thaw them first. Thawing helps the raspberries mix well in the filling. Drain any extra liquid to avoid a soggy texture. How can I tell when the bars are fully baked? The bars are done when the filling is slightly jiggly in the center. It should not look wet. You can also insert a toothpick. If it comes out mostly clean, the bars are ready. Can I make the bars ahead of time? Absolutely! You can make these bars a day or two in advance. Just store them in the fridge. This helps the flavors meld and makes them even tastier. What is the best way to cut the bars for serving? To cut the bars neatly, use a sharp knife. I recommend warming the knife in hot water first. Wipe it dry before cutting. This prevents the filling from sticking to the knife. Can I replace the eggs with a vegan substitute in this recipe? Yes, you can replace eggs with flaxseed meal or applesauce. Use 1 tablespoon of flaxseed meal mixed with 2.5 tablespoons of water for one egg. This works well in the filling while keeping it tasty. For more details, check out the [Full Recipe](#). Raspberry lemonade bars are a tasty treat. We explored the key ingredients, step-by-step instructions, and helpful tips. Remember to bake the crust until golden and chill the bars for the best taste. You can also try fruit swaps for new flavors. Store extras in the fridge or freeze them for later. With these tips, your bars will impress anyone. Enjoy your baking and the delicious results!

Raspberry Lemonade Bars Flavorful Summer Treat

If you’re craving a sweet escape this summer, look no further than Raspberry Lemonade Bars. These bright, tangy treats combine

- 12 oz fettuccine or spaghetti - 4 tablespoons unsalted butter - 5 cloves garlic, minced - 1 cup heavy cream - Zest of 1 large lemon - ¼ cup freshly squeezed lemon juice - 1 cup grated Parmesan cheese - 1 teaspoon dried oregano - Salt and pepper to taste - Fresh parsley, chopped (for garnish) The main ingredients bring bold flavor and richness to creamy lemon garlic pasta. The fettuccine or spaghetti serves as the perfect base. I love using fresh garlic; it adds a punch. The heavy cream makes the sauce smooth and velvety. The zest of a lemon brightens the dish. It gives a fresh taste that pairs well with the garlic. For seasoning, I use lemon juice for extra tang. Grated Parmesan cheese adds a savory note. Oregano brings warmth and depth. Salt and pepper balance the flavors. Finally, fresh parsley adds color and freshness. It makes the dish pop. This recipe combines all these ingredients for a delightful meal. You can find the full recipe in the main article. - Bring a large pot of salted water to a boil. - Add 12 oz of fettuccine or spaghetti. - Cook the pasta until al dente, about 8-10 minutes. - Reserve 1 cup of the pasta cooking water and then drain the pasta. Cooking the pasta is simple. The key is to use salted water. This adds flavor to the pasta. Al dente means the pasta is firm to the bite. This texture holds up well when tossed with sauce. Don’t forget to save some cooking water. This starchy water helps make the sauce silky smooth. - In a large skillet, melt 4 tablespoons of unsalted butter over medium heat. - Add 5 cloves of minced garlic and sauté for 1-2 minutes. - Pour in 1 cup of heavy cream, the zest of 1 large lemon, and ¼ cup of freshly squeezed lemon juice. - Stir well and let it simmer for 3-5 minutes to thicken. Making the sauce is where the magic happens. Sautéing the garlic in butter brings out its rich flavor. Be careful not to burn the garlic; it can turn bitter. The heavy cream makes the sauce rich and creamy. The lemon zest and juice add brightness. Simmering allows the flavors to meld and the sauce to thicken. - Stir in 1 cup of grated Parmesan cheese and 1 teaspoon of dried oregano. - If the sauce is too thick, use the reserved pasta water to adjust the consistency. - Toss in the cooked pasta and season with salt and pepper to taste. Final touches elevate your dish. Stirring in Parmesan adds a delicious salty kick. Oregano brings a hint of earthiness. If your sauce feels heavy, the reserved pasta water is your friend. It lightens the sauce while keeping it creamy. Toss the pasta until it is well coated. Taste and adjust the seasoning, making sure it suits your palate. Enjoy your creamy lemon garlic pasta! For the full recipe, see above. Using heavy cream is key. It gives your sauce a rich and smooth finish. Regular milk won't work as well. Heavy cream creates a creamy texture that clings to the pasta perfectly. To balance the sauce thickness, keep some pasta water. After cooking, save about a cup. If your sauce is too thick, add a little pasta water. This helps to create the right consistency. To boost flavors, add fresh herbs like basil or thyme. These herbs bring a nice touch. You can also try using fresh dill for a unique twist. To enhance the lemon flavor, think about adding more zest. The zest adds bright notes. You can also add a splash of lemon juice for extra zing. Just taste as you go! One big mistake is overcooking the pasta. It should be al dente, firm to the bite. If you cook it too long, it will turn mushy and won't hold the sauce well. Burning garlic is another common issue. Garlic cooks fast; it only needs 1-2 minutes. Watch it closely when sautéing. If it burns, it will taste bitter and ruin your sauce. For the full recipe, visit the [Full Recipe](#) link. {{image_2}} You can easily add protein to your creamy lemon garlic pasta. Grilled chicken makes a tasty option. Just slice the chicken and mix it with the pasta. Shrimp also works great. Cook them until pink and toss them in. If you prefer a vegetarian dish, try adding chickpeas. They add a nice texture and protein boost. Adding veggies can make your meal even better. You can use seasonal vegetables like zucchini or bell peppers. Sauté them until soft, then mix them in. Spinach is also a fantastic choice. It wilts down nicely and boosts the color. Cherry tomatoes can add a sweet burst. Just cut them in half and toss them in at the end. If you need gluten-free options, choose gluten-free pasta. Many brands make tasty alternatives that work well. For a dairy-free dish, swap the heavy cream with coconut milk or cashew cream. You can also use nutritional yeast instead of Parmesan cheese for flavor. These swaps ensure everyone can enjoy this creamy lemon garlic pasta. For the full recipe, please look above. To store leftover creamy lemon garlic pasta, place it in an airtight container. Let the pasta cool first to avoid steam build-up. This keeps the pasta fresh and prevents sogginess. When reheating, add a splash of cream or reserved pasta water. This helps restore the creamy texture. Heat it gently on the stove or in the microwave. Stir often to ensure even heating. Yes, you can freeze creamy lemon garlic pasta. First, let it cool completely. Pack it in a freezer-safe container or bag, removing as much air as possible. When ready to eat, thaw it overnight in the fridge. To reheat, warm it on the stove with a bit of cream or pasta water. Stir frequently to keep it creamy and delicious. Leftover pasta can last in the fridge for about 3 to 4 days. Always check for signs of spoilage. If it has an off smell or unusual texture, it’s best to discard it. Mold is a sure sign that the pasta has gone bad. Always trust your senses when it comes to food safety. For creamy lemon garlic pasta, I recommend using fettuccine or spaghetti. These pasta types hold sauce well and have a nice texture. Fettuccine is flat and wide, which makes it perfect for creamy sauces. Spaghetti, on the other hand, is long and thin, offering a lovely bite. Both choices blend well with the creamy lemon sauce, ensuring each bite is flavorful. Yes, you can prep this recipe ahead of time! Cook the pasta and make the sauce separately. Store each in the fridge. When you're ready to eat, just reheat the sauce in a skillet. Toss in the pasta and warm it through. If the sauce thickens, add a splash of reserved pasta water to loosen it up. To spice up creamy lemon garlic pasta, consider adding red pepper flakes or crushed chili peppers. Start with a small amount, like ½ teaspoon, and adjust to your taste. You can also sauté sliced jalapeños with the garlic for a fresh kick. If you want more flavor, try adding hot sauce or a dash of smoked paprika for a smoky heat. For creamy lemon garlic pasta, a crisp white wine works best. Sauvignon Blanc is a great choice. Its citrus notes complement the lemon in the dish. Pinot Grigio also pairs well, offering a fresh and fruity taste. If you prefer red wine, go for a light Pinot Noir, as it won't overpower the flavors of the pasta. This blog post covered a creamy lemon garlic pasta recipe. We discussed key ingredients, step-by-step cooking methods, and expert tips. You learned how to achieve a rich texture, avoid common mistakes, and explore delicious variations, like adding proteins or vegetables. Remember, storage matters too, for the best taste later. I hope these insights inspire you to create your own pasta dish. Enjoy cooking and sharing this delightful meal!

Creamy Lemon Garlic Pasta Delightful and Easy Meal

Are you looking for a tasty and easy meal? Look no further! This creamy lemon garlic pasta is your answer.

- 1 can (15 oz) chickpeas, drained and rinsed - 2 tablespoons olive oil - 1 teaspoon smoked paprika - 1 teaspoon ground cumin - ½ teaspoon garlic powder - ½ teaspoon chili powder - Salt and pepper to taste - 8 small corn or flour tortillas - 1 avocado, sliced - 1 cup red cabbage, shredded - ½ cup fresh cilantro, chopped - 1 lime, cut into wedges - Hot sauce (optional) The base of this recipe is simple yet packed with flavor. The chickpeas are the star, and they bring protein and a nice texture. I always use canned chickpeas for convenience, but you can cook dried ones if you prefer. For the spices, smoked paprika and cumin give a warm flavor. I love garlic powder and chili powder for an extra kick. You can adjust the salt and pepper to make it just right for you. You will need tortillas as well. I suggest using corn or flour depending on your taste. Corn tortillas are gluten-free and add a nice bite. Flour tortillas are softer and easier to fold. The fresh toppings make these tacos shine. Avocado gives creaminess and healthy fats. Red cabbage adds crunch and color. Fresh cilantro brings brightness and enhances flavor. Lime wedges are a must to squeeze over the tacos. If you like heat, don’t forget the hot sauce! For the full recipe, check out the detailed instructions in the previous section. First, preheat your oven to 400°F (200°C). This makes sure your chickpeas roast perfectly. Next, take one can of chickpeas, drain it, and rinse them well. In a bowl, add the chickpeas. Drizzle two tablespoons of olive oil over them. Then, sprinkle one teaspoon of smoked paprika, one teaspoon of ground cumin, half a teaspoon of garlic powder, half a teaspoon of chili powder, salt, and pepper to taste. Toss the chickpeas until they are well coated in the oil and spices. Now, spread the chickpeas in a single layer on a baking sheet. This helps them cook evenly. Place the sheet in the preheated oven. Roast the chickpeas for about 25 to 30 minutes. Halfway through the cooking time, shake the pan gently. This ensures every chickpea gets crispy and golden. While the chickpeas roast, warm your tortillas. Use a dry skillet over medium heat and heat each tortilla for about 30 seconds on each side. This makes them soft and easy to fold. When the chickpeas are crispy, take them out of the oven. To assemble your tacos, place a generous amount of crispy chickpeas in each tortilla. Top with sliced avocado, shredded red cabbage, and fresh cilantro. Squeeze lime juice over the tacos and add hot sauce if you like it spicy. Serve right away with lime wedges on the side. For the full recipe, check out the complete instructions and tips provided. To get the best crispy chickpeas, shake the baking pan halfway through cooking. This helps them cook evenly. If you want more flavor, adjust the spices. Add more chili powder or smoked paprika to suit your taste. Warm your tortillas in a skillet for great flexibility. Use medium heat and turn them for about 30 seconds on each side. You can choose between corn or flour tortillas based on what you like most. Corn gives a nice crunch, while flour offers a softer bite. Pair your tacos with fresh sides like a simple salad or roasted veggies. You can also serve them with refreshing drinks such as lemonade or iced tea. For parties, set up a taco bar. Let guests build their own tacos with toppings like avocado, cabbage, and lime. This makes it fun and interactive! For the full recipe, check the earlier section. {{image_2}} If you want to switch things up, try using black beans or lentils instead of chickpeas. Both options offer great texture and flavor. Black beans add a rich, earthy taste, while lentils provide a hearty bite. Just cook them the same way as the chickpeas. The spices will blend well, making your tacos just as tasty. Don’t be afraid to get creative with your seasonings. You can mix different taco seasoning blends to change the flavor of your crispy chickpeas. Try adding oregano, coriander, or a pinch of cayenne for a kick. Each blend can transform your dish into something new and exciting. Toppings are where you can really express yourself. Add cheese, sour cream, or a mix of colorful veggies. Shredded cheese melts nicely on warm tacos. Sour cream adds a creamy contrast to the crispy chickpeas. Fresh veggies like bell peppers or onions can also give extra crunch. The options are endless. Explore what you like best to make your tacos unique. Check out the Full Recipe for inspiration on assembling delicious combinations. To keep your crispy chickpeas fresh, store them in an airtight container. Make sure they cool completely before sealing. This helps maintain their crunch. If you leave them out, they may get soggy. You can keep them in the fridge for about three days. If you want to keep them longer, freeze them. Just remember to thaw them before reheating. For assembled tacos, they are best eaten right away. If you have leftovers, store the filling and tortillas separately. Wrap tortillas in foil or plastic wrap to keep them soft. Place the chickpea filling in a container with a lid. This way, they stay fresh and tasty. You can keep both in the fridge for two days. To reheat crispy chickpeas, preheat your oven to 350°F (175°C). Spread the chickpeas on a baking sheet and heat for about 10 minutes. This will help them regain their crunch. For tortillas, warm them in a skillet over medium heat for about 30 seconds on each side. This will make them soft and easy to fold. Enjoy your meal just like when it was fresh! For the full recipe, check out the Crispy Chickpea Tacos section. To make chickpeas crispy, start by rinsing and draining them well. Pat them dry with a towel. This helps remove extra moisture. Spread the chickpeas on a baking sheet in a single layer. Drizzle with olive oil and sprinkle your favorite spices. I love using smoked paprika and garlic powder. Roast them in a preheated oven at 400°F for about 25 to 30 minutes. Shake the pan halfway through to cook them evenly. You want them golden and crunchy. Yes, this recipe is naturally vegan! The chickpeas provide protein, and all the other ingredients are plant-based. Use corn or flour tortillas, depending on your preference. If you want to add more flavor, try using a vegan sour cream or cheese alternative. Fresh toppings like avocado and cilantro add great taste without any animal products. Crispy chickpea tacos pair well with many sides. I recommend a fresh salad or guacamole. You can also serve them with rice or beans for a complete meal. A side of roasted veggies adds color and nutrition. If you like heat, serve with hot sauce or salsa on the side. Lime wedges are great for squeezing over the tacos to enhance the flavor even more. You can easily customize your tacos to fit your taste. Swap chickpeas for black beans or lentils if you prefer. Change the spices to suit your palate; try cumin or chili powder for a kick. Add toppings like cheese, diced tomatoes, or even pickled onions. For a crunch, consider adding radishes or jalapeños. Make the recipe your own by trying different flavors and textures! You can find the full recipe [here](insert-link). In this post, we explored how to make tasty crispy chickpea tacos. You learned the main ingredients and how to prepare them. Roasting chickpeas adds flavor and crunch. We shared tips for perfect tacos and variations to suit your taste. These tacos make a great meal or snack. They are simple to make and full of flavor. Enjoy creating and customizing your tacos to fit your style!

Crispy Chickpea Tacos Flavorful and Easy Dinner Idea

Looking for a fun and simple dinner idea? You’re in the right place! Crispy Chickpea Tacos pack a punch of

Older posts
Newer posts
← Previous Page1 … Page54 Page55 Page56 … Page86 Next →

dsad

© 2025 So Yum Recipes • Built with GeneratePress

Our Policies

  • Copyright Policy
  • Cookie Policy
  • GDPR Policy
  • Privacy Policy
  • Disclaimer
  • Terms Of Use

More Information

  • Home
  • About
  • Contact
  • Appetizers
  • Dessert
  • Dinner
  • Drinks
©2025, So Yum Recipes About Back To Top