Skip to content
DisclaimerTerms Of UseGDPR PolicyCookie Policy

So Yum Recipes

  • Home
  • Drinks
  • Appetizers
  • Dinner
  • Dessert
  • About
  • Contact
  • Privacy Policy
DisclaimerTerms Of UseGDPR PolicyCookie Policy

Chloe

To make delicious teriyaki salmon bowls, gather the following main ingredients: - 2 salmon fillets - 1 cup jasmine rice - 2 cups water These items form the heart of your dish, providing flavor and texture. For the teriyaki flavor, you need these marinade ingredients: - 1/4 cup soy sauce (low sodium) - 2 tablespoons honey - 1 tablespoon rice vinegar - 1 teaspoon ginger, grated - 1 teaspoon garlic, minced This mix adds a sweet and savory taste to the salmon. Fresh veggies make your bowl colorful and healthy. Use these: - 1 cup broccoli florets - 1 carrot, julienned - 1/2 red bell pepper, sliced These vegetables add crunch and nutrients to your meal. For the full recipe, check above. To start, I make the marinade. In a bowl, I whisk together soy sauce, honey, rice vinegar, ginger, and garlic. This mix gives the salmon its sweet and savory taste. Next, I place the salmon fillets in a shallow dish and pour the marinade on top. I let the salmon marinate for at least 30 minutes. If I have time, I let it sit for up to an hour in the fridge. This wait helps the flavors soak in. While the salmon marinates, I prepare the jasmine rice. First, I rinse the rice under cold water until the water runs clear. This step removes excess starch. Then, I combine the rinsed rice and water in a saucepan. I bring the mixture to a boil, then reduce the heat to low. I cover the pot and let it simmer for about 15 minutes. Once the rice absorbs all the water, I remove it from the heat. I let it sit covered for 5 minutes, then fluff it with a fork. Next, I steam the vegetables. I use broccoli florets, julienned carrots, and sliced bell pepper. I fill a steamer basket with them and steam for about 5-7 minutes. I aim for them to be tender but still crisp. This keeps their bright colors and nutrients. Once done, I set them aside while I cook the salmon. Now, it's time to cook the salmon. I heat sesame oil in a skillet over medium heat. I take the salmon out of the marinade, saving the marinade for later. I place the salmon skin-side down in the skillet. I cook it for 4-5 minutes on one side. Then, I carefully flip the fillets and cook for another 3-4 minutes until they are cooked through. In the last minute, I drizzle some of the reserved marinade over the salmon for extra flavor. With everything cooked, I can assemble the bowls. In each serving bowl, I add a generous scoop of jasmine rice. Next, I layer the steamed vegetables on top. Finally, I place a salmon fillet in each bowl, making it look appetizing. To finish, I sprinkle sesame seeds and sliced green onions over the top of each bowl. This adds a nice crunch and color. I serve the bowls right away, with any remaining marinade on the side for drizzling. This dish looks great and tastes even better. For the full recipe, check out the details provided. To cook salmon perfectly, start with fresh fillets. You want them to be thick and firm. Heat your skillet over medium heat and add sesame oil. Place salmon skin-side down in the hot oil. Cook for about 4-5 minutes. This gives it a nice sear. Flip the salmon and cook for another 3-4 minutes. The fish should be opaque and flake easily. Drizzle some marinade over it at the end for extra flavor. Fluffier rice makes your bowl more inviting. First, rinse the jasmine rice well to remove excess starch. Use a 1:1 ratio of rice to water. Bring the water to a boil, then lower the heat. Cover and let it cook for about 15 minutes. Once it’s done, let it sit for 5 more minutes. Finally, use a fork to fluff the rice gently. This helps to separate the grains. Steaming keeps veggies bright and crunchy. Use a steamer basket over boiling water. Add your broccoli, carrots, and bell peppers. Steam for about 5-7 minutes. You want them tender but still crisp. Don't overcook them; they should retain their color and nutrients. Once done, set them aside until you're ready to assemble your bowl. {{image_2}} You can swap jasmine rice for quinoa. Quinoa packs more protein and fiber. It cooks similar to rice, just use a 2:1 water-to-quinoa ratio. Rinse it well before cooking to remove the bitter taste. Once cooked, fluff it like rice and layer it in your bowl. The nutty flavor of quinoa pairs well with the teriyaki sauce. If you want a change, use tofu or chicken. For tofu, press it to remove extra water and cut it into cubes. Marinate it just like the salmon and cook until golden. If you choose chicken, use boneless thighs or breasts. Cook them in the same way as the salmon. Both options keep the dish tasty and healthy. Get creative with toppings to make your bowl unique. Try adding sliced avocado for creaminess. Pickled ginger gives a nice zing. You can also add edamame for extra protein. For a crunch, sprinkle on chopped nuts like peanuts or cashews. Fresh herbs like cilantro or basil can brighten the dish, too. Explore your favorite flavors to make it your own. For the full recipe, check out the details above. After you enjoy your teriyaki salmon bowls, store any leftovers in a container. Make sure it has a tight lid. Keep the salmon, rice, and veggies together or separate them if you prefer. They will last up to three days in the fridge. To reheat your teriyaki salmon bowls, use the microwave for quick warmth. Place the bowl in the microwave and cover it with a lid or a damp paper towel. Heat in 30-second bursts until warm. You can also use a skillet over low heat. Add a splash of water or sauce to keep the salmon moist and prevent drying. You can freeze your teriyaki salmon bowls if you want to save them for later. Place the salmon, rice, and veggies in a freezer-safe container. They can last for about three months in the freezer. When ready to eat, thaw them overnight in the fridge. Reheat them as mentioned earlier to enjoy a quick, tasty meal. For the full recipe, check the original instructions. You can store teriyaki salmon bowls in the fridge for up to three days. Make sure to place them in an airtight container. This keeps the flavors fresh and prevents spoilage. When you're ready to eat, simply reheat in the microwave or on the stove until warm. Yes, you can make teriyaki salmon bowls without soy sauce. Use coconut aminos as a great substitute. Coconut aminos are soy-free and have a similar flavor profile. You can also try using a mix of balsamic vinegar and water for a unique twist. If you need a substitute for jasmine rice, try using brown rice or quinoa. Brown rice adds a nutty flavor and more fiber. Quinoa is also high in protein and cooks faster than brown rice. Both options work well with the teriyaki salmon. To make teriyaki salmon bowls gluten-free, choose gluten-free soy sauce or coconut aminos. Always check that all ingredients are labeled gluten-free. This way, you can enjoy the dish without any worry about gluten content. You can find teriyaki salmon bowls at many Asian restaurants or sushi bars. Look for places that specialize in Japanese cuisine. Many restaurants offer teriyaki salmon as a signature dish on their menu. You can also check local food delivery apps for options nearby. You now know how to make tasty teriyaki salmon bowls. We covered key ingredients, step-by-step cooking, and helpful tips. You learned about variations like quinoa and alternate proteins. We also shared storage advice for your leftovers. Putting these tips into action will surely impress your family and friends. Enjoy creating these bowls that are both healthy and delicious. Your kitchen is now ready for a flavorful adventure!

Teriyaki Salmon Bowls Packed with Flavor and Nutrition

Looking for a meal that’s both delicious and nutritious? Teriyaki salmon bowls might be your answer! These bowls are packed

- 6 small corn tortillas - 4 large eggs - 1/2 cup black beans, rinsed and drained - 1/4 cup red bell pepper, diced - 1/4 cup red onion, diced - 1/2 avocado, sliced - 1/4 cup fresh cilantro, chopped - 1/2 teaspoon chili powder - 1/4 teaspoon cumin - Salt and pepper to taste - 2 tablespoons olive oil - Salsa or hot sauce for topping To make savory breakfast tacos, you need simple but fresh ingredients. Corn tortillas serve as the base, giving you that authentic taste. Eggs provide protein and flavor. Black beans add a nice texture and heartiness. Diced red bell pepper and onion give a sweet and savory kick. Slicing an avocado adds creaminess. Fresh cilantro brightens the dish with its herbaceous notes. Chili powder and cumin lend warmth and depth. Don't forget salt and pepper; they enhance all the flavors. Lastly, your choice of salsa or hot sauce brings it all together. You can find the full recipe for these delightful breakfast tacos in the provided link. In a medium bowl, crack four large eggs. Whisk them well with chili powder, cumin, salt, and pepper. This adds great flavor to the eggs. Set this mixture aside for now. Next, when your veggies are ready, combine the egg mixture with the sautéed vegetables. This will create a delicious filling for your tacos. Heat two tablespoons of olive oil in a non-stick skillet over medium heat. Add the diced red bell pepper and onion. Sauté them for about three to four minutes. You want them to become soft but not mushy. This timing is key for getting the right texture. Once they are soft, pour in the egg mixture. Stir occasionally until the eggs are set but still creamy. This should take about three to four minutes. Now it's time to heat the corn tortillas. Use a separate skillet and warm them over medium heat. Heat each tortilla for about one to two minutes on each side. You want them pliable and slightly toasted. To assemble your tacos, layer a spoonful of the egg and veggie mix onto each tortilla. Add the black beans, avocado slices, and fresh cilantro on top. For an extra kick, finish each taco with salsa or hot sauce. Enjoy your savory breakfast tacos right away! For the full recipe, check out the previous section. You can make these breakfast tacos your own. Here are some ideas: - Suggested fillings: - Scrambled eggs with cheese - Chorizo or sausage - Spinach or kale for greens - Spicy vs. mild options: - Use jalapeños for heat. - Try mild salsa for a softer touch. The right pan can change your taco game. Here’s how: - Non-stick skillet: - Great for easy cooking and cleaning. - Keeps eggs from sticking. - Cast iron skillet: - Adds nice flavor. - Retains heat well but needs oil to prevent sticking. - Importance of heat levels: - Keep medium heat for even cooking. - Too high can burn your eggs quickly. Make your tacos look as good as they taste. Here’s how: - Arranging for visual appeal: - Layer ingredients neatly. - Use colorful toppings like avocado and cilantro. - Serving suggestions for sides: - Pair with fresh fruit for sweetness. - Offer a side of beans or rice for balance. These tips will help you create tasty and stunning breakfast tacos. For the full recipe, check out the link above. {{image_2}} You can change up your savory breakfast tacos with many fillings. If you enjoy meat, try adding crumbled chorizo or cooked bacon. For a vegetarian option, use sautéed mushrooms or spinach. Seasonal ingredients can also make a big difference. In summer, add fresh tomatoes or zucchini. In fall, consider roasted squash or sweet potatoes. Toppings can transform your breakfast tacos. You might love creamy add-ons like sour cream or guacamole. For some crunch, try shredded lettuce or crispy fried onions. Don’t forget flavor enhancers! A drizzle of hot sauce or a spoonful of salsa can elevate each bite. You can also sprinkle cheese for a rich taste. The style of your breakfast taco is important. You can choose a soft shell or go for a crispy taco. Soft shells are warm and easy to fold. Crispy tacos give you a nice crunch. Another fun style is the burrito-style taco. Wrap your fillings tightly in a larger tortilla. This style is great for on-the-go meals. For a complete guide, check out the Full Recipe for savory breakfast tacos! To keep your breakfast tacos fresh, use airtight containers. Glass or plastic containers work well. Place the tacos in these containers and cover them tightly. Store them in the fridge. You can keep them for up to three days. The shorter, the better for taste. When you want to enjoy your tacos again, reheating is key. The stovetop method helps maintain texture. Heat a skillet over medium heat and warm the tacos for a few minutes. This keeps them crispy. If you use the microwave, place a taco on a plate. Heat for about 30 seconds. This method may make the tortillas a bit soft. Yes, you can freeze breakfast tacos. However, it’s best to freeze them without toppings. Wrap each taco in plastic wrap, then place them in a freezer bag. They can last up to three months. To defrost, move them to the fridge overnight. Reheat them using the stovetop or microwave methods mentioned above. Enjoy your flavorful morning delight anytime! To make breakfast tacos gluten-free, choose corn tortillas instead of wheat. Corn tortillas are naturally gluten-free and delicious. You can also find gluten-free flour tortillas made from rice or almond flour. For toppings, select gluten-free ingredients. Use fresh veggies, black beans, and avocado. Make sure your salsa or hot sauce is gluten-free too. Always check the labels for any hidden gluten. Breakfast tacos pair well with various sides. Consider serving fresh fruit, like sliced melons or berries. You can also serve crispy hash browns or a simple green salad. For drinks, try a refreshing orange juice or a cup of warm coffee. A smooth, creamy smoothie can also be a great choice. These sides will make your breakfast tacos even more enjoyable. Yes, you can prepare breakfast tacos ahead of time. For meal prep, cook the eggs and veggies, then store them in the fridge. Keep the tortillas separate, so they stay fresh. For safe storage, use airtight containers. The cooked egg mixture will last about 3-4 days in the fridge. When you are ready to eat, just reheat everything and assemble your tacos. You can create tasty breakfast tacos with simple ingredients like eggs, beans, and veggies. We discussed how to prepare and cook these flavorful treats using easy steps. Consider personalizing your tacos with different fillings and toppings. Remember, you can store leftovers and even freeze extras for later. Enjoying breakfast tacos can be quick and fun. Try these ideas to make your mornings better. Get creative and enjoy your meals!

Savory Breakfast Tacos Flavorful Morning Delight

Breakfast just got a savory upgrade! Imagine warm corn tortillas stuffed with fluffy eggs, black beans, and fresh veggies. My

To create a flavorful avocado chickpea salad, you'll need a few fresh ingredients. Each one adds a unique taste and texture. Here’s what you should gather: - 1 ripe avocado, diced - 1 can (15 oz) chickpeas, drained and rinsed - 1 cup cherry tomatoes, halved - 1/4 red onion, finely chopped - 1/4 cup fresh cilantro, chopped - 2 tablespoons lemon juice - 2 tablespoons olive oil - 1 teaspoon cumin powder - Salt and pepper to taste - Optional: 1/4 teaspoon red pepper flakes for spice This salad is not only easy to make but also packed with nutrition. The chickpeas provide protein, while the avocado adds healthy fats. Cherry tomatoes give a burst of sweetness, and red onion adds a nice crunch. Cilantro adds a fresh kick, and the lemon juice gives a bright note. If you like spice, the red pepper flakes can heat things up. You can find the full recipe in the earlier sections. Enjoy making this vibrant dish! - Step 1: In a large bowl, combine the chickpeas, diced avocado, halved cherry tomatoes, and chopped red onion. This mix creates a bright and colorful base for your salad. - Step 2: In a small bowl, whisk together the lemon juice, olive oil, cumin powder, salt, and pepper. If you want a kick, add red pepper flakes. This dressing adds zing to your salad. - Step 3: Pour the dressing over the chickpea mixture. Gently toss everything together until each piece is coated. Be careful not to mash the avocado. - Step 4: Fold in the chopped cilantro. This herb brings freshness to the dish. Taste your salad and adjust the seasoning if needed. Add more salt, pepper, or lemon juice as you like. Let your salad sit for about 10 minutes. This wait helps the flavors mix well. You can find the Full Recipe for more details. Choosing ripe avocados is key. Look for avocados that are slightly soft but not mushy. Press gently; if it gives a little, it’s ready. This gives your salad a creamy texture. Time-saving preparation techniques can help. Use canned chickpeas to save time—just drain and rinse them. This cuts down your prep time to about 10 minutes. You can also chop veggies while the chickpeas drain. Adjusting flavors to your preference is important. Taste the salad after mixing. If you want more zest, add a splash of lemon juice. If you like heat, sprinkle in some red pepper flakes. Each bite should make you smile. Serve the salad in a large bowl for a vibrant look. This invites everyone to dig in. You can also scoop it into smaller bowls for individual servings. Garnishing with cilantro or extra tomatoes adds flair. A sprinkle of cilantro on top gives a fresh taste. Extra cherry tomato halves look great and make it colorful. This makes your dish not only tasty but beautiful too! {{image_2}} If you want to mix things up, try using different beans instead of chickpeas. White beans work well and add a creamy texture. You can also add more crunch with bell peppers or cucumbers. These veggies brighten the salad and add freshness. Feel free to get creative with what you have in your kitchen! To make your salad pop, consider adding spices or herbs. A pinch of smoked paprika can add depth. Fresh herbs like basil or parsley bring bright flavors. If you want more protein, grilled chicken and feta cheese are great additions. They make the salad heartier and more filling. Experiment with these options to find your favorite twist on my avocado chickpea salad. For the full recipe, check out Avocado Chickpea Delight. To keep your avocado chickpea salad fresh, store it in an airtight container. This method keeps moisture out and flavors locked in. You can layer the salad with plastic wrap pressed directly onto the top. This will help slow down browning. The salad stays fresh for about 1 to 2 days in the fridge. If you notice browning on the avocado, you can scrape it off. The chickpeas and other ingredients will still taste great. You usually do not need to reheat this salad. It's best enjoyed cold or at room temperature. If you want to warm it up, do so gently. Place the salad in a microwave-safe dish. Heat it for about 15-30 seconds. Stir and check the temperature. Remember, reheating might change the salad's texture. The avocado can become mushy. For best results, serve it fresh. You can find the full recipe above to enjoy this delightful dish! How long does avocado chickpea salad last? Avocado chickpea salad stays fresh for about one day in the fridge. The avocado can brown quickly, so enjoy it soon. Can I make it ahead of time? You can prep the salad ahead. However, add avocado just before serving. This keeps it green and fresh. Is this salad suitable for meal prep? Yes, it works well for meal prep! Store the dressing separately and combine before eating. This keeps the salad crisp. What can I pair with avocado chickpea salad? This salad pairs well with grilled chicken, fish, or whole grain bread. You can also serve it as a side dish. Avocado chickpea salad offers great nutrition. Each serving has about 250 calories. You get healthy fats from avocado and protein from chickpeas. - Dietary considerations: - Vegan: Yes, this salad is fully plant-based. - Gluten-free: Yes, all ingredients are gluten-free. This makes it a great choice for many diets. If you're looking for a balanced meal, this salad is perfect! If you want more details, check the full recipe for complete nutrition facts. This Avocado Chickpea Delight is a tasty, healthy meal. Here’s a quick list of what you need: - 1 ripe avocado, diced - 1 can (15 oz) chickpeas, drained and rinsed - 1 cup cherry tomatoes, halved - 1/4 red onion, finely chopped - 1/4 cup fresh cilantro, chopped - 2 tablespoons lemon juice - 2 tablespoons olive oil - 1 teaspoon cumin powder - Salt and pepper to taste - Optional: 1/4 teaspoon red pepper flakes for spice To prepare, start by mixing the chickpeas, avocado, tomatoes, and onion in a bowl. In another bowl, whisk lemon juice, olive oil, cumin, salt, and pepper. Pour the dressing over the chickpeas and mix gently. Fold in cilantro carefully. Taste and adjust the seasoning as needed. Let it sit for about 10 minutes before serving. Prep Time: 10 minutes | Total Time: 20 minutes | Servings: 4 For a lovely presentation, serve in a large bowl with more cilantro or extra cherry tomato halves on top. Enjoy every bite of this fresh and flavorful salad! This blog post guides you through making an Avocado Chickpea Salad. You learned about the key ingredients, like ripe avocados and chickpeas. I shared simple steps to prepare the salad quickly and how to present it well. I also included storage tips and answered common questions. Overall, this salad is easy, tasty, and packed with nutrients. You can adjust the recipe to suit your taste. Enjoy making this fresh dish for yourself or sharing it with friends!

Flavorful Avocado Chickpea Salad for Fresh Meals

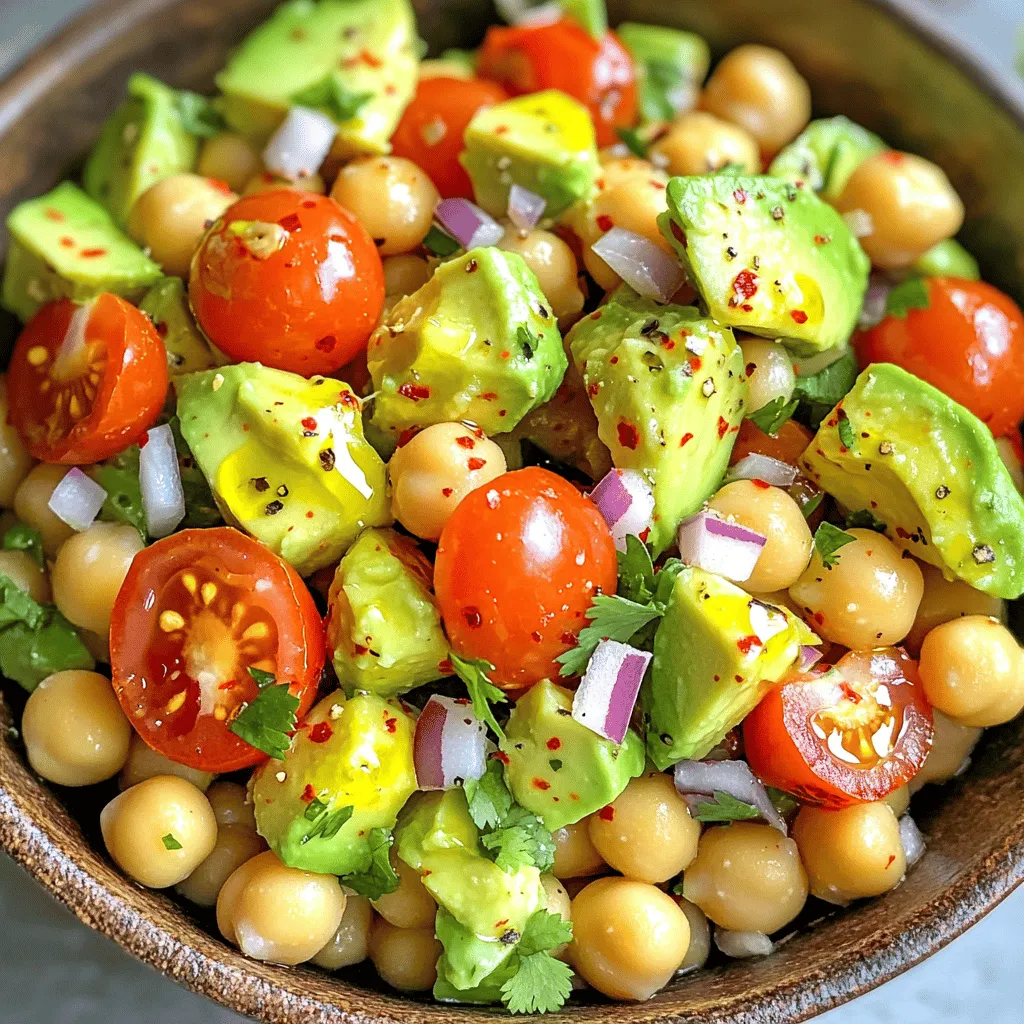
Looking for a fresh and tasty meal? This flavorful Avocado Chickpea Salad is perfect for you! Packed with healthy ingredients

To make this delicious curry, you will need: - 1 cup cauliflower florets - 1 cup diced carrots - 1 cup green beans, trimmed and cut into 1-inch pieces - 1 red bell pepper, diced - 1 medium onion, chopped - 3 cloves garlic, minced - 1 tablespoon fresh ginger, grated - 1 can (400ml) coconut milk - 2 tablespoons curry powder - 1 tablespoon turmeric powder - 1 tablespoon olive oil - 1 tablespoon soy sauce or tamari - Salt and pepper to taste - Fresh cilantro for garnish - Cooked rice or quinoa for serving If you need to adjust your measurements, here are some handy conversions: - 1 cup = 240 milliliters - 1 tablespoon = 15 milliliters - For a milder flavor, use less curry powder and turmeric. - You can swap green beans for peas or zucchini. - Use vegetable stock instead of coconut milk for a lighter dish. These swaps help you tailor the dish to your taste. Each serving of this spicy coconut vegetable curry provides: - Calories: 250 - Protein: 5 grams - Fat: 15 grams - Carbohydrates: 30 grams - Fiber: 5 grams This meal is not just tasty; it packs a punch with nutrients. The vegetables bring vitamins and minerals, while coconut milk adds healthy fats. Enjoy this flavorful dish with rice or quinoa for a complete meal. For the full recipe, check out the Spicy Coconut Vegetable Curry section. To make a great vegetable curry, follow these steps carefully. First, heat the olive oil in a large pot over medium heat. Add the chopped onion and cook for about 5 minutes. You want the onion to be soft and clear. Next, add the minced garlic and grated ginger. Cook them for 1-2 minutes. This brings out their flavors. Then, stir in the curry powder and turmeric powder. Mix well and let it cook for one minute. This step helps release the spice aroma. Now, add the cauliflower, carrots, and green beans. Stir everything together to coat the veggies in spices. Next, pour in the coconut milk and soy sauce. Mix well and bring the curry to a gentle simmer. After this, add the diced red bell pepper. Cover the pot and let it simmer for 15-20 minutes. This allows the vegetables to soften. Once tender, taste and season with salt and pepper. If needed, you can add water to adjust the thickness. Remove the pot from heat and let it sit for a few minutes. This helps the flavors blend. Finally, serve the curry over rice or quinoa. Don’t forget to garnish it with fresh cilantro. For more details, see the Full Recipe. Timing is key when making vegetable curry. Make sure you keep an eye on the heat. If it's too high, the curry can burn. Medium heat is best for cooking the onion and spices. When you add the vegetables, stir them well. This helps them cook evenly. Check the vegetables for tenderness after 15 minutes. If they are still firm, let them simmer a bit longer. Always taste your curry before serving. Adjust the spices and seasoning as needed. Here are some mistakes to watch out for. First, do not skip the sautéing step. Cooking the onion, garlic, and ginger builds flavor. Another mistake is adding too many spices at once. Start with less and add more as needed. This keeps the flavors balanced. Lastly, avoid high heat when simmering. This can cause the coconut milk to separate. A gentle simmer is best for a smooth curry. Remember these tips, and your vegetable curry will be delicious! To boost the flavor of your vegetable curry, start with fresh spices. Fresh spices pack more punch than old ones. Toast your curry powder and turmeric in the pot for a few seconds. This step makes the spices smell amazing and taste better. Use good-quality coconut milk too. It adds a rich, creamy base that elevates the dish. Don’t forget to season well! Salt enhances flavors, so add it bit by bit. Squeeze in some lime juice at the end for a fresh kick. Fresh cilantro on top adds a nice touch. It brightens the dish and adds color. For this curry, you only need basic kitchen tools. A large pot or skillet is essential for cooking. I recommend using a wooden spoon. It helps mix everything without scratching your pot. A good knife is vital for chopping vegetables. A cutting board is also necessary to keep your work area clean. If you want to blend spices, a mortar and pestle works well. This tool brings out the best in your spices. A measuring cup for coconut milk ensures you get the right amount. A ladle is handy for serving the curry onto plates. To get the right curry consistency, start with the coconut milk. If it’s too thick, add a bit of water or vegetable broth. Mix it in slowly to control thickness. Let the curry simmer gently. This method helps the vegetables soften while bringing flavors together. If you find your curry too watery, let it simmer longer with the lid off. This step reduces liquid and thickens the sauce. Stir occasionally to prevent sticking. Aim for a creamy, slightly thick sauce that coats the vegetables well. Enjoy your perfect curry with rice or quinoa! For the complete recipe, check out the Full Recipe section. {{image_2}} You can easily make this vegetable curry vegan. Just use plant-based ingredients. Replace the soy sauce with tamari for a gluten-free option. The coconut milk already makes this dish creamy and rich. You do not need any dairy. Add more veggies like zucchini or spinach for extra nutrients. Try using chickpeas or lentils as a protein source. They blend well with the spices and add heartiness. This vegetable curry is already gluten-free with the right choices. Use tamari instead of regular soy sauce. For a thicker curry, blend some of the cooked vegetables and stir them back in. You can also use gluten-free grains like quinoa or rice. This will keep your meal light and healthy. Always check labels on pre-packaged items to ensure they are gluten-free. To make your curry unique, feel free to add different veggies. Sweet potatoes add a nice sweetness. Peas can give a pop of color and texture. Try adding some diced tomatoes for acidity and depth. You can also toss in some nuts for crunch. Cashews or peanuts work great. If you like heat, add fresh chili or cayenne pepper. For a fresh twist, top your curry with a squeeze of lime or some chopped herbs. For the complete recipe and details, check the Full Recipe. To store leftover vegetable curry, first let it cool. Use an airtight container. Transfer the curry into the container. Seal it tightly to keep moisture in. Place it in the fridge. Leftovers can last up to three days. If you want to keep it longer, consider freezing it. When reheating, use a pot on low heat. Stir it gently to avoid sticking. You can add a splash of water or coconut milk. This helps keep it creamy. Heat until warm throughout but don’t boil. This keeps the flavors bright and fresh. To freeze vegetable curry, use freezer-safe containers. Leave some space at the top. This allows for expansion. Label containers with the date. The curry will stay good for up to three months. Thaw it overnight in the fridge before reheating. Enjoy your delicious meal later! For the full recipe, check out the Spicy Coconut Vegetable Curry. Vegetable curry is packed with nutrients. You get vitamins and minerals from fresh veggies. The spices offer health perks too. For example, turmeric has anti-inflammatory properties. Coconut milk gives you healthy fats. This dish is great for digestion, thanks to fiber in vegetables. Eating vegetable curry can help you feel full and satisfied. Yes, you can make vegetable curry ahead of time. It tastes even better the next day. Just let it cool completely before storing. Place it in an airtight container. When you're ready to eat, you can reheat it on the stove or in the microwave. Make sure to stir well and check the temperature. Vegetable curry has roots in Indian cuisine. It has spread worldwide over the years. Each region adds its own twist with local ingredients. You can find variations in Thailand and even the Caribbean. The use of spices makes it unique and flavorful. This dish reflects the culture and traditions of many places. You learned how to make a great Spicy Coconut Vegetable Curry. We covered ingredients, measurements, and nutritional info. I shared step-by-step instructions, including tips and common mistakes to avoid. We discussed ways to enhance flavor, tools you'll need, and how to get the right consistency. You can adapt the recipe for vegan and gluten-free diets. Lastly, I explained how to store, reheat, and freeze leftover curry. Enjoy cooking, and remember that this dish can be a tasty and healthy choice. Happy cooking!

Vegetable Curry Delightful and Nutritious Recipe

Craving a warm, comforting meal? My Vegetable Curry Delightful and Nutritious Recipe has you covered! This easy dish is packed

To make garlic roasted broccoli, gather these simple ingredients: - Fresh broccoli florets - Minced garlic - Olive oil - Red pepper flakes - Lemon zest - Salt and pepper - Parmesan cheese (optional) - Balsamic vinegar These ingredients create a bright and savory dish that brings out the best in broccoli. The fresh florets give it a nice crunch. The minced garlic adds a bold flavor that you will love. Olive oil helps everything roast evenly. Red pepper flakes add a touch of heat, making it exciting. Lemon zest brightens the dish with its fresh taste. Salt and pepper are key for balance. If you want a creamy touch, sprinkle some Parmesan cheese on top. Finally, a drizzle of balsamic vinegar adds a sweet finish. For the full recipe, check out the detailed steps in the next section. First, set your oven to 425°F (220°C). This high heat helps the broccoli get crispy. Next, grab a baking sheet and line it with parchment paper. This makes cleaning easy later. In a large mixing bowl, add the broccoli florets and minced garlic. Stir them gently. Now drizzle the olive oil over the mix. Make sure every piece gets coated. Sprinkle red pepper flakes, lemon zest, salt, and pepper on top. Toss everything together well. Each piece should be well-seasoned for the best flavor. Spread the broccoli mixture evenly on the baking sheet. Don't overcrowd the pan. Roast in your preheated oven for 20-25 minutes. Halfway through, give it a quick toss. This helps it cook evenly. You'll know it's done when the broccoli is tender and the tips look crispy. Enjoy this delicious dish! For the full recipe, check out the complete guide. To get the best roast, spread the broccoli evenly on the baking sheet. This helps each piece cook well. If they are too close, some will steam instead of roast. Check for doneness by looking for a nice brown color on the tips. Broccoli should feel tender but not mushy. You can boost the flavor by adding other spices or herbs. Try red onion or smoked paprika for a twist. A drizzle of balsamic vinegar after roasting adds a sweet tang. It pairs well with the garlic and lemon zest. Garlic roasted broccoli goes great with chicken or fish. It adds color and flavor to any plate. For a nice touch, sprinkle some extra Parmesan on top before serving. You can also add lemon wedges for extra zest. For the complete recipe, check out the [Full Recipe]. {{image_2}} To make this dish vegan, you can leave out the Parmesan cheese. Instead, try adding sunflower seeds. They bring a nice crunch and extra nutrients. Sunflower seeds also add a nutty flavor that pairs well with garlic. If you love spice, increase the red pepper flakes. You can also use different hot sauces for a kick. A drizzle of sriracha or chili oil can elevate the heat. Adjust the spice level to match your taste buds. You can add nuts like almonds or walnuts to this dish. They provide a great crunch and healthy fats. Almonds are rich in vitamin E, while walnuts offer omega-3 fatty acids. Both nuts enhance the flavor and nutrition of the dish. For more details, check the Full Recipe to see how to prepare these variations. To store leftover garlic roasted broccoli, let it cool first. Place it in an air-tight container. This keeps the broccoli fresh for up to three days. To maintain the flavor, avoid adding any sauces until you’re ready to eat. When reheating, try using the oven or a skillet. This helps keep the broccoli crispy. You can freeze garlic roasted broccoli to enjoy later. First, let it cool completely. Then, spread the broccoli on a baking sheet. Freeze it for about an hour. After that, transfer it to a zip-top bag. Press out the air and seal it tight. You can freeze it for up to three months. To reheat, you can bake it from frozen at 400°F (200°C) for about 15-20 minutes. For storage, use air-tight containers for the best results. They keep moisture out and help prevent freezer burn. Zip-top bags are great for freezing. They take up less room and are easy to label. Always label your containers with the date. This way, you know when to use them. To make garlic roasted broccoli crispy, you need to follow a few easy tips: - Use fresh broccoli florets. Freshness helps with texture. - Cut the florets into similar sizes. This helps them cook evenly. - Spread the broccoli in a single layer on your baking sheet. Crowding will steam the broccoli instead of roasting it. - Don't skip the tossing step halfway through cooking. This ensures even browning. - Roast at a high temperature, around 425°F (220°C). High heat makes the edges crispy while keeping the insides tender. Yes, you can prepare garlic roasted broccoli ahead of time: - Store leftovers in an airtight container in the fridge. They stay fresh for up to three days. - If you want to reheat, use an oven. This helps keep the broccoli crispy. Heat at 350°F (175°C) for about 10 minutes. You can also use a microwave. Just know it may not stay crispy. Garlic roasted broccoli goes well with many dishes: - Pair it with grilled chicken or fish for a balanced meal. - It also complements pasta dishes nicely. Try it with a light lemon sauce. - For a vegetarian option, serve it alongside quinoa or couscous. - You can also use it as a side for a hearty steak or pork chop. It adds color and flavor to your plate. Try out the [Full Recipe] for garlic roasted broccoli and enjoy this simple and tasty side dish! Roasting garlic broccoli is easy and fun with the right ingredients and steps. From fresh broccoli to Parmesan cheese, each item adds flavor. Remember to preheat your oven and check for doneness during roasting. You can even change the recipe to suit your taste. Store leftovers well to enjoy later. Try the tips provided for the best results. By following these steps, you’ll have a tasty, healthy dish ready for any meal. Enjoy making your garlic roasted broccoli!

Garlic Roasted Broccoli Simple and Tasty Side Dish

If you’re looking for a quick and tasty side dish, garlic roasted broccoli is your answer! This dish is simple

- 2 cups watermelon, cubed - 2 cups strawberries, halved - 1 cup blueberries - 1 cup kiwi, peeled and sliced - 1 cup pineapple, diced To make a perfect Honey Lime Fruit Salad, choose ripe, juicy fruits. Watermelon adds sweetness. Strawberries bring a vibrant red color. Blueberries offer a burst of flavor. Kiwi gives a nice tang. Pineapple adds a tropical twist. Using fresh fruit makes the salad bright and tasty. - 1/4 cup honey - 2 tablespoons lime juice - Zest of 1 lime The honey-lime dressing ties everything together. Honey adds sweetness, while lime juice gives a zesty kick. Lime zest adds even more flavor. This simple dressing is quick to whip up. It makes the fruit taste even better! - Fresh mint leaves Mint leaves make a great garnish. They add color and a fresh taste. You can sprinkle a few on top when serving. It’s a small touch that makes a big difference. Enjoy your colorful and tasty Honey Lime Fruit Salad! For the full recipe, check out the details provided earlier. To start, gather your fresh fruits. You will need watermelon, strawberries, blueberries, kiwi, and pineapple. - Cubing watermelon: Cut the watermelon into large slices. Remove the seeds, if needed. Cut each slice into cubes. Aim for about 2 cups of cubes. This adds a juicy base to your salad. - Halving strawberries: Rinse the strawberries well. Remove the green tops. Cut each strawberry in half. You will want about 2 cups of these. Their sweetness shines in this dish. - Slicing kiwi: Peel the kiwi with a knife or a vegetable peeler. Cut it into thin slices. You will need 1 cup of sliced kiwi. The bright green color adds a vibrant touch. Now, let’s make the honey-lime dressing. This dressing brightens the flavors of the fruits. - Whisking honey, lime juice, and zest: In a small bowl, add 1/4 cup of honey. Then, pour in 2 tablespoons of lime juice. Grate the zest of one lime and add it in. Use a whisk to mix these ingredients until smooth. This simple dressing packs a punch! It’s time to bring everything together. This is the fun part! - Mixing fruits in a bowl: In a large mixing bowl, add the cubed watermelon, halved strawberries, blueberries, sliced kiwi, and diced pineapple. Gently mix to combine the fruits. - Pouring and tossing with dressing: Pour the honey-lime dressing over the mixed fruit. Gently toss the fruits again to coat them well. Be careful not to mash the fruits. Let the salad sit for about 10 minutes. This helps the flavors blend. Enjoy your fresh and flavorful Honey Lime Fruit Salad! You can find the [Full Recipe] here for more details. When making honey lime fruit salad, pick fresh, ripe fruits. Seasonal fruits taste best and are full of flavor. For summer, choose juicy watermelon and sweet strawberries. In winter, opt for citrus fruits like oranges and grapefruits. To tell if a fruit is ripe, look for bright colors. A good watermelon should feel heavy for its size. Strawberries should be bright red and firm. Kiwi should give slightly when you press it. To make your salad even tastier, add more flavors! Coconut pairs well with the honey lime dressing. You can use shredded coconut or coconut milk for a tropical twist. Lime zest adds a zesty kick. Just a bit of lime zest brightens the whole dish. You might also think about adding a pinch of salt. This small addition can really boost the flavors of the fruit. How you serve the salad matters! Choose a clear glass bowl to show off the colors. A large bowl works well for family-style serving. For a fun twist, use small cups for individual servings. You can also layer the fruits in a mason jar for a cute look. Add fresh mint leaves on top for a pop of color. This not only looks good but adds extra flavor too. For a special touch, drizzle a bit of extra honey on top before serving. Feel free to check out the Full Recipe to create this delicious dish! {{image_2}} You can easily change the Honey Lime Fruit Salad to match your taste. Here are some fun ideas. To give your salad a tropical twist, add mango or papaya. These fruits bring a sweet and juicy flavor. You can dice them and mix them right in with the other fruits. The bright colors will also make your salad more eye-catching. For a berry medley, mix in raspberries or blackberries. These berries add a tangy kick and a lovely pop of color. Just toss them gently with the other fruits. Their bold flavor complements the honey and lime dressing well. If you want some crunch, add nuts or seeds. Almonds, walnuts, or sunflower seeds work great. Just sprinkle them on top before serving. This extra texture makes the salad even more enjoyable. These variations keep your salad fresh and exciting. They also let you use fruits that are in season or that you love. For the full recipe, check out the details above. To keep your Honey Lime Fruit Salad fresh, store it in an airtight container. This helps keep the flavors intact and prevents the fruits from drying out. Place the container in the fridge. The cool temperature slows down spoilage and keeps your salad crisp. The prepared fruit salad lasts about 3 days when stored properly in the fridge. After this time, the fruits may start to lose their texture and flavor. To enjoy the best taste, try to eat it within this time frame. Freezing fruit salad is not ideal, but you can freeze individual fruits if needed. If you want to freeze it, do so without the honey-lime dressing. The dressing can separate and change texture when thawed. When you’re ready to eat, thaw the fruit in the fridge overnight. This keeps it as fresh as possible. For the complete recipe, check the [Full Recipe]. Yes, you can switch up the fruits in this salad. Feel free to use any mix you like! Some great options are mango, raspberries, or even pomegranate seeds. The key is to choose fruits that are ripe and in season. This makes the salad taste even better. Mixing different colors and textures makes it visually appealing too. Just keep the honey-lime dressing, as it works well with many fruits. This salad is perfect for meal prep! You can make it ahead of time and store it in the fridge. Just prepare the fruit and the dressing. Keep them separate until you are ready to serve. This will keep the fruit fresh and crunchy. You can prep it a day in advance, making it a great option for busy weeks. To keep the fruit from browning, you can use a few simple tricks. First, add lime juice to the cut fruit. It acts like a natural preservative. Secondly, store the salad in an airtight container. This reduces exposure to air, which can cause browning. Lastly, avoid mixing fruits that brown quickly, like apples or bananas, until you serve. These tips help maintain the bright colors and fresh taste of your honey lime fruit salad. You learned how to make a fresh fruit salad with a honey-lime dressing. We explored great fruits, like watermelon, strawberries, and kiwi. I shared tips for selecting the best fruits and presentation ideas. You can also try tasty variations like adding mango or nuts. Keep this recipe handy for warm days or meal prep. It’s healthy, colorful, and fun to make and eat. Enjoy experimenting with flavors and ingredients. Remember to store your salad properly to keep it fresh longer. Happy fruit salad making!

Honey Lime Fruit Salad Fresh and Flavorful Delight

Are you ready to elevate your summer gatherings with a dish that bursts with flavor? My Honey Lime Fruit Salad

- Ripe avocados - Unsweetened cocoa powder - Sweeteners such as maple syrup or agave nectar The base of this mousse is ripe avocados. They give the mousse a creamy texture. Choose avocados that are soft but not mushy. They should feel slightly tender when you gently press them. Next, we use unsweetened cocoa powder. This adds rich chocolate flavor without extra sugar. It keeps the mousse healthy and delicious. For sweetness, I recommend maple syrup or agave nectar. Both options blend well and bring natural sweetness. You can adjust the amount to your taste. - Almond milk or other milk alternatives - Vanilla extract - Sea salt Adding almond milk makes the mousse even creamier. You can use any milk you prefer. This choice makes the mousse lighter and easier to blend. A teaspoon of vanilla extract enhances the flavors. It adds warmth and depth to the mousse. A pinch of sea salt balances the sweetness. It lifts the flavor and makes the chocolate pop. - Whipped coconut cream - Fresh berries - Chopped nuts For toppings, whipped coconut cream adds a light touch. It contrasts nicely with the rich mousse. Fresh berries bring color and freshness. They add a fruity burst with each bite. Chopped nuts provide crunch. You can sprinkle them on top. They add texture and a nutty flavor to complement the chocolate. For the full recipe, check [Full Recipe]. To make a great mousse, start with ripe avocados. A ripe avocado feels slightly soft when gently pressed. Look for dark green or black skin. Avoid hard avocados; they won’t mash well. To peel and pit ripe avocados, follow these steps: 1. Cut the avocado in half lengthwise around the pit. 2. Twist the halves to separate them. 3. Carefully remove the pit with a spoon or knife. 4. Use a spoon to scoop the flesh out of the skin. This method ensures you get all the creamy fruit without any waste. Next, combine the ingredients in a blender. Here’s how: - Add the peeled avocados, cocoa powder, maple syrup, almond milk, vanilla extract, and a pinch of sea salt to the blender. - Blend on high speed until the mixture is smooth and creamy. Make sure to scrape down the sides a few times. This helps blend everything evenly. The goal is a silky texture, like a classic mousse. If the mixture seems too thick, add a bit more almond milk. Chilling is key for flavor. It helps the mousse set and taste better. This step enhances the creamy texture. Chill the mousse in the fridge for at least 30 minutes. This waiting time is worth it! When you’re ready to serve, you can add toppings. Whipped coconut cream, fresh berries, or chopped nuts make great choices. For the full recipe, refer to the earlier section. Enjoy your delicious, nutritious treat! To make your mousse just right, you can adjust the thickness easily. If your mousse is too thick, add more almond milk. Start with a tablespoon and blend again. If it's too thin, add more avocado or cocoa powder. Blend until you reach the right creaminess. For a smoother consistency, blend the mixture on high speed. Scrape down the sides of the blender often. This helps all the ingredients mix well and prevents lumps. A high-speed blender is best, but a good food processor will work too. Taste is key! If you want to adjust the sweetness, use maple syrup. Start with a small amount and blend. Taste after blending to see if you like it. If you want it sweeter, add more syrup gradually. Blend again until fully mixed. I suggest tasting your mousse before serving. This way, you can find the perfect balance for your palate. Sweetness can vary based on the cocoa powder and avocados you use. When it comes to plating, keep it simple yet elegant. Use small bowls or cups to serve your mousse. A dollop of whipped coconut cream on top adds a nice touch. Fresh berries or chopped nuts also look great and add texture. For a complete dessert experience, pair your mousse with a cup of coffee or a scoop of sorbet. The flavors complement each other well. Enjoy experimenting with different toppings to find your favorite combination. You can find the full recipe above. {{image_2}} You can make this mousse vegan by swapping out sweeteners. Use maple syrup or agave nectar. Both add sweetness without dairy. For toppings, try whipped coconut cream. It’s rich and creamy, just like regular cream. You can also use sliced bananas or fresh berries on top. Ensure all your ingredients are gluten-free. Most cocoa powders and sweeteners are safe. If you want more flavor, try adding a splash of almond extract. This gives a nice twist to the mousse. You can also mix in crushed gluten-free cookies for a crunchy texture. Spices can bring new life to your mousse. Consider adding a pinch of cinnamon or a dash of espresso powder. These flavors blend well with chocolate. Using different types of chocolate can also change the taste. Dark chocolate gives a rich flavor, while milk chocolate adds sweetness. Just remember to stick to high-quality chocolate for the best results. To store leftovers, place the mousse in an airtight container. This method keeps it fresh and prevents it from absorbing other smells in your fridge. The mousse stays good for about 3 days when chilled. Always check for changes in texture or smell before eating. Yes, you can freeze Chocolate Avocado Mousse! To do this, spoon it into freezer-safe containers. Leave some space at the top, as it may expand. When you want to enjoy it, move it to the fridge to thaw overnight. You can also let it sit at room temperature for a couple of hours. To know if the mousse is still good, look for discoloration. If you see brown spots, it may be time to toss it. Also, if it smells sour or off, don’t eat it. To prevent spoilage, always use clean utensils when serving. Keeping it covered will also help maintain its freshness. For the full recipe, check out the previous sections. Yes, you can use other fruits in this mousse! Bananas and berries work great. Bananas add a creamy texture and a hint of sweetness. Berries, like strawberries or raspberries, add a fresh burst of flavor. You can blend them in or use them as a topping. Experimenting can lead to fun new flavors! Absolutely! This recipe is vegan and gluten-free. It uses avocados instead of dairy, making it perfect for a plant-based diet. The sweeteners, like maple syrup, are also vegan. Just check your milk choice to ensure it's dairy-free. This mousse fits many dietary needs, making it a great treat for everyone. Chocolate Avocado Mousse is quite healthy. Avocados are rich in healthy fats, fiber, and vitamins. They help your heart and keep you full. Compared to traditional mousse, this recipe has less sugar and no heavy cream. It gives you a tasty treat without the guilt. Enjoy this creamy dessert knowing it’s good for you! This blog post covered the easy steps to make Chocolate Avocado Mousse. You learned about key ingredients like ripe avocados, cocoa powder, and sweeteners. I shared tips for blending and chilling your mousse for the best taste. Plus, we explored variations to fit different diets and preferences. In conclusion, you can create a healthy treat that's both delicious and fun. Experiment with flavors and toppings to make it your own. Enjoy every creamy bite of your homemade mousse!

Chocolate Avocado Mousse Creamy and Nutritious Treat

Indulge your sweet tooth without the guilt! This Chocolate Avocado Mousse is a rich, creamy treat that packs a nutritional

In this stuffed acorn squash recipe, you will need the following ingredients: - 2 medium acorn squashes - 1 cup quinoa, rinsed - 2 cups vegetable broth - 1 small onion, finely chopped - 2 cloves garlic, minced - 1 red bell pepper, diced - 1 cup black beans, drained and rinsed - 1 teaspoon cumin - 1 teaspoon smoked paprika - ½ teaspoon cinnamon - Salt and pepper to taste - ½ cup corn kernels (fresh or frozen) - ¼ cup chopped fresh parsley - ½ cup feta cheese, crumbled (optional) - Olive oil for drizzling These ingredients work together to create a flavorful and nutritious dish. The acorn squash brings a sweet and nutty taste, while the quinoa adds protein and texture. The black beans provide fiber, making this dish satisfying. The spices, like cumin and smoked paprika, give depth to the flavor. Fresh parsley adds a bright touch, and feta cheese can enhance the taste, if you like. For the full recipe, check out the [Full Recipe]. Each bite of this stuffed acorn squash is a delight! - Preheat oven to 400°F (200°C). - Cut the acorn squashes in half and remove the seeds. - Brush the insides with olive oil, then sprinkle with salt and pepper. Roasting the squashes adds sweetness and flavor. I like to place them cut-side down on a baking sheet lined with parchment paper. This helps keep them tender as they cook. Roast them for about 30 to 35 minutes. You want them soft and easy to scoop. - Boil vegetable broth, add quinoa, and cook until liquid is absorbed. - Sauté onions and garlic in olive oil until translucent. - Mix in bell pepper, corn, and spices. While the squash roasts, it's time to prepare the filling. Bring vegetable broth to a boil and add quinoa. Lower the heat, cover, and let it simmer for about 15 minutes. Fluff it with a fork when done. In a skillet, heat some olive oil and sauté chopped onion and garlic. They should be soft and fragrant. Then, add diced bell pepper and corn. Cook for about five more minutes. - Fill the roasted squash halves with the quinoa mixture. - Return to the oven for an additional 10 minutes. - Tips for ensuring perfect roasting include checking for tenderness with a fork. Once your squash is ready, flip each half cut-side up. Stuff them with the quinoa mix, packing it in well. Return them to the oven for another 10 minutes. This melds the flavors together beautifully. Enjoy the aroma wafting from your kitchen! For more details on the full process, check the Full Recipe. - Best practices for roasting squash: Start with fresh acorn squash. Cut them in half and scoop out the seeds. Brush the insides with olive oil. This helps them roast well. Roast them cut-side down at 400°F (200°C). This keeps them moist and helps them cook evenly. - Optimal quinoa cooking techniques: Rinse your quinoa before cooking. This removes the bitter coating. Boil vegetable broth and add the rinsed quinoa. Cover and simmer for about 15 minutes. Fluff it with a fork when it's done. This makes the quinoa light and fluffy. - How to enhance flavors with spices: Use spices like cumin, smoked paprika, and cinnamon. These spices add warmth and depth. Add them when cooking your filling. This allows the flavors to meld beautifully. Don't forget salt and pepper for balance. - Ideal side dishes for stuffed squash: Serve your stuffed acorn squash with a fresh salad. A simple green salad or roasted veggies works well. You can also pair it with a grain like brown rice or farro. - Serving in bowls vs. plates: I recommend serving the stuffed squash in bowls. This keeps the filling secure. Plus, it makes for a cozy presentation. Plates can work too, but bowls are more fun! - Garnish for added appeal: Add a sprinkle of fresh parsley on top. This adds color and freshness. You can also drizzle a bit of olive oil for shine. If you like cheese, crumbled feta works great too. It adds a nice tang to each bite. For the full recipe, check out the detailed instructions above. Enjoy your cooking! {{image_2}} Stuffed acorn squash is a great dish for everyone. You can make it vegan by skipping the feta cheese. Use nutritional yeast instead for a cheesy flavor. For gluten-free options, quinoa is a safe choice. It adds protein and texture without gluten. If you want low-carb variations, replace quinoa with cauliflower rice. This keeps your meal light but still full of flavor. To make your stuffed acorn squash even better, try adding spices. A pinch of chili powder can add heat. You might also like to mix in some fresh herbs like basil or thyme. Changing the filling can also add variety. Try using lentils or chickpeas for a different taste. For a crunchy topping, sprinkle some nuts or seeds before baking. Pumpkin seeds or walnuts work great and add extra nutrition. These simple changes can turn a classic dish into something new. You can explore different flavors with each meal. For the full recipe, check out the Harvest Delight Stuffed Acorn Squash. To keep your stuffed acorn squash fresh, follow these steps: - Refrigerating: Place leftovers in an airtight container. This keeps moisture in and prevents drying out. Consume within 3-5 days for the best taste. - Freezing: You can freeze stuffed acorn squash. Wrap each half in plastic wrap, then place in a freezer bag. This way, it stays fresh for up to 3 months. - Reheating: To reheat, use an oven set to 350°F (175°C). Bake for 20-25 minutes. This method helps maintain flavor and texture, unlike microwaving. Preparing meals ahead saves time and effort. Here are my go-to meal prep tips: - Making Ahead: You can make stuffed acorn squash a few days in advance. Cook them as per the recipe, and store in the fridge. - Perfect Pairings: Pair with a green salad or roasted veggies. They balance flavors and add nutrition to your meals. - Storage Containers: Use glass containers for storing. They are reusable and keep food fresh longer, making them a smart choice for meal prep. For the full recipe, check out the complete guide on making Harvest Delight Stuffed Acorn Squash! How to know when the acorn squash is done? You can tell the acorn squash is done when it feels soft. A fork should easily pierce the skin. Usually, this takes about 30–35 minutes in the oven. Always check for fork-tenderness as the best test. Can I use other types of squash? Yes, you can use other squashes like butternut or pumpkin. Each squash brings a different flavor, but they all work well with the stuffing. What can I substitute for quinoa? You can use rice or couscous as a substitute for quinoa. Both options will absorb the flavors well and provide a nice texture. How long does this dish last in the fridge? Stuffed acorn squash lasts about 3 to 5 days in the fridge. Store it in an airtight container to keep it fresh and tasty. Can stuffed acorn squash be reheated? Yes, you can reheat stuffed acorn squash. Just place it in the oven or microwave until warm. This dish stays delicious even after reheating. Is it possible to prepare stuffed squash in an air fryer? Absolutely! You can cook stuffed squash in an air fryer. It cuts down on time and keeps the squash nice and tender. What to do if my squash is too hard to cut? If the squash is hard to cut, microwave it for a few minutes. This softens it a bit, making it easier to slice. Always be careful with the knife! For the full recipe, check out the Harvest Delight Stuffed Acorn Squash. Enjoy cooking! In this article, we explored how to make delicious stuffed acorn squash. We covered the key ingredients, step-by-step instructions, cooking tips, and various serving ideas. We also looked at dietary adaptations and storage methods to keep leftovers fresh. Stuffed acorn squash is tasty and versatile, which makes it great for everyone. I hope you are excited to try this dish and share it with friends and family. Enjoy your cooking!

Stuffed Acorn Squash Flavorful and Nutritious Dish

Stuffed acorn squash is not just delicious—it’s a feast for your health too! In this blog post, I’ll guide you

For a tasty dish, you need these main ingredients: - 1 lb Brussels sprouts, trimmed and halved - 3 tablespoons balsamic vinegar - 2 tablespoons olive oil - 1 tablespoon honey - 2 cloves garlic, minced - Salt and pepper to taste These ingredients bring out the best flavors. The balsamic adds sweetness and tang. The honey gives a nice glaze, while garlic offers a warm kick. You can add extra items for more taste: - 1/4 cup pecans, roughly chopped - 1/4 cup goat cheese, crumbled (optional) - Fresh parsley for garnish Pecans add a crunchy texture. Goat cheese gives a creamy touch. Parsley brightens the dish and adds color. This dish is not just tasty; it is also nutritious. Each serving has: - Calories: about 160 - Protein: 4g - Carbohydrates: 10g - Fat: 12g - Fiber: 4g Brussels sprouts are full of vitamins and minerals. They support your health while keeping the meal light. You can find the Full Recipe for more details on this delicious meal. First, gather your ingredients. You will need: - 1 lb Brussels sprouts, trimmed and halved - 3 tablespoons balsamic vinegar - 2 tablespoons olive oil - 1 tablespoon honey - 2 cloves garlic, minced - Salt and pepper to taste - 1/4 cup pecans, roughly chopped - 1/4 cup goat cheese, crumbled (optional) - Fresh parsley for garnish Next, preheat your oven to 425°F (220°C). This step is key for getting that nice crisp. In a large bowl, whisk together the balsamic vinegar, olive oil, honey, minced garlic, salt, and pepper. This mixture gives the sprouts a lovely flavor. Now, add the halved Brussels sprouts to the bowl. Toss them well in the balsamic mixture until they are evenly coated. This ensures that every bite is packed with flavor. Spread the Brussels sprouts out on a baking sheet in a single layer. Make sure they have room to breathe. If they are crowded, they won’t roast well. Roast them in your preheated oven for about 20 to 25 minutes. Stir them halfway through to help them cook evenly. You want them to become golden brown and crispy on the edges. Once they are done, take them out of the oven. Immediately sprinkle the chopped pecans over the sprouts. The heat will toast them slightly and add a nice crunch. If you want to add a creamy touch, sprinkle crumbled goat cheese over the top. Finally, garnish with fresh parsley for a pop of color. For the best results, use fresh Brussels sprouts. They taste better and roast nicely. Cut them in half for more surface area. This helps them get crispy. Don’t skip stirring them halfway through cooking. This step prevents burning and ensures even cooking. For added sweetness, adjust the honey to your taste. If you want more flavor, try adding some red pepper flakes for heat. This small change can elevate the dish. Trust me, following these tips will make your Balsamic Glazed Brussels Sprouts shine. For the full recipe, click here. To make the best balsamic glaze, focus on balance. Use quality balsamic vinegar. The right blend of sweet and tangy makes a great glaze. Mix balsamic vinegar with honey for sweetness. Heat this mixture gently on the stove. Simmer it until it thickens. This process brings out rich flavors. A thicker glaze clings better to the sprouts. Avoid overcooking your Brussels sprouts. If you roast them too long, they can turn mushy. Check them at the 20-minute mark. Stir them halfway through cooking for even browning. Another mistake is using low-quality vinegar. Cheap balsamic can ruin the flavor. Always opt for a good brand for the best taste. You need a few simple tools for this recipe. A large mixing bowl helps you combine the ingredients. Use a whisk to mix your glaze smoothly. A baking sheet lined with parchment paper makes cleanup easier. Tongs or a spatula help you turn the sprouts while roasting. With these tools, you can cook like a pro! For the full recipe, refer to the earlier section. {{image_2}} You can switch up the flavors in your balsamic glazed Brussels sprouts. Try adding different nuts like walnuts or almonds. They bring a nice crunch and taste. For a sweet touch, use maple syrup instead of honey. If you want a spicy kick, add a pinch of red pepper flakes. Balsamic glazed Brussels sprouts are great on their own, but they pair well with many dishes. Serve them alongside roasted chicken or grilled steak for a hearty meal. They also fit nicely with quinoa or rice for a lighter option. You can even add them to a salad for extra flavor. This dish can easily fit many diets. To make it vegan, simply skip the honey and use agave nectar instead. All the other ingredients are naturally gluten-free. This makes it a great side dish for everyone at the table. For the full recipe, check out the guidelines above! After enjoying your Balsamic Glazed Brussels Sprouts, store any leftovers in an airtight container. This keeps them fresh. Make sure they cool completely before sealing the container. You can store them in the fridge for up to four days. To reheat, place the Brussels sprouts on a baking sheet. Preheat your oven to 350°F (175°C). Bake for about 10-15 minutes or until warmed through. You can also use a microwave, but they may lose some crispness. Heat in short bursts, about 30 seconds at a time, stirring in between. If you want to freeze them, do it before roasting. Toss the halved Brussels sprouts in the balsamic mix, then spread them on a baking sheet. Freeze them for about an hour, then transfer to a freezer bag. This keeps them from clumping together. They can last up to three months in the freezer. When you're ready, roast them straight from the freezer. Just remember, they may need a few extra minutes to cook. For the full recipe, check out Balsamic Bliss Brussels Sprouts. To make Brussels sprouts crispy, start by cutting them in half. This helps them cook evenly. Use high heat, like 425°F (220°C), when roasting. The hot oven gives them a nice crunch. Toss the sprouts in olive oil and balsamic vinegar for flavor. Spread them in a single layer on the baking sheet. Avoid overcrowding, as this can cause steaming instead of roasting. Stir them halfway through to brown all sides. Follow the full recipe for best results. Yes, you can use other veggies with the balsamic glaze. Carrots, broccoli, and cauliflower work well. Just cut them into similar sizes to Brussels sprouts. This way, they cook evenly. Toss them in the same balsamic mixture for added flavor. You can even mix different vegetables for a colorful dish! If you need to avoid honey, try maple syrup or agave nectar. Both add sweetness and work well in the glaze. You can also use brown sugar, but it may change the texture slightly. Adjust the amount to your taste. Each option will give a unique flavor to the dish. In this blog post, we explored the key ingredients for making balsamic glazed Brussels sprouts. I shared step-by-step instructions and tips for the perfect roast. You learned about variations and storage options to keep your sprouts tasty. Remember, cooking is about fun and creativity. Experiment with flavors and make this dish your own. Enjoy your cooking journey!

Balsamic Glazed Brussels Sprouts Flavorful and Easy Dish

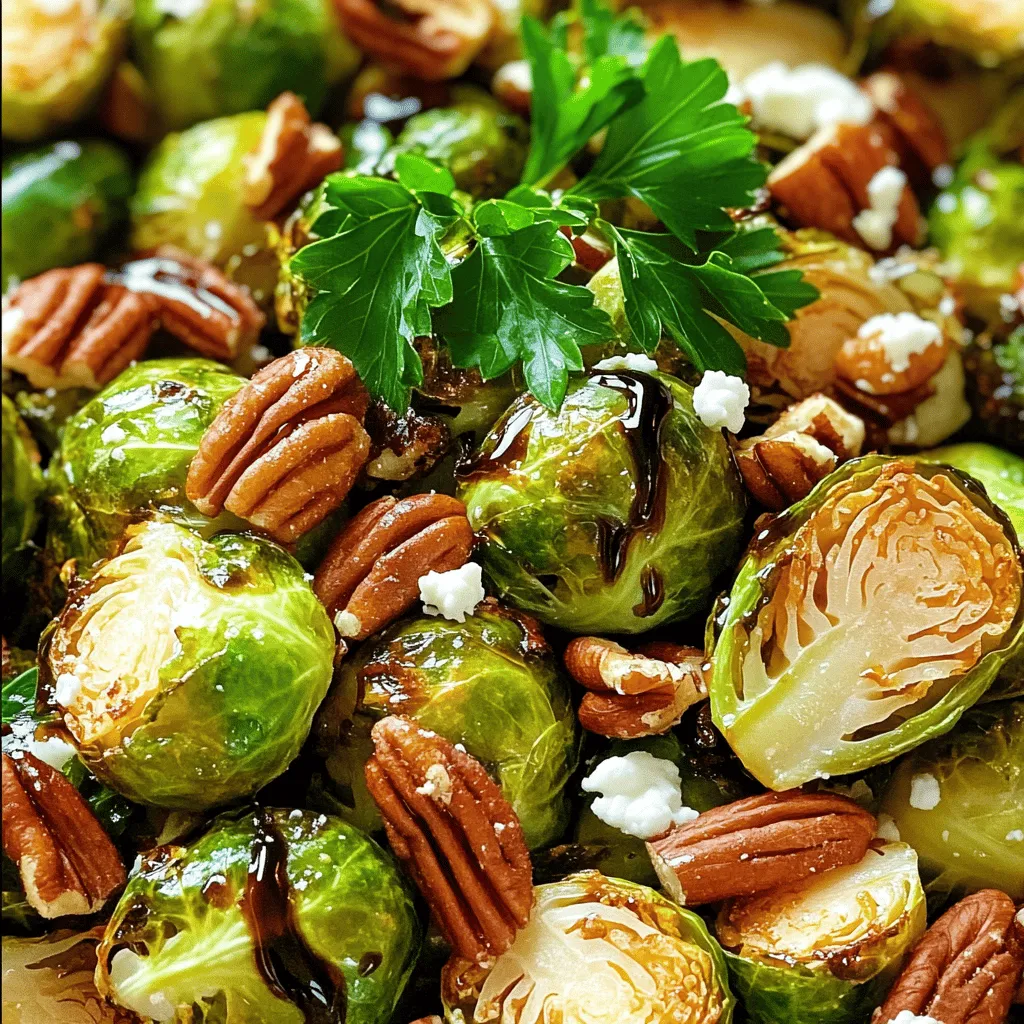
Looking for a simple yet delicious side dish? Balsamic Glazed Brussels Sprouts are your answer! With just a few fresh

- 2 pounds russet potatoes - 4 cloves garlic - ½ cup unsalted butter - 1 cup heavy cream - ½ cup sour cream - Salt and pepper - Fresh chives (for garnish) The main ingredients for creamy garlic mashed potatoes are simple but essential. The russet potatoes provide a fluffy texture when cooked and mashed. Garlic adds a rich flavor that makes this dish special. Unsalted butter gives the mash a smooth finish, while heavy cream and sour cream add depth and creaminess. Don’t forget salt and pepper to enhance the taste. Fresh chives not only look great but also add a fresh note. - Dairy-free options: Use almond milk or coconut cream in place of heavy cream. Substitute vegan butter for unsalted butter. A dairy-free sour cream works well too. - Low-fat alternatives: Swap heavy cream with low-fat milk or Greek yogurt. You can also use reduced-fat butter. - Flavor variations: Add roasted garlic for a sweeter taste. Try mixing in herbs like rosemary or thyme for extra flavor. If you like cheese, sharp cheddar can bring a new twist. For the full recipe, check out the details above. To start, grab a large pot. Add the cubed russet potatoes and the peeled garlic cloves. Cover them with water and toss in a pinch of salt. This small step adds flavor right from the start. Bring the pot to a boil over medium-high heat. Once it boils, reduce the heat to a simmer. Let the potatoes cook for about 15 to 20 minutes. You want them fork-tender. This means a fork should easily slide into the potatoes. Now it’s time to mash! You can use a potato masher for a rustic texture or a ricer for a smoother finish. A ricer creates a fluffy mash, which I love. If you prefer a bit of texture, stick with the masher. Mash the potatoes and garlic together until they are smooth and creamy. You can stop here if you like a thicker mash. If you want it creamier, keep mashing until you reach your desired consistency. Next, let’s mix in the good stuff! Add the unsalted butter to your hot potatoes and garlic. It will melt and blend right in. Slowly pour in the heavy cream. Stir until everything is mixed well. Now, fold in the sour cream. This makes the potatoes extra creamy. Don’t forget to season with salt and pepper to taste. Taste as you go to find the right balance. If you want more flavor, feel free to add more cream or butter. For the final touch, transfer your creamy garlic mashed potatoes to a serving dish. Garnish with fresh chopped chives for a pop of color. You just made a rich and flavorful dish! For the complete process, check out the Full Recipe. To get the best creamy texture, use the right mix of cream and butter. I suggest using a mix of ½ cup of unsalted butter and 1 cup of heavy cream. This gives the right balance of richness. For a super smooth mash, use a potato ricer. A potato masher can work too, but it may leave lumps. If you want it creamier, add more cream or butter as you mash. Roasting garlic brings out its sweet, rich taste. Wrap whole garlic cloves in foil, drizzle with olive oil, and roast until soft. This method gives a deeper flavor than raw garlic. If you need a quick option, you can sauté minced garlic in butter. This will still add great flavor but with less time. Creamy garlic mashed potatoes pair wonderfully with roasted meats and grilled fish. They also complement rich sauces well. For a lovely presentation, use a piping bag to swirl the mash in a dish. Top with fresh chives for color. You can even create a well in the center and drizzle with olive oil for a gourmet touch. Don't forget to check the Full Recipe for more tips! {{image_2}} For a vegan twist, you can use plant-based ingredients. Replace the butter with olive oil or coconut oil. Use almond milk or oat milk in place of heavy cream. For creaminess, add silken tofu or vegan sour cream. This way, you keep the rich taste without dairy. You can make these mashed potatoes healthier. Swap sour cream for Greek yogurt. This adds protein and cuts fat. You can also try cauliflower instead of potatoes. Steam cauliflower until tender, then mash it. This gives you a lighter, low-carb option. Don’t be afraid to get creative! Add fresh herbs like rosemary or thyme for extra flavor. You can also sprinkle in some smoked paprika for a kick. For a richer taste, mix in cheese like cheddar or Parmesan. These additions make your mashed potatoes even more delicious. For creamy garlic mashed potatoes, use airtight containers. Glass or plastic containers work well. Make sure the potatoes cool before sealing. This helps prevent moisture build-up. You can store them in the fridge for up to three days. If you want to keep them longer, freeze them. Use freezer-safe containers or bags for this. Squeeze out as much air as you can before sealing. This keeps the flavor fresh. When reheating, aim to keep the creamy texture. You can use the microwave or stove. If using the microwave, stir every 30 seconds. This helps heat evenly. For stove reheating, add a splash of cream or milk. Stir gently over low heat. This keeps the potatoes moist and creamy. Avoid high heat to prevent dryness. Creamy garlic mashed potatoes last in the fridge for about three days. If frozen, they can last up to two months. Look for changes in color or smell as signs of spoilage. If they smell sour or look off, it’s best to toss them. Always trust your senses when it comes to food safety. For the full recipe, check the earlier section. Russet and Yukon Gold are the top choices for mashed potatoes. - Russet potatoes are starchy and fluffy. They create light and airy mashed potatoes. - Yukon Gold potatoes have a creamy texture. They add a buttery flavor to your dish. Both types work well, but for a richer taste, I prefer Yukon Gold. You can prepare mashed potatoes a day in advance. Store them in the fridge. - Make the creamy garlic mashed potatoes as usual. - Let them cool, then place them in a covered dish. - Reheat gently on the stove or in the microwave before serving. This method saves time and keeps your meal stress-free. Yes, you can freeze them. Just follow these steps: - Allow the mashed potatoes to cool completely. - Transfer them to an airtight container or freezer bag. - Label and date the container. When you’re ready to eat, let them thaw in the fridge overnight. Reheat gently for the best texture. To achieve fluffy mashed potatoes, try these techniques: - Use a potato ricer instead of a masher. This method adds air. - Avoid over-mixing; it can make the potatoes gummy. - Start with hot potatoes for a lighter texture. For the best results, follow the [Full Recipe]. This blog post covered creamy garlic mashed potatoes, from the right ingredients to cooking tips. We explored ingredient swaps and variations for every taste and diet. I shared storage methods and reheating techniques to keep your potatoes tasty. In the end, creamy garlic mashed potatoes can be a simple yet delightful dish. With these tips, you can create a side that impresses everyone at your table. Enjoy crafting your perfect mashed potatoes!

Creamy Garlic Mashed Potatoes Rich and Flavorful Dish

Looking for a side dish that’s rich, flavorful, and easy to make? You’ve found it! Creamy garlic mashed potatoes are

Older posts
Newer posts
← Previous Page1 … Page52 Page53 Page54 … Page86 Next →

dsad

© 2025 So Yum Recipes • Built with GeneratePress

Our Policies

  • Copyright Policy
  • Cookie Policy
  • GDPR Policy
  • Privacy Policy
  • Disclaimer
  • Terms Of Use

More Information

  • Home
  • About
  • Contact
  • Appetizers
  • Dessert
  • Dinner
  • Drinks
©2025, So Yum Recipes About Back To Top