Skip to content
DisclaimerTerms Of UseGDPR PolicyCookie Policy

So Yum Recipes

  • Home
  • Drinks
  • Appetizers
  • Dinner
  • Dessert
  • About
  • Contact
  • Privacy Policy
DisclaimerTerms Of UseGDPR PolicyCookie Policy

Chloe

- 1 cup quinoa, rinsed - 2 cups vegetable broth - 1 medium onion, finely chopped - 2 cloves garlic, minced - 1 carrot, diced - 1 bell pepper, diced (any color) - 1 zucchini, diced - 1 teaspoon ground cumin - 1 teaspoon smoked paprika - 1/2 teaspoon turmeric - 1/4 teaspoon black pepper - 1/2 cup peas (fresh or frozen) - 2 tablespoons olive oil - 1/4 cup chopped fresh parsley or cilantro - Salt to taste - Optional: Lemon wedges for serving These ingredients make the pilaf both tasty and healthy. Quinoa is a great grain. It is packed with protein and fiber. The veggies add color and nutrients. The spices bring warmth and depth. You can find the full recipe on my website. Fresh herbs add a bright finish to the dish. Lemon wedges give a nice touch. They add a zing that pairs well with the flavors. This dish is easy to make. It is perfect for weeknight meals or special occasions. - Heat the olive oil in a large skillet over medium heat. - Sauté the onion until it is soft and light in color. - Add the minced garlic and cook until it smells great. - Add the diced carrot, bell pepper, and zucchini to the skillet. Cook until the vegetables are soft, about 5-7 minutes. - Incorporate ground cumin, smoked paprika, turmeric, and black pepper. Mix well and let it cook for about 2 minutes. - Mix in the rinsed quinoa and stir it with the veggies and spices. Pour in the vegetable broth and add salt to taste. Bring this to a boil. Then, lower the heat and cover to simmer for about 15 minutes. - When the quinoa is done, use a fork to fluff it. - Add in the peas and chopped parsley or cilantro. Let it sit, covered, for 5 more minutes to warm the peas. - Taste and adjust seasoning if needed. Serve the pilaf warm with optional lemon wedges on the side. For the complete recipe, check out the Full Recipe section. - Rinse quinoa for optimal fluffiness. This step removes bitter saponins. - Control salt levels with low-sodium broth. This keeps your dish healthy and tasty. - Try adding nuts or dried fruits for texture. Almonds or raisins work well. - Experiment with different herbs such as thyme or dill. Fresh herbs boost flavor. - Garnish with fresh herbs and serve with lemon wedges. This adds color and freshness. - Use a colorful bowl to enhance visual appeal. A bright bowl makes the dish pop. These small tips can make a big difference in taste and look. For the full recipe and steps, check the Full Recipe. {{image_2}} You can make your savory quinoa pilaf even better by adding protein. Chickpeas or beans work well. They not only boost protein but also add great texture. If you want a non-vegetarian option, grilled chicken or shrimp is perfect. These choices make your dish heartier and more filling. For a vegan dish, use vegetable broth instead of chicken broth. This keeps your pilaf plant-based while still being tasty. If you want more protein, substitute tofu for some of the vegetables. Tofu absorbs flavors well and adds a nice bite. One of my favorite things about this recipe is how flexible it is. You can swap in seasonal vegetables based on what you have. In the spring, try adding asparagus or peas. In the fall, butternut squash is a great choice. Adding greens like spinach or kale gives a nutritional boost and makes your dish vibrant. After enjoying your savory quinoa pilaf, store leftovers in an airtight container. Place it in the fridge. It stays fresh for about 3-5 days. This keeps it tasty and safe to eat. If you want to save some for later, freeze the pilaf in portions. Use freezer bags or containers for easy storage. When you're ready to eat, thaw it in the refrigerator. This method helps maintain its flavor and texture. To reheat, you can use the stovetop. Add a splash of broth to keep it moist. Heat it gently until warm. You can also use a microwave. Just heat until warmed through, stirring occasionally for even heat. Quinoa cooks quickly. It usually takes about 15 minutes. You can rinse it first to remove the bitter coating. This helps the quinoa taste better. Once the water boils, reduce the heat and cover it. Let it simmer gently until it is fluffy and holds its shape. Yes, you can make savory quinoa pilaf ahead of time. Cook it fully and let it cool. Then, store it in an airtight container in the fridge. It stays good for about 3 to 5 days. Before serving, simply reheat it on the stove or in the microwave. You can add a splash of broth to keep it moist. Savory quinoa pilaf pairs well with many dishes. Here are some great options: - Grilled chicken or fish - Roasted vegetables - A fresh salad - Stuffed peppers - A yogurt sauce or tzatziki These sides add more flavor and make a complete meal. You can easily change the flavors in quinoa pilaf. Some popular options include: - Adding nuts like almonds or walnuts for crunch - Mixing in dried fruits like raisins or cranberries for sweetness - Using different veggies like spinach or mushrooms - Trying spices like curry powder for a new twist Feel free to get creative with your favorite ingredients! Yes, you can use different types of broth. Vegetable broth is common, but chicken broth adds a richer flavor. You can also use low-sodium options to control the salt level. For a unique twist, try using coconut milk or mushroom broth. Each option will give your pilaf a special taste. For the full recipe, check out the entire guide to making savory quinoa pilaf. This blog post shared how to make a tasty savory quinoa pilaf. We covered the main ingredients, cooking steps, and different variations you can try. You now have tips for storing leftovers and reheating too. Remember, cooking is fun and you can change the recipe to fit your tastes. Enjoy making this dish and feel free to share your results. Explore new flavors and enjoy each bite!

Savory Quinoa Pilaf Flavorful Healthy Side Dish

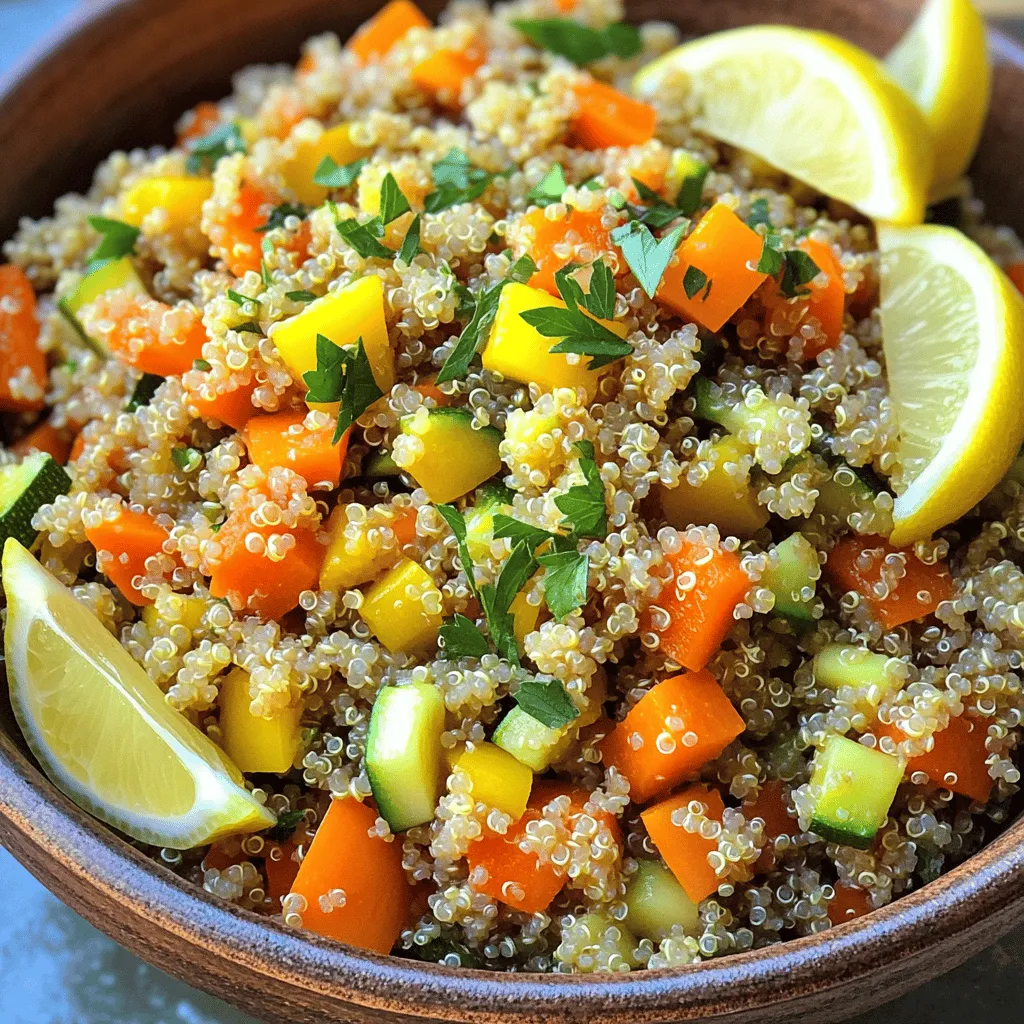
If you’re looking for a tasty and healthy side dish, you’re in the right place! This Savory Quinoa Pilaf is

- 4 salmon fillets (about 6 oz each) - 2 tablespoons olive oil - 1 lemon, zested and juiced - 2 tablespoons fresh dill, chopped (or 1 tablespoon dried dill) - 3 cloves garlic, minced - Salt and pepper to taste - Lemon slices for garnish - Optional: Cooked quinoa or wild rice for serving When making lemon dill salmon, fresh ingredients shine. I love using vibrant lemon zest and juice for bright flavor. Fresh dill gives the dish a lovely herbal note. If fresh dill is not available, dried dill works too. Garlic adds a nice aromatic punch that pairs well with the fish. Make sure to season your salmon with salt and pepper. This step amplifies the flavors and enhances the taste. I often garnish my finished dish with lemon slices. They not only look pretty but also add a fresh burst of flavor. For a hearty meal, serve the salmon over cooked quinoa or wild rice. These grains soak up the lemon dill sauce and make the dish even more satisfying. You can find the full recipe above for easy reference. Enjoy crafting this delightful dish! - Preheat your oven to 400°F (200°C). This step is key. A hot oven helps the salmon cook evenly. - Combine olive oil, lemon juice, lemon zest, dill, garlic, salt, and pepper. Mix these ingredients in a small bowl. The lemon juice adds brightness. The dill gives a nice herbal flavor. - Place fillets in a baking dish and coat with the marinade. Lay the salmon skin-side down. Use a brush or spoon to cover each fillet. Make sure every piece has a good amount of the mixture. Let it soak in for about 15-20 minutes. This waiting time helps the flavors blend. - Bake salmon and garnish with lemon slices. Put the dish in the oven. Bake for 12-15 minutes. The salmon is done when it flakes easily with a fork. After baking, add fresh lemon slices on top. This adds a nice touch and flavor. For a great meal, serve it with cooked quinoa or wild rice. You can drizzle any leftover marinade over the top for extra taste. For the full recipe, check the detailed instructions. Monitoring cooking time is key to a great dish. Salmon cooks fast, so watch it closely. Bake it for 12 to 15 minutes. You want it just right, not overcooked. If you leave it too long, the fish can dry out. Use a fork to check. If it flakes easily, it’s done. For a flavor boost, marinate the salmon. Let it sit for 15 to 20 minutes. This allows the lemon and dill to soak in. You can add herbs like parsley or thyme for extra taste. A touch of honey can balance the lemon’s tartness too. Experiment with spices like paprika for a warm kick. To ensure your salmon stays flaky and moist, start with fresh fish. Dry it gently with a paper towel before cooking. This helps the marinade stick. Avoid cooking at too high a temperature. Lower heat can help keep it tender. Adding a splash of broth or white wine in the dish can also help maintain moisture. For the full recipe, check out the Citrus Herb Delight: Lemon Dill Salmon. {{image_2}} Grilling lemon dill salmon gives it a smoky taste. To grill, first, preheat your grill to medium-high heat. Brush the salmon fillets with the lemon dill mixture just like you do for baking. Then, place the fillets directly on the grill grates. Grill each side for about 4-5 minutes. Check for doneness by seeing if the salmon flakes easily. Grilled salmon has a great char and flavor that is hard to beat. You can switch up the herbs in this recipe. Try using fresh parsley, chives, or tarragon instead of dill. Each option brings a unique flavor to the dish. For example, tarragon adds a sweet, anise-like taste. If you want a more earthy flavor, rosemary works well too. Do not be afraid to mix and match. This way, you can create your own favorite version of lemon dill salmon. Pair your lemon dill salmon with tasty side dishes. Steamed green vegetables like asparagus or broccoli add color and crunch. A light salad with mixed greens and a lemon vinaigrette can brighten the meal. Quinoa or wild rice offers a hearty base that complements the salmon's flavors. You can even serve it with roasted potatoes for a cozy vibe. These sides make your meal complete and satisfying. After you enjoy your lemon dill salmon, store leftovers properly. Place the cooked salmon in an airtight container. Make sure to cool it down first. This helps keep it fresh. Store the container in the fridge for up to three days. If you want to keep the salmon longer, freezing is a good option. When you are ready to eat your leftovers, reheat the salmon carefully. The best way is to use the oven. Preheat the oven to 350°F (175°C). Place the salmon on a baking sheet. Cover it with foil to keep it moist. Heat for about 10-15 minutes or until warm. You can also use the microwave. If you choose this method, heat it in short bursts. Check after every 30 seconds. This will help you avoid overcooking. If you want to freeze your lemon dill salmon, follow these steps. First, let the salmon cool completely. Wrap each piece tightly in plastic wrap. Then, place them in a freezer-safe bag or container. Make sure to remove as much air as possible. Label the bag with the date. You can freeze the salmon for up to three months. To thaw, move the salmon to the fridge a day before you plan to eat it. This will help keep the taste and texture nice. You can tell if salmon is done by looking for a few signs. First, the salmon should change from a bright pink to a light pink or opaque color. Second, use a fork to gently flake the salmon. If it flakes easily, it is cooked. Finally, the thickest part of the fillet should reach an internal temperature of 145°F (63°C). Be careful not to overcook it. Overcooked salmon can become dry and tough. Yes, you can use frozen salmon. Just make sure to thaw it first. The best way to thaw salmon is to place it in the fridge overnight. If you're in a hurry, you can seal it in a plastic bag and submerge it in cold water for about an hour. When using thawed salmon, you might need to adjust the baking time slightly. Check for doneness a few minutes earlier to avoid overcooking. If you can't find dill, don't worry! You can use other herbs. Fresh parsley or tarragon work well in place of dill. Basil also adds a nice flavor, but it changes the dish a bit. You can even try fresh chives for a mild onion taste. Experiment with these herbs to find your favorite flavor! You’ve learned how to make a tasty lemon dill salmon. We covered key steps like mixing the marinade, baking, and serving perfectly. Remember to watch the cooking time for the best results. You can swap ingredients or try grilling for a new twist. Storing leftovers correctly helps keep your meal fresh. Keep experimenting with flavors and side dishes. Enjoy your cooking journey!

Lemon Dill Salmon Flavorful and Simple Bake Recipe

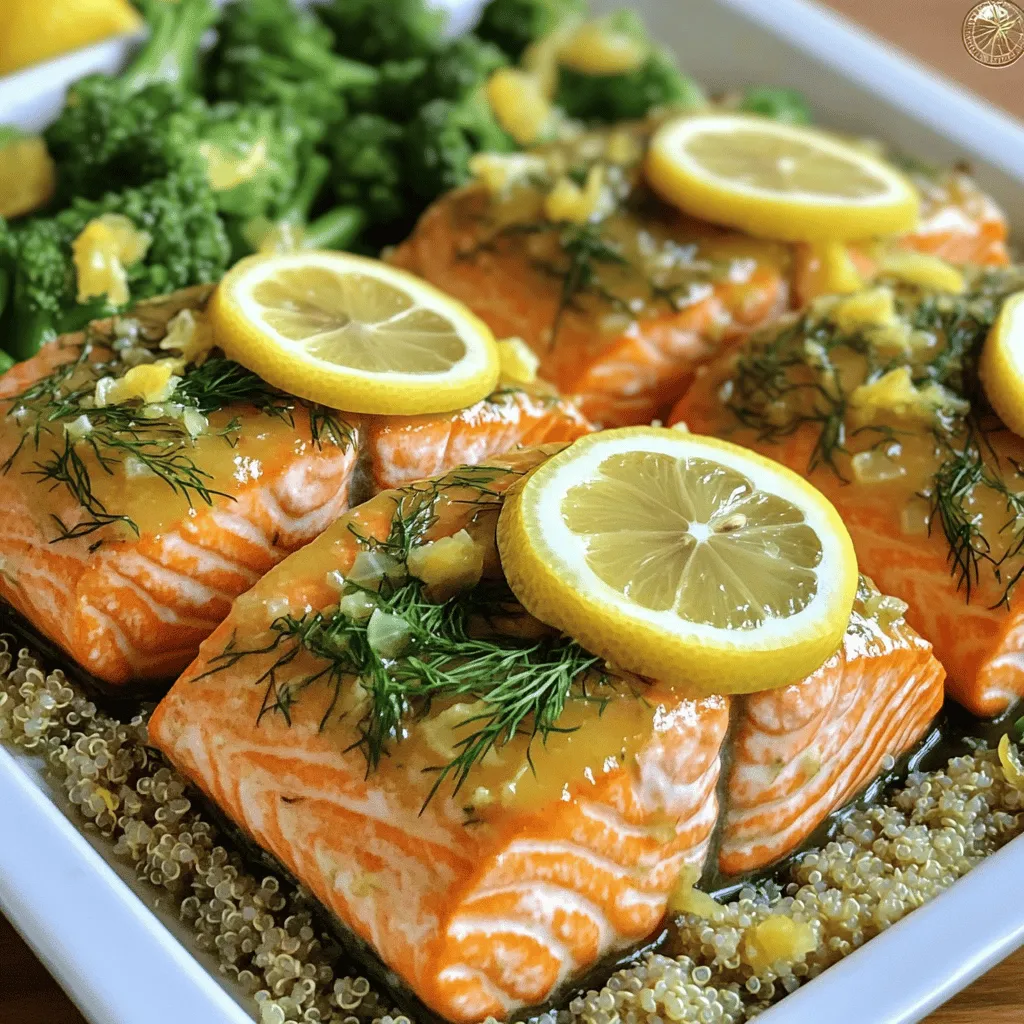
Looking for a delicious and easy dinner? Try my Lemon Dill Salmon recipe! This flavorful dish combines fresh ingredients for

- 1 ripe avocado - 1/4 cup fresh lime juice - 1/2 cup plain Greek yogurt - 1 tablespoon honey or agave syrup - 1 garlic clove, minced - 1/4 teaspoon ground cumin - Salt and pepper to taste - 2 tablespoons fresh cilantro, chopped (optional) The first key player in this dressing is the ripe avocado. It makes the dressing creamy and smooth. When selecting an avocado, look for one that yields slightly to gentle pressure. This means it is ripe and ready for your dish. Next, fresh lime juice adds zest and brightness. The tangy taste of lime balances the creaminess of the avocado. Fresh juice is best, as it has more flavor than bottled options. Greek yogurt is a fantastic addition, providing protein and a lovely tang. This thick yogurt helps make the dressing rich without adding too much fat. It’s a great swap for heavy creams. Honey or agave syrup adds a touch of sweetness. This flavor helps to balance the lime’s tartness. You can adjust the amount based on your taste. A minced garlic clove adds depth and savory notes. It gives the dressing a bit of a kick without being overpowering. Ground cumin brings warmth and earthiness to the mix. Just a little bit goes a long way in enhancing the overall flavor. Finally, don't forget salt and pepper. These simple seasonings help to bring all the flavors together. Use them to your taste. You can also include fresh cilantro for a burst of herb flavor. If you enjoy its taste, chop it finely and mix it in. Avocados are a superfood packed with healthy fats. They are rich in monounsaturated fats, which help your heart. They also provide fiber, potassium, and vitamins. Lime juice is low in calories but high in vitamin C. This vitamin is good for your immune system and skin. Its acidity helps with digestion too. Greek yogurt is full of protein and probiotics. Probiotics are great for gut health. It also contains calcium, which is important for strong bones. Together, these ingredients make a tasty dressing that is also good for you. You can enjoy this dressing guilt-free. For the full recipe, check out the Zesty Avocado Lime Dressing. 1. Cutting and scooping the avocado Start by cutting the avocado in half. Be careful with the knife. Remove the pit gently. Use a spoon to scoop out the green flesh into a blender. 2. Adding ingredients to the blender Next, add 1/4 cup of fresh lime juice. Then, include 1/2 cup of plain Greek yogurt. Add 1 tablespoon of honey or agave syrup. Toss in 1 minced garlic clove and 1/4 teaspoon of ground cumin. 3. Blending for the perfect texture Blend the mixture on high speed until it’s smooth and creamy. If it seems too thick, pour in a tablespoon of water. Blend again until you reach your desired texture. 1. Adjusting consistency with water If your dressing is still thick, add more water bit by bit. This helps you control the thickness. 2. Tasting and seasoning tips Taste your dressing. It should be bright and fresh. Sprinkle in salt and pepper to your liking. Season a little, taste, and adjust again if needed. 3. Adding cilantro for enhanced flavor If you love herbs, mix in 2 tablespoons of chopped fresh cilantro. This adds a burst of flavor. Stir it in gently. 1. Importance of refrigerating the dressing Pour the dressing into a jar or bowl. Refrigerate it for at least 30 minutes. This chilling time helps all the flavors blend well. 2. Flavor melding process As the dressing chills, the lime and garlic flavors will meld. You’ll notice a richer taste after it sits. Enjoy your zesty avocado lime dressing with your favorite dishes! - Using ripe avocados for creaminess: Choose avocados that give slightly when you press them. This means they are ripe and will blend smoothly, giving your dressing a rich texture. - Fresh lime juice vs. bottled: Always opt for fresh lime juice. It adds a bright taste that bottled juice can’t match. Fresh juice brings life to your dressing. - Optimal seasoning suggestions: Start with a pinch of salt and pepper. Taste as you go. You can also add a dash of cumin or chili powder for an extra kick. - Over-blending the dressing: Blend just until smooth. If you blend too much, the dressing may become too thin. - Skipping the chilling time: Letting the dressing chill for at least 30 minutes is key. This helps the flavors blend and taste better. - Not adjusting seasoning: Always taste before serving. You might need to add more salt, lime, or even honey for balance. - Recommended blenders and processors: A high-speed blender works best for a smooth dressing. Brands like Vitamix or Ninja are great choices. A standard food processor can also do the job well. - Other useful kitchen tools: Keep measuring spoons and cups handy. A citrus juicer makes getting fresh lime juice easier. A spatula helps scrape down the sides of the blender. For the full recipe, check out the Zesty Avocado Lime Dressing section above. {{image_2}} You can switch Greek yogurt for vegan options like silken tofu or cashew cream. This works well for a dairy-free version. For sweeteners, honey adds a floral note, while agave syrup gives a mild taste. You can also try maple syrup for a different flavor. Spice it up! Add herbs like dill or basil for a fresh twist. A pinch of cayenne can bring heat, while smoked paprika adds depth. This dressing pairs perfectly with a mixed green salad. It also works great as a dip for fresh veggies or chips. Try it on tacos or drizzled over grilled meats. It even complements seafood, adding a creamy zing to shrimp or fish dishes. You can make this dressing gluten-free by sticking to the basic recipe. If you want a vegan version, just use a plant-based yogurt. For low-carb diets, skip the sweeteners or use a low-carb option like erythritol. This dressing fits many diets, making it a versatile choice for any meal. For the full recipe, check the Zesty Avocado Lime Dressing section above. To keep your Avocado Lime Dressing fresh, store it in the fridge right after making it. Use an airtight container to prevent air from spoiling the flavors. A glass jar works great as it seals well and looks nice. Make sure to seal it tightly. This will help maintain its creamy texture and zesty taste. When stored properly in the fridge, your dressing can last about 3 to 5 days. Look for signs of spoilage, like a change in color or smell. If it turns brown or smells off, it’s best to toss it. Freshness is key to enjoying its bright flavor. You can freeze Avocado Lime Dressing! Use a freezer-safe container and leave some space at the top, as it may expand. When you're ready to use it, thaw it in the fridge overnight. Mix it well after thawing, as the ingredients may separate. This way, you can enjoy your dressing later without losing its taste! To make your dressing thicker, add more avocado. You can also use less lime juice or yogurt. Blend it again after adding more ingredients until smooth. This helps achieve the right texture. You can also chill it longer to make it creamier. Yes, you can use lemon juice in place of lime juice. This swap will give your dressing a different taste. Lemon adds a bright, fresh flavor. However, lime juice offers a unique zest that pairs well with avocado. Avocado Lime Dressing is great on salads. It also works well as a dip for veggies or chips. You can drizzle it on grilled meats or fish for added flavor. Try it in wraps or as a spread on sandwiches. You can keep the dressing in the fridge for up to five days. Store it in an airtight container for best results. Check for any off smells or color changes before using. If it looks good, it should be fine. Yes, this dressing is perfect for meal prep. It stores well and saves you time on busy days. Make a batch at the start of the week. It will add quick flavor to your meals and snacks. Check the Full Recipe for storage tips! In this post, we explored how to make Avocado Lime Dressing from fresh ingredients. We covered preparation, mixing tips, and storage. You learned about the health benefits of avocados and Greek yogurt. Remember, choose ripe avocados and chill the dressing for the best flavor. Whether you use it for salads or as a dip, this dressing adds a tasty touch. Enjoy experimenting with variations to make it your own.

Avocado Lime Dressing Flavorful and Simple Recipe

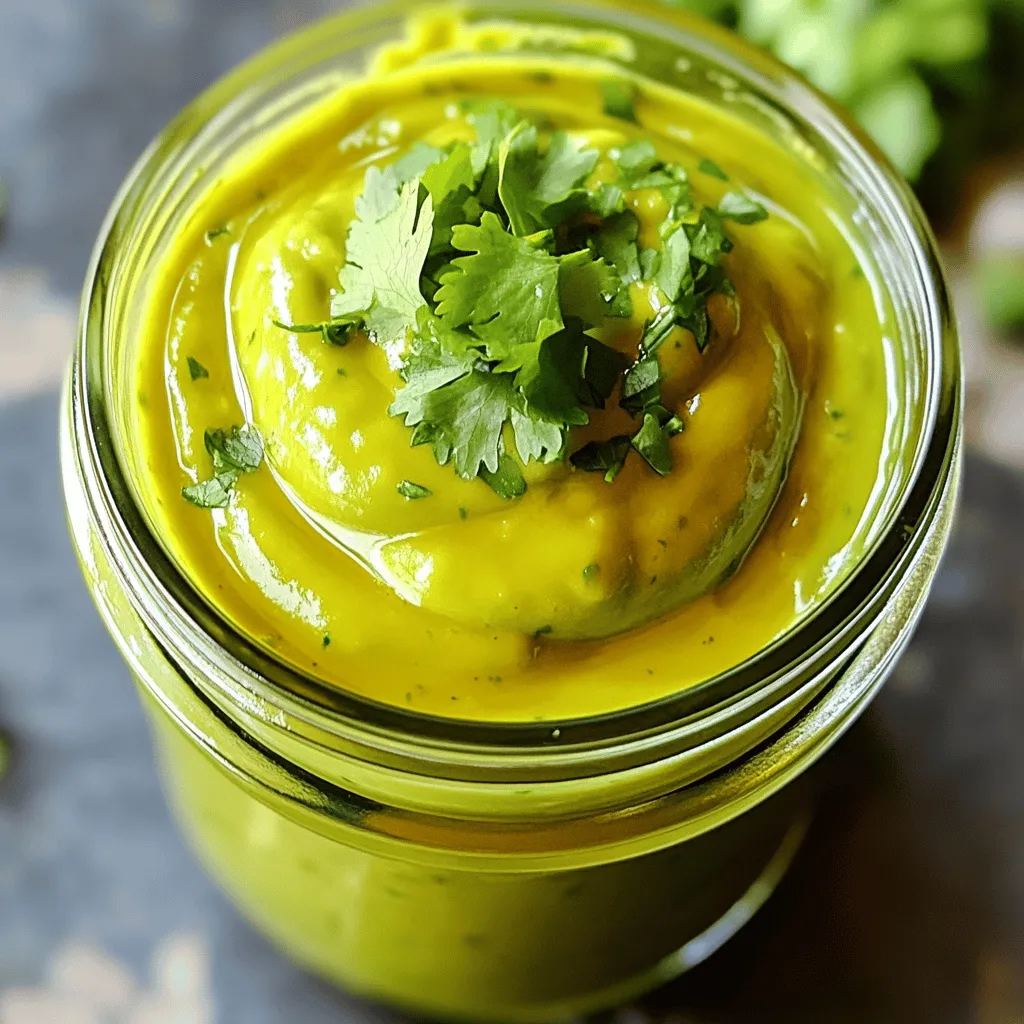
Are you ready to elevate your salads with a vibrant twist? This Avocado Lime Dressing is not just simple to

To make your crispy fried eggplant, you need these key items: - 2 medium eggplants, sliced into 1/4-inch rounds - 1 cup all-purpose flour - 1 teaspoon garlic powder - 1 teaspoon onion powder - 1 teaspoon paprika - Salt and pepper to taste - 2 large eggs - 1 cup breadcrumbs (preferably panko for extra crunch) - Vegetable oil for frying These ingredients create a perfect blend for crispy texture and rich flavor. You can add these ingredients for even more taste: - 1 teaspoon cayenne pepper for heat - 1 teaspoon dried oregano for a herbaceous note - Fresh parsley or basil for garnish These extras can elevate your dish and impress your guests. Having the right tools makes cooking easier. Here are my must-haves: - Sharp knife for slicing the eggplant - Three shallow bowls for the breading station - Deep frying pan or Dutch oven for frying - Slotted spoon for flipping and removing eggplant - Paper towels for draining excess oil Using these tools ensures a smooth cooking process and great results. For the full recipe, refer to the detailed instructions above. Start by slicing two medium eggplants into 1/4-inch rounds. This size helps them cook evenly. Next, sprinkle the slices with salt. This step pulls out extra moisture and bitterness. Let the slices sit for 30 minutes. After that, rinse the slices under cold water. Pat them dry with paper towels. This process ensures a tasty and crispy final dish. Now, let’s set up our breading station. First, grab a shallow bowl and mix 1 cup of all-purpose flour with 1 teaspoon each of garlic powder, onion powder, paprika, salt, and pepper. In another bowl, beat two large eggs until smooth. In a third bowl, place 1 cup of breadcrumbs. Panko works great for extra crunch. Dip each eggplant slice first into the flour mixture. Shake off the extra flour. Next, coat it in the egg, making sure to cover it well. Finally, press it into the breadcrumbs. This will create a nice layer. Repeat this for all slices. For frying, heat about 1/2 inch of vegetable oil in a deep frying pan over medium heat. Aim for about 350°F or 175°C. Carefully add the breaded eggplant slices in batches. Fry them for about 3-4 minutes on each side. This timing helps them turn golden brown. Use a slotted spoon to flip them. Once crispy, transfer the slices to a plate lined with paper towels. This will absorb any extra oil. Now, your crispy fried eggplant is ready to enjoy! You can check the full recipe for any details you might have missed. Choosing the right eggplant is key. Look for firm, smooth skin without spots. The weight should feel heavy for its size. Young eggplants are best. They have fewer seeds and a sweeter taste. If the eggplant feels soft, it's likely overripe and bitter. Always pick eggplants that feel solid and fresh. To get that perfect crunch, follow these tips. Start by salting the eggplant slices. This helps remove moisture and bitterness. Let them sit for at least 30 minutes. Rinse and dry them well before breading. Use panko breadcrumbs for extra crunch. When frying, do not crowd the pan. Fry in batches to keep the oil hot. This helps achieve that golden-brown color and crisp texture. Watch out for these common errors. Do not skip salting the eggplant. This step is crucial for flavor and texture. Avoid using too much oil. If the oil is too shallow, the eggplant may not fry evenly. Also, don’t rush the frying. Allow each piece to cook fully before flipping. Lastly, resist the urge to move them around too much. Let them sit in the oil to get crispy. Follow these tips for a tasty, crispy fried eggplant experience! {{image_2}} You can add fun flavors to crispy fried eggplant with spices. Try using curry powder for a warm, earthy taste. For a spicy kick, add cayenne pepper or chili flakes. You can also mix up the herbs. Italian herbs like oregano and thyme work great too. Even a bit of lemon zest can brighten the flavor. Experiment until you find your favorite blend! You don’t have to fry your eggplant to make it crispy. Baking is a great option. Preheat your oven to 425°F (220°C). Place the breaded slices on a baking sheet lined with parchment paper. Spray them lightly with cooking oil. Bake for 20-25 minutes, flipping halfway through. For air frying, set your air fryer to 375°F (190°C). Cook for about 10-15 minutes. Both methods give you a lighter, yet still crispy, eggplant! Crispy fried eggplant shines on its own, but it pairs well with many foods. Serve it with marinara sauce for dipping. A tangy yogurt sauce adds a nice touch too. You can also stack the slices in a sandwich or use them in a salad. Top your eggplant with feta cheese or fresh herbs for extra flavor. These ideas will make your meal even more delicious. If you're looking for the full recipe, check it out [here](#). To store your leftover crispy fried eggplant, let it cool down first. Place the slices in an airtight container. Make sure to layer them with paper towels. This helps absorb any moisture and keeps them crispy. Store the container in the fridge. They will stay fresh for about 2-3 days. When you’re ready to enjoy your leftovers, reheating is key. I recommend using an oven or an air fryer. Preheat the oven to 375°F (190°C). Place the eggplant slices on a baking sheet. Bake for about 10-15 minutes until they are hot and crispy. If using an air fryer, set it to 350°F (175°C) and heat for about 5-7 minutes. Avoid the microwave, as it can make them soggy. If you want to freeze your crispy fried eggplant, it’s best to freeze them before frying. After breading, arrange the slices in a single layer on a baking sheet. Place the baking sheet in the freezer for about 1-2 hours. Once frozen, transfer the slices to a freezer-safe bag. They will keep well for up to 3 months. When you’re ready to cook them, fry them straight from the freezer. Check the full recipe for detailed cooking instructions. Yes, you can easily make Crispy Fried Eggplant gluten-free. Just swap out the all-purpose flour for a gluten-free flour blend. You can also use gluten-free breadcrumbs. Make sure to check the labels to ensure they are certified gluten-free. This way, you can enjoy the same crispy texture without the gluten. To keep your eggplant crispy, salt is key. Start by slicing the eggplant and sprinkling it with salt. Let it sit for about 30 minutes. This draws out excess moisture and bitterness. After that, rinse the slices well and pat them dry with paper towels. Proper drying is crucial to avoid sogginess. Also, ensure your oil is hot enough when frying. This helps create that golden, crispy exterior. Crispy Fried Eggplant goes great with several sauces. A classic marinara sauce is always a hit. You can also try a tangy tzatziki or a spicy aioli for a twist. For something unique, a sweet chili sauce adds a nice kick. Experiment with different sauces to find your favorite pairing! You learned how to make crispy fried eggplant today. We covered key ingredients, steps to prepare, and the right tools. I shared tips for choosing the best eggplants and avoiding mistakes. You also discovered fun flavor variations and storage methods. Now, you can enjoy delicious, crunchy eggplant any time. With these skills, feel free to experiment and personalize your dish. Your kitchen adventures await!

Crispy Fried Eggplant Irresistible Cooking Guide

Crispy fried eggplant is a dish that will steal your heart. With the right steps, you can create a crunchy,

To make these tasty lemon poppy seed muffins, gather the following ingredients: - 1 ½ cups all-purpose flour - 1 tablespoon poppy seeds - 1 teaspoon baking powder - ½ teaspoon baking soda - ¼ teaspoon salt - ½ cup unsalted butter, softened - 1 cup granulated sugar - 2 large eggs - Zest of 1 lemon - ½ cup plain yogurt - 2 tablespoons fresh lemon juice - 1 teaspoon vanilla extract For a sweet glaze, use these simple ingredients: - ½ cup powdered sugar - 2 tablespoons fresh lemon juice These muffins offer a delightful balance of flavors and nutrients. Each muffin contains roughly: - Calories: 180 - Protein: 3g - Fat: 7g - Carbohydrates: 27g - Fiber: 1g - Sugar: 10g This breakdown helps you understand what you’re enjoying with every bite. Enjoy the flavor without guilt! For the full recipe, check out the complete guide. Start by preheating your oven to 350°F (175°C). This step is key for even baking. While the oven warms up, line your muffin tin with paper liners. This makes cleanup easy and helps the muffins pop out smoothly. In a medium bowl, whisk together the dry ingredients. Combine 1 ½ cups of flour, 1 tablespoon of poppy seeds, 1 teaspoon of baking powder, ½ teaspoon of baking soda, and ¼ teaspoon of salt. This mix gives your muffins the right texture and flavor. Set this bowl aside for later. In a large bowl, add ½ cup of softened unsalted butter and 1 cup of granulated sugar. Use a mixer to cream them together until the mixture is light and fluffy. This step adds air and helps your muffins rise perfectly. Next, add two large eggs one at a time, mixing well after each. After that, stir in the zest of 1 lemon, ½ cup of plain yogurt, 2 tablespoons of fresh lemon juice, and 1 teaspoon of vanilla extract until everything is blended well. Now it's time to bring the wet and dry ingredients together. Gradually add the dry mix to the wet mix. Stir gently until just combined. Be careful not to overmix; a few lumps are okay. This keeps your muffins light and fluffy. When the batter looks good, scoop it into the muffin tin. Fill each cup about two-thirds full. This allows room for the muffins to rise without overflowing. Bake your muffins for 18-20 minutes. To check if they are done, insert a toothpick in the center. If it comes out clean, they are ready. Once baked, let them cool in the pan for 5 minutes. Then, transfer them to a wire rack. While they cool, prepare a glaze by mixing ½ cup of powdered sugar with 2 tablespoons of fresh lemon juice in a bowl. Drizzle this glaze over the warm muffins for a sweet finish. To keep your muffins moist, use yogurt in the batter. The yogurt adds creaminess and keeps the muffins soft. Also, do not overmix the batter. Overmixing can make muffins tough. Mix just until the dry and wet ingredients come together. This helps trap air and keeps them light. One common mistake is not measuring the flour correctly. Too much flour can lead to dry muffins. Use a spoon to scoop the flour into the measuring cup, then level it off with a knife. Also, make sure your oven is at the right temperature. An oven thermometer can help. Lastly, don't skip the muffin liners. They help with easy removal and keep the muffins from sticking. To check if your muffins are done, use a toothpick. Insert it into the center of a muffin. If it comes out clean, they are ready. If it has batter on it, bake for a few more minutes. Another method is to gently press the top of a muffin. It should spring back if it is done. These tips help ensure your Lemon Poppy Seed Muffins turn out great every time. For a full guide, check the Full Recipe. {{image_2}} You can enjoy lemon poppy seed muffins with or without glaze. The glaze adds sweetness and a nice shine. It mixes powdered sugar with lemon juice. If you want a lighter muffin, skip the glaze. The muffins still taste great on their own. If you have dietary needs, you can easily adjust this recipe. For gluten-free muffins, use a gluten-free flour blend. You can swap regular yogurt for dairy-free yogurt. If you prefer to cut sugar, use a sugar substitute. These changes keep the taste while meeting your needs. To make your muffins stand out, add fruits or nuts. Blueberries, raspberries, or chopped apples work well. Nuts like walnuts or almonds add crunch. Just fold them into the batter before baking. This gives you a new twist on a classic recipe. You can find the full recipe above to start your baking adventure! To store your leftover lemon poppy seed muffins, let them cool completely first. Place them in an airtight container. This keeps them fresh and soft. You can also wrap each muffin in plastic wrap for extra protection. Store them at room temperature for up to three days. If you want them to last longer, consider freezing them. Freezing is a great way to keep your muffins fresh for later. After they cool, wrap each muffin in plastic wrap. Then, place them in a freezer bag. Make sure to squeeze out all the air. Label the bag with the date. You can freeze muffins for up to three months. When you're ready to enjoy one, just take it out and let it thaw at room temperature. Reheating your lemon poppy seed muffins is easy. Preheat your oven to 350°F (175°C). Place the muffins on a baking sheet. Heat them for about 5 to 10 minutes. This warms them up and makes them taste fresh again. You can also use a microwave. Just heat them for about 15 to 20 seconds. Enjoy them warm for the best flavor! For the full recipe, check out the complete details. Yes, you can use whole wheat flour. It will make your muffins denser. Start with half whole wheat and half all-purpose flour. This mix keeps the flavor light while adding some whole grain goodness. To reduce sweetness, cut down the sugar to ¾ cup. You can also add extra lemon juice for a tangy kick. Adding some plain yogurt helps balance the flavors without adding more sugar. To make these muffins vegan, replace eggs with flax eggs. Mix 2 tablespoons of ground flaxseed with 6 tablespoons of water. Let it sit until it thickens. Use plant-based yogurt and dairy-free butter in the recipe. Dense muffins often happen from overmixing the batter. Mix until just combined. Also, check your baking powder. It should be fresh for the best rise. If your muffins are still dense, add a bit more baking soda. Yes, you can make mini muffins! Just fill the mini muffin tin about halfway. Bake for 12-15 minutes. Keep an eye on them to avoid overbaking. These muffins burst with bright lemon flavor. The poppy seeds add a nice crunch and nutty taste. Together, they create a light, fresh muffin that’s perfect for breakfast or a snack. If you want more zest, add extra lemon zest to the batter. For the full recipe, check out the Lemon Poppy Seed Delight. You learned how to make lemon poppy seed muffins from scratch. We covered the ingredients, step-by-step instructions, and helpful tips. Plus, you discovered variations and storage methods. These muffins can be sweet or simple, based on your choices. With practice, you can bake perfect muffins every time. Enjoy experimenting with flavors and share your creations! Happy baking!

Lemon Poppy Seed Muffins Quick and Easy Recipe

Are you ready to bake the fluffiest Lemon Poppy Seed Muffins? This quick and easy recipe is perfect for a

To make delicious coconut lime rice, gather these simple ingredients: - 1 cup jasmine rice - 1 can (14 oz) coconut milk - 1 cup water - 1 lime (zested and juiced) - 1 teaspoon salt - 1 tablespoon sugar - 2 tablespoons fresh cilantro, chopped (for garnish) - Lime wedges (for serving) You can adjust this recipe with easy swaps if needed: - Swap jasmine rice for basmati or long-grain rice. - Replace coconut milk with almond milk for a lighter option. - Use lemon instead of lime for a different zest. - Brown sugar can work in place of white sugar. - If you don’t have cilantro, parsley or green onions can add fresh flavor. To make this recipe, you’ll need basic kitchen tools: - A medium saucepan for cooking the rice. - A measuring cup for accurate ingredient portions. - A zester or grater for the lime. - A fork for fluffing the rice after cooking. - A cutting board and knife for chopping cilantro. This coconut lime rice recipe is easy to follow. You can find the full recipe for more details. Start by rinsing the jasmine rice. Use cold water and let it run until clear. This step removes extra starch. It helps keep the rice fluffy and not sticky. Measure 1 cup of jasmine rice for this recipe. In a medium saucepan, mix the rinsed rice with coconut milk and water. Add salt, sugar, lime zest, and half of the lime juice. Stir gently to combine all the ingredients. Heat the mixture on medium-high until it boils. Once boiling, reduce the heat to low. Cover the saucepan and let it simmer for 15 to 20 minutes. The rice should absorb all the liquid and become tender. After cooking, remove the saucepan from the heat. Let it sit, covered, for 5 minutes. This resting time helps the rice fluff up. Once ready, uncover the rice and fluff it gently with a fork. Add the remaining lime juice for a brighter flavor. Serve the coconut lime rice warm. Garnish it with chopped cilantro and lime wedges. This dish pairs well with many meals. You can find the Full Recipe for more details. To make your rice fluffy, rinse it well. Rinse the jasmine rice until the water runs clear. This removes extra starch. Starch makes the rice sticky. Use the right water-to-rice ratio. For this recipe, mix one cup of rice with one can of coconut milk and one cup of water. Once cooked, let it sit for five minutes after boiling. This resting time helps the rice become fluffy. Use a fork to fluff the rice gently before serving. You can boost the flavor in many ways. Lime zest adds a bright taste. Fresh cilantro gives a nice herbal note. Consider adding a pinch of chili flakes for heat. You can also mix in peas or diced bell peppers for color. These additions make the dish more vibrant and fun. Avoid overcooking the rice. This can make it mushy. Keep an eye on the cooking time. Also, don’t skip rinsing the rice. It’s key for texture. If you forget to let the rice rest, it won’t fluff up well. Follow these tips for a perfect coconut lime rice every time. For the full recipe, check the earlier section. {{image_2}} You can make coconut lime rice even better by adding vegetables. Use colorful veggies like bell peppers, peas, or carrots. Chop them into small pieces and sauté them in a bit of oil before adding them to the rice. This adds texture and nutrition. The veggies soak up the coconut and lime flavor, making every bite tasty. To turn coconut lime rice into a full meal, add protein. Grilled chicken, shrimp, or tofu work great. Cook the protein separately, then mix it in with the rice. The creamy coconut and zesty lime pair well with these options. This way, you get a balanced dish that fills you up. If you want a vegan version, skip the animal proteins. Use chickpeas or black beans instead. They add protein and fiber too. Check that your coconut milk is dairy-free, which it usually is. You can also try adding nuts like cashews or almonds for a crunchy twist. This keeps your meal plant-based and delicious. For more details, check the Full Recipe. After you enjoy your meal, let the coconut lime rice cool to room temperature. Then, place it in an airtight container. This helps keep it fresh. You can store it in the fridge for up to three days. If you want to keep it longer, consider freezing it. To reheat, take the rice from the fridge. Place it in a microwave-safe bowl. Add a splash of water to keep it moist. Cover it with a lid or a damp paper towel. Heat it in the microwave for about 1-2 minutes. Stir it halfway through. If you froze the rice, thaw it in the fridge overnight first. Freezing is a great option if you want to save some coconut lime rice for later. Use a freezer-safe container. Scoop the cooled rice into the container, leaving some space at the top. This allows for expansion. Seal it tightly and label it with the date. You can freeze it for up to two months. When you're ready to eat, thaw it in the fridge and reheat as mentioned above. This way, you can always have a taste of tropical goodness on hand! You can make Coconut Lime Rice without coconut milk by using vegetable broth. Start with the same amount of rice and water. Replace the coconut milk with broth. Add lime juice and zest to keep the flavor bright. This method gives you a savory twist without losing the rice's deliciousness. Yes, you can use different types of rice. Jasmine rice is great for its fragrance. However, long-grain rice or basmati rice can work well too. Just adjust the water amount based on the rice type you choose. Follow the cooking time on the package for best results. Coconut Lime Rice pairs well with many dishes. Try it with grilled chicken or shrimp for a tasty meal. It also complements spicy curries or stir-fried vegetables. Don't forget to add lime wedges for an extra zing! You can find the full recipe for Coconut Lime Rice to get started. To make the perfect Coconut Lime Rice, start with the right ingredients and equipment. Follow each step carefully to ensure your rice turns out fluffy and tasty. Remember to enhance the flavor with herbs or spices, and watch out for common mistakes. Explore delicious variations to suit your taste. Lastly, store leftovers properly and enjoy them later. Rice is a simple dish, but with the right tips, it shines. I hope these insights help you create a fantastic meal. Enjoy your cooking!

Coconut Lime Rice Flavorful and Easy Recipe Guide

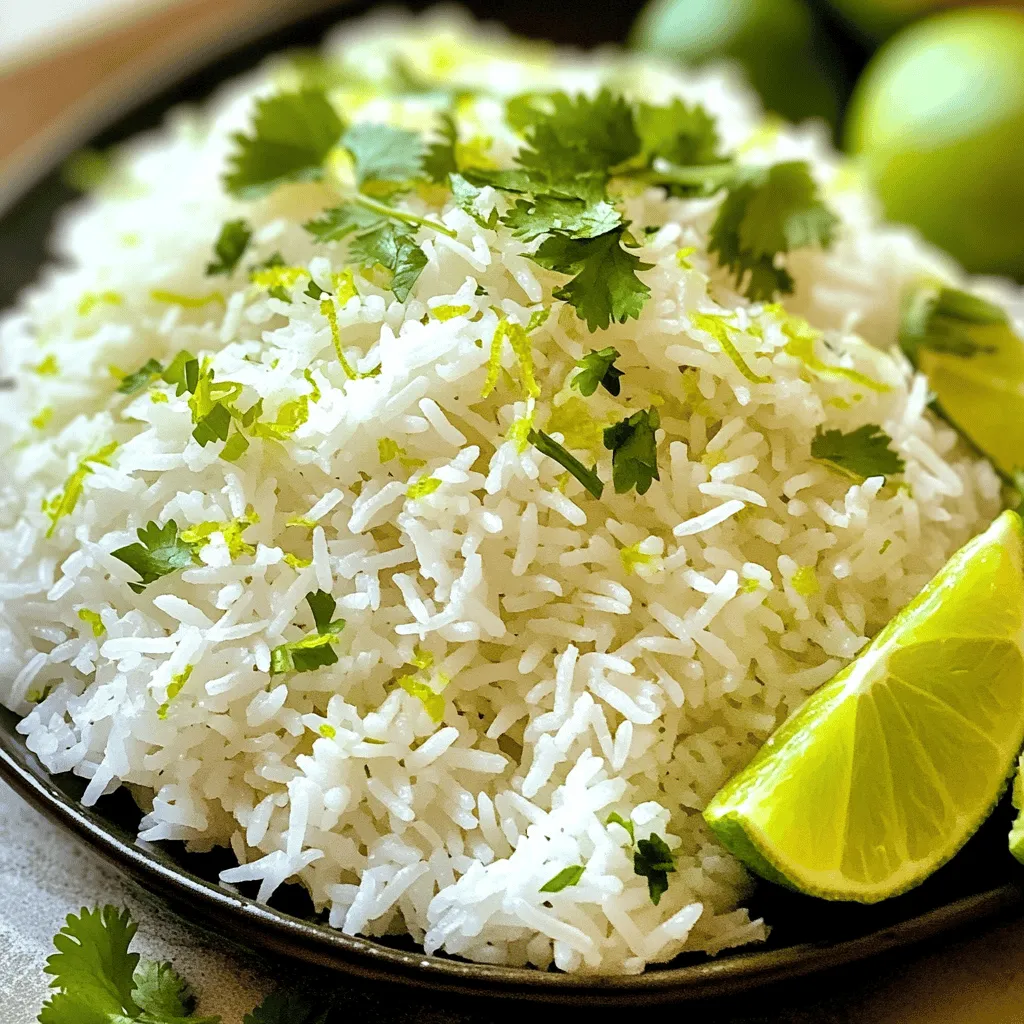
Are you ready to elevate your meals with a burst of tropical flavor? This Coconut Lime Rice recipe is not

- 1 large head of cauliflower, cut into florets - 6 cloves of garlic, peeled - 2 tablespoons olive oil - 1/4 cup unsweetened almond milk (or any preferred milk) - 2 tablespoons butter (or vegan butter) - Salt and pepper to taste - Fresh chives for garnish - Parmesan cheese for a creamy, cheesy flavor - Cream cheese for extra richness - Nutritional yeast for a vegan cheese flavor When I create roasted garlic mashed cauliflower, I start with fresh ingredients. The cauliflower is key. It gives the dish its base and texture. I cut it into florets, making it easier to roast. Garlic adds a mellow sweetness once roasted. Six cloves of garlic might seem like a lot, but it makes the flavor shine. Next, I drizzle in olive oil. This not only helps with roasting but also adds richness. Don't forget the almond milk! It keeps the mash creamy. If you like butter, you can use that too. A couple of tablespoons make everything taste better. Salt and pepper are must-haves. They bring out the flavors of the vegetables. Finally, I love to sprinkle fresh chives on top for color and taste. They give a fresh bite that brightens everything up. If you want to make it even richer, consider some optional add-ins. Parmesan cheese gives a nice cheesy flavor. Cream cheese also adds a smooth texture. If you’re vegan, nutritional yeast can replace cheese and still taste great. You can find the full recipe to make this dish at home. Each ingredient plays a role in creating a creamy delight you'll love. - Preheat your oven to 400°F (200°C). - Toss the cauliflower florets and garlic cloves with olive oil, salt, and pepper. Start by cutting the cauliflower into bite-size pieces. This helps it cook evenly. Next, peel the garlic cloves and add them to the bowl. Use enough olive oil to coat the veggies lightly. Salt and pepper add flavor, so don't skip this step! Make sure everything is well mixed. - Spread the mixture evenly in a baking dish. - Roast for 25-30 minutes until tender and caramelized. Once you have everything mixed, spread it in a single layer in a baking dish. This allows the veggies to roast properly. Keep an eye on them as they cook. You want them to become soft and slightly golden. The smell will be amazing! - Combine roasted ingredients with almond milk and butter. - Blend until smooth and creamy, or mash for a chunkier texture. - Season with salt and pepper, and garnish with chives. After roasting, let the dish cool slightly. Transfer the roasted cauliflower and garlic into a large bowl. Add the almond milk and butter for creaminess. Blend with an immersion blender until smooth. If you like it chunkier, just mash it with a potato masher. Taste your mixture and adjust the salt and pepper as needed. Finally, sprinkle chopped chives on top for color. For the full recipe, refer to the section above. Enjoy your creamy delight with your favorite meal! To get that creamy consistency, roast the cauliflower and garlic until they are tender. This step is key. When you blend them, add almond milk and butter for richness. If it's too thick, add more milk. For a lighter touch, use a potato masher instead of a blender. This gives you some texture while still being smooth. Adjust the salt and pepper to match your taste. Always taste as you go! If you have any leftovers, don’t worry! You can mix them into soups or make a dip for veggies. Leftover mashed cauliflower can also stuff into baked potatoes for a new dish. When reheating, do it slowly on low heat. This keeps the flavor fresh and the texture nice. You can add a splash of milk while reheating to keep it creamy. To achieve smooth results, I recommend using an immersion blender. It's easy and quick. If you prefer a regular blender, make sure to blend in batches to avoid spills. For roasting, a glass or ceramic baking dish works best. These help the cauliflower brown nicely and develop flavor. Always choose a dish that allows for even heat. {{image_2}} You can change the taste of roasted garlic mashed cauliflower easily. Adding herbs like thyme or rosemary gives it a fresh twist. These herbs add depth and aroma. You can also make it spicy by adding red pepper flakes. Just a pinch can turn up the heat and excite your palate. For those who follow a vegan diet, you can swap out butter for vegan butter. This keeps the dish creamy without dairy. Almond milk is a great choice, but any plant-based milk works well too. If you have nut allergies, use oat milk or soy milk instead. These options keep the dish safe and tasty. Roasted garlic mashed cauliflower is very versatile. You can pair it with proteins like chicken or fish. It makes a great side dish that balances flavors. You can also use it as a filling for wraps. Just add some veggies or protein, and you have a meal ready to go! For detailed steps to make this dish, check the Full Recipe. To keep your Roasted Garlic Mashed Cauliflower fresh, store it in airtight containers. Glass containers work well, but plastic ones are fine too. Make sure you cool the dish before sealing it. This helps prevent moisture buildup. You can keep it in the fridge for about 3 to 5 days. Just remember to label the container with the date! If you want to save your mashed cauliflower for later, freezing is a great option. Portion it into freezer-safe bags or containers. Make sure to remove as much air as possible. You can freeze it for up to 3 months. When you're ready to eat, thaw it in the fridge overnight. For reheating, place it in a pot over low heat. Stir often to keep it smooth. You can add a splash of almond milk if it seems dry. Enjoy your creamy delight even after a few months! Roasted garlic mashed cauliflower is a creamy side dish. It uses cauliflower and garlic for a tasty twist. This dish is lower in carbs than traditional mashed potatoes. Nutritionally, it's rich in vitamins C and K. Plus, it has fiber and antioxidants. The roasting brings out a sweet flavor in the garlic, making it a delight for your taste buds. Yes, you can prepare this dish ahead of time. Roast the cauliflower and garlic, then let them cool. Store them in the fridge for up to three days. When you're ready to serve, reheat them in a pot on low heat. Add a splash of almond milk if it feels too thick. Stir until it’s hot and creamy again. To make roasted garlic mashed cauliflower vegan, swap butter for vegan butter. Use almond milk or any plant-based milk. This way, you keep the creamy texture without dairy. The taste remains just as rich and delightful. There are many ways to change up this dish. You can add herbs like thyme or rosemary for extra flavor. Try mixing in nutritional yeast for a cheesy taste without dairy. For a spicy kick, sprinkle in some red pepper flakes. These small changes can make your dish new and exciting! To sum up, I guided you through making roasted garlic mashed cauliflower. I covered the key ingredients, from cauliflower to flavor boosters. You learned step-by-step instructions for preparation and roasting. I shared tips on achieving perfect texture, using leftovers, and suggested variations for flavor. In the end, this dish is simple and versatile. Whether you make it vegan or add cheese, it suits many tastes. Enjoy experimenting with this comforting recipe!

Roasted Garlic Mashed Cauliflower Creamy Delight

Are you ready to embrace a new, creamy delight? Roasted Garlic Mashed Cauliflower is a tasty twist on traditional mashed

- 1 can (15 oz) chickpeas, drained and rinsed - 1 red bell pepper, diced - 1 cucumber, diced - 1 small red onion, finely chopped - 1 jalapeño, seeded and minced (optional for extra heat) - 1/4 cup fresh cilantro, chopped - 3 tablespoons olive oil - 2 tablespoons lime juice - 1 teaspoon ground cumin - 1/2 teaspoon smoked paprika - Salt and pepper to taste - Prep Time: 10 mins - Cook Time: 20 mins - Servings: 4 When I think of a fresh and zesty dish, Spicy Chickpea Salad is at the top of my list. The chickpeas provide a solid base, packed with protein and fiber. I love how the colors from the red bell pepper and cucumber pop in the bowl. Each bite bursts with flavor. The dressing is where the magic happens. The olive oil and lime juice blend together, creating a bright and tangy taste. Ground cumin adds warmth, while smoked paprika gives a hint of smokiness. I often tweak the seasoning, adding more lime juice for extra zest or salt to enhance the flavors. This salad is quick to make, taking about 10 minutes for prep and 20 minutes total. It serves four, making it perfect for a light lunch or a side dish at dinner. You can easily pair it with grilled meats or serve it alone for a satisfying meal. For the full experience, check out the [Full Recipe]. - First, drain and rinse the chickpeas. This step removes excess salt and helps the salad taste fresh. - Next, dice the red bell pepper, cucumber, and red onion into small pieces. This makes the salad easy to eat. - If you want some heat, mince the jalapeño. Also, chop the fresh cilantro for added flavor. - In a large bowl, combine the chickpeas and all the diced vegetables. - Add the chopped cilantro and mix everything together evenly. You want each bite to have a bit of everything. - In a small bowl, whisk together olive oil, lime juice, cumin, smoked paprika, salt, and pepper. This dressing gives the salad its zesty flavor. - Drizzle the dressing over the salad and toss gently. Make sure all the ingredients get coated well. - Let the salad sit for about 10 minutes before serving. This marinading time allows the flavors to mix and develop. Enjoy your Spicy Chickpea Salad! For the full recipe, check out the [Full Recipe]. To get the heat just right, adjust the jalapeño and spices to your taste. If you like more heat, consider adding a few drops of hot sauce or a sprinkle of chili flakes. This salad is all about your preference, so don't be shy; find your perfect balance. Fresh lime juice makes a big difference. It tastes much better than bottled juice. You can also experiment with fresh herbs. Try adding parsley or dill for a twist. These herbs boost the salad's flavor and add a fresh touch. Serve your salad in a large bowl for sharing or in individual portions. This makes it look great and easy to serve. For garnish, sprinkle cilantro on top and add lime wedges on the side. These small touches make your dish pop and invite everyone to dig in. {{image_2}} You can change the flavors of your Spicy Chickpea Salad easily. For a different taste, substitute roasted red peppers or cherry tomatoes. They both add sweetness and depth. You can also add avocado for creaminess. This makes the salad rich and smooth, balancing the spice. This salad is gluten-free and vegan-friendly. It is perfect for many diets. To make it lower in sodium, use low-salt chickpeas. This keeps the dish healthy without losing flavor. Want to make your salad heartier? Include chicken, tuna, or feta cheese for a protein boost. These options can make it a full meal. You can mix and match based on what you like or have at home. Enjoy the Full Recipe for more ideas! Keep your Spicy Chickpea Salad in an airtight container in the fridge. This keeps it fresh and safe to eat. You should eat the salad within 2-3 days for the best taste. The flavors may get stronger over time, which some people enjoy. You can serve this salad cold or at room temperature. There is no need to reheat it. Enjoy it as a quick and easy meal! For the full recipe, check out the earlier sections. Yes, but for best results, add dressing just before serving. This keeps the salad fresh and crunchy. If you dress it early, the veggies may get soggy. So, wait until you’re ready to eat. This salad pairs well with grilled meats, pita bread, or as a light meal on its own. The flavors work nicely with chicken or fish. You can also enjoy it as a side dish for a barbecue. To make it less spicy, reduce or omit the jalapeño. You can also use less paprika. This way, you keep the salad tasty without too much heat. Adjust to your taste for a milder version. Absolutely, it's great for meal prep and lasts well in the fridge. You can store it in an airtight container. It stays fresh for 2-3 days. The flavors become more intense, adding to the taste. Check out the Full Recipe for more details! This chickpea salad recipe is simple and full of flavor. We covered the main ingredients, how to mix them, and tips to make it even better. Remember, adjust the spices to suit your taste. You can easily customize it with different veggies or proteins. Enjoying this salad will bring freshness to your meals. Plus, it’s perfect for making ahead of time. With these easy steps, you'll create a satisfying dish that's healthy and delicious.

Spicy Chickpea Salad zesty and fresh delight

Looking for a fresh and zesty dish? My Spicy Chickpea Salad is just what you need! With a mix of

- 2 ripe bananas, frozen - 2 tablespoons chocolate hazelnut spread (like Nutella) - 1 cup almond milk (or any milk of choice) - 1 tablespoon unsweetened cocoa powder - 1 tablespoon chia seeds - 1 tablespoon honey or maple syrup (optional, for extra sweetness) - Handful of ice cubes - 1 tablespoon crushed hazelnuts (for garnish) - For a vegan option, use coconut milk or oat milk instead of dairy milk. - You can swap honey for agave syrup or a low-calorie sweetener. - If you need nut-free options, try sunflower seed butter in place of chocolate hazelnut spread. When you pick the right ingredients, you set the stage for a great smoothie! The frozen bananas give it a thick and creamy texture. The chocolate hazelnut spread adds a sweet and rich flavor. Using almond milk or any milk you like keeps it light but adds creaminess. Cocoa powder enhances the chocolate taste, while chia seeds boost nutrition. If you want it sweeter, honey or maple syrup can help. By knowing your options, you can customize this smoothie to fit your taste and diet. You don’t just make a drink; you create a delicious experience that matches your needs. This flexibility makes this recipe a favorite among all types of eaters! Using frozen bananas gives the smoothie a thick and creamy texture. They make the drink cold and smooth, just like ice cream. Gather your tools first. You need a blender, measuring spoons, and a cup. Make sure to have tall glasses for serving. Add the ingredients to the blender in this order: frozen bananas, chocolate hazelnut spread, cocoa powder, almond milk, chia seeds, and any sweetener. This order helps everything blend well. Blend on high until it is completely smooth and creamy. If the smoothie is too thick, add more almond milk. Taste it! If you want it sweeter, add more honey or syrup and blend again. Pour the smoothie into your chilled glasses. For a fun touch, drizzle some chocolate hazelnut spread inside the glass before pouring. This makes it look fancy! Top the smoothie with crushed hazelnuts for a nice crunch. You can even add a banana slice on the rim for decoration. Enjoy your rich and creamy delight! To make your smoothie super creamy, always use frozen bananas. Fresh bananas can make it too runny. Frozen bananas add thickness and chill. They help create that rich texture we love. If you only have fresh bananas, add extra ice cubes. This will help thicken the smoothie. When you add milk, do it slowly. Pour in a little at a time. Blend between each addition. This way, you can control how thick or thin your smoothie is. Want to make your smoothie healthier? You can add some great extras. A scoop of protein powder boosts your protein. Spinach or kale adds fiber and vitamins. Greek yogurt makes it creamy and gives probiotics. Just remember, balance is key. If you add strong flavors, like spinach, use sweeter fruits. This helps keep the taste nice. You can also try different nut butters for a twist. Almond butter or peanut butter both work well. If you have leftover smoothie, store it in an airtight container. This helps keep it fresh. It’s best to drink it within 24 hours. To keep bananas fresh, store them at room temperature. If they start to brown, they’re still good for smoothies. You can also freeze overripe bananas. This way, you always have frozen bananas ready for your next smoothie. They can last up to six months in the freezer. {{image_2}} To make your Chocolate Hazelnut Banana Smoothie even more fun, try adding different fruits. Strawberries and blueberries work great. They add a burst of flavor and color. Just blend them in with the bananas for a fruity twist. You can also switch up the nut butter. While chocolate hazelnut spread is a classic, almond butter or peanut butter can add unique tastes. Each nut butter brings its own charm. Experiment to find what you love best! Want to make your smoothie keto-friendly? You can swap out the banana for avocado. It gives a creamy texture with fewer carbs. Use unsweetened almond milk to keep it low in sugar. For gluten-free and dairy-free options, no need to worry! This smoothie is already gluten-free. Just use dairy-free milk, like almond or oat milk. You can also skip the honey or maple syrup to keep it sugar-free. Incorporating seasonal fruits can elevate your smoothie. In summer, try adding fresh peaches or ripe mangoes. They make the drink refreshing and fruity. For winter, consider using warm spices like cinnamon. It adds a cozy flavor that pairs well with chocolate. Each season brings new tastes. Feel free to mix and match! You can create a seasonal delight with this simple recipe. Check out the Full Recipe for more ideas. You can store any leftover smoothie in the fridge. Pour it into a sealed container. This keeps it fresh and tasty. The best time to drink it is within 24 hours. After that, it might separate or lose flavor. If you notice separation, just shake or stir it before drinking. Freezing is a great option if you want to save some for later. Pour the smoothie into ice cube trays or small containers. This way, you can freeze it in portion sizes. When you want some, take it out and let it thaw. Place it in the fridge overnight for best results. If you're in a hurry, you can leave it at room temperature for a couple of hours. To enjoy the best texture, blend it again after thawing. You can turn your smoothie into a fun smoothie bowl. Just pour it into a bowl instead of a glass. This gives you more space for toppings. You can use sliced bananas, crushed hazelnuts, or granola. Fresh berries or a drizzle of honey also work great. Get creative and add your favorite toppings for a delicious twist! Yes, you can use fresh bananas. However, using fresh bananas changes the texture and taste. Fresh bananas make the smoothie thinner and less creamy. For a thick and rich smoothie, frozen bananas are best. If you only have fresh bananas, add extra ice cubes to help thicken it up. If you want alternatives, try almond butter or peanut butter. These options work well and add a nutty flavor. For a vegan choice, look for dairy-free chocolate spreads. Nut-free spreads like sunflower seed butter can also work. Each option gives a unique taste while keeping the smoothie delicious. To cut down on sweetness, skip the honey or maple syrup. You can also use unsweetened cocoa powder. Adding a dash of salt balances out sweetness nicely. If you prefer, add more almond milk to dilute sweetness. Adjust these ingredients to fit your taste. This blog post shared a simple and tasty smoothie recipe. I covered the key ingredients, tips for making it creamier, and how to store leftovers. You learned about variations for different diets and seasons. Remember, using frozen bananas makes your smoothie smooth and thick. Feel free to mix in your favorite fruits or nut butters to create your perfect blend. Enjoy this healthy drink that fits into any meal or snack time. With these easy steps, making delicious smoothies will become a fun routine!

Chocolate Hazelnut Banana Smoothie Rich and Creamy Delight

Are you ready to indulge in a rich and creamy treat? This Chocolate Hazelnut Banana Smoothie blends frozen bananas and

- 2 ripe bananas, mashed - 2 cups rolled oats - 2 cups almond milk (or any milk of choice) - 1/4 cup maple syrup (or honey) - 1/4 cup almond butter (or peanut butter) - 1 teaspoon vanilla extract - 1 teaspoon baking powder - 1 teaspoon cinnamon - 1/2 teaspoon salt - 1/2 cup walnuts, chopped (optional) - 1/4 cup dark chocolate chips (optional) These ingredients come together to create a warm and comforting dish. The ripe bananas bring natural sweetness and moisture. Rolled oats form the base and add great texture. Almond milk provides creaminess. Maple syrup enhances the flavor while keeping it sweet. Almond butter adds richness and healthy fats. Vanilla extract gives a lovely aroma. Baking powder helps the oatmeal rise. Cinnamon adds warmth and spice. A pinch of salt balances the sweetness. You can customize this recipe with optional ingredients. Walnuts add crunch, and dark chocolate chips bring indulgence. Each ingredient plays a role in making banana bread baked oatmeal delicious and nutritious. Incorporating these ingredients makes this dish a wholesome choice for breakfast or a snack. For the full recipe, check out the details provided earlier. 1. Preheat your oven to 375°F (190°C). Grease an 8x8-inch baking dish with cooking spray or oil. 2. In a large bowl, mash the ripe bananas. Then add almond milk, maple syrup, almond butter, and vanilla extract. Mix until smooth. 1. In another bowl, combine rolled oats, baking powder, cinnamon, and salt. Stir these dry ingredients well. 2. Gradually add the dry mix to the wet mix. Stir gently until everything is combined. 1. If you want, fold in walnuts and dark chocolate chips for extra taste. Then pour the batter into the greased dish. 2. Bake in the oven for 30-35 minutes. The top should be golden brown. Test with a toothpick; it should come out clean. You can change the nut butter for new flavors. Try using peanut butter or cashew butter. Each nut butter gives a unique taste. You can also add or swap fruit. Blueberries or chopped apples work well. Dried fruits like raisins add sweetness too. Adjust the baking time if you want it crispier. Bake for a few extra minutes for a crunchy top. Keep an eye on it so it doesn’t burn. To achieve the right texture, use ripe bananas. They make the oatmeal moist and sweet. Mixing the wet and dry ingredients well is key too. Serve the oatmeal warm for the best taste. Top each square with yogurt for creaminess. A drizzle of maple syrup makes it sweeter. For a fun look, add banana slices or a sprinkle of nuts. Pair it with fresh fruit or a cup of tea for a nice breakfast. Enjoy the flavors! {{image_2}} You can easily make this dish gluten-free. Just swap regular oats with certified gluten-free oats. This keeps the texture intact while making it safe for those with gluten sensitivities. Always check the labels to ensure they are truly gluten-free. To make a vegan version, ensure all ingredients are plant-based. Use almond milk or soy milk instead of dairy milk. Maple syrup is a great sweetener that fits well. You can also opt for almond butter or peanut butter, just check that they do not contain any animal products. Get creative with flavors! Adding spices like nutmeg can bring warmth and depth. You can also mix in other fruits, such as berries or apples, for a fruity twist. Experiment with extracts like almond or coconut for a unique taste. Each addition can change the flavor profile and keep things exciting. For the complete recipe, check out the [Full Recipe]. To keep your banana bread baked oatmeal fresh, store it in an airtight container. Place the container in the fridge if you plan to eat it in a few days. This method helps it stay moist and tasty. For longer storage, you can freeze it. Cut the baked oatmeal into squares and wrap each piece in plastic wrap. Put them in a freezer-safe bag or container. This way, you can enjoy it later without losing flavor. When you’re ready to eat your oatmeal again, reheating is easy. For the oven, preheat it to 350°F (175°C). Place the oatmeal square on a baking sheet. Heat for about 10-15 minutes or until warm. If you prefer the microwave, put a square on a microwave-safe plate. Heat it for 30-60 seconds. Check if it's warm enough. You can always heat it more if needed. Banana bread baked oatmeal stays fresh in the fridge for about 4-5 days. If you freeze it, it can last for up to 3 months. Just remember to label the bag with the date. This way, you will know when to eat it. Enjoy your delicious homemade treat any time! Yes, you can use quick oats, but I recommend rolled oats for this recipe. Rolled oats hold their shape better and give a lovely texture. Quick oats may turn mushy and absorb more liquid. This can change the taste and feel of your baked oatmeal. You can swap the maple syrup for a natural sweetener like mashed dates or stevia. These options keep the sweetness while cutting out sugar. Make sure to adjust the amount based on your taste. Yes, you can prepare this dish ahead of time. Mix the wet and dry ingredients and store them in the fridge overnight. Bake it in the morning for a warm breakfast. Leftovers can last up to a week in the fridge. This baked oatmeal pairs well with yogurt or a drizzle of honey. You can also serve it with some fresh fruit or a cup of coffee. It makes a hearty breakfast that everyone will love! For the full recipe, check it out here. In this blog post, we explored a simple baked oatmeal recipe with ripe bananas and oats. You learned about the ingredients and their nutritional value. The step-by-step instructions made baking easy. We covered tips for customizing and serving your dish, along with variations for dietary needs. Baked oatmeal is versatile and fun. Enjoy it fresh or store it for later. Experiment with flavors and toppings to make it your own. With these tools, you can create a delicious and healthy breakfast any day. Happy baking!

Banana Bread Baked Oatmeal Simple and Tasty Recipe

Are you ready to try a delicious twist on breakfast? This Banana Bread Baked Oatmeal recipe combines the beloved flavors

Older posts
Newer posts
← Previous Page1 … Page50 Page51 Page52 … Page86 Next →

dsad

© 2025 So Yum Recipes • Built with GeneratePress

Our Policies

  • Copyright Policy
  • Cookie Policy
  • GDPR Policy
  • Privacy Policy
  • Disclaimer
  • Terms Of Use

More Information

  • Home
  • About
  • Contact
  • Appetizers
  • Dessert
  • Dinner
  • Drinks
©2025, So Yum Recipes About Back To Top