Skip to content
DisclaimerTerms Of UseGDPR PolicyCookie Policy

So Yum Recipes

  • Home
  • Drinks
  • Appetizers
  • Dinner
  • Dessert
  • About
  • Contact
  • Privacy Policy
DisclaimerTerms Of UseGDPR PolicyCookie Policy

Chloe

- 1 pound Italian sausage (spicy or mild) - 1 medium onion, diced - 3 cloves garlic, minced - 2 cups fresh spinach (or kale) - 4 cups chicken broth - 1 can (14.5 oz) diced tomatoes, undrained - 2 cups tortellini (fresh or frozen) - 1 cup heavy cream (or half-and-half for a lighter option) The base of this soup starts with Italian sausage. You can choose spicy sausage for heat or mild for a gentler taste. I love adding diced onion and minced garlic for a nice aroma. Fresh spinach adds color and nutrients. Next, we need a rich broth. I use chicken broth for a comforting flavor. Diced tomatoes add sweetness and acidity, making the soup lively. For the tortellini and cream, you can pick fresh or frozen tortellini. They both work well and cook nicely in the soup. Heavy cream makes it rich, while half-and-half gives it a lighter touch. Make sure you have all these ingredients ready. The combination makes a delightful, creamy soup that warms the soul. - Cooking the sausage First, heat a skillet over medium heat. Add 1 pound of Italian sausage. Cook the sausage until it is browned, breaking it apart with a wooden spoon. This step adds great flavor. Once done, transfer the sausage to the slow cooker. - Adding vegetables and broth Next, add a diced onion and 3 cloves of minced garlic to the slow cooker. Pour in 4 cups of chicken broth. Then, add a can of diced tomatoes with juice. Sprinkle in 1 teaspoon of dried oregano and 1 teaspoon of dried basil. Season with salt and pepper to taste. Stir everything well. - Cooking times and settings Cover the slow cooker and set it to low. Cook for 4 to 5 hours, or on high for 2 to 3 hours. This time allows the flavors to meld together and create a rich taste. - Adding tortellini and cream About 30 minutes before you are ready to eat, add 2 cups of tortellini to the slow cooker. If you're using frozen tortellini, they will need about 20 minutes to cook through. Once the tortellini is tender, stir in 1 cup of heavy cream and 2 cups of fresh spinach. Let it heat for 10 more minutes, covered. - Adjusting seasoning Before serving, taste the soup. Adjust the seasoning by adding more salt and pepper if needed. This step ensures the flavors are just right. - Serving suggestions Serve the soup hot. Top each bowl with grated Parmesan cheese and chopped fresh parsley for a lovely touch. Enjoy this creamy delight with a piece of crusty bread! To make this soup shine, start with the right sausage. I love using Italian sausage because it adds depth. You can choose spicy or mild, based on your taste. For seasoning adjustment, taste as you go. Adding salt or pepper can enhance the flavor. You can also boost the herbs. A bit more oregano or basil can make a big difference. Want to make it heartier? Add more vegetables! Carrots, zucchini, or bell peppers work great. They add color and nutrition. You can also think about alternative dairy options. Instead of heavy cream, try half-and-half for a lighter touch. Coconut milk can give it a unique twist, too. When serving, think about toppings. Grated Parmesan cheese adds flavor and creaminess. Fresh parsley gives a pop of color. You can also add crushed red pepper for heat. For sides, consider crusty bread or a fresh salad. They pair well and make the meal complete. {{image_2}} You can change the protein in this soup. Chicken and turkey work well too. They both add a nice touch. If you want a vegan option, use plant-based sausage. It will keep the flavors rich and delicious. To make this soup even better, think about spices. Adding red pepper flakes gives it a kick. Fresh herbs like thyme or rosemary can also boost the taste. You might want to try using vegetable broth instead of chicken broth. This change can add a different layer of flavor. When it comes to tortellini, you have options. You can make your own for a fresh taste. But store-bought is quick and easy. If you need gluten-free options, look for gluten-free tortellini in stores. It cooks well and still tastes great in this soup. To keep Creamy Sausage Tortellini Soup fresh, store it in an airtight container. Let the soup cool down first. This helps prevent condensation and keeps it tasty. When stored well, the soup lasts about 3 to 4 days. For reheating, use a pot on the stove or a microwave. Heat it slowly to avoid burning. Stir often while reheating. This ensures even warmth and keeps the flavors intact. You can freeze this soup for longer storage. First, let it cool completely. Then, pour it into a freezer-safe container. Leave some space at the top, as soup expands when frozen. It stays good in the freezer for 2 to 3 months. To thaw, place it in the fridge overnight. For quick thawing, use the microwave. Reheat it on the stove, stirring frequently to keep it smooth and creamy. The soup has a short shelf life in the fridge. It lasts 3 to 4 days when stored properly. In the freezer, it can stay good for 2 to 3 months. Always check for any off smells or changes in texture before eating. This helps ensure you enjoy your soup safely and deliciously. To add spice to the soup, use spicy Italian sausage. You can also add red pepper flakes. Start with a pinch, then taste and add more if you like it hotter. Fresh jalapeños or a dash of hot sauce are great options too. These changes bring a nice kick without overpowering the other flavors. Yes, you can swap out the tortellini for other pasta types. Small shapes, like shells or elbows, work well. Just adjust the cooking time slightly. If you use fresh pasta, it may need less time to cook. Make sure to check the package for exact cooking times. If you want a lighter soup, use half-and-half instead of heavy cream. You can also try coconut milk for a dairy-free option. For a healthier choice, blended silken tofu adds creaminess without the fat. Each option gives a unique taste and texture to the soup. You can store leftover soup in the fridge for up to three days. Make sure to keep it in an airtight container. If you want to keep it longer, freeze it. The soup can last up to three months in the freezer. Just thaw it in the fridge before reheating. Yes, you can prepare this soup ahead of time. You can cook it the day before and store it in the fridge. Reheat it slowly on the stove. If you add tortellini right before serving, it keeps its texture better. Enjoy the rich flavors that develop overnight! This blog post covered tasty options for making a delicious tortellini soup. We explored key ingredients like Italian sausage, fresh veggies, chicken broth, and tortellini. The step-by-step instructions made cooking simple, and tips gave you ways to enhance flavor. Remember, you can customize this soup with various proteins and veggies. Whether you store it in the fridge or freeze it, you can savor leftovers later. Enjoy creating your own version of this comforting dish!

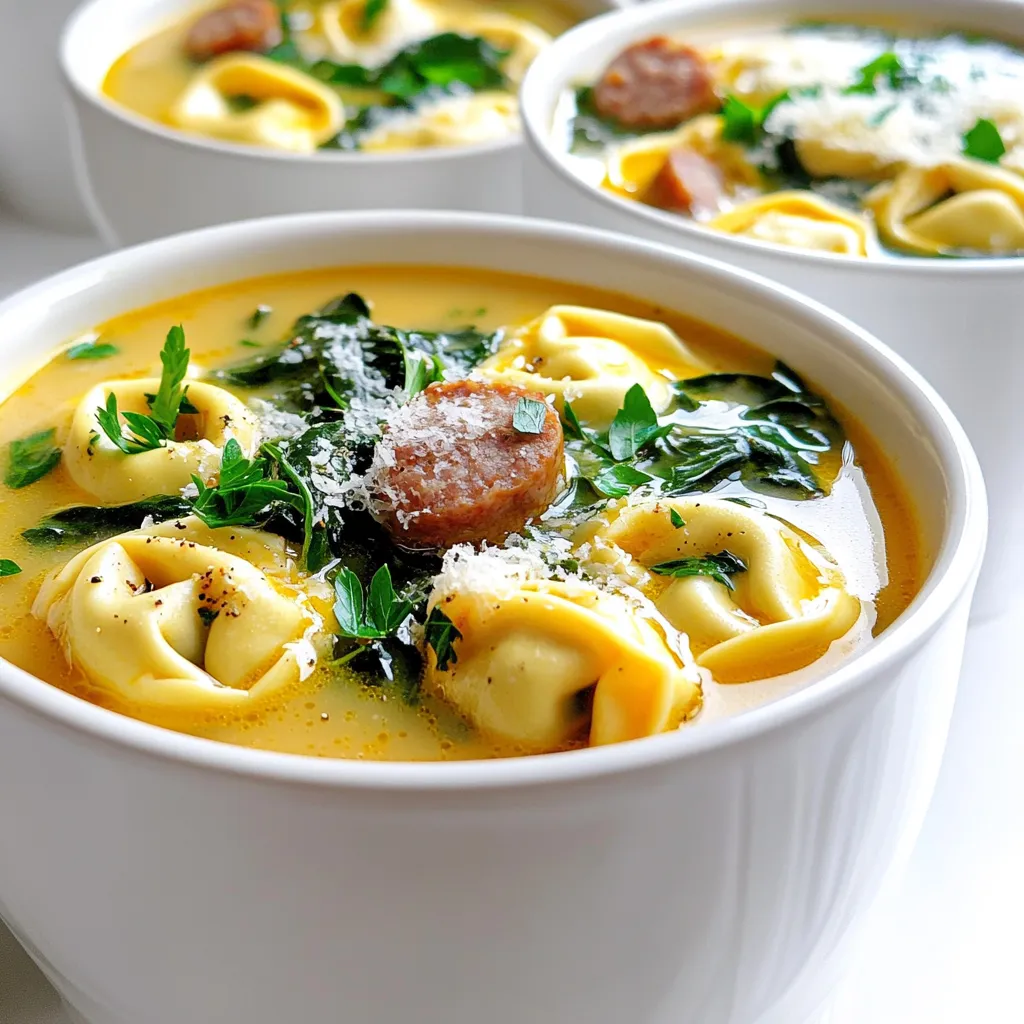
Creamy Sausage Tortellini Soup Slow Cooker Delight

Warm, comforting, and oh-so-creamy, this Slow Cooker Creamy Sausage Tortellini Soup is a must-try. With just a few simple ingredients

To make your apple cinnamon muffins, gather these simple ingredients: - 2 cups all-purpose flour - 1 cup granulated sugar - 1 tablespoon baking powder - 1 teaspoon baking soda - 1 teaspoon ground cinnamon - ½ teaspoon salt - 1 cup unsweetened applesauce - ½ cup vegetable oil - 2 large eggs - 1 teaspoon vanilla extract - 1 ½ cups apple, peeled and diced (about 2 medium apples) - ½ cup chopped walnuts or pecans (optional) - 1 tablespoon brown sugar (for topping) - Additional cinnamon (for topping) Using fresh ingredients is key to great flavor. Fresh apples bring natural sweetness and moisture. They also add a nice texture to each bite. Fresh baking powder and baking soda help the muffins rise well. They create that fluffy muffin we all love. Always check the expiration dates on your ingredients. This small step ensures your muffins taste their best. You can customize these muffins! Here are some fun ideas: - Nuts: Chopped walnuts or pecans add crunch and flavor. - Brown Sugar: A sprinkle on top gives a sweet, caramel-like finish. - Cinnamon Sugar: Mix extra cinnamon with sugar for a tasty topping. - Dried Fruits: Raisins or cranberries can add a fruity twist. Feel free to mix and match these options. Your apple cinnamon muffins can be as unique as you are! First, preheat your oven to 350°F (175°C). This heat will help the muffins rise. Next, grab your muffin tin. Line it with paper liners or grease it lightly with cooking spray. This step keeps the muffins from sticking. In a large bowl, whisk together the dry ingredients. Use 2 cups of all-purpose flour, 1 cup of granulated sugar, 1 tablespoon of baking powder, 1 teaspoon of baking soda, 1 teaspoon of ground cinnamon, and ½ teaspoon of salt. Mix until everything is well blended. This blend creates a good base for the muffins. In another bowl, combine the wet ingredients. You need 1 cup of unsweetened applesauce, ½ cup of vegetable oil, 2 large eggs, and 1 teaspoon of vanilla extract. Mix well until smooth. Then, pour the wet mix into the dry mix. Stir gently until just combined. You want to avoid overmixing. A few lumps are just fine. Next, fold in 1 ½ cups of peeled and diced apples. If you want, add ½ cup of chopped walnuts or pecans for extra crunch. Using a spoon or an ice cream scoop, fill each muffin cup about ¾ full with the batter. This allows room for the muffins to rise. Now, let’s make the topping. In a small bowl, mix 1 tablespoon of brown sugar with a sprinkle of cinnamon. Sprinkle this mixture generously over the tops of each muffin. This adds a sweet touch. Place the muffin tin in your preheated oven. Bake for 18-20 minutes. To check for doneness, insert a toothpick into the center of a muffin. If it comes out clean, they are ready. Once baked, remove the muffins from the oven. Let them cool in the tin for about 5 minutes. After that, transfer them to a wire rack to cool completely. Enjoy your fresh, warm muffins! To get that perfect bakery-style texture, you need a few key steps. First, use a mix of baking powder and baking soda. This helps your muffins rise nicely. Second, do not overmix the batter. Stir it just until combined. A few lumps are okay. This keeps the muffins light and fluffy. Lastly, fill your muffin cups about three-quarters full. This allows them to rise beautifully without overflowing. There are some common mistakes to watch out for. One big mistake is using old ingredients. Always check the dates on your baking powder and baking soda. If they are expired, your muffins won't rise. Another mistake is overmixing. This can make your muffins dense and tough. Finally, avoid opening the oven door too soon. This lets out heat and can cause your muffins to sink. Mixing the batter correctly is crucial. Start by whisking the dry ingredients together in one bowl. In a separate bowl, mix the wet ingredients well. When you combine them, pour the wet into the dry. Then, gently fold in the diced apples. Use a spatula for this, as it helps keep the batter light. Remember, the key is to be gentle. This way, your muffins will be soft and airy. {{image_2}} You can make these muffins gluten-free. Just replace all-purpose flour with a gluten-free blend. Look for a blend that has xanthan gum. This helps mimic the structure of regular flour. Use the same amount, two cups, for better results. The muffins will still taste great and stay fluffy! Want to make these muffins vegan? It’s simple! Instead of eggs, use flax eggs. To make a flax egg, mix one tablespoon of flaxseed meal with three tablespoons of water. Let it sit for five minutes. For the milk, swap the applesauce with a plant-based milk like almond or oat milk. Use coconut oil instead of vegetable oil. These swaps will keep your muffins moist and tasty. You can easily change the flavor of your muffins. Add ½ cup of raisins for a sweet twist. You can also mix in different spices, like nutmeg or ginger, for a unique taste. Try adding a pinch of cardamom for warmth. For a crunchy texture, toss in some chopped walnuts or pecans. Each option adds a fun touch to your apple cinnamon muffins! To keep your apple cinnamon muffins fresh, store them in an airtight container. This helps prevent them from drying out. Place a paper towel at the bottom of the container. This absorbs moisture and keeps the muffins soft. You can also wrap each muffin in plastic wrap for extra protection. Store them at room temperature for up to three days. If you want to keep them longer, consider freezing them. Freezing is a great way to save your apple cinnamon muffins for later. Allow them to cool completely first. Then, wrap each muffin tightly in plastic wrap. After wrapping, put them in a freezer-safe bag or container. Be sure to remove as much air as possible to prevent freezer burn. You can freeze them for up to three months. When you're ready to enjoy them, just thaw them in the fridge overnight. Reheating your muffins can bring back that fresh-baked flavor. You can use an oven or microwave. For the oven, preheat it to 350°F (175°C). Place the muffins on a baking sheet and heat for about 10 minutes. This gives them a nice crispy top. If you’re in a hurry, use the microwave. Heat each muffin for 15-20 seconds. Just be careful not to overheat, or they may become tough. Enjoy your warm muffins just like you made them fresh! To make your muffins rise higher, use fresh baking powder. Make sure your oven is preheated to 350°F (175°C). Fill each muffin cup about ¾ full, but not too much. Avoid overmixing the batter. A few lumps are okay. This helps create air pockets that expand while baking. Yes, you can use different types of apples. Honeycrisp, Granny Smith, or Fuji work great. Each apple brings its own flavor and sweetness. Mixing a couple of types can add depth to your muffins. Just make sure to peel and dice them well. If you don’t have applesauce, you can use mashed bananas or pureed pears. Both will keep your muffins moist. You can also try yogurt for a different texture. If you use yogurt, reduce the sugar a bit, as yogurt can be sweet. Apple cinnamon muffins last about 2 to 3 days at room temperature. Store them in an airtight container to keep them fresh. If they start to feel dry, try reheating them in the microwave for a few seconds. This will bring back some moisture. In this article, we covered how to make tasty apple cinnamon muffins. We discussed key ingredients, the importance of freshness, and optional add-ins. I shared step-by-step baking instructions and tips for perfect texture. We also looked at flavor variations and storage tips for your muffins. Baking muffins can be fun and rewarding. Experiment with flavors and enjoy your creations! Happy baking!

Apple Cinnamon Muffins Bakery Style Delight Recipe

Are you ready to bake some amazing Apple Cinnamon Muffins that taste just like the ones from your favorite bakery?

- 4 chicken thighs, bone-in and skin-on - 2 large sweet potatoes, peeled and cubed - 1 red bell pepper, sliced - 1 green bell pepper, sliced - 1 red onion, cut into wedges - 1 cup BBQ sauce, your choice of sweetness - 2 tablespoons olive oil - 1 teaspoon garlic powder - 1 teaspoon smoked paprika - Salt and pepper to taste - Fresh parsley for decoration The main ingredients here make this dish shine. Chicken thighs give a rich, juicy flavor. Sweet potatoes add sweetness and creaminess. The bell peppers bring crunch and color. Red onion gives a slight sharpness. Together, they create a perfect balance. Now, let’s talk about the seasoning. BBQ sauce is key for that smoky, sweet flavor. You can choose any sauce you love. Olive oil helps the chicken stay moist. Garlic powder and smoked paprika add a kick. Salt and pepper pull all the flavors together. For a fresh finish, I like to sprinkle parsley on top. It looks great and adds a touch of brightness. This combination is not just tasty; it's fun to eat! First, preheat your oven to 425°F (220°C). This high heat helps crisp up the chicken skin and cook the sweet potatoes perfectly. Next, line a large baking sheet with parchment paper. This makes for easy clean-up later. Now, let's prepare the marinade for the chicken. In a small bowl, mix together: - 2 tablespoons olive oil - 1 teaspoon garlic powder - 1 teaspoon smoked paprika - Salt and pepper to taste This mix will add great flavor to your chicken. Take your chicken thighs and pat them dry with paper towels. This step is key for crispy skin. Now, rub the marinade all over each piece. Don’t forget to get under the skin! This helps the marinade seep in, making the chicken juicy and tasty. In a large bowl, toss together the sweet potatoes, red bell pepper, green bell pepper, and red onion. Drizzle them with olive oil and season with salt and pepper. Mix until everything is coated. Spread this mix onto the prepared baking sheet. You want to create a nice bed for the chicken. Place the marinated chicken thighs on top of the vegetables. Now, brush the BBQ sauce generously over the chicken. Make sure it’s well-coated. You can save some sauce for serving later. Bake in the preheated oven for 25-30 minutes. Check that the chicken reaches an internal temperature of 165°F (75°C). The sweet potatoes should be tender and golden, too. For extra crispy chicken skin, broil for an additional 3-5 minutes. Keep an eye on it so it doesn’t burn. Once done, let the sheet pan rest for a few minutes before you serve. Garnish with freshly chopped parsley for a pop of color! To cook chicken thighs perfectly, start with bone-in and skin-on pieces. This gives the meat more flavor and keeps it moist. Make sure to pat the chicken dry before you rub in the marinade. Dry skin helps it get crispy in the oven. Rub the marinade under the skin too. This helps the flavors soak in deeply. You want every bite to be tasty. Cut your sweet potatoes into cubes. Keep them about one inch thick for even cooking. If your cubes are smaller, they cook faster. Larger cubes may need a bit more time. Toss your sweet potatoes with olive oil, salt, and pepper. This simple mix helps them brown well. You can also add herbs like rosemary or thyme for extra flavor. Smoked paprika can lift the taste even more. Choose your BBQ sauce wisely. You can go for sweet, tangy, or spicy styles based on your taste. Sweet sauces pair well with the sweet potatoes. Tangy sauces add a nice contrast. For heat, spicy sauces can kick things up a notch. You can make your own sauce at home using ketchup, vinegar, and spices. Store-bought sauces are also great if you're short on time. Just look for ones with quality ingredients for the best taste. {{image_2}} You can switch out the sweet potatoes and peppers for other veggies. Try using zucchini, carrots, or even broccoli. These veggies roast well and add different flavors. Zucchini becomes tender and slightly sweet. Carrots bring a nice crunch and color. Mix and match to find your favorite combo. If you want to change the protein, chicken is not your only option. Tofu works great for a plant-based meal. Use firm tofu for the best texture. Just marinate it like chicken. Pork is another choice. Thighs or tenderloin will work well. Adjust the cooking time if you use pork. For some heat, add spices or hot sauce to your BBQ. Cayenne pepper gives a nice kick. You can mix it into the marinade or sprinkle it on the veggies. Sriracha or your favorite hot sauce also works. Just remember to taste as you go, so it’s just right for you. To store your BBQ chicken and sweet potatoes, let them cool first. This keeps moisture levels low. Place leftovers in an airtight container. Make sure to separate the chicken from the sweet potatoes. This helps keep the chicken crispy. You can keep leftovers in the fridge for up to four days. Always check for signs of spoilage before eating. For freezing, use a freezer-safe container. You can also use resealable bags. Remove as much air as possible before sealing. This helps prevent freezer burn. The dish can last up to three months in the freezer. When you are ready to eat, thaw it overnight in the fridge. To reheat, preheat your oven to 350°F (175°C). Place the chicken and sweet potatoes on a baking tray. Cover with foil to keep moisture in. Heat for about 20 to 25 minutes or until hot. You can also microwave portions, but the oven keeps the texture better. Always check the chicken reaches 165°F (75°C) before serving. Enjoy the tasty flavors just like when it was fresh! Yes, you can use boneless chicken thighs. They cook faster than bone-in thighs. For bone-in, cook for 25-30 minutes. Boneless thighs take about 20-25 minutes. Check the internal temperature. It should reach 165°F (75°C). The flavor will still be great, but the skin won't be as crispy. BBQ Chicken and Sweet Potatoes pair well with many sides. Here are some great options: - Coleslaw: Adds crunch and a tangy flavor. - Corn on the cob: A sweet side that complements BBQ. - Green salad: Fresh greens balance the richness of the chicken. - Rice or quinoa: A hearty base to soak up the BBQ sauce. Feel free to mix and match based on your taste! Yes, you can prep this dish ahead of time. Here are some tips: - Marinate the chicken: Do this up to 24 hours in advance. It will soak up more flavor. - Chop veggies early: Cut sweet potatoes and peppers a day before. Store them in the fridge. - Cook and store: You can cook the dish and store leftovers. Keep it in an airtight container for 3-4 days. This makes meal prep easy and tasty! This blog post showed you how to make BBQ chicken thighs with sweet potatoes. You learned about the main ingredients, seasoning, and optional garnishes. The step-by-step guide helped you prepare, marinate, and bake the dish perfectly. I shared tips for perfect cooking and ways to customize your meal. Now, you can easily store and reheat leftovers too. Enjoying this dish is simple and delicious—feel free to try new flavors and variations! Happy cooking!

BBQ Chicken & Sweet Potato Sheet Pan Flavor Boost

Looking for a quick dinner that packs a flavor punch? My BBQ Chicken & Sweet Potato Sheet Pan is your

- 1 round of Brie cheese (about 8 oz) - 1 cup cranberry sauce (homemade or store-bought) - 1/4 cup chopped pecans or walnuts Brie cheese is the star of this dish. Its rich, creamy texture pairs perfectly with the sweet-tart cranberry sauce. You can use homemade or store-bought cranberry sauce, depending on your time and skills. Chopped pecans or walnuts add a nice crunch and depth of flavor. - 1 tablespoon honey - 1 teaspoon fresh rosemary, finely chopped - Fresh cranberries for garnish Honey brings extra sweetness to the mix. It balances the tang of the cranberries. Fresh rosemary adds a hint of earthiness. You can use fresh cranberries as a garnish, giving your dish a festive look. - Crackers - Sliced baguette Serve this baked Brie with a variety of crackers or slices of fresh baguette. Both options work well for scooping up the melted cheese and topping. The crunch of the crackers or the softness of the baguette makes every bite delightful. - Preheat your oven to 350°F (175°C). - Line a baking sheet with parchment paper. This will help with easy cleanup later. - In a small bowl, mix together the cranberry sauce, chopped pecans, honey, and rosemary. - Make sure everything blends well. This mix will be the star on top of the Brie. - Place the Brie round on the prepared baking sheet. - Pour the cranberry mixture over the top of the Brie. Ensure it is evenly covered. - Bake the Brie in the preheated oven for about 15-20 minutes. Look for the cheese to be soft and gooey, but not fully melted. - Carefully take the baking sheet out of the oven. Let the Brie rest for a couple of minutes before serving. When you pick Brie cheese, look for a creamy texture. The rind should be white and soft. Check for fresh aroma and no strong odors. Aim for a round of Brie around 8 ounces for this recipe. This size melts well and serves a good number of people. A high-quality Brie enhances the dish's flavor. To get the right melt, don’t overcook the Brie. Bake it for just 15 to 20 minutes at 350°F. You want it soft and gooey but not runny. Keep an eye on it as it cooks. If it starts to bubble too much, it's time to take it out. Let it sit for a couple of minutes before serving. This helps it hold its shape. Garnishing makes your dish look festive. Add fresh cranberries on top for color. You can also sprinkle chopped pecans around it. Serve the baked Brie with an assortment of crackers or sliced baguette. This adds texture and makes it easy for guests to enjoy. A pretty presentation impresses everyone at your holiday gathering. {{image_2}} You can switch up the cranberry sauce for other fruit preserves or compotes. Try apricot or fig jam for a sweet twist. You can also use a mix of different nuts. Chopped almonds or pistachios add a nice crunch. For added depth, mix in dried fruits or spices. Chopped dried cherries or a pinch of cinnamon work well. You can also experiment with herbs. Thyme or sage can give the dish a fresh flavor. Wine can elevate your dish. A fruity white wine like Riesling pairs nicely. You can also offer other appetizers alongside. Cured meats or fresh vegetables with dip complement the rich cheese perfectly. After enjoying your baked Brie, store any leftovers in the fridge. First, let it cool down. Wrap the Brie tightly in plastic wrap or place it in an airtight container. This keeps it fresh and prevents it from drying out. Proper storage is key for great taste later. Leftovers can last up to four days in the fridge. If you don't eat it all, you still have time to enjoy it! When you want to reheat your baked Brie, take care not to lose its lovely texture. The best way to reheat it is in the oven. Preheat the oven to 350°F (175°C). Place the Brie on a baking sheet and cover it with foil. Heat it for about 10 minutes. This method warms the cheese without making it too runny. You can also use a microwave, but be careful. Heat it in short bursts of 15 seconds. Check it often to keep it from melting too much. Enjoy your warm, gooey Brie again! Yes, you can! While Brie is creamy and mild, other cheeses work well too. Here are some great options: - Camembert: Similar to Brie but has a stronger flavor. - Goat cheese: Offers a tangy taste and creamy texture. - Havarti: This cheese melts well and has a buttery flavor. - Cream cheese: A softer option that pairs well with toppings. You can prepare parts of this dish ahead. Here’s how: - Mix the cranberry sauce, nuts, honey, and rosemary a day before. - Store the mixture in an airtight container in the fridge. - On the day you serve, simply pour the mixture over the Brie and bake. - This saves time and helps the flavors blend well. Baked Brie pairs well with many tasty sides. Here are some great choices: - Crackers: Choose a variety for different textures. - Sliced baguette: Fresh bread adds a nice crunch. - Fruits: Apples or pears bring a sweet touch. - Veggies: Carrots and celery sticks add a fresh crunch. - Dips: Try serving with a sweet or savory dip for variety. In this article, we explored how to make baked Brie with cranberry sauce and nuts. You learned about the main ingredients, helpful tips for cooking, and creative serving ideas. Remember, using high-quality Brie and careful baking will enhance your dish. Feel free to try different toppings or pairings to suit your taste. Whether you're hosting a gathering or enjoying it alone, this baked Brie will impress. Enjoy the creamy goodness and share it with others!

Baked Brie with Cranberry Sauce Perfect Holiday Treat

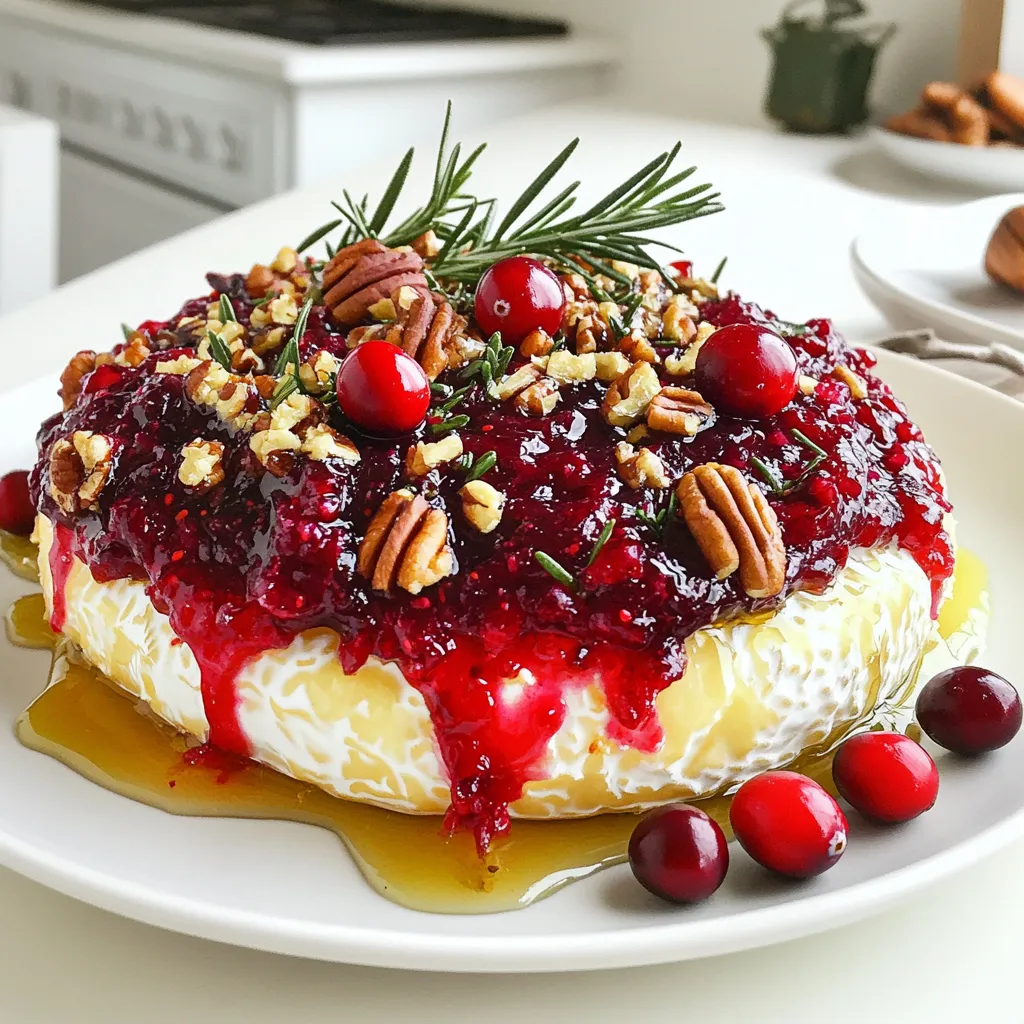
Get ready to impress your guests this holiday season with Baked Brie with Cranberry Sauce! This warm, gooey delight combines

- 1 cup all-purpose flour - 1 cup whole wheat flour - 1 teaspoon baking powder - 1 teaspoon baking soda - 1 teaspoon ground cinnamon - 1/2 teaspoon ground nutmeg - 1/4 teaspoon ground ginger - 1/2 teaspoon salt I use a mix of all-purpose and whole wheat flour. This blend gives the muffins a light texture. Baking powder and baking soda help the muffins rise. The spices add warmth and flavor. Cinnamon, nutmeg, and ginger create that cozy, fall taste. A pinch of salt balances the sweet flavors. - 1 cup canned pumpkin puree - 1 cup granulated sugar - 1/2 cup brown sugar, packed - 1/2 cup vegetable oil - 3 large eggs - 1 teaspoon vanilla extract Canned pumpkin puree is the star here. It adds moisture and a rich flavor. I use both granulated and brown sugar for sweetness. Brown sugar gives a deeper taste. Vegetable oil keeps the muffins soft. Eggs act as binders, while vanilla extract adds a hint of warmth. - 1/2 cup walnuts or pecans, chopped I love adding nuts for extra crunch. Chopped walnuts or pecans give great texture. They also add a nutty flavor that pairs well with pumpkin. - 1/2 cup all-purpose flour - 1/2 cup brown sugar, packed - 1/4 cup unsalted butter, softened - 1 teaspoon ground cinnamon - 1/4 cup rolled oats The streusel topping is a must. It adds a sweet, crumbly layer on top. I mix flour, brown sugar, and cinnamon for flavor. Softened butter makes the topping rich. Rolled oats add chewiness and a rustic touch. This topping makes every muffin feel like a treat! First, preheat your oven to 350°F (175°C). This step is key for getting a nice rise. While the oven heats, prepare your muffin tin. You can line it with paper liners or grease it well. This helps the muffins come out easily after baking. In a mixing bowl, combine 1/2 cup all-purpose flour, 1/2 cup brown sugar, softened butter, 1 teaspoon ground cinnamon, and 1/4 cup rolled oats. Use a fork to blend these ingredients until they look crumbly. Set this mixture aside for later. It will add a sweet crunch on top. In a large bowl, whisk together the dry ingredients. This includes 1 cup all-purpose flour, 1 cup whole wheat flour, 1 teaspoon baking powder, 1 teaspoon baking soda, 1 teaspoon ground cinnamon, 1/2 teaspoon ground nutmeg, 1/4 teaspoon ground ginger, and 1/2 teaspoon salt. Make sure everything is evenly mixed to ensure tasty muffins. In another bowl, combine 1 cup canned pumpkin puree, 1 cup granulated sugar, 1/2 cup brown sugar, 1/2 cup vegetable oil, 3 large eggs, and 1 teaspoon vanilla extract. Mix these together until smooth. The pumpkin gives a rich flavor and moisture to the muffins. Gradually fold the wet mixture into the dry ingredients. Do this gently until just combined. If you want, stir in 1/2 cup chopped walnuts or pecans for extra texture. Be careful not to overmix, or the muffins may turn out tough. Spoon the batter into the muffin tin, filling each cup about 2/3 full. This allows room for the muffins to rise. Evenly sprinkle the prepared streusel topping over the batter in each cup. Bake in your preheated oven for 18-22 minutes. Check for doneness with a toothpick. If it comes out clean, the muffins are ready. Let them cool in the tin for about 5 minutes. Then, transfer them to a wire rack to cool completely. Enjoy your delicious treats! - Ensuring the perfect muffin texture: For fluffy muffins, use room temperature ingredients. This helps them mix well. When mixing, stop as soon as everything is combined. This keeps the muffins light and tender. - Tips for not overmixing: Mix gently. Use a spatula to fold the wet and dry ingredients. If you see some lumps, that’s okay! Overmixing can lead to tough muffins, so be kind to your batter. - Best way to serve muffins: Serve these muffins warm. You can sprinkle powdered sugar on top or drizzle caramel sauce for an extra touch. These small details make a big difference in taste and look. - Pairing with beverages: These muffins pair wonderfully with coffee or tea. A warm cup of chai or a smooth latte will enhance the flavors. Enjoy them as a cozy breakfast or snack. - What to do if muffins sink: If your muffins sink, they may have too much liquid or not enough flour. Ensure you measure ingredients accurately. Next time, check your oven temperature, too. A hot oven helps muffins rise well. - How to fix dry muffins: If your muffins are dry, add a little milk or yogurt to the batter next time. You can also cover them with a damp paper towel for a few seconds. This can help add moisture back into the muffins. {{image_2}} You can make your pumpkin streusel coffee cake muffins even more fun. Adding chocolate chips gives a sweet touch. You can mix in half a cup of chocolate chips when you combine the wet and dry ingredients. This makes the muffins rich and tasty. You can also use different nuts or seeds. Instead of walnuts or pecans, try almonds or sunflower seeds. Just replace the nuts in the recipe with your choice. This adds a nice crunch to every bite. If you want gluten-free muffins, use gluten-free flour blends. They work well in this recipe. Just swap the all-purpose flour with a gluten-free mix. Ensure it has a good binding agent like xanthan gum. For vegan muffins, replace the eggs with flax eggs. Mix one tablespoon of flaxseed meal with three tablespoons of water. Let it sit for five minutes to thicken. Replace the vegetable oil with applesauce for moisture. This keeps your muffins soft and delicious. Add seasonal fruits for a fresh twist. Chopped cranberries or diced apples can brighten your muffins. Just fold in about a cup of either fruit when mixing the batters. This adds a pop of flavor and color. You can also add zests like orange or lemon. Grate the zest from one orange or lemon and mix it in. This gives a bright citrus note that pairs well with pumpkin. Enjoy exploring these fun variations! To keep your pumpkin streusel coffee cake muffins fresh, store them in an airtight container. This method helps retain moisture and flavor. You can keep them at room temperature for up to three days. If you want them to last longer, place them in the fridge. They should stay good for about a week in there. You can freeze these muffins if you want to save some for later. Allow the muffins to cool completely first. Wrap each muffin in plastic wrap and place them in a freezer bag. They can last for up to three months in the freezer. When you’re ready to eat one, take it out and thaw it in the fridge overnight. To reheat, pop it in the microwave for about 20 seconds or until warm. To prevent your muffins from drying out, try these tips. First, don’t overbake them. Check for doneness with a toothpick. If it comes out clean, they are ready. Also, adding a little extra oil or applesauce can help keep them moist. Lastly, always store your muffins in an airtight container right after they cool. This keeps them soft and fresh for longer. To help your muffins rise well, use fresh baking powder and baking soda. Make sure your oven is preheated to the right temperature. Mixing the wet and dry ingredients gently helps too. Do not overmix the batter; this keeps the muffins light and fluffy. Lastly, fill the muffin cups about two-thirds full for the best rise. Yes! You can prepare the batter a day before. Mix the wet and dry ingredients, then store the batter in the fridge. You can also bake the muffins and store them. Just cool them completely, then keep them in an airtight container. They stay fresh for about three days at room temperature. You can use applesauce or mashed bananas as a pumpkin alternative. Sweet potato puree also works well. If you're looking for a different flavor, try butternut squash puree. Each will give a unique taste while keeping the muffins moist. To boost flavor, add spices like cloves or allspice. You can also mix in chocolate chips, nuts, or dried fruit. A splash of maple syrup or a bit of orange zest can make a big difference too. Experiment with your favorite flavors to find the perfect blend. Using only whole wheat flour may change the texture. Whole wheat flour is denser, which can make your muffins heavy. If you want to use it, try mixing half whole wheat and half all-purpose flour. This way, you get a good texture while keeping some whole grain benefits. This blog post covered everything you need to make delicious pumpkin muffins. We went over key ingredients, like flour, pumpkin puree, and sugar. I also provided step-by-step instructions to guide you through baking. Plus, there are tips for perfect texture and serving ideas. If you want to make these muffins your own, try different mix-ins or storage techniques. With this knowledge, you can enjoy fresh, tasty treats anytime. Enjoy baking and tasting your delicious muffins!

Pumpkin Streusel Coffee Cake Muffins Delightful Recipe

If you love fall flavors, you’ll adore these Pumpkin Streusel Coffee Cake Muffins! This delightful recipe combines the warmth of

- 1 lb boneless, skinless chicken thighs - 2 tablespoons soy sauce - 2 tablespoons honey - 1 tablespoon freshly grated ginger - 2 garlic cloves, minced - 1 tablespoon sesame oil The main ingredients for Minute Teriyaki Chicken Bowls focus on tender chicken thighs. I love using boneless and skinless thighs because they stay juicy. The soy sauce and honey create a sweet and salty base. Fresh ginger adds warmth, while garlic gives a nice punch. These flavors come together beautifully. - 1 cup broccoli florets - 1 cup sliced bell peppers (any color) - 2 green onions, chopped - Sesame seeds for garnish Adding vegetables makes the dish colorful and healthy. Broccoli florets provide crunch and nutrients. I like to use bell peppers for their sweetness. Green onions add a fresh touch on top, while sesame seeds make everything look nice. - Cooked jasmine rice Jasmine rice is my go-to base for this meal. It soaks up the teriyaki sauce well. You can use other types of rice if you prefer. Just make sure it’s cooked and ready when you serve. This meal is quick, tasty, and full of flavor! First, grab a medium bowl. Mix together 2 tablespoons of soy sauce, 2 tablespoons of honey, 1 tablespoon of freshly grated ginger, and 2 minced garlic cloves. This mix creates a tasty teriyaki marinade. Next, add 1 pound of cut chicken thighs into the bowl. Make sure all the chicken pieces are coated well. Let the chicken marinate for 10 to 15 minutes. This wait helps to soak up all the yummy flavors. Now, heat 1 tablespoon of sesame oil in a large skillet over medium-high heat. Once the oil is hot, add the marinated chicken, but keep the marinade for later. Cook the chicken for 4 to 5 minutes. Stir it often until it turns brown and is fully cooked. The chicken should reach an internal temperature of 165°F. After the chicken is cooked, it's time to add some crunch! Toss in 1 cup of broccoli florets and 1 cup of sliced bell peppers. Stir everything together nicely. Then, pour in the reserved marinade. Cook this mix for another 3 to 4 minutes. You want the vegetables to be tender but still a bit crisp. This way, you keep that fresh taste. To make the best teriyaki chicken, marinate the chicken well. Mix soy sauce, honey, ginger, and garlic in a bowl. Let the chicken sit in this mix for 10 to 15 minutes. This step adds great flavor. For doneness, cut a piece of chicken. If it is no longer pink inside, it is done. You can also use a meat thermometer. The chicken should reach 165°F (75°C) for safety. Use a large skillet or wok for cooking. A non-stick surface helps prevent sticking. Heat the sesame oil over medium-high heat. This way, the chicken cooks evenly and gets a nice brown color. Keep an eye on the heat. If it gets too hot, the chicken may burn. You want it tender and juicy, not dry. When serving, scoop jasmine rice into bowls first. Then, add the teriyaki chicken and veggies on top. This creates a colorful dish. For garnish, sprinkle chopped green onions and sesame seeds. These add flavor and look nice. A well-presented meal makes it even more enjoyable. {{image_2}} For those who need gluten-free options, use tamari instead of soy sauce. Tamari has a similar taste but is safe for gluten-free diets. For a vegetarian or vegan meal, swap chicken for tofu or tempeh. Both soak up flavors well and add protein to your meal. If you want to try alternative proteins, consider shrimp or beef. These options cook quickly and add new tastes. You can also mix in different vegetables. Try snap peas, carrots, or zucchini for a new twist. Each adds color and nutrition to your dish. To add spice or heat, sprinkle red pepper flakes or Sriracha on top. This can wake up the dish and add a nice kick. You can also experiment with sauces. Try adding hoisin sauce or peanut sauce for a unique flavor. Toppings like crushed peanuts or fresh herbs can change the dish too. To keep your Minute Teriyaki Chicken Bowls fresh, first let them cool. Place leftovers in airtight containers. Glass or plastic containers work well. Make sure to store them in the fridge. They last about 3 to 4 days. When you’re ready to eat, reheating is easy. The best method is using the microwave. Place the bowl in the microwave for about 1 to 2 minutes. Stir halfway to heat evenly. If using a skillet, heat on low for about 5 minutes. This keeps the chicken juicy and the veggies crisp. If you want to freeze your bowls, do it soon after cooking. Let them cool completely. Place in freezer-safe containers or bags. It’s best to use them within 2 to 3 months. To thaw, move them to the fridge overnight before reheating. This keeps the taste and texture just right. Making Minute Teriyaki Chicken Bowls is quick. The prep time is just 15 minutes. Cooking takes about 30 minutes. So, you can have this meal ready in 45 minutes total. Yes, you can prepare some parts ahead. You can marinate the chicken the night before. Just keep it in the fridge. Chop the veggies in advance too. Store them in a sealed bag or container until you’re ready to cook. These bowls pair well with jasmine rice. You can also serve them with edamame or a side salad. For extra crunch, try some crispy wontons on the side. Enjoy experimenting with flavors! In this blog post, we explored how to make delicious Minute Teriyaki Chicken Bowls. We covered the key ingredients, like chicken thighs and fresh veggies. We also detailed how to prepare the marinade and cook everything perfectly. Use our tips for great flavor and presentation. Plus, you can adapt the recipe to fit your diet. Teriyaki chicken is quick, tasty, and perfect for any meal. Enjoy your cooking journey!

Minute Teriyaki Chicken Bowls Quick and Flavorful Meal

Looking for a quick and tasty meal? Minute Teriyaki Chicken Bowls are here to save the day! Packed with tender

- 2 cups cooked chicken, shredded - 1 cup cream cheese, softened - 1 cup shredded cheddar cheese - 1 cup shredded mozzarella cheese - 1/2 cup diced jalapeños (fresh or pickled) - 1/2 cup sour cream - 1/2 cup crumbled tortilla chips (plus extra for topping) - 1 teaspoon garlic powder - 1 teaspoon onion powder - 1/2 teaspoon paprika - Salt and pepper to taste - Green onions, sliced (for garnish) This dish shines with the right ingredients. The cream cheese and sour cream give it a rich, smooth texture. I recommend using fresh jalapeños for a bold kick. If you prefer less heat, pickled jalapeños work well, too. The mix of cheddar and mozzarella cheeses creates a creamy blend. I love using a mix for depth of flavor. If you need to swap out ingredients, it’s easy. You can use Greek yogurt in place of sour cream for a tangy twist. For a lighter option, try using shredded rotisserie chicken instead of cooked chicken. If you want to avoid dairy, consider vegan cream cheese and cheese alternatives. These swaps keep the essence of the casserole while catering to your needs. {{ingredient_image_1}} First, you need to preheat your oven to 350°F (175°C). This step is key. A hot oven helps the casserole cook evenly. In a large bowl, mix the softened cream cheese and sour cream. Add garlic powder, onion powder, and paprika. Then, toss in the diced jalapeños. Stir until the mixture is smooth and creamy. This will be the heart of your casserole. Now, grab a greased 9x13 inch baking dish. Start by spreading half of the crumbled tortilla chips at the bottom. This creates a crunchy base. Next, pour the creamy chicken mix on top. Spread it evenly so every bite is tasty. Sprinkle the rest of the tortilla chips on top of the chicken. Then, add the remaining cheddar and mozzarella cheese. Place the dish in your preheated oven. Bake for 25 to 30 minutes. Look for bubbly and golden cheese. Once done, let it cool a bit. Garnish with sliced green onions before serving. Enjoy this flavorful comfort dish! Mixing well is key. Start with the cream cheese and sour cream. Make sure both are soft. This helps create a smooth base. Use a sturdy spatula for folding in the chicken. Fold gently to keep the chicken tender. Add the spices next, then the jalapeños. This way, each bite is flavorful. Oven temperature matters! Preheat to 350°F (175°C) for even cooking. Bake for 25-30 minutes. Watch for bubbling cheese and a golden crust. If the top browns too fast, cover it with foil. This keeps the inside moist and helps the cheese melt perfectly. For a great look, serve from the baking dish. Add sliced green onions for color. Place extra jalapeños on the side for spice lovers. A dollop of sour cream makes it creamy. You can also sprinkle more crushed tortilla chips on top before serving. This adds crunch and a fun touch! Pro Tips Use Rotisserie Chicken: For a quicker preparation, use store-bought rotisserie chicken instead of cooking your own. It adds great flavor and saves time! Customize the Heat: Adjust the amount of jalapeños to suit your heat preference. For a milder dish, use fewer jalapeños or opt for pickled ones. Cheese Variations: Feel free to mix different cheeses based on your preference. Pepper Jack can add an extra kick, while creamier cheeses like fontina enhance the texture. Make-Ahead Option: Prepare the casserole a day in advance and refrigerate it. When ready to bake, allow it to come to room temperature before placing it in the oven. {{image_2}} You want a lighter version of jalapeño popper chicken casserole? Swap the cream cheese for Greek yogurt. This change cuts fat and adds protein. You can also use low-fat shredded cheese. Replace regular tortilla chips with baked ones or skip them entirely for a lower-carb option. Adding more veggies like bell peppers or spinach boosts nutrition without losing flavor. Craving a vegetarian twist? Replace the chicken with black beans or chickpeas. These options give protein and texture. Use a mix of bell peppers and corn for a colorful base. Keep the cream cheese and cheeses for that creamy goodness. Don’t forget the jalapeños for that classic kick! If you love heat, add more jalapeños or use spicy cheese. Pepper jack cheese gives a nice kick. You can also mix in diced serrano peppers or a splash of hot sauce for an extra punch. For a unique twist, try adding chorizo or spicy sausage. Just cook them first, then mix them into the casserole. To keep your jalapeño popper chicken casserole fresh, let it cool first. Place any leftovers in an airtight container. Store it in the fridge for up to three days. If you want to keep it longer, freezing is a great option. When you’re ready to enjoy your leftovers, preheat your oven to 350°F (175°C). Place the casserole in an oven-safe dish. Cover it with foil to prevent it from drying out. Heat for about 20 minutes or until warm. You can also microwave individual portions for 2-3 minutes, but the oven gives a better texture. For freezing, make sure the casserole is fully cooled. Cut it into smaller portions for easy use later. Wrap each serving tightly in plastic wrap, then place them in a freezer bag. Label the bag with the date. It can stay good in the freezer for up to three months. When you’re ready to eat, thaw it in the fridge overnight before reheating. Yes, you can use rotisserie chicken. It saves time and adds great flavor. Just shred it and mix it into the casserole. This shortcut makes the dish quick and easy. You still get all the creamy goodness and that pop of jalapeño. To adjust the heat, choose your jalapeños wisely. Use fresh jalapeños for more heat or pickled for less. You can also add more or fewer jalapeños to fit your taste. If you want it mild, remove the seeds and membranes. For extra heat, add diced serrano peppers or cayenne pepper. This casserole pairs well with simple sides. A fresh salad adds crunch and balance. Cornbread offers a nice sweetness. You can also serve it with roasted vegetables for more color and flavor. Chips and salsa make a fun snack alongside. This blog covers everything you need for a delicious jalapeño popper chicken casserole. We looked at the key ingredients, offered step-by-step instructions, and shared helpful tips. You also learned about variations and how to store leftovers. Remember, making this dish can be simple and fun. With the right mix of flavors, you can impress anyone at the table. Use these insights, and your casserole will shine every time. Enjoy cooking!

Jalapeño Popper Chicken Casserole Flavorful Comfort Dish

If you’re craving a dish that blends heat, creaminess, and comfort, I’ve got the perfect recipe for you: Jalapeño Popper

To make a tasty Cajun Shrimp Rice Skillet, gather these ingredients: - 1 pound large shrimp, peeled and deveined - 1 cup long-grain white rice - 2 cups chicken broth - 1 bell pepper, diced (red or green) - 1 medium onion, chopped - 3 cloves garlic, minced - 2 teaspoons Cajun seasoning - 1 teaspoon smoked paprika - 1/2 teaspoon cayenne pepper (adjust to taste) - 1 tablespoon olive oil - 1 cup frozen peas - Salt and pepper to taste - Fresh parsley, chopped (for garnish) You can swap some ingredients based on what you have. If you don’t have shrimp, try chicken or tofu. For rice, brown rice can work, but adjust the cooking time. If you lack Cajun seasoning, use Italian herbs. You can also pick other vegetables like zucchini or corn instead of bell pepper. Using fresh ingredients gives a bright flavor. Fresh shrimp tastes better than frozen. However, frozen shrimp saves time and lasts longer. You can use frozen peas for this dish as they cook quickly. In most cases, fresh vegetables bring more crunch and color, but frozen options can be just as good. Use what fits your kitchen and mood! First, grab a large skillet and heat one tablespoon of olive oil over medium heat. Once hot, add the chopped onion and diced bell pepper. You want to sauté these for about 3 to 4 minutes. This step helps soften the veggies and brings out their sweet flavor. Next, add three cloves of minced garlic and cook for one more minute. You’ll smell a nice aroma at this point. Now it’s time to stir in one cup of long-grain white rice. Sprinkle two teaspoons of Cajun seasoning, one teaspoon of smoked paprika, and half a teaspoon of cayenne pepper. Mix everything well. This will coat the rice in spices and give it a lovely color. Then, pour in two cups of chicken broth and bring the mixture to a boil. After it boils, reduce the heat to low and cover the skillet. Let it simmer for about 15 minutes. This is the time for the rice to cook and soak up the broth. While the rice cooks, season one pound of large shrimp with salt and pepper. After 15 minutes, check the rice. If it’s tender, add the shrimp and one cup of frozen peas to the skillet. Gently stir to combine everything. Cover the skillet again and cook for an additional 5 to 7 minutes. The shrimp will turn pink and opaque when they’re ready. Once the shrimp are cooked, remove the skillet from heat. Let it sit covered for a couple of minutes. This helps the flavors come together. Finally, fluff the rice with a fork and garnish with fresh chopped parsley. Serve it warm and enjoy the vibrant flavors! To get that true Cajun taste, use a good Cajun seasoning. You can buy it or make your own. Mix paprika, garlic powder, onion powder, and thyme for a homemade blend. Adjust the cayenne pepper according to your spice level. If you want more heat, add a touch more. Sautéing the onion and bell pepper first releases their natural sweetness, adding depth to the dish. This mix of flavors gives you that authentic Cajun kick. For tender shrimp, timing is key. Overcooking shrimp makes them tough. Cook them just until they turn pink and opaque. This usually takes about five to seven minutes. Season them with salt and pepper before adding them to the skillet. This simple step boosts their flavor. If you want to enhance the taste even more, add a squeeze of lemon juice right before serving. Use long-grain white rice for the best texture. It stays fluffy and separate, which is great for this dish. Rinse the rice under cold water to remove excess starch. This step helps prevent the rice from being sticky. When you add the chicken broth, bring it to a boil first. Then, cover it and let it simmer. This method allows the rice to absorb all those delicious flavors. Remember to let it sit for a few minutes after cooking. Fluffing it with a fork gives it a nice, light texture. {{image_2}} You can add vegetables to your Cajun shrimp rice skillet for more flavor and nutrition. Try adding diced zucchini, carrots, or corn. These veggies cook quickly and blend well with the rice. You can toss them in during the sauté step. This way, they soften up and soak in all those Cajun spices. If shrimp isn't your thing, you can switch proteins easily. Chicken or sausage works well in this dish. For chicken, cut it into bite-sized pieces. Sauté it until fully cooked before adding the rice. For sausage, slice it and cook it with the onion and bell pepper. This swaps proteins keeps the dish just as tasty! Cajun food is known for its kick, but you control the heat! If you want a mild version, skip the cayenne pepper. You can also use less Cajun seasoning. For extra heat, add more cayenne or even hot sauce. Taste as you go and adjust to match your spice level. Your taste buds will thank you! To store your Cajun shrimp rice skillet, let it cool first. Place it in an airtight container. This keeps your dish fresh for up to three days in the fridge. I recommend dividing it into smaller portions. This way, you can heat just what you need. When you're ready to enjoy leftovers, reheat them in a skillet. Add a splash of chicken broth to keep it moist. Heat over medium until it's warmed through. You can also use the microwave. Just cover the bowl with a damp paper towel to trap steam. If you want to save it longer, freezing is a great option. Portion the cooled dish into freezer-safe containers. It can last for up to three months in the freezer. To reheat, let it thaw overnight in the fridge. Then, warm it in a skillet or microwave. Enjoy your tasty meal anytime! Yes, you can use brown rice. Brown rice takes longer to cook. You will need about 40-45 minutes. Use more broth to ensure it cooks well. Adjust the cooking time in the recipe. Yes, this recipe is great for meal prep. You can store it in the fridge for up to four days. Just keep it in an airtight container. It reheats well in the microwave or on the stove. To add more heat, increase the cayenne pepper. You can also use a hot sauce. Add it when cooking the shrimp. Taste as you go to find your perfect spice level. This blog post covered essential ingredients, step-by-step cooking, and helpful tips. You learned how to create the perfect Cajun dish with shrimp, rice, and peas. Remember to try different ingredient options and flavor levels to match your taste. Store leftovers well and reheat them for a quick meal. With these tips, you can make this dish a go-to favorite. Enjoy cooking and experimenting as you refine your skills. Happy cooking!

Cajun Shrimp Rice Skillet Flavorful Dinner Idea

Looking for a quick and tasty dinner? Try my Cajun Shrimp Rice Skillet! This one-pan meal bursts with flavor and

- 1 cup natural peanut butter - 1/4 cup honey or maple syrup - 1 cup rolled oats These three ingredients are the heart of this recipe. Natural peanut butter gives a rich, creamy taste. Honey or maple syrup adds the right amount of sweetness. Rolled oats bring texture and help bind everything together. - 1/2 cup chocolate protein powder or cocoa powder - 1/2 cup mini chocolate chips - 1/2 teaspoon vanilla extract - Pinch of salt Optional add-ins turn these balls into a flavor party. Chocolate protein powder or cocoa powder makes them rich and chocolatey. Mini chocolate chips add delightful bites of chocolate. A dash of vanilla extract enhances all the flavors, while a pinch of salt balances the sweetness. To avoid a dry mixture, always use natural peanut butter. This type keeps the mix moist. If it feels too dry, add a bit more honey or syrup. You can also try adding a splash of water. This helps bind everything together. For a sticky dough, mix well until all ingredients are combined. Use your hands to really get in there. If it still feels crumbly, add a tiny bit of water or more peanut butter. The dough should easily stick together when you roll it into balls. For visual appeal, arrange your chocolate balls on a nice plate. You can sprinkle extra mini chocolate chips or chopped nuts on top. This adds color and texture to the dish. Pair these treats with a glass of almond milk. The nutty taste of the milk complements the chocolate flavor. You can also serve them with coffee for a more adult twist. Enjoying these treats with a drink makes them even more special! For the best taste and texture, store your no-bake peanut butter chocolate balls in an airtight container. Glass or plastic containers work great. You can also use a zip-top bag if you remove the air. You can keep them in the fridge or freezer. In the fridge, they stay cool and soft. This makes them easy to grab as a quick snack. If you want them to last longer, store them in the freezer. Just let them thaw for a bit before enjoying. When stored properly, these balls stay fresh for about one week in the fridge. In the freezer, they can last up to three months. Just make sure to keep them sealed to avoid freezer burn. Can I use almond butter instead of peanut butter? Yes, you can. Almond butter works well as a substitute. It will change the flavor a bit but will still be tasty. How do I make it nut-free? To make these balls nut-free, use sunflower seed butter. This option keeps the recipe safe for those with nut allergies. Each ball has about 100 calories. They also pack around 3 grams of protein. The sugar content is around 4 grams per ball, depending on the sweetener used. {{image_2}} You've learned how to create tasty peanut butter energy balls. We covered the main ingredients like peanut butter, oats, and sweeteners. I shared step-by-step instructions to make rolling the balls easy. Tips helped you achieve the right texture and add your favorite flavors. Remember, variations and storage ideas keep your snacks fresh. Feel free to explore flavors and share with friends. Your energy balls can boost snacks and meals!

No-Bake Peanut Butter Chocolate Balls Simple Treat

Are you ready for a simple treat that satisfies your sweet tooth and takes minutes to make? No-Bake Peanut Butter

- 1 ½ cups graham cracker crumbs - ½ cup unsalted butter, melted - ¼ cup brown sugar - 1 teaspoon cinnamon - 16 oz cream cheese, softened - 1 cup granulated sugar - 3 large eggs - 1 teaspoon vanilla extract - 1 teaspoon ground cinnamon - 1 ½ cups diced apples (peeled and cored) - ½ cup chopped pecans - 1 cup caramel sauce (store-bought or homemade) - ¼ cup additional chopped pecans This recipe for Caramel Apple Pecan Cheesecake Bars blends sweet and nutty flavors. You start with a crust made from graham cracker crumbs. This crust gives the bars a crisp base. For the cheesecake layer, I use creamy cream cheese. This layer is smooth and rich, making it the star of the show. Adding granulated sugar sweetens the mix. Eggs help set the filling. Vanilla extract adds a lovely aroma. Ground cinnamon brings warmth, while diced apples give it a fresh taste. Chopped pecans add a nice crunch. Lastly, the topping makes these bars even more special. Drizzling caramel sauce over them gives a sweet finish. Additional chopped pecans on top add texture and flavor. Each bite bursts with deliciousness. 1. First, preheat your oven to 350°F (175°C). Line an 8x8 inch baking dish with parchment paper. Leave some paper over the edges for easy lifting later. 2. In a bowl, combine 1 ½ cups of graham cracker crumbs, ½ cup of melted unsalted butter, ¼ cup of brown sugar, and 1 teaspoon of cinnamon. Stir until it looks like wet sand. 3. Firmly press the mixture into the bottom of the dish. Bake for 10 minutes. After baking, let the crust cool slightly. 1. In a large bowl, beat 16 oz of softened cream cheese until smooth. 2. Gradually add 1 cup of granulated sugar. Mix until fully combined. 3. Add 3 large eggs one at a time, mixing well after each addition. Then, beat in 1 teaspoon of vanilla extract and 1 teaspoon of ground cinnamon. 4. Using a spatula, fold in 1 ½ cups of diced apples and ½ cup of chopped pecans. Make sure they are evenly mixed in. 1. Pour the cheesecake filling over the cooled crust. Spread it out evenly. 2. Tap the dish lightly on the counter. This removes any air bubbles trapped in the filling. 3. Bake for 35-40 minutes. The center should be set but still slightly jiggly. The edges will be slightly golden. Using room temperature ingredients is key. This helps your cream cheese mix smoothly. Cold cream cheese can lead to lumps in your cheesecake. To know when it's done, look for slight jiggles in the center. It should not be too wobbly or overly firm. For a spice boost, add more cinnamon or nutmeg. You can also try ginger for a warm kick. Pair your bars with whipped cream or extra caramel sauce for a treat. Chopped nuts or fresh apples make great toppings too! Use a hand mixer or stand mixer for the best results. These tools help mix your batter evenly. A sturdy baking dish is important. Opt for an 8x8 inch pan for perfect-sized bars. Parchment paper makes for easy removal and cleanup! {{image_2}} You can change the topping to suit your taste. Try using chocolate sauce, which adds a sweet twist. Butterscotch sauce is another great choice for a rich flavor. For a crunch, swap pecans with walnuts or almonds. You can also add fruits like sliced strawberries or blueberries for a fresh touch. If you need a gluten-free option, use gluten-free graham crackers for the crust. For a vegan cheesecake layer, replace cream cheese with a mix of soaked cashews and coconut cream. Use flax eggs instead of regular eggs to bind the mixture. In fall, add pumpkin puree or a pinch of nutmeg for a cozy flavor. For spring or summer, fresh berries like raspberries or cherries can give a bright taste. Each season brings new options to enjoy these cheesecake bars in a different way. To keep your caramel apple pecan cheesecake bars fresh, store them in the fridge. Place the bars in an airtight container. This helps keep them moist and tasty. If you plan to enjoy them later, you can freeze them. Wrap each bar tightly in plastic wrap and then place them in a freezer bag. This protects them from freezer burn. Cheesecake bars can last in the fridge for about five days. In the freezer, they can last up to three months. Check for signs of spoilage. If you see any mold or a strange smell, it’s best to toss them out. To reheat your cheesecake bars without losing their texture, use the oven. Preheat it to 350°F (175°C). Place the bars on a baking sheet for about 10 minutes. This warms them nicely. You can also serve them cold straight from the fridge or at room temperature. A drizzle of caramel sauce on top adds a nice touch! Yes, you can prepare these bars a day or two in advance. Here are some tips: - Make the crust and filling: Prepare the crust and filling as directed. Bake and let them cool completely. - Store properly: Cover the cooled bars tightly in the fridge. This keeps them fresh and ready for serving. - Add toppings later: Drizzle the caramel and sprinkle pecans just before serving. This keeps everything fresh and tasty. If you want a different flavor, try these options: - Greek yogurt: It’s creamy and adds a slight tang. Use the same amount as cream cheese. - Ricotta cheese: This gives a lighter texture. Blend it well before adding to the recipe. - Silken tofu: For a vegan option, blend silken tofu until smooth. It works well and is dairy-free. To keep your cheesecake top smooth, use these techniques: - Room temperature ingredients: Always use room temp cream cheese and eggs. This helps mix everything evenly. - Mix gently: Avoid overmixing. Mix just until smooth and combined. - Baking water bath: Place your baking dish in a larger pan filled with water. This keeps the heat gentle and helps prevent cracks. This blog post guided you through making a delicious cheesecake bar. We covered the key ingredients for the crust, filling, and topping. You learned the step-by-step instructions, as well as tips for perfect texture and flavor. Variations let you customize your bars, and storage tips help keep them fresh. Now, you can enjoy this treat any time. Making adjustments can create new favorites, too. Whether for a party or a snack, have fun baking and sharing!

Caramel Apple Pecan Cheesecake Bars Delightful Treat

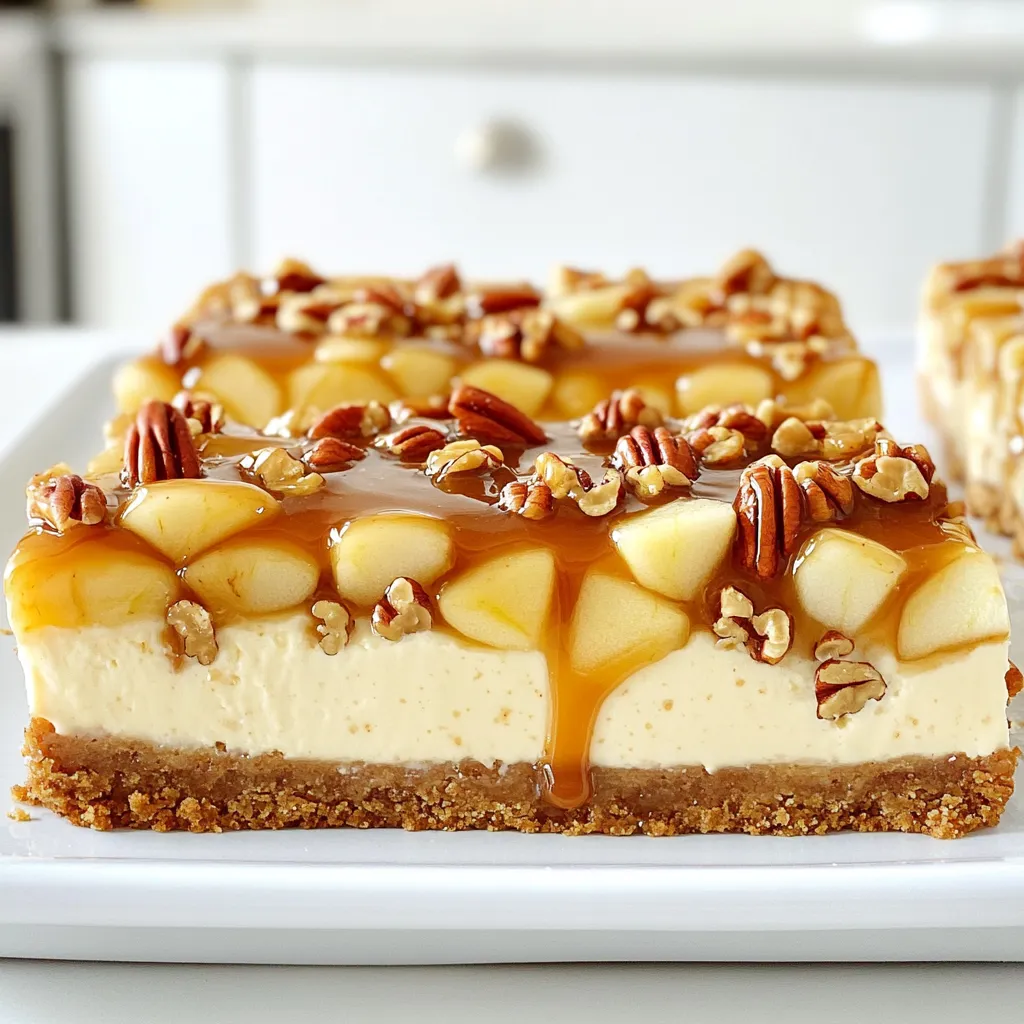
Sink your teeth into the rich, creamy delight of Caramel Apple Pecan Cheesecake Bars! This dessert combines the sweetness of

Older posts
Newer posts
← Previous Page1 … Page4 Page5 Page6 … Page144 Next →

dsad

© 2025 So Yum Recipes • Built with GeneratePress

Our Policies

  • Copyright Policy
  • Cookie Policy
  • GDPR Policy
  • Privacy Policy
  • Disclaimer
  • Terms Of Use

More Information

  • Home
  • About
  • Contact
  • Appetizers
  • Dessert
  • Dinner
  • Drinks
©2025, So Yum Recipes About Back To Top