
Cheesy Garlic Breadsticks Delightful and Easy Recipe
Craving a tasty snack that’s quick and simple? You’re in the right place! My Cheesy Garlic Breadsticks are packed with
Craving a tasty snack that’s quick and simple? You’re in the right place! My Cheesy Garlic Breadsticks are packed with
. These bars are easy to make and perfect for any occasion. They blend creamy cheesecake with fresh strawberries for a delightful treat. Enjoy each bite! In this post, we explored the key ingredients needed to make delicious strawberry cheesecake bars. You learned how to prep, bake, and store them. I shared helpful tips to avoid common mistakes and fun variations to try. Remember, these bars are great for any occasion and easy to customize. Now, it’s your turn to create this treat. Enjoy the process and taste the results! You will impress everyone with your baking skills.](https://soyumrecipes.com/wp-content/uploads/2025/06/b6a730d7-7add-44a7-a722-e082ff7456c6.webp)
If you love desserts that are both tasty and easy to make, these Strawberry Cheesecake Bars are perfect for you!
![To make Sweet Chili Chicken Bowls, you will need these fresh ingredients: - 2 boneless, skinless chicken breasts, diced - 1 cup jasmine rice - 1 cup low-sodium chicken broth - 1 red bell pepper, thinly sliced - 1 cup snap peas, trimmed - 2 cloves garlic, minced - 1 tablespoon grated ginger - 1/3 cup sweet chili sauce - 2 tablespoons soy sauce - 1 tablespoon sesame oil - Salt and pepper to taste - 2 green onions, chopped for garnish - Sesame seeds for garnish - Fresh cilantro for garnish (optional) These ingredients work together to create a meal that is both tasty and easy to prepare. The chicken, jasmine rice, and veggies blend well with sweet chili sauce for a delightful taste. You can find the full recipe for detailed steps on how to combine these ingredients perfectly. Enjoy the bright colors and flavors in this dish! - Combine jasmine rice and chicken broth in a saucepan. - Bring to a boil and reduce heat to low. - Cook until tender and let sit covered for five minutes. - Season diced chicken with salt and pepper. - Sauté in sesame oil until golden brown, about five to seven minutes. - Stir in minced garlic and grated ginger. - Sauté sliced red bell pepper and snap peas for three to four minutes. - Pour sweet chili sauce and soy sauce over the chicken and veggies. - Allow sauce to thicken for two to three minutes. - Fluff the rice with a fork and divide it among bowls. - Top each bowl with the chicken and vegetable mixture. - Sprinkle with chopped green onions. - Add sesame seeds and fresh cilantro if desired. This simple process creates a meal that bursts with flavor. You can find the full recipe in the article. To keep your chicken juicy, use these simple tips: - Cook at medium-high heat. This helps the chicken brown nicely. - Don’t overcrowd the skillet. Cook in batches if needed. This helps with even cooking. - Let it rest. After cooking, let the chicken sit for a few minutes. This keeps it moist. For the best sauté, aim for a skillet temperature around 375°F. If the oil shimmers, you’re ready. Spice up your dish by adding: - Cilantro or basil. Both herbs add freshness. - Chili flakes. For a little heat, add a pinch. - Lime juice. A squeeze at the end brightens the flavors. To balance sweetness and saltiness, use low-sodium soy sauce. This way, the sweet chili sauce shines without being too sweet. Make your bowls look great with these tips: - Layer the rice first. This creates a nice base. - Arrange chicken and veggies neatly on top. This makes it inviting. - Garnish with green onions and sesame seeds. It adds color and texture. Garnishing is key. It not only looks good but enhances flavor too. Fresh herbs elevate the dish and make it more appealing. {{image_2}} You can swap chicken for tofu or shrimp. Tofu gives a great texture and absorbs flavors well. Cook the tofu for about 6-8 minutes until golden. Shrimp cooks faster, usually needing only 3-4 minutes. Both options still work great with sweet chili sauce. Boost the nutrition by adding more vegetables. Try carrots, broccoli, or zucchini. These veggies add color and crunch. Adjust cooking times; cook carrots for about 5 minutes, while broccoli takes about 4 minutes. Zucchini only needs 2-3 minutes to stay crisp. You can make your own sweet chili sauce too. Mix equal parts honey and soy sauce, then add chili flakes. For a twist, try adding peanut butter or sesame paste for a unique flavor. Each sauce brings its own taste, making your meal special. To keep your sweet chili chicken bowls fresh, store them in airtight containers. This helps lock in flavor and moisture. Place the bowls in the fridge within two hours of cooking. They stay good for about three days. After that, the taste and quality may drop. When reheating, use the microwave or a skillet. For the microwave, heat in short bursts. Stir and check to avoid hot spots. In a skillet, add a splash of water to keep moisture. This helps maintain the texture. Avoid sogginess by not overcrowding the pan. You can freeze the chicken and veggies separately from the rice. Let everything cool before packing. Use freezer-safe bags or containers. They can last up to three months in the freezer. For thawing, move them to the fridge overnight. Reheat gently to enjoy a quick meal later. This storage info helps keep your sweet chili chicken bowls tasty and ready for any time! For the complete recipe, check out the Full Recipe. Yes, you can use brown rice. However, it needs more time to cook. Brown rice takes about 40-45 minutes compared to 15-18 minutes for jasmine rice. The flavor is nuttier and chewier. This adds a different texture to your sweet chili chicken bowls. Sweet chili sauce has a mild heat. It is sweet with a hint of spice, making it great for many dishes. The heat level varies by brand, but most are not very hot. If you want more heat, add chili flakes or hot sauce. You can pair these bowls with several sides. Here are some ideas: - Steamed broccoli - Cucumber salad - Asian slaw - Fried rice - Spring rolls These options add freshness and crunch, enhancing your meal. To make it low-carb, swap jasmine rice for cauliflower rice. Cauliflower rice cooks quickly and absorbs flavors well. You can also use zucchini noodles or skip the grains entirely. This keeps the meal light but still delicious. Yes, you can prep these bowls ahead. Cook the chicken and veggies, then store them in the fridge. They last for about 3-4 days. When ready, reheat and serve over fresh rice. This makes for a quick and easy meal. For the complete recipe, check out the [Full Recipe]. This blog post covered a quick and tasty recipe for sweet chili chicken bowls. You learned about the key ingredients, step-by-step cooking instructions, and smart tips to make it better. I hope you try adding your favorite veggies or protein to make it unique. Enjoy leftovers and know how to store them well. These bowls are easy to make and perfect for any day. Dive in and have fun cooking!](https://soyumrecipes.com/wp-content/uploads/2025/06/708cde85-7bcf-4c1f-ad07-cf3217f79caf.webp)
Are you ready for a meal full of flavor and ease? Sweet Chili Chicken Bowls are your perfect solution! In
![- 1 ½ cups graham cracker crumbs - ½ cup unsalted butter, melted - 1 cup sweetened condensed milk - ½ cup fresh lemon juice (about 2-3 lemons) - Zest of 2 lemons - 1 cup heavy whipping cream - ¼ cup powdered sugar - Fresh lemon slices and mint leaves for garnish (optional) Importance of using fresh lemon juice Using fresh lemon juice is key. It gives the pie a bright flavor. Bottled juice lacks that fresh taste. Always opt for fresh lemons when making this pie. Choosing the right graham crackers Not all graham crackers are the same. Look for a brand with a nice crunch. This helps your crust hold up well. A good crust is the base of a great pie. Tips for selecting powdered sugar When choosing powdered sugar, check the package. Make sure it is fresh and dry. Older sugar can clump and affect your cream. Fresh powdered sugar helps create a smooth, sweet whipped cream. For the full recipe, please refer to the section above. To make a great graham cracker crust, start with 1 ½ cups of graham cracker crumbs. Mix these crumbs with ½ cup of melted unsalted butter in a medium bowl. Make sure all the crumbs are coated well. Press the mixture into a 9-inch pie dish, forming an even layer. You can bake it for 8-10 minutes at 350°F for a crispier crust, or skip baking for a softer texture. Next, let's make the lemon filling. In another bowl, whisk together 1 cup of sweetened condensed milk, ½ cup of fresh lemon juice, and the zest of 2 lemons. Mix until everything is smooth and combined. This part adds a bright flavor to your pie. Now, we need to whip the cream. Take 1 cup of heavy whipping cream and whip it in a separate bowl until you see soft peaks. Gradually add in ¼ cup of powdered sugar while whipping until you reach stiff peaks. This cream will give your pie a light and airy texture. Now, for the fun part! Take the whipped cream and gently fold it into the lemon custard. Be careful not to deflate the cream. Keep folding until you see no white streaks. This mixture is what makes the pie so fluffy. Pour the lemon filling into your cooled graham cracker crust. Use a spatula to smooth out the top, making it look nice and even. A smooth finish makes the pie more appealing. For the best results, cover your pie with plastic wrap and refrigerate it for at least 4 hours. If you can, let it chill overnight. This helps the pie set properly. When it’s time to serve, slice the pie carefully. Use a sharp knife to get clean cuts. For a beautiful touch, garnish each slice with fresh lemon slices and mint leaves. This adds color and makes the pie look fancy. You can find the Full Recipe for more detailed guidance, but these steps will get you to a refreshing summer delight! To make the crust without baking, use a food processor. Combine graham cracker crumbs and melted butter until blended. Press this mix into your pie dish firmly. If you want a softer crust, skip baking altogether. To prevent a soggy bottom, chill the crust after pressing it. This step helps it firm up nicely. Adding extra zest from the lemons gives your pie a tangy kick. I suggest using the zest of three lemons for a burst of flavor. If you want to change the sweetness, try different sweeteners. Honey or agave syrup can give a unique twist. Adjust the amount to fit your taste buds. Pair your pie with fresh berries for a colorful touch. Raspberries or blueberries complement the lemon well. For a creative presentation, use a clear glass dish. This way, guests can admire the layers of lemon and cream. Garnish with lemon slices and mint leaves for a bright finish. {{image_2}} You can play with flavors to make this pie unique. Try a berry-infused lemon icebox pie. Just add fresh berries like strawberries or blueberries to the lemon filling. Blend them gently so the berries remain whole. This adds a nice pop of color and flavor. Another fun option is a chocolate lemon icebox pie. Mix in some melted dark chocolate into the lemon filling for a rich twist. The chocolate and lemon pair well, creating a delightful surprise. If you're looking for gluten-free options, swap regular graham crackers for gluten-free ones. Many brands offer gluten-free graham cracker crumbs that work great. You can also make your own with almond flour and coconut flour. For a dairy-free version, use coconut cream instead of heavy cream. Chill a can of coconut milk overnight. Scoop out the cream and whip it like regular cream. This gives you a light and airy texture without dairy. Mini icebox pies are perfect for parties or small servings. Use muffin tins or small jars to create individual pies. Simply follow the same recipe. Divide the crust and filling among the tins or jars. For portion control, aim for about half a cup of filling per mini pie. This way, everyone can enjoy their own without overindulging. Plus, they look cute when served! For presentation, add fresh fruit or a mint leaf on top of each mini pie. This makes them look fancy and inviting. You can find the full recipe to get started on this delicious journey! To keep your No-Bake Lemon Icebox Pie fresh, cover it tightly. Use plastic wrap or a lid. A good container keeps the pie from absorbing other smells. For best results, store it in a shallow, airtight container. This also makes it easier to slice later. If you have extra pie, just slice and store the pieces separately. This pie lasts about 3 to 4 days in the fridge. After that, it may start to lose its fresh taste. Look for changes in texture or smell. If it seems watery or has an off odor, it’s time to toss it. You can freeze this pie if you want to keep it longer. To do this, wrap the pie tightly in plastic wrap. Then, place it in a freezer-safe bag. It can stay frozen for about 1 month. When you're ready to eat it, move the pie to the fridge. Let it thaw overnight for the best texture. Avoid microwaving, as this can ruin the creamy filling. Enjoy your pie at its best! For the full recipe, check [Full Recipe]. To make this pie, you’ll start with the crust. Combine graham cracker crumbs and melted butter. Press the mixture into a pie dish. Next, make the filling by whisking sweetened condensed milk, fresh lemon juice, and zest. In another bowl, whip heavy cream and powdered sugar until it holds peaks. Fold the whipped cream into the lemon mix. Pour the filling into the crust and smooth it out. Then, chill the pie until firm. You can find the Full Recipe for all the details. The pie needs to chill for a minimum of four hours. For the best firmness, let it sit overnight. This time helps the filling set perfectly. The longer it chills, the better it tastes. You can use bottled lemon juice, but fresh juice is best. Fresh lemons give a brighter taste and better scent. Bottled juice may lack the same zing and can alter the texture. Always opt for fresh lemons if you can for the best results. To sum it up, you can create a delicious No-Bake Lemon Icebox Pie with key ingredients like graham crackers, fresh lemon juice, and heavy cream. Follow the simple steps to prepare, chill, and serve this treat. I shared tips for perfecting your crust and ways to enhance flavors. Explore variations for all diets, from gluten-free to mini pies. By storing it properly, your pie will stay fresh and tasty. With these insights, you're ready to enjoy this delightful dessert. Now, go make your lemon icebox pie!](https://soyumrecipes.com/wp-content/uploads/2025/06/59885d9a-79d4-4276-9b9f-8ed6388991af.webp)
Looking for a refreshing dessert to cool you down this summer? No-Bake Lemon Icebox Pie is a perfect choice! This
![To make this fun dish, you'll need these key ingredients: - 2 cups cooked chicken, shredded - 1 can (10.5 oz) cream of chicken soup - 1 cup sour cream - 1 cup shredded cheddar cheese (plus extra for topping) - 1 cup frozen mixed vegetables (peas, carrots, and corn) - 1 teaspoon garlic powder - 1 teaspoon onion powder - 1/2 teaspoon black pepper - 1 package (32 oz) frozen tater tots - 1/2 cup green onions, chopped (for garnish) Each ingredient plays a big role in making this casserole creamy and tasty. The chicken provides protein. The cream of chicken soup adds richness. Sour cream gives it a nice tang. Tater tots bring that crispy texture we all love. You can add more fun flavors if you want. Here are a few ideas: - Cooked bacon bits for extra crunch and taste - Diced bell peppers for a pop of color and flavor - Chopped jalapeños for a spicy kick - Dried herbs like thyme or oregano for added depth These optional ingredients can change your casserole's taste and style. Feel free to mix and match based on what your family enjoys. Sometimes, you might not have every ingredient on hand. Here are some easy swaps: - Use rotisserie chicken instead of cooked chicken for quick prep - Swap Greek yogurt for sour cream to lighten it up - Try cream of mushroom soup if you want a different flavor - Use frozen broccoli or spinach instead of mixed veggies These substitutions keep your casserole tasty while allowing you to use what you have at home. Don't hesitate to experiment! You can find the full recipe for Cheesy Chicken Tater Tot Casserole in the link provided. Start by preheating your oven to 375°F (190°C). In a large bowl, mix the shredded chicken, cream of chicken soup, and sour cream. Add in 1 cup of shredded cheddar cheese, frozen mixed vegetables, garlic powder, onion powder, and black pepper. Stir everything until it blends well. This mixture forms the heart of the casserole. Next, take a greased 9x13 inch casserole dish. Spread the chicken mixture evenly across the bottom. Then, grab your frozen tater tots. Layer them on top of the chicken mixture in a single row. Make sure they cover the chicken completely. For extra flavor, sprinkle additional cheddar cheese over the tater tots. This will create a nice cheesy crust. Now it’s time to bake! Place the casserole in your preheated oven. Bake for 35-40 minutes. You'll know it’s done when the tater tots turn golden brown and crispy. The cheese should be bubbly and melted. After baking, take it out and let it cool for about 5 minutes. Just before serving, garnish with chopped green onions for a fresh touch. Enjoy your delicious meal! For the complete recipe, check out the Full Recipe. To keep your tater tots crispy, start by baking them directly from the freezer. Avoid thawing them first. Place them in a single layer on top of the chicken mix. This helps them cook evenly. Bake at the right temperature, which is 375°F (190°C). If you want extra crunch, add a sprinkle of oil over the tots before baking. Cheddar cheese is a great choice for this dish. It melts well and gives a nice flavor. You can also try pepper jack for a spicy kick. Mozzarella adds a stretchy texture. Mixing different cheeses can boost your casserole's taste. For a gourmet twist, consider adding some Parmesan on top. This adds a rich layer of flavor. Using the right tools makes cooking easier. A large mixing bowl is key for combining your ingredients. A 9x13 inch casserole dish works best for baking. A spatula helps spread the mixture evenly. Keep a measuring cup handy for precise portions. Lastly, have a sharp knife ready to chop your green onions. These tools will make your cooking process smooth and enjoyable. For the full recipe, check out the details above! {{image_2}} You can easily change up the flavors by adding different vegetables. Try using broccoli, bell peppers, or even spinach. These veggies add color and nutrients. Just remember to chop them small so they cook well. Mix them in with the chicken and sauce. This way, every bite has a tasty crunch. If you like heat, add some hot sauce to the mix. A few dashes will give your casserole a nice kick. You can also use spicy cheese or jalapeños for extra spice. Just balance the heat with the creamy sauce. This will keep the flavors rich and not too overpowering. For a healthier option, swap out the cream of chicken soup for a lighter version. You can also use Greek yogurt instead of sour cream. For the chicken, grilled or baked chicken works great. Add more veggies to replace some of the tater tots. This keeps your meal tasty while cutting down on fat and calories. For the full recipe, click here: [Full Recipe]. To store leftover casserole, let it cool first. Once cool, cover it tightly with plastic wrap. You can also use an airtight container. This keeps the casserole fresh for 3 to 4 days in the fridge. Make sure to label your container with the date. This way, you won't forget when you made it! When you're ready to enjoy the leftovers, preheat your oven to 350°F (175°C). Place the casserole in an oven-safe dish. Cover it with foil to keep it moist. Heat for about 20-25 minutes. If you want a crispier top, remove the foil for the last 5 minutes. You can also reheat portions in the microwave. Just heat in 30-second bursts until warm. If you want to freeze the casserole, prepare it fully but do not bake it. Wrap it tightly in plastic wrap and then in aluminum foil. This helps prevent freezer burn. You can freeze it for up to 3 months. When you're ready to cook, thaw it overnight in the fridge. Bake as directed in the full recipe. Enjoy a quick and tasty meal anytime! Yes, you can use fresh chicken. Just make sure to cook it first. I recommend boiling or baking the chicken until it's fully cooked. Shred it into bite-sized pieces before mixing it with the other ingredients. This step ensures your casserole is safe to eat and tastes great. You can serve a simple salad or some steamed veggies. A fresh green salad adds a nice crunch and balances the rich flavors. You might also enjoy breadsticks or garlic bread on the side. These choices make a perfect meal for family gatherings or weeknight dinners. The casserole will stay fresh in the fridge for about 3 to 4 days. Just make sure to store it in an airtight container. When you're ready to eat, you can simply reheat it in the oven or microwave. This makes it a great option for meal prep or leftovers. For the full recipe, check out the details above! Cheesy Chicken Tater Tot Casserole is a fun and tasty dish. We explored the main and optional ingredients, plus easy substitutions. You learned the step-by-step way to prepare it, layer it, and bake it perfectly. I shared tips to keep your tater tots crispy and the best cheeses to use. You can also try variations and know how to store leftovers. This dish is simple and full of flavor. I hope you enjoy making it as much as I do.](https://soyumrecipes.com/wp-content/uploads/2025/06/92f3b068-7451-409e-9bc2-2e6532eef81e.webp)
Looking for a quick and tasty meal the whole family will love? This Cheesy Chicken Tater Tot Casserole combines tender
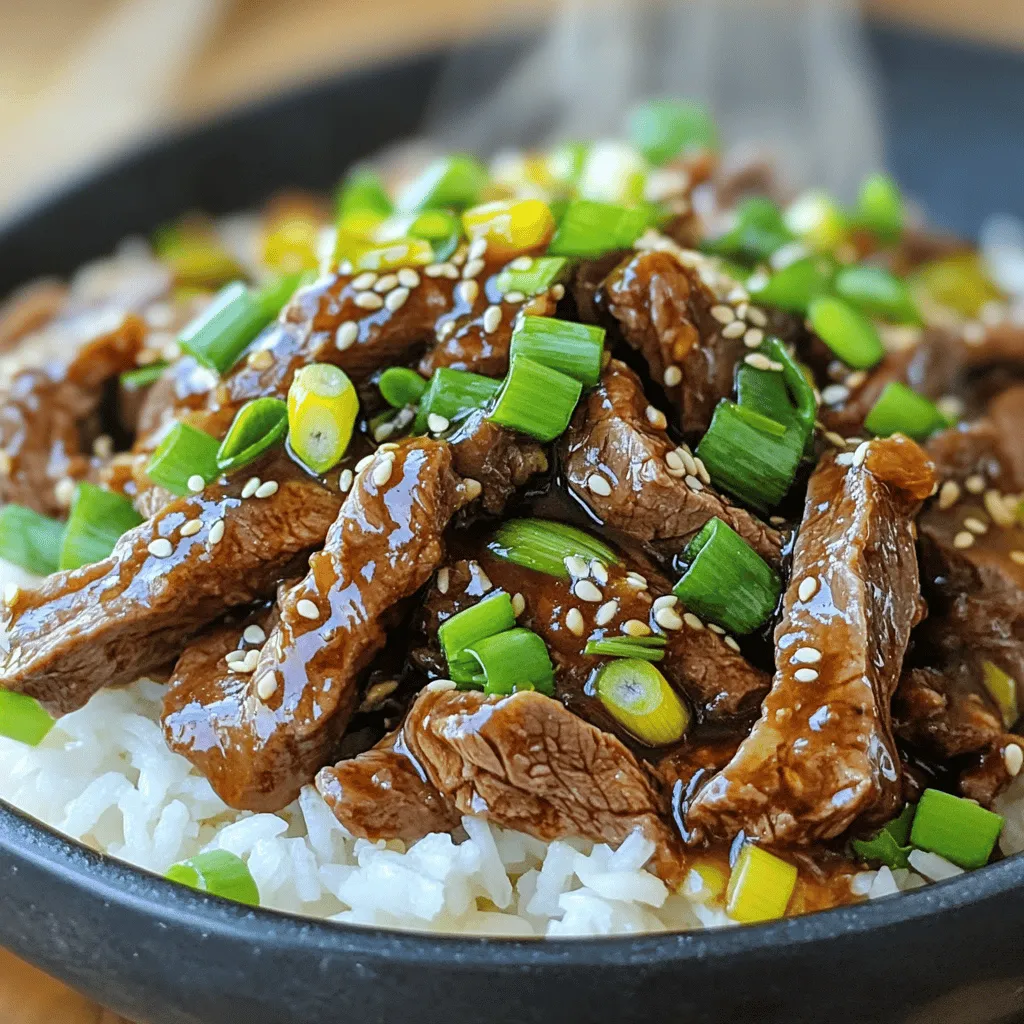
Are you ready to whip up a meal that’s quick, easy, and packed with flavor? This Easy Mongolian Beef recipe
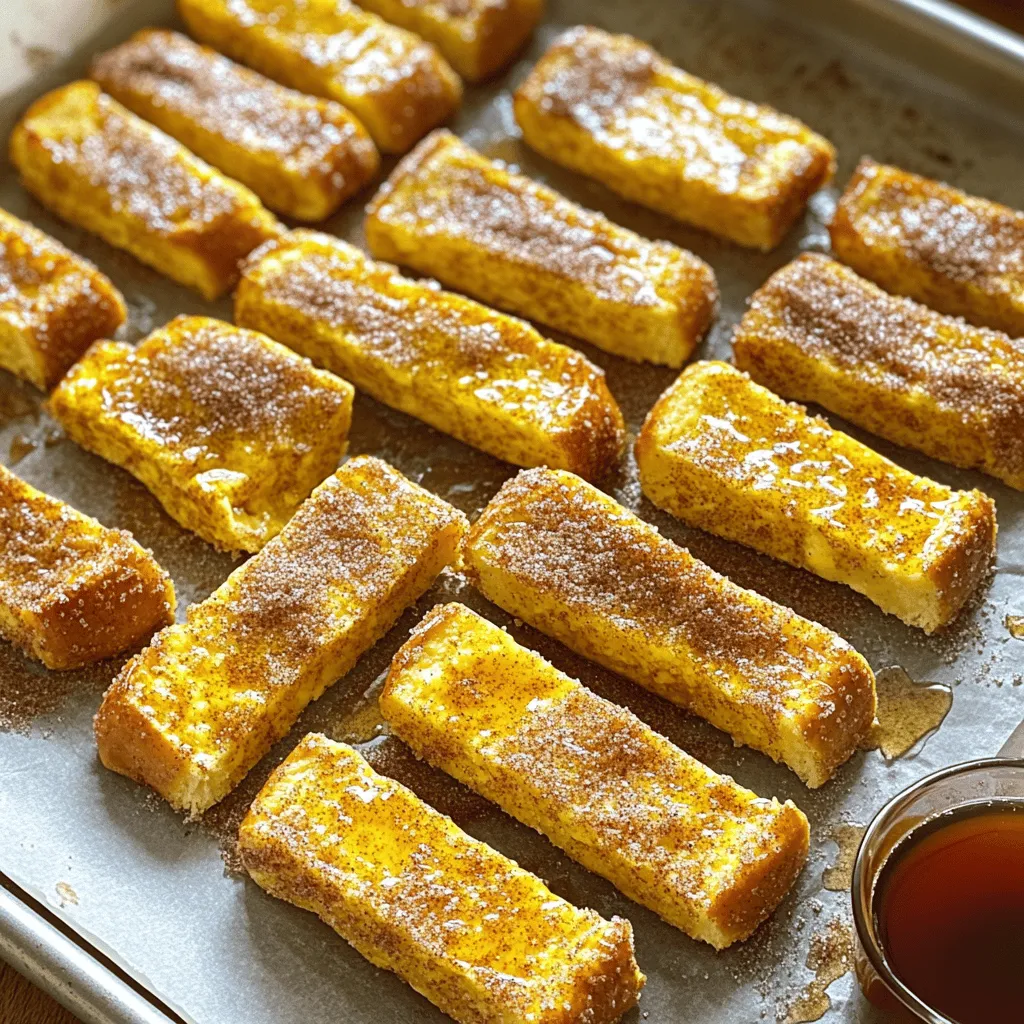
Start your day with a twist on a classic breakfast! Oven Baked French Toast Sticks are quick, easy, and oh-so-delicious.
![To make Buffalo Cauliflower Bites, gather these simple ingredients: - 1 head of cauliflower, cut into bite-sized florets - 1 cup all-purpose flour - 1 teaspoon garlic powder - 1 teaspoon onion powder - 1 teaspoon smoked paprika - 1 teaspoon salt - 1 cup milk (or plant-based milk) - ½ cup hot sauce (such as Frank's RedHot) - 2 tablespoons butter, melted - Optional: celery sticks and blue cheese dressing for serving Each ingredient plays a key role in building flavor and texture. The cauliflower provides a sturdy base. The flour and milk create a nice batter that coats the florets. The spices add depth, while the hot sauce gives that classic Buffalo kick. When choosing cauliflower, look for heads that are firm and heavy. The florets should be tightly packed. Avoid any that show signs of browning or wilting. Fresh cauliflower will have bright green leaves. Those leaves can help you identify a recently picked head. If you need alternatives, there are good options available. For the flour, you can use gluten-free flour if you prefer. It works well without changing the taste much. For the milk, almond, soy, or oat milk can replace dairy milk. Each option will still give you a delicious result. If you want to skip the butter, you can use olive oil instead. These substitutions make Buffalo Cauliflower Bites easy for everyone to enjoy. For the full recipe, check out [Full Recipe]. Start by preheating your oven to 450°F (230°C). This high heat helps get the cauliflower crispy. Line a baking sheet with parchment paper or spray it lightly with cooking spray. The parchment paper makes cleanup easy and helps prevent sticking. In a big bowl, mix together the flour, garlic powder, onion powder, smoked paprika, and salt. These spices add great flavor. Gradually pour in the milk, whisking as you go. Keep whisking until the batter is smooth and slightly thick. This coating is what makes the cauliflower crunchy. Dip each cauliflower floret into the batter. Make sure every piece is well-covered. Place the coated florets on the baking sheet. Space them out so they don’t touch. Bake for 20 to 25 minutes. Halfway through, flip them over to ensure they cook evenly. The goal is to achieve a golden and crispy finish. After the first bake, drizzle the buffalo sauce over the cooked florets and toss gently. Return them to the oven for another 10 minutes. This sets the sauce and gives an extra layer of flavor. Enjoy your Buffalo Cauliflower Bites with some celery sticks and blue cheese dressing. For the full recipe, refer to the complete instructions. To get your Buffalo Cauliflower Bites crispy, start with dry florets. Rinse the cauliflower and dry it well with a towel. When you coat the florets, make sure they are fully covered in batter. This helps lock in moisture and gives a nice crunch. Also, use a hot oven. Preheating to 450°F (230°C) is key. Flipping the cauliflower is an important step. Halfway through baking, carefully turn each floret. Use tongs to prevent breaking. This ensures even cooking and browning. When coating, dip each piece fully into the batter. Shake off excess batter before placing it on the baking sheet. This prevents soggy spots. Timing is crucial for the best flavor. After the first bake, take the cauliflower out and drizzle the sauce. Toss it gently to coat. Then, return it to the oven for another 10 minutes. This step helps the sauce stick and develops a deeper flavor. Keep an eye on your bites to avoid burning. Enjoy your crispy, spicy snack! For the full recipe, check the details above. {{image_2}} You can easily make Buffalo cauliflower bites vegan. Just swap the milk with plant-based milk. Options like almond or soy milk work great. For the butter, use vegan butter or olive oil. Both give you that rich flavor without dairy. The rest of the recipe stays the same. This way, everyone can enjoy these tasty treats. If you need gluten-free bites, replace all-purpose flour with gluten-free flour. Almond flour or chickpea flour are excellent choices. They provide a nice texture and taste. Make sure your hot sauce is also gluten-free. Some brands may add gluten, so check the label. This method keeps the bites crispy and delicious. You can play with flavors in Buffalo cauliflower bites. Try different hot sauces to find your favorite. Sriracha adds a sweet kick, while chipotle sauce gives a smoky taste. You can also mix in spices. Adding cumin or chili powder can change the flavor profile. For something fun, toss in ranch seasoning or taco seasoning. Each variation offers a new twist on this classic snack. Want to try the full experience? Check out the Full Recipe for all the details! After you enjoy your Buffalo Cauliflower Bites, store any leftovers in an airtight container. Let them cool first, then seal the container. This keeps them fresh for about 3 days in the fridge. If you want to enjoy them later, freezing is a great option. To reheat, use your oven for the best crispiness. Preheat the oven to 350°F (175°C). Spread the bites on a baking sheet and bake for about 10-15 minutes. Flip them halfway through to heat evenly. You can also microwave them, but they might lose some crunch. For longer storage, freeze the bites before you coat them in sauce. Place cooled, cooked cauliflower on a baking sheet. Freeze until solid, then transfer to a freezer bag. They can last up to 3 months. When ready to eat, bake them straight from the freezer. Add the sauce and bake as usual. Enjoy the full recipe for step-by-step details! Yes, you can make Buffalo Cauliflower Bites in an air fryer. Air fryers cook with hot air, making the bites crispy. To do this, coat your cauliflower as in the recipe. Preheat the air fryer to 400°F (200°C). Place the cauliflower in a single layer in the basket. Cook for about 15-20 minutes, shaking halfway through. Check for crispiness and adjust time if needed. Buffalo Cauliflower Bites pair well with many sides. Here are some great options: - Celery sticks - Carrot sticks - Blue cheese dressing - Ranch dressing - A light green salad - Pita chips or tortilla chips These sides complement the spicy flavor and add freshness to your meal. The spice level of Buffalo Cauliflower Bites depends on the hot sauce you use. A standard choice like Frank's RedHot gives a nice kick but isn't too hot. If you like it spicier, add more hot sauce or use a hotter brand. If you prefer less heat, try mixing the hot sauce with a bit of honey or BBQ sauce. This balances the spice while keeping the flavor. We explored how to make Buffalo Cauliflower Bites step by step. I shared tips on selecting fresh cauliflower and ways to make the dish gluten-free or dairy-free. Baking techniques help get the perfect crunch. You can also try fun flavor variations and different serving ideas. Remember, these bites store well and can be reheated or frozen for later. Enjoy this tasty snack any time, knowing you’ve made a healthy choice!](https://soyumrecipes.com/wp-content/uploads/2025/06/ac4721ad-03e9-4974-a99b-a63bcfd209a2.webp)
Looking for a fun and tasty snack? Buffalo Cauliflower Bites are the perfect choice! They pack a punch with flavor

Looking for a nutritious and delicious drink that’s quick to make? You’ll love the Peanut Butter Banana Smoothie! This blend
![To make these tasty bites, you need simple, easy-to-find ingredients. The recipe combines creamy cheese and pasta into a fun, crunchy snack. You can find the full recipe at the end of this section. Here’s what you need for the base of your baked mac and cheese bites: - 2 cups elbow macaroni - 2 cups shredded sharp cheddar cheese - 1 cup shredded mozzarella cheese - 1/2 cup grated Parmesan cheese - 1/4 cup cream cheese, softened - 2 large eggs - 1/2 cup milk - 1 teaspoon garlic powder - 1 teaspoon onion powder - 1/2 teaspoon smoked paprika - Salt and black pepper to taste - 1 cup breadcrumbs (panko for extra crunch) - Cooking spray or olive oil for greasing Each ingredient adds flavor and texture. The cheeses melt together, creating a creamy filling. The spices bring out the taste and the breadcrumbs add a crispy top. You can switch things up with these optional ingredients: - Cooked bacon or ham for extra protein - Chopped spinach or broccoli for added veggies - Different cheese types like gouda or pepper jack for unique flavors Feel free to mix and match. This way, you can tailor the bites to your liking! To start, I preheat my oven to 375°F (190°C). This step is key for getting a nice golden color. While the oven warms up, I cook 2 cups of elbow macaroni according to the package. I aim for al dente, so it stays firm when baked. After cooking, I drain the pasta and set it aside to cool a bit. Next, I grab a large mixing bowl. I add the cooked macaroni, 2 cups of shredded sharp cheddar cheese, 1 cup of shredded mozzarella cheese, 1/2 cup of grated Parmesan cheese, and 1/4 cup of softened cream cheese. I mix this all together until the cheese is well spread throughout the pasta. In a separate bowl, I whisk together 2 large eggs, 1/2 cup of milk, 1 teaspoon of garlic powder, 1 teaspoon of onion powder, and 1/2 teaspoon of smoked paprika. I also add salt and black pepper to taste. Once it's all mixed, I pour this egg mixture over the mac and cheese. I stir until everything is combined. Now, I get my mini muffin tin ready. I grease it using cooking spray or a light coat of olive oil. This helps the bites come out easily after baking. I then use a spoon to fill each muffin cup with the mac and cheese mix. I press down slightly to make sure they hold together well. I finish by sprinkling 1 cup of breadcrumbs over the top of each muffin cup. Using panko breadcrumbs gives a nice extra crunch. I place the tin in the preheated oven and bake for about 20-25 minutes. I look for a golden brown color on top and a firm texture when I touch them. After baking, I let the bites cool for a few minutes. Then, I use a small spatula to carefully remove them from the muffin tin. For a fun twist, I serve them warm with marinara sauce or my favorite dipping sauce. That's how I make baked mac and cheese bites! For the detailed steps, check out the Full Recipe. To get crunchy bites, use panko breadcrumbs. They add a nice, crisp layer. Make sure to fill the muffin tin cups well. Press the mixture down firmly. This helps them hold their shape while baking. Bake until the tops are golden brown. This step makes them crispy outside but soft inside. For a richer taste, mix different cheeses. Try adding Gouda or pepper jack. These will add depth to your bites. Don't skip the spices! Garlic powder and smoked paprika bring warmth. Adjust the salt and pepper to your liking. A hint of cayenne can add a nice kick. Serve the bites warm for the best taste. Arrange them on a nice platter. Pair with marinara or ranch dressing for dipping. This adds fun and flavor. You can also garnish with fresh herbs. Chopped parsley or basil can brighten the dish. Enjoy these bites at parties or as a snack! {{image_2}} You can mix up the types of cheese in your bites. Cheddar is great, but you can try gouda or pepper jack for extra flavor. Mixing cheeses adds depth and makes each bite unique. A blend of mozzarella and cheddar gives a nice stretch. Consider using fontina for a creamy touch. Each cheese has a different taste and texture, so feel free to play around! Want to make your bites heartier? Adding veggies or proteins is a fun way to do it. Spinach, broccoli, or diced bell peppers add color and nutrients. You can also add cooked chicken or bacon for a savory twist. Chopped tomatoes give a fresh burst of flavor. These additions can make your mac and cheese bites more filling and enjoyable. You can spice up your bites with different flavors. Adding a pinch of cayenne pepper makes them hot and tasty. Fresh herbs like basil or parsley can add a bright, fresh taste. You might even try adding a dash of hot sauce for an extra kick. These little changes can make a big difference in how your bites taste and feel. Get creative and find your favorite flavor combinations! For the full recipe, check the [Full Recipe] section. After you enjoy your baked mac and cheese bites, store the leftovers. Place them in an airtight container. Keep them in the fridge for up to three days. Make sure they cool down before you seal the container. This helps keep them fresh and tasty. When you're ready to eat the leftovers, reheating is simple. Preheat your oven to 350°F (175°C). Place the bites on a baking sheet. Heat for about 10-15 minutes until they are warm. This method keeps them crispy. You can also use the microwave, but they may lose some crunch. Heat for 30 seconds, then check. If they need more time, heat in short bursts. If you want to save some for later, freezing works great. First, let the bites cool completely. Then, place them in a single layer on a baking sheet. Freeze them for 1-2 hours until firm. After that, transfer them to a freezer-safe bag or container. They can last up to three months in the freezer. When you're ready to eat, bake them straight from the freezer. Just add a few extra minutes to the baking time. Enjoy your baked mac and cheese bites anytime! Yes, you can use gluten-free pasta. Look for options made from rice or corn. These types work well in baked mac and cheese bites. Just cook them al dente as you would regular pasta. They will hold up nicely in the mix and won’t change the taste much. To make your mac and cheese bites crispy, use panko breadcrumbs. They give a nice crunch when baked. You can also spray a little olive oil on top before baking. This adds extra crispiness. Baking them longer can help too, but watch closely to avoid burning. Baked mac and cheese bites taste great with many sauces. Marinara sauce is a classic choice. It adds a nice tang. Ranch or garlic aioli also work well. For a kick, try a spicy sriracha sauce. These dips enhance the flavors and make eating fun. Don't forget to try different sauces to find your favorite! We've covered the full recipe for mac and cheese bites, including key ingredients, steps, and tips. You learned how to create the perfect texture and enhance flavors. Variations allow you to try different cheeses, veggies, or spices. Don’t forget how to store and reheat those tasty leftovers. I hope you feel ready to make these bites your own! Enjoy experimenting and savoring each cheesy bite. Happy cooking!](https://soyumrecipes.com/wp-content/uploads/2025/06/c7601742-8308-414e-82ec-1dfc0c9e9278.webp)
If you’re craving a fun, tasty snack, you’re in the right spot! Baked Mac and Cheese Bites are not just
