Skip to content
DisclaimerTerms Of UseGDPR PolicyCookie Policy

So Yum Recipes

  • Home
  • Drinks
  • Appetizers
  • Dinner
  • Dessert
  • About
  • Contact
  • Privacy Policy
DisclaimerTerms Of UseGDPR PolicyCookie Policy

Chloe

- 2 pounds chicken wings - 1 tablespoon baking powder - 1 teaspoon garlic powder - 1 teaspoon onion powder - 1 teaspoon smoked paprika - 1 teaspoon cayenne pepper (optional for heat) - Salt and pepper to taste - 3 tablespoons olive oil - 1 tablespoon honey (for glazing) - Fresh parsley, chopped (for garnish) When measuring your ingredients, be precise. For example, 1 tablespoon of baking powder helps create that crisp texture you want. Use a kitchen scale for the chicken wings to ensure you have exactly 2 pounds. This accuracy makes a big difference in taste and texture. If you want to spice things up, consider adding a teaspoon of cayenne pepper. This gives your wings a nice kick. You can also try a splash of lemon juice for brightness. Additionally, consider mixing in some herbs like thyme or rosemary. These flavors can take your wings to a new level. Using these optional ingredients can make the dish more fun and personalized. For the full recipe, check out the detailed steps to make these crispy baked chicken wings! First, set your oven to 425°F (220°C). Line two baking sheets with aluminum foil. This makes for easy cleanup. Place a wire rack on each sheet. The racks help the air flow around the wings, making them crispy. Next, take your chicken wings and dry them well with paper towels. This step is very important. Moisture will make them soggy. After drying, put the wings in a large bowl. Sprinkle the baking powder, garlic powder, onion powder, smoked paprika, and cayenne pepper over them. Add salt and pepper too. Toss the wings to coat them evenly. Then, drizzle the olive oil over the wings. Toss them again to make sure the oil and seasonings cover every wing. Now, arrange the wings in a single layer on the wire racks. Make sure they do not touch each other. This helps them cook evenly. Place the trays in the preheated oven. Bake the wings for 40-45 minutes. Flip them halfway through baking. This way, both sides get crispy and golden. While the wings are baking, you can make the honey glaze. In a small bowl, mix honey with a splash of warm water. This will help it drizzle nicely over the wings later. When the wings turn golden brown and crispy, take them out of the oven. Brush the honey glaze over the hot wings for a sweet touch. Finally, sprinkle chopped parsley on top for a fresh look before serving. For the full recipe, check the main section. Enjoy your crispy baked chicken wings! To make your wings super crispy, follow a few simple steps. First, dry the wings well with paper towels. Remove all moisture. This helps them crisp up in the oven. Use baking powder in the spice mix. It helps create a crispy skin. Also, make sure the wings are spread out on the rack. Space between them allows air to flow, which is key for crispiness. You only need a few tools to make these wings great. A wire rack is essential. It lifts the wings off the baking sheet, letting hot air circulate. Use aluminum foil to line your baking sheets. This makes cleanup easy. A large bowl is perfect for mixing the wings with spices. Finally, a good meat thermometer helps check if they are cooked through. You can prep these wings ahead of time. Dry and season them a few hours before cooking. Keep them in the fridge until you’re ready to bake. This is a great way to save time. You can also make the honey glaze in advance. Store it in a small jar. When it’s time to eat, your wings will be ready to cook. For the full recipe, see the section above. {{image_2}} You can change the flavor of your wings easily. For a sweet twist, add honey or brown sugar. A hint of ginger or maple syrup can also work well. If you prefer spicy wings, increase the cayenne pepper or add some hot sauce. For savory wings, try adding herbs like thyme or rosemary. You can mix and match these flavors to create your own signature wings. Using an air fryer is a quick way to get crispy wings. Set your air fryer to 400°F (200°C). Cook the wings for about 25-30 minutes. Shake the basket halfway through to ensure even cooking. If you want to grill your wings, preheat your grill to medium heat. Cook wings for 20-25 minutes, turning often to avoid burning. Both methods can yield great results, just like the full recipe. Sauces can elevate your wings even more. A classic buffalo sauce made from hot sauce and butter is always a hit. For a tangy option, mix soy sauce, honey, and garlic for an Asian-inspired glaze. If you love ranch, try mixing sour cream, herbs, and a splash of lemon juice. Each sauce adds a different twist, so don’t be afraid to experiment! After enjoying your crispy baked chicken wings, let them cool down. Place them in an airtight container. Store the wings in the fridge. They will stay fresh for about 3 to 4 days. If you want them to last longer, consider freezing them. Make sure to separate layers with parchment paper. This will prevent sticking. To reheat your chicken wings, the oven is your best friend. Preheat the oven to 350°F (175°C). Lay the wings on a baking sheet. Heat them for about 10 to 15 minutes. This keeps them crispy. You can also use an air fryer. Set it to 350°F (175°C) and heat for 5 to 7 minutes. The wings will taste just as good as fresh. If you plan to freeze the wings, do it as soon as they cool. Place them in a freezer-safe bag. Remove as much air as possible. Label the bag with the date. Frozen wings can last up to 3 months. When ready to use, thaw them overnight in the fridge before reheating. Enjoy your crispy baked chicken wings anytime! To make chicken wings crispy without frying, you need to follow a few key steps. First, dry the wings well with paper towels. This removes extra moisture, which helps them become crispy. Next, coat the wings with baking powder and spices. The baking powder works wonders, making the skin puff up and crisp during baking. Lastly, bake them on a wire rack. This allows hot air to circulate around the wings, ensuring they cook evenly and stay crispy. Yes, you can use frozen chicken wings! Just remember to thaw them first. Place them in the fridge overnight or use a cold water bath to speed up the process. After thawing, dry them well with paper towels. Then, season and bake them just like fresh wings. The key is to ensure they are dry to get that perfect crispiness. The best sauces for chicken wings depend on your taste. Classic buffalo sauce is always a hit, giving wings a spicy kick. BBQ sauce adds a sweet and smoky flavor. For something unique, try a honey garlic sauce or a tangy lemon pepper sauce. You can even mix sauces! Combine buffalo and BBQ for a sweet heat. Feel free to experiment and find your favorite! Yes, you can make these wings in advance! Cook them as per the recipe, then let them cool. Store them in an airtight container in the fridge for up to two days. When you’re ready to serve, reheat them in the oven to restore their crispiness. If you want, you can also freeze the cooked wings. Just remember to place them in a freezer-safe container. They will be perfect for game day or a quick snack! For the full recipe, check out the details above. This blog post covered all you need for making chicken wings. We explored key ingredients, measurement details, and options for flavor. You learned step-by-step prep and baking methods, plus tips for extra crispiness. We discussed cooking variations, storage, and helpful FAQs. Remember, great wings are all about good ingredients and careful cooking. Try new flavor pairings and enjoy your delicious results!

Crispy Baked Chicken Wings Easy and Tasty Recipe

Are you craving crispy baked chicken wings that are simple and full of flavor? You’re in the right place! This

To make a French silk pie, you need a few simple ingredients that create a rich and creamy treat. Here’s what you will need: - 1 pre-baked pie crust (store-bought or homemade) - 1 cup unsweetened cocoa powder - 1 cup granulated sugar - 1/2 cup unsalted butter, softened - 3 large eggs - 1 teaspoon vanilla extract - 1 cup heavy cream - 2 tablespoons powdered sugar (for whipped cream topping) - Suggested garnishes (chocolate shavings, cocoa powder) These ingredients come together to create a pie that is smooth and velvety. The cocoa powder gives it a deep chocolate flavor that many love. The butter helps in making the filling rich, while the heavy cream adds a light touch. Using a pre-baked pie crust saves time, but you can make your own if you prefer. Each ingredient plays a role in the final taste and texture of the pie, making it a delightful dessert. For the full recipe, check out French Silk Dream Pie 🥧. 1. Start by creaming the butter and sugar together. Use a mixing bowl and work for about 3-5 minutes. You want it light and fluffy. 2. Now, gradually add the cocoa powder. Mix until it is well combined with the butter and sugar. This gives the pie its rich chocolate flavor. 3. Next, incorporate the eggs. Beat in one egg at a time. Make sure each egg is fully mixed in before adding the next. Mix for about 5 minutes. The filling should look light and velvety. 4. Stir in the vanilla extract. This adds a nice depth to the chocolate. Mix until it is fully combined. 5. In a separate bowl, whip the heavy cream until stiff peaks form. This step is key to making the filling light and creamy. 6. Gently fold the whipped cream into the chocolate mixture. Be careful not to overmix. You want to keep the air in the whipped cream for a light texture. 7. Pour the silky filling into your pre-baked pie crust. Smooth the top with a spatula for a nice finish. 8. Refrigerate the pie for at least 4 hours. For the best taste, chill it overnight. This helps the pie set properly. 9. Before serving, whip the remaining heavy cream with powdered sugar until stiff peaks form. Spread this whipped cream over the top of the chilled pie. 10. Finish with chocolate shavings or a dusting of cocoa powder. This adds a lovely touch to your dessert. Now you have a delicious French Silk Pie ready to impress your guests! For the full recipe, feel free to check out the details above. To get that smooth and rich texture, use room temperature ingredients. When the butter and eggs are at room temperature, they blend better. This helps create a light and fluffy filling. Your pie will taste so much better! When mixing, be gentle but thorough. Start slowly, then increase your speed. This way, you add air into the mix. The air makes the pie light and creamy. The goal is to have a silky texture that melts in your mouth. Pair your French Silk Pie with coffee or a glass of cold milk. Both drinks balance the rich flavors. You can also serve it with fresh berries on the side. They add a nice pop of color and freshness. For a stunning presentation, use elegant plates. Serve chilled slices with a drizzle of chocolate syrup. You can also add some whipped cream on top. A sprinkle of cocoa powder or chocolate shavings makes it look fancy. One big mistake is overmixing the filling. If you mix too much, the texture can become grainy. Stop mixing as soon as the ingredients blend well. Another mistake is not chilling the pie long enough. The pie needs at least four hours in the fridge. Chilling helps it set properly. Without this time, it may not hold its shape when sliced. {{image_2}} You can make French silk pie even more fun by adding new flavors. - Mint French Silk Pie: Add 1 teaspoon of mint extract to the filling. This gives a fresh twist to the rich chocolate. It’s like a chocolate mint treat in a pie! - Peanut Butter French Silk Pie: Mix in 1/2 cup of creamy peanut butter into your chocolate filling. This creates a lovely combo of chocolate and peanut butter flavors. It’s a dream for peanut butter lovers! You can enjoy this pie even if you have dietary needs. - Making it gluten-free: Use a gluten-free pie crust instead of a regular one. You can find these at many stores or make one from gluten-free flour. This way, everyone can enjoy a slice! - Vegan adaptations: Replace eggs with a mix of flaxseed meal and water. Use dairy-free butter and coconut cream instead of heavy cream. These swaps make the pie vegan-friendly while keeping it delicious! Toppings can elevate your pie and add more fun. - Different whipped cream flavors: Try adding flavors to your whipped cream! You can use vanilla, almond, or even coffee extract for extra taste. Just mix the flavor in while whipping. - Additional garnishes: Top your pie with fresh fruits like raspberries or strawberries. You can also add chopped nuts for a crunch. Chocolate shavings or a dusting of cocoa powder look great too and taste amazing! Explore these variations and toppings to make your French silk pie truly special. For the full recipe, check out the details above. To keep your French Silk Pie fresh, place it in the fridge. Cover the pie with plastic wrap or aluminum foil. This helps keep it safe from odors and moisture. It will stay good for about 3 to 4 days. If you want to save it for longer, freezing is an option. Wrap the pie tightly in plastic wrap, then in aluminum foil. This prevents freezer burn. When stored this way, it can last for up to 2 months. To enjoy it later, thaw the pie in the fridge overnight before serving. French Silk Pie is best served cold, so reheating is not common. If you want to warm a slice, use the microwave. Place a slice on a microwave-safe plate. Heat it for about 10 to 15 seconds. This warms it slightly without changing the texture too much. For the best experience, serve it chilled. The creamy filling tastes amazing when it's cold. Enjoy every rich bite! French Silk Pie comes from the United States, not France. It first appeared in the 1950s. A famous recipe was created by Betty Crocker. The pie is rich, creamy, and chocolatey. It became popular for its smooth texture and simple ingredients. This dessert is a favorite in many homes for special occasions. You can make French Silk Pie without eggs by using silken tofu or aquafaba. - Silken Tofu: Blend 1 cup of silken tofu until smooth. Mix it with cocoa powder, sugar, and vanilla. This gives a creamy texture. - Aquafaba: Use 3 tablespoons of aquafaba, the liquid from canned chickpeas. Whip it until fluffy, then fold it into the chocolate mix. Both options keep the pie rich without eggs. Yes, you can use a store-bought pie crust. It saves time and effort. - Benefits: It is quick and easy. You don’t need to make dough from scratch. It also helps keep the pie tasty and fresh. - Considerations: Check the ingredients for quality. Some crusts may have preservatives. A homemade crust may offer a fresher flavor. French Silk Pie lasts about 3 to 4 days in the fridge. - Best Practices: Always cover the pie tightly with plastic wrap or foil. This keeps it fresh and prevents it from drying out. You can also freeze it for longer storage, up to 2 months. Just remember to let it thaw in the fridge before serving. This blog post detailed how to make a classic French Silk Pie. We covered essential ingredients, step-by-step instructions, and tips for perfecting its texture. I also shared variations to try and storage information to keep your pie fresh. Remember, the key is in the mixing and chilling. Avoid common mistakes to enjoy a silky treat. With these insights, you can create a stunning pie that impresses every time. Enjoy your baking adventure!

French Silk Pie Delightfully Rich and Creamy Treat

If you crave a dessert that’s both rich and creamy, French Silk Pie is a must-try! This classic treat combines

- Spinach - Strawberries - Red onion In this salad, fresh spinach serves as the base. I love to use baby spinach because it is tender and full of nutrients. You need about 4 cups of washed and dried spinach. Next, add ripe strawberries. You will want 1 cup, hulled and sliced. These berries bring a sweet burst to the dish. Finally, use a 1/4 cup of thinly sliced red onion. The onion adds a nice crunch and a bit of bite. - Feta cheese - Sliced almonds For a creamy texture, crumbled feta cheese is a must. You will need 1/2 cup of this salty cheese. It complements the strawberries well. Then, add sliced almonds for crunch. Toasting them enhances their flavor. You will want a 1/4 cup of these nuts to sprinkle on top. - Balsamic vinegar - Honey - Olive oil - Seasoning Now, let’s talk about the dressing. A mix of 2 tablespoons of balsamic vinegar and 1 tablespoon of honey creates a sweet and tangy flavor. Then, add 2 tablespoons of olive oil for richness. Don’t forget to season with salt and pepper to taste. This dressing brings all the flavors together beautifully. For the full recipe, check out the details above. To make a great strawberry spinach salad, start with fresh ingredients. First, wash the spinach in cold water. Make sure to remove any dirt and grit. After washing, dry the spinach with a salad spinner or paper towels. This helps the dressing stick later. Next, prepare the strawberries. Take each berry and hull it by removing the green top. Then, slice the strawberries into thin pieces. This makes them easy to mix with the spinach. You want bite-sized pieces for a perfect salad. In a large bowl, combine the fresh spinach and sliced strawberries. Mix them gently to keep the berries intact. Next, add crumbled feta cheese on top. The creamy feta adds a nice flavor. Then, sprinkle the toasted sliced almonds. They give a crunchy texture that contrasts well with the soft fruits. Finally, add thinly sliced red onion. The onion brings a sharp taste that balances the sweetness of the strawberries. This mix of flavors and textures makes the salad exciting and delicious. For the dressing, choose a small bowl and whisk together the balsamic vinegar, honey, and olive oil. This mixture creates a sweet and tangy flavor. Add salt and pepper to taste. Make sure everything blends well. When you are ready to serve, drizzle the dressing over the salad. Do this just before serving to keep the spinach crisp. Gently toss all the ingredients together until they are coated with the dressing. Taste it to see if you need more salt or pepper. By following these steps, you will create a fresh and flavorful strawberry spinach salad that everyone will enjoy. For the complete recipe, check out the Full Recipe. Selecting ripe strawberries When picking strawberries, look for bright red color. They should feel firm to the touch. Avoid ones with white or green spots. A sweet smell means they are ripe and ready to enjoy. Choosing quality spinach Fresh spinach should have vibrant green leaves. Check for any wilting or yellowing. The leaves should be crisp and free from spots. Always wash and dry spinach to remove dirt and grit. Alternative dressings to try If balsamic isn't your style, lemon vinaigrette works great too. You can also use a yogurt-based dressing for creaminess. Each option adds a unique flavor to the salad. Balancing flavors with seasonings Add salt and pepper to enhance the taste. A sprinkle of nutmeg can add warmth. Try adding a dash of cayenne for a spicy kick. Balance is key to making each flavor shine. Ideal pairings for the salad This salad pairs well with grilled chicken or fish. You can also serve it alongside a hearty sandwich. It complements any meal nicely, adding freshness and color. Presentation tips for serving Serve this salad in a large bowl for sharing. Arrange the strawberries and feta on top for a pop of color. Garnish with extra almonds for an inviting look. For the full recipe, check out the details above. {{image_2}} You can change up the nuts and cheese in your salad. Adding walnuts or pecans gives a nice crunch. These nuts add flavor and healthy fats. You can also switch to goat cheese instead of feta. Goat cheese has a creamy texture that pairs well with the sweet strawberries. Try adding other fruits and veggies for more taste and color. Blueberries or apples can work well in this salad. They add sweetness and a pop of color. If you want creaminess, slice up an avocado. It adds a rich texture and blends nicely with the other ingredients. The dressing can also change the whole dish. Using lemon vinaigrette brings a zesty kick. It brightens up the flavors of the salad. You can also try yogurt-based dressings for a creamy twist. These dressings are lighter and can be very refreshing. For the full recipe, check out the complete guide to making this delightful salad! To store leftovers, place the salad in an airtight container. This helps keep it fresh. If you have dressing left, store it separately. This way, the greens won't get soggy. For fresh ingredients, wash and dry them well before storing. Keep spinach in a paper towel to absorb moisture. Store strawberries in the fridge in their original container. This helps them last longer. You can keep Strawberry Spinach Salad in the fridge for about 2 days. After that, the greens may wilt. Check for signs of spoilage. If the spinach turns brown or slimy, it's time to toss it. Mold on strawberries is another sign they are no longer good. Always trust your eyes and nose. You can prep ingredients a day before serving. Wash and slice strawberries, and store them in the fridge. Keep spinach whole until you're ready to mix. Assemble the salad just before serving for the best taste. This keeps everything crisp and fresh. Drizzle the dressing over the top right before eating. This makes your salad look and taste great! For the full recipe, check out the Strawberry Spinach Delight 🥗. Strawberry Spinach Salad lasts about 2 days in the fridge. The spinach wilts and strawberries soften quickly. This means it’s best to eat it fresh. Store it in an airtight container to keep it crisp a bit longer. You can prepare the salad ahead. However, avoid adding the dressing until you are ready to serve. This keeps the greens fresh and prevents sogginess. You can wash and slice the ingredients in advance. Just keep them in separate containers. You can add many healthy items to this salad. Consider these options: - Avocado for creaminess - Blueberries for extra sweetness - Cucumber for crunch - Quinoa for added fiber All these additions enhance flavor and nutrition. The base of the salad is vegan. However, it contains feta cheese, which is not vegan. To make it vegan, simply skip the cheese or use a plant-based alternative. This way, you keep all the taste without dairy. Adding protein boosts the salad’s heartiness. Here are some great options: - Grilled chicken for a classic touch - Chickpeas for a plant-based choice - Tofu for a vegetarian option - Shrimp for a seafood twist These additions make the salad a complete meal. Check out the Full Recipe for the complete steps! This blog post covered all you need for a great Strawberry Spinach Salad. I shared fresh ingredients, step-by-step prep, and easy tips to enjoy it. Remember, using ripe berries and quality spinach makes a big difference. You can change the salad with different fruits, nuts, or dressings to fit your taste. Store leftovers properly, and enjoy it fresh. With these ideas, you can make a delightful salad every time. Happy salad making!

Strawberry Spinach Salad Fresh and Flavorful Dish

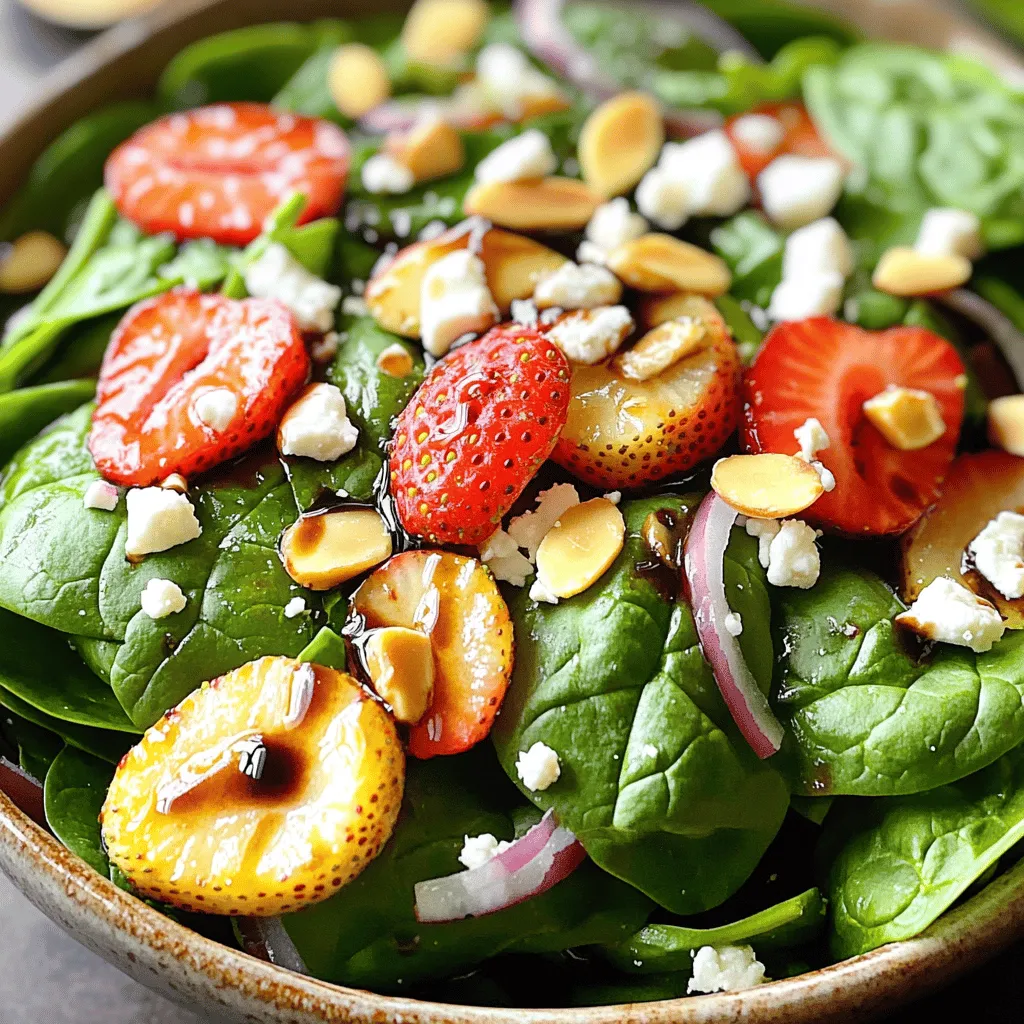
Looking for a fresh salad recipe that bursts with flavor? Let me introduce you to the delightful Strawberry Spinach Salad.

- 1 ½ cups graham cracker crumbs - ½ cup unsalted butter, melted - 2 tablespoons sugar - 16 oz cream cheese, softened - ¾ cup sugar - 3 large eggs - 1 teaspoon vanilla extract - 1 cup sour cream - 1 cup fresh raspberries - 2 tablespoons raspberry jam To get the best results, measure your ingredients carefully. Use a kitchen scale for precise amounts. For graham cracker crumbs, crush them finely for a smooth crust. When measuring butter, use a liquid measuring cup. If you need to substitute, you can use low-fat cream cheese or coconut cream, but the texture may change. When choosing cream cheese, opt for full-fat varieties. They provide a rich taste and creamy texture. For raspberries, fresh is best. Look for ripe, plump berries. If using frozen raspberries, thaw them first. This will help maintain the swirl's quality in your cheesecake. To start, preheat your oven to 325°F (160°C). This is important for even baking. Next, grab a 9-inch springform pan. Grease it well with non-stick cooking spray. This will help the cheesecake come out easily later. In a mixing bowl, combine 1 ½ cups of graham cracker crumbs, ½ cup melted unsalted butter, and 2 tablespoons of sugar. Mix until everything is well combined. Then, press this mixture firmly into the bottom of the greased springform pan. Bake your crust for 10 minutes, then take it out and let it cool. In a large bowl, beat 16 oz of softened cream cheese and ¾ cup of sugar. Use an electric mixer on medium speed. Mix until it is smooth and creamy, which takes about 3-4 minutes. Then, add 3 large eggs, one at a time. Mix well after each egg. Add 1 teaspoon of vanilla extract and 1 cup of sour cream. Mix until everything is just combined. In a small saucepan over low heat, combine 1 cup of fresh raspberries and 2 tablespoons of raspberry jam. Cook this mixture for about 3-4 minutes. The raspberries will break down and create a nice thick sauce. After cooking, remove it from heat and allow it to cool slightly. Pour half of the cheesecake batter over the cooled crust. Then, drop spoonfuls of the raspberry sauce over the filling. Pour the rest of the cheesecake batter on top. Use a knife to gently swirl the raspberry sauce into the cheesecake. Bake for 55-60 minutes. The center should be set but slightly jiggly. Turn off the oven and crack the door open. Let the cheesecake cool in the oven for about an hour. After cooling, place the cheesecake in the fridge for at least 4 hours, or better yet, overnight. This step is key for the best flavor and texture. When ready to serve, carefully remove the cheesecake from the springform pan. Slice it into wedges and enjoy! For a lovely touch, serve with fresh raspberries and a little powdered sugar. For the complete guide, check out the Full Recipe. - Overmixing the batter: Mix just until combined. Overmixing adds air and makes cracks. - Not cooling properly: Let the cheesecake cool in the oven. This helps prevent cracks. - Adjusting baking time for different ovens: Ovens vary. Check your cheesecake at 50 minutes. The center should jiggle slightly. - Tips for a creamy cheesecake: Use room temperature ingredients. This ensures a smooth mix without lumps. - Garnishing with raspberries: Place fresh raspberries on top. They make the cheesecake look bright and inviting. - Serving recommendations: Serve slices on colorful plates. Add whipped cream and extra raspberry sauce for flair. {{image_2}} You can change the fruit in your cheesecake. Try using strawberries or blueberries instead of raspberries. They will add a bright color and fresh taste. You can also mix in chocolate or caramel. Drizzling melted chocolate on top gives a rich twist. Caramel adds a sweet, buttery flavor that complements the cream cheese. If you need gluten-free options, use gluten-free graham cracker crumbs for the crust. This small change keeps the cheesecake tasty and safe for those with gluten allergies. For a vegan version, replace cream cheese with a vegan cream cheese alternative. Use a plant-based butter for the crust and flax eggs instead of regular eggs. These swaps keep the creamy texture while making it plant-based. You can make mini cheesecakes by using a muffin tin. This method creates perfect bite-sized treats that are fun to eat. Cheesecake bars are another great option. Simply spread the filling in a baking dish and cut it into squares once set. Both options are easy to share and perfect for parties. To store leftover cheesecake, wrap it tightly in plastic wrap. This keeps the air out and helps the cheesecake stay fresh. You can also place it in an airtight container. Use a container with a lid that seals well for the best results. If you want to save raspberry swirl cheesecake for later, freezing is a great option. First, let the cheesecake cool completely. Then, wrap it in plastic wrap, followed by aluminum foil. This helps prevent freezer burn. When you're ready to enjoy it, thaw the cheesecake in the fridge overnight. Serve it chilled for the best taste. In the fridge, your raspberry swirl cheesecake will stay fresh for about 5 to 7 days. Always check for signs it has gone bad. Look for a change in color, a sour smell, or mold. If you notice any of these, it's best to toss it and make a new one. You can use several options if you want a dairy-free choice. Popular alternatives include: - Silken tofu - Vegan cream cheese - Cashew cream These substitutes offer a similar texture. They may change the flavor slightly, but they still work well. Yes, you can make this cheesecake up to two days in advance. Just follow these tips: - Bake and cool the cheesecake. - Cover it tightly with plastic wrap. - Chill it in the fridge. This method helps the flavors blend nicely. The cheesecake is done when the edges look set. The center should jiggle slightly. Use an instant-read thermometer for best results. It should read 150°F (65°C). Yes, you can use frozen raspberries. They may change the texture a bit. The flavor will be less bright but still delicious. Just thaw and drain excess moisture before using. If you lack a springform pan, use a regular cake pan. Just line it with parchment paper. This makes it easy to remove. You can also use muffin tins for mini cheesecakes. Yes, raspberry swirl cheesecake can be made gluten-free. Use gluten-free graham crackers or almond flour for the crust. Always check labels to ensure all ingredients are safe. Chill the cheesecake for at least four hours. For best results, leave it overnight. This allows the flavors to develop and the texture to firm up. For the full recipe, check the details. This post walked you through making a delicious raspberry swirl cheesecake. You learned about key ingredients, measuring tips, and the best types of raspberries. The step-by-step instructions made the process clear, from preparing your pan to creating a stunning swirl. We also covered ways to avoid common mistakes and tips for the perfect texture. Now you’re ready to enjoy this tasty dessert. Create your version, impress your friends, and savor every bite!

Raspberry Swirl Cheesecake Delightful and Decadent Dessert

Are you ready to indulge in a dessert that combines creaminess and fruity flavor? This Raspberry Swirl Cheesecake is the

To make this dish, you need fresh and simple ingredients. Here’s what you’ll need: - 1 lb (450g) beef sirloin, thinly sliced - 3 cups broccoli florets - 1 red bell pepper, sliced - 3 cloves garlic, minced - 1 tablespoon ginger, grated - 1/4 cup soy sauce (low sodium) - 1 tablespoon honey - 2 tablespoons cornstarch - 2 tablespoons vegetable oil - 1 teaspoon sesame oil - Salt and pepper to taste - 2 green onions, sliced (for garnish) - Cooked jasmine rice or noodles (for serving) These ingredients create a tasty base for your stir fry. The beef adds protein while broccoli and bell pepper give color and crunch. You can boost the flavor of your stir fry with some add-ins. Consider these options: - Sliced mushrooms for umami - Snap peas for sweetness - Carrots for color and crunch - Cashews for crunch and richness These add-ins can make your dish more fun and tasty. Feel free to mix and match based on what you enjoy. Having the right tools makes cooking easier. Here’s what I suggest: - A large skillet or wok for even cooking - A sharp knife for slicing beef and veggies - A cutting board for safety - Measuring spoons for accuracy - A spatula for stirring Using these tools will help you make this dish quickly and easily. You’ll be ready to enjoy your Easy Beef and Broccoli Stir Fry in no time! For the full recipe, check [Full Recipe]. Start with the beef sirloin. Slice it thinly against the grain. This helps keep it tender. In a bowl, mix the sliced beef with a tablespoon of cornstarch. Add a pinch of salt and black pepper. Toss well to coat all the beef. Let it sit for ten minutes. This step makes the beef nice and juicy. Heat a large skillet or wok over medium-high heat. Pour in a tablespoon of vegetable oil. Once it shimmers, add the beef in a single layer. Sear for about two to three minutes until browned. Remove the beef and set it aside. In the same pan, add another tablespoon of vegetable oil. Toss in the minced garlic and sauté for thirty seconds. Then, add the broccoli florets and red bell pepper. Stir-fry for four to five minutes. The veggies should be bright and tender-crisp. In a small bowl, mix the soy sauce, honey, and grated ginger. Add the remaining tablespoon of cornstarch and stir until smooth. Return the beef to the pan along with the sauce. Toss everything together and cook for two to three minutes. The sauce should thicken and coat the beef and veggies nicely. Drizzle with sesame oil. Give it a quick toss, then remove from heat. Garnish with sliced green onions. This dish is ready to serve over jasmine rice or noodles. For the full recipe, check the section above. To make beef tender, slice it thinly against the grain. This helps break down fibers. I recommend marinating the beef with cornstarch and a bit of salt. Let it rest for about 10 minutes. This step locks in moisture and enhances flavor. Heat your pan well before adding the beef. High heat sears the meat quickly, keeping it juicy. To keep broccoli crisp, cook it fast. Add it to your pan after the beef. Stir-fry for just 4 to 5 minutes. You want the broccoli to be bright green and tender-crisp. If you overcook, it will turn mushy. A splash of water can help steam the broccoli quickly without losing crunch. For a great sauce, mix soy sauce, honey, and cornstarch. This blend gives the sauce a nice thickness. Stir it until there are no lumps. Add the sauce to your beef and veggies in the last few minutes of cooking. This ensures everything is well-coated and flavorful. If the sauce feels too thick, a splash of water can help thin it out. For the complete method, check out the Full Recipe. {{image_2}} You can add more veggies to your beef and broccoli stir fry. Try carrots, snap peas, or mushrooms. These add color and crunch. Just chop them up and toss them in with the broccoli. Cook them for about 3-4 minutes until they are bright and tender. This adds more nutrients and keeps the meal exciting. If you need a gluten-free sauce, worry not! You can swap soy sauce with tamari. Tamari tastes similar and works great. Check the label to ensure it is gluten-free. You can also use coconut aminos for a sweeter taste. Just mix it with honey and cornstarch like in the full recipe. For a vegetarian option, replace beef with tofu. Use firm or extra-firm tofu for the best texture. Press the tofu to remove excess water, then cut it into cubes. Cook the tofu the same way you would the beef. Sear it until golden brown, then add the sauce and veggies. This swap keeps the dish tasty and satisfying. After your meal, let the beef and broccoli cool. Place it in an airtight container. This keeps it fresh. Store it in the fridge for up to three days. To reheat, use a skillet over medium heat. Add a splash of water to steam it. This helps keep the beef and broccoli tender. Stir often until it's hot. You can also use a microwave. Heat in short bursts, stirring in between. To freeze, pack the stir fry in a freezer-safe bag. Squeeze out as much air as you can. It stays good for up to three months. When ready to eat, thaw it overnight in the fridge. Reheat it as mentioned above. For the best taste, avoid freezing the rice or noodles. For a detailed guide, check the Full Recipe. It takes about 25 minutes to make Easy Beef and Broccoli Stir Fry. You can prep the ingredients in 15 minutes. Cooking takes another 10 minutes. This quick meal fits well into a busy weeknight. Yes, you can use frozen broccoli. Just make sure to thaw it first. Drain any excess water before adding it to the stir fry. Frozen broccoli may cook faster, so keep an eye on it. If you need a soy sauce substitute, try coconut aminos or tamari. Both options work well. They offer a similar taste but vary in saltiness. You can also use homemade sauce made from broth and spices. To add heat, include red pepper flakes or Sriracha. Mix these into the sauce for flavor. You can also add sliced jalapeños or fresh chili peppers during cooking. Adjust the spice to your liking for a tasty kick. This blog post covered all you need for Easy Beef and Broccoli Stir Fry. You learned about the main ingredients, cooking steps, and tips for the best taste. We also shared storage info and answered common questions. Feel free to mix in new flavors or change the meat. Keep experimenting to find your favorite version. Enjoy this easy dish any night of the week!

Easy Beef and Broccoli Stir Fry Quick and Tasty Meal

Looking for a quick and tasty meal? You’ll love this Easy Beef and Broccoli Stir Fry! This dish is packed

- 1 large head of cauliflower, cut into bite-sized florets - 4 tablespoons olive oil - 4 cloves garlic, minced - ½ cup grated Parmesan cheese - 1 teaspoon Italian seasoning - ¼ teaspoon red pepper flakes (optional) - Salt and pepper to taste - Fresh parsley, chopped (for garnish) In this recipe, you will need fresh cauliflower. Cutting it into small florets helps with even cooking. Olive oil brings a rich taste and helps the garlic cook well. Garlic adds a punch of flavor, while Parmesan cheese gives a nice salty bite. Italian seasoning includes herbs like basil and oregano, adding depth to your dish. If you like spice, the red pepper flakes bring a little heat. Always season with salt and pepper to enhance the flavors. Finally, fresh parsley brightens the dish and adds a pop of color. - Additional herbs for flavor (e.g., thyme, rosemary) - Lemon zest for a citrusy twist You can add herbs like thyme or rosemary for more flavor. Lemon zest adds a fresh twist and balances the rich taste of cheese. These optional ingredients let you customize the dish to your liking. For the Full Recipe, check the detailed cooking instructions to make this tasty side. - Preheat the oven to 425°F (220°C). - Prepare the baking sheet with parchment paper. - Toss cauliflower with oil, garlic, and seasonings. - Spread on the baking sheet and roast. First, I take a large bowl and mix the cauliflower florets. I add olive oil, minced garlic, Italian seasoning, and a pinch of salt and pepper. If you like a bit of spice, toss in red pepper flakes too. Mix it well so every piece gets coated. Next, I lay the cauliflower on the prepared baking sheet. Make sure the florets have space between them. This helps them roast evenly. I pop the sheet in the oven and let the magic happen for 20-25 minutes. About halfway through, I give it a stir for even browning. - Add Parmesan and roast until melted. Once the cauliflower turns a lovely golden brown, I pull it out. Now comes the best part! I sprinkle grated Parmesan cheese over the top. Then, I return it to the oven for just 5 more minutes. This lets the cheese melt and become bubbly. The aroma will fill your kitchen, and you'll know it’s almost time to enjoy this Garlic Parmesan Roasted Cauliflower! To make Garlic Parmesan Roasted Cauliflower great, follow these tips: - How to achieve the perfect texture: Roast the cauliflower at a high temperature. This will make the outside crisp and the inside tender. Aim for 425°F (220°C). Toss the florets well to coat them with oil and seasoning. This ensures even cooking. - Importance of spreading florets evenly: Spread the cauliflower in a single layer on the baking sheet. This allows hot air to circulate around each piece. If the florets touch, they will steam instead of roast, which means less crispiness. Want to make your dish even better? Here are some ideas: - Suggestions for add-ins or toppings: Try adding lemon zest for brightness. Fresh herbs like thyme or rosemary can add depth. You can also mix in some cooked bacon bits for a smoky flavor. - Pairing options for a complete meal: Garlic Parmesan Roasted Cauliflower goes well with grilled chicken or fish. It also pairs nicely with pasta dishes. Serve it alongside a fresh salad for a balanced meal. For more ideas, check out the Full Recipe. {{image_2}} You can change the cheese in this recipe. Try cheddar for a sharp taste. If you want a vegan option, use a plant-based cheese. This way, you can enjoy the same great flavors without dairy. Spice adjustments can fit your taste. For more heat, add more red pepper flakes. If you prefer less spice, skip them altogether. You can also try different spices like smoked paprika or cumin for a unique twist. You can use Garlic Parmesan Roasted Cauliflower in salads. Just chop it up and mix it with greens. Add some cherry tomatoes and a light dressing for a fresh taste. This dish pairs well with many main courses. Serve it alongside grilled chicken, fish, or even pasta. It makes a great side for any meal. You can also use it as a filling for wraps or bowls. The options are endless! For the full recipe, click here. To keep your Garlic Parmesan roasted cauliflower fresh, store leftovers in the fridge. First, let it cool to room temperature. Then, place it in an airtight container. This helps keep the flavors strong. Use a container that is not too big, so the cauliflower doesn’t move around. Glass or plastic containers with tight lids work well. If you have many leftovers, use multiple containers. This helps with easy serving later. When you want to enjoy your leftovers, reheating is key. The best way is to use the oven. Preheat it to 350°F (175°C). Spread the cauliflower on a baking sheet. Heat for about 10-15 minutes. This keeps the texture crispy and warm. You can also use a microwave, but it may make it soft. After reheating, feel free to add a sprinkle of cheese or fresh parsley for extra flavor. Serve it as a side dish or toss it into a salad for added crunch. For the full recipe, check out the Garlic Parmesan Roasted Cauliflower section. Can I use frozen cauliflower? Yes, you can use frozen cauliflower. Just thaw it first. Drain any excess water. This helps the cauliflower roast better. It may take a bit longer to get crispy. How do I make this recipe gluten-free? This recipe is already gluten-free. The ingredients do not contain any gluten. Just make sure your Parmesan cheese is gluten-free. Always check labels to be sure. What to serve with Garlic Parmesan Roasted Cauliflower? Garlic Parmesan Roasted Cauliflower pairs well with many dishes. You can serve it with grilled chicken or fish. It also complements pasta dishes nicely. Try it as a side with steak or a hearty salad. Can I prepare this dish ahead of time? Yes, you can prep this dish ahead. Cut the cauliflower and mix with oil and spices. Store it in the fridge for up to 24 hours. Just roast it when you're ready to serve. You can find the Full Recipe to guide you through the steps. This post covered how to make Garlic Parmesan Roasted Cauliflower. We discussed ingredients, preparation, cooking steps, and tips for best results. You can enjoy this dish in various ways, making it simple to impress family or friends. Remember, the key is to spread florets evenly for even roasting. Store your leftovers properly to keep them fresh. With these steps, I hope you feel ready to whip up this tasty recipe and explore its many variations. Enjoy cooking!

Garlic Parmesan Roasted Cauliflower Flavorful Side Dish

Looking for a tasty side that steals the spotlight? You’ve found it! My Garlic Parmesan Roasted Cauliflower combines crispy, tender

- Greek Yogurt: You can choose full-fat or low-fat yogurt. Full-fat gives a rich taste, while low-fat is lighter. Both options work well. - Granola: Pick a flavor that you enjoy. Look for crunchy granola with nuts, seeds, or dried fruits. This adds texture and taste. - Mixed Berries: Use strawberries, blueberries, and raspberries. They are fresh and sweet. You can mix and match based on your favorites. - Sweeteners: Honey adds a floral note while maple syrup gives a warm flavor. Use what you like best. - Flavor Enhancements: Adding vanilla extract makes it sweet and creamy. A dash of cinnamon brings a warm spice that pairs well with yogurt. - Fresh Mint Leaves: They add a burst of color and a refreshing taste. - Other Presentation Ideas: You can layer your parfait in clear glasses for a beautiful view. Top with extra berries or a drizzle of honey for flair. For the full recipe, refer to the complete cooking instructions to create these delightful treats! First, you need to mix the Greek yogurt with sweeteners. In a medium bowl, combine 2 cups of Greek yogurt with 2 tablespoons of honey or maple syrup. Then, add 1 teaspoon of vanilla extract. If you like, sprinkle in 1/4 teaspoon of cinnamon for extra flavor. Use a whisk or spatula to blend everything until it is smooth and creamy. This step is key for a perfect texture. Now it’s time to layer your parfait! Use serving glasses or bowls for a fun look. Start with a layer of the yogurt mixture at the bottom. Next, add a layer of granola, pressing it down gently to keep it in place. Then, add a layer of mixed berries. You can use strawberries, blueberries, and raspberries. Make sure to alternate the colors for a beautiful presentation. Keep repeating these layers until your glass is full. End with a layer of berries on top for a vibrant finish. For the final touches, garnish each parfait with fresh mint leaves. This adds a bright pop of color and freshness. You can serve these right away for a crunchy texture. If you want a softer granola, chill them in the fridge for 30 minutes before serving. These simple steps create a tasty and appealing dessert. Enjoy your creamy Greek yogurt parfaits! To adjust the yogurt texture, mix it with honey or maple syrup. This makes it creamier. If you want it thicker, use full-fat Greek yogurt. For a lighter feel, choose low-fat. To keep granola crunchy, add it just before serving. If you mix it in too early, it may get soggy. You can prepare layers in advance for quick assembly. Mix the yogurt and sweeteners a day ahead. Store it in the fridge, covered. You can also pre-portion granola and berries in separate containers. This way, you can assemble parfaits right before serving. If you store assembled parfaits, eat them within a day. The granola will lose its crunch over time. Using glassware can make your parfaits look fancy. Clear glasses show off the layers nicely. Bowls work too, but they hide the beauty. For gatherings, set up a parfait bar. Place yogurt, granola, and fruits in bowls. Let guests create their own. This makes for a fun and interactive treat! You can find the [Full Recipe](#) for step-by-step instructions. {{image_2}} Using seasonal fruits adds fun and freshness to your parfaits. In spring and summer, use berries like strawberries, blueberries, and raspberries. These fruits burst with flavor and color. In fall, consider apples or pears with a hint of cinnamon. In winter, citrus fruits like oranges or grapefruits offer bright notes. You can also try spices. A dash of nutmeg or ginger can elevate your parfait. Mix in some chopped nuts for crunch. This way, you create a new taste every season. For those who avoid dairy, many alternatives exist. Coconut yogurt or almond yogurt works well in parfaits. These options still provide creaminess and flavor. Check labels for added sugars and ingredients. If you need gluten-free options, look for certified gluten-free granola. Many brands offer tasty mixes that fit this diet. You can also make your own granola at home using oats, nuts, and seeds. Swap ingredients to change textures and tastes. For instance, try using chia seeds or pudding instead of yogurt for a new base. You can also layer in different fruits, like bananas or peaches. Each addition brings its own charm. As you layer, think about your preferences. You might enjoy mixing yogurt with granola in one layer. Or, keep them separate for a fun surprise in each bite. The beauty of parfaits is in their flexibility; feel free to experiment until you find your perfect combination. To keep your creamy Greek yogurt parfaits fresh, store them in airtight containers. This helps prevent the yogurt from absorbing any odors in your fridge. You can refrigerate them for up to two days. After that, the granola may lose its crunch. If you want to enjoy them longer, consider adding the granola just before serving. Granola can get soft if stored with yogurt. Keep it in a separate container to maintain its crunch. Use a resealable bag or a jar with a tight lid. For berries, wash them and pat them dry. Store them in a container lined with paper towels to absorb moisture. This helps keep them fresh and firm. Greek yogurt lasts about one to three weeks in the fridge. Check the date on the container for freshness. Granola can stay fresh for up to six months if sealed well. Look for any signs of spoilage, like off smells or mold. Always trust your senses when checking food. For the full recipe, click here: [Full Recipe]. You can prep Greek yogurt parfaits ahead of time. Start by making the yogurt mix. Combine Greek yogurt with honey, vanilla, and cinnamon in a bowl. Then, layer the yogurt, granola, and fruit in jars or containers. Cover them tightly with lids. Store them in the fridge for up to 2 days. This lets the flavors blend. Just keep the granola separate if you want it crunchy. Absolutely! You can change the order of your layers. Start with yogurt, add granola, then fruit. This order keeps the granola crunchy. You can also swap it up. For example, try fruit first for a colorful top layer. Just remember to balance flavors. Use sweet fruit with tart berries for the best taste. You can use many fruits in your parfaits. Bananas add creaminess, while peaches bring sweetness. Apples give a nice crunch, and mangoes offer tropical flavor. You can even try citrus fruits like oranges for a zesty twist. Mix and match fruits to find your favorite combinations. This keeps your parfaits fresh and fun. For the full recipe, check the section above. This blog post offers a complete guide to making Greek yogurt parfaits. We discussed essential and optional ingredients, including Greek yogurt and mixed berries. You learned how to layer and garnish your parfait for great presentation. I shared tips to achieve perfect texture and creative serving ideas. Remember, you can customize your parfaits with different fruits and flavors. With these steps, you can make a tasty treat that is fun to create and enjoy.

Creamy Greek Yogurt Parfaits Fresh and Flavorful Treat

Ready for a delicious treat? Creamy Greek yogurt parfaits are fresh, flavorful, and easy to make! You can whip them

To make a delightful pineapple upside down cake, gather these essential items: - 1 can pineapple slices in juice - Unsalted butter - Brown sugar - Granulated sugar - 2 large eggs - 1 teaspoon vanilla extract These ingredients work together to create a scrumptious base for your cake. The pineapple brings sweetness and a juicy texture, while the butter and sugars create a rich, caramel-like flavor. You can also add these optional items for extra flair: - Ground cinnamon for added flavor - Maraschino cherries for garnish - Any other fruit variations Cinnamon gives a warm touch, while maraschino cherries add a pop of color. Feel free to get creative with other fruits. They can add a unique twist to the recipe. For a full recipe, check out the Tropical Pineapple Paradise Upside Down Cake. Start by preheating your oven to 350°F (175°C). This step is key for even baking. While the oven heats, grab a 9-inch round cake pan. Place it in the oven for about 5 minutes with half a cup of unsalted butter. This melts the butter perfectly. Once melted, mix in 1 cup of packed brown sugar. Stir until smooth. Spread this mixture evenly across the bottom of your pan. This creates a sticky, sweet base for your cake. Now, it's time to arrange the pineapple. Use the drained pineapple slices from the can. Place them on top of the butter and sugar mix. Make sure they fit snugly without gaps. For a pop of color, add a maraschino cherry in the center of each pineapple slice. This little touch makes your cake look even more inviting. In a large mixing bowl, cream together 1/2 cup of granulated sugar and the remaining softened butter. Mix until it feels light and fluffy. Then, add in 2 large eggs, one at a time. Make sure to mix well after each egg. Next, stir in 1 teaspoon of vanilla extract for added flavor. In a separate bowl, whisk together 1 1/2 cups of all-purpose flour, 1 1/2 teaspoons of baking powder, and 1/2 teaspoon of salt. If you want a hint of spice, add 1/2 teaspoon of ground cinnamon. Now, combine the dry ingredients with the butter mix. Alternate this with 1/2 cup of reserved pineapple juice. Mix gently until just combined. Be careful not to overmix, as this can make your cake dense. Now you’re ready to pour the batter over the arranged pineapple. Bake it for 35-40 minutes. Check with a toothpick to see if it comes out clean. To get a fluffy cake, use room temperature eggs and butter. Cold ingredients can lead to a dense cake. Make sure your butter is soft before mixing. Avoid overmixing the batter; this can also cause a heavy texture. Baking times may vary between ovens. Keep an eye on your cake as it bakes. If your oven runs hot, check for doneness a few minutes early. Insert a toothpick in the center. If it comes out clean, the cake is ready! A simple dusting of powdered sugar adds charm. For a tasty treat, serve the cake with whipped cream or ice cream. This pairing elevates the sweet, tangy flavors of the pineapple. You can also add fresh mint leaves for a pop of color. For a full recipe, check out the Tropical Pineapple Paradise Upside Down Cake. {{image_2}} You can switch out pineapple for other fruits. Peaches work great as a sweet choice. Cherries add a lovely tartness, while mangoes bring a tropical flair. Try a berry blend for a fun twist. Combine strawberries, blueberries, and raspberries for a colorful and tasty cake. These options keep the spirit of the classic but add your own touch. Want to spice things up? Add coconut for a chewy texture. Chopped nuts bring a nice crunch, too. You can use flavored extracts like almond or coconut to change the taste. These simple swaps make your cake unique and exciting. Don’t be afraid to experiment with different flavors. For gluten-free baking, use a gluten-free flour blend. This keeps the cake light and fluffy without gluten. If you prefer vegan options, replace butter with coconut oil. Use flax eggs or applesauce instead of regular eggs. These swaps make the cake friendly for many diets. Enjoy the same great taste while meeting your needs. For the full recipe, check out the Tropical Pineapple Paradise Upside Down Cake. To keep your leftover pineapple upside down cake fresh, store it in the fridge. Wrap the cake tightly in plastic wrap. You can also use an airtight container. This helps prevent the cake from drying out. Storing in an airtight container is key. It keeps the cake moist and tasty. You can freeze slices of cake for later. Here’s how: 1. Cool the Cake: Make sure the cake is completely cool. 2. Slice It: Cut the cake into slices. This makes it easy to grab just what you need. 3. Wrap It: Wrap each slice in plastic wrap. This helps seal in the flavor. 4. Use Foil: After wrapping, add a layer of aluminum foil. It protects against freezer burn. 5. Label: Write the date on each wrap. This helps you keep track of freshness. When you’re ready to enjoy a slice, thaw it in the fridge overnight. If you want it warm, you can reheat it in the oven. Set the oven to 350°F (175°C) and heat for about 10 minutes. This helps restore the cake's soft texture and rich flavor. To stop your cake from sticking, you need to prepare your pan well. First, use unsalted butter to grease the bottom and sides of your cake pan. Make sure to cover all areas. Next, you can add a layer of parchment paper on the bottom. This will help lift the cake out easily. Lastly, dust a little flour over the greased surface. This simple method keeps your cake intact when you flip it later. Yes, you can make this cake ahead of time. This is great for parties or special events. Just bake the cake and let it cool completely. Once cool, wrap it tightly in plastic wrap. Store it in the fridge for up to three days. If you want to keep it longer, you can freeze it. Just make sure to use an airtight container. This way, you can enjoy the cake later without losing its flavor. You can tell if your cake is done by checking a few signs. First, look for a golden-brown top. It should spring back when you touch it lightly. Another test is the toothpick method. Insert a toothpick into the center of the cake. If it comes out clean or with a few crumbs, your cake is ready. If you see wet batter, bake it a bit longer. Using fresh pineapple is possible, and it can be quite tasty. Fresh pineapple offers a bright flavor and juicy texture. However, it does require more work. You have to peel, core, and slice the pineapple. Canned pineapple is easy and saves time. It also ensures a consistent taste. If you choose fresh, make sure it’s ripe for the best flavor in your cake. Pineapple upside-down cake is an easy and fun dessert. You learned about essential and optional ingredients, plus step-by-step baking instructions. I shared tips for great texture and storing leftovers, along with creative variations. Don’t hesitate to try new fruits or flavors. This dessert is meant to surprise and delight. Enjoy your baking and share this tasty treat with friends and family!

Pineapple Upside Down Cake Delightful and Easy Recipe

Are you ready to impress your friends and family with a delicious Pineapple Upside Down Cake? This delightful and easy

- 1 lb boneless, skinless chicken breasts - 4 cups chicken broth - 2 cups water - 2 cups egg noodles - 1 cup carrots, diced - 1 cup celery, diced - 1 small onion, finely chopped - 4 cloves garlic, minced - 1 teaspoon dried thyme - 1 teaspoon dried parsley - Salt and pepper to taste - Juice of 1 lemon - Fresh parsley for garnish The key to making a great Instant Pot Chicken Noodle Soup lies in using fresh, quality ingredients. The chicken forms the base of this soup. I use boneless, skinless chicken breasts for ease and tenderness. The broth brings rich flavor, while the water balances it. Next, I add the vegetables. Carrots, celery, onion, and garlic create a lovely aroma and depth of taste. Dicing them ensures they cook evenly. Herbs and seasoning are essential for that warm, cozy flavor. Dried thyme and parsley add earthiness. A splash of lemon juice brightens everything. Lastly, fresh parsley gives a nice touch when serving. Using these ingredients will make a comforting soup that warms the heart. Check out the Full Recipe for detailed steps and times to enjoy this dish. 1. Set your Instant Pot to the Sauté function. 2. Heat 2 tablespoons of olive oil for about 1 minute. 3. Add 1 small chopped onion, 4 minced garlic cloves, 1 cup diced carrots, and 1 cup diced celery. 4. Sauté for 3-4 minutes until the veggies soften. 1. Place 1 lb of boneless, skinless chicken breasts into the pot. 2. Pour in 4 cups of chicken broth and 2 cups of water. 3. Stir in 1 teaspoon dried thyme, 1 teaspoon dried parsley, salt, and pepper to taste. 4. Close the lid and set the valve to sealing. 5. Select the Manual or Pressure Cook function and set the timer for 10 minutes. 1. Once the timer goes off, let the pressure release naturally for 5 minutes. 2. Carefully switch the vent to release any remaining pressure. 3. Open the lid and take out the chicken breasts. 4. Shred the chicken with two forks and return it to the soup. 5. Stir in 2 cups of egg noodles and let them cook in the hot soup for 5-7 minutes. 6. Add the juice of 1 lemon and adjust seasoning if needed. 7. Serve hot, garnished with fresh parsley! For the complete recipe, check out the [Full Recipe]. When you cook chicken in the Instant Pot, timing is key. Start by adding your chicken breasts whole. This keeps them juicy. Cook for just 10 minutes under high pressure. After cooking, let the pot rest for about 5 minutes. This helps keep the chicken tender and moist. Then, carefully release any remaining pressure. To boost the taste, try adding herbs like rosemary or basil. A few sprigs of fresh thyme can also work wonders. You can brighten the soup by adding a splash of lemon juice right before serving. This small step makes a big difference in flavor. Serve your soup with warm, crusty bread or a fresh salad. A side of buttery crackers also pairs well. For a nice touch, garnish each bowl with fresh parsley. This adds color and freshness to the dish. You can also sprinkle some black pepper for extra flavor. Enjoy your cozy bowl of soup! {{image_2}} You can easily change the noodles you use. Try whole wheat, gluten-free, or even rice noodles. Each type brings a new taste and texture. You can also swap out vegetables. If you don’t like carrots, use peas or corn. If you have other veggies, toss them in too! To make the soup gluten-free, choose gluten-free noodles. Check the labels to be sure. For a dairy-free option, skip any cream or cheese. The soup will still taste great. You can add coconut milk for creaminess if you want. Cooking in bulk is smart. Make a big batch and freeze some for later. You can store it in single portions for easy meals. Just let the soup cool before putting it in containers. This helps keep it fresh. To keep your soup fresh, store it in an airtight container. Let it cool first. Refrigerate leftovers within two hours of cooking. This keeps harmful bacteria away. If you want to freeze it, ensure the soup is cool. Use freezer-safe containers or bags. Leave some space at the top for expansion. This helps prevent spills. To reheat in the Instant Pot, add the soup back in. Use the Sauté function on low heat. Stir often until the soup is hot. For stovetop reheating, pour the soup into a pot. Heat it over medium heat. Stir regularly to avoid sticking. This method works well and warms the soup evenly. In the fridge, your soup lasts about 3 to 4 days. Always check for signs of spoilage. Look for off smells, changes in color, or mold. If any of these appear, throw the soup away. If you freeze the soup, it lasts about 2 to 3 months. Thaw it in the fridge before reheating for best results. To make Instant Pot Chicken Noodle Soup, follow these steps: - Set the Instant Pot to Sauté and add olive oil. - Sauté chopped onion, garlic, carrots, and celery for about 4 minutes. - Add 1 lb boneless, skinless chicken breasts, 4 cups chicken broth, and 2 cups water. - Stir in 1 teaspoon dried thyme, 1 teaspoon dried parsley, salt, and pepper. - Close the lid, seal the valve, and cook on High Pressure for 10 minutes. - Let the pressure release naturally for 5 minutes, then vent any remaining pressure. - Remove the chicken, shred it, and return it to the soup. - Stir in 2 cups egg noodles and let them cook in the hot soup for 5-7 minutes. - Finish with lemon juice and adjust seasoning as needed. This recipe is simple and quick, perfect for any day. For a detailed guide, check the Full Recipe. Yes, you can use frozen chicken. Just add an extra 5-7 minutes to the cooking time. Make sure to increase the liquid by a cup to help with cooking. The soup will still taste great, and you’ll have a warm meal ready in no time. Yes, this soup is excellent for meal prep. You can cook a large batch and store it in the fridge. It lasts for about 3-4 days. For longer storage, freeze portions in airtight containers. When you're ready, just reheat and enjoy! Chicken noodle soup pairs well with many sides. Here are some ideas: - A slice of crusty bread or a warm baguette. - A fresh green salad with light dressing. - Crackers for a crunchy texture. - Grilled cheese sandwiches for a fun twist. These sides add variety and enhance your meal! This blog post shows how to make a tasty Instant Pot Chicken Noodle Soup. We covered key ingredients, easy steps, and smart tips. You can customize the recipe with different vegetables or noodles to fit your taste. Remember to store any leftovers right and reheat them well. This soup is filling and great for meal prep. Enjoy the warmth and comfort it brings. You now have a simple recipe to share with friends. Happy cooking!

Instant Pot Chicken Noodle Soup Simple and Quick

When you need a warm, comforting meal fast, Instant Pot Chicken Noodle Soup is your answer. With just a few

- 6 large eggs - 1/4 cup mayonnaise - 1 teaspoon Dijon mustard - 1 teaspoon apple cider vinegar - 1/4 teaspoon garlic powder - Salt and pepper to taste - Smoked paprika for garnish - Fresh chives, finely chopped for garnish To make classic deviled eggs, you'll need a few simple ingredients. Each one plays a big role in taste and texture. - If you want to skip mayonnaise, try Greek yogurt for a lighter twist. - For a vegan option, use mashed avocado or a vegan mayo. - Want to switch up the spices? Try adding hot sauce or curry powder for a kick. - Use a pot for boiling eggs. - Grab a mixing bowl for the filling. - A spoon or piping bag helps fill the egg whites neatly. - Keep a bowl of ice water ready to cool the eggs fast. These ingredients and tools make the process easy and fun. With the right items, you can whip up tasty deviled eggs that everyone will love. Don't forget to check out the Full Recipe for detailed steps! To start, you need to know the right water-to-egg ratio. Place your eggs in a pot and cover them with cold water. Make sure the water is about an inch above the eggs. This ensures even cooking. Now, let’s talk boiling time. Bring the water to a boil over medium-high heat. Once it starts boiling, cover the pot and remove it from the heat. Let the eggs sit for 12 minutes. This method gives you firm whites and creamy yolks. Next, you will prepare the filling. After boiling, place the eggs in ice water for about 5-10 minutes. This stops the cooking and makes peeling easier. Peel the eggs under running water for best results. Slice each egg in half lengthwise. Gently scoop out the yolks into a mixing bowl. Now, mash the yolks well with a fork. Add 1/4 cup mayonnaise, 1 teaspoon Dijon mustard, 1 teaspoon apple cider vinegar, and 1/4 teaspoon garlic powder. Season with salt and pepper to taste. Mix until smooth and creamy. Now for the fun part! Spoon the yolk mixture back into each egg white. For a fancy look, use a piping bag with a star tip. This makes the eggs look beautiful and professional. Finally, sprinkle the tops with smoked paprika and garnish with fresh chives. This adds a nice pop of color and flavor. Your deviled eggs are ready to impress! For the full recipe, check out the [Full Recipe]. To make the best hard-boiled eggs, avoid these common mistakes. First, don't add eggs to boiling water. Start with cold water to cook them evenly. Bring the pot to a boil, then cover it and turn off the heat. Let the eggs sit for 12 minutes. If they are overcooked, you’ll get a green ring around the yolk. Cooling is key for easy peeling. After the eggs sit, put them in ice water. This stops the cooking and helps the shells come off. Leave them in the ice water for 5-10 minutes. You can make deviled eggs unique with herbs and spices. Try adding dill, chives, or even a pinch of cayenne for heat. The right herbs can change the flavor a lot. Adjusting creaminess is also easy. If you like it creamier, add more mayonnaise. For a lighter mix, use Greek yogurt instead. Tweak it until it suits your taste! To save time, store the filling separately from the egg whites. You can make the filling a day ahead. Just keep it in the fridge. When you’re ready to serve, fill the egg whites. As for timing, assemble your deviled eggs right before serving. This keeps them fresh and tasty. Enjoy your party! {{image_2}} You can spice up classic deviled eggs with unique ingredients. Try adding avocado for a creamy twist. Sriracha brings a hot kick, while bacon bits add crunch. You can also use herbs like dill or cilantro to brighten the taste. International flavors make great additions too. For instance, curry powder gives a bold flavor. Japanese miso adds a savory depth. You can explore many options to keep your deviled eggs exciting. If you're on a keto diet, swap mayonnaise for avocado or Greek yogurt. This keeps the dish low in carbs but rich in flavor. For a low-calorie option, use cottage cheese instead of mayo. It adds creaminess without the extra calories. You can also use egg whites only for a lighter version. These options work well and let everyone enjoy deviled eggs. Make your deviled eggs stand out with fun serving ideas. Use colorful plates or egg trays for an inviting look. You can also garnish with fresh herbs or edible flowers for a pop of color. For themed parties, try toppings that match the theme. For a fall gathering, add pumpkin seeds. For summer, use fresh tomatoes or olives. Simple touches can make your deviled eggs a showstopper at any event. To keep deviled eggs fresh, refrigerate them right away. Place them in a covered container. This helps prevent them from drying out. Use a shallow dish or a plastic container with a lid. Make sure to keep them tightly sealed. How long can they be kept? Deviled eggs are best eaten within three days. After that, their taste and texture may change. Signs of spoilage include an off smell or discoloration. If you see these signs, it's best to throw them away. Can you freeze them? I don’t recommend freezing deviled eggs. The texture of the egg whites can change and become rubbery. If you must freeze, separate the filling from the egg whites. To thaw, place the filling in the fridge overnight. Then, assemble the eggs just before serving. For the best taste, enjoy your deviled eggs fresh! To boil eggs for deviled eggs, cook them for 12 minutes. Here’s a quick guide: - Place eggs in a pot. - Cover with cold water, about an inch above the eggs. - Bring to a boil over medium-high heat. - Once boiling, cover the pot and remove it from heat. - Let the eggs sit in the hot water for 12 minutes. This method helps make sure the yolks are firm and the whites are tender. Yes, you can make deviled eggs the night before. Here are some tips: - Prepare the filling and store it in the fridge. - Keep the egg whites separate until serving. - Fill the whites just before you serve. This way, they stay fresh and look nice. Peeling hard boiled eggs can be tricky. Here’s an easy way: - After boiling, place the eggs in ice water. - Let them cool for about 5-10 minutes. - Peel the eggs under running water. The water helps loosen the shell, making it easier to peel. You’ll have smooth, clean egg whites ready for your deviled eggs. Deviled eggs are simple but tasty. We covered the key ingredients, tools, and steps. You can customize your dish with different spices and presentations. Remember to store them correctly for freshness. With these tips, making deviled eggs is easy and fun. Explore the variations to find your favorite style. Enjoy your kitchen adventure with this classic treat!

Classic Deviled Eggs Tasty and Easy Party Appetizer

Looking for the perfect party appetizer? Classic deviled eggs offer a tasty and easy option that everyone loves! With just

Older posts
Newer posts
← Previous Page1 … Page45 Page46 Page47 … Page90 Next →

dsad

© 2025 So Yum Recipes • Built with GeneratePress

Our Policies

  • Copyright Policy
  • Cookie Policy
  • GDPR Policy
  • Privacy Policy
  • Disclaimer
  • Terms Of Use

More Information

  • Home
  • About
  • Contact
  • Appetizers
  • Dessert
  • Dinner
  • Drinks
©2025, So Yum Recipes About Back To Top