Skip to content
DisclaimerTerms Of UseGDPR PolicyCookie Policy

So Yum Recipes

  • Home
  • Drinks
  • Appetizers
  • Dinner
  • Dessert
  • About
  • Contact
  • Privacy Policy
DisclaimerTerms Of UseGDPR PolicyCookie Policy

Chloe

To make Peach Bread Pudding, gather these ingredients: - 4 cups stale bread (such as challah or brioche), cubed - 3 ripe peaches, peeled and diced - 2 cups milk - 1 cup heavy cream - 3 large eggs - 1 cup brown sugar - 1 tablespoon vanilla extract - 1 teaspoon cinnamon - 1/2 teaspoon nutmeg - 1/4 teaspoon salt - 1/2 cup chopped pecans (optional) - Whipped cream or vanilla ice cream for serving Using fresh peaches gives your pudding a bright flavor. They add a juicy texture that canned peaches can't match. Look for ripe peaches that are soft to the touch. If fresh peaches are not in season, canned peaches are a great option. Just make sure to drain them well. They can still add sweetness and moisture to your dish. If you have dietary needs, you can modify this recipe. For a dairy-free version, use almond milk and coconut cream instead of milk and heavy cream. You can replace eggs with flaxseed meal mixed with water or use a store-bought egg substitute. For gluten-free options, choose gluten-free bread. These swaps help you enjoy this dessert without worry. First, gather your ingredients. You need stale bread, ripe peaches, milk, cream, eggs, brown sugar, vanilla extract, cinnamon, nutmeg, salt, and pecans. Start by preheating your oven to 350°F (175°C). Grease a 9x13-inch baking dish with butter or oil. Next, cut your stale bread into cubes. I like using challah or brioche for extra flavor. Then, peel and dice the peaches. If you choose to use pecans, chop them up now. In a big bowl, mix the cubed bread and diced peaches. Gently toss in the pecans if you’re using them. In another bowl, whisk the milk, heavy cream, eggs, brown sugar, vanilla extract, cinnamon, nutmeg, and salt together. Make sure it is well blended. Pour this egg mixture over your bread and peach mix. Press down gently so the bread soaks up all the custard. Let it sit for about 15-20 minutes. For the best texture, don’t skip letting it sit. This step helps the bread soak up the custard. When baking, keep an eye on the pudding. You want a golden brown top. Use a toothpick to check. Insert it in the center. If it comes out clean, it’s ready. Make sure your oven is fully preheated. This helps your pudding bake evenly. If you want a crispy top, you can broil it for a few minutes after baking. Just watch it closely to avoid burning. To know when your peach bread pudding is done, look for a golden brown color. It should rise a bit as it bakes. The edges may puff up slightly too. The toothpick test is your best friend. Insert it in the center of the pudding. If it comes out clean, your dessert is ready. Once done, take it out of the oven. Let it cool for a few minutes before slicing. This helps firm it up a bit. Serve warm with whipped cream or vanilla ice cream for a real treat. Enjoy your Peach Bread Pudding Delight! For the full recipe, check out the section above. One common mistake is using fresh bread. Fresh bread does not soak up the custard well. Always use stale bread for the best texture. Another mistake is not letting the bread soak long enough. If you skip this step, the pudding can turn out dry. Soaking bread is key to a creamy pudding. After you mix the bread and peaches, pour the custard over them. Then, press down gently. This lets the bread absorb the liquid. Let it sit for at least 15 to 20 minutes. This makes a big difference in taste and texture. You can add unique flavors to your peach bread pudding. Try mixing in a splash of almond extract. It pairs well with peaches. You might also add a pinch of ginger or cardamom for warmth. For a nutty twist, sprinkle in some chopped pecans or walnuts. These simple changes can elevate your dish. For the full recipe, check out the Peachy Delight Bread Pudding section. {{image_2}} You can change the fruit in this recipe easily. Try using ripe pears, apples, or berries. Each fruit adds a unique taste. For a tropical twist, use pineapple or mango. Adjust the sugar if your fruit is sweet or tart. Always pick ripe fruit for the best flavor. Want to mix things up? Add spices like ginger or cardamom. They give a warm, spicy kick. You can also use flavored extracts, like almond or coconut, for fun twists. A splash of bourbon or rum can add depth to the flavor. Experiment and find what you love most. To make a gluten-free version, use gluten-free bread. Many stores sell great options now. For a dairy-free twist, swap milk and cream for almond or coconut milk. You can use dairy-free butter too. These swaps keep the dish tasty while meeting dietary needs. Enjoy your Peach Bread Pudding with these fun variations! For the full recipe, check the details above. To store leftover Peach Bread Pudding, let it cool completely first. Place it in an airtight container. This keeps the pudding fresh and moist. You can store it in the fridge for up to three days. If you want to keep it longer, consider freezing it. When you reheat Peach Bread Pudding, do it slowly. Preheat your oven to 350°F. Place the pudding in an oven-safe dish. Add a splash of milk or cream on top to keep it moist. Cover it with foil to prevent drying out. Heat for about 15 minutes or until warm. Freezing Peach Bread Pudding is easy. Cut it into portions and wrap each piece tightly in plastic wrap. Then, place them in a freezer bag. Label the bag with the date. You can freeze it for up to three months. To enjoy, just thaw it in the fridge overnight before reheating. For detailed steps, check out the Full Recipe. Peach bread pudding lasts about three days in the fridge. Store it in an airtight container. After three days, it may dry out or lose flavor. If you want to keep it longer, freeze it. Frozen peach bread pudding can last for about three months. You can use fresh bread, but stale works better. Stale bread absorbs the custard well. Fresh bread may not soak up as much liquid. If you use fresh bread, let it sit out for a day or toast it lightly. This helps it soak up the custard better. Serve peach bread pudding warm for the best taste. Top it with whipped cream or vanilla ice cream for creaminess. You can also drizzle caramel sauce over it for extra sweetness. Adding fresh mint leaves can give a nice touch to the plate. For more ideas, check the Full Recipe. We explored how to make a delicious Peach Bread Pudding. You learned about the best ingredients, from fresh to canned peaches. Detailed steps make the baking process easy. I shared tips to avoid common mistakes and maximize flavor. You also discovered various ways to customize the recipe for your needs. Finally, I included storage advice to keep your pudding fresh. With this knowledge, you can create a tasty treat that everyone will love. Enjoy your baking journey!

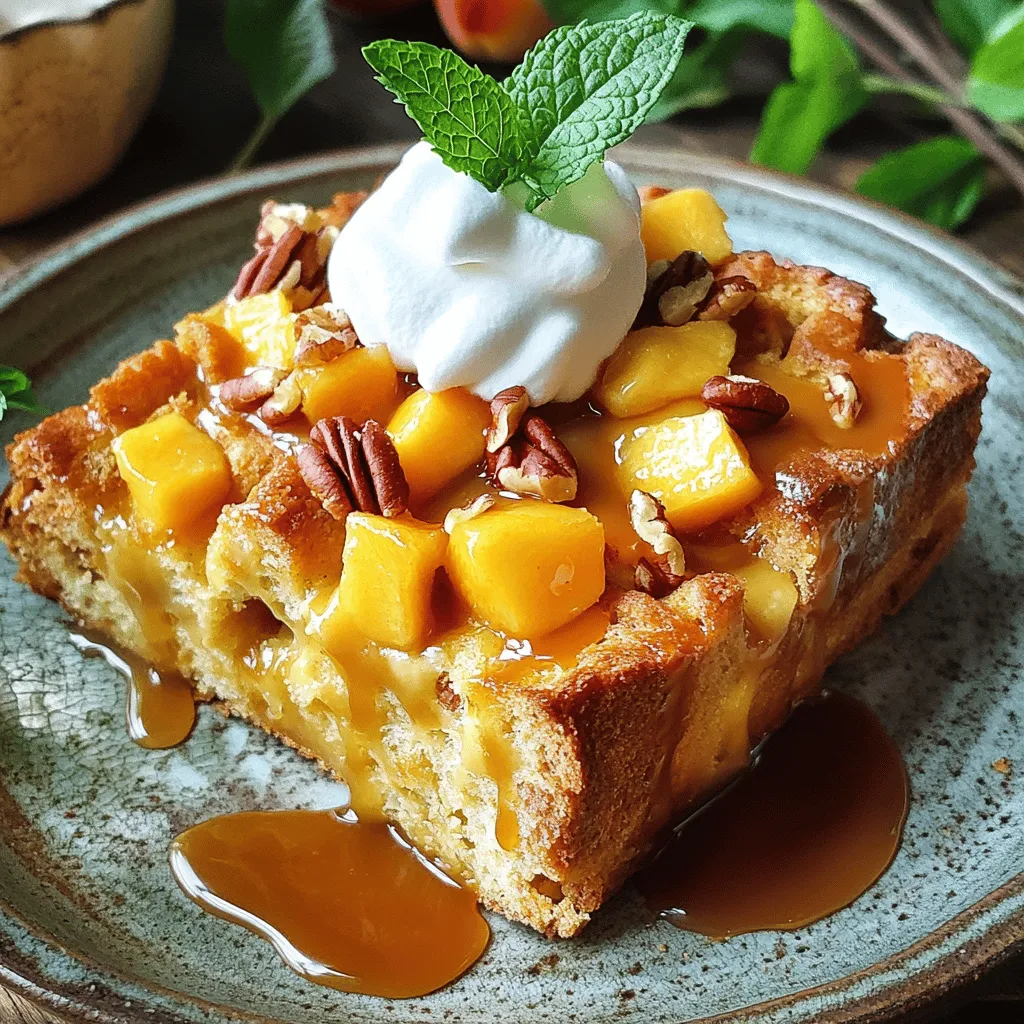
Peach Bread Pudding Delightful and Simple Recipe

If you love sweet and fluffy desserts, then you’ll enjoy my Peach Bread Pudding recipe. This easy treat combines juicy

- 2 medium zucchinis, grated - 1 cup fresh corn kernels - 1/2 cup all-purpose flour - 1/4 cup cornmeal - 2 large eggs - 1/4 cup green onions, finely chopped - 1/4 cup fresh cilantro, chopped - 1 teaspoon baking powder - 1 teaspoon garlic powder - 1/2 teaspoon cumin powder - Salt and pepper to taste - Olive oil for frying To make my zucchini corn fritters, I use simple, fresh ingredients. The main stars are grated zucchinis and sweet corn. These two give a great flavor and texture. I also add flour and cornmeal to bind everything together. Eggs act as glue, while green onions and cilantro add freshness. - You can substitute all-purpose flour with gluten-free options like almond flour or chickpea flour. This works well and keeps the fritters tasty. - If you want to use frozen corn, that's fine too. Just make sure to thaw and drain it before adding. - For dairy-free needs, you can replace eggs with a flaxseed mix. Just mix one tablespoon of ground flaxseed with three tablespoons of water and let it sit for a few minutes. These alternatives make it easy for everyone to enjoy my fritters. You can find the full recipe to guide you through. First, grate the zucchinis using a box grater. You want small shreds to mix well. After grating, squeeze out excess moisture. This step is key for crispy fritters. Next, chop the green onions and cilantro finely. In a large bowl, mix the dry ingredients: flour, cornmeal, baking powder, garlic powder, cumin, salt, and pepper. In another bowl, whisk the eggs. Combine both mixtures. Add the grated zucchini and corn kernels last. Stir until everything is well mixed. Heat a large skillet over medium heat. Add a tablespoon of olive oil and let it get hot. Use a 1/4 cup measure to scoop the mixture. Carefully drop the mixture into the skillet. Flatten each scoop slightly to form fritters. Be careful not to overcrowd the pan. Fry for about 3-4 minutes on each side. Look for a golden brown color and crispy edges. Once cooked, place the fritters on a paper towel to absorb excess oil. Keep frying until all the batter is used. Serve the fritters hot for the best flavor. I love adding a dollop of Greek yogurt or sour cream on top. A sprinkle of extra cilantro adds a nice touch. For a zesty kick, place a wedge of lime on the side. You can find the full recipe in the earlier section. Enjoy your delicious zucchini corn fritters! To fry zucchini corn fritters perfectly, aim for medium heat. If your oil is too cool, the fritters will absorb oil and become soggy. You want them crispy and golden. A good test is to drop a small amount of batter into the oil. If it sizzles right away, you’re ready to go. To avoid sogginess, ensure you squeeze out excess moisture from the zucchini. This step is key. Too much water will make your fritters soft. Use paper towels or a clean kitchen cloth to help. When grating zucchini, use a box grater or a food processor. Both work well. The goal is to have small, even pieces. This helps them cook evenly. After grating, place the zucchini in a clean cloth. Twist the cloth to squeeze out as much water as you can. This makes a big difference in texture. You can also use a fine-mesh strainer. Let the grated zucchini sit for about 10 minutes. You’ll see water collect at the bottom. This method works if you don’t want to use a cloth. To add more flavor, consider spices like smoked paprika or chili powder. Both will give your fritters a nice kick. Fresh herbs, such as dill or parsley, can also brighten the dish. For a cheesy twist, try adding shredded cheese to the mix. Feta or cheddar work great. Just fold it in gently before frying. The cheese melts and adds a lovely creaminess to each bite. For the full recipe, check out the [Full Recipe]. {{image_2}} You can change up the zucchini corn fritters easily. Adding bell peppers or jalapeños gives a nice kick. Just chop them finely and mix them in. These flavors blend well with the corn. You can also include cheese for creaminess. Feta brings a salty touch, while cheddar adds a rich flavor. Mix in a half cup of either cheese for a tasty twist. Want to explore different flavors? Try making Mexican-style fritters. Add chili powder, cumin, and a bit of lime juice. This twist gives a zesty flair. For an Asian-inspired version, mix in soy sauce and sesame oil. These ingredients add depth and a unique flavor to the fritters. You can make vegan zucchini corn fritters too. Simply replace eggs with flaxseed meal mixed with water. This works as a great binder. For a keto-friendly option, swap out the flour with almond flour. This keeps the fritters low in carbs while still tasty. Enjoy experimenting with these variations! You can find the full recipe in the article. To store leftovers properly, place the fritters in an airtight container. Make sure they cool before sealing. This helps keep them fresh. Zucchini corn fritters last in the fridge for about three days. If you want to enjoy them later, follow these storage tips. You can freeze both un-cooked and cooked fritters. For un-cooked fritters, scoop the batter onto a baking sheet lined with parchment paper. Freeze them until firm, then transfer to a freezer bag. For cooked fritters, let them cool first. Then place them in a freezer-safe container. When reheating, the best practice is to thaw them in the fridge overnight. This helps retain their flavor and texture. For the best results, use an oven or skillet to reheat your fritters. If using an oven, preheat it to 350°F (175°C). Place the fritters on a baking sheet for about 10 minutes. This warms them up nicely. If you choose a skillet, heat a small amount of oil over medium heat. Fry the fritters for a few minutes on each side. This keeps them crispy and delicious. To keep fritters crispy when reheating, avoid covering them. This helps prevent steam from making them soggy. How long do zucchini corn fritters last? Zucchini corn fritters stay fresh for about three days in the fridge. Store them in an airtight container. To keep them crispy, place a paper towel in the container. You can also freeze fritters for up to three months. Just make sure they cool down first. Can I bake these fritters instead of frying them? Yes, you can bake zucchini corn fritters! Preheat your oven to 400°F (200°C). Place the fritters on a lined baking sheet. Brush or spray them lightly with oil for a golden finish. Bake for about 20 minutes, flipping halfway through. Baking makes them a bit drier but still tasty! Why are my fritters falling apart? Fritters may fall apart if there's too much moisture in the zucchini. Always squeeze out excess liquid before mixing. Also, ensure you use enough flour and eggs to bind the mixture well. If they still break, add a bit more flour to help hold them together. What can I do if my fritters are too greasy? If your fritters are greasy, try lowering the frying heat. If the oil is too hot, they cook too fast on the outside but stay oily inside. After cooking, place them on paper towels to absorb extra oil. You can also try baking them next time for a lighter option. What to serve with zucchini corn fritters? I love serving these fritters with a dollop of Greek yogurt or sour cream. A sprinkle of fresh cilantro adds color and flavor. You can also serve them with a wedge of lime for a zesty touch. Pair them with a fresh salad or some salsa for extra crunch. Can they be an appetizer or main dish? Absolutely! Zucchini corn fritters work well as an appetizer or a light main dish. Serve them in small portions as a party snack. For a meal, add a side salad and some protein like grilled chicken or fish. They are versatile and delightful in any setting. This blog post covered how to make delicious zucchini corn fritters. We discussed all the key ingredients and provided step-by-step cooking instructions. You learned tips for the best texture and ways to add flavor. Plus, we explored variations to fit any diet and provided storage advice. In the end, these fritters are easy, fun, and packed with flavor. Enjoy making them your way!

Zucchini Corn Fritters Flavorful and Easy Recipe

Looking for a tasty snack that’s simple to make? Zucchini Corn Fritters are just what you need! These delicious bites

To make this refreshing drink, you need simple, fresh ingredients. Here’s what you need: - 2 medium cucumbers, peeled and chopped - 1/4 cup fresh lime juice (about 3-4 limes) - 1/4 cup agave syrup or honey (adjust to taste) - 4 cups cold water - A pinch of salt These ingredients bring a bright taste and cool feeling to your drink. The cucumbers provide hydration and a crisp taste, while lime adds a zesty kick. Agave syrup or honey sweetens the mix without overpowering the fresh flavors. The pinch of salt enhances the overall taste, making it more vibrant. Garnishes can make your drink look beautiful and taste even better. Here are some great options: - Lime slices - Cucumber slices - Fresh mint leaves These garnishes not only add color but also boost flavor. Mint leaves give a refreshing scent, while lime and cucumber slices make it visually appealing. You can mix and match these to suit your taste and style. To prepare your Cucumber Lime Agua Fresca, you will need a few basic tools: - A blender - A fine sieve or cheesecloth - A large pitcher - A spoon for mixing Using these tools makes the process easy and fun. The blender helps you create a smooth cucumber juice, while the sieve separates the juice from the pulp. The pitcher allows you to mix and serve the drink with ease. Start by peeling and chopping the cucumbers. You need about two medium cucumbers. Place the chopped cucumbers in a blender. Add two cups of cold water. Blend everything until smooth. This step makes a fresh cucumber juice. Next, strain the mixture using a fine sieve or cheesecloth. Pour the juice into a large pitcher. Press down firmly to get as much liquid as possible. Discard the leftover pulp. Now, it’s time to add flavor. Pour the fresh cucumber juice back into the pitcher. Add 1/4 cup of fresh lime juice. This is about three to four limes. Then, add 1/4 cup of agave syrup or honey for sweetness. You can adjust the sweetness to your taste. Next, add the remaining two cups of cold water. Don’t forget a pinch of salt. Stir everything well to blend the flavors. Taste it to see if you need more lime or sweetness. Chill the agua fresca in the fridge for at least 30 minutes. This helps the flavors meld together. When you’re ready to serve, fill glasses with ice. Pour the chilled cucumber lime agua fresca over the ice. For a pretty touch, garnish each glass. Use lime slices, cucumber slices, and fresh mint leaves. Enjoy this refreshing summer drink! For the full recipe, check out the details above. When picking cucumbers, look for ones that are firm and smooth. They should feel heavy for their size. Check for bright green skin, as dull skin can mean they're old. If you see any blemishes or soft spots, skip those. Fresh cucumbers taste better and make your drink crisp. You can change how sweet your agua fresca is by using different amounts of agave syrup or honey. Start with 1/4 cup, then taste it. If you want it sweeter, add more syrup little by little. You can also make it tangy by adding more lime juice. Balance is key, so taste as you mix! Herbs can make your drink even fresher. Mint is a great choice. Simply add a few leaves to your blender with cucumbers. They give a cool taste that blends well. You can also try basil or cilantro for a twist. Just remember to use fresh herbs for the best flavor. {{image_2}} You can easily change the taste of your cucumber lime agua fresca. Try adding fruits like watermelon, pineapple, or strawberries. Each fruit adds its own flavor. For example, watermelon makes it sweeter. Pineapple adds a tropical twist. Simply blend your chosen fruit with the cucumbers. Then strain as you would with just cucumber. Adjust the lime juice to balance the sweetness. Herbs can elevate your agua fresca to a new level. Mint is a popular choice. It adds a cool taste that pairs well with cucumber. Basil can also work wonders. Its unique flavor gives a fresh twist. To use herbs, blend them with the cucumbers. Strain the mixture to keep it smooth. You can garnish your drink with more herbs for a pretty touch. If you're watching your sugar intake, don't worry! You can make a tasty sugar-free version. Use stevia or monk fruit sweetener instead of agave or honey. These options provide sweetness without the calories. You might also enjoy the natural sweetness of ripe fruits. Just taste as you go. Adjust the lime juice to keep the drink refreshing. For a fun twist, add a splash of sparkling water for fizz. Explore these variations to find your perfect cucumber lime agua fresca recipe! For the full recipe, check out the detailed steps above. To store leftover agua fresca, pour it into a container. Make sure the container is clean and dry. Seal it tightly to keep out air. This helps preserve the flavor and freshness. Always refrigerate your agua fresca. I recommend using glass or BPA-free plastic containers. Glass jars with lids work great. They do not retain odors or stains. If you use plastic, choose high-quality containers. Avoid containers that can leach chemicals into your drink. Cucumber lime agua fresca tastes best when fresh. It stays good for about three days in the fridge. After that, the flavors may fade. To keep it fresh, always store it cold. If you notice strange smells or colors, throw it out. Always taste before serving. Freshness matters for a refreshing summer drink! Agua fresca means "fresh water" in Spanish. It is a light, refreshing drink. People make it with fruits, grains, or seeds mixed with water and sugar. You can find it in many places, especially during hot summers. Cucumber Lime Agua Fresca uses cucumbers and lime for a cool taste. It’s perfect for hot days. Yes, you can use other citrus fruits! Oranges, lemons, or grapefruits work well. Each fruit adds its own flavor. You can mix different citrus fruits too. This gives your drink a unique twist. Experiment and find your favorite combo. Just keep the balance of sweet and sour right. Cucumber Lime Agua Fresca is quite healthy. Cucumbers are low in calories and full of water. They help keep you hydrated. Lime adds vitamin C, which is good for your immune system. You can adjust the sweetness with agave syrup or honey. This way, you control the sugar. Enjoy this drink guilt-free! Cucumber Lime Agua Fresca is simple and refreshing. We covered the main ingredients and garnishes you can use. I shared step-by-step instructions for making it, along with tips for choosing cucumbers and sweetening. You can try fun variations with other fruits or herbs. Remember to store any leftovers properly to keep them fresh. Agua Fresca is not just tasty; it’s also healthy. Now you have all the info to enjoy this drink anytime you want!

Cucumber Lime Agua Fresca Refreshing Summer Drink

Looking for a cool drink to beat the summer heat? Cucumber Lime Agua Fresca is your perfect match! This light

- 1 cup grated zucchini (excess moisture squeezed out) - 1/2 cup unsalted butter, softened - 1 cup granulated sugar - 1 large egg - 1 teaspoon vanilla extract - 1 tablespoon lemon zest - 1/4 cup fresh lemon juice - 2 cups all-purpose flour - 1 teaspoon baking soda - 1/2 teaspoon baking powder - 1/4 teaspoon salt - 1/2 teaspoon cinnamon (optional) - 1/2 cup powdered sugar for icing (optional) Grated zucchini adds moisture and flavor to the cookies. Make sure to squeeze out excess water. This step keeps your cookies from being soggy. Zucchini has a mild taste, which works well with lemon's bright flavor. Using unsalted butter is key in this recipe. It allows you to control the salt content. The sweetness of the cookies shines when you add unsalted butter. This way, you can adjust salt later in the dough if needed. Fresh lemon juice is better than bottled. Fresh juice gives a bright and tangy flavor. Bottled juice often lacks the same punch. Fresh lemon juice also pairs well with the zest, enhancing the cookie's taste. You can add spices to boost the flavor. A touch of cinnamon adds warmth, perfect for the lemon zest. You might also try nutmeg or ginger for a unique twist. For icing, you can mix powdered sugar with lemon juice. Adjust the amount of lemon juice to get your desired thickness. Drizzling this over the cookies gives them a sweet and tangy finish. Enjoy experimenting with these flavors! For the Full Recipe, check out the complete instructions to create these delicious cookies. Start by preheating your oven to 350°F (175°C). This temperature is key for the right cookie texture. If your oven is not accurate, cookies may bake unevenly. Use an oven thermometer to check the heat. While the oven heats up, line two baking sheets with parchment paper. This helps prevent sticking and makes cleanup easy. I recommend leaving a little space between cookies. They will spread as they bake. Next, it’s time to mix the ingredients. In a large bowl, cream together the softened butter and sugar. Use a hand mixer or a sturdy spoon. Mix until the mixture looks light and fluffy. This step adds air, which helps the cookies rise. Then, beat in the egg. After that, add in the vanilla extract, lemon zest, and fresh lemon juice. Mix well until everything is combined. In another bowl, whisk together the dry ingredients—flour, baking soda, baking powder, salt, and cinnamon if you like. Gradually add this dry mix to the wet ingredients. Stir gently until just combined. Finally, fold in the grated zucchini. Make sure it’s evenly mixed for that yummy flavor in every bite. Now, let’s talk baking. Spoon rounded balls of dough onto your baking sheets. Make sure to leave space between them. Bake for 12-15 minutes. The edges should look lightly golden, and the centers should be set. To check if they are done, gently press a cookie. If it springs back, it’s ready. Once done, remove the sheets from the oven. Let the cookies cool on the sheets for about 5 minutes. Then, transfer them to wire racks to cool completely. This cooling step helps give them the perfect texture. You can drizzle them with lemon icing if you want that extra zing. For the icing, mix powdered sugar with a bit of lemon juice until it’s the right thickness. For the full recipe, check out the detailed instructions above. To prevent cookies from becoming soggy, always squeeze excess moisture from the grated zucchini. This keeps your cookies light and fluffy. Use a clean kitchen towel or cheesecloth to press the zucchini before adding it to your dough. For a light and fluffy cookie, cream the butter and sugar well. Mix until it looks pale and soft. This step adds air, making your cookies tender. Do not overmix the dough once you add the flour. Just stir until combined. To grate zucchini properly, use a box grater or food processor. Choose the medium grate setting. This size helps blend the zucchini with the dough. After grating, place the zucchini in a clean towel and twist it to remove extra water. If you want alternatives to zucchini, consider using finely grated carrots or apples. Both add moisture and sweetness to your cookies. You can also swap in a different fruit puree, like banana or pumpkin, but adjust the sugar to balance the flavors. For the full recipe, check the earlier section. {{image_2}} You can make these cookies even more exciting by adding nuts or chocolate chips. Walnuts or pecans add a nice crunch. A handful of chocolate chips will give a sweet twist. You can even mix both for a delightful combo. If you want a different taste, try substituting citrus flavors. Instead of lemon, you can use lime or orange. Each will change the flavor but keep the cookie's soft texture. Experimenting with flavors keeps your baking fun and fresh! If you need a gluten-free option, use gluten-free all-purpose flour. Many brands work well and keep the cookie soft. Just ensure it has a binding agent, like xanthan gum. For vegan options, you can replace the butter with coconut oil or a vegan butter substitute. Use a flax egg instead of a regular egg. To make a flax egg, mix one tablespoon of ground flaxseed with two and a half tablespoons of water. Let it sit for a few minutes until it thickens. This method keeps the cookies moist while being plant-based. Explore these variations to make the perfect lemon zucchini cookies for everyone! For the complete recipe, check out the Full Recipe. Store your Lemon Zucchini Cookies in an airtight container. This keeps them fresh and soft. A simple glass jar works well. You can also use plastic containers. Just make sure they seal tight. Place parchment paper between layers if stacking them. This prevents cookies from sticking together. Keep the cookies at room temperature for up to five days. To keep them even fresher, you can add a slice of bread. The bread helps to absorb moisture. This tip works wonders to maintain that soft texture. If you want to store them longer, freezing is your best option. To freeze unbaked cookie dough, scoop the dough onto a baking sheet. Space the balls apart so they do not touch. Freeze the dough for about two hours until firm. Then, transfer the frozen dough balls into a zip-top bag. Label the bag with the date, and they can last up to three months. When you're ready to bake, take out the dough. Let it thaw in the fridge overnight or for about 30 minutes at room temperature. Preheat the oven and bake the cookies as per the Full Recipe instructions. Enjoy warm, fresh cookies straight from the oven! Can I make these cookies ahead of time? Yes, you can make these cookies ahead of time. Prepare the dough and scoop it into balls. Place the cookie dough balls on a baking sheet and freeze them. Once frozen, transfer them to a bag. When you want fresh cookies, bake them straight from the freezer. Just add a few extra minutes to the baking time. What can I use if I don’t have any zucchini? If you don't have zucchini, you can use grated carrots or even applesauce. Both options keep your cookies moist. They will change the taste slightly, but they still make a great treat. What happens if I skip the lemon zest? If you skip the lemon zest, your cookies will lack that bright, citrus flavor. Zest adds a bold taste that enhances the cookies. You can replace it with extra lemon juice if needed, but the zest is best. Can I use oil instead of butter? Yes, you can use oil instead of butter. Use the same amount of oil as butter. The cookies may be slightly softer but still tasty. Just make sure to use a neutral oil like canola or vegetable oil. Why are my cookies flat or spread too much? Flat cookies can happen if the butter is too warm. Make sure the butter is softened but not melted. Also, check that you measure your flour correctly. Too little flour can lead to spreading. How can I fix dry cookies? If your cookies are dry, next time try adding a bit more moisture. You can add an extra egg yolk or a splash of milk to the dough. Also, make sure you’re not overbaking. Check your cookies a minute or two earlier to ensure they stay soft and chewy. For the complete recipe, check the [Full Recipe]. This blog post shared all you need to make tasty lemon zucchini cookies. We covered essential ingredients, like fresh lemon juice and unsalted butter. You learned how to prepare your oven and mix the dough. Tips on baking and storing your cookies will help keep them fresh. Variations let you customize flavors to your liking. Remember, whether you add chocolate chips or freeze the dough, experimentation brings out your creativity. Enjoy baking these cookies and share them with family and friends!

Lemon Zucchini Cookies Soft and Flavorful Delight

Looking for a sweet treat that’s both unique and delicious? Try my Lemon Zucchini Cookies! These cookies are soft, flavorful,

To make these tasty popsicles, you need just a few simple items. Gather the following ingredients: - 4 ripe peaches, pitted and diced - 1 cup Greek yogurt (plain or vanilla) - 1/4 cup honey or maple syrup (adjust for sweetness) - 1 tablespoon lemon juice - 1 teaspoon vanilla extract - Pinch of salt These ingredients work together to create a creamy and delicious treat. You can mix in some fun extras to make your popsicles even better. Here are some optional add-ins to consider: - Fresh mint for a refreshing twist - Chopped nuts for a crunchy texture - A splash of coconut milk for extra creaminess - A handful of berries for added sweetness These add-ins can help you customize your popsicles to fit your taste. Each ingredient brings great nutrition to your popsicles. Here are some benefits: - Peaches are low in calories and packed with vitamins. They provide fiber and antioxidants. - Greek yogurt is high in protein and good for your gut health. It adds creaminess to the mix. - Honey or maple syrup offers natural sweetness and may have health benefits. Use them in moderation. - Lemon juice adds a zing and is rich in vitamin C. It helps balance the flavors. - Vanilla extract adds warmth and a lovely aroma to your popsicles. These ingredients not only taste great but also offer health benefits. Enjoy making your Easy Peach Yogurt Popsicles with these ingredients! For the complete recipe, check out the Full Recipe. First, you need to prepare the peaches. Choose four ripe peaches for the best flavor. Rinse them under cold water to clean any dirt. Cut each peach in half and remove the pit. Then, dice the peaches into small chunks. You want to make sure they are bite-sized. This helps them blend better and makes for a tasty treat. Now, it's time to blend the mixture. In a blender, add the diced peaches, one cup of Greek yogurt, and a quarter cup of honey or maple syrup. You can choose plain or vanilla yogurt. Also, add one tablespoon of lemon juice and one teaspoon of vanilla extract for extra flavor. Don’t forget a pinch of salt! Blend everything until smooth, but leave some small peach pieces for texture if you like. Taste the mix and adjust the sweetness if needed. Add more honey or syrup if you want it sweeter. Next, pour the blended mixture into popsicle molds. Be careful to leave a small space at the top. This space allows the popsicles to expand while freezing. Once filled, insert popsicle sticks into the molds. To remove air bubbles, gently tap the molds on your countertop. Finally, place the molds in the freezer. Let them freeze for at least 4 to 6 hours or until solid. When you're ready to enjoy, run warm water over the outside of the molds for a few seconds. This helps release the popsicles easily. You can now pull on the sticks to remove them. Enjoy your homemade peach yogurt popsicles! To get the best texture for your popsicles, use ripe peaches. They make the mixture smooth and creamy. When blending, you can leave some peach chunks for added texture. This will make every bite feel special. If your mixture is too thick, add a splash of water or extra yogurt. This helps it blend well without losing creaminess. Sweetness can change based on how ripe your peaches are. Start with 1/4 cup of honey or maple syrup. Blend, then taste the mixture. If it needs more sweetness, add a little more honey or syrup. Remember, you can always add more, but you can’t take it out. Try using a mix of honey and vanilla yogurt for a richer flavor. If your popsicles are hard to remove from the molds, run warm water over the outside for a few seconds. This helps loosen them up. If they are too icy, it may mean your mixture froze too quickly. Try blending in a bit more yogurt or fruit. This can help create a smoother texture. If they taste too tart, add a touch more sweetener to balance the flavors. Enjoy your creamy peach bliss popsicles! {{image_2}} You can easily change the taste of your peach yogurt popsicles. Try mixing in other fruits. Strawberries, mangoes, or berries all work well. Just chop them up and add them to the mix. For a tropical twist, use pineapple. The sweet and tart flavors will make your popsicles fun and fresh. You can even blend fruits together for new tastes. Sweeteners can change how your popsicles taste. If you want less sugar, try using stevia or agave syrup. These sweeteners are great for cutting calories. You can also switch up the yogurt. Use coconut yogurt for a dairy-free option. Almond yogurt adds a nice nutty flavor. Each choice brings a new vibe to your treat. Making vegan popsicles is simple and tasty. Use plant-based yogurt like almond or cashew. These types give a creamy texture without dairy. For the sweetener, maple syrup works well. Just follow the same steps in the full recipe. You can enjoy a refreshing treat that fits vegan diets perfectly. To keep your peach yogurt popsicles fresh, store them in an airtight container. If you leave them in the popsicle molds, cover them tightly with plastic wrap. This protects them from freezer burn and keeps flavors intact. Before freezing, make sure your popsicles are fully blended for a smooth texture. After pouring the mixture into molds, insert the sticks straight down. Tap the molds gently on the counter. This step removes air bubbles and helps the popsicles freeze evenly. Once frozen, try not to let them sit out too long. If you do, they may melt and lose shape. When you're ready to enjoy, run warm water over the molds for a few seconds. This helps release the popsicles easily. Homemade popsicles can last up to three months in the freezer. After that, they may lose flavor and texture. To enjoy the best taste, eat them within this time frame. For precise recipes, check the Full Recipe for making these delightful treats. These popsicles take about 4 to 6 hours to freeze completely. Make sure to leave them in the freezer long enough. If you check them too soon, they might still be soft. I often find that overnight freezing works best. This way, they are ready to enjoy the next day! Yes, you can use frozen peaches! They work well in this recipe. Just let them thaw a bit before you blend them. This makes it easier to mix with the yogurt and other ingredients. Frozen peaches might give your popsicles a slightly different texture, but they will still taste delicious. You can serve these popsicles in fun ways! Try dipping them in melted chocolate for a sweet twist. You can also roll them in crushed nuts or granola for added crunch. Another idea is to serve them with fresh peach slices or a drizzle of honey on top. These ideas will make your popsicles even more fun to eat! In this post, we explored how to make easy peach yogurt popsicles. We covered the key ingredients, preparation steps, and tips for success. You can adjust flavors and sweetness to fit your taste. Remember, options like different fruits or dairy-free choices add variety. Storing your popsicles correctly will keep them fresh longer. Making popsicles is fun and simple. Enjoy your delicious, homemade treats this summer!

Easy Peach Yogurt Popsicles Simple and Tasty Treat

Cool down with a delicious treat that’s both easy to make and full of flavor. My Easy Peach Yogurt Popsicles

To make these delicious tacos, gather the following ingredients: - 2 medium zucchinis, diced - 1 bell pepper, diced (any color) - 1 small red onion, finely chopped - 2 cloves garlic, minced - 1 tablespoon olive oil - 1 teaspoon smoked paprika - 1 teaspoon cumin - ½ teaspoon cayenne pepper (adjust to taste) - Salt and pepper to taste - 8 small corn tortillas - Fresh cilantro, chopped (for garnish) - Lime wedges (for serving) - Optional toppings: avocado slices, salsa, or Greek yogurt These ingredients come together to create a tasty and spicy filling. The zucchinis add a fresh crunch. The bell pepper and onion bring sweetness, while the garlic adds depth. The spices make the dish pop with flavor. Toppings can elevate your spicy zucchini tacos. Here are some favorites: - Sliced avocado for creaminess - Fresh salsa for a burst of flavor - Greek yogurt for a cool contrast - Crumbled feta cheese for a salty kick - Extra chopped cilantro for freshness Feel free to mix and match these toppings. They add different textures and flavors to your tacos. Pair your spicy zucchini tacos with these side dishes: - A zesty corn salad for sweetness - Black beans for protein - Rice with lime and cilantro for a filling option - Fresh fruit salad for a light touch These sides complement the tacos well. They enhance the meal and create a balanced plate. Check the Full Recipe for all the details on how to assemble your perfect tacos! Start by washing the zucchinis and bell pepper. Dice the zucchinis into small pieces. This helps them cook evenly. Next, chop the bell pepper into similar-sized pieces. Then, finely chop the red onion and mince the garlic. This will bring out the best flavors. Gather all your ingredients so you can work quickly. In a large skillet, pour in the olive oil and heat it on medium. Once hot, add the chopped onion and garlic. Sauté for 2-3 minutes until they smell great. Now, toss in the diced zucchinis and bell pepper. Cook for another 5-7 minutes. You want the veggies to be soft and slightly browned. Then, sprinkle in the smoked paprika, cumin, and cayenne pepper. Add salt and pepper to taste. Mix well and let the spices blend for 2 more minutes. While the zucchini mixture cooks, toast the corn tortillas in a separate pan. Heat them for about 30 seconds on each side. This makes them warm and slightly crispy. Now, it’s time to build your tacos. Take a tortilla and spoon the spicy zucchini mix onto it. Don’t forget to add fresh cilantro and any other toppings you like. Serve the tacos with lime wedges on the side. These add a nice zing! For the full recipe, check out the earlier section. To get the right spice level, start with cayenne pepper. Use just half a teaspoon. If you like more heat, add more. You can also try adding chili powder for a different kick. Always taste as you go. This way, you can adjust to your liking. If you want a twist on the corn tortillas, try flour tortillas. They are soft and easy to fold. You can also use lettuce leaves for a low-carb option. This adds a fresh crunch. Another choice is whole wheat tortillas for added fiber. Meal prep makes cooking easy. Chop the veggies ahead of time. Store them in the fridge for up to three days. You can cook the spicy zucchini mix and keep it in a container. It stays fresh for a few days. Just warm it up when you’re ready to eat. This recipe is perfect for busy nights. Check the Full Recipe for more details on quantities and cooking methods. {{image_2}} You can easily boost the nutrition of your spicy zucchini tacos by adding protein. Consider adding cooked black beans or chickpeas for a plant-based choice. If you prefer meat, try using ground turkey or diced chicken. Simply cook the protein with the zucchini mix. This keeps flavors rich and satisfying. Making these tacos vegan is simple. Just avoid any dairy toppings. Use avocado slices or a vegan yogurt instead. For a gluten-free option, stick with corn tortillas. They work well with the spicy zucchini mix and taste great. Always check the labels to ensure your tortillas are gluten-free. You can change the flavor of your tacos by swapping spices. Try using garlic powder or onion powder for a different taste. Adding chili powder can give it a nice kick, too. For a fresh twist, add chopped fresh herbs like oregano or basil. Each tweak makes the dish new and exciting! For the full recipe, check out the complete guide on Spicy Zucchini Tacos. To keep your spicy zucchini tacos fresh, store them in an airtight container. Place any leftover zucchini filling in one container. If you have extra tortillas, store them separately. This prevents the tortillas from getting soggy. Always let the food cool before sealing the container. To reheat the zucchini filling, use a skillet over medium heat. Stir it often until warm. This method keeps the texture nice. For the tortillas, warm them in a dry pan for about 30 seconds on each side. This helps them regain some crispness. The spicy zucchini filling lasts about 3-4 days in the fridge. If you want to freeze it, place it in a freezer-safe bag. Squeeze out as much air as possible before sealing. It can last up to three months in the freezer. When you're ready to eat, thaw it overnight in the fridge. You can then reheat it as mentioned above. Enjoy your flavorful meals later! For the full recipe, check back in the earlier sections. Yes, you can use other veggies! Bell peppers add sweetness, while corn adds crunch. Try mushrooms for a savory taste. Spinach or kale gives a nice green boost. Just chop them small, so they cook well. Keep the spices the same for that great flavor! Making these tacos ahead is easy. Cook the zucchini mixture as usual. Let it cool, then store it in a container. Keep it in the fridge for up to three days. When ready, just reheat it in a pan. Warm your tortillas and assemble. It’s quick and simple! Tacos shine with different sauces! A fresh salsa adds a zing. Try a creamy avocado sauce for richness. If you like heat, drizzle some hot sauce on top. Greek yogurt works well too, adding coolness. Choose what you love to make your tacos perfect! For the full recipe, check out the Spicy Zucchini Tacos section above. Spicy zucchini tacos offer fresh flavors and a tasty meal option. You learned about essential ingredients, cooking steps, and ways to customize your dish. Remember to adjust spice levels and try different toppings. Meal prep can make this recipe even easier. Store extra tacos properly for later enjoyment. Enjoy experimenting with new flavors and make this recipe your own. Tacos can be quick, fun, and satisfying for everyone. Dive into your cooking journey with confidence!

Spicy Zucchini Tacos Flavorful and Easy to Make

Get ready to spice up taco night with my easy Spicy Zucchini Tacos! These tacos are loaded with flavor and

- 2 large cucumbers, diced - 1 cup cherry tomatoes, halved - 1/2 red onion, thinly sliced For this salad, pick firm cucumbers. Their crunch makes a big difference. I like using fresh cherry tomatoes, too. They add sweetness and color. Slice the red onion thinly for a milder taste. This mix brings brightness to your dish. - 1/2 cup Kalamata olives, pitted and halved - 1 cup feta cheese, crumbled - 1/4 cup extra-virgin olive oil - 2 tablespoons red wine vinegar (or lemon juice for a non-vinegar option) Kalamata olives give a salty kick. Their rich flavor works well with the salad. Feta cheese adds creaminess and tang. Use good quality olive oil for the best taste. Red wine vinegar or lemon juice brightens the dish further. Feel free to switch the vinegar for lemon if you prefer. - 1 teaspoon dried oregano - Salt and pepper to taste - Fresh parsley, for garnish Dried oregano is a must for that classic Greek flavor. Add salt and pepper to make everything pop. Fresh parsley adds a nice touch and color. You can find the full recipe for these ingredients in my section on step-by-step instructions. To start, you need to prepare the vegetables. First, grab your two large cucumbers. Dice them into small, even pieces. This helps them mix well with other ingredients. Next, take one cup of cherry tomatoes. Halve each tomato carefully. This step adds sweetness and color to your salad. Finally, slice half of a red onion. Thin slices will give a nice crunch and flavor. Now, let’s combine everything. In a large mixing bowl, add your diced cucumbers and halved cherry tomatoes. Then, stir in the sliced red onion and half a cup of Kalamata olives. The olives bring a briny taste that contrasts nicely with the fresh veggies. Next, we need to make the dressing. In a smaller bowl, whisk together a quarter cup of extra-virgin olive oil and two tablespoons of red wine vinegar. If you prefer, you can use lemon juice instead of vinegar. Add one teaspoon of dried oregano, and season with salt and pepper. Whisk until everything is well combined. It’s time to toss the salad! Pour the dressing over the salad ingredients. Gently toss to coat everything evenly. Be careful with the mixing, so you don’t break the veggies too much. Now, fold in one cup of crumbled feta cheese. This adds creaminess and tang. Transfer the salad to a nice serving dish. For a pop of color, garnish with freshly chopped parsley. You can serve the salad right away or chill it for 30 minutes. This resting time helps the flavors blend beautifully. For the full recipe, check the section above. Enjoy your fresh and flavorful Greek cucumber salad! To make a tasty Greek cucumber salad, start with fresh cucumbers. Look for firm, shiny cucumbers with no soft spots. Thin-skinned varieties, like Persian or English cucumbers, add a nice crunch. Next, choose ripe tomatoes. Look for bright colors and a sweet smell. The cherry tomatoes should feel slightly soft but not mushy. For feta cheese, opt for a block instead of crumbled. This way, you can crumble it yourself, keeping it fresh and flavorful. To take your salad to the next level, consider adding fresh herbs. Dill, mint, or basil work well with the flavors of cucumber and tomato. These herbs add a burst of freshness. Also, adjust the seasoning to your taste. Start with salt and pepper, then taste as you mix. If you want more tang, add a bit more vinegar or lemon juice. Just remember, balance is key. When serving your salad, think about how it looks. Use a large, shallow bowl to show off the colors. Layer the ingredients for a beautiful display. For garnishing, sprinkle fresh parsley on top just before serving. You can also add a few extra Kalamata olives for color. This small touch makes the salad look even more inviting and delicious. For the full recipe, visit the section above. Enjoy making your Greek cucumber salad! {{image_2}} You can change some ingredients in this salad without losing the flavor. If you don’t have Kalamata olives, try green olives or capers. For cheese, you can use goat cheese or leave it out for a lighter option. Adding other veggies can also bring new flavors. Consider including bell peppers, radishes, or even zucchini. These additions make your salad colorful and crunchy. You can make your dressing unique by trying different vinegars. Use balsamic or apple cider vinegar for a twist. Adding garlic gives a nice kick, while lemon zest brightens the taste. Feel free to mix herbs in your dressing, too. Fresh dill or mint can change the vibe of your salad. To make this salad vegan, skip the feta cheese. You can add avocado for creaminess instead. For gluten-free options, this salad is already safe since it does not contain gluten. If you want low-carb, focus on more cucumbers and add fewer tomatoes. These little changes can help you customize your Greek cucumber salad to fit your needs and taste! You can find the full recipe above. To keep your Greek cucumber salad fresh, store it in the fridge. Use an airtight container to seal the salad well. This helps keep out air and moisture. The salad is best when eaten within three days. For best taste, enjoy your salad in one to two days. As time goes by, the cucumbers can become soggy. Look for signs of spoilage, like off smells or slimy textures. If you see these signs, it’s best to toss the salad. You can make this salad ahead of time for easy meals. Just prepare the salad, but wait to add the dressing until you’re ready to serve. Chilling the salad for about 30 minutes makes the flavors pop. This way, you can enjoy a fresh, tasty dish without much fuss. For the full recipe, check out the details above. To boost flavor, add fresh herbs. Try dill, basil, or mint. They add a bright taste. You can also use more dried oregano. A squeeze of fresh lemon juice adds zest. Mix and taste until you find your perfect blend. Yes! You can add grilled chicken for heartiness. Shrimp is another tasty option. For a meatless choice, use chickpeas or black beans. They give protein and keep it fresh. Just mix them in before serving. For the best shape, slice cucumbers into half-moons or quarters. This makes them easy to eat. A sharp knife helps you get nice, clean cuts. You can peel them if you want a smoother texture. The goal is to keep them bite-sized. Yes, Greek Cucumber Salad is gluten-free. It contains fresh veggies, olives, and feta. Make sure any additional ingredients are also gluten-free. You can enjoy this dish worry-free if you follow this. You can keep the salad in the fridge for up to three days. Store it in an airtight container. The flavors will deepen over time, but the veggies may soften. For the best taste, eat it fresh. For the full recipe, check out the earlier section. This blog post covered how to make a Greek cucumber salad. We went through choosing fresh ingredients like cucumbers, cherry tomatoes, and feta cheese. I shared tips on preparing, mixing, and serving. We also explored ways to customize this salad, including ingredient swaps and dressing options. Remember, good ingredients and seasoning make a tasty salad. With proper storage, you can enjoy this dish for days. Now you’re ready to make a delicious Greek cucumber salad that fits your taste!

Greek Cucumber Salad Fresh and Flavorful Delight

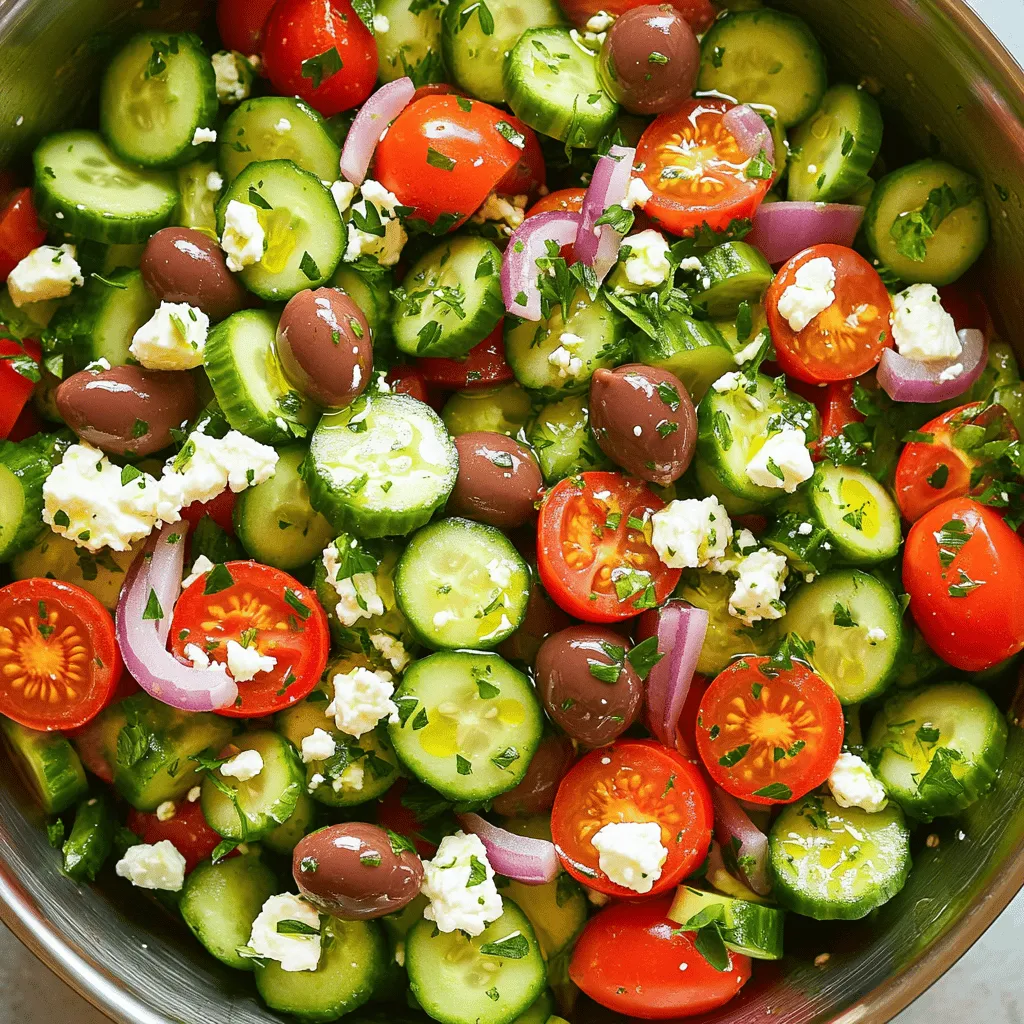
If you’re craving a refreshing dish, look no further than Greek Cucumber Salad. This salad bursts with color, flavor, and

Coconut milk options: canned vs. carton You can use either canned or carton coconut milk for this recipe. Canned coconut milk is thick and creamy. It adds a rich flavor to the pudding. Carton coconut milk is lighter and often has added water. It might make your pudding less creamy but still tasty. Choosing the best peaches for flavor and ripeness When selecting peaches, look for ones that are firm but slightly soft. This shows they are ripe and sweet. Choose peaches with a nice aroma. The best peaches for this pudding have a deep yellow or orange color. Avoid peaches with bruises or dark spots. Natural sweeteners: honey vs. maple syrup You can sweeten your pudding with honey or maple syrup. Honey gives a floral taste, while maple syrup has a warm, earthy flavor. Both work well, so pick the one you like best. Adjust the sweetness based on your taste. Using the right ingredients makes your Peach Coconut Chia Pudding shine. For the full recipe, check out the details above. To start making your peach coconut chia pudding, gather your base ingredients. You will need coconut milk, almond milk, chia seeds, honey or maple syrup, vanilla extract, and a pinch of salt. This blend creates a creamy and tasty base. Whisk the mixture well. This step is key since it helps avoid clumps of chia seeds. A good whisk mixes everything together so each bite is smooth and delicious. Next, refrigerate the pudding. This step is crucial because it allows the chia seeds to soak up the liquid. You should chill it for at least four hours, but overnight is best. This waiting time creates that perfect pudding-like texture. Now comes the fun part: layering your pudding! Grab small cups or bowls to showcase those beautiful layers. Start with a layer of the chia pudding at the bottom. Then, add a layer of diced peaches. Repeat this process until your cups are full. For an even look, try to distribute the layers equally. This ensures that each bite has a balance of pudding and fruit. You want everyone to enjoy the same tasty experience! Finally, garnish your pudding to make it eye-catching. Top it with more diced peaches, toasted coconut flakes, and fresh mint leaves. These little touches not only add flavor but also make your dish look stunning. For the full recipe, check out what we've put together! Soaking chia seeds is key to a great pudding. When you soak them, they absorb liquid and swell up. This creates that nice, thick texture we all love. I suggest soaking your chia seeds for at least four hours or overnight. This time allows them to reach their full potential. You can adjust the texture by changing the liquid. If you want a thicker pudding, add less coconut or almond milk. For a creamier pudding, add more liquid. Play around with it until you find what you like best! To make your peach coconut chia pudding even better, try adding more fruits. Berries, mangoes, or bananas can bring a new twist. Just chop them into small pieces and mix them in. You can also layer them for a pretty look. Spices can add warmth to your pudding. A pinch of cinnamon or nutmeg can change the flavor profile. Just be careful not to overdo it! A little goes a long way. These simple enhancements will make your pudding burst with flavor. For the full recipe, be sure to check out the complete guide! {{image_2}} You can easily adjust this recipe to fit your needs. If you want a vegan option, use maple syrup instead of honey. Maple syrup gives a sweet taste and works well with the pudding. For milk, choose dairy-free options. Almond milk is great, but you can also try oat milk or soy milk. These substitutes keep the pudding creamy and delicious. You can change the fruits in this recipe to match the seasons. In summer, use fresh berries like strawberries or blueberries. In winter, apples or pears can add nice flavor. For special occasions, make it festive! Add spices like cinnamon for a warm touch. You can also layer in holiday-themed fruits for a fun twist. Don't forget to check out the Full Recipe for all the steps to make this treat! To keep your peach coconut chia pudding fresh, store it in the fridge. Use a clean container with a lid. Glass jars work best for this. They prevent odors and keep the pudding tasty. If you only have plastic containers, those will work too. Just make sure they are airtight. When storing, add a layer of plastic wrap over the pudding. This helps seal in moisture. If you have extra peaches or toppings, store them separately. This keeps everything fresh and prevents sogginess. Can you freeze chia pudding? Yes, you can freeze chia pudding. However, the texture may change. Freezing can make it more grainy. It may not be as creamy when thawed. Guidelines for thawing and consumption: To thaw, move the pudding to the fridge overnight. Avoid thawing at room temperature. Once thawed, stir well before serving. If needed, add a splash of coconut or almond milk to bring back creaminess. Enjoy your delicious pudding within a week for the best flavor. How long does chia pudding last in the fridge? Chia pudding lasts about 5 days in the fridge. Make sure to store it in a sealed container. This keeps it fresh and tasty for your next snack. Can I make this recipe in advance? Yes, you can make this recipe in advance. I often prepare it the night before. This way, the chia seeds soak up the liquid and create the perfect texture. What are the health benefits of chia seeds? Chia seeds are packed with nutrients. They contain omega-3 fatty acids, which are good for your heart. They also have fiber, which helps digestion and keeps you full longer. Plus, they are rich in protein and minerals. Enjoying chia pudding can give you a healthy boost! For a full recipe, check out the details above. In this blog post, we covered how to make peach coconut chia pudding. We explored key ingredients, like the best coconut milk and ripe peaches. I shared step-by-step instructions for mixing, layering, and storing your pudding. Tips on achieving the perfect texture, enhancing flavor, and adapting the recipe for diets were included. To wrap up, this dessert is not just tasty but also simple to make. Enjoy experimenting with flavors and seasonal fruits to make it unique!

Peach Coconut Chia Pudding Delightful and Healthy Treat

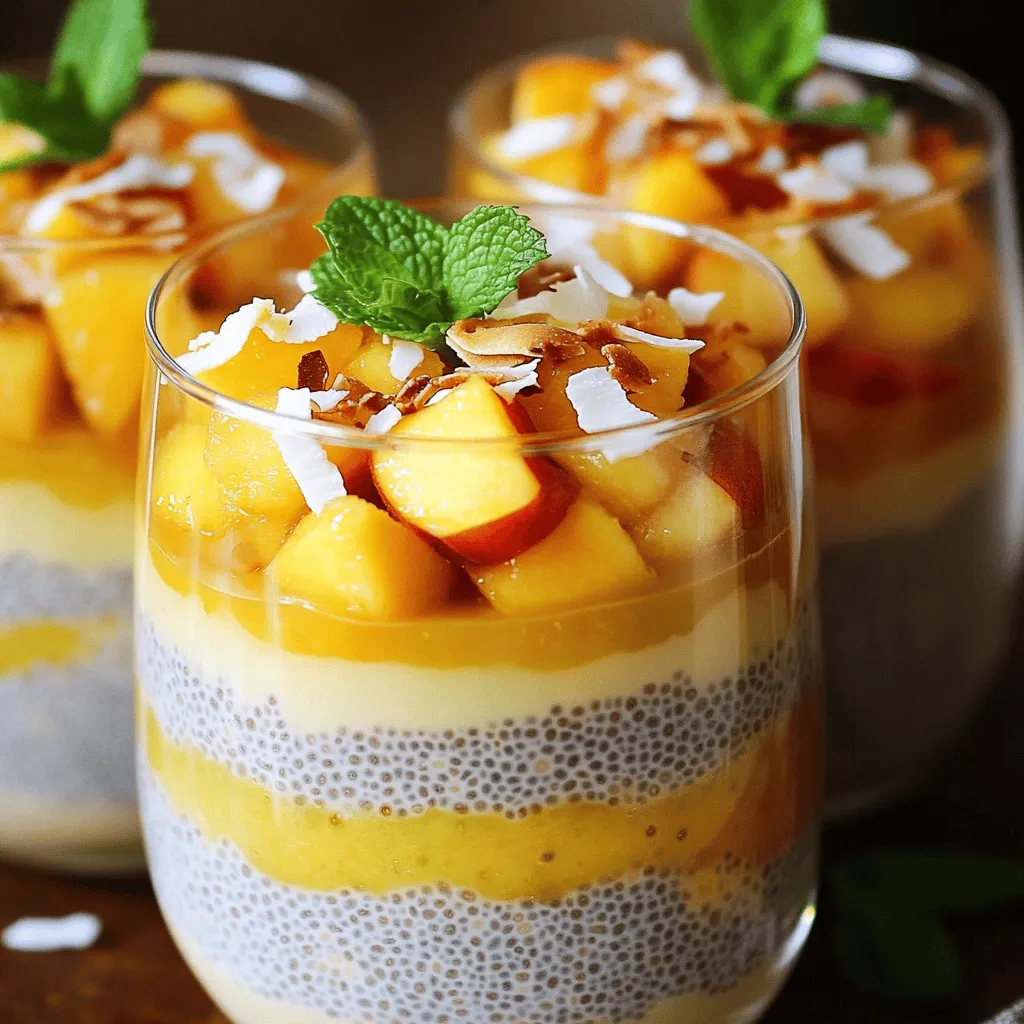
Looking for a healthy treat that’s also a delight for your taste buds? Look no further than this Peach Coconut

- 1 cup grated zucchini - 1 ½ cups all-purpose flour - ¾ cup brown sugar - ¼ cup granulated sugar - ½ cup unsalted butter - 1 large egg - 1 tsp vanilla extract - 1 tsp baking soda - ½ tsp baking powder - ½ tsp salt - 1 cup semi-sweet chocolate chips - ½ tsp ground cinnamon - ½ cup chopped walnuts - Mixing bowls - Baking sheets - Parchment paper - Cookie scoop or spoon I love these ingredients because they work together to create a tasty cookie. The grated zucchini adds moisture and a subtle flavor. It also gives the cookies a lovely texture. I like to use fresh zucchini, which makes a big difference. You get a nice, soft bite with each cookie. Brown sugar and granulated sugar blend well, giving the cookies a nice sweetness. The butter brings richness and helps them stay chewy. I always use unsalted butter so I can control the salt level. The egg keeps the dough together. The baking soda and baking powder help the cookies rise. They create a nice balance in texture. The semi-sweet chocolate chips add a touch of decadence. You can add walnuts for a nice crunch or sprinkle in some cinnamon for warmth. You’ll need basic kitchen tools like mixing bowls and baking sheets. Parchment paper helps prevent sticking, so I always keep some on hand. A cookie scoop or spoon makes it easy to portion the dough. For the full recipe, check out the details above. Happy baking! - Preheat the oven to 350°F (175°C). - Grate one medium zucchini and sprinkle it with a pinch of salt. Let it rest for 10 minutes. This step helps draw out moisture. After 10 minutes, squeeze the zucchini with a clean towel to remove extra liquid. - In a large bowl, cream together ½ cup of softened butter, ¾ cup of brown sugar, and ¼ cup of granulated sugar. Mix until it gets light and fluffy. - Beat in one large egg and 1 teaspoon of vanilla extract until everything is well combined. - In another bowl, whisk together 1 ½ cups of all-purpose flour, 1 teaspoon of baking soda, ½ teaspoon of baking powder, and ½ teaspoon of salt. - Gradually add the dry ingredients to the wet mixture. Mix until just combined. - Gently fold in the drained zucchini and 1 cup of semi-sweet chocolate chips. - Using a cookie scoop or spoon, drop rounded balls of dough onto two prepared baking sheets. Leave about 2 inches between each ball. - Bake the cookies in the oven for 10-12 minutes. They should be lightly golden at the edges. The cookies may seem a bit soft, but they will firm up as they cool. - Allow the cookies to cool on the baking sheets for about 5 minutes. Then, transfer them to a wire rack to cool completely. For the full recipe, check out the details above. Enjoy your chewy zucchini chocolate chip cookies! To make your cookies chewy, start by squeezing out excess moisture from the zucchini. After salting the grated zucchini, let it sit for ten minutes. This helps release water. Use a clean kitchen towel or paper towel to press the zucchini. It should feel dry but still have some moisture. This will keep your cookies from becoming too wet. For a chewy texture, don’t overmix the dough. Stir until the flour just combines with the wet ingredients. This keeps the cookies from becoming tough. Also, try using brown sugar. It adds moisture and helps create that desired chewiness. Baking time can change how your cookies turn out. For chewy cookies, bake them for about 10-12 minutes. They should look slightly underbaked when you take them out. The edges should be golden, and the centers soft. They will firm up as they cool. If you prefer crispy cookies, let them bake for a few extra minutes. Always check your oven's temperature. An oven thermometer is a good tool to ensure it heats correctly. This simple step helps avoid overbaking or underbaking. Want to add more flavor? Consider toppings like a sprinkle of sea salt or drizzling melted chocolate. Both give a nice contrast to the sweet cookie. You can also mix in nuts like walnuts for a crunchy bite. If you have leftover cookie dough, store it in an airtight container. Keep it in the fridge for up to a week. You can also freeze the dough. Just scoop it into balls, freeze them, and store them in a zip-top bag. This way, you can bake fresh cookies whenever you want! For the complete journey of making these treats, check out the Full Recipe. {{image_2}} You can easily switch ingredients for your Zucchini Chocolate Chip Cookies. For a gluten-free option, use gluten-free flour. This keeps the texture while making it safe for gluten-sensitive eaters. If you prefer natural sweetness, try coconut sugar or maple syrup instead of regular sugar. Both add a unique flavor. Get creative with your add-ins! You can try dark or white chocolate chips for a twist on flavor. Each type of chocolate brings its own taste. Dried fruits, like raisins or cranberries, also work well. If you want a heartier cookie, mix in some oats. This adds a chewy texture and boosts fiber. Want to amp up the flavor? Try adding spices like nutmeg or cardamom. These spices give warmth and depth to each bite. For a fresh and bright taste, add citrus zest, like lemon or orange. This will lighten the flavor and bring a fun twist to your cookies. For the full recipe, check out the Zesty Zucchini Chocolate Chip Cookies. To keep your Zucchini Chocolate Chip Cookies fresh, store them in an airtight container. This helps prevent them from drying out. You can also use a zip-top bag for easy storage. Make sure to let the cookies cool completely before placing them in the container. They can stay fresh for up to a week at room temperature. If you want them to last longer, consider refrigerating them. The cold will help maintain their softness but may change the texture slightly. If you want to enjoy these cookies later, freeze the dough. Scoop the cookie dough into balls and place them on a baking sheet. Freeze them for about two hours until solid. Then, transfer the frozen dough balls to a zip-top bag. You can keep them in the freezer for up to three months. When you're ready to bake, no need to thaw. Just bake straight from the freezer, adding a couple of extra minutes to the bake time. Baked cookies usually last about five to seven days when stored properly. Check for signs of spoilage, like an off smell or mold. If they start to feel hard or dry, they might not taste as good. Keeping an eye on them will ensure you enjoy every bite of your delicious treats. Follow the Full Recipe for best results! Yes, you can use frozen zucchini. Here are some pros and cons: - Pros: Frozen zucchini is convenient and saves prep time. It also lasts longer than fresh zucchini. - Cons: Frozen zucchini can release more water when cooked. This may make your cookies too moist. To avoid this, squeeze out as much water as you can after thawing. You can reduce sugar by using these tips: - Replace half of the brown sugar with unsweetened applesauce. - Use a natural sweetener like honey or maple syrup in smaller amounts. - Try reducing the overall sugar by 25% without losing flavor. Always taste the dough before baking to ensure it’s sweet enough for you. If you want a vegan option, here are some great substitutes: - Use 1 tablespoon of ground flaxseed mixed with 3 tablespoons of water. Let it sit for 5 minutes to thicken. - You can also use ¼ cup of unsweetened applesauce per egg. - Another option is ¼ cup of silken tofu blended until smooth. Cookies can be too moist for a few reasons: - You may have added too much zucchini without draining it well. - If you used the wrong flour type, it could lead to excess moisture. - Baking at too low a temperature can also result in wet cookies. Always check your oven temperature for accuracy. Yes, you can! Here are some tasty alternatives: - Use chopped nuts, like walnuts or pecans, for a crunchy texture. - Try dried fruits like cranberries or raisins for a sweet twist. - You can even add a mix of spices like cinnamon or nutmeg for added flavor. In summary, you learned how to make delicious zucchini cookies. We covered key ingredients, step-by-step instructions, and useful tips. You can enjoy variations to fit your taste. Remember to store cookies properly for freshness and think about ingredient swaps for healthy baking. This simple recipe welcomes creativity. Baking should be fun and rewarding. Try it out and enjoy your tasty treats!

Zucchini Chocolate Chip Cookies Chewy and Delicious Treat

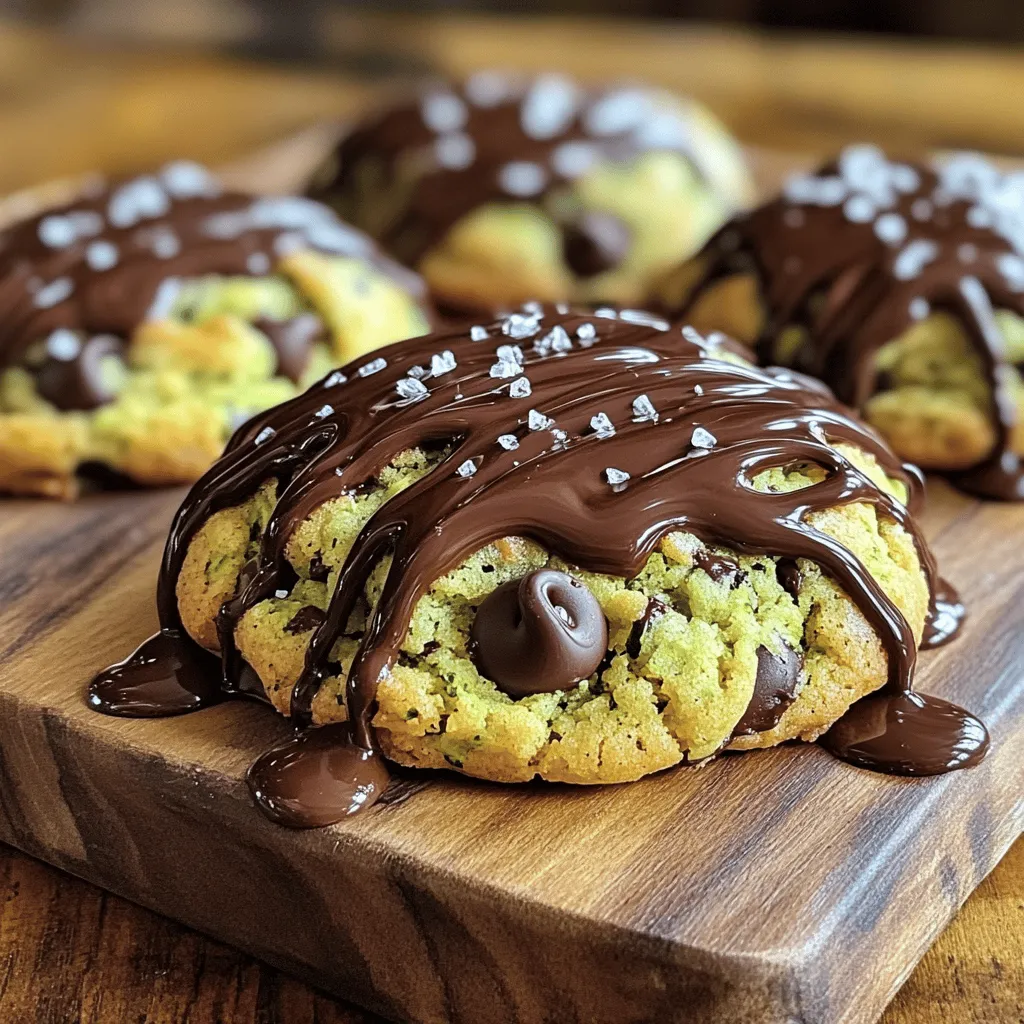
Are you ready to enjoy a delightful treat that combines health and indulgence? These Zucchini Chocolate Chip Cookies are not

To make mini lemon tarts, gather these simple ingredients: - 1 cup all-purpose flour - 1/4 cup powdered sugar - 1/2 cup unsalted butter, softened - 1/4 teaspoon salt - 1 large egg yolk - 1/4 cup granulated sugar - 2 large eggs - 1/2 cup fresh lemon juice (about 3 lemons) - 1 tablespoon lemon zest - 1/4 teaspoon baking powder - Fresh mint leaves (for garnish) - Whipped cream (optional, for serving) You can swap some ingredients if needed. For the all-purpose flour, use a gluten-free blend. Instead of unsalted butter, you can use coconut oil. If you want a lower sugar option, try a sugar substitute in the filling. For a richer flavor, you can use brown sugar instead of granulated sugar. Always adjust the amount to taste. Garnishing your mini lemon tarts makes them pop! Fresh mint leaves add a nice touch, both in flavor and look. You can also top them with whipped cream for added creaminess. Try adding some crushed berries or a sprinkle of powdered sugar for a sweet finish. These little touches make your tarts even more inviting. For the full recipe, check out the complete instructions above. To start, preheat your oven to 350°F (175°C). Next, grab a mini muffin tin and grease it with cooking spray or butter. In a bowl, mix together 1 cup of all-purpose flour, 1/4 cup of powdered sugar, and 1/4 teaspoon of salt. Then, add in 1/2 cup of softened unsalted butter. Mix until the blend looks like coarse crumbs. Stir in 1 large egg yolk until the dough holds together. If it's too crumbly, add a teaspoon of cold water. Now, press the dough into the bottom and sides of each cavity in the mini muffin tin. Make sure to prick the bottoms with a fork. This helps keep the shells from puffing up. Bake the tart shells for 12-15 minutes until they turn lightly golden. Once done, let them cool in the tin for about 10 minutes before moving them to a wire rack. In a separate mixing bowl, whisk together 1/4 cup of granulated sugar, 2 large eggs, 1/2 cup of fresh lemon juice (that’s about 3 lemons), 1 tablespoon of lemon zest, and 1/4 teaspoon of baking powder. Mix until all the ingredients blend well. The filling should be smooth and bright. Pour the lemon filling into each tart shell, filling them about three-quarters full. Be careful not to overfill, as the filling may spill while baking. Now, return the tarts to the oven and bake for another 15-20 minutes. You’ll know they are done when the filling feels set and slightly firm to the touch. After baking, remove the tarts and let them cool completely. When ready to serve, garnish with fresh mint leaves and a dollop of whipped cream if you like. These mini lemon tarts are a delight and easy to make! For the full recipe, check out the details above. To avoid soggy bottoms in your mini lemon tarts, you should pre-bake the crust. This step helps set the dough before adding the filling. Pricking the bottoms with a fork also helps. It allows steam to escape. Bake the shells until they are lightly golden for the best results. For a filling that sets well, use fresh lemon juice and eggs. These two ingredients create a nice balance of tartness and richness. Make sure to whisk the mixture until smooth to prevent lumps. Pour the filling gently into the shells, filling them three-quarters full. This gives the filling room to rise slightly while baking. After baking, let the tarts cool in the tin for about 10 minutes. This helps them hold their shape. Then, transfer them to a wire rack to cool completely. Serve them chilled or at room temperature. Garnish with fresh mint leaves and whipped cream for a tasty touch. You can find the Full Recipe for more detailed instructions. {{image_2}} You can switch up the flavor of your mini tarts. Use lime or orange instead of lemon. Lime gives a tangy twist, while orange adds a sweet zest. To make lime tarts, use fresh lime juice and zest in the filling. For orange tarts, do the same with orange juice and zest. The method stays the same, and you will have new flavors to enjoy! If you need a gluten-free option, it's easy to adapt. Use gluten-free flour instead of all-purpose flour. There are many good brands available. The taste will be just as good, and your guests won't even notice! Follow the same steps in the recipe. You can still have a delicious dessert that everyone can enjoy. For an extra special treat, add a meringue topping. Make meringue with egg whites and sugar. Whip the egg whites until stiff peaks form. Spread the meringue on top of your cooled tarts. Then, use a kitchen torch to lightly brown the meringue. This adds a nice look and a sweet finish. Your mini lemon tarts will taste amazing with this added layer! For the full recipe, check out the details above. To keep your mini lemon tarts fresh, place them in an airtight container. Make sure they are completely cool before sealing. This helps keep the crust crisp and the filling smooth. You can store them in the fridge for up to three days. If you want to enjoy them later, freezing is a great option. You can freeze mini lemon tarts for longer storage. First, let them cool completely. Then, wrap each tart in plastic wrap. Place the wrapped tarts in a freezer-safe container or bag. They can last up to three months in the freezer. When you're ready to eat them, thaw them in the fridge overnight before serving. Mini lemon tarts stay fresh for about three days in the fridge. If you freeze them, they can last for three months. To reheat, place them in a preheated oven at 350°F (175°C) for about 10 minutes. This warms the filling and helps restore some crispness to the crust. Enjoy your tarts warm for the best taste! For the full recipe, check out [Full Recipe]. Yes, you can make these tarts ahead of time. I recommend baking the tart shells and filling them the day before. Store the baked shells in an airtight container. Keep the filling in the fridge. When you are ready to serve, just pour the filling into the shells. Bake them again to warm up the filling. Serve these mini lemon tarts chilled or at room temperature. A little whipped cream on top adds a nice touch. Fresh mint leaves make a great garnish too. You can also serve them with a slice of lemon for a pop of color. You can find pre-made mini lemon tarts at many grocery stores. Look in the dessert section or the bakery. Some bakeries also sell them fresh. Check online for local shops that might carry them. If you want a quick treat, this is an easy option! For the complete recipe, check out the Full Recipe section. You learned about the ingredients, tips, and steps to make mini lemon tarts. We explored variations for different tastes and how to store them. Remember, making these tarts is fun and rewarding. Use fresh ingredients for the best flavor. Try the meringue topping for a special touch. I hope you feel ready to bake! Enjoy sharing your tasty mini lemon tarts with friends and family.

Mini Lemon Tarts Delicious and Easy Dessert Recipe

If you love a sweet and tangy treat, you’re in for a delight! Mini lemon tarts are the perfect dessert

Older posts
Newer posts
← Previous Page1 … Page44 Page45 Page46 … Page90 Next →

dsad

© 2025 So Yum Recipes • Built with GeneratePress

Our Policies

  • Copyright Policy
  • Cookie Policy
  • GDPR Policy
  • Privacy Policy
  • Disclaimer
  • Terms Of Use

More Information

  • Home
  • About
  • Contact
  • Appetizers
  • Dessert
  • Dinner
  • Drinks
©2025, So Yum Recipes About Back To Top