Skip to content
DisclaimerTerms Of UseGDPR PolicyCookie Policy

So Yum Recipes

  • Home
  • Drinks
  • Appetizers
  • Dinner
  • Dessert
  • About
  • Contact
  • Privacy Policy
DisclaimerTerms Of UseGDPR PolicyCookie Policy

Chloe

When making a Healthy Chicken Caesar Salad, gather these simple ingredients. They bring the dish to life and keep it fresh. - 2 boneless, skinless chicken breasts - 1 tablespoon olive oil - Salt and pepper to taste - 6 cups romaine lettuce, chopped - 1 cup cherry tomatoes, halved - 1/4 cup grated Parmesan cheese (or nutritional yeast for a vegan option) - 1/4 cup whole grain croutons (store-bought or homemade) - 1/4 cup Greek yogurt - 2 tablespoons lemon juice - 1 tablespoon Dijon mustard - 1 clove garlic, minced - Fresh parsley for garnish These ingredients make your salad tasty and nutritious. The chicken adds protein, while the romaine lettuce and tomatoes provide crunch and freshness. The dressing, made from Greek yogurt, lemon juice, and mustard, gives a creamy touch without too many calories. You can switch Parmesan cheese with nutritional yeast if you prefer a vegan option. Feel free to adjust the salt and pepper to your taste. Adding croutons gives a nice crunch. This mix of flavors will make your Healthy Chicken Caesar Salad shine. For the complete recipe, check out the Full Recipe section above. 1. Preheat your grill or grill pan. Set it to medium-high heat. This helps the chicken cook evenly. 2. Season and grill the chicken. Brush the chicken breasts with olive oil. Add salt and pepper to taste. Grill the chicken for 6-7 minutes on each side. Look for clear juices to know they’re done. 3. Let the chicken rest before slicing. Take the chicken off the grill. Let it sit for about 5 minutes. This helps keep the meat juicy when you slice it. 1. Combine romaine lettuce and cherry tomatoes. In a big salad bowl, add the chopped romaine. Toss in the halved cherry tomatoes for a burst of flavor. 2. Make the dressing with Greek yogurt and seasonings. In a small bowl, mix Greek yogurt, lemon juice, Dijon mustard, minced garlic, salt, and pepper. Whisk until smooth and creamy. 3. Toss salad and add toppings. Pour the dressing over the salad. Gently toss to coat the lettuce and tomatoes. Add the grilled chicken strips, grated Parmesan cheese, and croutons on top. For the complete process, don’t forget to check the Full Recipe! Enjoy your Healthy Chicken Caesar Salad! - Always check that chicken reaches 165°F for safe eating. - Slice chicken against the grain for tender strips. When cooking chicken, a meat thermometer is your best friend. Insert it into the thickest part of the breast. This will help ensure it is fully cooked. Let the chicken rest for 5 minutes before slicing. This keeps the juices in. For serving, cut the chicken into strips. This makes it easier to mix into the salad. - Use Greek yogurt instead of mayo for a healthy twist. - Adjust the lemon juice and mustard to fit your taste. Dressing can make or break your salad. For a lighter Caesar dressing, I use Greek yogurt. It adds creaminess without too many calories. You can also swap in nutritional yeast for a cheesy flavor. If you want more zing, add extra lemon juice. A splash of Worcestershire sauce can also boost the flavor. Taste as you go to find what you like best. Check out the Full Recipe for more ideas. {{image_2}} You can easily change this salad to fit your diet. If you want a vegan option for chicken, try using grilled tofu or tempeh. Both options have a great texture. They soak up flavors well and add protein. For croutons, look for gluten-free options. You can also make your own with gluten-free bread. Just cube the bread and toast it in the oven. Adding more vegetables makes the salad even better. Cucumbers add a nice crunch, while bell peppers bring a sweet taste. You can mix in cherry peppers or radishes for extra flavor. If you want more protein, try adding chickpeas. They are tasty and fill you up. Another great choice is to use quinoa. It gives a nice texture and boosts nutrition. You can find all these ideas in the Full Recipe. To keep your Healthy Chicken Caesar Salad fresh, store the salad and dressing separately. This way, the greens stay crisp. Use an airtight container for the salad. Place the dressing in a small jar. This helps prevent sogginess. You can keep the salad in the fridge for up to three days. The dressing lasts about a week. For the best storage, make sure everything is cool before sealing. Avoid adding croutons until serving. They add crunch and stay fresh this way. Meal prep can save you time and keep your salad fresh. Start by cooking the chicken in advance. You can grill it and store it in the fridge. Slice it right before you serve. Chop the romaine and tomatoes ahead of time, too. Keep them in separate containers. On the day you want to eat, just assemble everything. Drizzle the dressing over the salad and toss it well. This keeps the flavors bright and fresh. For the full recipe, check out the complete guide. How to make a lower-calorie dressing? To make a lower-calorie dressing, replace Greek yogurt with a lower-fat option. You can also use less oil and add more lemon juice. This keeps the flavor but cuts down on calories. Can I use pre-cooked chicken? Yes, you can use pre-cooked chicken for this salad. It saves time and still tastes great. Just make sure it is shredded or chopped into bite-sized pieces for easy mixing. Is this salad suitable for meal prep? This salad is great for meal prep! You can store the salad and dressing separately. Keep the chicken, lettuce, and toppings fresh until you are ready to eat. What are the health benefits of this salad? This salad is packed with nutrients. Chicken provides lean protein. Romaine lettuce is rich in vitamins A and K. Tomatoes add antioxidants. Together, they make a balanced meal that helps keep you full. How can I reduce sodium in the recipe? To reduce sodium, use less salt when cooking the chicken. You can also choose low-sodium croutons and skip added salt in the dressing. This makes the salad heart-friendly without losing flavor. This blog post covered a tasty salad with grilled chicken and a healthy dressing. We explained the key ingredients, step-by-step instructions, and helpful tips. You learned ways to customize the salad and store leftovers. Remember, you can adjust flavors to fit your taste. This recipe offers a fresh option for meals. Enjoy experimenting until you find your perfect version.

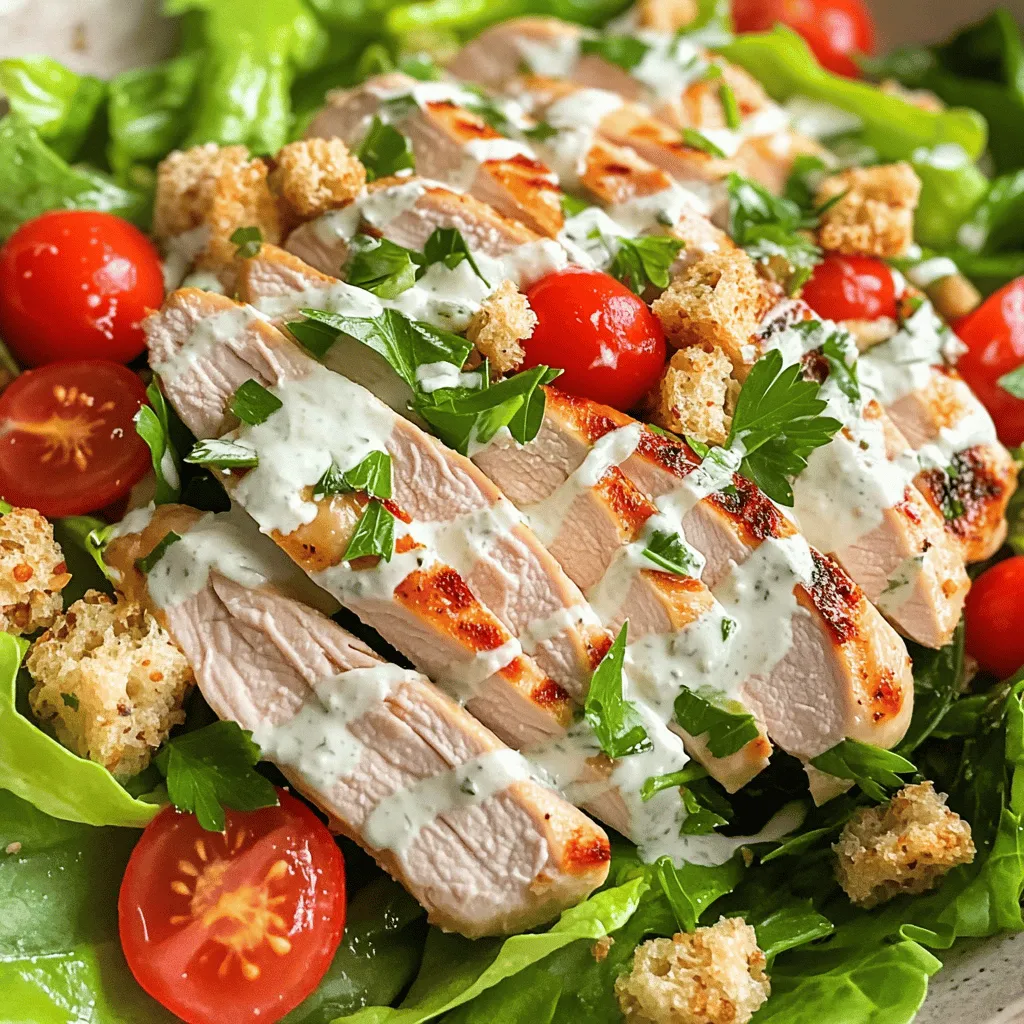
Healthy Chicken Caesar Salad Flavorful and Fresh Meal

Craving a meal that’s both tasty and healthy? You’re in the right place! This Healthy Chicken Caesar Salad packs flavor

To make this creamy spinach artichoke dip, you will need: - 1 cup fresh spinach, chopped - 1 cup canned artichoke hearts, drained and chopped - 1 cup cream cheese, softened - 1/2 cup sour cream - 1/2 cup mayonnaise - 1 cup shredded mozzarella cheese - 1/2 cup grated Parmesan cheese - 2 cloves garlic, minced - 1/2 teaspoon onion powder - 1/2 teaspoon crushed red pepper flakes (optional) - Salt and pepper to taste - Tortilla chips or sliced baguette for serving Measuring ingredients correctly helps your dip taste great. Use dry measuring cups for solids and liquid measuring cups for liquids. If you do not have fresh spinach, you can use frozen spinach. Just make sure to thaw and drain it well before using. For a lighter dip, you can swap sour cream with Greek yogurt. You can also replace mayonnaise with a low-fat version if you prefer. Using fresh ingredients can enhance the flavor of your dip. Fresh spinach adds a vibrant taste and color. Canned artichoke hearts save time and are easy to find. They still offer great flavor and texture. When using fresh items, remember they may change cooking times slightly. Fresh garlic gives a stronger taste compared to jarred garlic. Both options work but fresh is often best for flavor. To start, preheat your oven to 375°F (190°C). This step helps the dip cook evenly. In a large bowl, mix the softened cream cheese, sour cream, and mayonnaise together. Stir until the mix is smooth and creamy. Next, add in the chopped spinach and artichoke hearts. Don’t forget to include the minced garlic, shredded mozzarella, and grated Parmesan cheese. These ingredients bring great flavor! Season the mix with onion powder and crushed red pepper flakes if you like a little heat. Add salt and pepper to taste. Make sure to combine everything well. You want all those delicious flavors to mingle. Once mixed, transfer the dip to a baking dish, spreading it out evenly. Now it’s time to bake! Place the dip in your preheated oven and let it cook for about 25-30 minutes. Keep an eye on it. You want the dip to be bubbly and have a golden top. This gives it that perfect finish you see at parties. Once it’s done baking, carefully remove it from the oven. Let it cool for a few minutes. This step makes it easier to serve and eat. When serving, I love to keep it simple yet elegant. Serve the warm dip in the baking dish or transfer it to a pretty bowl. Garnish it with a sprinkle of extra Parmesan and a few crushed red pepper flakes for color. It looks great! Pair the dip with crispy tortilla chips or slices of toasted baguette. These options are perfect for dipping. Enjoy this creamy spinach artichoke dip at your next gathering or as a tasty snack. For the full recipe, check out the details above. To make your dip extra creamy, use full-fat cream cheese. This gives a rich base. You can also mix in some heavy cream if you want more creaminess. Another tip is to blend the cream cheese well before adding other ingredients. This makes it smoother. You can adjust the flavors based on your taste. If you like garlic, add more minced garlic. For a spicy kick, toss in some jalapeños or more crushed red pepper flakes. For a tangy twist, add a squeeze of fresh lemon juice. Don’t forget to taste as you go. One common mistake is overbaking the dip. Watch it closely to avoid burning the top. Another error is not mixing well. If the cheeses and veggies are not mixed right, you may get uneven flavors. Lastly, skip the salt until the end. This helps you control the taste better. For the full recipe, check out the details above. {{image_2}} You can add jalapeños for a spicy kick. Chop 1-2 fresh jalapeños and mix them into the dip. This gives a nice heat that pairs well with the creamy texture. You can adjust the number of jalapeños based on your spice preference. For milder heat, remove the seeds. This spicy twist makes a great party dip. To make a vegan version, swap dairy for plant-based options. Use vegan cream cheese instead of regular cream cheese. You can also use cashew cream for a rich texture. Replace sour cream and mayonnaise with dairy-free yogurt. This way, you keep the creamy taste while being plant-based. Everyone can enjoy this tasty dip! Cheese adds depth to the dip. You can mix different cheeses for added flavor. Try using sharp cheddar or pepper jack cheese to change the taste. If you want a smoky flavor, add some smoked gouda. Feel free to experiment and find your favorite combo. Each cheese brings its own unique twist to the dish. For the full recipe, check out the Cheesy Spinach Artichoke Delight! Store any leftover dip in an airtight container. This keeps it fresh. Place it in the fridge. It will last for about three to four days. Make sure to cool it down first before sealing. If you have more than you can eat, consider freezing part of it. To reheat, use an oven or microwave. If using an oven, preheat to 350°F (175°C). Transfer the dip to a baking dish. Cover it with foil to keep moisture in. Heat for about 15-20 minutes or until warm. If using the microwave, heat in short bursts. Stir in between to avoid hot spots. You can freeze the dip for later use. Place it in a freezer-safe container. Make sure to leave space at the top. The dip expands when frozen. It can last up to three months in the freezer. To use it, thaw overnight in the fridge before reheating. For the best taste, eat it within a month after thawing. You can find the full recipe for creamy spinach artichoke dip at the beginning of the article. You can serve creamy spinach artichoke dip with many tasty options. Tortilla chips are a classic choice. They add a nice crunch. Sliced baguette works well too. You can toast the slices for extra flavor. Fresh veggies like carrots or celery are great for dipping. You can even use crackers for a fun twist. Pair it with a nice drink, and you’re all set! Yes, you can make creamy spinach artichoke dip ahead of time. Just prepare the dip and place it in a baking dish. Cover it well and store it in the fridge. This way, you can enjoy it later. When you are ready, just bake it. This makes it perfect for parties or gatherings. To reheat spinach artichoke dip, preheat your oven to 350°F (175°C). Place the dip in the oven for about 15-20 minutes. You want it to be hot and bubbly. If you are in a hurry, you can use the microwave. Heat it in 30-second bursts, stirring in between. Keep an eye on it so it doesn’t get too hot. Enjoy it warm for the best taste! We discussed every detail of making creamy spinach artichoke dip. You learned about essential ingredients, how to prepare them, and baking tips for the perfect dip. I shared ideas for variations and how to store leftovers. Remember, creativity and careful prep can elevate your dish. Use my tips to avoid common mistakes and make your dip a hit every time. Enjoy sharing this tasty treat at your next gathering!

Creamy Spinach Artichoke Dip Flavorful and Easy Recipe

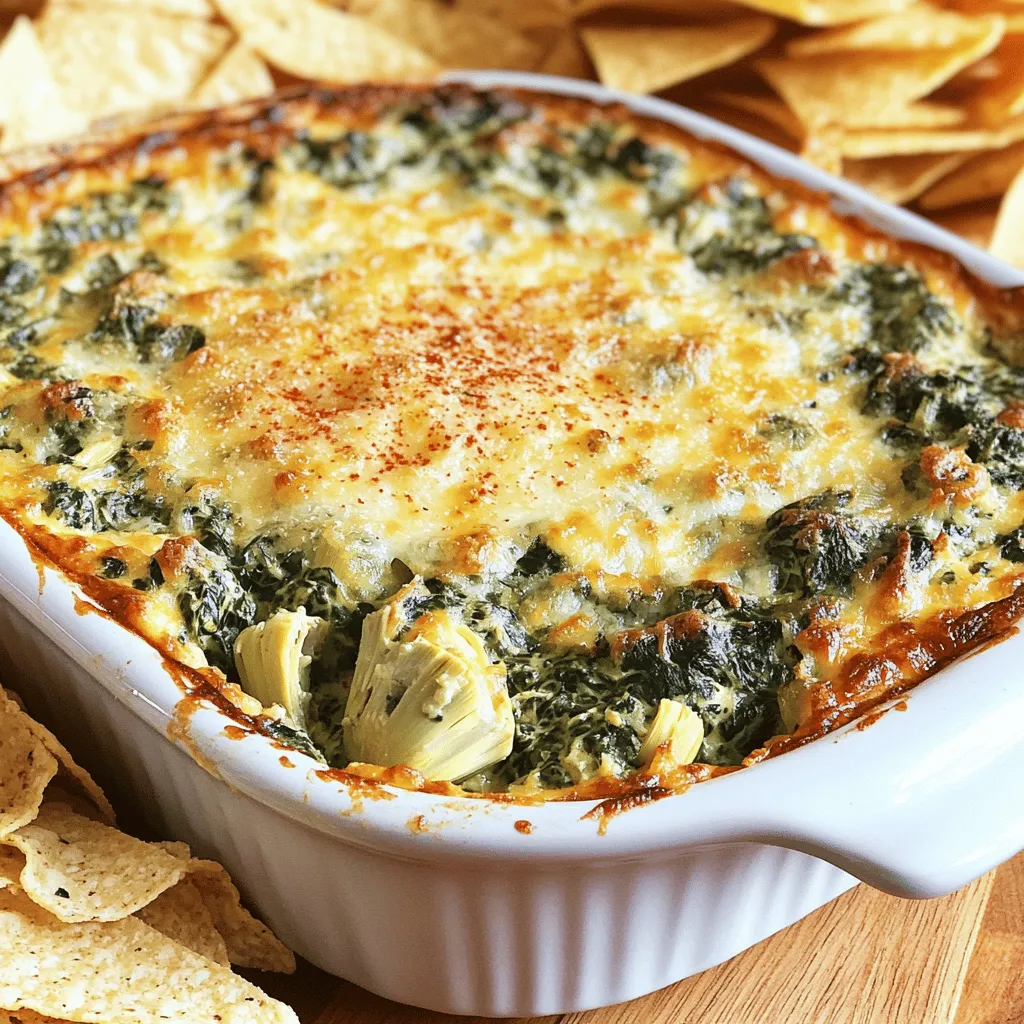
Are you ready to elevate your snack game? This Creamy Spinach Artichoke Dip is not just flavorful; it’s also easy

To make this dish, you need fresh and simple ingredients. Here’s what you’ll need: - 4 salmon fillets - 3 tablespoons olive oil - 4 cloves garlic, minced - 1 lemon, zested and juiced - 1 teaspoon dried oregano - 1 teaspoon salt - ½ teaspoon black pepper These ingredients work together to create a bright and tasty flavor. The salmon gives you protein, while the garlic adds zest. The lemon juice and zest give a fresh kick that makes this dish shine. While the salmon is delicious on its own, some garnishes can make it even better. Here are a few ideas: - Fresh parsley, chopped - Lemon slices for serving Adding fresh parsley gives color and flavor. Lemon slices add a nice touch when serving. You can also squeeze extra lemon on the dish for more zesty goodness. Having the right tools can make cooking easier. Here’s what I recommend using: - Baking sheet - Parchment paper - Mixing bowl - Brush for the marinade Using a baking sheet lined with parchment paper helps with easy cleanup. A mixing bowl is perfect for combining the marinade. A brush makes it easy to coat the salmon evenly. For the full recipe, check out the [Full Recipe]. First, gather your ingredients. You will need: - 4 salmon fillets - 3 tablespoons olive oil - 4 cloves garlic, minced - 1 lemon, zested and juiced - 1 teaspoon dried oregano - 1 teaspoon salt - ½ teaspoon black pepper - Fresh parsley, chopped (for garnish) - Lemon slices (for serving) Now, preheat your oven to 400°F (200°C). Line a baking sheet with parchment paper. In a small bowl, mix the olive oil, minced garlic, lemon zest, lemon juice, oregano, salt, and pepper. This is your marinade. Place the salmon fillets on the baking sheet. Brush the marinade over each fillet. Let the salmon sit for 10-15 minutes to soak up the flavors. For perfect salmon, check the thickness. A thicker fillet needs a longer cooking time. Bake the salmon for 12-15 minutes. It is done when it flakes easily with a fork. If you want crispy skin, place the salmon skin-side down. Use a meat thermometer if you have one. The internal temperature should reach 145°F (63°C). After baking, let the salmon rest for a few minutes. This helps the juices redistribute. Garnish with fresh parsley and serve with lemon slices. You can also drizzle any leftover marinade over the top. For a colorful plate, serve the salmon on a bed of sautéed spinach or with steamed asparagus. For the full recipe, check [Full Recipe]. Marinating salmon is key for flavor. Use olive oil, garlic, lemon zest, and juice. Mix these well in a bowl. Brush this mix on the salmon fillets. Let them sit for 10-15 minutes. This short wait makes a big difference. It helps the fish soak up the good taste. To boost the flavor, add fresh herbs like thyme or dill. A splash of white wine adds a lovely twist too. You can also sprinkle some chili flakes for heat. If you want a sweet note, try a bit of honey. Each option can make your dish unique. Cooking time depends on how thick your salmon is. For thinner fillets, bake for 10-12 minutes. For thicker cuts, aim for around 15 minutes. Check the salmon; it should flake easily with a fork. This way, you get perfectly cooked salmon every time. For the full recipe, click here: [Full Recipe]. {{image_2}} You can play with the flavors of your lemon garlic salmon. Try using different herbs like dill or thyme. You can also swap out olive oil for avocado oil for a richer taste. If you want a spicy kick, add red pepper flakes to the marinade. For a sweet touch, mix in some honey or maple syrup. This allows you to create a unique dish each time. Both grilling and baking work well for this recipe. Grilling gives the salmon a smoky flavor. It also creates nice grill marks, which look great on the plate. Baking is simple and keeps the salmon moist. For grilling, preheat your grill and cook the salmon for about 6-8 minutes per side. For baking, follow the steps in the full recipe for easy preparation. Each method has its perks, so try both to see what you like best! This salmon pairs well with many sides. Consider serving it with a fresh salad or steamed veggies. Roasted potatoes or quinoa make great sides too. For a light touch, serve it with lemon wedges and a sprinkle of fresh parsley. You can also add a creamy sauce, like tzatziki, to enhance the flavors. These options will make your meal colorful and tasty. To keep your leftover lemon garlic salmon fresh, let it cool first. Use an airtight container to store it in the fridge. This helps keep the salmon moist. It will last up to three days this way. If you want to keep it longer, freezing is a great option. When reheating, I suggest using the oven. Preheat it to 350°F (175°C). Place the salmon on a baking sheet. Cover it with foil to keep moisture in. Heat for about 10-15 minutes. This helps the salmon stay tender and tasty. You can also microwave it, but be careful. Heat in short intervals to avoid overcooking. To freeze your lemon garlic salmon, wrap each fillet tightly in plastic wrap. Then, place them in a freezer bag. Remove as much air as you can. This prevents freezer burn. You can freeze the salmon for up to three months. When ready to eat, thaw it in the fridge overnight. This keeps the flavor and texture nice. For the full recipe, check out the previous section. Yes, you can use frozen salmon fillets for this recipe. Make sure to thaw them first. You can do this by placing the fillets in the fridge overnight. If you're in a hurry, submerge them in cold water for quicker thawing. Once thawed, follow the same steps as fresh salmon. The flavor will still be great! Salmon is a superfood packed with nutrients. It is rich in omega-3 fatty acids, which help heart health. Omega-3s also support brain function and reduce inflammation. Salmon is high in protein, helping build and repair muscle. Plus, it provides vitamins like B12 and D, which are important for energy and bone health. You can tell when salmon is properly cooked by checking its color and texture. Cooked salmon should be opaque and flake easily with a fork. The internal temperature should reach 145°F (63°C). If you don’t have a thermometer, just look for that nice, flaky texture. It’s an easy way to check without any tools! Yes, you can make this recipe without garlic. If you don't like garlic or have an allergy, just leave it out. You can replace it with other herbs like dill or basil for flavor. The lemon and olive oil will still give you a tasty dish. Feel free to experiment and find what you love! We covered how to make a quick lemon garlic salmon that shines with flavor. You now know the key ingredients, cooking steps, and tips for the best results. Remember to experiment with variations for unique meals. Store any leftovers properly or freeze them for later. Enjoy the health benefits of salmon and feel confident cooking it. You have all the tools to impress your family and friends with this tasty dish!

Quick Lemon Garlic Salmon Healthy and Simple Recipe

Are you ready to make a meal that’s both quick and healthy? This Quick Lemon Garlic Salmon recipe packs a

- 1 lb shrimp, peeled and deveined - 2 tablespoons olive oil - 1 teaspoon chili powder - 1/2 teaspoon cumin - 1/4 teaspoon garlic powder - Salt and pepper to taste - 1 cup shredded cabbage - 1 ripe avocado, sliced - 1/4 cup fresh cilantro, chopped - 1 lime, cut into wedges - Optional: hot sauce for serving - 8 small corn tortillas Gather these ingredients for easy shrimp tacos. Fresh shrimp gives the best flavor. The olive oil helps the spices stick to the shrimp. Chili powder adds a warm kick. Cumin and garlic powder deepen the taste. Use salt and pepper to enhance all the flavors. Shredded cabbage adds crunch. Sliced avocado brings creaminess. Fresh cilantro adds a pop of color and taste. Lime wedges brighten each bite. Hot sauce can add heat, if you like. With all these items, you can create a delicious meal in no time. Check out the Full Recipe for more guidance on how to cook these shrimp tacos perfectly! - Combine shrimp and seasonings in a bowl. - Toss until well-coated. Start by taking your shrimp and placing them in a large bowl. Add the olive oil, chili powder, cumin, garlic powder, salt, and pepper. These spices will give your shrimp a great flavor. Toss everything together until the shrimp is covered in the spices. This step is crucial! It ensures each shrimp is full of taste. - Heat skillet over medium-high heat. - Cook shrimp for 2-3 minutes on each side until pink. Next, heat a non-stick skillet over medium-high heat. This temperature is perfect for cooking shrimp quickly. Once the skillet is hot, add the shrimp in a single layer. Let them cook for about 2-3 minutes on each side. You’ll know they are done when they turn pink and opaque. Be careful not to overcook them; they can become tough. - Warm corn tortillas. - Layer ingredients in each tortilla (cabbage, shrimp, avocado, cilantro). While the shrimp cooks, warm your corn tortillas. You can do this in another pan or even in the microwave. Once they are warm and soft, it’s time to assemble your tacos. Start by placing a handful of shredded cabbage on each tortilla. Next, add the shrimp on top of the cabbage. Finish with slices of avocado and a sprinkle of fresh cilantro. Each bite will be a burst of flavor. Enjoy your Easy Shrimp Tacos! For the full recipe, check the section above. To cook shrimp well, heat your skillet to medium-high. This temperature ensures a quick cook, keeping your shrimp juicy. Cook the shrimp for about 2-3 minutes on each side. Look for a bright pink color and a firm texture. This means they are perfect. If you cook them too long, they will turn rubbery. Trust me, nobody wants that! Want to jazz up your shrimp? Try adding spices like paprika or cayenne for a kick. You can also marinate your shrimp in lime juice for a fresh twist. For sauces, a simple mix of sour cream and lime juice works wonders. You might also like a drizzle of spicy mayo or a zesty salsa. They add extra flavor that makes every bite exciting. If you're short on time, use pre-cooked shrimp. They save you cooking time and still taste great. Also, prep your ingredients in advance. Chop your cabbage, slice your avocado, and measure your spices ahead of time. This way, you can focus on cooking when you're ready to eat. The Full Recipe is simple and quick, making meal prep a breeze! {{image_2}} For grilled shrimp tacos, start by marinating shrimp. Use olive oil, chili powder, and cumin for flavor. Here’s how to grill shrimp: 1. Preheat your grill to medium-high heat. 2. Thread shrimp onto skewers for easy handling. 3. Grill for 2-3 minutes on each side until they turn pink and firm. Grilling gives shrimp a nice smoky taste. You can add lime juice for extra zing. If you prefer fried shrimp tacos, you will want to use a frying method. Here’s how to fry shrimp: 1. Heat oil in a deep pan to 350°F. 2. Dredge shrimp in seasoned flour or breadcrumbs. 3. Fry shrimp for about 2-3 minutes or until golden brown. Use vegetable oil or canola oil for frying. It gives a crispy texture that everyone loves. You can switch up the shrimp for other proteins. Fish, like tilapia or cod, works great. Chicken also makes a tasty taco filling. For a vegetarian option, try black beans or grilled veggies. These options keep the meal fresh and fun. Feel free to explore the Full Recipe for more ideas! To keep your shrimp fresh, store them in an airtight container. This helps keep moisture out. Use glass or plastic containers with tight lids. If you have extra tortillas, wrap them in foil or plastic wrap. Leftovers can last in the fridge for about 2 days. After that, the shrimp may lose their taste and texture. When reheating shrimp, do it gently. Use a skillet over low heat. This keeps the shrimp moist. Heat for about 2 minutes on each side until warm. For tortillas, warm them in a dry skillet for 30 seconds. This way, they stay soft and flexible. To freeze shrimp tacos, wrap each taco tightly in plastic wrap. Then place them in a freezer bag. Make sure to squeeze out all the air. They can stay in the freezer for up to 3 months. When you want to eat them, thaw in the fridge overnight. Reheat as described above for best results. Enjoy your meal from the freezer! The best shrimp for tacos are medium to large shrimp. They have a firm texture and hold up well in tacos. Look for shrimp that are peeled and deveined. Fresh shrimp will taste better, but frozen shrimp work too. I often use shrimp that are 21-25 count per pound. This size offers a good bite and flavor in each taco. Yes, you can use frozen shrimp for these tacos. Just make sure to thaw them first. To thaw, place the shrimp in cold water for about 15 minutes. Drain them well and pat them dry with a paper towel. This helps the seasoning stick better. Using frozen shrimp makes this dish quick and easy. Shrimp tacos are great with many toppings. Here are some tasty options: - Shredded cabbage for crunch - Sliced avocado for creaminess - Chopped cilantro for freshness - A squeeze of lime for brightness - Hot sauce for heat You can mix and match these toppings to fit your taste. Each adds flavor and color to your tacos. For a fun twist, try adding pineapple salsa or pickled onions. This blog post covered how to make shrimp tacos, from selecting ingredients to cooking shrimp. I shared tips for flavor, optimal techniques, and tasty variations. Making these tacos is simple and fun. Whether grilled, fried, or using different proteins, you can customize them to your taste. Store and reheat them easily for quick meals. Enjoy your cooking and share these delicious tacos with friends and family!

Easy Shrimp Tacos Flavorful and Quick Dinner Recipe

Are you craving a quick and tasty meal? These easy shrimp tacos are the answer! In just a few steps,

- 1 lb ground chicken - 1 tablespoon olive oil - 1 small onion, finely chopped - 2 cloves garlic, minced - 1 tablespoon chili powder - 1 teaspoon cumin - 1 teaspoon smoked paprika - ½ teaspoon salt - ½ teaspoon black pepper - 1 cup cherry tomatoes, halved - 1 cup corn kernels (fresh or canned) - 1 avocado, diced - 1 lime, juiced - 1 head of iceberg or butter lettuce, leaves separated - Fresh cilantro, chopped (for garnish) - Salsa (for serving) For this tasty dish, I use fresh ground chicken as the main protein. It cooks quickly and absorbs flavors well. I always start with a tablespoon of olive oil. This helps to sauté the onion and garlic, giving your dish a strong base flavor. Next, I add spices. Chili powder brings heat, while cumin and smoked paprika add depth. Don’t forget salt and black pepper to balance everything. Fresh ingredients make this recipe pop. I use cherry tomatoes and corn for sweetness. Diced avocado adds creaminess. A squeeze of lime juice brightens the flavors. Finally, I choose iceberg or butter lettuce for the wraps. Their crisp leaves hold the filling well. I also garnish with fresh cilantro and serve with salsa on the side for extra zest. You can find the full recipe in the article. 1. Heat 1 tablespoon of olive oil in a large skillet over medium heat. 2. Add 1 small chopped onion and sauté it for about 3-4 minutes until it turns soft. 3. Stir in 2 cloves of minced garlic and cook for 1 more minute until you smell that great aroma. 4. Now, add 1 pound of ground chicken to the skillet. Break it apart with a wooden spoon. Cook it for about 6-8 minutes. You want it all browned and cooked through. 5. Sprinkle in 1 tablespoon of chili powder, 1 teaspoon of cumin, 1 teaspoon of smoked paprika, ½ teaspoon of salt, and ½ teaspoon of black pepper. Mix well to coat the chicken in spices. 1. Next, stir in 1 cup of halved cherry tomatoes and 1 cup of corn kernels. Cook this for another 2-3 minutes until the tomatoes soften up. 2. Remove the skillet from the heat. Drizzle the chicken mixture with the juice of 1 lime. Toss it gently to combine all the flavors. 1. Grab a clean lettuce leaf from your head of iceberg or butter lettuce. This will be your wrap. 2. Scoop a generous amount of the chicken mixture into the center of the leaf. 3. Top it with diced avocado and a sprinkle of fresh chopped cilantro. 4. Serve your wraps with salsa on the side for that extra kick of flavor. For the complete recipe, be sure to check the [Full Recipe]. Use fresh ingredients for the best flavor. Fresh ground chicken makes a big difference. I always choose ripe tomatoes and sweet corn. These ingredients enhance the taste of your dish. Spice levels can change the whole meal. Adjust spices like chili powder and cumin to suit your taste. Start with less if you're unsure, then add more if needed. When picking lettuce, consider texture and taste. Iceberg lettuce is crisp and strong. It holds the filling well. Butter lettuce is softer and has a sweet flavor. Both are great choices for wraps. You can even mix them for a fun texture. Always wash and dry your lettuce leaves. This step keeps them fresh and crunchy when you serve. These wraps pair well with low-carb sides. Think of fresh salsa, guacamole, or a tangy dip. You can also serve them with a green salad. It adds more crunch and nutrients. For a twist, try a side of roasted veggies. These options keep your meal light and tasty. Enjoy experimenting with different flavors! For the complete recipe, refer to the Full Recipe section. {{image_2}} You can switch up the protein in your chicken taco lettuce wraps. Ground turkey or beef works well. Both options keep the dish tasty and satisfying. If you want a veggie option, try beans or lentils. They add fiber and protein. This makes the meal hearty without meat. Toppings can change your wraps in fun ways. Hot sauce adds heat, while yogurt adds creaminess. Chopped onions, jalapeños, or radishes give extra crunch and flavor. You can also add fresh veggies like bell peppers or cucumbers. These bright colors make the dish look great and taste fresh. Changing the flavor profile can create a new dish. Add jalapeños for a spicy kick. For a Mediterranean twist, use feta cheese and olives. These flavors bring a new taste to your wraps. Don't be afraid to experiment with spices and toppings. Each variation can be just as delicious as the original. For the full recipe, check out the detailed instructions. To store leftover chicken filling, place it in an airtight container. This keeps the filling fresh. You can store it in the fridge for up to three days. Make sure to cool it down before sealing. If you want to keep it longer, consider freezing it. To freeze the chicken filling, let it cool first. Then, scoop it into freezer-safe bags. Remove as much air as possible before sealing. Label the bags with the date. This way, you can track how long it has been frozen. The filling can last up to three months in the freezer. To keep lettuce crisp, store the leaves in a dry container. You can wrap them in a paper towel to absorb moisture. Place them in the fridge, but not near fruits like apples or bananas. These fruits release gas that can wilt the lettuce faster. Enjoy your fresh lettuce for up to a week! Iceberg lettuce is crisp and crunchy. It holds the filling well. Butter lettuce is tender and has a mild flavor. It wraps easily around the filling. Choose iceberg for a crunch. Opt for butter if you like softer wraps. Yes, you can prep this meal ahead. Cook the chicken filling and store it in the fridge. You can keep it fresh for up to three days. Just assemble the wraps when you're ready to eat. This saves time on busy days. Each serving has about 8 grams of carbs. This low-carb dish is great for many diets. Most of the carbs come from corn and tomatoes. If you want even fewer carbs, skip the corn. Absolutely! The chicken filling is perfect for meal prep. You can double the recipe for extra servings. Store it in separate containers. Add lettuce and toppings fresh before serving. This way, your meal stays crisp and tasty. Yes, you can try different meats. Ground turkey or beef works well. For a vegetarian option, use black beans or lentils. Each option will give a unique flavor to your wraps. Feel free to get creative with your protein choice! We explored a tasty recipe for chicken taco lettuce wraps. This dish uses simple ingredients like ground chicken, spices, and fresh veggies. You can adjust flavors and toppings to fit your taste. Wrap the savory filling in crisp lettuce leaves for a healthy meal. Don’t forget to keep your leftovers fresh in the fridge or freezer. This easy-to-make recipe is perfect for meal prep or a weeknight dinner. Enjoy experimenting with different proteins and flavors!

Chicken Taco Lettuce Wraps Fresh and Flavorful Meal

Craving a meal that’s both fresh and flavorful? Chicken taco lettuce wraps could be your new favorite dish! This easy

To make a delicious Apple Cinnamon Oatmeal Bake, you need some key ingredients. Gather these before you start: - 2 cups rolled oats - 3 cups almond milk (or regular milk) - 2 ripe apples, peeled, cored, and diced - 1/2 cup brown sugar - 1/4 cup maple syrup - 1 teaspoon vanilla extract - 1 tablespoon cinnamon - 1 teaspoon baking powder - 1/4 teaspoon salt - 1/2 cup chopped walnuts (optional) - 1/2 cup raisins or dried cranberries (optional) - Extra apple slices and walnuts for topping These ingredients combine to create a warm and hearty dish. The oats serve as the base, while the apples add sweetness and moisture. The cinnamon warms up the flavors, making each bite delightful. If you want a bit of crunch, add walnuts. For a sweet touch, toss in some raisins or cranberries. Make sure to have everything ready. This way, you can enjoy the cooking process and savor the delicious smells that fill your kitchen. You can find the Full Recipe for a complete guide on how to mix and bake your oatmeal dish. - Preheat your oven to 350°F (175°C). Grease a 9x13 inch baking dish. - In a large bowl, combine rolled oats, almond milk, diced apples, brown sugar, maple syrup, vanilla extract, cinnamon, baking powder, and salt. Mix until all ingredients blend well. - If you want, fold in walnuts and raisins or dried cranberries. - Pour the mixture into the greased baking dish. Spread it out evenly. - Top with extra apple slices and chopped walnuts for added crunch. - Bake in the oven for 35-40 minutes. Look for a golden brown top. A toothpick should come out clean when done. - Let it cool for about 10 minutes. Then slice into squares for serving. This simple method makes the Apple Cinnamon Oatmeal Bake so easy to prepare and enjoy. For full details, check the Full Recipe. To ensure even cooking, mix all your ingredients well. This helps the oats soak up the milk evenly. If you skip this step, some oats may be dry. A good stir makes a big difference. For that perfect golden brown top, watch the baking time. Aim for 35 to 40 minutes at 350°F (175°C). If the top seems too pale, you can broil it for a few minutes. Keep a close eye on it, so it doesn’t burn. This dish shines with some tasty toppings. A dollop of yogurt adds creaminess. Drizzling extra maple syrup gives it a sweet kick. You can also sprinkle more cinnamon for that cozy flavor. Enjoy it with fresh fruit or a side of nuts. Some crunchy granola pairs well too. Try it with a cup of tea or coffee for a cozy breakfast treat. If you need gluten-free options, use certified gluten-free oats. You can also swap regular milk for almond or oat milk. This keeps the dish tasty and safe for everyone. To adjust sweetness, cut back on brown sugar or maple syrup. You can also use mashed bananas or applesauce. These swaps make your meal healthier without losing flavor. Remember, it’s all about making it fit your needs while enjoying the full recipe! {{image_2}} You can switch the apples for pears or mixed berries. Pears add a nice soft touch. Berries bring a burst of flavor and color. They both work well in this bake. You can also mash up bananas to add sweetness. Bananas make the dish moist and sweet without extra sugar. Want more spice? Try adding nutmeg or ground ginger to the mix. These spices give your bake a warm kick. If you love chocolate, stir in some cocoa powder. It adds a rich taste that pairs well with apples. You can create a whole new dessert with just this simple change. For a crunchy finish, top your bake with granola. This adds a nice crunch when you bite in. You can also add seeds like chia or flax. These seeds boost the nutrition and give a unique texture. They blend well with the oats and fruit, making every bite exciting. To keep your Apple Cinnamon Oatmeal Bake fresh, use airtight containers. Glass or plastic containers work well. If you have a lot, you can cut it into squares and stack them in layers. Place parchment paper in between to avoid sticking. Store it in the fridge for up to five days. For reheating, the oven is best. Preheat it to 350°F (175°C). Place the squares in a baking dish, and cover them with foil to keep moisture in. Heat for about 10-15 minutes. You can also microwave it. Just add a splash of almond milk before heating. This keeps it soft. For best results, check to see if it is warm all the way through. Enjoy your warm oatmeal bake with a drizzle of maple syrup! Yes, you can make this dish ahead of time. This is great for busy mornings. Just prepare the oatmeal bake the night before. After mixing all the ingredients, cover the dish and put it in the fridge. In the morning, bake it straight from the fridge. It will take a few extra minutes in the oven. Enjoy a warm breakfast without the fuss! Absolutely! Freezing this oatmeal bake is easy. First, let it cool completely after baking. Then, cut it into squares. Wrap each square tightly in plastic wrap. Place them in a freezer-safe bag or container. Label it with the date for future reference. To thaw, take a piece out and leave it in the fridge overnight. You can also microwave it for a quick warm-up. You can easily make this dish vegan! Here are some swaps: - Use almond milk or any plant-based milk instead of regular milk. - Substitute maple syrup for honey. - Make sure the brown sugar is vegan. For the full recipe details on vegan options, check the Full Recipe. These simple changes keep the flavors while making it plant-based. Enjoy your delicious vegan Apple Cinnamon Oatmeal Bake! This blog post covers a simple Apple Cinnamon Oatmeal Bake recipe. We shared essential ingredients, step-by-step instructions, and helpful tips. You learned about variations to fit your taste and storage tips for leftovers. In conclusion, this recipe is easy and versatile. You can customize it to suit your needs and enjoy it any time. Happy baking!

Apple Cinnamon Oatmeal Bake Simple and Tasty Recipe

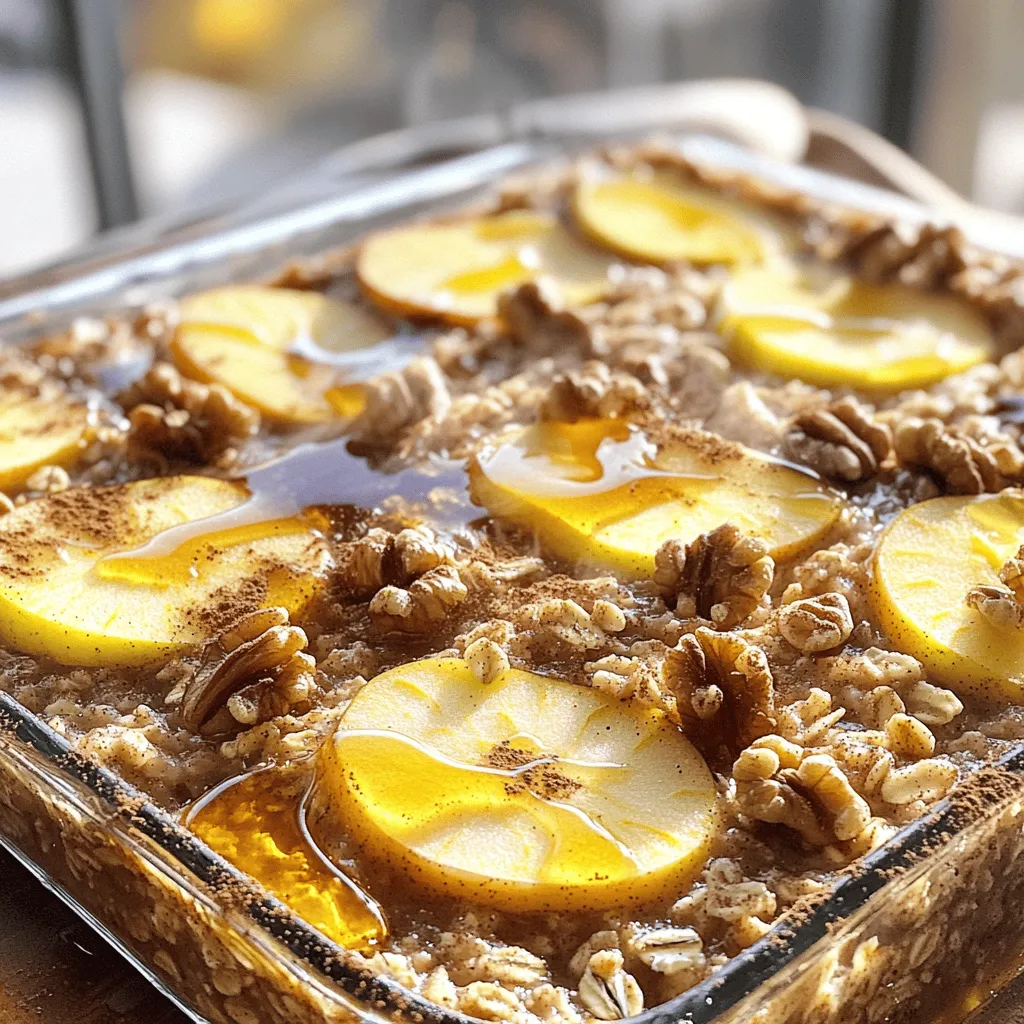
Are you ready to enjoy a warm, comforting breakfast that’s both simple and delicious? This Apple Cinnamon Oatmeal Bake combines

- 2 lbs ripe cherry tomatoes, halved - 1 medium onion, quartered - 4 cloves garlic, peeled - 3 tablespoons olive oil - Salt and pepper, to taste - 2 cups vegetable broth - 1/2 cup fresh basil leaves, roughly chopped - 1 teaspoon balsamic vinegar - 1/4 teaspoon red pepper flakes (optional) When I make roasted tomato soup, I always start with ripe cherry tomatoes. They add sweetness and flavor. The onion and garlic give depth to the soup. Olive oil helps everything roast nicely, creating a rich taste. Vegetable broth is key for a good soup base. Fresh basil brings a delightful touch, while balsamic vinegar adds a hint of tang. If you like some heat, red pepper flakes work great too. - Alternatives for tomatoes: If fresh tomatoes are not available, use canned tomatoes. They still taste great. - Options for vegetable broth: You can use homemade vegetable broth for more flavor. Store-bought broth is also fine and saves time. Using these ingredients or substitutes makes it easy to enjoy a delicious bowl of roasted tomato soup anytime. For more details on how to prepare this dish, check the Full Recipe. Start by preheating your oven to 400°F (200°C). This temperature helps the tomatoes roast nicely. Next, take a large baking sheet and arrange the halved cherry tomatoes, quartered onion, and peeled garlic cloves on it. Spread them out so they have room to breathe. Now, drizzle about 3 tablespoons of olive oil over the veggies. This oil adds richness and helps them roast evenly. Season everything with salt and pepper. Use your hands to toss the vegetables gently. This ensures they are well-coated and flavorful. Place the baking sheet in the oven and roast for about 25-30 minutes. You want to see the tomatoes blister and caramelize. This shows they are ready. Keep an eye on them to avoid burning, as ovens can vary. When done, the smell will fill your kitchen with a warm, inviting scent. Once the vegetables cool slightly, it's time to blend. If you have an immersion blender, it makes the job easy. Simply blend the roasted veggies right in the pot with the broth. If you use a standard blender, blend in small batches. This helps avoid spills and mess. You may want to adjust the soup's texture. If you like it smooth, blend until creamy. If you prefer some chunks, blend less. After blending, taste the soup. Add more salt or pepper if needed. To finish, stir in fresh basil, balsamic vinegar, and red pepper flakes for a kick. For the full recipe, refer to the complete guide. Enjoy your flavorful roasted tomato soup! Using fresh, ripe ingredients is key. Ripe tomatoes burst with flavor. They make your soup taste bright and sweet. Look for tomatoes that feel heavy and smell fragrant. Avoid any that are soft or bruised. Fresh garlic and onion also enhance the taste. To prevent burning during roasting, watch the temperature closely. Roasting at 400°F (200°C) works well. Stir the veggies halfway through. This helps them cook evenly and avoids charred bits. If you see them browning too fast, lower the heat a bit. Garnishing your soup can make it special. Add fresh basil for a pop of color and taste. You can drizzle a little olive oil on top too. For a crunchy touch, try adding croutons. When it comes to pairing, crusty bread is a great choice. It soaks up the soup and adds texture. A simple salad with greens can balance the meal. For drinks, a light white wine or sparkling water complements the soup well. Explore the Full Recipe for more tips and to create your own delicious bowl of roasted tomato soup! {{image_2}} You can make your roasted tomato soup even better with a few simple tweaks. Adding cream or coconut milk will give the soup a rich, smooth texture. This change makes it feel cozy and satisfying. Incorporating spices can elevate your soup's flavor too. Try adding thyme, oregano, or smoked paprika. Each spice brings its unique taste to the mix. For example, smoked paprika adds a touch of warmth and depth. You can experiment with these spices to find your favorite combination. This soup is easy to adapt for different diets. If you want a vegan option, simply skip the cream or use coconut milk. The soup will still taste great and keep its creamy feel. For those watching their sodium intake, use low-sodium vegetable broth. You can also skip adding extra salt to make it healthier. This way, everyone can enjoy delicious roasted tomato soup without worrying about dietary restrictions. You can find the full recipe above to explore these variations in your own kitchen. To keep your roasted tomato soup fresh, use airtight containers. Glass jars or plastic containers work well. Make sure the soup is cool before sealing. Store it in the fridge for up to five days. If you want to keep it longer, freeze the soup. Use freezer-safe containers or bags. Leave some space for expansion when freezing. The soup can last for up to three months in the freezer. When it's time to enjoy your soup again, reheating is key. You can use a pot on the stove or a microwave. If using a pot, heat it over low to medium heat. Stir often to keep it from sticking. For the microwave, heat in short bursts. Stir in between to ensure even heating. If you froze the soup, let it thaw in the fridge overnight. You can also thaw it in the microwave. After reheating, if the soup is too thick, add a splash of broth or water. This will help bring back its smooth texture. Enjoy your creamy, flavorful roasted tomato soup just as much the second time around! Can I use other types of tomatoes? Yes, you can use other tomatoes. While ripe cherry tomatoes work best, you can use Roma or beefsteak tomatoes. Just chop them into smaller pieces to ensure even roasting. The flavor will still be rich and delicious. How long does homemade roasted tomato soup last? Homemade roasted tomato soup lasts about 5 days in the fridge. Make sure to store it in an airtight container. You can also freeze it for up to 3 months. Just remember to let it cool before freezing. Nutritional highlights of tomatoes and basil Tomatoes are low in calories but high in nutrients. They provide vitamins C, K, and potassium. Basil adds flavor and is also rich in antioxidants. Together, they make a nutritious meal. Potential health advantages of consuming roasted tomato soup Eating roasted tomato soup can support heart health. The lycopene in tomatoes may help reduce heart disease risk. Plus, the fiber in tomatoes aids digestion and keeps you full longer. How to increase or decrease servings easily To change the number of servings, adjust the ingredients. If you want to serve more, simply double the amounts. For fewer servings, cut the amounts in half. Ingredient scaling tips for batch cooking When batch cooking, use a larger pot. Add more vegetable broth and extra tomatoes. Keep the same ratios for spices to maintain flavor. This way, you can enjoy your soup for days! For the full recipe, check out the Roasted Tomato Basil Bliss. This blog post covered how to make delicious roasted tomato soup. We explored essential ingredients, easy substitutions, and fun variations to try. You learned how to prepare, roast, and blend the soup while keeping flavors rich. We shared tips to serve and store leftovers effectively. In conclusion, making roasted tomato soup is simple and rewarding. You can adjust it to fit your taste or dietary needs. Enjoy experimenting in your kitchen and savoring every bowl!

Roasted Tomato Soup Flavorful and Easy Recipe Guide

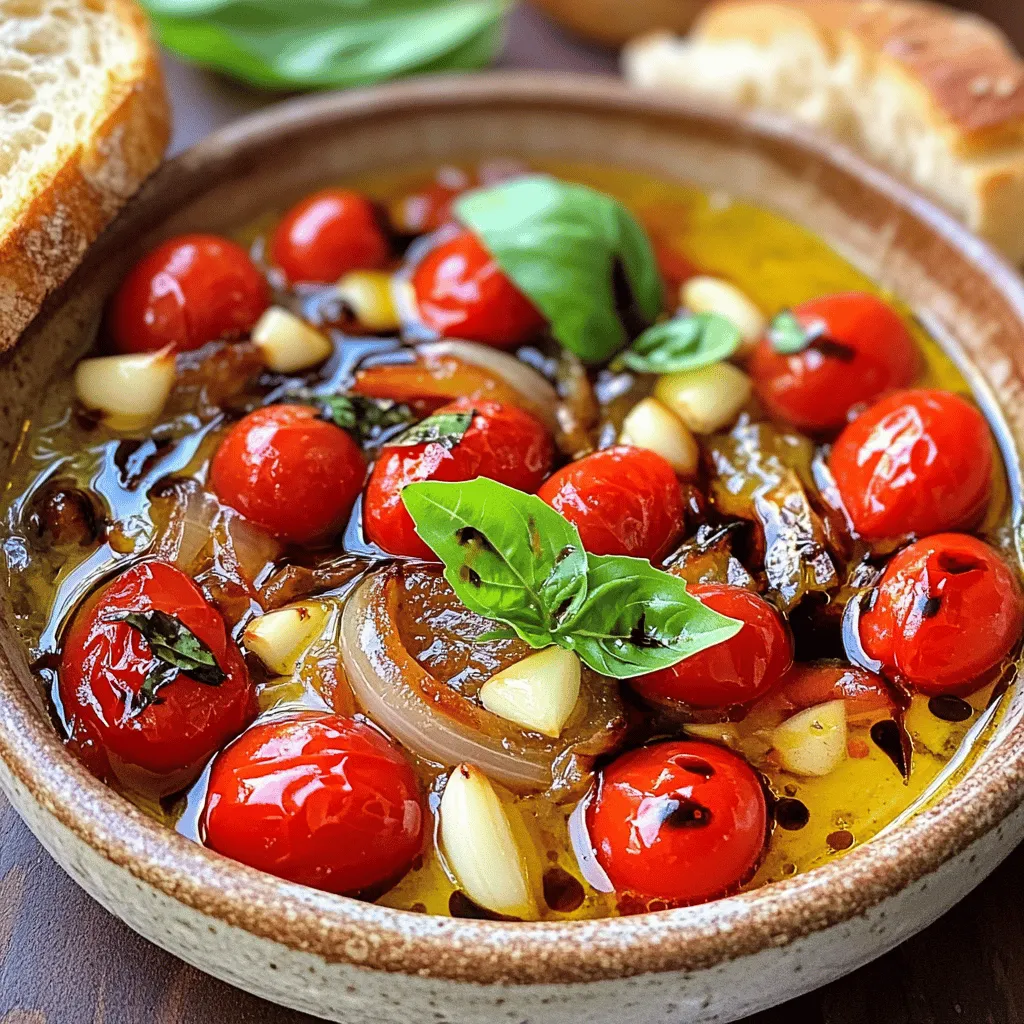
If you love a warm bowl of comfort, this roasted tomato soup is for you. It’s packed with flavor, easy

To make a tasty chicken salad, gather these fresh ingredients: - 2 cups cooked chicken breast, diced - 1 ripe mango, diced - 1 cup celery, finely chopped - 1/2 cup red bell pepper, finely chopped - 1/4 cup red onion, finely chopped - 1/2 cup Greek yogurt - 2 tablespoons honey - 2 tablespoons lime juice - Salt and pepper to taste - 1/4 cup fresh cilantro, chopped - Mixed greens for serving Each ingredient plays a key role in the salad's flavor and texture. The chicken gives protein and heartiness. The mango adds sweetness and a tropical twist. Celery offers a nice crunch. Red bell pepper and onion add color and flavor. Greek yogurt is a creamy base with a tangy kick. Honey balances the tartness of lime juice. Fresh cilantro brightens the dish, while mixed greens provide a fresh bed for serving. With these simple and fresh ingredients, you make a vibrant, healthy meal. For the full recipe, continue to the next section. To start, grab a medium bowl. In this bowl, mix together the Greek yogurt, honey, lime juice, salt, and pepper. Use a whisk or a fork to blend until smooth. This dressing adds creaminess and a touch of sweetness. Taste it and adjust if you like. You want it to be just right! Next, take a large mixing bowl. Add the cooked chicken, diced mango, celery, red bell pepper, red onion, and chopped cilantro. These fresh ingredients bring great flavor and color to your salad. Gently mix them together with a spatula. Make sure all the pieces are well distributed. Now, pour the dressing over the chicken mixture. Use your spatula to toss everything together. Ensure every piece gets coated in that tasty dressing. Once mixed, taste again. If needed, add a pinch more salt or pepper. Cover the bowl with plastic wrap and place it in the fridge. Let it chill for about 30 minutes. This step helps the flavors blend nicely. For the best serving, enjoy it on a bed of mixed greens. For the full recipe, check the recipe details above. You can swap Greek yogurt for sour cream or cottage cheese. These options provide a creamy base too. If you want extra crunch, add nuts or seeds. Sliced almonds or sunflower seeds work great. They add texture and flavor to your salad. To make your chicken salad pop, balance sweetness and acidity. If your salad tastes too sweet, add more lime juice. This helps cut through the sweetness of the honey and mango. You can also add a pinch of salt to enhance the taste. Taste as you mix to find the right balance. Serve your salad in a large, shallow bowl. It looks more inviting that way. Garnish with fresh cilantro and lime wedges for a splash of color. You can also sprinkle some extra diced mango on top. This makes the dish colorful and appealing, perfect for any meal. For the full recipe, refer to the main section. {{image_2}} You can make this chicken salad with different proteins. If you're short on time, use canned chicken. It’s quick and easy. Just drain it and mix it into your salad. Another great choice is rotisserie chicken. Grab one from your store, shred it, and you’re ready to go. Both options save time and taste great! Spices and herbs can change your chicken salad's taste. Try adding cumin for warmth or paprika for a little kick. Fresh herbs like dill or basil can add freshness. If you love a zesty taste, squeeze in some lemon juice. These small changes can make a big difference! If you need gluten-free options, use gluten-free yogurt. Most Greek yogurt brands offer gluten-free choices. For a dairy-free salad, swap Greek yogurt with a plant-based yogurt. You can also use avocado to add creaminess. These swaps let everyone enjoy this tasty salad without worry. To keep your chicken salad fresh, store it in an airtight container. This helps prevent air from getting in and keeps the salad tasty. Place it in the fridge right after you make it. This salad is best when eaten within three days. If you want to save it for later, be sure to check the temperature of your fridge. It should stay at 40°F or lower to keep food safe. You can freeze chicken salad, but it may change the texture. If you decide to freeze it, use a freezer-safe container. Leave some space at the top for expansion. It’s best to eat frozen chicken salad within three months. Thaw it in the fridge before eating, and never refreeze after thawing. Chicken salad usually lasts about 3 to 4 days in the fridge. Signs of spoilage include a bad smell, slimy texture, or discoloration. If you notice any of these signs, it’s best to throw it away. Always trust your senses when it comes to food safety. For the full recipe, check the earlier section. Yes, you can make this salad ahead of time. It tastes even better after the flavors blend. Prepare the chicken salad and store it in the fridge. You can keep it for up to a day before serving. Just remember to add the mixed greens right before you eat. This keeps the greens fresh and crisp. Chicken salad pairs well with many sides. Here are some great options: - Crackers or toasted bread - Fresh fruit, like berries or apples - A light soup or vegetable sticks - A side of pickles for extra crunch These sides can enhance your meal and make it more fun. Leftover chicken salad can last about three to four days in the fridge. Make sure you store it in an airtight container. If you see any signs of spoilage, like a bad smell or change in color, throw it away. Always check before eating. Enjoy the chicken salad while it's still fresh! This blog post detailed a tasty chicken salad that combines fresh ingredients. You learned how to mix chicken, mango, and veggies with a simple yogurt dressing. I shared tips on substitutes and flavor adjustments to suit your taste. You now know how to store this salad and its shelf life. My final thoughts are that this chicken salad is easy, healthy, and fun to make. Enjoy experimenting with different flavors and serving it your way!

Easy Chicken Salad Tasty and Quick Recipe Guide

Are you looking for a tasty, quick meal? This Easy Chicken Salad recipe has you covered! Packed with fresh ingredients

- 6 large flour tortillas - 1 pound breakfast sausage (or a plant-based alternative) - 1 bell pepper, diced (any color) - 1 small onion, diced - 1 cup corn (fresh or frozen) - 1 can (15 oz) black beans, drained and rinsed - 8 large eggs - 1 cup milk (or plant-based milk) - 2 cups shredded cheddar cheese - 1 teaspoon cumin - 1 teaspoon chili powder - Salt and pepper to taste - Fresh cilantro, chopped (for garnish) - Salsa (for serving) Gathering the right ingredients is key to making a great Breakfast Burrito Casserole. You start with the main ingredients, where the tortillas form the base. Breakfast sausage adds a hearty flavor, but feel free to swap it for a plant-based version. Bell peppers and onions bring color and crunch. Corn and black beans add sweetness and protein. Next, you need eggs and milk to bind everything together. Shredded cheddar cheese melts beautifully, giving that rich taste we all love. Cumin and chili powder add warmth and spice, while salt and pepper round it out. For garnishing, fresh cilantro adds a burst of freshness. Don't forget the salsa to bring some zing to each bite! Check out the Full Recipe for more details on making this delicious dish. - Preheat your oven to 350°F (175°C). - Brown the breakfast sausage in a skillet and crumble as it cooks. - Add diced bell pepper, onion, corn, and black beans; sauté briefly. First, you need to preheat your oven. This step helps cook the casserole evenly. While it heats, brown the sausage in a large skillet. Use medium heat. Crumble the sausage as it cooks. This process adds flavor and texture. Next, add the diced bell pepper and onion. Sauté these for about 3-4 minutes. This softens them and boosts the taste. Now, stir in the corn and black beans. Cook for another 2 minutes. Season with cumin, chili powder, salt, and pepper. Once done, set this mixture aside. - Layer tortillas in the baking dish and add the sausage mixture. - Pour the combined egg and milk mixture over the layers. - Repeat the layers until all ingredients are used. Now, grab a 9x13 inch baking dish. Spray it with non-stick spray. Start by layering two tortillas at the bottom. Overlap them slightly for full coverage. Spread half of the sausage mixture over the tortillas. Next, take your egg and milk mixture. Whisk these together until smooth. Pour half of it over the sausage layer. Sprinkle one cup of shredded cheese on top. Repeat this layering process with the remaining tortillas, sausage, egg mixture, and cheese. Finish with a final layer of tortillas to cover everything. - Cover and bake for 30-35 minutes. - Allow to cool briefly, then slice and garnish with cilantro. Cover the baking dish with foil. This keeps the casserole moist while baking. Bake it in the preheated oven for 30-35 minutes. Check if the casserole is set in the middle and golden on top. After baking, take the casserole out and let it cool for a few minutes. This makes slicing easier. Finally, garnish each slice with fresh cilantro before serving. You can find the full recipe [here](#). Enjoy your delicious breakfast burrito casserole! - Ensure even browning of sausage by stirring frequently. - Use a non-stick spray generously to prevent sticking. - Allow the casserole to rest after baking for easier slicing. Cooking this Breakfast Burrito Casserole is fun and simple. I always make sure my sausage gets nice and brown. Stirring it often helps. This way, I get that rich flavor and good texture. Using a non-stick spray is key too. I spray my baking dish well to keep everything from sticking. After baking, I let the casserole rest for a few minutes. This step makes slicing easier and keeps it from falling apart. Trust me, you’ll appreciate this tip when serving! - Substitute sausage with turkey, chicken, or a plant-based option. - Add more veggies like spinach or mushrooms for added nutrition. - Experiment with cheese types like pepper jack for heat. I love to mix things up with my casseroles. You can swap sausage for turkey or chicken if you want. If you prefer plant-based options, that works too! Adding extra veggies like spinach or mushrooms boosts the nutrition and flavor. Don’t forget about cheese! I often use pepper jack for a spicy kick. It really makes the casserole pop with flavor! - Serve with additional salsa on the side. - Pair with avocado slices for a creamy touch. - Offer fresh fruit as a light side dish. When it’s time to serve, I always have extra salsa on the side. It adds a nice zing to each bite. I also like to offer avocado slices. They bring a creamy texture that complements the casserole. For a light side, fresh fruit is perfect. It balances the rich flavors of the casserole and adds a nice crunch. Enjoy the dish! For the full recipe, check out the links provided. {{image_2}} For a tasty vegetarian option, swap out the meat. Use black beans and a mix of colorful vegetables. You can add diced zucchini, spinach, or mushrooms for extra flavor and nutrition. If you want a fluffy texture instead of eggs, consider using tofu scramble. This will keep the dish light and packed with protein. If you need a gluten-free meal, it’s easy to adapt. Simply replace flour tortillas with corn tortillas. Make sure to check that all other ingredients, like sausage or cheese, are certified gluten-free. This keeps your dish safe and delicious for everyone. Want to kick up the flavor? Try adding chorizo for a spicy twist. It adds a rich taste that pairs well with the other ingredients. You can also toss in jalapeños for extra heat in the sausage mixture. This will give your casserole a bold and exciting flavor. For the full recipe, check out the [Full Recipe]. Store leftovers in an airtight container for up to 3 days. This keeps the dish fresh. For the best taste, reheat it in the oven. If you need a quick fix, the microwave works too. You can freeze the unbaked casserole for up to 3 months. This is great for meal prep! Just make sure to wrap it well. When you are ready, thaw it overnight in the refrigerator before baking. To reheat, bake in a preheated oven at 350°F (175°C) until heated through. This helps keep the texture nice. For quick reheating, microwave individual portions. This way, you can enjoy your delicious breakfast burrito casserole anytime! - Yes, prepare the casserole up to the baking step and refrigerate overnight. It saves time in the morning, and flavors blend overnight. - You can use a flaxseed mixture or commercial egg replacers for a vegan option. Mix 1 tablespoon of ground flaxseeds with 3 tablespoons of water for each egg. Let it sit until it thickens. - The casserole should be set in the center and golden brown on top. A knife inserted should come out clean. This shows it's fully cooked. - This recipe serves approximately 8 people when sliced into portions. It's great for family brunches or meal prep for the week. - Absolutely! Consider adding chili flakes or hot sauce to the egg mixture for more heat. You can also mix in jalapeños for extra flavor. This Breakfast Burrito Casserole combines key ingredients for a tasty dish. You start with savory sausage, fresh veggies, and eggs. Layer everything with tortillas and bake to perfection. Remember, customize it with your favorite spices or veggies. You can even make a gluten-free or vegetarian version. Leftovers store well and reheat easily. Enjoy making this fun casserole, and share it with friends!

Breakfast Burrito Casserole Tasty and Easy Dish

Looking for a quick, mouth-watering breakfast idea? This Breakfast Burrito Casserole combines savory sausage, fresh veggies, and creamy cheese into

- 2 pounds baby potatoes, halved - 4 tablespoons olive oil - 6 cloves garlic, minced - 2 teaspoons dried rosemary - 2 teaspoons dried thyme - 1 teaspoon smoked paprika - Salt and pepper to taste - Fresh parsley, chopped - Presentation tips for serving The base of this dish starts with baby potatoes. They are small and tender, perfect for roasting. Halving them helps them cook evenly and adds crunch. Olive oil gives rich flavor and helps the potatoes crisp up in the oven. Garlic adds a punch of taste that you can't resist. For the spices, I use dried rosemary and dried thyme. These herbs bring a warm, earthy taste. Smoked paprika adds a slight smokiness that really enhances the dish. Salt and pepper balance all the flavors. Make sure to taste as you go! Garnishing with fresh parsley not only looks great but adds a fresh touch. When serving, I like to use a rustic bowl. It makes the dish feel warm and inviting. You can also add a sprig of parsley on top. If you want a dip, try lemon aioli for a zesty kick. For the full recipe, check out the detailed instructions to make this easy and delicious dish! - Preheat the oven to 425°F (220°C). - In a large bowl, mix the halved baby potatoes with minced garlic, olive oil, dried rosemary, dried thyme, smoked paprika, salt, and pepper. Toss until the potatoes are well-coated. This helps to bring out all the flavors. - Spread the seasoned potatoes on a baking sheet. Make sure they are in a single layer. This is key for even cooking. - Roast in the preheated oven for 25-30 minutes. Toss the potatoes halfway through to ensure they brown evenly. You want them golden and crispy on the outside, and tender inside. - Once the potatoes are done, take them out of the oven. Adjust the salt and pepper if needed. This is your chance to tweak the flavor. - Transfer the roasted potatoes to a serving dish. Garnish with fresh chopped parsley for a pop of color. This adds freshness and makes the dish look great. For the complete recipe, check the [Full Recipe]. Enjoy this crunchy and flavorful dish! To get crispy potatoes, start with good quality baby potatoes. Cut them in half for even cooking. Make sure to soak them in cold water for 30 minutes. This helps remove excess starch, leading to a crunchier finish. When you roast, place them on a baking sheet in a single layer. This is key. If you overcrowd the sheet, steam forms, and your potatoes won't get crispy. For extra flavor, consider adding fresh herbs like basil or oregano. You can also try spices like chili powder or cumin for a twist. Olive oil is the best choice for roasting potatoes. It has a rich flavor that enhances the herbs. You can also use avocado oil for a higher smoke point, which is great for roasting at high heat. Watch out for overcooking or undercooking your potatoes. Overcooked potatoes can become mushy, while undercooked ones stay hard inside. Aim for that golden brown color on the outside. Another mistake is not cutting the potatoes evenly. This leads to uneven cooking. Always ensure they are similar in size. For the best results, toss them halfway through roasting. This helps them cook evenly. For the full recipe, check out the link to create your own garlic herb roasted potatoes! {{image_2}} You can get creative with garlic herb roasted potatoes. For a Mediterranean twist, add olives and feta cheese. This mix brings a salty, tangy flavor that pairs well with the herbs. You can also try a spicy version. Just sprinkle some chili flakes into your mix. This adds a nice kick and makes the dish pop. If you want to cook these potatoes faster, try an air fryer. Set it to 400°F (200°C) and cook for about 15-20 minutes. Shake the basket halfway through for even cooking. You can also grill the potatoes for a smoky taste. Just place them in a grill basket and cook over medium heat for about 20 minutes. This adds a fun outdoor flavor. This recipe is easy to adapt for different diets. You can keep it vegan and gluten-free by sticking to the original ingredients. If you want a lower-fat option, use less oil or try a cooking spray. These changes still keep the flavor while making the dish lighter. For the full recipe, check out the link provided. To keep your garlic herb roasted potatoes fresh, store them in an airtight container. Make sure they cool down before sealing. This helps prevent sogginess. In the fridge, they last about 3 to 5 days. Use them in salads or as a side dish for quick meals. You can reheat roasted potatoes in the microwave or oven. If you choose the microwave, heat them for one to two minutes. However, the oven gives better results. Preheat the oven to 400°F (200°C) and spread the potatoes on a baking sheet. Bake for about 10 to 15 minutes. This method keeps them crispy. To ensure the best texture, toss them halfway through reheating. Yes, you can freeze garlic herb roasted potatoes! First, let them cool completely. Then, place them in a freezer bag and remove as much air as possible. They can last up to three months in the freezer. When ready to eat, thaw them in the fridge overnight. Then, reheat using the oven to bring back their crunch. To achieve crispy garlic herb roasted potatoes, choose the right oil and oven settings. Use a good amount of olive oil. This helps the potatoes brown nicely. Preheat your oven to 425°F (220°C). A hot oven gives the best results. Spread the potatoes in a single layer. Crowding the pan traps steam and makes them soggy. Toss the potatoes halfway through cooking. This ensures they crisp evenly. Yes, you can use other types of potatoes. Yukon Gold and red potatoes work well. They have a creamy texture and hold up during roasting. Fingerling potatoes are also great for their unique shape. Each type brings its own flavor and texture. Experiment with what you have on hand to find your favorite. These potatoes pair well with many dishes. Try serving them with roast chicken or grilled steak. They also go nicely with salmon or a hearty veggie dish. For sides, consider a fresh green salad or steamed vegetables. This balance adds color and nutrition to your meal. You can find the full recipe for garlic herb roasted potatoes [here](#). This link provides all the details for your cooking adventure. Garlic herb roasted potatoes are easy to make and taste amazing. You need baby potatoes, garlic, olive oil, and simple seasonings for great flavor. We covered the steps to roast them perfectly, along with tips and variations to try. Don't forget to store and reheat them well to keep that crispy texture. With all these ideas, you can enjoy delicious potatoes any time! Get creative and make this dish your own. Enjoy your cooking!

Garlic Herb Roasted Potatoes Crunchy and Flavorful Dish

Are you craving a dish that is both crunchy and packed with flavor? Garlic Herb Roasted Potatoes are your answer!

Older posts
Newer posts
← Previous Page1 … Page40 Page41 Page42 … Page90 Next →

dsad

© 2025 So Yum Recipes • Built with GeneratePress

Our Policies

  • Copyright Policy
  • Cookie Policy
  • GDPR Policy
  • Privacy Policy
  • Disclaimer
  • Terms Of Use

More Information

  • Home
  • About
  • Contact
  • Appetizers
  • Dessert
  • Dinner
  • Drinks
©2025, So Yum Recipes About Back To Top