Skip to content
DisclaimerTerms Of UseGDPR PolicyCookie Policy

So Yum Recipes

  • Home
  • Drinks
  • Appetizers
  • Dinner
  • Dessert
  • About
  • Contact
  • Privacy Policy
DisclaimerTerms Of UseGDPR PolicyCookie Policy

Chloe

Here is what you need for this tasty dish: - 1 medium butternut squash, peeled and cubed - 2 cups Brussels sprouts, halved - 1 red onion, sliced into wedges - 2 cups carrots, peeled and cut into sticks - 1 cup parsnips, peeled and sliced - 4 tablespoons olive oil - 2 teaspoons dried thyme - 1 teaspoon smoked paprika - Salt and pepper to taste - ¼ cup pecans, roughly chopped - ¼ cup dried cranberries Gather these fresh veggies. They bring color and flavor. The butternut squash adds sweetness. Brussels sprouts give a nice crunch. Red onion adds a bit of zing. Carrots and parsnips add earthiness. Olive oil helps them roast to perfection. Thyme and smoked paprika create warm, cozy notes. Salt and pepper boost the flavors. Pecans add crunch, while cranberries offer a sweet touch. This mix makes a great fall meal. Enjoy the harmony of these flavors! First, set your oven to 425°F (220°C). This high heat helps the veggies caramelize. Next, grab a large sheet pan and line it with parchment paper. This step makes clean-up easy and keeps the veggies from sticking. Take your butternut squash and peel it. Cut it into small cubes. Next, halve the Brussels sprouts and slice the red onion into wedges. For the carrots, peel and cut them into sticks. Do the same with the parsnips, peeling and slicing them. Place all the chopped veggies in a large bowl. Drizzle the olive oil over them. Then, sprinkle the dried thyme, smoked paprika, salt, and pepper on top. Use your hands to mix everything well. Make sure each piece gets coated in oil and spices. Spread the vegetable mix on your lined sheet pan. Make sure they are in a single layer. This helps them roast evenly. If they are too crowded, they might steam instead of roast. Place the pan in the oven and roast for 25-30 minutes. Halfway through, take the pan out and stir the veggies. This helps them cook evenly and get that nice brown color. When they are fork-tender and caramelized, they are ready. For the final touch, add the chopped pecans and dried cranberries. Stir them in and put the pan back in the oven for another 5 minutes. This toasts the nuts and adds great flavor. Enjoy your warm, roasted fall veggies! To get a nice roast, avoid overcrowding the pan. When veggies are too close, they steam instead of roast. Spread them out in one layer. This allows hot air to flow and crisp the edges. Place the pan in the center of your oven. This spot gives even heat for the best results. To boost flavor, use herbs and spices like thyme and smoked paprika. Thyme adds earthiness, while smoked paprika gives a warm, smoky taste. You can also add some acidity or sweetness. A splash of lemon juice or a drizzle of honey brightens the dish. This balance makes every bite pop. This dish pairs well with proteins like chicken or fish. Roasted veggies add a colorful touch to your plate. For sides, consider a simple green salad or grains like quinoa. These sides round out your meal and add more texture. {{image_2}} You can change up the veggies for more fun. Try using seasonal vegetables like sweet potatoes, cauliflower, or beets. Each gives a new taste. You can also add vegetables like zucchini or bell peppers for color. If you want extra flavor, consider adding garlic or fresh herbs like rosemary or sage. These add depth and make the dish even better. This recipe is easy to make vegan and gluten-free. Instead of olive oil, use avocado oil for a different flavor. You can also swap in sunflower seeds for pecans if you want a nut-free option. For texture, keep the veggies cut small. This helps them cook well and taste great. Always check labels to ensure any packaged items are gluten-free. If you want to try different methods, use an air fryer. Set it to 400°F and cook for about 18-20 minutes. Shake the basket halfway through for even cooking. You can also grill the veggies. Just toss them in a grill basket and cook over medium heat for about 15-20 minutes. Cooking times may vary, so check for tenderness and char. To keep your roasted veggies fresh, store them in an airtight container. Place the container in the fridge. This method helps the veggies stay tasty. They will last about 3 to 5 days in the fridge. If you want to keep them longer, freezing is a good option. When reheating, the oven is your best friend. Preheat it to 350°F (175°C). Spread the veggies on a baking sheet. This keeps them from getting soggy. Bake for about 10 to 15 minutes. Check to make sure they are hot throughout. You can also use the microwave, but be careful. Microwaving may make them soft if you heat too long. To freeze leftovers, let them cool first. Once cooled, place them in a freezer-safe bag. Squeeze out the air and seal it tight. This helps avoid freezer burn. When ready to eat, thaw in the fridge overnight. Reheat them in the oven to keep the texture. Enjoy your delicious roasted veggies again! For roasting, I love using a mix of vegetables. Seasonal options are great! In fall, try these: - Butternut squash - Brussels sprouts - Carrots - Parsnips - Red onion These veggies roast well and give a nice mix of flavors and textures. Butternut squash becomes sweet and creamy. Brussels sprouts get crispy on the edges. Carrots add a touch of sweetness. Parsnips bring an earthy note, and red onion caramelizes beautifully. Yes, you can easily add protein! It turns the dish into a full meal. Here are some ideas: - Chicken thighs or breasts - Sausages - Tofu or tempeh for a vegan option If you add protein, check cooking times. Chicken needs about 25-30 minutes like the veggies, but sausages may need 20-25 minutes. Tofu cooks quickly, so check after 15 minutes. Adjust the time to ensure everything is cooked well. To add some spice, consider these options: - Red pepper flakes - Cayenne pepper - Chili powder Start with a small amount. You can always add more later. Mix the spices with olive oil before tossing with veggies. This helps spread the heat evenly. Balance the spice with sweet elements like dried cranberries. The sweetness will help cool the heat a bit and create a tasty contrast. This article covers how to prepare a tasty roasted vegetable dish. We explored the best ingredients, step-by-step roasting instructions, and key tips for optimal flavor. From seasonal vegetable swaps to cooking methods, you now have many ideas to make this dish your own. Remember, storing and reheating leftovers is simple, so you can enjoy this meal again. I hope you feel inspired to create your own delicious variations and share them with friends and family. Enjoy roasting!

Sheet Pan Roasted Fall Veggies Simple and Tasty Meal

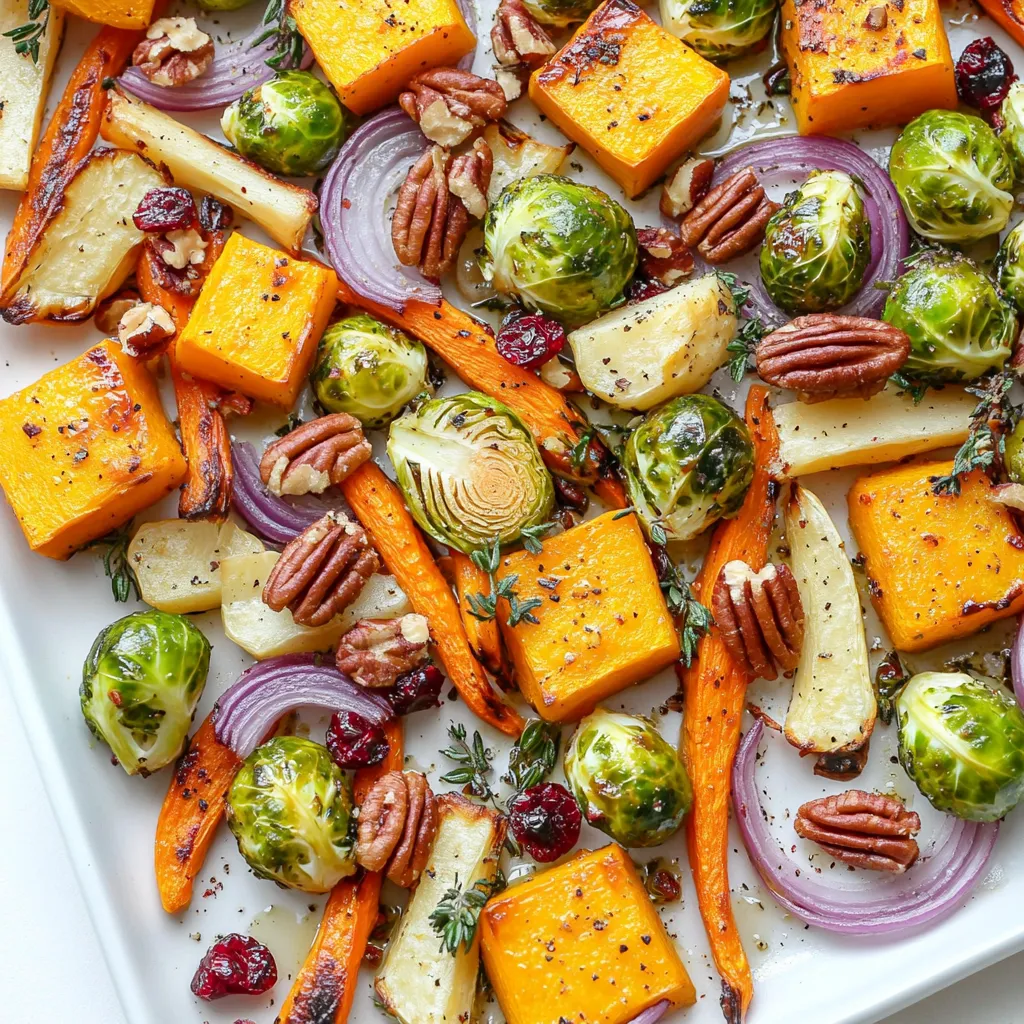
Looking for a simple and tasty meal that celebrates fall? Sheet pan roasted veggies are the answer! This dish combines

- 1 cup rolled oats - 1/2 cup finely chopped pecans - 1/4 cup almond butter - 1/4 cup maple syrup - 1/4 cup unsweetened shredded coconut - 1 teaspoon vanilla extract - 1/2 teaspoon ground cinnamon - Pinch of salt To make these energy balls, you need simple, wholesome ingredients. Each item plays a key role. Rolled oats give structure and fiber. Finely chopped pecans bring a nice crunch and flavor. Almond butter adds creaminess and healthy fats. Maple syrup provides sweetness and helps bind everything. Shredded coconut adds texture and a hint of tropical taste. Vanilla extract enhances all the flavors, making them more vibrant. Ground cinnamon adds warmth, while salt balances the sweetness. - Chocolate chips - Chia seeds - Flaxseed meal You can personalize your energy balls. Chocolate chips add sweetness and fun. Chia seeds boost nutrition, adding fiber and omega-3s. Flaxseed meal adds more healthy fats and fiber. - Alternatives to almond butter: You can use peanut butter or sunflower seed butter. - Using different nuts: Swap pecans for walnuts or almonds. - Different sweeteners: Honey or agave syrup work well instead of maple syrup. If you don’t have an ingredient, don’t worry! Feel free to swap or change items. This recipe is flexible, making it easy to adjust to your taste or what you have on hand. Start by gathering your dry ingredients. You need 1 cup of rolled oats, 1/2 cup of finely chopped pecans, 1/4 cup of unsweetened shredded coconut, and 1/2 teaspoon of ground cinnamon. In a large mixing bowl, add all these ingredients. Mix well to ensure they are evenly combined. This step is key to getting great flavor in each bite. Next, prepare your wet ingredients. In a separate bowl, whisk together 1/4 cup of almond butter, 1/4 cup of maple syrup, and 1 teaspoon of vanilla extract. Add a pinch of salt to enhance the flavors. Whisk until the mixture is smooth and creamy. This will be the glue that holds your energy balls together. Pour the wet mixture over the dry ingredients. Stir everything together until the dry ingredients are well coated. You should see a sticky dough forming. This dough will be easy to work with. Now, take small portions of the mixture and roll them into bite-sized balls, about 1 inch in diameter. Place the energy balls on a parchment-lined tray. Put them in the fridge for about 30 minutes to chill. This helps them firm up nicely. Once chilled, transfer the energy balls to an airtight container. Store them in the refrigerator for a quick snack or energy boost anytime. To get the right texture, keep the mixture sticky. If it feels too dry, add a splash of maple syrup or almond butter. This will help bind the ingredients. Mix well until everything is coated. If you notice crumbling, ensure you use enough wet ingredients. Roll the mixture tightly into balls. This will help them hold together. You can serve these energy balls in many ways. They’re great as a snack or a quick breakfast. Try placing them on a platter for sharing. Pair them with almond milk or your favorite smoothie. They also taste great with a cup of tea or coffee. Want them sweeter? Just add more maple syrup. For a spicier kick, mix in extra cinnamon or nutmeg. If you prefer less sweetness, cut back on the syrup. You can also swap out ingredients. Try adding chocolate chips or dried fruits for a twist. Omit the coconut if you’re not a fan. The fun part is making them your own! {{image_2}} You can change the taste of your energy balls easily. Try adding cocoa powder for a chocolate twist. Just mix in 2 tablespoons of cocoa powder with the dry ingredients. This gives a rich flavor. You can also add spices, like nutmeg, for a warm touch. A pinch of nutmeg enhances the sweetness and adds depth. These energy balls can fit many diets. For a vegan option, use maple syrup and almond butter. Both are plant-based and delicious. If you need gluten-free snacks, stick to rolled oats labeled as gluten-free. You can also swap pecans for other nuts to suit your taste. Seasonal changes can inspire new flavors. In fall, add pumpkin spice for a cozy taste. Just mix in a teaspoon of pumpkin spice with the dry ingredients. In summer, toss in dried fruits like cranberries or apricots. This adds sweetness and a chewy texture. To keep your No Bake Maple Pecan Energy Balls fresh, store them in the fridge. Use an airtight container to avoid moisture. This method keeps them tasty and safe to eat. These energy balls last for about one week in the fridge. If you want to enjoy them longer, freezing is a great option. To freeze your energy balls, place them on a tray in a single layer. Once they freeze, transfer them to a freezer-safe bag or container. Label the bag with the date. They can stay frozen for up to three months. When you want to eat them, just take out what you need. Let them thaw in the fridge for a few hours or at room temperature for about 30 minutes. I find the best way to enjoy these energy balls is fresh from the fridge. They have a nice texture and flavor when cold. Refrigeration may slightly change their taste, making them less sweet. However, they still taste great! Stored energy balls are perfect for a quick snack when you need energy on the go. You can store these energy balls in the fridge for up to one week. Keep them in an airtight container. This helps maintain their freshness. If you want to keep them longer, you can freeze them. They will last up to three months in the freezer. Yes, you can use other nut butters. Peanut butter, cashew butter, or sunflower seed butter all work well. Just choose a nut butter that you enjoy. Each will give a different taste and texture to the energy balls. Absolutely! These energy balls are a great snack for kids. They are healthy and tasty. The sweet flavor of maple syrup and the crunch from pecans make them fun to eat. They also provide energy for active kids. These energy balls are packed with nutrients. They contain fiber from oats, healthy fats from pecans and almond butter, and some protein. They also have natural sugars from maple syrup. This mix helps keep you full and gives you energy. Yes, you can add protein powder to boost the protein content. Just add a scoop when mixing the dry ingredients. This is a great way to make them more filling and nutritious. Adjust the wet ingredients slightly if the mixture gets too dry. These no-bake maple pecan energy balls are easy to make and fun to customize. We explored the key ingredients, preparation steps, and handy tips to enhance your energy balls. You can even adapt the recipe with different flavors or dietary needs. Remember to store them properly to enjoy their best taste. Making these treats brings both nourishment and joy. Enjoy experimenting with new flavors and sharing them with others!

No Bake Maple Pecan Energy Balls Simple Recipe

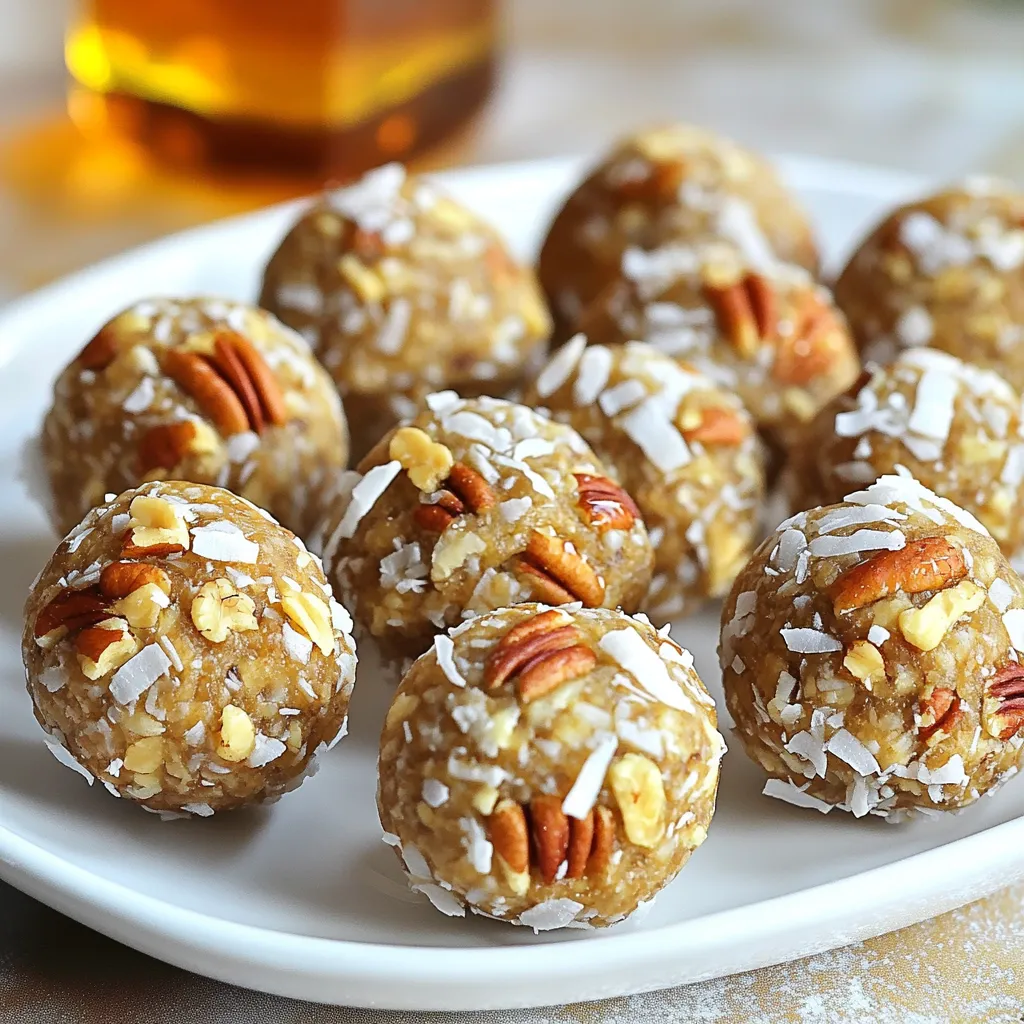
Looking for a quick and easy snack that packs a nutritious punch? My No Bake Maple Pecan Energy Balls recipe

To make these yummy bars, you need some key ingredients: - 1 cup canned pumpkin puree - 1 cup brown sugar - 1/2 cup granulated sugar - 1/2 cup vegetable oil - 2 large eggs - 1 teaspoon vanilla extract - 1 1/2 cups all-purpose flour - 1 teaspoon baking soda - 1 teaspoon ground cinnamon - 1/2 teaspoon ground nutmeg - 1/2 teaspoon salt - 1 cup semi-sweet chocolate chips These ingredients create a moist and sweet base for the bars. The pumpkin adds a rich flavor, while the chocolate chips give a nice touch of sweetness. You can also add some optional ingredients to boost the taste: - 1/2 cup chopped walnuts Adding walnuts gives a nice crunch and nutty flavor. If you're not a fan of nuts, you can skip them without losing any taste. If you don’t have some ingredients, here are some swaps: - Use applesauce instead of vegetable oil for less fat. - Replace eggs with flaxseed meal mixed with water. Use 1 tablespoon of flaxseed meal and 2.5 tablespoons of water for each egg. - Swap all-purpose flour with a gluten-free blend if needed. These substitutions help keep the bars delicious, no matter your needs! First, gather all your ingredients. You will need pumpkin puree, sugars, oil, eggs, and vanilla. In a large bowl, mix the pumpkin, brown sugar, granulated sugar, and oil. Whisk these together until smooth. Next, add the eggs one by one. Mix well after each egg. Then, stir in the vanilla extract for flavor. In another bowl, mix the flour, baking soda, cinnamon, nutmeg, and salt. This blend adds spice and lifts the bars. Gradually, add this dry mix to your wet ingredients. Stir gently until just combined; avoid overmixing. Finally, fold in the chocolate chips, and walnuts if you want. Preheat your oven to 350°F (175°C). Grease your 9x13-inch baking dish, or line it with parchment paper. This helps with easy removal later. Pour the batter into the dish and spread it evenly. Bake for 25 to 30 minutes. Check for doneness by inserting a toothpick in the center. It should come out clean or with a few moist crumbs. Once baked, let the bars cool in the pan for about 10 minutes. Then, transfer them to a wire rack to cool completely. This helps them set well. When ready to serve, cut the bars into squares. For a special touch, dust them with powdered sugar. You can also add whipped cream or ice cream for a treat! To make the best pumpkin chocolate chip bars, follow these steps: - Preheat your oven to 350°F (175°C). This ensures even baking. - Grease your baking dish or use parchment paper. This helps with easy removal. - Mix wet and dry ingredients carefully. Overmixing can make the bars tough. - Use room temperature eggs. This helps create a smooth batter. You can boost the flavor and texture with a few tricks: - Add spices. Try more cinnamon or a pinch of cloves for warmth. - Use high-quality chocolate chips. This can elevate the taste. - Chop the walnuts finely. This gives a nice crunch without being overwhelming. - Mix in some orange zest. It brightens the flavor and pairs well with pumpkin. Knowing when your bars are done is key: - Check with a toothpick. Insert it into the center; it should come out clean or with a few moist crumbs. - Look for a golden-brown top. The edges should pull away slightly from the pan. - The center should be firm. It should not jiggle when you shake the pan. These tips will help you bake perfect pumpkin chocolate chip bars every time! {{image_2}} You can make these bars gluten-free. Use a 1:1 gluten-free flour mix instead of all-purpose flour. This mix works well and gives great texture. It helps keep your bars soft and chewy. Just follow the same steps in the recipe. To make these bars dairy-free, swap the semi-sweet chocolate chips for dairy-free ones. You can find great options in stores now. Also, use a plant-based oil, like coconut oil, instead of vegetable oil. This way, you can enjoy the same tasty bars without dairy. Feel free to be creative with mix-ins. Here are some ideas: - Add 1/2 cup of chopped pecans for extra crunch. - Try 1/2 cup of dried cranberries for a sweet-tart twist. - Use white chocolate chips for a fun color contrast. - Sprinkle in some pumpkin seeds for a nutty flavor. You can also enhance the spice by adding a pinch of allspice or ginger. These small changes can take your bars to a new level! Store leftover pumpkin chocolate chip bars in an airtight container. Make sure to let them cool first. They stay fresh for about 3 to 5 days at room temperature. If you want them to last longer, refrigerate them. Cold bars taste great and can last up to a week in the fridge. To freeze, cut the bars into squares. Wrap each square in plastic wrap, then place them in a freezer bag. This keeps them fresh. They can be frozen for up to three months. When you’re ready to enjoy, just take them out and let them thaw at room temperature. To reheat, use the microwave for about 10 to 15 seconds. This warms them gently. You can also use the oven. Preheat it to 350°F (175°C) and heat the bars for about 5 to 10 minutes. This keeps them soft and tasty. Enjoy your warm treat! Pumpkin chocolate chip bars last about 4 to 5 days when stored correctly. Keep them in an airtight container at room temperature. If you want them to last longer, consider refrigerating them. In the fridge, they can last up to a week. Just remember, they taste best when fresh! Yes, you can use fresh pumpkin. Start by roasting the pumpkin until it is soft. Then, scoop out the flesh and mash it well. This gives you a nice puree to use. Just make sure to measure out 1 cup of fresh pumpkin puree for the best results in your recipe. You can use several options to replace eggs. Some popular substitutes include: - 1/4 cup unsweetened applesauce - 1/4 cup mashed banana - 1 tablespoon ground flaxseed mixed with 2.5 tablespoons water (let it sit for 5 minutes) These substitutes work well and keep the bars moist and tasty. In this post, we explored the key ingredients for pumpkin chocolate chip bars, from essential to optional. We detailed step-by-step instructions, including mixing, baking, and cooling. We also covered tips for perfect bars and shared variations like gluten-free and dairy-free options. Storage tips ensure your leftovers stay fresh. Remember, the right ingredients and techniques make all the difference. Enjoy your baking adventure!

Pumpkin Chocolate Chip Bars Tasty and Simple Treat

Craving a warm, spiced treat? These Pumpkin Chocolate Chip Bars are the answer! They mix rich pumpkin flavor with sweet

For the best Korean BBQ wings, gather these main items: - 2 pounds chicken wings - 1/4 cup soy sauce - 2 tablespoons gochujang (Korean red chili paste) - 1 tablespoon honey - 1 tablespoon sesame oil The marinade makes the wings flavorful. You need: - 3 cloves garlic, minced - 1 teaspoon grated ginger - 1 tablespoon rice vinegar - Salt and pepper to taste Garnishes add a nice touch. Consider these options: - 2 teaspoons sesame seeds - 2 green onions, sliced To start, grab a large mixing bowl. Add the following ingredients: - 1/4 cup soy sauce - 2 tablespoons gochujang - 1 tablespoon honey - 1 tablespoon sesame oil - 3 cloves garlic, minced - 1 teaspoon grated ginger - 1 tablespoon rice vinegar - Salt and pepper to taste Mix all these well. You want a smooth blend. This marinade brings bold flavors to the wings. Now, take your 2 pounds of chicken wings. Add them to the bowl with the marinade. Make sure each wing gets fully coated. Cover the bowl, then place it in the fridge. Let it sit for at least 1 hour. For the best taste, marinate overnight. Preheat your air fryer to 380°F (193°C). After marinating, take the wings out. Set aside the leftover marinade for later. Place the wings in the air fryer basket in a single layer. Cook for 25-30 minutes. Shake the basket halfway through for even cooking. While the wings cook, heat the reserved marinade in a small saucepan. Heat it over medium for about 5-7 minutes. This will thicken to become your glaze. Once the wings turn golden brown and crispy, brush them with the glaze. Cook for another 5 minutes in the air fryer. Finally, remove the wings and let them rest for a few minutes. Serve them with a sprinkle of sesame seeds and sliced green onions for a fresh touch. Enjoy your delicious wings! To get the wings nice and crispy, first, dry them well. Pat them with paper towels to remove excess moisture. This helps the skin crisp up in the air fryer. Preheat the air fryer to 380°F (193°C). Cooking them at this temperature gives you that perfect crunch. Remember to shake the basket halfway through cooking. This ensures even crisping on all sides. Marinating is key for flavor. I like to marinate the wings for at least one hour. For the best taste, let them sit overnight. Make sure to cover the bowl tightly. This keeps the flavor in and the wings moist. When you are ready to cook, shake off any excess marinade. This prevents soggy wings. One common mistake is overcrowding the air fryer basket. This can lead to uneven cooking. Always cook in a single layer for the best results. Another mistake is skipping the resting time after cooking. Letting the wings rest for a few minutes lets the juices settle. This keeps them juicy and flavorful when you bite in. {{image_2}} You can change the flavor of your wings by mixing up the marinade. Try adding orange juice for a citrus twist. You can also use pineapple juice for a sweet touch. If you like it spicy, add more gochujang or some red pepper flakes. For a smoky flavor, mix in a bit of smoked paprika. Each change makes your wings unique! If you have allergies, there are easy swaps. Use tamari instead of soy sauce for a gluten-free option. You can also make a honey substitute using maple syrup if you're vegan. For those allergic to sesame, use olive oil instead of sesame oil. Just make sure your other ingredients are safe for your needs. Air Fryer Korean BBQ wings pair well with many sides. Serve them with steamed rice for a filling meal. You can also add a fresh salad or some crunchy veggies. Pickled radishes are great for a tangy bite. If you want a snack, try serving them with kimchi. This adds a nice kick and complements the wings well. To store leftover wings, let them cool slightly. Place them in an airtight container. You can keep them in the fridge for up to three days. If you want them to last longer, freezing is a great option. Just make sure they are completely cool before putting them away. To freeze the wings, place them in a freezer-safe bag. Remove as much air as you can before sealing. This helps prevent freezer burn. You can freeze them for up to three months. Thaw them overnight in the fridge before reheating. For the best taste, reheat the wings in your air fryer. Set the air fryer to 350°F (175°C). Cook for about 10-15 minutes until they are hot and crispy. You can also use an oven if you don’t have an air fryer. Just cover them loosely with foil to keep them from drying out. Enjoy those tasty wings! Yes, you can use frozen wings! Just make sure to thaw them first. This helps the marinade soak in. For best results, marinate the wings overnight. Then, follow the cooking steps as usual. To add more heat, use extra gochujang. You can also add red pepper flakes or sliced fresh chili peppers. Adjust the amount based on your heat tolerance. Taste the marinade before adding more spice. Korean BBQ wings go well with many sauces! Try a sweet chili sauce or a soy dipping sauce. You can also use a garlic aioli or a creamy ranch dressing. These add a nice contrast to the spicy wings. You can store leftover wings in the fridge for up to 3 days. Make sure to place them in an airtight container. When ready to eat, reheat them in the air fryer for the best texture. You learned how to make tasty Air Fryer Korean BBQ wings. We covered key ingredients, marinade tips, and cooking steps. I shared ways to make your wings crispy and avoid common mistakes. Variations and storage tips ensure you can enjoy these wings anytime. Dive into your kitchen with confidence. Enjoy delicious, homemade wings any day!

Irresistible Air Fryer Korean BBQ Wings Recipe

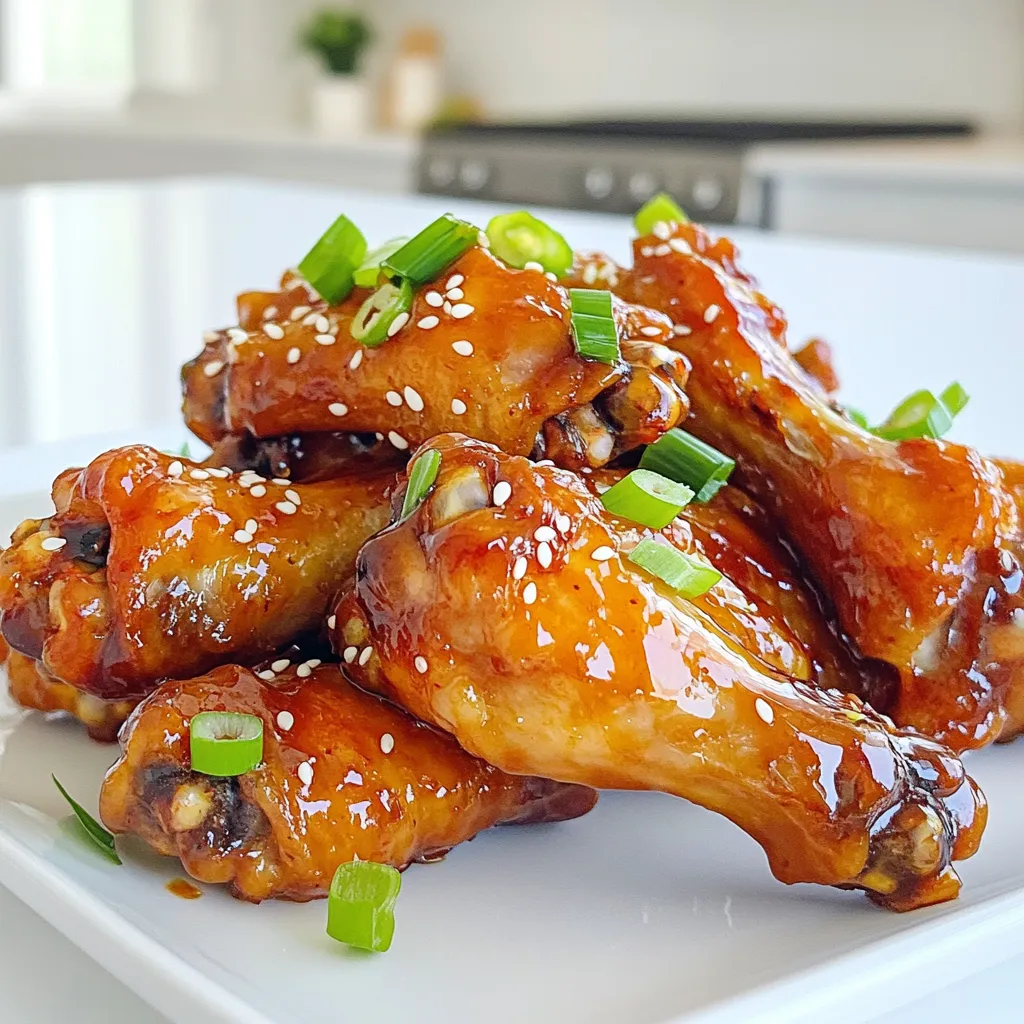
Are you ready to impress your friends at your next gathering? These Irresistible Air Fryer Korean BBQ Wings are a

To make this tasty dip, you will need a few simple items. Here’s what you need: - 8 oz cream cheese, softened - 1 cup powdered sugar - 1 teaspoon vanilla extract - 1/2 cup caramel sauce, plus extra for drizzling - 1/2 teaspoon cinnamon - 2 large apples (Granny Smith or Honeycrisp), cored and sliced These ingredients come together to create a creamy and sweet base for your dip. When serving this dip, you want to have the right dippers. I suggest using: - Graham crackers - Pretzels These crunchy options pair nicely with the smooth dip. You can also try slicing some more apples to add variety. To make your dip even better, consider adding some toppings. You might enjoy: - Chopped nuts (like walnuts or pecans) Sprinkling these on top adds a nice crunch. You can also drizzle extra caramel sauce for a sweet finish. This dip is all about layers of flavor and fun textures. Start with 8 ounces of softened cream cheese. Use an electric mixer to beat it until smooth. This step takes about one to two minutes. Next, add 1 cup of powdered sugar. Mix until it’s fluffy and well combined. Then, stir in 1 teaspoon of vanilla extract. Finally, add 1/2 teaspoon of cinnamon. Mix again to blend the flavors well. Now, it’s time for the fun part: adding the caramel! Pour in 1/2 cup of caramel sauce. Reserve a bit for drizzling later. Gently fold the caramel into the cream cheese mixture. Be careful not to mix too much. You want to keep some swirls of caramel visible. This gives the dip a lovely look. Transfer your dip into a nice serving dish. Smooth the top with a spatula for a clean finish. Drizzle the reserved caramel sauce on top. This adds extra sweetness and a beautiful touch. Next, sprinkle chopped nuts over the caramel. Walnuts or pecans work great. Finally, serve your dip with sliced apples, graham crackers, or pretzels. Enjoy this tasty treat! To soften cream cheese fast, cut it into small cubes. Place the cubes in a bowl. Microwave them for about 10 to 15 seconds. Check if it is soft enough to mix. If not, heat it for a few more seconds. This method works well and saves time. To get that pretty swirl in your dip, mix carefully. After adding the caramel sauce, gently fold it into the cream cheese. Use a spatula and make slow movements. Don’t stir too much. You want to see both the cream cheese and caramel. This makes your dip look nice and inviting. Yes, you can make this dip ahead of time. Prepare the dip and store it in the fridge. Keep it in an airtight container. It stays fresh for about two days. When ready to serve, drizzle extra caramel on top. This adds a fresh touch and looks great. {{image_2}} If you want a lighter dip, try Greek yogurt. It adds a creamy texture without all the fat. Just mix 8 oz of plain Greek yogurt with the powdered sugar. You can keep the vanilla and cinnamon for flavor. This swap makes it healthier but still tasty. Want to make your dip even better? You can add fun mix-ins! Chocolate chips bring sweetness, while toffee bits add crunch. Just fold in about 1/2 cup of either before serving. These extras make the dip even more exciting and fun to eat. You can change the flavor with the seasons. In fall, add pumpkin spice to give it a cozy taste. Just mix in 1 teaspoon of pumpkin spice with the other ingredients. This adds warmth and makes it perfect for autumn gatherings. To keep your caramel apple cream cheese dip fresh, store it in an airtight container. This prevents air from getting in and keeps the dip from drying out. Place a piece of plastic wrap directly on the dip before sealing the lid. This extra layer helps to keep it creamy and delicious. When stored properly, this dip lasts about three to five days in the fridge. I always recommend eating it sooner for the best taste and texture. If you notice any changes in color or smell, it’s best to toss it out. Freezing this dip is not ideal. The cream cheese can change texture when thawed, making it grainy. If you must freeze it, store it in a freezer-safe container. Use it within a month for the best quality. When ready to eat, thaw it in the fridge overnight, then mix it well before serving. For this dip, I recommend using Granny Smith or Honeycrisp apples. Granny Smith apples add a nice tartness. They balance the sweetness of the caramel and cream cheese. Honeycrisp apples are sweet and crisp, making them great for dipping. Their texture holds up well, so you get a satisfying crunch. Yes, you can use store-bought caramel sauce. It saves time and still tastes great. Just look for a high-quality brand for the best flavor. You can drizzle extra caramel on top for a nice touch. If you want to make your own, it’s simple, but store-bought works perfectly. Yes, this recipe can be gluten-free. The dip itself is gluten-free since it uses cream cheese and sugar. Just choose gluten-free dippers. You can use fresh apple slices or gluten-free graham crackers. Pretzels can also be gluten-free. Always check labels to be sure. Caramel apple cream cheese dip is a fun and tasty treat. We covered key ingredients like cream cheese and caramel, plus tasty accessories and dips. I shared easy steps to make the dip and tips for softening cream cheese. You can even try healthier versions or seasonal flavors. Remember to store leftovers properly for the best taste. This dip is perfect for gatherings or a cozy snack. Enjoy every creamy, sweet bite!

Caramel Apple Cream Cheese Dip Easy and Flavorful Treat

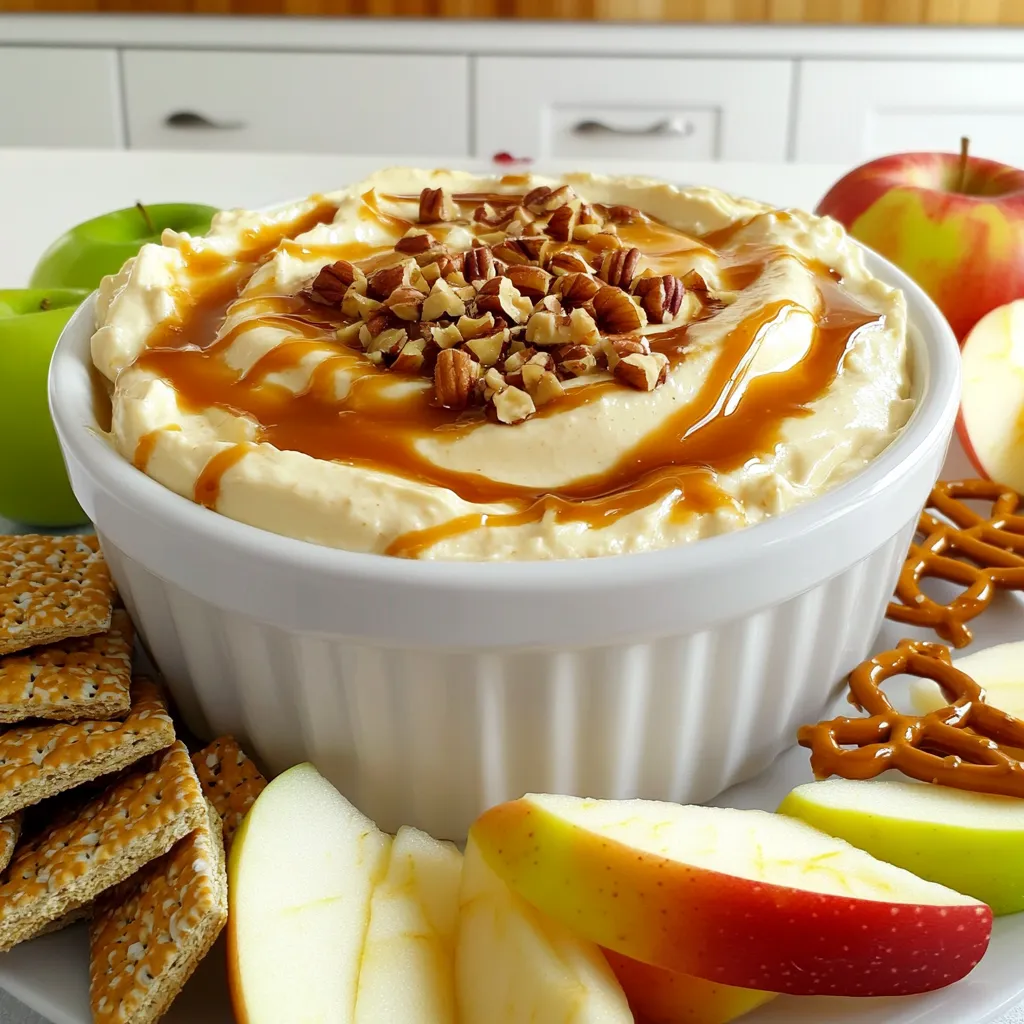
Are you ready to impress your friends at the next gathering? This Caramel Apple Cream Cheese Dip is not just

For a delicious Slow Cooker Pumpkin Lasagna Soup, gather these simple ingredients: - 1 can (15 oz) pumpkin puree - 1 lb ground turkey or beef - 1 onion, chopped - 3 cloves garlic, minced - 4 cups vegetable broth - 1 can (14.5 oz) diced tomatoes, undrained - 2 cups uncooked lasagna noodles, broken into pieces - 1 teaspoon Italian seasoning - 1/2 teaspoon nutmeg - Salt and pepper to taste - 1 cup ricotta cheese - 1 cup shredded mozzarella cheese - 1/2 cup grated Parmesan cheese - Fresh basil for garnish Each ingredient brings a unique flavor. The pumpkin puree adds creaminess. Ground turkey or beef provides protein. Onion and garlic give a savory base. Vegetable broth and diced tomatoes create a rich soup. Lasagna noodles bring heartiness. The seasonings elevate the taste. Cheeses add a creamy finish. Ricotta gives a soft texture, while mozzarella and Parmesan offer a cheesy top. Fresh basil adds color and freshness. With these ingredients, you can make a warm, comforting soup that feels like a hug on a chilly day. Cooking the meat Start by browning the ground turkey or beef. Use a skillet over medium heat. Cook until the meat is brown, stirring often. This should take about 5 to 7 minutes. When done, drain any extra fat. Set the meat aside for later. Chopping vegetables Next, chop one onion and mince three cloves of garlic. The onion adds sweetness, while the garlic gives depth. Make sure to chop them fine for even cooking. This step is quick and takes only a few minutes. Mixing ingredients in the slow cooker In your slow cooker, combine the browned meat, chopped onion, and minced garlic. Add one can of pumpkin puree, four cups of vegetable broth, and one can of diced tomatoes. Don’t forget to include one teaspoon of Italian seasoning and half a teaspoon of nutmeg. Season with salt and pepper to taste. Stir everything well to mix the flavors. Layering the lasagna soup Now, add two cups of uncooked lasagna noodles. Break them into pieces first. Gently push the noodles into the soup mixture. This helps them cook evenly. Cooking times and temperatures Cover the slow cooker with its lid. Cook on low for four to six hours, or on high for two to three hours. You want the noodles to be soft and tender. Check them a bit before the end of cooking to be sure. Final additions before serving About 15 minutes before serving, stir in one cup of ricotta cheese. This adds creaminess to your soup. When ready to serve, top each bowl with shredded mozzarella and grated Parmesan cheese. Garnish with fresh basil leaves for a pop of color and flavor. How to prevent noodles from becoming mushy To keep your noodles firm, add them later in the cooking process. Break the lasagna noodles into smaller pieces. Stir them in about 30 minutes before serving. This helps them cook just right. Substitutions for ground meat You can swap ground turkey for ground chicken or beef. If you want a vegetarian option, use lentils or mushrooms. Both add great flavor and texture. Adjusting seasoning to taste Taste your soup before serving. If it needs more zest, add salt, pepper, or more Italian seasoning. You can also sprinkle in more nutmeg for warmth. Serving ideas Serve your soup in deep bowls. A drizzle of olive oil on top makes it look fancy. Pair it with crusty bread for a complete meal. Enhancing flavors with garnishes Garnish each bowl with fresh basil leaves. Add a sprinkle of extra Parmesan cheese for a rich taste. You can even add a dash of red pepper flakes for a bit of heat. {{image_2}} You can easily change the ingredients in this soup to suit your taste. - Vegetarian options: Instead of ground turkey or beef, try lentils or mushrooms. Both options add great texture and flavor. - Different protein choices: You can use chicken or sausage for a different meat flavor. Ground chicken works well, too. - Alternative cheeses: Swap ricotta for cottage cheese or cream cheese. For a bolder taste, use feta or goat cheese. Spices and veggies can change the soup’s flavor profile. - Adding spices: Try adding a pinch of cayenne or chili powder for some heat. A bit of smoked paprika can add depth as well. - Incorporating seasonal vegetables: Toss in spinach, kale, or bell peppers for added nutrition. They blend well with the pumpkin. - Making it spicier or creamier: For spice, add crushed red pepper flakes. If you want creaminess, stir in more ricotta or a splash of cream before serving. Feel free to mix and match these ideas! They will make your Slow Cooker Pumpkin Lasagna Soup unique and delicious. To keep your Slow Cooker Pumpkin Lasagna Soup fresh, follow these tips: - Refrigeration tips: Let the soup cool to room temp before storing. Transfer it to an airtight container. In the fridge, it stays safe for up to five days. To reheat, warm it on the stove or in the microwave until hot. Stir well before serving. - Freezing and reheating instructions: If you want to freeze the soup, use freezer-safe containers. Leave some space at the top for expansion. It can last up to three months in the freezer. To reheat, thaw it overnight in the fridge. Heat it on the stove or in the microwave until fully warmed. The shelf life of your soup depends on how you store it. - In the fridge, it lasts about five days. - In the freezer, it can last up to three months. Always check for changes in smell or appearance before eating. Enjoy your delicious soup! Can I use fresh pumpkin instead of puree? Yes, you can. Fresh pumpkin adds a nice texture. Just cook it down until soft. Then, mash it well to get a smooth consistency. What can I serve with Slow Cooker Pumpkin Lasagna Soup? This soup pairs well with crusty bread or garlic bread. A fresh salad also makes a great side. You could even serve it with some cheese sticks for extra fun. How do I make this soup dairy-free? To make it dairy-free, skip the ricotta and cheeses. Use a dairy-free cream or nut-based cheese instead. Coconut milk can also add creaminess without dairy. What to do if the soup is too thick or thin? If the soup is too thick, add more broth or water slowly. Stir well and check the consistency. If it's too thin, let it cook longer uncovered to reduce the liquid. How to fix over-seasoning? If the soup is too salty or strong, add more broth or water to balance the flavors. You can also add more pumpkin or some diced tomatoes to dilute the seasoning. This blog post highlights how to make a tasty Slow Cooker Pumpkin Lasagna Soup. We covered key ingredients, like pumpkin puree and turkey, and shared step-by-step instructions. You learned tips to perfect the recipe and variations to make it your own. Proper storage information helps keep leftovers fresh. Remember, you can swap ingredients and adjust flavors to fit your taste. Enjoy making this warm and cozy soup, perfect for any season.

Savory Slow Cooker Pumpkin Lasagna Soup Delight

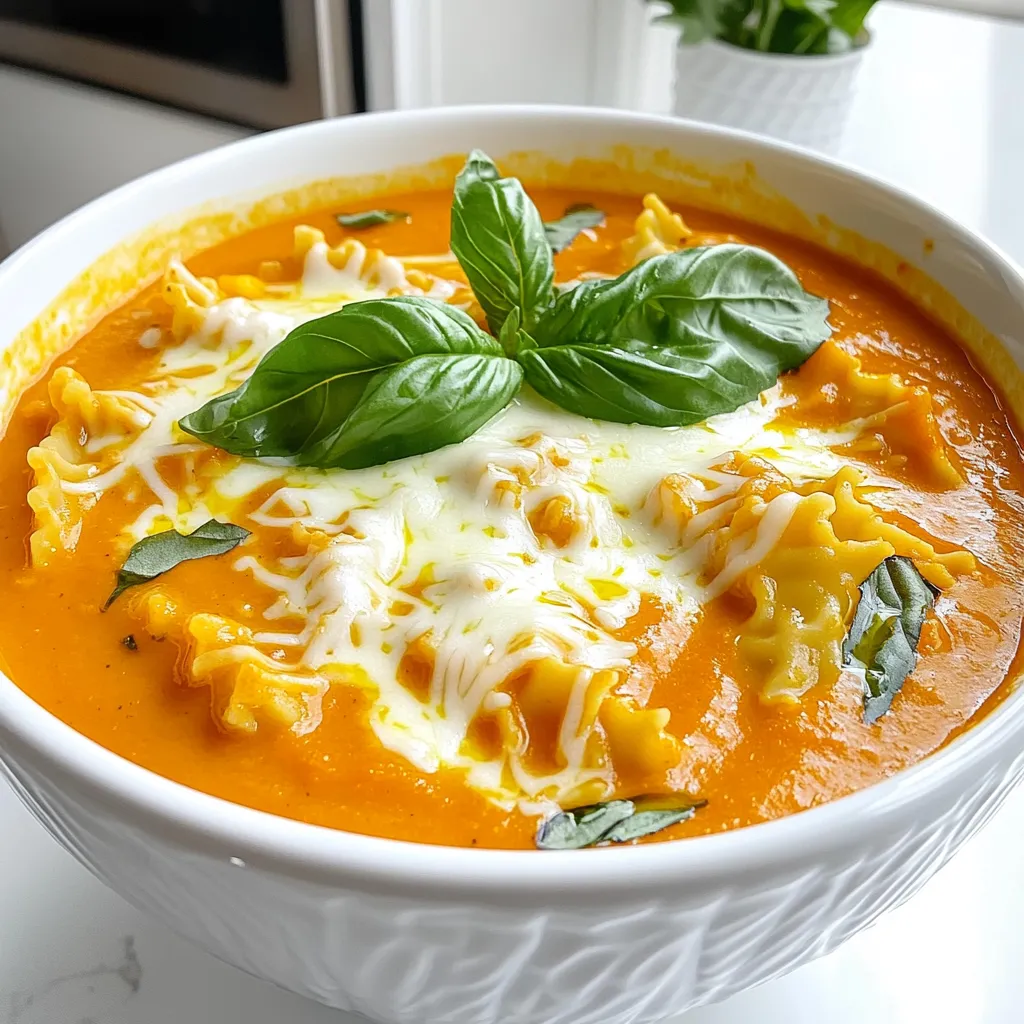
Do you crave a unique fall dish that’s both hearty and easy to make? My Savory Slow Cooker Pumpkin Lasagna

- 1/2 cup unsalted butter - 1 cup packed light brown sugar - 1 large egg - 1 teaspoon vanilla extract - 1 cup all-purpose flour - 1/2 teaspoon baking powder - 1/4 teaspoon baking soda - 1/4 teaspoon salt - 1 teaspoon ground cinnamon - 1 medium apple, peeled, cored, and diced - 1/2 cup chopped walnuts (optional) To make the best brown butter apple blondies, start with these simple ingredients. Each one plays a key role in creating flavor and texture. The unsalted butter is essential for that nutty taste. Browning it adds depth and richness. Light brown sugar gives sweetness and moisture. The egg binds everything together. Vanilla adds a warm note that enhances the apple. Flour is your base, while baking powder and baking soda help them rise. A little salt balances the sweetness, and ground cinnamon gives warmth. The apple adds a fresh crunch, making these blondies special. If you like nuts, add walnuts for extra texture. They provide a lovely contrast to the soft blondies. To start, you need to brown the butter. Take 1/2 cup of unsalted butter and melt it in a small saucepan over medium heat. Stir the butter as it cooks. In about 5 to 7 minutes, it will turn a lovely golden brown and smell nutty. This step is key for flavor! Once it’s browned, remove it from the heat and let it cool for a few minutes. Now, let’s mix the ingredients. In a large mixing bowl, combine the browned butter with 1 cup of packed light brown sugar. Whisk them together until smooth. Next, add 1 large egg and 1 teaspoon of vanilla extract. Whisk again until the mixture is light and fluffy. In another bowl, mix 1 cup of all-purpose flour, 1/2 teaspoon of baking powder, 1/4 teaspoon of baking soda, 1/4 teaspoon of salt, and 1 teaspoon of ground cinnamon. Gradually add this dry mix to the wet mix, stirring until just combined. Be careful not to overmix! Finally, gently fold in 1 medium apple, peeled, cored, and diced, along with 1/2 cup of chopped walnuts if you like. Next, pour your batter into an 8x8 inch baking dish lined with parchment paper. Spread the batter evenly. Preheat your oven to 350°F (175°C) while you get ready. Bake the blondies for 25 to 30 minutes. They should be golden brown and a toothpick inserted in the center should come out clean. Let them cool for about 10 minutes in the pan. Then, lift them out using the parchment paper and cool completely on a wire rack. To get the best blondies, avoid overmixing the batter. Overmixing can make them tough. Stir gently until just mixed. This keeps them soft and chewy. Also, use room temperature ingredients. Cold butter or eggs can change the batter’s texture. Let your eggs sit out for 30 minutes before mixing. These blondies taste amazing warm. Serve them with a scoop of vanilla ice cream. The cold ice cream melts into the warm blondies. It creates a delightful contrast. You can also drizzle caramel sauce on top. This adds extra sweetness and richness. Want to change the flavor a bit? Add a sprinkle of nutmeg or a dash of almond extract. Both give a lovely twist. You can also try different mix-ins. Consider chocolate chips or dried cranberries for fun flavors. Just remember to keep it balanced with the apples. {{image_2}} You can make these blondies gluten-free by using alternative flours. Here are some great choices: - Almond flour - Coconut flour - Oat flour Mix these flours in a 1:1 ratio with the all-purpose flour in the recipe. Keep in mind that coconut flour absorbs more liquid, so you may need to adjust the egg or add some applesauce. To make vegan blondies, you can substitute some ingredients: - Replace the egg with a flax egg (1 tablespoon ground flaxseed + 2.5 tablespoons water). - Use vegan butter instead of unsalted butter. - Choose a plant-based vanilla extract. This will keep your blondies moist and tasty without any animal products. You can switch up the apples with other fruits. Here are some options: - Pears for a sweet and juicy twist. - Cherries for a tart flavor. - Peaches for a summer vibe. Feel free to explore seasonal variations. Each fruit will change the taste and texture, making your blondies unique and fun! To keep your brown butter apple blondies fresh, store them in an airtight container. This helps retain their moisture. Place parchment paper between layers to avoid sticking. The blondies stay good for about five days at room temperature. If you want them to last longer, try refrigerating them. They will keep for up to two weeks in the fridge. If you want to save some for later, freezing is a great option. Cut the blondies into squares before freezing. Wrap each piece in plastic wrap, then place them in a freezer bag. They can last in the freezer for up to three months. To serve, take the blondies out of the freezer and let them thaw at room temperature. This usually takes about an hour. If you're in a hurry, you can microwave them for a few seconds. Enjoy your blondies as if they were freshly baked! Yes, you can use different apples. Some great choices are: - Granny Smith: Tart and crisp - Honeycrisp: Sweet and juicy - Fuji: Firm and sweet These apples add unique flavors and textures to the blondies. You can check the blondies in a few ways: - Look for a golden brown color on top. - Insert a toothpick in the center. It should come out clean. - The edges should pull away from the pan slightly. These signs mean your blondies are ready to eat! You can use white sugar, but the flavor will change. Brown sugar adds moisture and a rich taste. Your blondies may turn out drier and less flavorful. For best results, stick with brown sugar. These Brown Butter Apple Blondies are a treat filled with flavor and warmth. We covered the essential ingredients, from butter to apples, and outlined clear steps to make them. I shared tips for perfecting texture and ways to serve them. Plus, I included options for gluten-free and vegan variations. Whether you enjoy them fresh or as leftovers, these blondies bring a cozy touch to any setting. Try them out, mix flavors, and enjoy each bite! Your homemade dessert adventure awaits.

Brown Butter Apple Blondies Delightful Sweet Treat

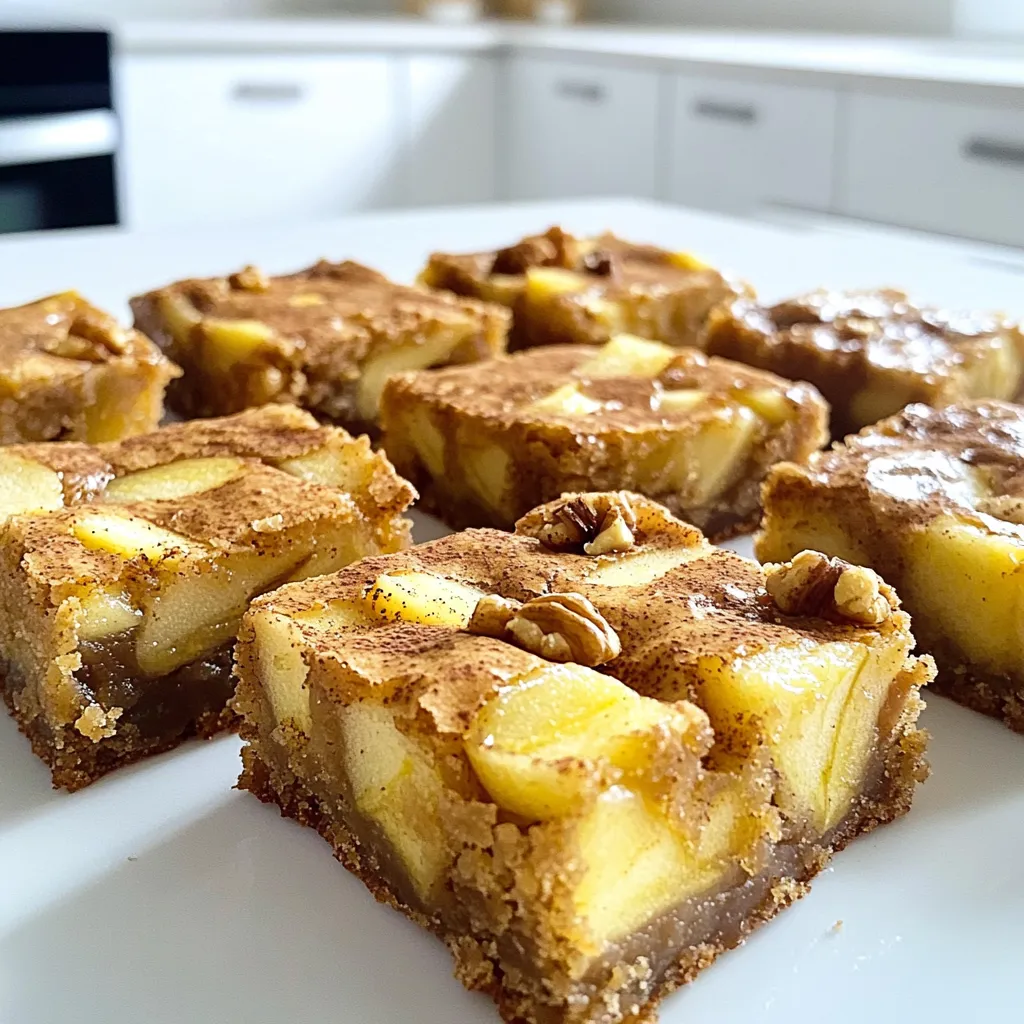
Craving a sweet treat that’s full of flavor? Brown Butter Apple Blondies are the answer! These blondies blend nutty brown

To make potato roses, you need: - 4 medium-sized potatoes (preferably Yukon Gold or red potatoes) - 2 tablespoons olive oil - 1 teaspoon garlic powder - 1 teaspoon dried thyme - 1 teaspoon paprika - Salt and pepper to taste - Fresh parsley for garnish - 1 cup grated cheese (optional, for a cheesy twist) Choose Yukon Gold or red potatoes for the best flavor. These types have a creamy texture. Look for firm potatoes without any soft spots. The skin should be smooth and free of blemishes. These details matter for a great taste. You can add more flavor by mixing in different herbs. Try rosemary or oregano for a unique twist. If you love spice, add some chili powder for heat. Cheese can also change the flavor; cheddar or mozzarella work well. {{ingredient_image_1}} First, preheat your oven to 425°F (220°C). Line a muffin tin with greased foil or silicone liners. This helps the potato roses keep their shape. Next, wash and peel the potatoes. I like to use Yukon Gold or red potatoes for their creamy texture. Slice the potatoes very thinly, about 1/8 inch thick. A mandoline works great for this. Try to make the slices uniform. This ensures even cooking and a lovely look. Now, it's time to assemble the roses. In a large bowl, mix the potato slices with olive oil, garlic powder, thyme, paprika, salt, and pepper. Toss until all the slices are coated. Take one slice and roll it into a tight spiral. Place the roll in the muffin tin. Add more slices around the first roll, layering as you go. Keep adding until the cup is nearly full. If you want a cheesy twist, sprinkle grated cheese on top of each rose. Place the muffin tin in the oven and bake for 30-35 minutes. Your goal is tender potatoes with crispy edges. If your oven runs hot, check earlier to avoid burning. Once done, take them out and let them cool a bit. Carefully remove the potato roses from the tin. Garnish with fresh parsley before serving. Enjoy your beautiful, tasty potato roses! To cut potatoes thinly, use a mandoline or a sharp knife. Aim for slices about 1/8 inch thick. This helps them cook evenly. If you cut them too thick, they won’t crisp up as nicely. Practice makes perfect, so don’t worry if it takes a few tries. To make sure your potato roses hold their shape, use a muffin tin. Line it with greased foil or silicone cups. This support helps the roses stay upright while baking. Start with one slice and roll it tightly. Add more slices around it, layering as you go. Leave a little space between each rose. If you have a convection oven, reduce the cooking time by about 5 minutes. Convection ovens cook food faster and more evenly. For a standard oven, stick to the 30-35 minute range. Always check for tenderness and crispiness before taking them out. Cooking times may vary based on the oven’s power. Pro Tips Choose the Right Potatoes: Yukon Gold or red potatoes work best for their creamy texture and flavor, which help create tender and delicious roses. Uniform Slices are Key: Using a mandoline ensures even slicing, which promotes consistent cooking and helps avoid any undercooked or overcooked pieces. Layering Technique: When placing the potato slices in the muffin tin, try to overlap them slightly to create a more visually appealing rose shape. Creative Toppings: Feel free to experiment with different cheeses or herbs for a unique flavor twist. Cheddar, mozzarella, or even feta can enhance the dish! {{image_2}} You can add cheese to your potato roses for a tasty twist. Use about one cup of grated cheese. Cheddar, mozzarella, or even goat cheese work great here. After you layer the potato slices, sprinkle cheese on top before baking. The melted cheese adds flavor and a nice texture. It makes each bite creamy and rich. You’ll love how the cheese pairs with the crispy edges of the potatoes. You can change the flavor by using different herbs and spices. Instead of just thyme, try rosemary or oregano. For a kick, add some chili flakes or cayenne pepper. You can even use fresh herbs if you have them. Just chop them up and mix them in with the potato slices. These small changes can take your potato roses to a new level. Think about using other vegetables to make your roses pop. Zucchini, carrots, or sweet potatoes can work well. Slice them thinly, just like the potatoes. Mix the colors together for a vibrant look. This will not only taste great but also make your dish eye-catching. Your guests will love the colorful and tasty display on their plates. After enjoying your potato roses, store leftovers in an airtight container. Let them cool down first. Place a paper towel inside to absorb moisture. This helps keep them crispy. Store the container in the fridge. They will stay fresh for about three days. To reheat your potato roses, use the oven. Preheat it to 350°F (175°C). Place the potato roses on a baking sheet. Heat them for about 10-15 minutes. This method keeps them crispy. Avoid using the microwave, as it makes them soggy. If you want to freeze potato roses, let them cool completely. Arrange them on a tray in a single layer. Freeze them for about one hour. Once frozen, transfer them to a freezer bag. Make sure to remove as much air as possible. They can last up to three months in the freezer. When ready to eat, thaw them overnight in the fridge before reheating. Yes, you can use different types of potatoes. Yukon Gold and red potatoes work best. They hold their shape well and have great flavor. Other types, like Russets, can be used too. Just remember, they may not hold their shape as well. Experiment with different varieties for unique tastes! To make potato roses ahead of time, follow these steps: - Prepare the potato slices and season them. - Assemble the roses but do not bake them yet. - Cover the muffin tin with plastic wrap and store it in the fridge. - Bake them when you are ready to serve. This method saves you time! Potato roses pair well with many dishes. Here are some ideas: - Serve them alongside a fresh salad for a light meal. - They go great with grilled meats like chicken or steak. - Try them with a creamy dip or sauce. - You can also serve potato roses with roasted vegetables for a complete meal. These options will make your meal fun and tasty! You learned how to make potato roses from this blog post. We covered the best ingredients, preparation steps, and ways to customize your dish. You now know how to select good potatoes and how to keep the roses in shape while baking. Remember to try cheese or herbs for fun variations. Store leftovers properly for later enjoyment. With these tips, you're ready to impress at your next meal. Enjoy the process and have fun creating!

Potato Roses Delightful and Simple Recipe Guide

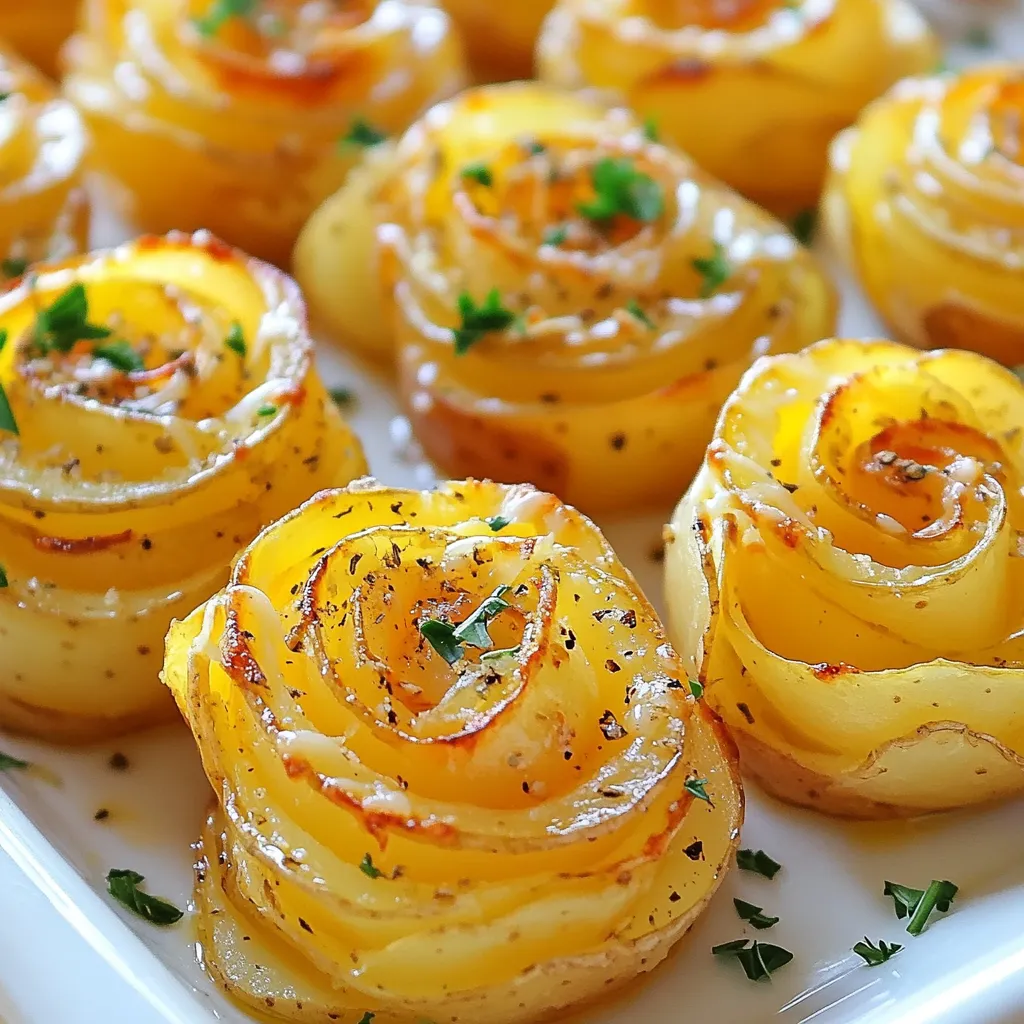
Looking for a fun and easy dish to impress your friends? Potato Roses are a perfect choice! This guide will

To make these tasty donuts, gather the following main ingredients: - 1 cup all-purpose flour - 1/2 cup granulated sugar - 1/4 cup brown sugar, packed - 1 teaspoon baking powder - 1/2 teaspoon baking soda - 1/4 teaspoon salt - 1/2 teaspoon ground cinnamon - 1/4 teaspoon nutmeg - 1/2 cup buttermilk, at room temperature - 1 large egg, at room temperature - 1/2 teaspoon vanilla extract - 1/2 cup unsalted butter (for browning) These ingredients give the donuts their light texture and rich flavor. The brown sugar adds depth, while the spices bring warmth and comfort. For the sweet maple glaze, you will need: - 1/2 cup maple syrup - 1 cup powdered sugar This glaze makes the donuts shine with a lovely sweetness. The maple syrup adds a unique flavor that pairs perfectly with the brown butter. If you need to swap out some ingredients, here are a few great options: - All-purpose flour can be replaced with whole wheat flour for a healthier version. - Buttermilk can be made by mixing milk with a bit of vinegar or lemon juice. - Granulated sugar can be substituted with coconut sugar if you prefer a less processed option. - For a dairy-free version, use almond milk or oat milk and a plant-based butter. These substitutions keep the taste delightful while catering to your dietary needs. Start by preheating your oven to 350°F (175°C). This step is key for perfect donuts. While the oven heats, grab your donut pan. Lightly grease it with non-stick spray. This helps prevent the donuts from sticking. Next, we’ll brown the butter. In a small saucepan, melt 1/2 cup of unsalted butter over medium heat. Gently swirl the pan as it melts. Watch it closely. In about 5-7 minutes, it will turn a deep golden brown. It will smell nutty and delicious. Remove it from heat and let it cool slightly. Now, it’s time to mix your dry ingredients. In a large bowl, whisk together: - 1 cup all-purpose flour - 1/2 cup granulated sugar - 1/4 cup brown sugar, packed - 1 teaspoon baking powder - 1/2 teaspoon baking soda - 1/4 teaspoon salt - 1/2 teaspoon ground cinnamon - 1/4 teaspoon nutmeg Make sure everything is well combined. In another bowl, mix your wet ingredients. Combine 1/2 cup buttermilk, 1 large egg, and 1/2 teaspoon vanilla extract. Slowly add the slightly cooled browned butter. Whisk until smooth. Pour the wet mixture into the dry ingredients. Gently fold them together until just combined. Be careful not to overmix. Transfer the batter into a piping bag or zip-top bag. Snip off the corner of the bag. Fill each cavity of the donut pan about 2/3 full. Bake for 10-12 minutes. They should be golden brown. A toothpick should come out clean from the center. Let them cool in the pan for about 5 minutes, then move to a wire rack. While the donuts cool, prepare the maple glaze. In a bowl, whisk together 1/2 cup maple syrup and 1 cup powdered sugar. Mix until smooth. If the glaze is too thick, add a teaspoon of water. Once the donuts are cool, dip the tops into the glaze. Let them set on a wire rack or plate. Enjoy your sweet treat! To make sure your butter is perfectly browned, watch it closely. Start by melting the butter in a pan over medium heat. Swirl the pan often. This helps the butter brown evenly. You want a deep golden color. It should smell nutty, which means it’s ready. This will take about 5-7 minutes. If it burns, you need to start over. When making the batter, don’t overmix. Mix just until the wet and dry ingredients are combined. Overmixing makes donuts tough. Also, use room temperature ingredients. This helps the batter blend smoothly. If your egg or buttermilk is cold, it can shock the batter and change the texture. For the glaze, start with maple syrup and powdered sugar. Mix them until smooth. If the glaze is too thick, add a little water, one teaspoon at a time. Keep mixing until you get the right consistency. It should coat the back of a spoon but not drip off too fast. This will give your donuts a nice, even glaze. {{image_2}} You can easily change the taste of your donuts. Try using different extracts. For example, almond or maple extract adds a unique twist. Just replace half of the vanilla extract with your chosen flavor. You can also use spices like cardamom or ginger for warmth. Experimenting with flavors helps you find your favorite. Adding texture to your donuts makes them even better. Chop up nuts like walnuts or pecans and fold them into the batter. If you love chocolate, mix in chocolate chips. Dark or milk chocolate works great here. Just be careful not to overmix, as this can make your donuts dense. These add-ins make every bite exciting and tasty. You can switch up the way you glaze your donuts. Instead of the classic maple glaze, try a chocolate glaze. Just melt chocolate and dip the donuts in it. You can also sprinkle toppings like crushed nuts or sprinkles on the glaze. For a lighter option, dust them with powdered sugar. These techniques allow you to create a variety of delicious donuts to enjoy! To keep your Brown Butter Maple Donuts fresh, store them in an airtight container. Layer parchment paper between the donuts to prevent them from sticking together. Place the container in a cool, dry spot, like your kitchen counter. This method helps maintain the donuts' soft texture and delicious flavor for up to three days. If you want to save some donuts for later, freezing is a great option. Allow the donuts to cool completely before freezing. Wrap each donut in plastic wrap, then place them in a freezer bag. Squeeze out the air before sealing. Properly stored, these donuts can last in the freezer for up to three months. When you're ready to enjoy them, simply thaw at room temperature. To bring back the warm, fresh taste of your donuts, reheat them in the oven. Preheat your oven to 350°F (175°C). Place the donuts on a baking sheet and warm them for about 5-10 minutes. This method keeps the outside crisp while warming the inside. Avoid using the microwave, as it can make the donuts chewy rather than soft and fluffy. Enjoy your treats as if they were just baked! If you don’t have buttermilk, you can make a quick substitute. Mix 1/2 cup of milk with 1/2 tablespoon of lemon juice or vinegar. Let it sit for about 5 minutes. This will create a similar tangy flavor. You can also use plain yogurt or sour cream, thinned with a little milk. Yes, you can make these donuts vegan! Replace the egg with a flax egg. To make a flax egg, mix 1 tablespoon of ground flaxseed with 2.5 tablespoons of water. For buttermilk, use a non-dairy milk like almond or soy milk with a splash of vinegar. Finally, substitute the butter with a vegan butter or coconut oil. Brown Butter Maple Donuts stay fresh for about 2 days at room temperature. To keep them longer, store them in an airtight container in the fridge for up to a week. You can also freeze them for up to 3 months. Just thaw them at room temperature before enjoying. Finding Brown Butter Maple Donuts can be fun! Check local bakeries or coffee shops. Many places offer seasonal treats. You can also search online for bakeries that specialize in gourmet donuts. Some might even deliver! Making Brown Butter Maple Donuts is fun and rewarding. We covered the main ingredients and how to make a tasty glaze. I shared step-by-step instructions and helpful tips to avoid common mistakes. You can even try different flavors or store leftovers easily. Enjoying these donuts brings joy to your day. Try this recipe, experiment, and share with friends. Get ready to impress everyone with your delicious treats!

Brown Butter Maple Donuts Irresistible Sweet Treat

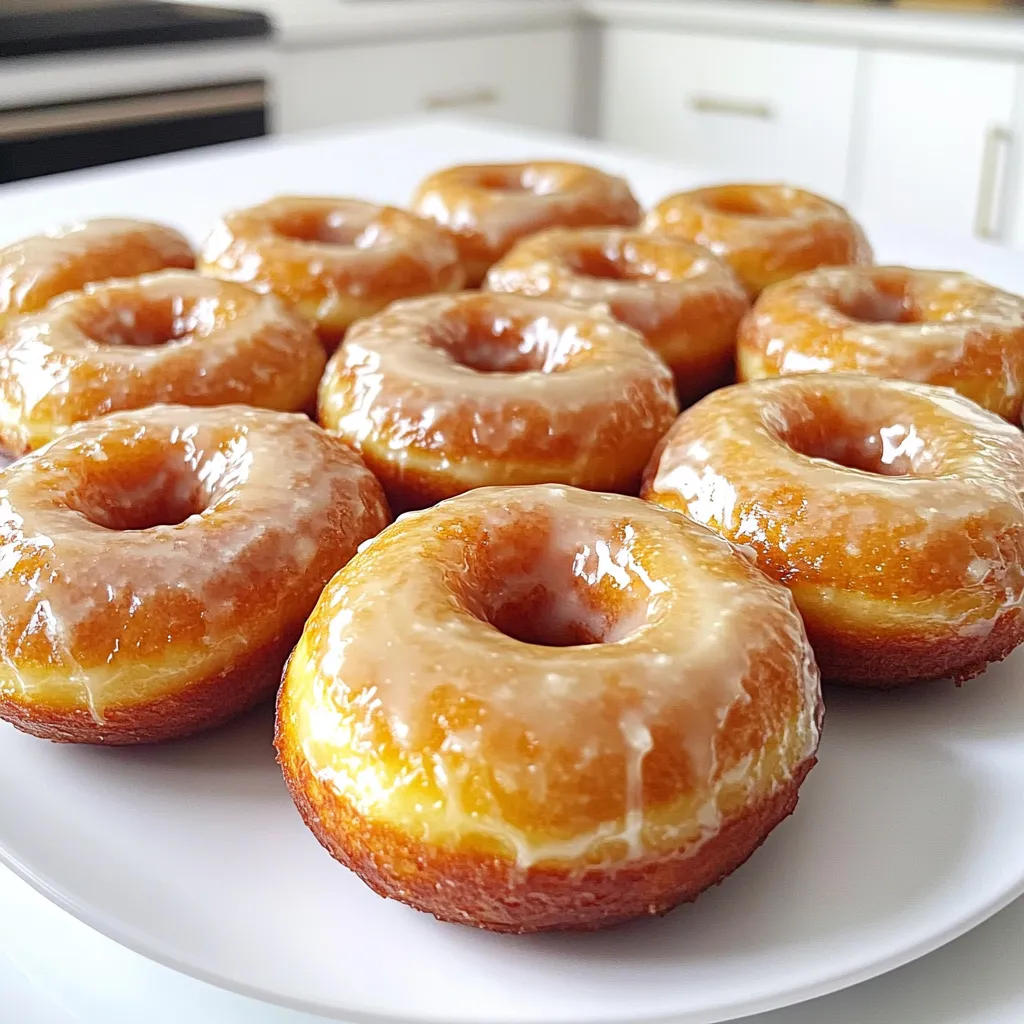
If you love donuts, get ready for a treat! Brown Butter Maple Donuts are rich, sweet, and oh-so-delicious. I’ll guide

Here’s what you need for crispy air fryer potato wedges: - 4 medium russet potatoes - 3 tablespoons olive oil - 2 teaspoons garlic powder - 1 teaspoon onion powder - 1 teaspoon smoked paprika - 1 teaspoon dried oregano - Salt and pepper to taste - Fresh parsley, chopped (for garnish) These simple ingredients make a big difference. The russet potatoes give a fluffy inside and a crispy outside. Olive oil helps the spices stick and enhances the flavor. Garlic powder and onion powder add depth to the taste. Smoked paprika gives a nice kick. Dried oregano adds herb freshness. Lastly, don't forget salt and pepper for the perfect finish. Using fresh parsley as a garnish makes the dish look bright and inviting. It’s a simple step that adds color and a burst of flavor. Start by washing and scrubbing the potatoes. This removes dirt and makes them clean. Pat them dry with a kitchen towel. Next, cut each potato in half lengthwise. Then, cut each half into 4 to 6 wedges. The size of the wedges can change how they cook. In a large bowl, mix the wedges with olive oil. Add 2 teaspoons of garlic powder, 1 teaspoon of onion powder, 1 teaspoon of smoked paprika, and 1 teaspoon of dried oregano. Sprinkle in salt and pepper to taste. Toss everything together well. This step ensures every wedge gets that tasty flavor. First, preheat your air fryer to 400°F (200°C) for about 3 minutes. This helps the wedges cook evenly. Next, place the seasoned wedges in a single layer in the air fryer basket. You may need to do this in batches if your fryer is small. Cook the wedges for 15 to 20 minutes. Remember to shake the basket halfway through. This gives you golden brown and crispy wedges. When done, remove them and let them cool for a few minutes. Enjoy your delicious, crispy potato wedges! To get crispy wedges, start by drying the potatoes. After washing, pat them dry with a towel. This step is key. If the potatoes are wet, they will steam instead of crisp. Adjust the cooking time if your wedges are thick. Thicker wedges need a bit more time to get that golden look. Aim for about 20 minutes for thicker cuts. Adding extra spices can take your wedges to the next level. Consider using cayenne for heat or rosemary for a fresh twist. You can also try sweet potatoes for a different flavor. They add a nice sweetness and color. Each type of potato brings its unique taste, so feel free to experiment. When making multiple batches, keep the first batch warm. Place them on a baking sheet in a low oven, about 200°F. This way, everyone can enjoy hot, crispy wedges together. Don’t overcrowd the air fryer basket. Leave space for air to flow, ensuring each wedge cooks evenly. {{image_2}} You can change the flavor of your potato wedges easily. Here are some fun ideas: - Spicy potato wedges: Add cayenne pepper or chili powder for heat. Mix these with your oil and spices. This gives a nice kick to the dish. - Herb-infused options: Try adding fresh or dried herbs. Rosemary, thyme, or basil work great. They add a fresh taste. Mix them with the garlic and onion powder for a lovely aroma. You can cook potato wedges in different ways. Each method gives a unique taste: - Oven-baked version: Preheat your oven to 425°F (220°C). Spread the seasoned wedges on a baking sheet. Bake for 25-30 minutes until crispy. Flip them halfway for even cooking. - Traditional frying method: Heat oil in a deep pan. Fry the wedges until golden brown. This method gives a rich, crispy texture. Be careful with hot oil! Pairing your potato wedges with the right dips makes them even better. Here are some suggestions: - Pairing with dips: Serve with ranch, ketchup, or aioli. These dips enhance the flavor and add creaminess. - Complementary dishes: Enjoy them with burgers, grilled chicken, or salads. They make a great side dish. Mix and match to find your favorite combo! To keep your potato wedges fresh, place them in an airtight container. Glass or plastic containers work well. Make sure the wedges cool to room temperature before sealing. This prevents moisture buildup, which can make them soggy. The best way to reheat potato wedges is in the air fryer. Set it to 350°F (175°C) and heat for about 5-7 minutes. This method helps retain crispiness. You can also use a conventional oven. Heat it to 375°F (190°C) and bake for about 10 minutes. Yes, you can freeze potato wedges! To freeze, first cook them fully. Let them cool down before placing them in a single layer on a baking sheet. Freeze for about 1-2 hours until firm. Then, transfer them to a freezer bag or container. When ready to eat, bake them directly from the freezer. No need to thaw! To make air fryer potato wedges from scratch, first wash and scrub 4 medium russet potatoes. Pat them dry with a towel. Cut each potato in half lengthwise, then slice each half into 4 to 6 wedges. In a bowl, mix the wedges with 3 tablespoons olive oil, 2 teaspoons garlic powder, 1 teaspoon onion powder, 1 teaspoon smoked paprika, 1 teaspoon dried oregano, and salt and pepper. Toss until coated. Preheat your air fryer to 400°F (200°C). Arrange the wedges in a single layer in the air fryer basket. Cook for 15 to 20 minutes, shaking halfway through. Enjoy your crispy wedges! The best type of potato for wedges is the russet potato. Russets are starchy and crisp up well when cooked. They have a fluffy interior and a great texture. You can also try Yukon Gold potatoes for a buttery flavor. Avoid waxy potatoes, as they may not get as crispy. Yes, you can use different seasonings for air fryer potato wedges! You can try chili powder for heat or Italian herbs for a fresh taste. Other options include parmesan cheese, lemon zest, or even a sprinkle of cayenne pepper. Feel free to mix and match spices to find your favorite flavor. To ensure your wedges are crispy, dry the potatoes well after washing. Make sure they are not overcrowded in the air fryer basket. Cooking in batches helps. Shake the basket halfway through cooking to allow even air flow. Lastly, adjust cooking time as needed for your air fryer model. You can store cooked potato wedges in the fridge for about 3 to 5 days. Place them in an airtight container to keep them fresh. When you’re ready to eat, reheat them in the air fryer to regain their crispiness. Air fryer potato wedges are easy and tasty. We covered the key ingredients, crucial steps, and helpful tips. You learned how to season, cook, and store them for later. Explore flavor options and different cooking methods to mix things up. Enjoy your crispy wedges with your favorite dips. With these ideas, you can create a delicious snack that everyone will love. Happy cooking!

Air Fryer Potato Wedges Crispy and Flavorful Treat

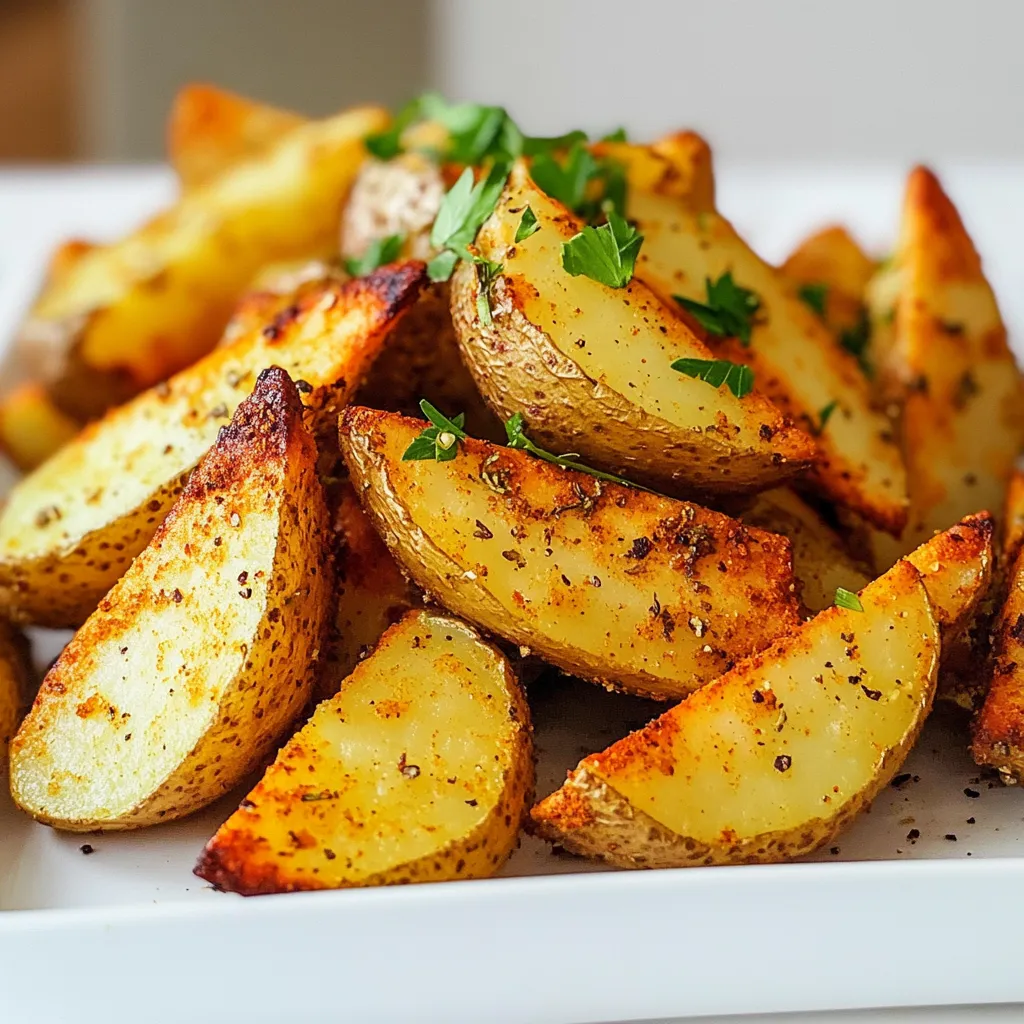
Looking for a delicious snack that’s easy and quick? Try these air fryer potato wedges! They’re crispy, flavorful, and perfect

Older posts
Newer posts
← Previous Page1 … Page3 Page4 Page5 … Page144 Next →

dsad

© 2025 So Yum Recipes • Built with GeneratePress

Our Policies

  • Copyright Policy
  • Cookie Policy
  • GDPR Policy
  • Privacy Policy
  • Disclaimer
  • Terms Of Use

More Information

  • Home
  • About
  • Contact
  • Appetizers
  • Dessert
  • Dinner
  • Drinks
©2025, So Yum Recipes About Back To Top