Skip to content
DisclaimerTerms Of UseGDPR PolicyCookie Policy

So Yum Recipes

  • Home
  • Drinks
  • Appetizers
  • Dinner
  • Dessert
  • About
  • Contact
  • Privacy Policy
DisclaimerTerms Of UseGDPR PolicyCookie Policy

Chloe

- 4 cups mixed salad greens (such as romaine and spinach) - 1 cup shredded red cabbage - 1 cup shredded carrots - 1 bell pepper (red or yellow), sliced - 1 cucumber, thinly sliced - 1 cup edamame, shelled (cooked if using frozen) - 1/2 cup fresh cilantro, chopped In this Crunchy Thai Peanut Salad, fresh ingredients shine. The mixed greens provide a crisp base. Shredded red cabbage adds color and crunch. Shredded carrots bring a touch of sweetness. The bell pepper adds a slight bite, while cucumber adds coolness. Edamame boosts protein, making the salad filling. Fresh cilantro ties everything together with its bright flavor. - 3 tablespoons peanut butter - 2 tablespoons soy sauce - 1 tablespoon honey or agave syrup - 1 tablespoon rice vinegar - 1 tablespoon sesame oil - 1 teaspoon grated ginger - 1 clove garlic, minced - 1 tablespoon lime juice The dressing transforms this salad into a gourmet dish. Peanut butter gives it a creamy texture. Soy sauce adds umami depth. Honey or agave syrup brings a hint of sweetness. Rice vinegar and lime juice add tang. Sesame oil gives a nutty flavor, while ginger and garlic add warmth. - 1/2 cup roasted peanuts, chopped - Additional cilantro Toppings enhance both the taste and texture. Roasted peanuts provide crunch and richness. Extra cilantro brightens the dish, making it even more fresh. You can play with these toppings as you like. For a nut-free version, skip the peanuts. The salad will still be delicious! For the full recipe, check out the details above. Enjoy making this vibrant salad! To start, gather all fresh ingredients. You need mixed salad greens, shredded cabbage, carrots, bell pepper, cucumber, edamame, and cilantro. In a large salad bowl, combine these ingredients. Toss them gently to mix well. For even distribution, ensure you cut the veggies into similar sizes. This helps everyone enjoy a bit of everything in each bite. Also, use a large bowl. It gives you more space to toss the salad without spilling. Next, let’s make the dressing. In a small bowl, add peanut butter, soy sauce, honey or agave syrup, rice vinegar, sesame oil, grated ginger, minced garlic, and lime juice. Whisk these together until smooth. When whisking, start slowly. This helps combine the peanut butter with the other ingredients. If the dressing is too thick, add a little water. Taste it to see if you want more sweetness or salt. Adjust it to fit your taste. Now it’s time to combine the salad and dressing. Drizzle the dressing over the salad. Use a large spoon to toss everything together gently. You want all the ingredients to be coated evenly. For serving, you can use large bowls or plates. Garnish with extra cilantro and a few whole peanuts on top. This makes the dish look colorful and inviting. Enjoy the crunchy, fresh flavors! For the full recipe, check out the detailed instructions above. Fresh ingredients are key to a great Crunchy Thai Peanut Salad. The greens should be crisp and vibrant. Use salad greens like romaine and spinach for a good mix of textures. Shredded cabbage and carrots also add a nice crunch. For peanuts, I suggest using roasted, unsalted peanuts. They give a great flavor and texture. If you want an extra kick, try spicy peanuts. If you have leftover dressing, store it in an airtight container. Keep it in the fridge for up to a week. You can also use the dressing on other salads. It works well with mixed greens or even grain salads. Adding lean proteins can make this salad a full meal. Try grilled chicken, shrimp, or tofu for a boost. You can also pack in more veggies. Bell peppers, snap peas, or radishes work great. More veggies mean more crunch and nutrients! {{image_2}} For a vegetarian twist, consider using plant-based protein alternatives. You can add chickpeas or lentils for extra protein. These options are hearty and filling. If you want a nut-free dressing, try tahini instead of peanut butter. It has a creamy texture and pairs well with the salad. To make this salad more filling, add grilled chicken or shrimp. They bring a nice flavor and texture. If you want a vegetarian protein, try cubed tofu. It soaks up the dressing well and adds a great bite. If you like spice, add chili flakes for a kick. The heat balances out the creamy dressing. You can also adjust the sweetness. Use maple syrup or agave for a different taste. These small tweaks can make a big difference in flavor. For the full recipe, check out Crunchy Thai Peanut Salad. To keep your Crunchy Thai Peanut Salad fresh, store it in the fridge. Use an airtight container to prevent moisture loss. If you made extra dressing, keep it in a separate container. This keeps the salad crisp and tasty. Your salad will last about three days in the fridge. After that, the veggies might wilt. Look for signs of spoilage, like a sour smell or slimy greens. If you see these signs, it’s best to toss it out. For meal prep, use glass containers. They keep your salad fresh and let you see what’s inside. Portion your salad into single servings. This makes it easy to grab for lunch. Plus, it helps with healthy eating choices. To make this salad vegan, replace honey with agave syrup. Both serve as sweeteners. Agave syrup has a similar taste. For a dairy-free dressing, ensure your peanut butter contains no added dairy and use plant-based alternatives. Yes, you can make the dressing ahead. Store it in the fridge for up to one week. Chilling the dressing can enhance its flavors. It allows the ingredients to blend well and taste better. You can add seasonal vegetables like bell peppers or snap peas. These add color and crunch. For more nutrition, try adding chickpeas or quinoa. These ingredients boost protein and fiber content. Yes, the salad can be gluten-free. Use gluten-free soy sauce, like tamari, instead of regular soy sauce. Always check for cross-contamination when using processed foods. This ensures that your meal stays gluten-free and safe. This blog post covered how to create a Crunchy Thai Peanut Salad from fresh ingredients to dressing. You learned about mixing salad greens, making a tasty peanut dressing, and adding fun toppings. We also shared tips for crunch and storage, plus ways to customize your salad. In summary, this salad is fresh and full of flavor. Experiment with your favorite ingredients to make it unique. Enjoy a healthy meal that tastes amazing while meeting your dietary needs.

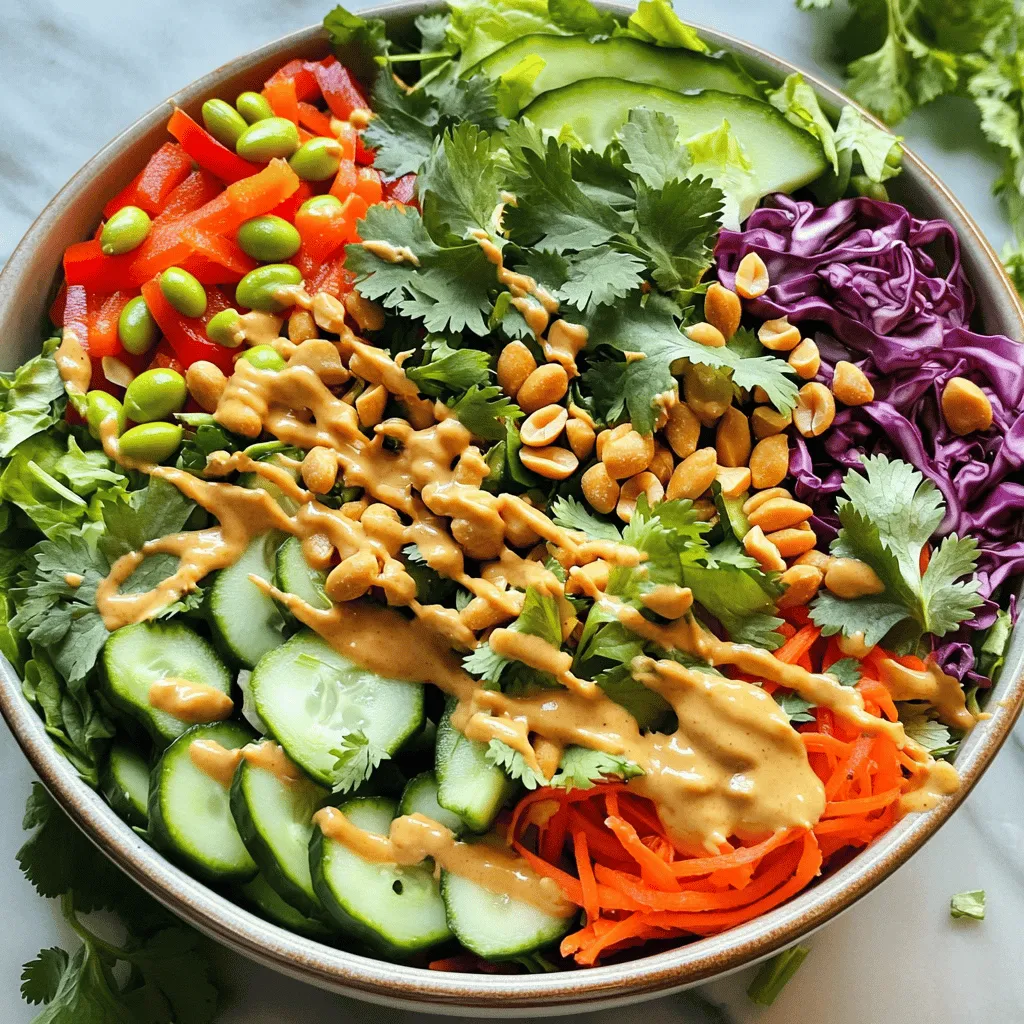
Crunchy Thai Peanut Salad Fresh and Flavorful Dish

If you’re looking for a light yet satisfying meal, my Crunchy Thai Peanut Salad is the answer. This vibrant dish

To make this dish, you need a few key items. Here’s what you’ll need: - 4 salmon fillets - 1/4 cup honey - 3 tablespoons soy sauce These ingredients create the base for a sweet and savory glaze that makes the salmon shine. Next, we add some flavor with aromatics and seasonings. These are essential to bring out the best taste: - 4 cloves garlic, minced - 1 tablespoon fresh ginger, grated - Salt and pepper to taste The garlic and ginger add a fresh kick. The salt and pepper help balance everything. Finally, you need a few cooking essentials to prepare your dish: - 2 tablespoons olive oil - 1 tablespoon sesame seeds (for garnish) - Fresh cilantro or green onions (for garnish) Olive oil helps cook the salmon perfectly. The sesame seeds and herbs make your dish look beautiful and bright. For the full recipe, check out [Full Recipe]. Now you have all the ingredients to create a delicious honey garlic glazed salmon! To make the honey garlic glaze, start by grabbing a small bowl. Add 1/4 cup of honey, 3 tablespoons of soy sauce, 4 minced garlic cloves, and 1 tablespoon of grated ginger. Whisk these ingredients together until they blend well. This glaze will give your salmon a sweet and savory flavor that you will love. Now, let's season the salmon fillets. Take your 4 salmon fillets and sprinkle salt and pepper on both sides. This simple step enhances the taste of the fish. Use a light hand, as we want the glaze to shine through. If you like, you can let the fillets sit for a few minutes to absorb the seasoning. Heat 2 tablespoons of olive oil in a large skillet over medium-high heat. Once the oil is hot, place the salmon fillets in the skillet, skin-side down if they have skin. Cook for about 4 minutes until the skin is crispy. Carefully flip each fillet and lower the heat to medium. Brush the honey garlic glaze generously over the top of each piece. Cook for another 3 to 4 minutes, basting occasionally with the glaze. The salmon is done when it flakes easily with a fork. Transfer the glazed salmon to a serving platter and drizzle any leftover glaze from the pan on top. For a final touch, sprinkle sesame seeds and garnish with fresh cilantro or sliced green onions. Enjoy your delicious meal! For the full recipe, check out the [Full Recipe]. To get a great glaze on your salmon, start with the right mix. Use equal parts honey and soy sauce. This combo gives a sweet and salty kick. Add minced garlic and grated ginger for flavor. When cooking, brush the glaze on the salmon often. This keeps it moist and adds layers of taste. Cooking salmon can be tricky. For perfect doneness, check the thickest part. It should be opaque and flake easily with a fork. Aim for about 3-4 minutes per side. If you have skin on, cook skin-side down first. This helps keep the fish together. Lower the heat if the outside cooks too fast. Making your dish look great is easy! After cooking, place the salmon on a nice plate. Drizzle any leftover glaze over the top. Sprinkle sesame seeds for crunch. Finally, add fresh cilantro or sliced green onions. These bright colors make the dish pop! For the full recipe, visit the [Full Recipe]. {{image_2}} You can switch out honey and soy sauce for new flavors. For a sugar-free option, use agave syrup instead of honey. It gives a similar sweetness. If you want a different taste, use maple syrup too. For soy sauce, try tamari for a gluten-free choice. Coconut aminos also work well. They add a slight sweetness and a unique flavor. You can cook honey garlic glazed salmon in two main ways: baking or pan-searing. Baking is simple. Preheat your oven to 375°F (190°C). Place the salmon on a baking sheet and brush the glaze on top. Bake for 15-20 minutes until it flakes easily. Pan-searing gives the salmon a nice crust. Heat olive oil in a skillet and follow the steps in the Full Recipe for a crispy outside and juicy inside. Honey garlic glazed salmon pairs well with many sides. Serve it with steamed broccoli for a healthy choice. Rice or quinoa makes a great base too. You can add a fresh salad with mixed greens and a light dressing. Roasted vegetables, like carrots or asparagus, also complement the dish nicely. To keep your honey garlic glazed salmon fresh, store it in an airtight container. Place the salmon in the fridge. It will stay good for up to three days. Make sure to let it cool down first. This helps keep the texture nice. If you have sauce left, store it separately. This keeps the salmon from getting soggy. To reheat your salmon, use low heat. You can use a skillet or an oven. If using a skillet, add a little olive oil. Heat the skillet on low, then add the salmon. Cover it for even heating. If using an oven, preheat to 350°F. Place the salmon on a baking sheet and cover it with foil. Heat for about 10 minutes. This keeps the salmon moist. Yes, you can freeze honey garlic glazed salmon! Wrap each piece tightly in plastic wrap. Then, place the wrapped salmon in a freezer bag. It can last up to three months. When ready to eat, thaw it in the fridge overnight. This will help retain its flavor and texture. For the full recipe, check out the Honey Garlic Glazed Salmon. You can use several fish types. Here are some good options: - Trout - Mackerel - Cod - Tilapia Each of these fish has a nice, light flavor. They will take on the sweet and savory glaze well. Keep in mind that cooking times may vary depending on the thickness of the fillets. Always check for doneness with a fork. Yes, you can use a sugar substitute. Some popular options include: - Maple syrup - Agave nectar - Coconut sugar - Stevia These can work well in the glaze. Just remember that they may change the taste a bit. Start with a small amount and adjust to your liking. Absolutely! Honey garlic glazed salmon is great for meal prep. Here are some tips: - Cook the salmon and glaze as directed. - Let it cool before storing. - Place in airtight containers. You can keep it in the fridge for up to three days. Reheat it gently to keep it moist. Enjoy it with rice or veggies for quick meals! Check the Full Recipe for more details on preparation. Honey garlic glazed salmon is easy to make and delicious. We covered essential ingredients, from salmon to aromatics. I shared step-by-step cooking instructions to help you shine in the kitchen. Remember to check for doneness for perfect results. You can even switch ingredients for new flavors or try baking. Finally, store and reheat leftovers so nothing goes to waste. Enjoy your cooking journey and create tasty meals with this recipe. Happy cooking!

Honey Garlic Glazed Salmon Delightful and Easy Recipe

Get ready to treat your taste buds with my Honey Garlic Glazed Salmon! This delightful recipe is not only easy

To make a tasty lemon herb couscous salad, you need the following ingredients: - 1 cup couscous - 1 1/4 cups vegetable broth - 1/2 cup cherry tomatoes, halved - 1/2 cucumber, diced - 1/4 red onion, finely chopped - 1/4 cup fresh parsley, chopped - 1/4 cup fresh mint, chopped - 2 tablespoons olive oil - 2 tablespoons lemon juice - Zest of 1 lemon - Salt and pepper to taste These ingredients come together to create a fresh and bright dish. The couscous serves as a fluffy base, while the veggies add crunch and color. The herbs bring a lovely aroma, making each bite a delight. You can add some extra ingredients to make this salad even better. Here are some ideas: - Avocado for creaminess - Feta cheese for a salty kick - Chickpeas for protein - Bell peppers for sweetness - Nuts or seeds for crunch These add-ins can change the flavor and texture of the salad. Feel free to mix and match to find your favorite combination. To prepare this salad easily, you need a few basic tools: - Medium saucepan for cooking the couscous - Large mixing bowl for combining the ingredients - Small bowl for whisking the dressing - Fork for fluffing the couscous Having the right tools helps make the process smooth and enjoyable. Now you’re ready to create this refreshing dish! For the Full Recipe, check the details provided. First, grab a medium saucepan. Pour in the vegetable broth and bring it to a boil. Once it bubbles, stir in the couscous. Cover the pan tightly and take it off the heat. Let it sit for five minutes. This step lets the couscous soak up all that tasty broth. After five minutes, use a fork to fluff the couscous. This makes it light and airy. Now, let the couscous cool for a few minutes. You want it to be warm, but not hot. While it cools, prepare a large mixing bowl. Add the cooled couscous to the bowl. Next, toss in the halved cherry tomatoes, diced cucumber, finely chopped red onion, parsley, and mint. Mix these fresh ingredients gently. This brings out the bright flavors and makes a colorful salad. In a small bowl, whisk together the olive oil, lemon juice, and lemon zest. Add salt and pepper to taste. Make sure it blends well. This dressing adds zing to the salad. Once mixed, pour the dressing over the couscous mixture. Toss everything gently until all the ingredients are well coated. Taste your salad and adjust the seasoning if needed. You can add more salt, pepper, or lemon juice for extra flavor. For the full recipe, check out the link. To make perfect couscous, start with the right broth. Using vegetable broth adds flavor. Boil the broth, then stir in the couscous. Cover the pan and take it off the heat. Let it sit for five minutes. This lets the couscous absorb all the liquid. After that, fluff it with a fork. This step keeps the grains light and airy. For great flavor, use fresh herbs like parsley and mint. They brighten every bite. Don't forget the lemon juice and zest. They add a tangy twist. You can also add salt and pepper to taste. For a spicy kick, try a pinch of red pepper flakes. Mix and taste as you go, adjusting to your liking. When mixing the salad, do it gently. Use a large bowl to prevent spills. Add the cooled couscous first. Then, add your chopped veggies and herbs. Pour the dressing over the top. Toss lightly to coat everything. This keeps the veggies from getting mushy. Taste again, and adjust the seasoning if needed. For extra flair, serve with lemon zest on top. For the step-by-step process, check out the Full Recipe. {{image_2}} Want to make your salad heartier? Adding protein is a great choice. Chickpeas are a fantastic option. They add a nice texture and boost nutrition. Just rinse and drain a can of chickpeas before adding them. If you prefer meat, grilled chicken works well too. Cut it into bite-sized pieces and mix it in. You can easily change the veggies based on the season. In spring, try adding asparagus or peas. In summer, bell peppers and zucchini shine bright. Fall brings great choices like roasted butternut squash or sweet potatoes. These swaps keep your salad fresh and exciting. If you want to switch up the flavor, try different dressings. A yogurt-based dressing adds creaminess. A balsamic vinaigrette gives a sweet-tart twist. You can even use tahini for a nutty taste. Experimenting with dressings can make the same base salad feel brand new. For the full recipe, check out the details above. Happy cooking! To keep your Lemon Herb Couscous Salad fresh, place it in an airtight container. Make sure the lid seals well to keep out air. This will keep the salad crisp and tasty. If you have extra dressing, store it separately. This way, you can add it just before eating. When stored correctly, the salad lasts about 3 to 5 days in the fridge. If you notice any change in smell or color, it’s best to toss it. Always trust your senses to keep your food safe. Couscous salad is best served cold or at room temperature. If you prefer it warm, you can microwave it. Heat it in short bursts of 30 seconds. Stir between each time to avoid hot spots. However, the fresh flavors shine when served cold, so enjoy it that way if you can! Couscous is a type of pasta made from semolina wheat. It looks like tiny pearls. To make couscous, you boil water or broth, then stir in the couscous. After you cover it, let it sit for about five minutes. The couscous will absorb the liquid and become fluffy. You can then fluff it with a fork for a light texture. Yes, you can make this salad ahead of time. It tastes even better after sitting in the fridge for a few hours or overnight. The flavors have time to blend. Just keep it in an airtight container. When you are ready to serve, give it a gentle toss to mix everything again. Couscous salad pairs well with many dishes. Here are some great options: - Grilled chicken or fish - Roasted vegetables - Hummus with pita bread - A simple green salad - Stuffed bell peppers These side dishes add variety and enhance the meal. To make this recipe gluten-free, use gluten-free couscous or quinoa. Both grains work well in salads. Make sure to check labels for hidden gluten in other ingredients. Some vegetable broths may contain gluten, so choose a gluten-free broth. You can find the Full Recipe for Lemon Herb Couscous Salad in the earlier sections of this article. This recipe includes all the ingredients and steps to make this delicious dish. Enjoy creating your salad! In this blog post, we explored making a Lemon Herb Couscous Salad. We covered the key ingredients and tools needed, along with a step-by-step cooking guide. I shared tips on perfecting texture and flavor. Plus, we looked at variations to suit your taste and how to store leftovers properly. This salad is easy to make and packed with flavor. I hope you enjoy making it as much as I do!

Lemon Herb Couscous Salad Fresh and Flavorful Delight

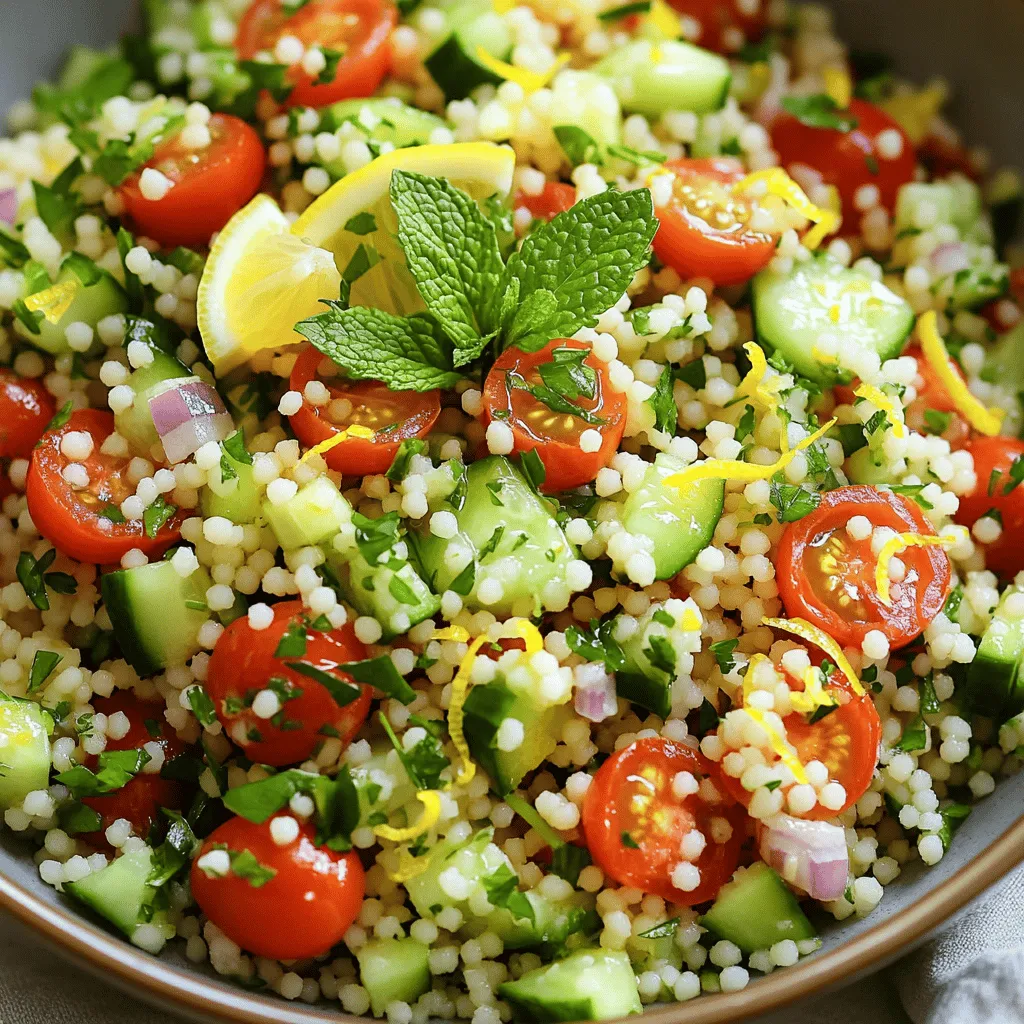
Looking for a fresh and tasty dish? Lemon Herb Couscous Salad is the answer! This salad is easy to make

- 1 lb Brussels sprouts, trimmed and halved - 3 tablespoons balsamic vinegar - 2 tablespoons olive oil - 1 tablespoon honey - 3 cloves garlic, minced - Salt and freshly cracked black pepper, to taste - 1/4 cup crushed walnuts (optional) - 1/4 cup grated parmesan cheese (optional) - Fresh parsley, chopped (for garnish) For this dish, I focus on fresh Brussels sprouts. They should be bright green and firm. The balsamic vinegar adds a sweet-tart flavor. I love using high-quality olive oil for richness. Honey brings a touch of sweetness to balance the vinegar. Fresh garlic adds depth and aroma to the dish. If you want extra flavor, consider adding salt and pepper. They help enhance all the other tastes. Crushed walnuts add a nice crunch and earthy flavor. Parmesan cheese can be sprinkled on top for a savory finish. Lastly, fresh parsley brightens up the dish with color and freshness. This recipe is simple and allows you to customize it. You can find the full recipe with detailed instructions as you gather these ingredients! - Preheat your oven to 400°F (200°C). - Prepare the Brussels sprouts by trimming and halving them. Start by cutting off the tough ends of the Brussels sprouts. Next, slice them in half from top to bottom. This helps them cook evenly and become crispier. - In a large bowl, combine the Brussels sprouts with olive oil, balsamic vinegar, honey, minced garlic, salt, and pepper. - Toss until the Brussels sprouts are evenly coated. For the best flavor, use a big bowl. Add all your ingredients to the bowl. Drizzle the olive oil and balsamic vinegar over the Brussels sprouts. Then, add honey, minced garlic, salt, and pepper. Toss well. Make sure every sprout gets coated in the mixture. This step is key for great flavor. - Spread the Brussels sprouts on a lined baking sheet. - Roast in the oven for 20-25 minutes, stirring halfway through for even cooking. - Add walnuts in the last 5 minutes of roasting, if desired. Lay the coated Brussels sprouts on a baking sheet lined with parchment paper. This helps with cleanup. Roast them for 20-25 minutes. Halfway through, stir them. This keeps them from burning and helps them cook evenly. If you want extra crunch, add walnuts in the last 5 minutes of roasting. This adds a nice texture and flavor. Once done, you will have delicious balsamic roasted Brussels sprouts. For the full recipe, refer to the earlier section. To get the most flavor from your Brussels sprouts, make sure they are coated well. Mix them with olive oil, balsamic vinegar, honey, garlic, salt, and pepper in a big bowl. Toss until every sprout is covered. This will help them roast evenly and soak in all those tasty flavors. Always pick fresh Brussels sprouts. They should feel firm with tight leaves. Fresh sprouts give the best taste and texture. Overcrowding your baking sheet can ruin your dish. If you put too many sprouts together, they will steam instead of roast. This means less flavor and no crispy edges. Try to keep them in a single layer. Also, keep an eye on your sprouts while they roast. Stir them halfway through cooking. This helps them cook evenly and prevents burning. Herbs can take your Brussels sprouts to the next level. Try adding fresh parsley for a pop of color. You can also sprinkle grated parmesan cheese on top while they are still warm. This adds a rich flavor. For a crunchy twist, consider adding crushed walnuts. They give a nice texture and flavor contrast. You can even try some chili flakes for a spicy kick. {{image_2}} You can make balsamic roasted Brussels sprouts even more exciting. Add chili flakes for a spicy kick. Just a pinch can change the whole dish. If you want a citrus twist, try adding orange or lemon zest. This brightens the flavor and adds freshness. Simply sprinkle the zest over the sprouts before roasting. You’ll love how these small changes create big flavors. If you follow a vegan diet, you can easily adapt this recipe. Replace honey with maple syrup or agave nectar. Both options add sweetness without the animal product. For those avoiding gluten, this recipe is already gluten-free! You can enjoy it without worry. These simple swaps keep the dish tasty and accessible for everyone. To keep your balsamic roasted Brussels sprouts fresh, place them in an airtight container. Make sure they cool down first. Store them in the fridge for up to three days. After that, they may lose their great taste and texture. When you want to enjoy your leftovers, the best way to reheat them is in the oven. Preheat your oven to 350°F (175°C). Spread the Brussels sprouts on a baking sheet. Heat them for about 10 to 15 minutes. This method helps to keep them crispy. If they are not crispy enough, you can broil them for a minute or two. Just watch closely to avoid burning. For a quick option, you can also use a microwave. Just heat for 1 to 2 minutes. However, this may make them a bit soft. Enjoy your flavorful side dish again! For the full recipe, click here. To prepare Brussels sprouts for roasting, start by rinsing them under cold water. This removes any dirt. Next, trim the ends with a sharp knife. Cut off about a quarter-inch from the bottom. Then, remove any yellow or damaged outer leaves. After that, slice each sprout in half from top to bottom. This helps them cook evenly. Yes, you can make balsamic roasted Brussels sprouts ahead of time. You can prep the sprouts a day before. Just trim and halve them, then store in an airtight container in the fridge. You can also mix the dressing in advance. Just pour it over the sprouts right before roasting. If you have leftovers, store them in the fridge for up to three days. Balsamic roasted Brussels sprouts pair well with many dishes. They complement roasted chicken or turkey nicely. You can also serve them with grilled steak or fish. For a veggie option, try them with quinoa or a grain bowl. Add some nuts or cheese for extra flavor and crunch. For more ideas, check the Full Recipe. Balsamic roasted Brussels sprouts are tasty and easy to make. We covered the essential ingredients, from Brussels sprouts to balsamic vinegar. The step-by-step guide helps you prepare, mix, and roast them perfectly. With tips for avoiding common mistakes and ideas for variations, you now have the tools to create a great dish. Enjoy experimenting with flavors and making it your own!

Balsamic Roasted Brussel Sprouts Flavorful Side Dish

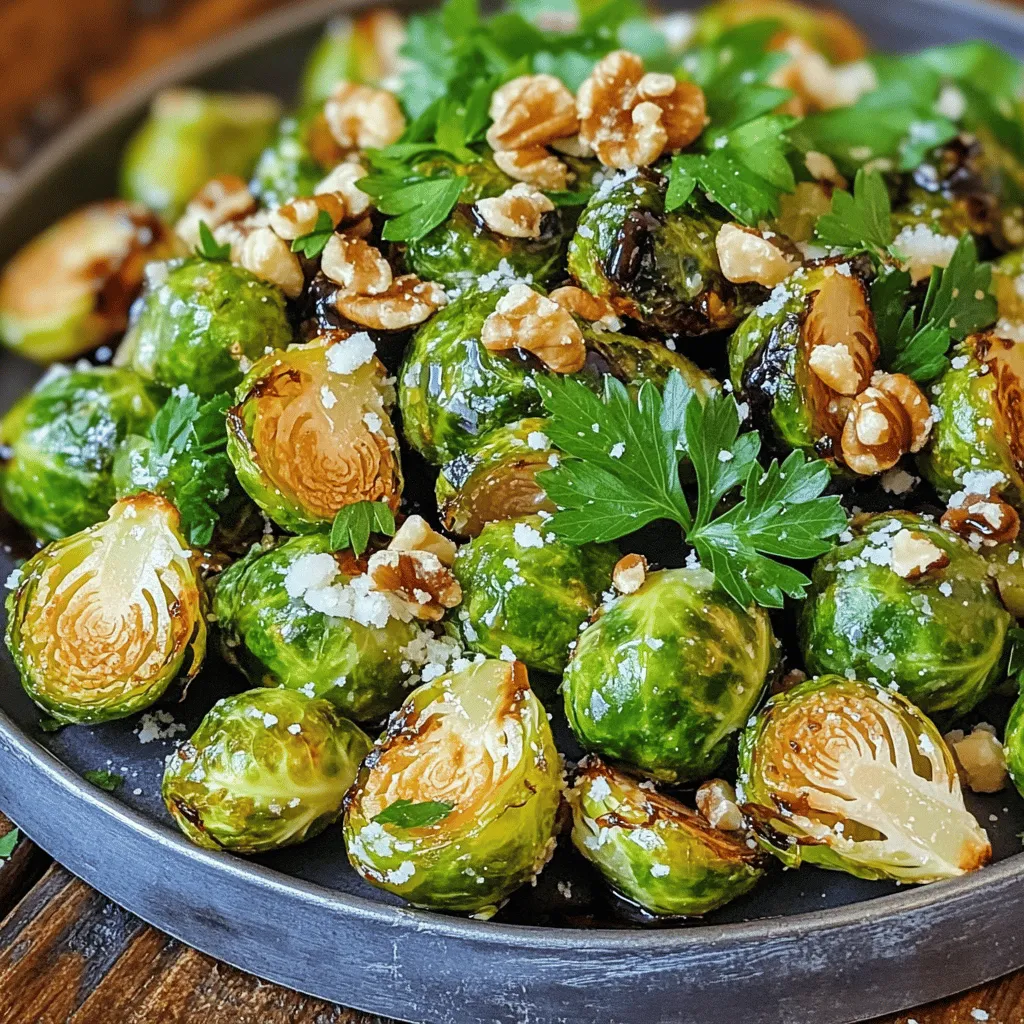
Looking for a side dish that packs a flavorful punch? Balsamic Roasted Brussels Sprouts are your answer! This simple recipe

- 1 can (15 oz) chickpeas, drained and rinsed - 1/2 cup sun dried tomatoes (packed in oil, drained) - 1/4 cup tahini - 3 tablespoons olive oil - 2 tablespoons lemon juice - 1 garlic clove, minced - 1 teaspoon ground cumin - Salt and pepper, to taste - Water, as needed for consistency The main ingredients create a rich and flavorful base. Chickpeas bring protein and creaminess. Sun dried tomatoes add a sweet and tangy taste. Tahini offers a nutty flavor and smooth texture. Olive oil enhances richness, while lemon juice brightens the dish. Garlic provides depth, and cumin adds warmth. - Extra olive oil for drizzling - Fresh herbs for garnish (e.g., parsley, basil) - Crushed red pepper flakes Garnishes can take your hummus to the next level. A drizzle of olive oil adds a shiny finish. Fresh herbs bring color and freshness. Crushed red pepper flakes add a bit of heat. Feel free to mix and match these garnishes to suit your taste. Don't forget to check the [Full Recipe] for all the steps! - Step 1: In a food processor, combine the drained chickpeas, sun dried tomatoes, tahini, olive oil, lemon juice, minced garlic, and ground cumin. - Step 2: Blend the mixture until it is smooth. Stop to scrape the sides as needed. - Step 3: If the hummus is too thick, add water one tablespoon at a time. Blend again until you reach your desired creamy texture. - Step 4: Season the hummus with salt and pepper to taste. Blend once more to mix well. - Step 5: Transfer the hummus to a serving bowl. Drizzle a bit of olive oil on top for flavor. - Step 6: Chill the hummus for at least 30 minutes. This helps the flavors blend together nicely. For the full recipe, check out the instructions above! To make hummus smooth, use high-quality olive oil. It adds richness and flavor. A good oil can make a big difference. When blending, it’s key to avoid a grainy texture. To do this, ensure all ingredients are well combined. If the hummus doesn’t blend smoothly, add a bit of water. Do this one tablespoon at a time. Keep blending until you achieve that creamy consistency. To boost the flavor, try adding spices like smoked paprika or cayenne pepper. These give your hummus depth and warmth. Roasted garlic can also make a big impact. It offers a sweeter taste compared to raw garlic. Roasting the garlic before adding it brings out its natural sweetness. This small change can elevate your sun dried tomato hummus to a new level. For more tips and a full recipe, check the recipe section. {{image_2}} You can take sun dried tomato hummus to new levels with simple tweaks. Adding fresh herbs, like basil or cilantro, gives the hummus a bright taste. Just chop them fine and mix them in. For a spicy kick, try adding jalapeños or harissa. This adds heat and depth to the flavor. Both options keep your hummus fresh and exciting. If you need gluten-free options, rest easy. Chickpeas are naturally gluten-free, so you’re already set. For a nut-free alternative to tahini, use sunflower seed butter. It blends well and keeps that creamy texture. You can still enjoy this yummy hummus, even with dietary needs. Just remember, these swaps can change the flavor a bit, but they keep it tasty! For the full recipe, check out the details above and get cooking! To keep your sun-dried tomato hummus fresh, store it in an airtight container. This helps keep out air and moisture. Place the container in the fridge. Homemade hummus stays good for about 4 to 7 days in the fridge. Always check for any off smells or changes in texture before eating. If you want to save some for later, you can freeze it. Spoon the hummus into a freezer-safe container. Leave some space at the top because it will expand when frozen. You can freeze it for up to three months. When you're ready to enjoy it, take it out and thaw it in the fridge overnight. If you're in a hurry, you can use the microwave, but do so in short bursts. Stir it well after thawing to make it smooth again. Enjoy your sun-dried tomato hummus anytime! For the full recipe, check the ingredients and steps earlier in this article. Can I use dried sun-dried tomatoes instead of oil-packed? Yes, you can! If you choose dried sun-dried tomatoes, soak them in warm water. This helps soften them before blending. Oil-packed tomatoes add a richer flavor. So, if you have the option, go for oil-packed for the best taste. What can I serve with sun-dried tomato hummus? You can serve sun-dried tomato hummus with many tasty options. Try fresh veggies like carrots and bell peppers. Pita bread or crackers work great too. You can also use it as a spread on sandwiches or wraps. How to make the hummus creamier? To make hummus creamier, use high-quality olive oil. Adding water gradually while blending also helps. If it’s still thick, try adding more tahini. This will enhance the flavor and texture. Health benefits of chickpeas Chickpeas are packed with protein and fiber. They help keep you full and satisfied. They also support heart health and help control blood sugar. This makes them a great choice for a healthy diet. Advantages of tahini and olive oil in the recipe Tahini adds healthy fats and calcium. It gives a creamy texture to the hummus. Olive oil is rich in antioxidants and good for your heart. Together, they make this hummus not just tasty but also nutritious. Top brands to look for When buying pre-made hummus, some great brands include Sabra, Tribe, and Cedar's. These brands offer tasty options that are easy to find in stores. Look for ones with simple ingredients for the best flavor. What to check on labels for quality Always check the ingredient list. Choose hummus with real sun-dried tomatoes and no preservatives. Avoid brands with added sugars or artificial flavors for a healthier choice. Quality ingredients make a big difference in taste. For the full recipe, check out the detailed instructions in the previous section. Creating sun-dried tomato hummus is simple and fun. We covered key ingredients, best storage tips, and ways to enhance flavor. You can add herbs, spices, or even go spicy with jalapeños. Remember, the quality of your olive oil and fresh ingredients matters most. Once you make this hummus, serve it cooled for the best taste. Enjoy your tasty creation, knowing it’s healthy and quick to make. Now, it’s time to dive in and enjoy every bite!

Savory Sun Dried Tomato Hummus Easy and Flavorful Recipe

Are you ready to elevate your snacking game? This easy and flavorful sun-dried tomato hummus will have you craving more!

Creating Spicy Black Bean Tacos means using simple, fresh ingredients. Each one adds to the flavor and texture. Here’s what you need: - 2 cups canned black beans, rinsed and drained - 1 tablespoon olive oil - 1 small onion, diced - 2 cloves garlic, minced - 1 red bell pepper, diced - 1 jalapeño, seeds removed and minced - 1 teaspoon ground cumin - 1 teaspoon smoked paprika - Salt and pepper to taste - 8 small corn tortillas - 1 avocado, sliced - Fresh cilantro, for garnish - Lime wedges, for serving These ingredients come together to create a tasty, fulfilling meal. The black beans bring protein, while the spices add warmth. You can find the full recipe easily if you want to dive deeper into the cooking process. 1. Heat 1 tablespoon of olive oil in a medium skillet over medium heat. 2. Add 1 small diced onion and sauté for about 3-4 minutes until it softens. 3. Next, add 2 minced garlic cloves, 1 diced red bell pepper, and 1 minced jalapeño. Cook for 2-3 minutes, stirring often. 4. Incorporate 2 cups of rinsed and drained black beans, 1 teaspoon of ground cumin, 1 teaspoon of smoked paprika, and salt and pepper to taste. Cook for 5-7 minutes to let the flavors blend. 5. While the black bean mixture cooks, warm 8 small corn tortillas in another skillet over low heat for about 1 minute on each side until they are pliable. 1. Spoon the black bean mixture onto each warmed tortilla. 2. Add a few slices of avocado and a sprinkle of fresh cilantro on top. 3. Serve with lime wedges on the side for a zesty kick. These steps are simple and fun, making cooking a breeze. Enjoy your Spicy Black Bean Tacos! For the full recipe, check out the previous section. To make the best Spicy Black Bean Tacos, heat the beans well. This helps bring out their rich flavor. You can also adjust the spice level by changing the jalapeño amount. If you want it mild, use less. For a kick, add more! A vibrant plate makes your tacos pop. Arrange the tacos neatly and add lime wedges for color. Fresh herbs like cilantro add beauty and flavor. Scatter them on top for a lovely finish. This makes your meal look as good as it tastes! {{image_2}} You can easily swap out some ingredients in this recipe. Here are a couple of ideas: - Use different beans like kidney or pinto beans. Both add great flavor. - Substitute corn tortillas with flour tortillas for a softer texture. Flour tortillas can hold more filling. These simple changes can give your tacos a new twist while keeping them delicious. You can also change the flavors in your tacos to suit your taste. Here are some great options: - Add cheese or sour cream for creaminess. These toppings can make the tacos richer. - Experiment with different spices like chili powder or oregano. Both spices can enhance the taste and give it a unique flair. Feel free to mix and match these ideas to create your perfect spicy black bean tacos! For the full recipe, check out the details above. Store any leftover black bean mixture in an airtight container. It stays fresh for up to 3 days. Make sure to let it cool before sealing. This way, you keep the flavors intact. You can easily reheat it in a skillet or microwave. Just add a splash of water if it seems dry. If you want to save the black bean mixture, freeze it. You can freeze it before you make the tacos. Store it in a freezer-safe bag or container. It will last for up to 3 months. When you're ready to use it, thaw it in the fridge overnight. Then, reheat it before assembling your tacos. This method saves time and gives you a quick meal option later. For the full recipe, check the details above. Yes, you can prepare the black bean filling in advance and store it in the fridge. This saves time and makes it easy to enjoy a tasty meal later. Just warm the filling when you're ready to eat. It stays delicious for up to three days in the fridge. All ingredients are already vegan except for toppings like cheese. You can simply omit the cheese or replace it with a vegan option. This way, everyone can enjoy them, whether they follow a vegan diet or not. Consider side dishes like rice, salad, or corn salsa. These add great flavors and textures to your meal. They also help round out the meal, making it more filling and satisfying. You can mix and match to find your favorite combo! These Spicy Black Bean Tacos are simple to make and full of flavor. We covered ingredients, step-by-step instructions, and some fun variations. You can personalize these tacos with different toppings or spices to fit your taste. Remember, the black bean mixture is easy to store for quick meals later. Enjoy your cooking and share these delicious tacos with friends and family. They will love them just as much as you do!

Spicy Black Bean Tacos Flavorful and Easy Meal

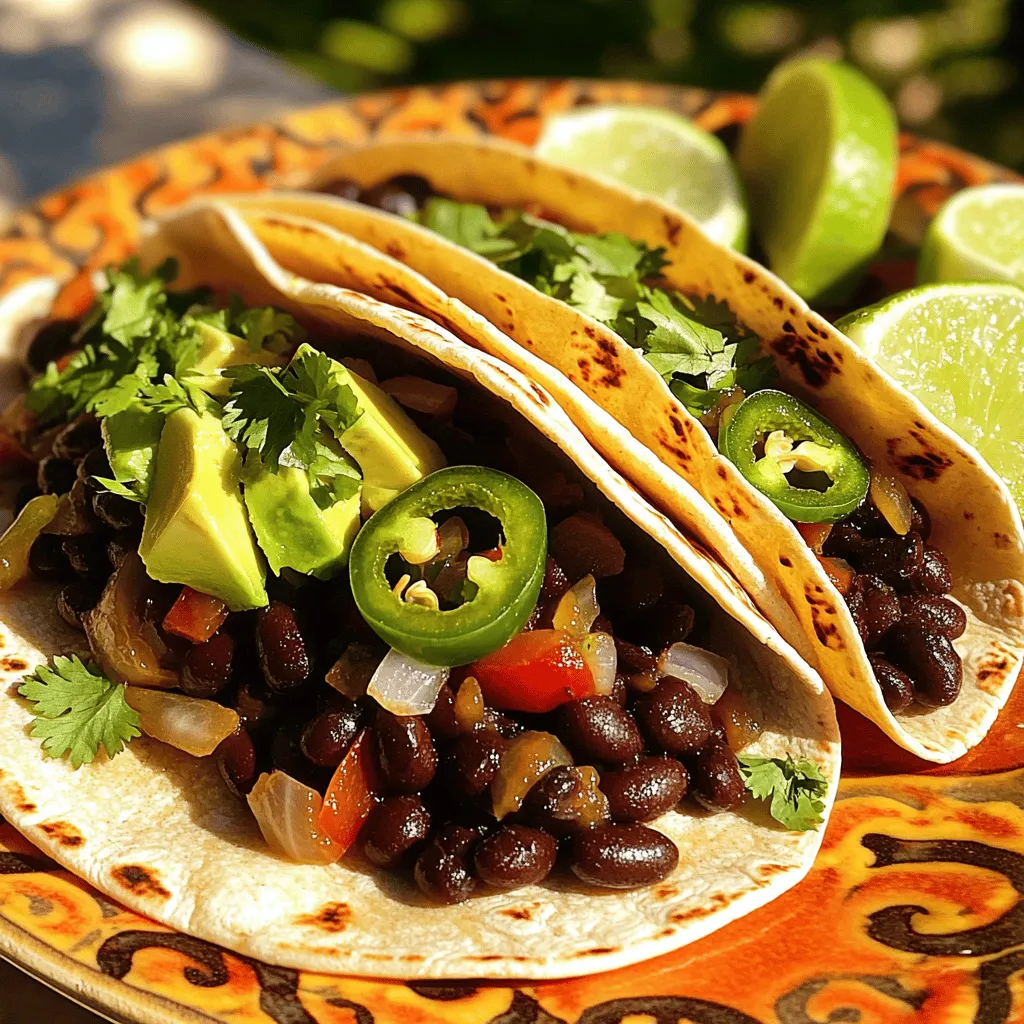
Craving a tasty meal that’s easy to make? Spicy Black Bean Tacos are the answer! With just a few simple

To make a tasty creamy tomato basil soup, gather these simple ingredients: - 2 tablespoons olive oil - 1 medium onion, chopped - 3 cloves garlic, minced - 2 cans (14 oz each) crushed tomatoes - 2 cups vegetable broth - 1 teaspoon sugar - 1 teaspoon dried oregano - 1 teaspoon salt (adjust to taste) - 1/2 teaspoon black pepper - 1 cup heavy cream (or coconut cream for a dairy-free option) - 1/4 cup fresh basil leaves, chopped - 1 tablespoon lemon juice These ingredients create a rich and warm soup full of flavor. You can tweak this recipe to fit your taste or what you have at home. Here are some fun swaps: - Use coconut milk instead of heavy cream for a vegan option. - Swap fresh basil with parsley or thyme for a different herb flavor. - If you want more texture, add diced carrots or celery. - For a spicy kick, add a pinch of red pepper flakes. Feel free to mix and match to find your perfect blend. Fresh herbs usually give a brighter flavor. They add a nice pop of color and aroma to the soup. Dried herbs are convenient and can still add great taste. They work well if fresh herbs aren't available. When using dried herbs, remember they are more potent. Use about one-third of the amount you would use for fresh herbs. This helps keep the flavor balanced. Using fresh or dried herbs can change the soup’s flavor. Choose what fits your needs and enjoy the cooking journey! To make creamy tomato basil soup, follow these steps carefully. First, heat 2 tablespoons of olive oil in a large pot over medium heat. Next, add 1 medium onion, chopped. Sauté the onion until it turns soft and clear, about 5 minutes. After that, stir in 3 cloves of minced garlic. Cook it for 1 more minute until you smell the garlic. Then, pour in 2 cans of crushed tomatoes and 2 cups of vegetable broth. Add 1 teaspoon of sugar, 1 teaspoon of dried oregano, 1 teaspoon of salt, and 1/2 teaspoon of black pepper. Stir the mix well to combine all the flavors. Bring this mixture to a boil. Once boiling, lower the heat and let it simmer for 15 to 20 minutes. This time allows all the flavors to blend beautifully. Once the soup is done simmering, use an immersion blender to blend it until smooth. If you lack an immersion blender, carefully transfer the soup in batches to a countertop blender. Blend it until you reach your desired smoothness. After blending, return the soup to the pot over low heat. Stir in 1 cup of heavy cream or coconut cream for a dairy-free option. Bring the soup back to a gentle simmer. Finally, add 1/4 cup of fresh chopped basil and 1 tablespoon of lemon juice. Stir well to mix everything. Cook for another 5 minutes until it is warmed through. Taste and adjust the salt and pepper as needed. Remove the pot from heat and let the soup cool a bit before serving. Using an immersion blender is simple and quick. You can blend the soup right in the pot. This method saves time and limits mess. Just be careful not to splash the soup. Hold the blender steady at the bottom of the pot for even blending. If you opt for a countertop blender, be cautious. The hot soup can splash when blended. To avoid burns, fill the blender halfway and cover the lid with a towel. Blend in short bursts until smooth. Then, return the soup to the pot. To get the perfect consistency, pay attention during blending. If you like a chunky texture, blend less. For a silky and smooth soup, blend until no lumps remain. If the soup is too thick, add more vegetable broth a little at a time until it feels just right. If it's too thin, simmer it longer to thicken. This way, you can enjoy a creamy tomato basil soup that suits your taste perfectly. For the complete recipe, check the Full Recipe section. To make your creamy tomato basil soup even better, add some spices. Try a pinch of red pepper flakes for heat. You can also use smoked paprika for a deeper flavor. If you love a bit of sweetness, add a dash of balsamic vinegar. Each spice brings a new twist. Experiment and find what you like best. You can easily make this soup dairy-free. Swap the heavy cream for coconut cream. It gives a rich taste without dairy. You can also use almond milk for a lighter option. Make sure to check the ingredients for any added sugars. This way, you keep the soup creamy and delicious. Storing your leftover soup is simple. Let it cool before placing it in airtight containers. It stays fresh in the fridge for three to four days. If you want to keep it longer, consider freezing it. Use freezer-safe containers and leave some space at the top. This prevents the soup from spilling as it freezes. When ready to eat, thaw it overnight in the fridge. Reheat gently on the stove for the best taste. Enjoy every spoonful! {{image_2}} You can boost the soup's nutrition by adding protein. Chicken is a great choice. Just cook it first, then shred it and stir it in. Lentils are another tasty option. They add texture and fill you up. Use cooked lentils and mix them in during the last few minutes of cooking. They will soak up the flavors. Feel free to add more veggies to your soup. Carrots bring a natural sweetness. Chop them small and cook them with the onions. Bell peppers add color and crunch. You can use any color—red, yellow, or green. Dice them and add them before blending. This way, they keep some of their bite and flavor. Garnishes make your soup look fancy and inviting. Try adding a swirl of cream on top. It adds a nice touch. You can also sprinkle more fresh basil for a burst of color and flavor. Croutons give a nice crunch, making each bite exciting. For a twist, consider adding a sprinkle of grated cheese or a squeeze of lemon juice. Each option makes the soup feel special and unique. To explore the complete recipe, check out the [Full Recipe]. To keep your soup fresh, store it in an airtight container. Glass containers work great. Let the soup cool before sealing it, so it doesn’t sweat inside. Label the container with the date. This way, you know when you made it. You can freeze Creamy Tomato Basil Soup for later. Pour it into freezer-safe bags or containers. Leave some space at the top for expansion. When you’re ready to eat, thaw it in the fridge overnight. Reheat in a pot over low heat. Stir often to heat it evenly. You can add a splash of cream if it thickens too much. In the fridge, your soup lasts about 3 to 5 days. Check for any off smells or changes in color. If you see or smell anything strange, toss it out. For the best taste, eat it within this time. Enjoy your soup fresh for a comforting meal anytime! For the full recipe, click here. Creamy Tomato Basil Soup can stay fresh in your fridge for about 3 to 4 days. Make sure to store it in an airtight container. This keeps the soup tasty and safe to eat. Yes, you can make this soup ahead of time. In fact, the flavors may even get better. Just let it cool, then store it in the fridge. When you're ready to serve, heat it gently on the stove. You can serve this soup with many tasty sides. Try crispy bread for dipping or a fresh salad to add crunch. Grilled cheese also makes a great pair. Each option adds to the comfort of the soup. For the full recipe, check out the details above. You learned all about making Creamy Tomato Basil Soup. We covered the ingredients, cooking steps, and tips for great flavor. I shared ways to store your soup and answered common questions. This soup is easy to customize. You can try new ingredients or make it dairy-free. I hope you feel inspired to cook and enjoy a warm bowl of soup. It’s simple, delicious, and good for you!

Creamy Tomato Basil Soup Flavorful Comfort Dish

If you’re craving a warm, hearty meal, our Creamy Tomato Basil Soup is the answer. This dish bursts with flavor

To make the Sesame Honey Soy Latte, gather these items: - 1 cup unsweetened soy milk - 1 tablespoon tahini (sesame paste) - 1 tablespoon honey (or maple syrup for vegan) - 1 teaspoon vanilla extract - 1/2 teaspoon ground cinnamon - Pinch of sea salt - 1/2 cup strong brewed coffee or espresso - Toasted sesame seeds for garnish These ingredients blend together to create a creamy, rich flavor. The tahini adds a nutty taste, while honey sweetens it just right. The vanilla and cinnamon bring warmth and depth. If you want to mix it up, you can change some ingredients: - Different types of milk: Try almond, oat, or coconut milk for varied flavors. - Sweetener alternatives: Agave syrup or stevia can replace honey or maple syrup. - Other spice options: Cardamom or nutmeg can add an exciting twist to the latte. Feel free to play around with these options! Each variation brings a new flair to your latte. For the full recipe, check the details in the previous section. 1. Start by heating the soy milk and tahini. Use a small saucepan over medium heat. Whisk them together until they blend well. Heat until warm but do not let it boil. This step makes the base creamy and rich. 2. Next, mix in the additional ingredients. Stir in the honey or maple syrup, vanilla extract, ground cinnamon, and a pinch of sea salt. Keep stirring until everything is smooth and well combined. This adds a sweet and warm flavor to your latte. 3. Now, brew your coffee or espresso. Use strong coffee for the best taste. This will give your latte a rich coffee flavor that pairs well with the soy and tahini blend. 1. In a large mug, combine the brewed coffee with the tahini-soy mixture. Stir well to mix them together. The mix should look creamy and inviting. 2. For garnishing the latte, sprinkle some toasted sesame seeds on top. This adds a nice crunch and a touch of elegance to your drink. You can also drizzle a bit of honey for extra sweetness. 3. Serve your latte warm. The ideal temperature is just right for sipping. This way, you enjoy all the flavors without burning your tongue. Enjoy your Sesame Honey Soy Latte! For the complete recipe, check the Full Recipe section. Using homemade tahini is a great choice. It tastes fresher and richer. You can easily make it by blending toasted sesame seeds until smooth. Store-bought tahini is fine, but it may lack depth. To get the perfect froth, heat the soy milk slowly. Whisk it gently as it warms. Stop before it boils; otherwise, the texture can change. You can also use a milk frother for a creamy top. Just remember to froth the soy milk solo, then mix it in with the coffee. Soy milk has many health benefits. It is low in calories and high in protein. One cup contains about 7 grams of protein. It also offers healthy fats and is a good source of vitamins. Honey adds sweetness and has natural healing properties. It can soothe a sore throat and boost your immune system. Ground cinnamon is another gem. It may help lower blood sugar and has anti-inflammatory effects. Together, these ingredients make your latte not just tasty but good for you too. For the full recipe, check out the detailed steps above. Enjoy your creamy delight! {{image_2}} You can easily switch up the flavor of your Sesame Honey Soy Latte. One fun option is to add chocolate or cocoa powder. This makes the drink rich and sweet. Just mix in one tablespoon of cocoa powder when you add the tahini. It gives a nice twist that chocolate lovers will enjoy. Another great choice is a spicy version. Adding a pinch of cayenne or ginger can add warmth and a kick. It is perfect for chilly days. Start with just a small amount, like 1/8 teaspoon, and adjust to your taste. If you follow a vegan diet, you can adapt this latte too. Simply use maple syrup instead of honey. It keeps the same sweet taste without any animal products. For those with nut allergies, you can enjoy this latte safely. Ensure that the tahini comes from sesame seeds only. You can also use sunflower seed butter if you prefer. This way, you avoid nuts but still get a creamy texture. These variations let you enjoy the Sesame Honey Soy Latte in many ways while keeping it delicious. For the full recipe, check the earlier section. To keep your latte fresh, store it in an airtight container. Place it in the fridge. The soy milk and tahini can separate over time. Stir well before using. The prepared latte lasts up to three days in the fridge. If you have leftover ingredients, store tahini and honey in a cool, dark place. They can last for months if stored properly. When reheating the latte, use a small saucepan over low heat. Stir often to prevent burning. Avoid boiling, as high heat can change the taste. You can also use a microwave. Heat in 30-second bursts, stirring in between. For the best taste, drink it warm. Enjoy the creamy, rich flavors like when it was first made! The best way to sweeten your Sesame Honey Soy Latte is to use honey. Honey adds a rich flavor that pairs well with sesame. If you want a vegan option, maple syrup works great too. You can adjust the sweetness based on your taste. Start with one tablespoon and add more if needed. Yes, you can easily double or triple the ingredients. Just keep the same ratios. This way, you can share with friends or enjoy more yourself. Make sure you have a big enough pan to heat the soy milk and tahini. Many specialty cafes offer unique lattes. Look for places that focus on Asian-inspired drinks or specialty coffee. Many coffee shops now include creative lattes on their menu. If you don’t see it, ask the barista if they can make it. To make a cold Sesame Honey Soy Latte, start by brewing your coffee and letting it cool. Use cold soy milk instead of heating it. Blend the tahini, honey, and cold soy milk together. Pour the mixture over ice and add the cooled coffee. It’s refreshing and perfect for warm days! For the full recipe, check out the Sesame Honey Soy Latte section. Enjoy! This blog post covered everything you need for a tasty Sesame Honey Soy Latte. You learned what ingredients to use, from soy milk to tahini. I shared how to mix and serve it perfectly, along with tips to enhance flavor. I also highlighted health benefits and storage info. Enjoy making this latte your own with different flavors and variations. Let your creativity flow as you enjoy this delicious drink!

Savory Sesame Honey Soy Latte Creamy Delight

Are you ready to enjoy a warm hug in a cup? The Savory Sesame Honey Soy Latte is a creamy

To make Pineapple Mint Iced Tea, you will need these ingredients: - 4 cups water - 4 black tea bags (or green tea if preferred) - 1 cup fresh pineapple, diced - 1/2 cup fresh mint leaves (plus extra for garnish) - 1/2 cup honey or agave syrup (adjust to taste) - Juice of 1 lime - Ice cubes Using fresh ingredients is key to a great drink. Always choose ripe, sweet pineapples. Look for mint that smells strong and fresh. Fresh tea bags or loose tea provide the best flavor. You can switch out honey or agave for other sweeteners. Try maple syrup or stevia for a different taste. If you want less sweetness, you can reduce the amount used. For tea, black tea gives a bold flavor, but green tea is lighter. You could also try herbal teas like chamomile or hibiscus for a unique twist. Just remember, the type of tea you choose will change the drink’s overall flavor. First, we need to make the tea. In a medium saucepan, bring 4 cups of water to a boil. Once it boils, remove it from heat. Place 4 tea bags into the hot water. Let it steep for about 5 to 7 minutes. This makes a strong and tasty base for our drink. While the tea is steeping, it’s time to prepare the pineapple. Take 1 cup of fresh pineapple and chop it into small pieces. Then, blend the pineapple in a blender until it is smooth. If you like some chunks, you can mash it with a fork instead. After blending, we will combine everything. In a large pitcher, mix the steeped tea, the blended pineapple, 1/2 cup of honey or agave syrup, the juice of 1 lime, and 1/2 cup of fresh mint leaves. Stir it well to dissolve the honey. Next, let the mix cool down to room temperature. After that, transfer it to the fridge. Chill it for at least 1 hour. This makes sure the drink is nice and cold. When you are ready to serve, grab some glasses. Fill them with ice cubes. Pour the chilled Pineapple Mint Iced Tea over the ice. For a nice touch, garnish with extra mint leaves. This will make your drink look fun and fresh! To make your Pineapple Mint Iced Tea truly shine, balance sweetness and acidity. Start by tasting as you mix. If it’s too sweet, add a bit more lime juice. This will brighten the drink. If it’s too tart, stir in a little more honey or agave syrup. You can also add other herbs or spices. Try using basil for a unique twist. A dash of ginger can give it a spicy kick. Experiment and find what you love best! Prepping ingredients in advance can save you time. Chop your pineapple and mint the day before. Store them in the fridge for easy use. You can also steep the tea ahead of time. Just keep it in the fridge until you are ready to mix. Using bottled juices can be a great shortcut. Pineapple juice or lime juice works well. However, check for added sugars. Fresh is best, but bottled can save you time if needed. {{image_2}} You can change the taste of Pineapple Mint Iced Tea in fun ways. Adding other fruits brings new flavors. Try strawberries, mango, or even blueberries. Each fruit gives a unique twist. You can also use herbs like basil or lemongrass. These herbs add a fresh and exciting taste to your drink. For a floral touch, consider adding lavender or hibiscus. Both pair well with pineapple and mint. You can also mix different teas. Black tea is great, but green or herbal teas work too. Try chamomile for a calming effect or chai for a spicy kick. Experiment with your favorite flavors. Want to make your iced tea a cocktail? It's simple and fun! Adding spirits can elevate your drink. Light rum is a great choice. It blends well with pineapple and mint. Vodka is another good option. Its neutral taste lets the tea shine. For a tropical twist, try coconut rum. It pairs perfectly with the fruity notes. If you enjoy gin, add it for a herbal touch. You can muddle some mint leaves for more flavor. Mix your chosen spirit into the tea before serving. Garnish with mint or a slice of fruit for a fancy look. For a refreshing summer drink, check out the Full Recipe. To keep your Pineapple Mint Iced Tea fresh, store leftovers in the fridge. Use a clean glass pitcher or an airtight container. This helps keep the flavors strong. Avoid using metal containers, as they can change the taste. If you have extra mint leaves for garnish, store them in a damp paper towel in a plastic bag. This keeps them fresh longer. Your iced tea stays fresh for about 3 to 5 days in the fridge. After that, it can lose flavor and freshness. Watch for signs of spoilage. If you see any strange smells or colors, throw it away. If the drink starts to taste off, it’s best to discard it. Enjoy your Pineapple Mint Iced Tea while it's fresh for the best flavor! What is the best type of tea to use? I recommend using black tea for this drink. It has a strong flavor that mixes well with pineapple and mint. Green tea is a great choice too if you want a lighter taste. Both options work well. Can I make this iced tea ahead of time? Yes, you can make this iced tea ahead. It tastes even better after chilling in the fridge for a few hours. Just follow the Full Recipe, and store it in a pitcher. Pineapple and mint both have great health benefits. Pineapple is rich in vitamin C and helps digestion. It can boost your immune system too. Mint adds a refreshing touch and may help with digestion and freshening breath. This drink has about 60 calories per serving. It mainly comes from honey or agave syrup, depending on what you choose. Each glass also gives you vitamins from pineapple and mint. Pair your Pineapple Mint Iced Tea with light snacks. Fresh fruit, cheese, or crackers work great. You can also enjoy it with salads or light sandwiches. For a fun presentation, serve in clear glasses. Add a slice of lime on the rim and a sprig of mint for color. This makes it look as good as it tastes! You learned how to make Pineapple Mint Iced Tea. We covered required ingredients, possible substitutions, and step-by-step instructions. Flavor tips, variations, and storage advice also helped enhance your drink. Experiment with options like adding fruits or herbs to suit your taste. Remember, nice storage keeps your tea fresh. Enjoy this refreshing drink anytime, and share your own twists on it. Your iced tea can impress at any gathering!

Pineapple Mint Iced Tea Refreshing Summer Drink

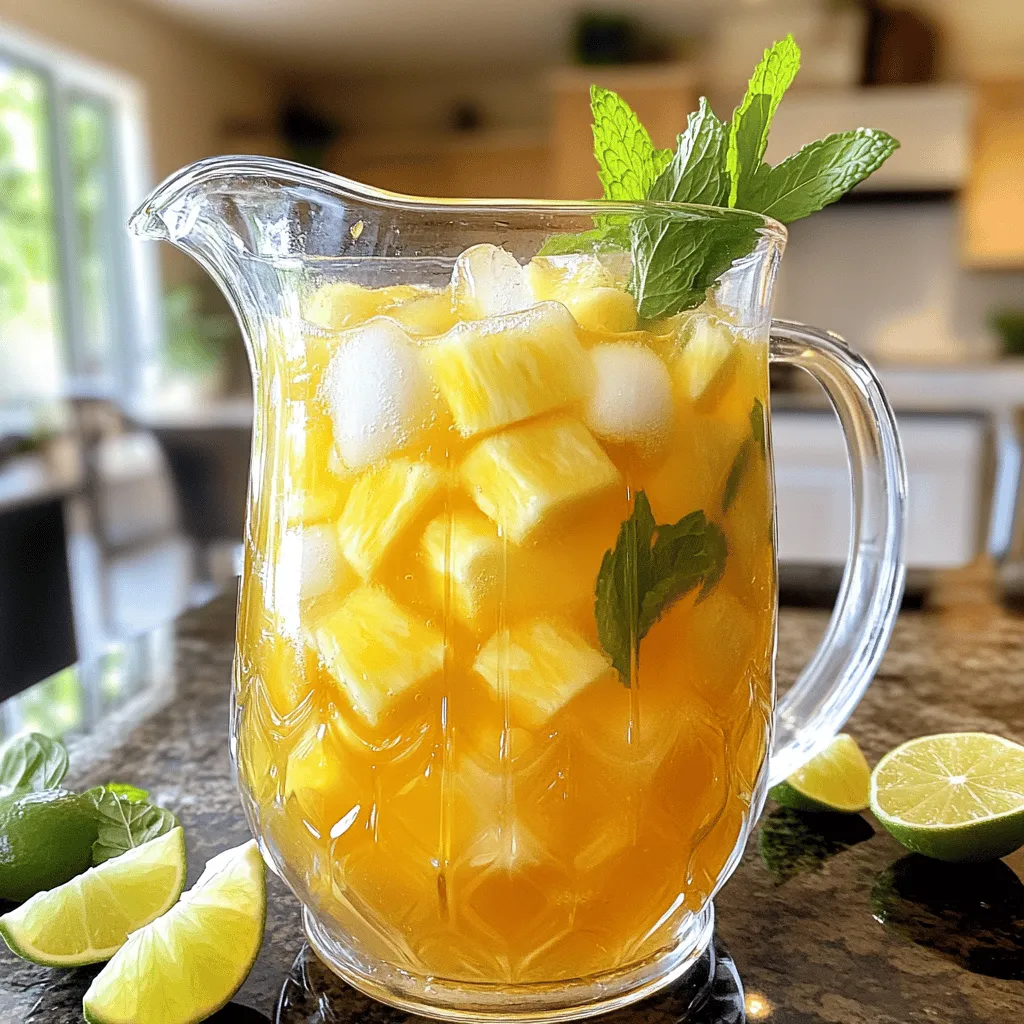
Looking for a refreshing drink that screams summer? You’ve found it! Pineapple Mint Iced Tea combines sweet tropical pineapple and

To make a tasty Raspberry Lemon Cheesecake Shake, gather these key ingredients: - 1 cup fresh raspberries (plus extra for garnish) - 1 cup vanilla ice cream - 1/2 cup cream cheese, softened - 1/2 cup milk - 2 tablespoons sugar (adjust based on sweetness preference) - 1 tablespoon lemon juice - 1 teaspoon lemon zest - Crushed graham crackers for topping These ingredients blend together to create a shake that is both refreshing and rich. The fresh raspberries give a sweet-tart flavor. The cream cheese adds that classic cheesecake taste. Vanilla ice cream makes it creamy and delightful. You might want to tweak the recipe to your taste. Here are some easy substitutions: - For a lower-fat option, use Greek yogurt instead of cream cheese. - Swap vanilla ice cream for a dairy-free alternative, like coconut milk ice cream. - If you don’t have fresh raspberries, frozen raspberries work well too. Just let them thaw a bit before blending. - For a sweeter shake, try using honey or maple syrup instead of sugar. These options allow you to customize the shake to fit your needs. You can still enjoy the delicious flavors while making it work for you. If you want the full recipe, check out the link. To make the Raspberry Lemon Cheesecake Shake, follow these simple steps. 1. Wash the Raspberries: Start by washing 1 cup of fresh raspberries. Set aside a few for garnish later. This keeps your shake looking pretty. 2. Blend the Ingredients: In a blender, add: - 1 cup fresh raspberries - 1 cup vanilla ice cream - 1/2 cup cream cheese, softened - 1/2 cup milk - 2 tablespoons sugar (you can adjust this based on how sweet you like it) - 1 tablespoon lemon juice - 1 teaspoon lemon zest 3. Blend Until Smooth: Blend on high speed. Make sure everything mixes well. The raspberries should be smooth and creamy. This creates a nice texture. 4. Taste and Adjust: After blending, taste your shake. If it’s not sweet enough, add a bit more sugar. Blend again for a few seconds. 5. Serve the Shake: Pour the shake into tall glasses. 6. Add Toppings: Top each shake with crushed graham crackers. This gives it that cheesecake feel. Add a few whole raspberries on top for a nice touch. These steps are quick and easy. You can whip this up in just 10 minutes. Enjoy your delicious Raspberry Lemon Cheesecake Shake! For the complete recipe, check the [Full Recipe]. To make the best Raspberry Lemon Cheesecake Shake, balance is key. You want the sweet taste of raspberries and the tartness of lemon. - Use fresh raspberries for that bright flavor. Frozen berries can work, but they may dilute the taste. - Add lemon juice and zest together. This boosts the lemon flavor without overpowering the shake. - If your shake is too sweet, add a little more lemon juice. This will balance the flavors nicely. Common mistakes can ruin your shake. Here are some tips to avoid them: - Don't skip the cream cheese. It gives a rich, creamy texture. - Blend on high until smooth. You don't want any raspberry seeds left. - Taste your shake before serving. Adjust sweetness as needed. Presentation makes your shake even more fun. Here are some creative ideas: - Use tall glasses to show off the shake’s color. - Add crushed graham crackers on top for a cheesecake effect. - Garnish with whole raspberries for a pop of color. For serving, think about pairing your shake with a light snack. A slice of lemon cake or some cookies can complement the flavors well. Enjoy your delicious and creamy Raspberry Lemon Cheesecake Shake! For the complete process, check out the Full Recipe. {{image_2}} You can customize your Raspberry Lemon Cheesecake Shake by using different fruits. Strawberries or blueberries work well. Just swap out the raspberries for these fruits. You will still get a tasty shake! If you or someone you know has a dairy allergy, try a non-dairy version. Use coconut or almond milk instead of regular milk. You can also pick a non-dairy ice cream. This keeps the same creamy taste while being allergy-friendly. Incorporate seasonal ingredients for a fresh twist. In summer, add fresh peaches or cherries for a fruity kick. In the fall, consider adding a pinch of pumpkin spice. This gives your shake a cozy flavor. For holiday-themed suggestions, try adding peppermint extract during winter. It gives a festive taste to your shake. You could also use eggnog in place of milk for a holiday treat. Explore these variations to find your favorite flavor. Each option brings a new experience while keeping the shake delicious and creamy. For the complete recipe, check the [Full Recipe]. To keep your Raspberry Lemon Cheesecake Shake fresh, follow these tips. Store any leftover shake in an airtight container. This helps prevent it from absorbing other smells and flavors in the fridge. Keep it in the fridge for up to two days. Before serving, stir it well, as it may separate. If you want to save some for later, freezing is an option. Pour the shake into a freezer-safe container, leaving some space at the top. This allows the shake to expand as it freezes. It can last up to three months in the freezer. When ready to enjoy, thaw it in the fridge overnight. Blend it again for a smooth texture. Understanding how long your shake lasts is key. When stored correctly in the fridge, the Raspberry Lemon Cheesecake Shake stays fresh for about 48 hours. After that, flavors may start to fade. If frozen, the shake retains its best quality for three months. However, it remains safe to eat beyond that time, though taste may decline. Always check for any off smells or changes in texture before consuming. How to Make a Thicker Shake? To make a thicker shake, add more cream cheese or ice cream. You can also use less milk. This will give you that rich, creamy texture you want. Can I Use Frozen Raspberries? Yes, frozen raspberries work great! They chill the shake and add a nice texture. Just blend them well to ensure everything mixes smoothly. What Can I Add for Extra Creaminess? For extra creaminess, try adding a bit of heavy cream. You could also blend in some Greek yogurt. These options keep the shake rich and delicious. Is the Raspberry Lemon Cheesecake Shake Vegan-Friendly? This shake is not vegan due to cream cheese and ice cream. To make it vegan, use non-dairy cream cheese and plant-based ice cream. This way, you can enjoy a tasty shake without dairy. Tips for Adjusting Sweetness If your shake is too sweet, add a bit more lemon juice. This will balance the flavors. If it's not sweet enough, add more sugar or honey. Always taste as you go! How to Make a Larger Batch of the Shake To make more shakes, simply double or triple the recipe. Just remember to blend in batches if your blender is small. This ensures everything mixes well. Caloric Breakdown per Serving Each serving has about 300 calories. This can vary based on your choice of ice cream and sweeteners. Health Considerations for Ingredients The shake has fruit, which gives vitamins. However, it also has sugar and cream cheese, so enjoy in moderation. For a healthier option, use less sugar or low-calorie ice cream. You can find the Full Recipe to create your delicious shake! This blog post covered how to make a delicious Raspberry Lemon Cheesecake Shake. We discussed the key ingredients and alternatives, simple steps for preparation, and tips for a perfect shake. You learned about variations, storage options, and answered common questions. Enjoy experimenting with flavors and make it your own. Remember, the right ingredients plus a bit of creativity lead to a tasty treat every time. Happy blending!

Raspberry Lemon Cheesecake Shake Delicious and Creamy

If you’re craving something cool, sweet, and tangy, you need to try a Raspberry Lemon Cheesecake Shake! This delicious and

Older posts
Newer posts
← Previous Page1 … Page37 Page38 Page39 … Page90 Next →

dsad

© 2025 So Yum Recipes • Built with GeneratePress

Our Policies

  • Copyright Policy
  • Cookie Policy
  • GDPR Policy
  • Privacy Policy
  • Disclaimer
  • Terms Of Use

More Information

  • Home
  • About
  • Contact
  • Appetizers
  • Dessert
  • Dinner
  • Drinks
©2025, So Yum Recipes About Back To Top