Skip to content
DisclaimerTerms Of UseGDPR PolicyCookie Policy

So Yum Recipes

  • Home
  • Drinks
  • Appetizers
  • Dinner
  • Dessert
  • About
  • Contact
  • Privacy Policy
DisclaimerTerms Of UseGDPR PolicyCookie Policy

Chloe

- 2 lbs baby potatoes, halved - 4 cloves garlic, minced - 1/4 cup olive oil - Juice and zest of 1 large lemon - 1 teaspoon dried oregano - 1 teaspoon smoked paprika - Salt and pepper to taste - Fresh parsley, chopped (for garnish) The key to this dish is fresh ingredients. Baby potatoes work best for their tender texture and flavor. Garlic adds a deep, savory taste that pairs perfectly with lemon. Use fresh lemon juice and zest for a bright, zesty kick. The dried oregano and smoked paprika enhance the flavor profile, bringing a nice aroma to your kitchen. - Calories per serving: Approximately 200 calories - Macronutrient breakdown: - Carbohydrates: 35g - Protein: 3g - Fat: 8g These lemon garlic roasted potatoes provide a balanced mix of carbs and fats, making them a filling side dish. They are perfect for any meal. - Types of potatoes to use: You can use Yukon gold or red potatoes if you can't find baby potatoes. - Olive oil alternatives: Try avocado oil or melted butter for a different flavor. - Herb substitutions: Mix in herbs like rosemary or thyme if you want to change the taste. These options help you customize the dish to fit your pantry or dietary needs. Feel free to experiment and make it your own! For the full recipe, check out the complete steps to make these delightful potatoes. First, preheat your oven to 400°F (200°C). This heat helps the potatoes become crisp and golden. Next, line a large baking sheet with parchment paper for easy cleanup. Then, take 2 pounds of baby potatoes and halve them. In a large bowl, add the halved potatoes along with 4 minced garlic cloves. Mixing these together is simple, and you will smell the garlic right away. Now, let’s create the lemon-garlic mixture. In a separate bowl, whisk together 1/4 cup of olive oil, the juice and zest of 1 large lemon, 1 teaspoon of dried oregano, and 1 teaspoon of smoked paprika. Add salt and pepper to taste. This mix brings a bright flavor to the potatoes. Pour this mixture over the potatoes. Toss them well to ensure every piece is coated. An even coating makes each bite tasty and zesty. Time to roast! Arrange the potatoes cut-side down on the baking sheet. Make sure they sit in a single layer. This helps them roast evenly. Roast in the oven for 25 to 30 minutes. Halfway through, flip the potatoes for good browning. Check for doneness by piercing them with a fork. They should feel soft inside. Once done, remove them from the oven and let them cool slightly. Serve them with fresh parsley for a pop of color and flavor. For the full recipe, refer to the earlier section. To get crispy roasted potatoes, follow these simple tips: - Cut the potatoes into even halves. This helps them cook at the same rate. - Use enough olive oil. It helps with that nice, crispy texture. - Spread the potatoes out on the baking sheet. They should not touch. This allows heat to circulate around them. Flipping the potatoes halfway through cooking is important. It ensures all sides get crispy and golden. Set a timer to remind yourself. I often do this to avoid forgetting! Lemon garlic roasted potatoes go well with many dishes. You can serve them with chicken, steak, or fish. They also pair nicely with a fresh salad. For garnishing, try adding fresh parsley. Sprinkle it on just before serving. You can also add lemon zest for an extra zing. It makes the dish pop with color and flavor! One common mistake is overcrowding the baking sheet. When you put too many potatoes on it, they steam instead of roast. This makes them soft instead of crispy. Another mistake is cooking at the wrong temperature. Make sure your oven is set to 400°F (200°C). If it’s too low, the potatoes won’t brown. If it’s too high, they may burn outside while staying raw inside. Keep an eye on them! For the full recipe, check out the complete instructions. Enjoy your tasty lemon garlic roasted potatoes! {{image_2}} You can easily change the taste of lemon garlic roasted potatoes. Adding herbs makes a big difference. Try rosemary or thyme for an earthy touch. These herbs blend well with lemon and garlic. You can also spice things up. Red pepper flakes give your potatoes a nice kick. Just a pinch can turn up the heat! If you follow a vegan diet, this dish is perfect for you. Skip the butter and use olive oil. It keeps the dish light and tasty. You can also make low-carb versions. Substitute baby potatoes with cauliflower. Cauliflower roasts well and takes on the flavor nicely. Want a quicker option? Use an air fryer. Cook the potatoes at 400°F (200°C) for about 15-20 minutes. Shake the basket halfway through for even cooking. Grilling is another fun way to cook them. Toss the potatoes in a grill basket. Grill them over medium heat for about 20 minutes. Both methods keep the outside crispy and the inside soft. Find the [Full Recipe](#) to explore these variations! To keep your lemon garlic roasted potatoes fresh, use airtight containers. Glass containers work best because they do not retain odors. Make sure the potatoes are cool before sealing them. Store them in the fridge for up to five days. To reheat your potatoes, the oven is the best choice. Preheat your oven to 350°F (175°C). Spread the potatoes on a baking sheet and heat for about 10 to 15 minutes. This keeps them crispy. You can also use the microwave for quick heating. Place the potatoes in a microwave-safe dish and cover with a paper towel. Heat in 30-second intervals until warm. You can freeze lemon garlic roasted potatoes, but there are some do's and don'ts. Do let them cool completely before freezing. Use freezer-safe bags or containers to avoid freezer burn. Don't freeze them if they are still warm, as this can create ice crystals. To thaw, leave them in the fridge overnight. When ready to eat, reheat in the oven to restore crispiness. Lemon garlic roasted potatoes can last about 3 to 5 days in the fridge. To store them, place the potatoes in an airtight container. Make sure they cool down first. This helps keep them fresh and tasty. When you want to eat them again, check for any signs of spoilage. If they smell off or look strange, throw them away. Yes, you can use different herbs to change the flavor. Here are some good options: - Rosemary: It adds a woodsy note. - Thyme: This herb has a mild taste that works well. - Basil: It offers a sweet and peppery flavor. Feel free to mix and match herbs to find your favorite blend. Each herb adds its own twist to the dish. Lemon garlic roasted potatoes pair well with many meals. Here are some great options: - Grilled chicken: The lemon flavor goes nicely with the meat. - Fish: Roasted potatoes complement the light taste of fish. - Salads: A fresh salad can balance the rich flavors. Try these pairings to create a full meal. You can also serve them as a side at a BBQ or family dinner. For more ideas, check the Full Recipe. This blog post showed how to make lemon garlic roasted potatoes. We covered the ingredients, simple steps, and tips for perfect roasting. You learned about substitutions, serving ideas, and storage methods. Remember, you can customize the recipe to fit your taste. Try different herbs or cooking methods for a new twist. These versatile potatoes pair well with many meals. Enjoy creating delicious dishes that everyone will love!

Lemon Garlic Roasted Potatoes Tasty and Simple Dish

Looking for a simple yet tasty side dish that will wow your guests? Look no further than lemon garlic roasted

To make Jalapeño Popper Dip, gather these tasty ingredients: - 8 oz cream cheese, softened - 1 cup sour cream - 1 cup shredded cheddar cheese - 1/2 cup diced jalapeños (fresh or pickled) - 1/2 cup diced green onions - 1 tsp garlic powder - 1/2 tsp smoked paprika - Salt and pepper to taste - 1/2 cup breadcrumbs (for topping) - 2 tbsp olive oil These ingredients blend together to create a creamy, spicy dip. You can swap some ingredients if you need to. Here are a few options: - Cream Cheese: Use Greek yogurt for a lighter dip. - Sour Cream: Try using plain yogurt instead. - Cheddar Cheese: Use pepper jack cheese for more heat. - Jalapeños: If you want less spice, use bell peppers. - Bread Crumbs: Substitute with crushed tortilla chips for extra crunch. These swaps keep the dip delicious and fun. I love using fresh jalapeños for a bright flavor. They add a crisp bite and a fresh taste. If you want a tangy twist, pickled jalapeños work well. They bring a zesty flavor and a softer texture that blends nicely in the dip. Both options are tasty, so pick what you like best! 1. First, preheat your oven to 350°F (175°C). 2. Next, grab a large mixing bowl. 3. Add 8 oz of softened cream cheese. 4. Mix in 1 cup of sour cream. 5. Now, add 1 cup of shredded cheddar cheese. 6. Toss in 1/2 cup of diced jalapeños, fresh or pickled. 7. Add 1/2 cup of diced green onions. 8. Sprinkle in 1 tsp of garlic powder. 9. Add 1/2 tsp of smoked paprika. 10. Season with salt and pepper to taste. 11. Mix all ingredients until smooth and well combined. 1. Transfer the dip mixture into a baking dish. 2. Spread it evenly across the dish. 3. In a small bowl, mix 1/2 cup of breadcrumbs with 2 tbsp of olive oil. 4. Coat the breadcrumbs well. 5. Sprinkle the breadcrumb mix evenly over the dip. 6. Place the dish in the oven. 7. Bake for 25 to 30 minutes. 8. Look for a bubbly dip and a golden breadcrumb topping. 9. Remove the dip from the oven and let it cool for a few minutes. 1. Serve the dip warm with tortilla chips. 2. You can also use sliced bell peppers or crackers. 3. For a nice touch, garnish with more green onions. 4. Add a few jalapeño slices for extra flair. For the full recipe, be sure to check the earlier section! To get the best texture, cream cheese must be soft. Leave it out for an hour. This makes mixing easy and smooth. You want a creamy dip, not a lumpy one. Blend all the ingredients well. The melted cheese will add a nice stretch when you serve it. One common mistake is overbaking the dip. Keep an eye on it after 20 minutes. You want it bubbly with a golden top but not burnt. Another mistake is using too many jalapeños. Balance is key. Too much spice can hide the other flavors. You can add extra cheese for richness. Try using pepper jack for a spicy kick. Want a smoky flavor? Add more smoked paprika. You can also mix in cooked bacon for a savory twist. For a fresh touch, add chopped cilantro or lime juice. These tweaks make the dip your own. {{image_2}} If you love heat, add more jalapeños! Use one cup of diced jalapeños. You can use fresh jalapeños for a bold kick or pickled ones for a tangy twist. This spicy version will make your taste buds dance. Serve it at your next party, and watch it disappear! Want a meat-free dip? No problem! You can skip the bacon bits or any meat. Use the same creamy base with cheese and jalapeños. Consider adding chopped bell peppers or corn for extra texture. These add-ins bring color and crunch to the dip. Your vegetarian friends will love it! Cheese makes this dip creamy and rich. If you want to try something new, swap cheddar for Monterey Jack or pepper jack cheese. These options give a different taste and texture. For a lighter dip, use Greek yogurt instead of sour cream. This keeps it creamy and adds protein. For the complete recipe, check out the Full Recipe section! You can store leftover jalapeño popper dip in the fridge. Place it in an airtight container. It will last for about three to four days. Make sure to let the dip cool down before sealing it. This helps keep the flavors fresh. When you are ready to eat it again, just take it out and enjoy! If you want to save the dip for later, freezing is a great option. Use a freezer-safe container or a heavy-duty freezer bag. Make sure to remove as much air as you can. The dip can last in the freezer for up to three months. Just remember to label the container with the date. This way, you know when to use it! To reheat, you have a couple of options. You can use the oven or the microwave. For the oven, preheat it to 350°F (175°C). Place the dip in an oven-safe dish. Heat for about 20 minutes or until it is hot and bubbly. If using a microwave, put it in a microwave-safe bowl. Heat in short bursts, stirring in between. Make sure it gets hot all the way through. Enjoy your tasty dip just like new! Jalapeño Popper Dip lasts about three to four days in the fridge. Store it in an airtight container to keep it fresh. If you notice any changes in smell or texture, it’s best to toss it. Yes, you can make Jalapeño Popper Dip ahead of time. Mix the dip and place it in a baking dish. Cover it tightly with plastic wrap and keep it in the fridge. Bake it when you are ready to serve. You can serve Jalapeño Popper Dip with a variety of snacks. Some great options include: - Tortilla chips - Sliced bell peppers - Crackers - Fresh veggies These pair well and add crunch to each bite. For the full recipe, you can find it above. It includes all the ingredients and steps needed to create this tasty dip. Enjoy making it for your next gathering! We covered a lot about Jalapeño Popper Dip. You learned about key ingredients, how to prepare, and bake it. Remember the tips for perfect texture and avoiding common mistakes. Explore variations for added spice or vegetarian options. Finally, store your leftovers safely, and use the reheating tips to enjoy later. This dish brings bold flavor and fun to the table, making every bite count. Dive into your next cook-off armed with these details!

Jalapeño Popper Dip Tasty and Easy Party Snack

If you’re looking for a crowd-pleasing snack for your next party, you’re in the right spot! Jalapeño Popper Dip combines

- 2 large flatbreads (store-bought or homemade) - 1 cup cooked chicken, shredded - 1 cup BBQ sauce (choose your favorite) - 1 cup shredded mozzarella cheese - 1/2 cup red onion, thinly sliced - 1/2 cup corn kernels (fresh or canned) - 1/4 cup fresh cilantro, chopped (for garnish) - 1 teaspoon olive oil - Salt and pepper to taste When making BBQ chicken flatbread pizza, you want the best flavors. Start with flatbreads. You can use store-bought or make your own. I love homemade because it adds a nice touch. Next, use cooked chicken. Shredded chicken works well here. You can use leftover chicken or rotisserie chicken. It saves time and adds great flavor. BBQ sauce is key. Choose your favorite type, and it will shine through. Sweet, tangy, or spicy—pick what you like best. Mozzarella cheese is classic for pizza. It melts well and gives that gooey texture. Red onion adds a nice crunch and flavor. Slice it thinly for the best bite. Corn brings sweetness and color. You can use fresh corn or canned. Both taste great! For garnish, use fresh cilantro. It adds a bright note to the dish. Don’t forget olive oil, salt, and pepper. These simple seasonings enhance all the flavors. - Alternatives to flatbreads: You can use pita bread or naan as a base. - Options for BBQ sauce: Try a spicy sauce or a mustard-based BBQ sauce for a twist. - Cheese variations: Use cheddar, gouda, or a dairy-free cheese for different flavors. Feel free to mix and match these ingredients. Use what you have at home. Make this pizza your own! For the full recipe, check the details above. - Preheat the oven. Set your oven to 425°F (220°C) so it’s ready. - Prepare your ingredients. Gather everything you need for easy cooking. - Mixing chicken and BBQ sauce. In a bowl, combine shredded chicken with BBQ sauce. Make sure the chicken is well-coated. - Assembling the flatbreads. Brush flatbreads with olive oil. Add a pinch of salt and pepper. Spread the BBQ chicken mix on top, leaving space at the edges. - Baking and achieving the perfect melt. Place flatbreads on a baking sheet lined with parchment paper. Sprinkle mozzarella cheese over the chicken. Add red onion and corn. Bake for 10-12 minutes until golden and bubbly. - How to slice and serve. Let the flatbreads cool for a minute before slicing. This makes it easy to serve. - Pairing ideas with sides or drinks. Serve with a fresh salad or your favorite drink. Enjoy the flavors! To make the best BBQ chicken flatbread pizza, focus on two main things: the crust and the toppings. Achieving a crispy crust: - Preheat your oven to 425°F (220°C) for the best results. - Use a lightly oiled baking sheet or a hot pizza stone. - Bake until the edges are golden brown and the cheese bubbles. Balancing flavors with toppings: - Use a mix of sweet and savory. BBQ sauce adds sweetness, while red onion adds a nice bite. - Don’t skimp on cheese! It binds all flavors together and helps with texture. When cooking your pizza, the method matters. Using a pizza stone vs. a baking sheet: - A pizza stone traps heat, giving you a crispier bottom. - A baking sheet is easier to use and still yields great results. Recommended oven settings: - Always set your oven to bake, not broil. This ensures even cooking. - Keep an eye on the pizza as it cooks to avoid burning. Even the best chefs make mistakes. Here are a few to watch out for. Overloading toppings: - Too many toppings can make the pizza soggy. Stick to a few key ingredients. - Aim for balance; too much of one flavor can overwhelm the dish. Cooking time variations: - Every oven is different. Start checking your pizza at 10 minutes. - Adjust cooking time based on your oven’s performance and the thickness of the flatbread. {{image_2}} You can switch chicken for beef or turkey. Shredded beef works well with BBQ sauce. If you want a vegetarian option, try using grilled mushrooms or jackfruit. Both can soak up the BBQ flavor nicely. You can also experiment with different BBQ sauces. A smoky sauce gives depth, while a sweet sauce adds a nice contrast. Feel free to add more veggies! Bell peppers, spinach, or jalapeños can enhance flavor. Fresh herbs like basil or parsley also add a bright taste. For a spicy kick, sprinkle crushed red pepper flakes on top. This will give your flatbread a fun twist. If you need gluten-free options, look for gluten-free flatbreads at the store. Cauliflower crusts are also a good choice for low-carb diets. Want to make your own? Check out the homemade flatbread recipe in the Full Recipe section. Making your flatbread allows you to control the ingredients and flavors. To store leftover BBQ chicken flatbread pizza, let it cool first. Place the slices in an airtight container. You can also wrap them tightly in plastic wrap. This keeps the pizza fresh and prevents it from drying out. For best results, use glass or BPA-free plastic containers. They seal well and help maintain flavor. You can freeze both cooked and uncooked flatbreads. If freezing cooked flatbreads, let them cool completely. Wrap each slice in foil or plastic wrap. Place the wrapped slices in a freezer bag. For uncooked flatbreads, assemble as usual but do not bake. Freeze them on a baking sheet, then transfer to a bag. This way, they won’t stick together. When you're ready to eat, reheat from frozen. For cooked flatbreads, bake in the oven at 375°F (190°C) for 15-20 minutes. For uncooked flatbreads, bake at 425°F (220°C) for about 10-12 minutes. Check for that golden-brown crust and melted cheese. Stored pizza lasts about 3-4 days in the fridge. If frozen, it can last up to three months. Always label your containers with the date. Signs of spoilage include an off smell, mold, or a change in color. If you notice these signs, it’s best to throw it away. Enjoy your BBQ chicken flatbread pizza while it's fresh! BBQ chicken flatbread pizza is a fun twist on classic pizza. It uses flatbreads as the base instead of traditional dough. The toppings include tender chicken, tangy BBQ sauce, and gooey cheese. This dish has gained popularity for its ease and taste. It's great for quick meals or parties. You can make it in just 20 minutes! Yes, you can prep this pizza ahead of time. Here are some tips for meal prepping: - Cook the chicken: Shred and mix it with BBQ sauce. Store it in the fridge for up to 3 days. - Prep the toppings: Slice onions, corn, and cilantro. Keep them in airtight containers. - Assemble before cooking: You can put everything on the flatbread and cover it. Just bake it when you're ready to eat. You can find BBQ chicken flatbread pizza at many local restaurants and pizza shops. Popular chains often have it on their menu, too. Look for places that offer gourmet pizzas or flatbreads. Some grocery stores also sell frozen versions, making it easy to enjoy at home. You now have all the details to make a tasty BBQ chicken flatbread pizza. From choosing the right ingredients to preparing and cooking it perfectly, every step counts. Don't forget to customize your pizza to suit your taste. With the right tips, you can avoid common mistakes and enjoy a fun meal. Whether you share it with friends or save leftovers, this dish is sure to please. Dive in and enjoy your delicious homemade pizza!

BBQ Chicken Flatbread Pizza Delightful and Easy Recipe

Looking for a delicious and easy meal? You’ve come to the right place! This BBQ Chicken Flatbread Pizza recipe combines

To create your Frozen Mango Margarita Mocktail, you need fresh and tasty ingredients. Here’s what you’ll want to gather: - Ripe mangoes - Fresh lime juice - Agave syrup (or honey) - Coconut water - Ice cubes - Optional garnishes (lime slices, mint leaves, salt) Ripe mangoes are the star of this drink. They should be sweet and soft. Fresh lime juice adds a nice tang. You can use agave syrup or honey to sweeten it. Coconut water gives a tropical twist. Ice cubes make it cold and refreshing. You can also add lime slices and mint leaves on top for a pretty finish. Some people love a salted rim on their glass. It adds a fun flavor! For the full recipe, check out the details later. This drink is perfect for a warm day or a fun gathering. Enjoy making it! Start by getting your serving glasses ready. First, take a lime wedge and run it around the rim of each glass. This helps the salt stick. If you like a salty kick, dip the rim into salt. You can use coarse salt for a nice texture. For a fun look, you can use colored salt or add spices. Make sure the glass is clean and dry for the best results. This small step adds a lot to your drink. It makes it look fancy and bright. Now, it’s time to blend. First, add the diced mangoes to the blender. Next, pour in the fresh lime juice. Add the agave syrup, coconut water, and ice cubes. This order helps blend everything well. Blend on high speed for about 30 seconds. You want it to be smooth and creamy. If you like your drink thicker, add more ice and blend again. Check the texture. You can always adjust it to your liking. After blending, taste your mixture. If it’s not sweet enough, add more agave syrup. Blend again until mixed well. Next, pour the frozen mango mixture into your prepared glasses. To make it look stunning, garnish with lime slices and fresh mint leaves. This adds color and flavor. Serve right away to enjoy it at its best. You can find the Full Recipe in this article for easy reference. For the best taste, pick ripe mangoes. A ripe mango feels soft but not mushy. Look for a sweet aroma. The skin may have some red or yellow hues. A good mango should be slightly wrinkled. This means it is ripe and sweet. You can try different sweeteners if agave syrup isn’t your favorite. Honey works well, too. For a fruity twist, add berries or peaches. Fresh herbs like mint or basil can add a nice touch. They bring a fresh taste. Just a few leaves can really brighten your drink. To get your mocktail just right, adjust the ice amount. If it’s too thin, add more ice. Blend until smooth. If you want it thicker, blend longer. If it’s too thick, add a bit more coconut water. This will help you reach your ideal texture. {{image_2}} You can add a tropical twist to your frozen mango margarita mocktail. Try mixing in coconut or pineapple. Both fruits bring sweetness and a fun flavor. For coconut, use coconut milk or cream. This gives a creamy texture. Pineapple adds a juicy zing. You can blend in fresh pineapple chunks or juice. Experimenting with these fruits makes the drink more exciting. Want some heat? Infuse your mocktail with jalapeño or chili. Start with a small slice of jalapeño in the blender. Blend it with the other ingredients. This adds a kick to the sweetness of the mango. If you prefer, add a pinch of chili powder for warmth. Adjust the spice level to your taste. This spicy mango variation adds a new layer of flavor. You can also change your drink into a slushie. Use the same ingredients but adjust the ice. Add more ice cubes to the blender. This will make the drink thicker and slushier. Blend until you reach your desired texture. Serve it in a tall glass for a fun look. This mocktail slushie is perfect for hot days. Enjoy it as a cool treat! If you have any leftover mocktail, store it in an airtight container. This keeps it fresh. Place the container in the fridge and drink it within two days. The flavors stay best when you keep it cold. Give it a good shake before serving again. You can also add some fresh ice to make it cold and refreshing. To freeze mangoes for later use, start by peeling and dicing them. Spread the diced mango on a baking sheet. Make sure they are not touching. Freeze them for about two hours. Once frozen, transfer the mango to a zip-top bag. Remove as much air as you can before sealing. This helps to avoid freezer burn. You can enjoy these frozen mangoes in smoothies or another batch of your Frozen Mango Margarita Mocktail. The mocktail can last up to two days in the fridge. After that, the taste may change. If you notice it smells off, it's best to toss it. Always check the look and smell before drinking. Enjoy your mocktail while it’s fresh for the best taste! Yes, you can use frozen mango. It makes things easy! Pros: Frozen mango is ready to use. It often costs less, too. It stays fresh longer, so you waste less. Cons: Frozen mango may not taste as fresh. It can be more watery when blended. You might need less ice if you use frozen mango. To reduce the sweetness, use less agave syrup. Start with a little and blend. You can also add more lime juice. This will balance the sweetness. If you want, add a pinch of salt. It can help cut the sweet taste. You can prepare the mixture ahead of time. Just blend the ingredients and store in the fridge. Keep it in an airtight container for up to 24 hours. When ready to serve, blend it again with ice. This keeps it cold and fresh. For best taste, do not add ice until serving. This keeps the texture just right. You can find the Full Recipe for more details. This blog post shared how to make a refreshing mango mocktail using simple ingredients. We covered the best fruits, blending methods, and even cool variations. I shared tips on enhancing flavors and proper storage, so your drink stays fresh. Remember, you can adapt this recipe to suit your taste. Enjoy experimenting with flavors, and don’t hesitate to share your mocktail creations. Now, let’s get blending and enjoy that delicious drink!

Frozen Mango Margarita Mocktail Refreshing Delight

Looking for a drink that’s as refreshing as a summer day? The Frozen Mango Margarita Mocktail is your answer! With

- 1 cup unsalted butter - 1 cup granulated sugar - 1 large egg yolk - 1 teaspoon almond extract - 2 cups all-purpose flour - 1/2 teaspoon salt - 1/2 cup raspberry jam - 1/4 cup sliced almonds - Optional: powdered sugar for dusting For these Raspberry Almond Thumbprint Cookies, each ingredient plays a key role. The unsalted butter gives the cookies a rich taste. Granulated sugar adds the sweet touch we all love. The egg yolk helps bind the dough and adds moisture. Almond extract gives a nice nutty flavor that pairs well with raspberry. All-purpose flour forms the base of the dough, while salt balances the sweetness. Raspberry jam brings a fruity finish, and sliced almonds add crunch. Accurate measurements are key for baking success. Use a measuring cup for dry ingredients and a liquid measuring cup for wet ones. Level off the flour with a knife to avoid extra flour. This ensures the cookies have the right texture. Too much flour can make them dry. You can swap almond extract for vanilla extract. This change will give a different flavor but still taste great. For a low-sugar option, choose a low-sugar raspberry jam. This keeps the cookies tasty without too much sweetness. You can also use different types of jam if you want to mix things up! First, you need to preheat your oven to 350°F (175°C). This step is key for even baking. While it heats, take two baking sheets and line them with parchment paper. This helps the cookies not stick. Set them aside for later. Now, let’s make the dough. In a mixing bowl, cream together 1 cup of softened butter and 1 cup of granulated sugar. Beat them until the mixture is light and fluffy. This takes about 3 to 4 minutes. Next, add 1 large egg yolk and 1 teaspoon of almond extract to the bowl. Mix until everything is well combined. In another bowl, whisk together 2 cups of all-purpose flour and 1/2 teaspoon of salt. Gradually add this dry mixture into the butter mixture. Stir just until combined; don't overmix. Time to shape the cookies! Roll the dough into 1-inch balls. Place them on your prepared baking sheets, leaving about 2 inches of space between each cookie. This lets them spread while baking. Using your thumb or the back of a teaspoon, make an indentation in the center of each ball. This is where the jam will go. Then, spoon about 1/2 teaspoon of raspberry jam into each indentation. Make sure not to overfill, or the jam will spill out. To add some crunch, sprinkle sliced almonds around the edges of the jam in each cookie. Press them lightly into the dough so they stick. Now it’s time to bake! Place the baking sheets in the oven and bake for 12 to 15 minutes. Keep an eye on the edges. They should turn lightly golden. Once they look good, take them out of the oven. Let the cookies cool on the baking sheets for about 5 minutes. Then, transfer them to a wire rack to cool completely. For extra sweetness, you can dust them with powdered sugar before serving. Enjoy your Raspberry Almond Thumbprint Cookies! You can find the Full Recipe for more details. To get creamy cookie dough, start with softened butter. This helps it mix well with sugar. Beat the butter and sugar until light and fluffy. This takes about 3-4 minutes. For fluffy cookies, don’t over-mix the dough after adding flour. If you bake them too long, they can turn hard. Keep an eye on them. Bake until the edges are lightly golden, about 12-15 minutes. Use high-quality raspberry jam for the best taste. Cheap jam may lack the fruit flavor you want. You can also add a few drops of lemon juice. This brightens the taste of the cookies. If you like, try adding a bit of vanilla extract for depth. For making indentations in the cookies, you can use your thumb or a teaspoon. If you want a uniform shape, use a teaspoon. This gives you a nice round indentation. If you prefer a more rustic look, use your thumb. Both methods work well for holding the jam. {{image_2}} You can use many types of jam for these cookies. Try strawberry, apricot, or blueberry jam. Each jam brings its own flavor twist. You can mix and match flavors to find your favorite. Just remember to keep the jam thick enough to hold its shape. Thinner jams may spread out too much in the oven. If you want to switch up the nuts, pecans, walnuts, or peanuts work well. Each nut adds a unique taste. Pecans give a soft, buttery flavor. Walnuts add a slight bitterness that pairs nicely with sweet jam. Peanuts can add a fun crunch and a savory note. Feel free to experiment with your favorites! You can easily make these cookies gluten-free. Use a gluten-free flour blend instead of all-purpose flour. They still taste great! For vegan cookies, swap the butter for coconut oil and the egg yolk for a flax egg. Mix one tablespoon of ground flaxseed with two and a half tablespoons of water. Let it sit for a few minutes until it thickens. This works well in most cookie recipes. To keep your Raspberry Almond Thumbprint Cookies fresh, put them in an airtight container. Line the bottom with parchment paper. This will help keep moisture away. Store them at room temperature, away from sunlight. If you want to keep them longer, you can refrigerate them. Just let them come to room temperature before serving. You can freeze both the dough and the baked cookies. For the dough, shape it into balls and freeze on a baking sheet first. Once frozen, place the balls in a zip-top bag. For baked cookies, let them cool completely before freezing. Store them in an airtight container or a freezer bag. Enjoy them within three months for best taste. These cookies can last about a week at room temperature. If you store them in the fridge, they can last up to two weeks. The jam helps keep them moist, but they taste best fresh. For longer storage, use the freezing tips above. If your dough feels too sticky, don't worry! You can fix it easily. Start by adding a bit more flour, one tablespoon at a time. Mix it well after each addition. This helps balance the moisture. If the dough is still sticky, chill it in the fridge for about 15 minutes. Chilling firms up the dough and makes it easier to work with. Yes, you can! Making these cookies ahead of time is a great idea. You can prepare the dough and roll it into balls. Then, place the balls on a baking sheet and freeze them for about an hour. Once frozen, transfer the cookie balls to a zip-top bag. When you're ready to bake, just pop them in the oven. You might need to bake them a few minutes longer. To know when your cookies are done, look for a few signs. They should be lightly golden around the edges. The center might look a bit soft, but that’s okay. The cookies will firm up as they cool. You can also gently press the edge with your finger. If it feels set, you’re good to go! You can find the complete recipe for these delicious Raspberry Almond Thumbprint Cookies [here](#). You now have all the details to make perfect Raspberry Almond Thumbprint Cookies. We covered essential ingredients, precise measurements, and helpful tips for excellent results. Remember to try different jams or nuts to make this recipe your own. Store your cookies properly to keep them fresh for longer. Enjoy these tasty delights anytime! Happy baking, and I hope these cookies bring joy to your kitchen.

Raspberry Almond Thumbprint Cookies Easy and Tasty Treat

If you love cookies that are easy to make and taste great, you’re in the right place! Raspberry Almond Thumbprint

To make a tasty Cheesy Broccoli Rice Casserole, gather these ingredients: - 2 cups cooked white rice - 2 cups fresh broccoli florets (steamed) - 1 cup shredded sharp cheddar cheese - 1 cup cream of mushroom soup (canned or homemade) - ½ cup milk - 1 small onion, finely chopped - 2 cloves garlic, minced - 1 teaspoon garlic powder - 1 teaspoon onion powder - ½ teaspoon paprika - Salt and pepper to taste - 1 cup breadcrumbs (plain or seasoned) - 2 tablespoons butter, melted When you make this dish, feel free to swap some ingredients. If you don’t have sharp cheddar cheese, try mild or pepper jack for a different taste. For the soup, you can use cream of chicken or even a homemade version. If you want a lighter option, use low-fat milk instead of whole milk. Here are some key nutritional facts for the main ingredients: - Broccoli: High in vitamins K and C, fiber, and antioxidants. - Cheddar Cheese: Provides calcium and protein but is high in fat. - Cream of Mushroom Soup: Adds creaminess but can be high in sodium. - Rice: A good source of carbs for energy. Knowing these facts helps you make better choices. With the right mix, you can enjoy a dish that's both comforting and good for you. First, preheat your oven to 350°F (175°C). This helps the casserole cook evenly. Next, grab a 9x13 inch baking dish. Grease it lightly with butter or cooking spray to prevent sticking. In a large mixing bowl, add these ingredients: - 2 cups cooked white rice - 2 cups fresh broccoli florets (steamed) - 1 cup shredded sharp cheddar cheese - 1 cup cream of mushroom soup - ½ cup milk Mix these ingredients well until everything is blended. It should look creamy and delicious. Now, add: - 1 small onion, finely chopped - 2 cloves garlic, minced - 1 teaspoon garlic powder - 1 teaspoon onion powder - ½ teaspoon paprika - Salt and pepper to taste Stir again to spread out all the flavors. Once mixed, transfer this tasty mixture into the greased baking dish. Spread it evenly with a spatula. Then, in a small bowl, mix: - 1 cup breadcrumbs - 2 tablespoons melted butter Make sure the breadcrumbs are coated well with butter. Sprinkle this breadcrumb mix over the top of the casserole. It will give a nice, crunchy finish when baked. Now it’s time to bake! Place the dish in your preheated oven. Bake for 25-30 minutes. Keep an eye on it. You want the top to be golden brown. Check if the casserole is heated all the way through. For the best taste, let it cool for a few minutes after baking. This will help it set and make serving easier. Enjoy this warm and cheesy comfort food right from the dish! To make the best Cheesy Broccoli Rice Casserole, avoid these common mistakes: - Overcooking the broccoli: Steam it just until bright green. This keeps it crunchy. - Not measuring ingredients: Accurate measurements ensure the right taste and texture. - Skipping the breadcrumbs: They add a nice crunch that balances the creamy filling. To achieve a crispy topping with breadcrumbs, follow these steps: - Mix breadcrumbs with melted butter. This helps them brown nicely. - Spread the mixture evenly over the casserole before baking. This ensures every bite has crunch. For best results, use these cooking tools: - 9x13 inch baking dish: This size allows for even cooking. - Mixing bowls: Use large bowls to blend ingredients without spills. - Steam basket: This helps cook broccoli perfectly without losing nutrients. Pair your Cheesy Broccoli Rice Casserole with these great sides: - Simple green salad: It adds freshness and crunch. - Garlic bread: This adds a warm, comforting touch. - Roasted chicken: The protein complements the casserole’s creaminess. For a creative garnish, try these ideas: - Extra shredded cheese: Sprinkle on top before serving for extra flavor. - Fresh parsley: This adds a pop of color and freshness. - Chopped green onions: They provide a mild onion flavor that brightens the dish. Feel free to explore the [Full Recipe] for detailed steps and more tips! {{image_2}} You can easily change this dish to fit your needs. If you want a vegetarian or vegan meal, swap the cream of mushroom soup for a plant-based version. Use vegan cheese and milk to keep it creamy and tasty. To add protein, consider cooked chicken or diced ham. These options bring heartiness to the casserole. You can also mix in cooked sausage for a different flavor. Feel free to boost flavor with spices or herbs. Try adding thyme, basil, or even a sprinkle of red pepper flakes for a kick. You can add other veggies too, like carrots or peas, for extra texture and color. Cheese can change the whole taste of your casserole. Sharp cheddar is a classic choice, but you can try others too. For a milder flavor, use mozzarella. If you want a bit of tang, go for goat cheese or feta. Each cheese alters the texture. Cheddar melts well and creates a creamy feel. Mozzarella gives a stretchy, gooey effect. Mixing different cheeses can add depth to the dish. For the full recipe, check out the detailed steps to create your own cheesy broccoli rice casserole. To keep your Cheesy Broccoli Rice Casserole fresh, store it properly. First, let it cool down to room temperature. Then, transfer it to an airtight container. You can also wrap it tightly in plastic wrap. This helps avoid air exposure, which can lead to spoilage. You can refrigerate the casserole for up to four days. If you want to store it longer, consider freezing it. It will stay good in the freezer for about three months. Just be sure to label the container with the date. When it's time to enjoy the leftovers, reheating is key. The best way is to use an oven. Preheat it to 350°F (175°C). Place the casserole in a baking dish. Cover it with foil to keep moisture in. Heat for about 20-25 minutes or until it's hot throughout. You can also use a microwave. Place a portion in a microwave-safe dish. Cover it with a damp paper towel to keep it moist. Heat for 1-2 minutes, stirring halfway through. This helps keep the texture and taste intact. Enjoy your delicious comfort food again! For the full recipe, check the previous section. You can prepare the casserole the night before. Mix all the ingredients, then cover and store it in the fridge. Bake it the next day. Just add a few extra minutes to the baking time. Yes, you can use brown rice. Cook it first, as it takes longer to cook than white rice. This adds more fiber and a nuttier flavor to your dish. You can use cream of chicken soup or a homemade white sauce. If you want a vegetarian option, try pureed cauliflower or a vegan cream soup. Each choice will change the flavor a bit. Yes, you can make it gluten-free. Use gluten-free breadcrumbs and check the soup label for gluten-free options. This way, everyone can enjoy the casserole. Check for a golden brown top and bubbly edges. Insert a fork or knife into the center. If it comes out hot and clean, it is ready. The total baking time is usually 25-30 minutes. In summary, we explored how to make Cheesy Broccoli Rice Casserole. I shared detailed ingredient measurements, helpful cooking steps, and tips for perfecting the dish. You learned about variations, including vegetarian options and cheese choices. Remember to store leftovers properly and reheat them for best taste. This dish is easy and adjustable to fit your taste. Try it out, explore variations, and enjoy a comforting meal anytime!

Cheesy Broccoli Rice Casserole Simple Comfort Food

Looking for the perfect dish to warm your heart and fill your belly? Look no further! My Cheesy Broccoli Rice

For this vegan blueberry cheesecake, you will need: - 1 ½ cups raw cashews, soaked for at least 4 hours - ½ cup coconut cream - ½ cup maple syrup - ¼ cup fresh lemon juice - 1 cup fresh or frozen blueberries (thawed if frozen) - 1 teaspoon vanilla extract - ½ teaspoon agar-agar powder (for a firmer texture) - 1 cup almond flour (for crust) - ¼ cup coconut oil, melted (for crust) - 2 tablespoons coconut sugar (for crust) - Pinch of salt Fresh blueberries add bright flavor and natural sweetness. They provide a vibrant color that makes the cheesecake appealing. These berries are packed with vitamins and antioxidants, which boost health. Using fresh blueberries enhances the overall taste and makes the cheesecake more enjoyable. If you use frozen blueberries, thaw them first. This step ensures that the texture stays creamy in the filling. If you have allergies or dietary needs, here are some substitutes: - Cashews: Use soaked sunflower seeds for a nut-free option. - Coconut cream: Swap with silken tofu for a lighter texture. - Maple syrup: Honey or agave syrup can work as sweeteners. - Almond flour: Oat flour is a good gluten-free option for the crust. - Agar-agar: You may replace it with cornstarch, but the texture may differ. Use these substitutes thoughtfully to maintain the balance of flavors and textures in your cheesecake. If you want to explore a twist, try mixing in different fruits or flavorings. Check the Full Recipe for detailed steps and enjoy making this delightful dessert! To make this vegan blueberry cheesecake, we start with the crust and then create the filling. This recipe is easy and fun. You can mix the crust in a bowl and blend the filling in a blender. Be ready to enjoy this delicious treat! First, gather all your crust ingredients. You will need: - 1 cup almond flour - ¼ cup coconut oil, melted - 2 tablespoons coconut sugar - Pinch of salt In a mixing bowl, combine the almond flour, melted coconut oil, coconut sugar, and a pinch of salt. Use your hands or a spoon to mix until crumbly. Next, grease a 9-inch springform pan with a little coconut oil. Press the crust mixture evenly into the bottom of the pan. Make sure it is compact and flat. Set the crust aside while you make the filling. Now, let’s make the creamy filling. Start with these ingredients: - 1 ½ cups raw cashews, soaked for at least 4 hours - ½ cup coconut cream - ½ cup maple syrup - ¼ cup fresh lemon juice - 1 cup fresh or frozen blueberries (thawed if frozen) - 1 teaspoon vanilla extract - ½ teaspoon agar-agar powder Drain and rinse the soaked cashews. In a high-speed blender, add the cashews, coconut cream, maple syrup, lemon juice, vanilla extract, and agar-agar. Blend until the mixture is smooth and creamy. Next, gently fold in the blueberries. You can save a few for garnish later. Pour this creamy filling over the crust in the springform pan. Use a spatula to smooth the top. Now, refrigerate the cheesecake for at least 4-6 hours. If you used agar-agar, it may set faster in the freezer. Once it is set, carefully remove the springform pan. Slice and serve chilled, adding reserved blueberries on top for a beautiful finish. Enjoy your vegan blueberry cheesecake! For the full recipe, check out the complete instructions. To get that creamy, dreamy texture, soak your cashews for at least 4 hours. This step softens them, making blending easy. Use a high-speed blender for the smoothest result. If you want it firmer, add half a teaspoon of agar-agar powder. This keeps your cheesecake from being too soft. Make sure to blend until the mixture is silky. I love serving this cheesecake chilled. It tastes best after a few hours in the fridge. You can garnish it with fresh blueberries, mint leaves, or a drizzle of maple syrup. For a fun twist, try serving it on a colorful cake stand. This makes it look inviting and special. If your cheesecake is too soft, check the soaking time of your cashews. They should be soaked well. If it doesn’t set properly, you can try increasing the agar-agar. If the crust crumbles, ensure you mix the crust ingredients well. Press the crust firmly into the pan for a solid base. Follow the Full Recipe for precise steps and enjoy your baking journey! {{image_2}} You can change the fruit in this vegan blueberry cheesecake. Try using raspberries, strawberries, or blackberries. Each fruit gives a unique taste. Cherries also work well if you want something sweet and tart. Just make sure to adjust the sugar if your fruit is very sweet. You can even mix fruits for a fun blend! If you need a gluten-free option, the crust is easy to change. Use almond flour like in the recipe. You can also try oat flour or ground nuts. These options create a tasty base. Just remember to check any labels to ensure they are gluten-free. This way, everyone can enjoy your cheesecake! Add fun flavors to your cheesecake. Try mixing in some lemon zest or orange zest for a citrusy kick. You can also use almond extract instead of vanilla for a nutty taste. If you love chocolate, fold in some cacao powder. This gives a rich flavor and a nice color to your dessert. Experimenting with flavors can make your cheesecake even more exciting! Store leftover vegan blueberry cheesecake in an airtight container. Place it in the fridge. This keeps your cheesecake fresh for up to five days. Make sure to cover the top to avoid drying out. If you want to save space, slice it into pieces before storing. You can freeze vegan blueberry cheesecake for up to three months. Wrap it tightly in plastic wrap first. Then place it in a freezer bag or container. This helps prevent freezer burn. When ready to eat, let it thaw in the fridge overnight for the best texture. To thaw, simply move the cheesecake from the freezer to the fridge. Let it sit overnight. This keeps it creamy and delicious. Avoid using a microwave to thaw, as it can change the texture. If you need it fast, let it sit at room temperature for about 30 minutes. Enjoy your cheesecake cold for the best flavor! Yes, you can make this cheesecake nut-free. Instead of cashews, use silken tofu for the filling. This will give a creamy texture without nuts. Blend it just like you would with cashews. The taste may change a bit, but it will still be delicious. You can also try sunflower seeds as a nut-free option. Just soak them first to soften. The cheesecake lasts about 5 days in the fridge. Store it in an airtight container to keep it fresh. If you want to enjoy it later, you can freeze it. Just wrap it tightly and it will stay good for up to 3 months. Thaw it in the fridge before serving. Agar-agar is a plant-based gelling agent. It helps the cheesecake set and gives it firmness. If you don’t have agar-agar, you can use cornstarch instead. Just mix 2 tablespoons of cornstarch with a little water to create a slurry. Add it to the filling while blending. However, agar-agar gives a better texture for this cheesecake. For the best results, I recommend using agar-agar. For the full recipe, check out the Vegan Blueberry Bliss Cheesecake! This blog post covered making a delicious vegan blueberry cheesecake. We discussed key ingredients, the importance of fresh blueberries, and good substitutes. You learned step-by-step how to prepare the crust and filling. We shared tips for the perfect texture and serving ideas. Variations allow you to customize this dessert with different fruits and gluten-free options. We also explored proper storage and answered common questions. With this guide, you can create a tasty treat that everyone will love. Enjoy your cheesecake adventure!

Vegan Blueberry Cheesecake Delightful and Easy Recipe

Are you ready to enjoy a vegan dessert that satisfies your sweet tooth? This Vegan Blueberry Cheesecake is not only

A Classic Greek Salad shines with fresh, bright veggies. Here’s what you need: - 4 ripe tomatoes - 1 cucumber - 1 red onion - 1 bell pepper These vegetables add crunch and flavor. Choose ripe tomatoes for the best taste. A crisp cucumber gives a refreshing bite. A red onion brings a slight sweetness, while a bell pepper adds color. Next, we have cheese and olives, which are key to this salad: - 200g feta cheese - 100g Kalamata olives Feta cheese provides a creamy texture and tangy flavor. Kalamata olives offer a rich and briny taste. Together, they make the salad truly special. Lastly, let’s mix up a simple dressing: - 3 tablespoons extra-virgin olive oil - 2 tablespoons red wine vinegar - 1 teaspoon dried oregano - Salt and pepper to taste This dressing is easy to make. The olive oil adds richness. Red wine vinegar gives a nice tang. Dried oregano brings an earthy note, while salt and pepper enhance all the flavors. For the full recipe, check out the Sunny Greek Delight section. Enjoy these fresh ingredients in your next meal! - Chop tomatoes and cucumber. Use ripe tomatoes for the best taste. Dice the cucumber into small pieces, too. - Slice red onion and bell pepper. Keep the onion slices thin. For the bell pepper, chop it into bite-sized pieces. - Mix fresh vegetables in a salad bowl. Place all the chopped vegetables in a large bowl. Make sure they are evenly mixed. - Gently fold in feta cheese and olives. Add crumbled feta cheese and Kalamata olives. Be careful not to break the feta too much. - Whisk together dressing ingredients. In a small bowl, combine olive oil, vinegar or lemon juice, oregano, salt, and pepper. - Drizzle over salad and toss gently. Pour the dressing on the salad. Toss everything carefully to coat without smashing the feta. This process takes just about 15 minutes. You will enjoy a fresh and tasty Classic Greek Salad! For the complete recipe, check out the Full Recipe section. To make your Greek salad shine, always use fresh, in-season vegetables. They taste better and add vibrant color. This gives your salad that crisp bite. When it comes to seasoning, balance is key. A sprinkle of salt brings out the flavors, while the olive oil adds richness. Try to find the right mix that suits your taste. Serving your salad in a chilled bowl makes it look even more inviting. A cold bowl keeps the salad crisp. For a touch of flair, garnish with extra herbs or whole olives. This adds a pop of color and makes your dish look gourmet. One common mistake is overdressing the salad. Too much dressing can drown the fresh flavors. Always start with a little and add more if needed. Another mistake is breaking the feta too much while mixing. Gently fold it in to keep those lovely chunks intact. This way, you enjoy the creamy texture in every bite. {{image_2}} You can make simple changes to the Classic Greek Salad. One tasty option is to add capers. They give a salty, briny flavor that pairs well with the fresh veggies. Another great idea is to swap the red wine vinegar for lemon juice. This adds a bright, zesty note that enhances the salad's freshness. Different regions in Greece have their own twists on this salad. For example, you can add arugula or spinach. These greens add a peppery taste that blends nicely with the other ingredients. You can also switch up the cheese. Goat cheese can be a creamy and tangy alternative to feta. This variation brings a new texture and flavor to the dish. If you're following a vegan diet, you can easily adapt this salad. Simply skip the cheese or use a plant-based alternative. This keeps the salad light but still tasty. To add crunch and protein, consider adding nuts like almonds or walnuts. They give a satisfying bite and enrich the salad's flavor profile. To keep your Greek salad fresh, store leftovers in an airtight container. This keeps air out and helps keep the veggies crisp. It is best consumed within 1-2 days. The longer it sits, the soggier it gets. To avoid sogginess, keep the dressing separate until you serve the salad. This helps the vegetables stay crunchy. Also, store the vegetables away from the dressing. That way, they won't soak up too much liquid. Freezing Greek salad is not recommended. The vegetables lose their texture when frozen. If you have extras, try to eat them fresh. If you must freeze, only freeze the feta and olives. Use them later in cooking or other recipes. Classic Greek salad, known as Horiatiki, comes from Greece. This salad reflects the simple way of life in rural Greece. People used fresh, seasonal ingredients from their gardens. The dish symbolizes the Mediterranean diet, rich in veggies, healthy fats, and flavors. It has roots in ancient times, emphasizing local produce and traditional tastes. Yes, you can make Classic Greek salad ahead of time. To prep, chop the veggies and store them in the fridge. Keep the dressing separate to prevent sogginess. Mix everything just before serving. This way, the salad stays crisp and fresh. If you want a quick meal, this method works great. If you cannot eat feta cheese, try these options: - Tofu: Crumbled tofu gives a similar texture and can soak up flavors. - Nutritional yeast: This gives a cheesy flavor and is dairy-free. - Vegan feta: Made from nuts or soy, it mimics the taste well. - Cottage cheese: A softer alternative, but it changes the flavor a bit. These substitutes allow you to enjoy the salad without dairy. The Classic Greek salad recipe serves four people. Each serving is a generous portion, perfect for a side dish or a light meal. You can easily double or triple the recipe for larger gatherings. Just adjust the ingredient amounts based on your needs. To make the "Sunny Greek Delight," follow these simple steps: 1. Combine chopped tomatoes, diced cucumber, sliced red onion, and chopped bell pepper in a bowl. 2. Gently fold in crumbled feta cheese and Kalamata olives. 3. Whisk together olive oil, red wine vinegar (or lemon juice), oregano, salt, and pepper. 4. Drizzle the dressing over the salad and toss gently. 5. Taste and adjust seasoning as needed. This quick recipe brings fresh flavors to your table. This blog gave a clear guide to making a Classic Greek Salad. We covered key ingredients, step-by-step instructions, and helpful tips. You learned how to prepare fresh vegetables, combine them with cheese and olives, and make a simple dressing. Remember to balance flavors and avoid overdressing. Feel free to experiment with variations or store leftovers correctly. A fresh Greek salad can brighten any meal and is easy to make. Enjoy creating your salad and sharing it with others!

Classic Greek Salad Fresh and Flavorful Nourishment

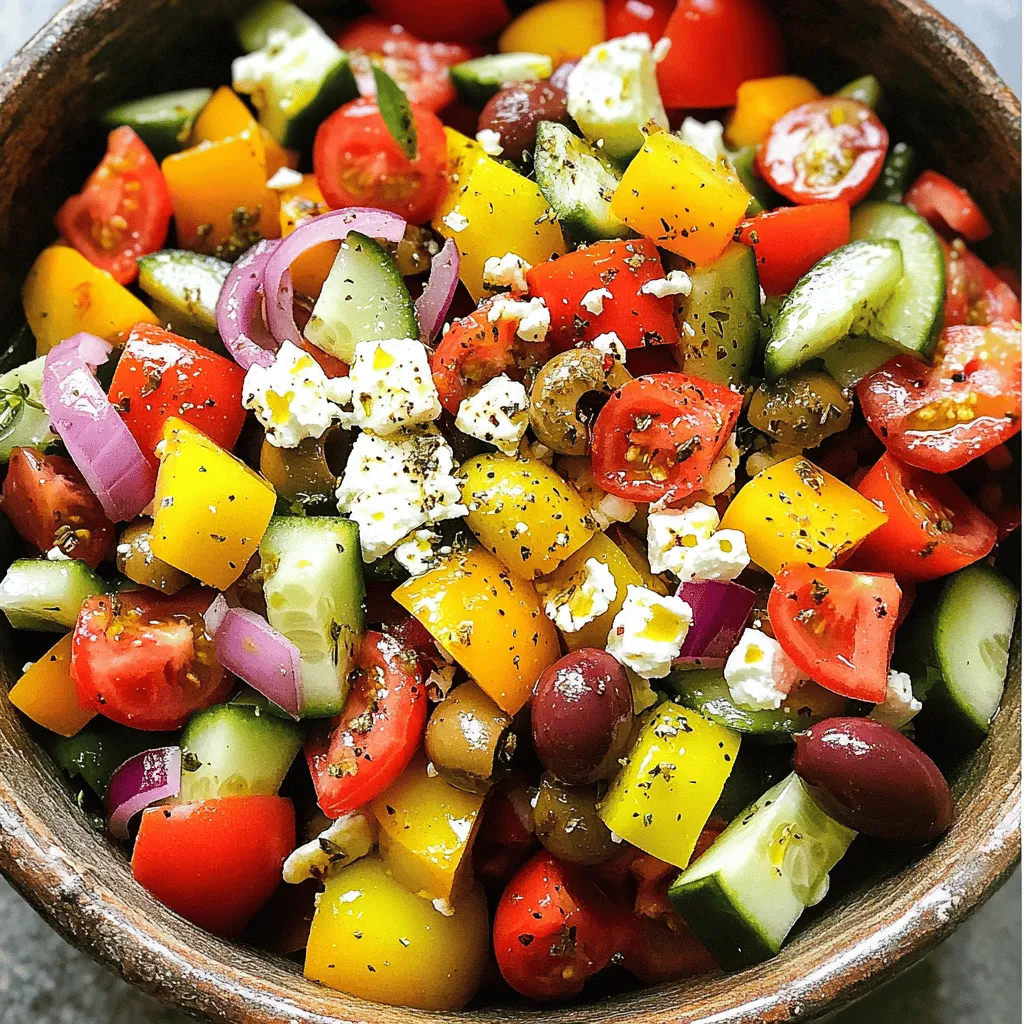
Are you ready to dive into a bowl of freshness? Classic Greek Salad is more than just a side dish—it’s

- 8 slices of turkey bacon - 1 large head of romaine lettuce - 1 medium tomato, diced - 1 avocado, sliced When you make BLT lettuce wraps, start with fresh ingredients. The turkey bacon adds a nice crunch. Romaine lettuce gives a crisp base. A ripe tomato adds juiciness, and avocado gives a creamy touch. Choose a ripe avocado for the best flavor. - ¼ cup mayonnaise - 1 tablespoon Dijon mustard - Salt and pepper to taste The sauce is simple yet tasty. Mayonnaise provides creaminess, while Dijon adds a tangy kick. Adjust the salt and pepper for your taste. This sauce ties all the flavors together. - Chopped chives or cilantro For a pop of color and flavor, add chopped chives or cilantro. These herbs brighten the dish and make it look appealing. You can skip them if you prefer a simpler wrap. For the full recipe, check out the [Full Recipe]. - Cook the bacon until crispy. - Drain excess grease on paper towels. Start by heating a skillet over medium heat. Place the turkey bacon in the skillet. Cook it for about 5 to 7 minutes. You want it nice and crispy. The bacon adds a rich flavor to the wraps. Once done, let it drain on paper towels. This helps remove extra fat, making your wraps healthier. - Separate and wash the lettuce leaves. - Dry leaves gently to avoid tearing. While the bacon cooks, grab your romaine lettuce. Carefully pull off the large leaves. Rinse them under cool water to clean. After washing, dry them gently. Pat them with a towel. Be careful not to tear the leaves. These will hold all the good stuff inside. - Mix mayonnaise and Dijon mustard. - Season with salt and pepper. In a small bowl, combine mayonnaise and Dijon mustard. Use a spoon to mix them well. This sauce gives your wraps a zesty kick. After mixing, add salt and pepper to taste. Adjust the flavors to your liking. This simple sauce makes each bite burst with flavor. - Spread sauce on lettuce leaves. - Layer bacon, tomatoes, and avocado. Take a lettuce leaf and lay it flat. Spread a thin layer of the sauce on it. Next, add a few slices of crispy bacon. Top it with diced tomatoes and avocado slices. The fresh ingredients make the wraps vibrant and tasty. Repeat for each leaf until all ingredients are used. - Add optional herbs for flavor. - Fold and serve. For an extra touch, sprinkle some chopped chives or cilantro on top. These herbs add color and taste. Finally, fold the edges of the lettuce leaf over the filling. Your wraps are now ready to serve! Enjoy this fresh and easy meal option. For more detailed instructions, check the Full Recipe. For crispy bacon, I recommend using a skillet. Place the turkey bacon in a cold pan. Turn the heat to medium. This method helps the fat render slowly. Cook for 5 to 7 minutes. Flip the bacon halfway through for even crispiness. Drain it on paper towels to soak up extra grease. If you prefer an alternative, try turkey bacon. It has less fat and cooks well. You can also use plant-based bacon for a veggie-friendly option. Just follow the package instructions for cooking. When choosing lettuce, I suggest romaine. Its sturdy leaves hold fillings well. Butter lettuce also works for a softer wrap. Both types add a fresh crunch. To keep lettuce fresh, store it in a damp paper towel. Place it in a plastic bag. This helps keep moisture in. Always wash leaves before using. Dry them gently to avoid tearing. You can customize your sauce for different tastes. Try adding garlic or lemon juice for zing. A splash of hot sauce can kick it up a notch. For a creamy twist, mix in some Greek yogurt. Experiment with herbs like dill or basil for fresh flavor. You can use plain yogurt or sour cream, too. This way, you can tailor the taste to your liking. Check out the full recipe for more ideas! {{image_2}} You can switch out romaine lettuce for other greens. Try using collard greens or Swiss chard. These options add a unique taste and texture. They also pack a nutrient punch. For those on a keto diet, you can use cheese wraps. These wraps are low in carbs and high in flavor. They make a great substitute for traditional lettuce. To make your wraps even more delicious, add cheese. Cheddar, mozzarella, or feta can elevate the flavor. You can also add toppings like sliced olives or pickles. If you like heat, try a few drops of hot sauce. It brings a spicy kick that many love. Mix and match flavors to find your favorite. If you prefer a meat-free version, use plant-based bacon. Many brands offer tasty substitutes that mimic the flavor of bacon. You can also add extra veggies for crunch. Consider cucumber slices, bell peppers, or shredded carrots. These add freshness and more color to your wraps. With these options, everyone can enjoy a tasty meal. Discover the full recipe to create your own savory BLT Lettuce Wraps! To keep your BLT lettuce wraps fresh, refrigerate them right away. Place the wraps in an airtight container. This helps prevent wilting. If you have extra filling, store it separately. This keeps the lettuce crisp and the flavors fresh. Can you freeze BLT lettuce wraps? Yes, but it's best to freeze only the filling. The lettuce does not freeze well. For freezing, place the filling in a freezer bag. When ready to eat, thaw it in the fridge overnight. Reheat the filling in a pan over low heat. Avoid microwaving, as it can make the bacon soggy. How long do they last in the fridge? BLT lettuce wraps can last up to three days. Check for signs they have gone bad. If the lettuce is slimy or the filling smells off, it’s time to toss them. Always trust your senses to ensure food safety. Romaine lettuce is my top choice for these wraps. Its strong leaves hold the filling well. Butter lettuce is another good option. It has a softer texture and a mild taste. You can also try iceberg lettuce for a nice crunch. Each type gives a unique bite to your wraps. Yes, you can prep these wraps in advance! Just keep the ingredients separate until you are ready to serve. This way, the lettuce stays crisp, and the filling stays fresh. Cook the bacon and store it in the fridge. You can slice the avocado and tomatoes, but add them right before serving. This keeps everything from getting soggy. Making these wraps gluten-free is easy! Just use gluten-free bacon or turkey bacon. For the sauce, check that your mayonnaise and mustard are gluten-free. You can also add other toppings like roasted red peppers or cucumbers. This adds flavor without gluten. Enjoy your fresh, gluten-free meal! For the full recipe, check [Full Recipe]. This blog post shared a simple recipe for BLT Lettuce Wraps. We covered key ingredients, step-by-step cooking, and variations. You also learned tips for storage and making it gluten-free. These wraps are easy to customize with your favorite flavors. Enjoy them for a healthy meal or snack without the carbs! Keep experimenting, and make your wraps unique with different ingredients.

Savory BLT Lettuce Wraps Easy and Fresh Meal Option

If you’re craving a fresh and easy meal, these Savory BLT Lettuce Wraps are perfect! Packed with crispy turkey bacon,

To make roasted garlic hummus, you need simple ingredients. Here’s what you’ll need: - 1 cup dried chickpeas (or 2 cans of chickpeas, rinsed and drained) - 1 head of garlic - 1/4 cup tahini - 1/4 cup lemon juice (about 2 lemons) - 2 tablespoons olive oil - 1 teaspoon ground cumin - Salt to taste - Water as needed - Fresh parsley for garnish These ingredients work together to create a creamy and flavorful dip. The chickpeas give it texture, while the roasted garlic adds a rich taste. You can customize your hummus with some optional add-ins. Here are a few ideas: - 1/4 teaspoon smoked paprika - A pinch of red pepper flakes for heat - Fresh herbs like cilantro or basil - A squeeze of lime juice for a zesty kick Feel free to experiment with these add-ins to make your hummus unique. Each addition can bring a new twist to the classic recipe. Each serving of roasted garlic hummus packs a nutritious punch. Here’s a quick look at the nutrition: - Calories: 150 - Protein: 6g - Fat: 8g - Carbohydrates: 15g - Fiber: 4g This hummus is a healthy snack option. It is rich in protein and fiber, making it great for any diet. Enjoy it with veggies or pita, and feel good about what you eat! For the full recipe, check out the complete guide above. Roasting garlic is simple and rewarding. Start by preheating your oven to 400°F (200°C). Take a head of garlic and cut off the top to expose the cloves. Drizzle a teaspoon of olive oil over the cut side. Wrap the garlic in aluminum foil to keep it moist. Roast it for 30 to 35 minutes until the cloves are soft and golden. Once done, let it cool before you handle it. This step adds a sweet and rich flavor to your hummus. You can use either dried or canned chickpeas for your hummus. If you choose dried chickpeas, soak them overnight in water. This helps them cook faster. After soaking, drain and rinse them. Cook the chickpeas in boiling water for about one to two hours until they are tender. If you prefer canned chickpeas, simply rinse and drain them. Canned chickpeas are quicker and still taste great in hummus. To make smooth hummus, use a food processor. First, add the cooked chickpeas, roasted garlic, tahini, lemon juice, olive oil, ground cumin, and salt into the processor. Blend the mixture until smooth. If it feels too thick, add water one tablespoon at a time. Blend again after each addition until you reach a creamy consistency. Taste your hummus and adjust the flavors if needed. This step is key to creating a delicious dip. You can find the full recipe for roasted garlic hummus [here]. When making roasted garlic hummus, a few common mistakes can ruin your dip. First, don’t skip roasting the garlic. Raw garlic can taste sharp and bitter. Always roast it for a sweet, rich flavor. Second, avoid using canned chickpeas without rinsing. This can add a tinny taste. Always rinse and drain them well. Lastly, don’t rush the blending process. Blend until smooth for the best texture. Getting the right consistency is key for great hummus. If your hummus is too thick, just add water. Start with a tablespoon at a time. Blend well after each addition. If it’s too thin, add a bit more chickpeas or tahini. Aim for a creamy, spreadable texture. You want it smooth, but not runny. Roasted garlic hummus tastes great with many flavors. Try it with fresh veggies like carrots, cucumbers, or bell peppers. Crispy pita chips are a perfect match too. You can also serve it with olives or feta cheese for a Mediterranean twist. For an extra kick, add some red pepper flakes or a drizzle of hot sauce. Each option adds a new layer of flavor to your dip. {{image_2}} To make a spicy version, add heat! You can mix in a dash of cayenne pepper or a spoonful of harissa paste. These spices boost flavor and warmth. Blend them in with the chickpeas and garlic. Taste as you go to find your perfect spice level. Fresh herbs can brighten up your hummus. Try adding basil, cilantro, or dill. Just toss a handful into the food processor with the other ingredients. The herbs bring a fresh twist. You can also use dried herbs if fresh ones are not available. If you want a creamier texture, try adding avocado instead of tahini. This keeps the dip smooth and rich without dairy. Another option is to use sunflower seed butter in place of tahini. This change keeps it nut-free and still tasty. Remember, these swaps keep the hummus flavor exciting! For the full recipe, check out the complete details on Roasted Garlic Hummus. To keep your roasted garlic hummus fresh, store it in an airtight container. Make sure to cover the top with a thin layer of olive oil. This helps seal in moisture and flavor. Always use a clean spoon when scooping out hummus. This prevents bacteria from spoiling the dip. Keep your hummus in the fridge. It stays fresh longer when kept cold. Roasted garlic hummus can last about 5 to 7 days in the fridge. If you notice any changes in color or smell, it’s best to toss it. Always check for signs of spoilage. This ensures you enjoy the best flavor and quality. If you made a large batch, consider freezing some for later use. To freeze your roasted garlic hummus, use a freezer-safe container. Leave some space at the top, as hummus expands when frozen. You can also freeze it in ice cube trays for easy portioning. Just pop out a cube when you’re ready to enjoy. When thawing, move it to the fridge overnight. Stir well before serving to restore its creamy texture. For the full recipe, check out the earlier sections! Roasted garlic hummus is a creamy dip made from chickpeas, roasted garlic, and tahini. It has a rich, nutty flavor. The roasted garlic adds a sweet, mellow taste, making this dip special. This dish is perfect for snacks or parties. You can enjoy it with pita bread, veggies, or crackers. Yes, you can find pre-made roasted garlic hummus in many grocery stores. Look in the deli or refrigerated section. It is a quick option if you are short on time. Just check the ingredients for quality. However, making it at home gives you fresh flavors and more control. You can easily customize your hummus. Here are some ideas: - Add herbs like basil or cilantro for freshness. - Mix in roasted red peppers for sweetness. - Spice it up with chili flakes for heat. - Incorporate lemon zest for a bright flavor. Experiment with different ingredients to find your favorite blend. Roasted garlic provides many health benefits. It is rich in vitamins and minerals. Garlic may boost your immune system and lower blood pressure. It also has antioxidants that can help reduce inflammation. This makes it a great addition to your diet. Yes, hummus is vegan. It is made with plant-based ingredients like chickpeas, garlic, and tahini. This makes it a perfect snack for those who do not eat animal products. Enjoy it guilt-free and share it with your friends. Check the label if you buy it, to ensure it meets your dietary needs. For the full recipe, check out Roasted Garlic Hummus. Roasted garlic hummus is simple and delicious. We explored essential ingredients, including fun add-ins for taste. I shared step-by-step instructions, tips to avoid mistakes, and blends for the perfect consistency. Variations like spicy and herb-infused add flair to your dish. Finally, proper storage helps keep your hummus fresh longer. Now, you have the tools to make great hummus at home. Enjoy creating and tasting your own unique flavors!

Roasted Garlic Hummus Flavorful and Easy Dip Recipe

Are you ready to elevate your snack game? This Roasted Garlic Hummus recipe is both flavorful and easy to make!

Older posts
Newer posts
← Previous Page1 … Page35 Page36 Page37 … Page89 Next →

dsad

© 2025 So Yum Recipes • Built with GeneratePress

Our Policies

  • Copyright Policy
  • Cookie Policy
  • GDPR Policy
  • Privacy Policy
  • Disclaimer
  • Terms Of Use

More Information

  • Home
  • About
  • Contact
  • Appetizers
  • Dessert
  • Dinner
  • Drinks
©2025, So Yum Recipes About Back To Top