Skip to content
DisclaimerTerms Of UseGDPR PolicyCookie Policy

So Yum Recipes

  • Home
  • Drinks
  • Appetizers
  • Dinner
  • Dessert
  • About
  • Contact
  • Privacy Policy
DisclaimerTerms Of UseGDPR PolicyCookie Policy

Chloe

- 1 can (15 oz) chickpeas, rinsed and drained - 1 large red bell pepper, roasted and peeled - 2 tablespoons tahini - 2 tablespoons olive oil The main ingredients make this dip so smooth and flavorful. Chickpeas are the heart of hummus. They add protein and fiber. Roasted red bell pepper gives a sweet taste and bright color. The tahini adds creaminess, while olive oil brings richness. - 2 cloves garlic, minced - 1 tablespoon lemon juice - 1 teaspoon cumin - Salt, to taste - Water, as needed for consistency - Paprika, for garnish - Fresh parsley, chopped, for garnish You can add garlic for a zesty kick. Lemon juice brightens the flavor. Cumin adds warmth. Don't forget salt to enhance the taste. Adjust with water for creaminess. Garnish with paprika and parsley for color. - Chickpeas are high in protein and fiber. They help keep you full. - Red bell peppers contain antioxidants. They support your immune system. Together, these ingredients create a healthy dip that satisfies. You can enjoy it guilt-free. For the full recipe, check out the cooking instructions. To make roasted red pepper hummus, you first need roasted red peppers. You can roast them in two ways. 1. Oven Method: Preheat your oven to 450°F (230°C). Place the whole red pepper on a baking sheet. Roast it for about 20 to 25 minutes. Turn it every few minutes. This helps the skin blister and char. 2. Open Flame Method: If you have a gas stove, you can roast the pepper directly over the flame. Hold it with tongs and turn it until the skin is charred all over. This method gives a smoky flavor. If you want to save time, you can use jarred roasted red peppers. They work great and save you the hassle of roasting. Now, let’s blend! Start by gathering your food processor. This tool makes blending easy. 1. Add the drained chickpeas, roasted red pepper, tahini, olive oil, minced garlic, lemon juice, cumin, and salt into the processor. 2. Blend on high speed. Stop and scrape down the sides if needed. This ensures everything mixes well. Adding the ingredients in this order helps create a smooth texture. Consistency is key for a great hummus. If your mix is too thick, don’t worry! 1. Add water, one tablespoon at a time. Blend after each addition until you reach your desired smoothness. 2. After blending, taste the hummus. You might want to add more salt, lemon juice, or cumin. Adjust to your liking. This step is vital for getting the flavors just right. Follow these steps, and you'll create a flavorful dip every time. For the full recipe, refer to the main section. To make your roasted red pepper hummus pop, consider adding spices and herbs. Here are some ideas: - Cumin: This spice adds warmth and depth. - Smoked Paprika: It brings a smoky flavor that pairs well with roasted peppers. - Fresh Herbs: Try adding fresh basil or cilantro for a bright touch. If you like a bit of heat, you can add chili or cayenne pepper. Start with a small amount and taste as you go. This way, you can adjust the heat to fit your taste. Serving your hummus can be just as fun as making it. Here are some tips: - Pair with Pita Bread: Warm pita bread is a classic choice. You can cut it into small triangles for easy dipping. - Fresh Vegetables: Carrots, cucumbers, and bell pepper sticks make great dippers. They add crunch and freshness. - Creative Presentation: Use a colorful platter and arrange the vegetables and pita around the hummus. Drizzle olive oil and sprinkle paprika for a nice touch. Making hummus in advance can save time. Here’s how to prep ahead: - Best Practices: Make your hummus a day before your event. This allows the flavors to meld. - Flavor Development: Store it in an airtight container in the fridge. The taste improves as it chills. Just remember to give it a stir before serving. These tips can help you create a smooth and flavorful dip that everyone will love. For the complete recipe, check out the Full Recipe. {{image_2}} For a spicy kick, add some heat to your roasted red pepper hummus. You can mix in chili powder or cayenne pepper. Start with a small amount and taste as you go. This way, you control the spice level. You can also try adding jalapeños or a splash of hot sauce. Each option gives your dip a unique flavor. It’s great for those who love a bit of fire in their food! To make a creamy version, add some plain yogurt to your hummus. Greek yogurt works well for extra creaminess and protein. Just a few tablespoons can make a big difference. This twist gives your dip a tangy taste. It also enhances the texture, making it even more enjoyable. You can also use sour cream if you prefer that flavor. Feel free to switch up the beans used in your hummus. If you want, try white beans or black beans. Each type brings its own flavor. You can also change the oil. For instance, use avocado oil for a richer taste. These swaps let you cater to different diets. They also help you explore new flavors in your hummus. If you want to go nut-free, skip the tahini and use sunflower seed butter instead. For the full recipe, refer back to the earlier section. To store roasted red pepper hummus, use an airtight container. Glass containers work best, as they keep flavors fresh. You can also use plastic containers, but make sure they seal well. The hummus stays fresh in the fridge for about 4 to 7 days. Always check for freshness before serving. Freezing hummus is easy. First, place it in a freezer-safe container. Leave some space at the top, as it will expand. You can also use ice cube trays for smaller portions. To thaw, move it to the fridge overnight. Once thawed, stir it well and add a bit of water if needed. This keeps it smooth and tasty. Look for changes in color or texture. If the hummus appears dry or has a strange smell, it may be bad. Mold is another clear sign. Always trust your senses. When in doubt, throw it out. Enjoy your hummus while it’s fresh! Making roasted red pepper hummus is simple. First, roast a red bell pepper until the skin is charred. You can do this on an open flame or in the oven at 450°F (230°C). After it cools, peel off the skin and remove the seeds. Then, in a food processor, blend the roasted pepper with a can of chickpeas, tahini, olive oil, minced garlic, lemon juice, cumin, and salt. Process until smooth. If the mix is too thick, add water until you reach your desired texture. For the full recipe, check the earlier section. You have many tasty options for dippers and accompaniments. Here are some ideas: - Warm pita bread - Fresh vegetable sticks (carrots, cucumbers, and bell peppers) - Crackers or chips - Toasted bread slices These choices complement the dip's smooth texture and rich flavor. Roasted red pepper hummus is a healthy snack. A serving has about 100 calories. It is low in fats and high in fiber. Chickpeas offer protein and essential nutrients. Red peppers add vitamins A and C. This dip is a great choice for a nutritious snack or appetizer. Yes, you can! If you want to skip tahini, there are good alternatives. Try using: - Greek yogurt for creaminess - Sunflower seeds for a nut-free option - Extra olive oil for a richer taste These swaps keep the dip delicious while catering to different diets. To keep your hummus fresh, store it in an airtight container in the fridge. It lasts about 5 to 7 days. Make sure to cover the surface with a thin layer of olive oil to prevent drying. If you need to store it longer, freezing is an option. Just thaw it in the fridge before serving. Roasted red pepper hummus is a tasty treat. You need simple ingredients like chickpeas, roasted red peppers, tahini, and olive oil. I shared tips on preparing, blending, and storing for the best flavor. Don't forget to add spices or make variations for a fun twist. This hummus is great for health and easy to serve. Enjoy making it your own!

Roasted Red Pepper Hummus Smooth and Flavorful Dip

Are you ready to elevate your snack game? This Roasted Red Pepper Hummus is smooth, flavorful, and super easy to

- 2 ripe avocados - 1 can (15 oz) chickpeas, drained and rinsed - 1 small red onion, finely chopped - 1 cup cherry tomatoes, halved - 1 cucumber, diced - 1 jalapeño, deseeded and minced (optional for spice) - 2 tablespoons fresh cilantro, chopped - Juice of 1 lime - 2 tablespoons olive oil - Salt and pepper to taste For my Smashed Avocado Chickpea Salad, I love these fresh and vibrant ingredients. The ripe avocados bring creaminess and flavor. Chickpeas add protein and a hearty feel. Red onion gives a nice crunch and a bit of zing. Cherry tomatoes add sweetness and color. Cucumber adds crispness, making each bite refreshing. If you like heat, jalapeño is a great choice. Fresh cilantro brightens the dish with its unique taste. The lime juice adds acidity, balancing the flavors. Olive oil ties everything together, making it luscious. Feel free to adjust the salt and pepper to your liking. This salad is not just tasty; it is also packed with nutrients. You can find the full recipe to guide you through the steps of making this delicious dish. To make this Smashed Avocado Chickpea Salad, we follow three main steps: - Cutting and smashing the avocados: First, cut the avocados in half. Remove the pit and scoop the flesh into a bowl. Use a fork to smash it. Aim for a creamy yet chunky texture. - Mashing the chickpeas: Open the can of chickpeas, drain, and rinse them. Add them to the bowl with the smashed avocado. Lightly mash them with a fork, leaving some whole for a nice texture. - Combining the ingredients: Add chopped red onion, halved cherry tomatoes, diced cucumber, minced jalapeño, and chopped cilantro. Mix everything gently to keep the ingredients intact. 1. Cut the avocados: Slice them in half, remove the pit, and scoop the flesh into a medium bowl. 2. Smash the avocados: Use a fork to mash the avocado until creamy but still chunky. 3. Add chickpeas: Place the drained chickpeas into the bowl. Mash them lightly with the avocado. 4. Mix in the vegetables: Stir in the red onion, cherry tomatoes, cucumber, jalapeño, and cilantro. 5. Season the salad: Squeeze lime juice and drizzle olive oil over the mixture. Gently fold it together. 6. Taste and adjust: Season with salt and pepper. Mix again, adjusting to your taste. Tips for achieving the best texture: - Use ripe avocados for creaminess. - Don’t over-mash the chickpeas; leave some whole. - Mix gently to keep the salad fresh and vibrant. For plating, serve the salad in a large bowl or on individual plates. Garnish with extra cilantro and a lime wedge for color. For a fun crunch, pair it with whole-grain pita chips. You can also place the salad on a bed of leafy greens for added nutrition. For the full recipe, see the detailed sections above. Enjoy your fresh and nourishing salad! To get the best texture for your avocado, use ripe ones. They should feel soft but not mushy. When you smash the avocados, aim for a creamy yet chunky mix. This adds a nice texture to your salad. When seasoning, start with a pinch of salt and black pepper. Taste it, then add more if needed. The lime juice adds brightness, so don’t hold back! To store leftovers, place the salad in an airtight container. This keeps it fresh for 1-2 days. To prevent browning, cover the top with plastic wrap directly on the salad. For keeping ingredients fresh before mixing, store the avocados and chickpeas separately. This way, you’ll enjoy the best taste and texture when ready to eat. One big mistake is over-mashing the ingredients. You want some chunks for texture. If everything turns into a puree, the salad loses its character. Another mistake is not seasoning enough. A little salt and pepper make a huge difference. Always taste your salad before serving to ensure it’s just right. For the full recipe, check out the main section! {{image_2}} You can easily make this dish vegan-friendly. The recipe already uses plant-based ingredients. Just ensure you check any added sauces or dressings. For gluten-free options, serve the salad with gluten-free crackers or fresh veggies. You can also enjoy it on a gluten-free wrap or lettuce leaves. To switch up the flavors, try adding diced bell peppers or corn. These add sweetness and crunch. You can also mix in a handful of olives for a briny kick. If you like it spicy, toss in more jalapeños or a dash of hot sauce. For herbs, swap cilantro with parsley or basil. Each herb gives the salad a new taste. Fresh dill can also add a nice touch. Using seasonal veggies can enhance your salad. In summer, fresh corn or zucchini work well. In fall, add roasted sweet potatoes or butternut squash. Adapting to what's in season keeps your meal fresh and exciting. You can also use leftovers from other meals. This way, nothing goes to waste, and your salad stays unique. For the full recipe, refer to the earlier section. To keep your Smashed Avocado Chickpea Salad fresh, store it in an airtight container. This helps prevent browning and keeps flavors locked in. The salad lasts for about 1 to 2 days in the fridge. Keep an eye on the avocado; it can brown quickly. I do not recommend freezing Smashed Avocado Chickpea Salad. Freezing changes the texture of avocado, making it mushy. If you must freeze it, pack it tightly in a freezer-safe bag. To refresh after thawing, add a little lime juice and fresh herbs to brighten the flavors. You can prepare the ingredients ahead of time for easy meals. Chop veggies and store them separately. This way, you can mix them with smashed avocado right before eating. Making a larger batch is also great for quick lunches. Just remember to store the avocado separately until you’re ready to eat. How long does Smashed Avocado Chickpea Salad last? This salad stays fresh for about 2 days in the fridge. Keep it in an airtight container. The avocados might brown a bit, but it will still taste good. Can I make this salad ahead of time? Yes, you can prep this salad up to 24 hours in advance. Just wait to add the lime juice until you are ready to serve. This keeps the avocados from browning too soon. Is this salad high in protein? Yes, this salad is high in protein. Chickpeas provide a great plant-based protein source. Each serving has about 7 grams of protein, which is excellent for a light meal. Nutritional benefits of the main ingredients - Avocados: They are rich in healthy fats, fiber, and vitamins. They support heart health and are great for skin. - Chickpeas: These legumes are full of protein and fiber, helping with digestion. They also keep you full longer. - Red Onion: It adds flavor and contains antioxidants. They can help reduce inflammation. - Cucumber: It's hydrating and low in calories. It also provides vitamin K. - Cherry Tomatoes: These are high in vitamins A and C. They help boost your immune system. What can I serve with this salad? You can serve this salad with whole-grain pita chips for crunch. It also pairs well with grilled chicken or fish for a heartier meal. Try it on a bed of leafy greens for extra nutrition. How to customize for dietary needs? You can easily make this salad vegan by leaving out the cheese. For gluten-free options, just ensure your pita chips are gluten-free. If you need it spicier, add more jalapeño or some hot sauce. There are many ways to enjoy it! This blog post covered everything you need for a tasty Smashed Avocado Chickpea Salad. We went over the key ingredients, step-by-step instructions, and helpful tips to perfect your dish. Remember to store leftovers properly and feel free to add your own twist. This salad is not only healthy but also easy to make and customize for everyone. Enjoy your cooking and share this recipe with friends for a fun meal together. Your kitchen adventures start now!

Smashed Avocado Chickpea Salad Fresh and Nourishing

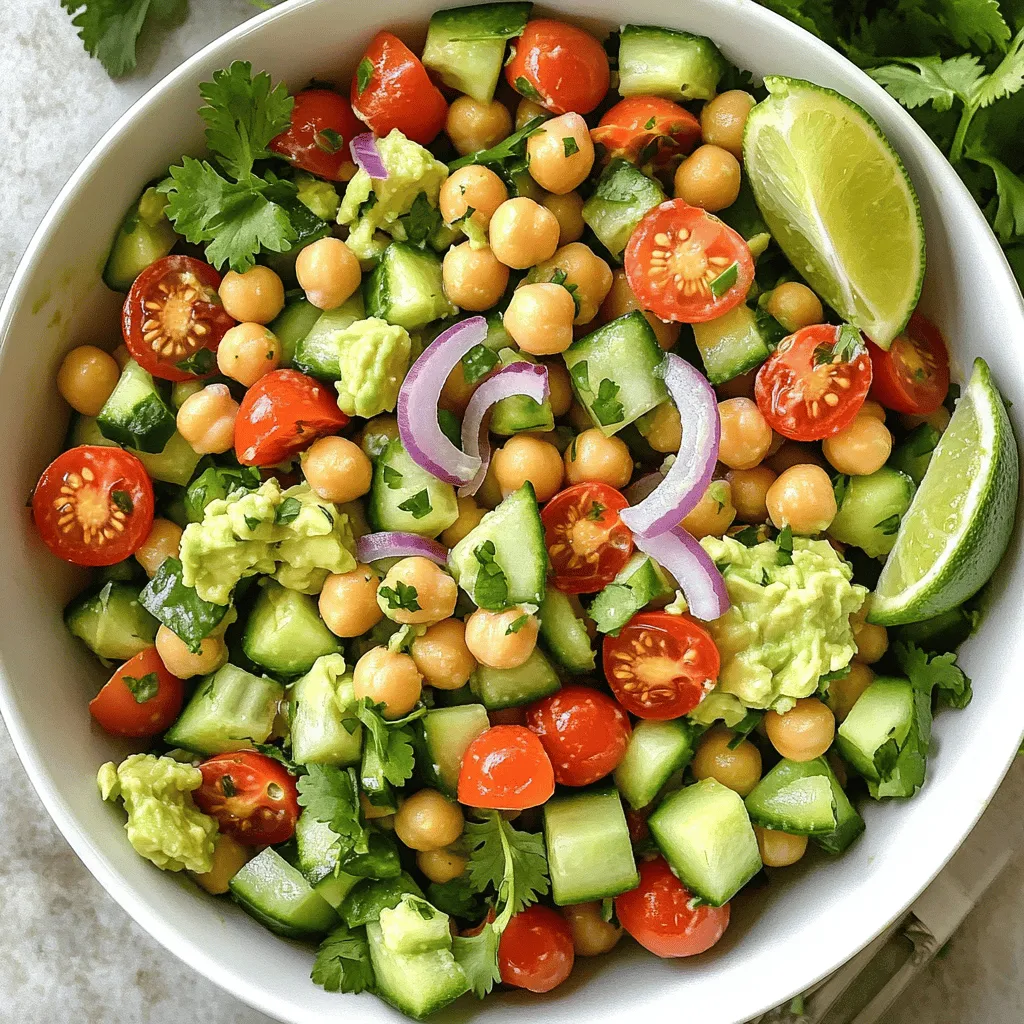
If you’re looking for a bright and healthy meal, you’ve come to the right place! My Smashed Avocado Chickpea Salad

- 1 can (15 oz) chickpeas, drained and rinsed - 2 tablespoons olive oil - 1 teaspoon smoked paprika - 1 teaspoon garlic powder - 1/2 teaspoon cumin - Salt and pepper to taste - 2 cups cooked quinoa - 1 cup baby spinach - 1/2 cup cherry tomatoes, halved - 1/2 avocado, sliced - 1/4 cup tahini - Juice of 1 lemon - 2 tablespoons water (to thin tahini) - Fresh parsley, chopped, for garnish - Feta cheese - Nuts or seeds - Additional veggies - Caloric content per serving: About 550 calories - Macronutrient breakdown: 20g protein, 30g carbs, 40g fat The main star of this dish is the chickpeas. They give a nice crunch and great flavor. I use canned chickpeas for ease, but feel free to cook dried ones if you wish. Olive oil adds a lovely richness. I sprinkle smoked paprika and garlic powder on the chickpeas for depth. Cumin gives warmth and aroma. Quinoa serves as a base. It’s packed with protein and fiber. Baby spinach adds vitamins and freshness. Cherry tomatoes bring sweetness and color. The tahini dressing is creamy and tangy. Mix tahini with lemon juice and water until smooth. Adjust it to your taste; more water if it’s too thick. You can also add optional toppings. Feta cheese adds saltiness. Nuts or seeds bring crunch. Extra veggies can add variety and nutrition. If you're curious about the full recipe, check the section above. - Preheat the oven to 400°F (200°C). - Spread chickpeas on a baking sheet in a single layer. - Drizzle with olive oil and sprinkle your spices. - Roast chickpeas for about 25-30 minutes until crispy. - In a serving bowl, layer your cooked quinoa first. - Add baby spinach next, followed by roasted chickpeas. - Top with halved cherry tomatoes and avocado slices. - Drizzle the tahini dressing on top for added flavor. For a complete guide, check the Full Recipe. Enjoy your meal! To make your chickpeas crispy, start by drying them well. Pat them with a towel after rinsing. This helps remove extra moisture. Moisture keeps them from getting crunchy. Spread your chickpeas in a single layer on the baking sheet. Crowding the pan makes them steam instead of roast. This step is key for even roasting. Shake the pan halfway through roasting. This action helps them brown on all sides. Aim for 25 to 30 minutes at 400°F (200°C). Check for a golden color and a crunchy sound. The tahini dressing should be smooth and creamy. If it's too thick, add a little water. Start with one tablespoon, then mix again. Keep adding water until you reach your desired thickness. You can try other dressings too. A simple lemon vinaigrette or yogurt dressing works well. Each option brings a unique flavor to your bowl. Pair your crispy chickpeas with cooked quinoa. Quinoa adds protein and fiber to your meal. You can also mix in brown rice or farro for variety. Roasted veggies make great sides. Try sweet potatoes, broccoli, or bell peppers. Each adds color and taste to your power bowl. {{image_2}} You can easily swap quinoa for rice or other grains. Brown rice or farro works great. If you want more protein, try adding tofu or tempeh. They both soak up flavors well and stay soft. You can also use lentils for a nice twist. This keeps your bowl vegan and gluten-free. Using seasonal veggies can really change your bowl. In spring, try adding asparagus or peas. In summer, use corn or zucchini for a fresh taste. Fall brings sweet potatoes and kale, while winter calls for root veggies like carrots or parsnips. Adjust your spices too; use warm spices in winter and bright herbs in summer. Feel free to add your favorite toppings. Nuts or seeds add crunch. You can also sprinkle on feta cheese for a salty kick. To make it kid-friendly, include items like shredded carrots or sliced cucumbers. Let kids build their own bowls to explore flavors and textures. This makes dinner fun and interactive. For the complete recipe, check the Full Recipe. To keep your crispy chickpeas fresh, store them in an airtight container. This helps maintain their crunch. Place the chickpeas in the fridge. They stay good for up to three days. Keep the dressing in a separate jar. It lasts about a week in the fridge. To reheat chickpeas and keep them crispy, use the oven. Preheat it to 375°F (190°C). Spread the chickpeas on a baking sheet. Bake for about 10 minutes. This method keeps them crunchy. Avoid the microwave if you want crispiness. Microwaving can make them soft. You can prepare components in advance for easy meals. Cook the quinoa and chickpeas ahead of time. Store them in separate containers. This way, they stay fresh and tasty. When you’re ready to eat, just assemble your bowl. Add fresh spinach, tomatoes, and avocado right before serving. Chickpeas are a powerhouse of nutrition. They offer high protein content. Each serving contains about 15 grams of protein. This makes them great for muscle health and energy. Chickpeas are also rich in fiber. One cup provides about 12 grams of fiber. Fiber helps with digestion and keeps you feeling full. This can help control your weight. Yes, you can use canned chickpeas. They save time and are easy to use. Canned chickpeas are already cooked. Just drain and rinse them before using. Fresh chickpeas take longer to cook. They need soaking and boiling. Canned chickpeas offer convenience, but fresh ones can be tastier. To make this dish gluten-free, choose the right grains. Quinoa is naturally gluten-free and a great choice. You can also use rice or millet. Always check labels for gluten-free products. Some sauces and seasonings may contain gluten. Make sure your tahini and spices are safe for gluten-free diets. This recipe combines simple ingredients to make a tasty, healthy dish. We covered chickpeas, quinoa, and lots of fresh veggies. Crispy roasted chickpeas add extra flavor. You can customize with your favorite toppings or seasonal veggies. Storing and reheating tips help you enjoy leftovers. This meal is great for quick lunch prep or dinner. With these tips, you can create many delicious bowls. Enjoy making this dish your own!

Crispy Chickpea Power Bowl Flavorful and Healthy Meal

Looking for a healthy yet flavorful meal? The Crispy Chickpea Power Bowl is your answer! Packed with protein-rich chickpeas, nutrient-dense

To make vegan lentil sloppy joes, you need simple and tasty ingredients. Here are the main ones: - 1 cup green or brown lentils, rinsed - 3 cups vegetable broth - 1 tablespoon olive oil - 1 medium onion, finely chopped - 2 cloves garlic, minced - 1 red bell pepper, finely diced - 1 cup canned crushed tomatoes - 2 tablespoons tomato paste - 2 tablespoons maple syrup - 2 tablespoons soy sauce or tamari - 1 tablespoon apple cider vinegar - 1 teaspoon smoked paprika - 1 teaspoon chili powder - Salt and pepper to taste - 4 whole wheat hamburger buns These ingredients work together to create a flavorful and hearty meal. The lentils provide protein and fiber. The spices give a warm and smoky taste. You can add some fun toppings to make your sloppy joes even better! Here are a few ideas: - Pickled jalapeños - Fresh parsley These options add a nice crunch and a pop of color. They also enhance the flavors in your dish. Vegan lentil sloppy joes are not only delicious but also healthy. Here are some key nutritional facts: - Calories: About 350 per serving - Protein: 18 grams - Fiber: 10 grams - Fat: 6 grams - Carbohydrates: 60 grams These facts show that you can enjoy a satisfying meal without guilt. The high fiber and protein content will keep you full and happy. For the full recipe, check out the details above. Start by rinsing one cup of green or brown lentils. Place the lentils in a medium saucepan. Add three cups of vegetable broth. Bring this mix to a boil over high heat. Once it boils, lower the heat to simmer. Cover the pot and let it cook for 25 to 30 minutes. The lentils should be tender when done. If there is any extra liquid, just drain it. Set the cooked lentils aside for later. In a large skillet, heat one tablespoon of olive oil on medium heat. Add one medium onion, finely chopped. Sauté the onion for 3 to 4 minutes until it looks clear. Then, add two minced garlic cloves and one diced red bell pepper to the skillet. Cook these for another 3 to 5 minutes. The bell pepper should soften nicely. The smell will be amazing at this point! Now, it's time to make everything come together. Add one cup of canned crushed tomatoes, two tablespoons of tomato paste, and two tablespoons of maple syrup to the skillet. Pour in two tablespoons of soy sauce and one tablespoon of apple cider vinegar. Also, add one teaspoon of smoked paprika and one teaspoon of chili powder. Finally, mix in the cooked lentils. Stir everything well to combine. Let this simmer for 10 to 15 minutes. This allows all the flavors to blend together. Taste and add salt and pepper as needed. If the mixture feels too thick, add a splash of vegetable broth. While this simmers, toast four whole wheat hamburger buns for a great crunch. Once ready, serve the lentil mix on the buns. You can garnish with pickled jalapeños and fresh parsley if you like. Enjoy your vegan lentil sloppy joes! For the full recipe, check the earlier section. To make your vegan lentil sloppy joes burst with flavor, use fresh ingredients. Fresh garlic and onions create a strong base for your sauce. Choose ripe tomatoes for a sweet taste. Smoked paprika and chili powder add depth. If you want extra sweetness, drizzle in more maple syrup. This will balance the flavors nicely. Texture matters in a good sloppy joe. Cook lentils until they are tender but not mushy. You want them to hold their shape. When you mix in the veggies and sauce, make sure everything blends well. If the mix is too thick, add a splash of vegetable broth. This will help create a nice, saucy consistency. One common mistake is overcooking the lentils. This can lead to a mushy mix that doesn't hold well on the bun. Avoid skipping the seasonings. They are key to a tasty dish. Lastly, don't forget to toast your buns. Toasting adds a nice crunch and keeps them from getting soggy. For the full recipe, check out the [Full Recipe] section. {{image_2}} To add a kick to your vegan lentil sloppy joes, try adding spices. Start by increasing the chili powder to two teaspoons. You can also add cayenne pepper for more heat. Pickled jalapeños are a great topping too. They bring both spice and flavor that make each bite exciting. If you need a gluten-free version, swap the whole wheat buns for gluten-free ones. You can find many tasty options at stores. Also, check your soy sauce. Use tamari, which is gluten-free, instead. This way, you can enjoy your sloppy joes without any worry. You can change some ingredients based on what you have. If you don’t have green or brown lentils, try red lentils. They cook faster and still taste great. For the crushed tomatoes, you can use diced tomatoes instead. These swaps keep the recipe simple and flexible. For the full recipe, check out the detailed steps to make these delicious vegan lentil sloppy joes. Store any leftover vegan lentil sloppy joes in an airtight container. Make sure to let them cool first. They can last in the fridge for about 3 to 4 days. When stored properly, the flavors will continue to blend and taste even better. You can freeze the lentil mixture for later use. Place it in a freezer-safe container. Leave some space at the top for expansion. It can last in the freezer for up to 3 months. Just remember to label the container with the date. To reheat, you have a few options. You can use the microwave for quick heating. Just heat in 1-minute intervals, stirring in between. If you prefer, reheat on the stovetop over medium heat. Add a splash of vegetable broth if it looks too thick. Enjoy on toasted buns for the best experience! For the complete recipe, check the Full Recipe section. You can use cooked chickpeas or black beans instead of lentils. Mash them slightly for a better texture. You can also use mushrooms for a meatier bite. Just chop them finely and sauté them until tender. Add your favorite seasonings and a bit of tomato sauce for flavor. This still gives you that tasty and messy feel of a sloppy joe. Yes, you can use canned lentils. They save you time and effort. Rinse and drain them before adding to your recipe. Use about 1.5 cups of canned lentils to replace 1 cup of dried lentils. Cut the cooking time down since canned lentils are already cooked. Just add them in when you combine ingredients in the skillet. This makes it quick and easy to whip up a meal. These sloppy joes pair well with many sides. You can serve them with sweet potato fries or a fresh salad. Coleslaw adds a nice crunch and balances the flavors. For a cozy meal, serve them with a side of mashed potatoes. You can also add some pickles for extra flavor. This makes a fun and filling dinner that everyone will enjoy. Vegan lentil sloppy joes are a tasty meal. You learned about key ingredients and how to prepare them. You also explored tips for flavor and texture. Plus, you found fun variations and storage info. These simple recipes are healthy and versatile. Whether it's for a quick dinner or lunch, you cannot go wrong. Enjoy your cooking and make it your own!

Vegan Lentil Sloppy Joes Delicious and Satisfying Meal

Are you ready for a meal that’s both tasty and filling? In this blog, I’ll show you how to make

When making Raspberry White Chocolate Muffins, you need fresh and simple ingredients. Here’s a detailed list of what you will need: - 1 ½ cups all-purpose flour - ½ cup granulated sugar - ½ cup brown sugar, packed - 1 tablespoon baking powder - ½ teaspoon salt - 1 large egg - ¾ cup buttermilk (or milk with 1 tablespoon vinegar) - ⅓ cup vegetable oil - 1 teaspoon vanilla extract - 1 cup fresh raspberries (or frozen) - ¾ cup white chocolate chips Each ingredient plays a key role. The all-purpose flour gives structure. Granulated sugar and brown sugar add sweetness and moisture. Baking powder helps the muffins rise, while salt enhances the flavors. The egg adds richness, and buttermilk keeps them tender. Vegetable oil keeps them moist, while vanilla brings warmth. Raspberries offer a tangy burst, and white chocolate provides creamy sweetness. You can find the complete recipe in the Full Recipe section. Make sure to gather all these ingredients before you start. This will ensure a smooth cooking process and great muffins. Start by preheating your oven to 375°F (190°C). This step is key for even baking. Line a muffin tin with paper liners. If you prefer, you can use cooking spray to grease each cup. This helps the muffins release easily after baking. In a large bowl, whisk together the dry ingredients. Use 1 ½ cups of all-purpose flour, ½ cup of granulated sugar, and ½ cup of packed brown sugar. Add 1 tablespoon of baking powder and ½ teaspoon of salt. Mix these well until they are fully combined. This ensures the muffins rise and taste great. In a separate bowl, beat 1 large egg. Then, add ¾ cup of buttermilk. If you don't have buttermilk, mix ¾ cup of milk with 1 tablespoon of vinegar. Next, pour in ⅓ cup of vegetable oil and 1 teaspoon of vanilla extract. Stir until smooth. Combining wet ingredients well helps create a moist muffin. Gently pour the wet mixture into the dry ingredients. Stir slowly until just combined. You want the batter to be lumpy, not smooth. Now, fold in 1 cup of fresh raspberries and ¾ cup of white chocolate chips. Be careful not to mash the raspberries. This step adds flavor and sweetness to each bite. Spoon the batter into the muffin tin. Fill each cup about 2/3 full. This allows space for rising. Bake in your preheated oven for 18-20 minutes. Check them by inserting a toothpick into the center; it should come out clean. Golden-brown tops mean they are ready. Once baked, remove the muffins from the oven. Let them cool in the tin for about 5 minutes. Then, transfer them to a wire rack to cool completely. For a lovely touch, serve them warm with a dusting of powdered sugar and fresh raspberries on the side. Enjoy these delightful treats! For the full recipe, refer to the earlier section. To get a great muffin texture, mix the dry and wet ingredients separately. Combine them gently. Overmixing makes muffins tough. You want a lumpy batter. This helps keep them light and fluffy. Also, do not skip the buttermilk. It adds moisture and richness. If you use frozen raspberries, do not thaw them first. Thawing makes them mushy. Add them straight to the batter. They will hold their shape better during baking. Frozen berries can also chill the batter, helping muffins rise nicely. Add a hint of lemon zest to the batter. This brightens the flavor. You can also sprinkle a little sea salt on top before baking. A touch of salt can enhance the sweetness. Try using almond extract instead of vanilla for a different taste. Keep your muffins in an airtight container at room temperature. This keeps them soft for a few days. If you want them to last longer, freeze them. Wrap each muffin in plastic wrap and store in a freezer bag. They stay fresh for up to three months. To enjoy, just reheat them in the microwave for a few seconds. {{image_2}} Gluten-Free Version You can make these muffins gluten-free. Use a 1-to-1 gluten-free flour blend. This swap works well and keeps the muffins soft. Always check that all your other ingredients are gluten-free. Dairy-Free Version To make these muffins dairy-free, replace buttermilk with plant-based milk. Almond milk or oat milk works great. You can also use a dairy-free yogurt for added moisture. Nuts add a nice crunch. Try chopped pecans or walnuts for a richer taste. You can also mix in other fruits. Blueberries or chopped strawberries pair well with raspberries. Adjust the amount of fruit to keep the batter balanced. If you prefer dark chocolate, you can swap it with white chocolate. Dark chocolate gives a deep flavor. It balances the tartness of raspberries. Use the same amount for perfect results. You can keep your Raspberry White Chocolate Muffins at room temperature. Place them in an airtight container. This helps keep them fresh for up to three days. If you live in a humid area, it’s best to eat them within two days. Always check for any signs of mold before enjoying. Freezing muffins is a great way to save some for later. Allow the muffins to cool completely first. Wrap each muffin in plastic wrap, then place them in a freezer bag. This method helps prevent freezer burn. You can freeze them for up to three months. When you're ready to eat one, just take it out and let it thaw at room temperature. Reheating muffins brings back their fresh-baked taste. You can use a microwave or an oven. If using a microwave, heat for about 10-15 seconds. This warms them up nicely. For the oven, preheat it to 350°F (175°C) and bake for about 5-7 minutes. Enjoy them warm, and the white chocolate will melt just right! For more detailed steps, check the Full Recipe. You can check your muffins by sticking a toothpick into the center. If it comes out clean, they are ready. Muffins should also look golden brown on top. A slight spring back when touched is a good sign too. Yes, you can use frozen raspberries. They work well in this recipe. Just be careful not to defrost them before adding. This helps keep the batter from turning too mushy. To make these muffins healthier, try these tips: - Use whole wheat flour instead of all-purpose flour. - Substitute applesauce for some of the oil. - Reduce the sugar by a quarter. - Add nuts or seeds for extra fiber and protein. To prevent muffins from sticking, use paper liners or grease the pan well. You can use butter or cooking spray for this. Letting them cool for a few minutes in the pan before transferring helps too. For the complete recipe, check out the Full Recipe link. It provides all the details you need to create these tasty treats! We covered all the key steps to make Raspberry White Chocolate Bliss Muffins. From gathering your ingredients to serving tips, you now have a solid plan. Use the tips for texture and storage to keep your muffins fresh. Don’t forget the variations for gluten-free or dairy-free options. Enjoy experimenting and sharing these tasty treats. Your baking journey can bring joy to others through your delicious muffins. Happy baking!

Raspberry White Chocolate Muffins Delightful Treats

Get ready for a sweet treat that’s bursting with flavor! In this blog post, we’ll whip up Raspberry White Chocolate

To make a classic Margherita pizza, gather these simple ingredients: - 2 cups all-purpose flour - 1 teaspoon active dry yeast - 1 teaspoon sugar - ¾ cup warm water - 1 teaspoon salt - 1 tablespoon olive oil - 1 cup canned San Marzano tomatoes, crushed - 1 cup fresh mozzarella cheese, sliced - Fresh basil leaves - Salt and pepper to taste - Extra virgin olive oil for drizzling You can adjust some ingredients if you have dietary needs. For gluten-free crust, use a gluten-free flour mix. If you are dairy-free, try vegan cheese. You can also use fresh tomatoes instead of canned if you prefer. This list gives you everything you need to create a delicious Margherita pizza. The flavors of fresh basil, creamy mozzarella, and sweet tomatoes shine through. Each component plays a key role in making this pizza special. For the full recipe, check the detailed instructions above! 1. Combining yeast with warm water: Start by mixing ¾ cup of warm water with 1 teaspoon of sugar and 1 teaspoon of active dry yeast. Let this sit for 5 to 10 minutes. You want it to get frothy. This means the yeast is alive and ready to work. 2. Mixing dry ingredients and forming dough: In a large bowl, mix 2 cups of all-purpose flour and 1 teaspoon of salt. Make a well in the center. Pour in your yeast mixture and 1 tablespoon of olive oil. Stir it all together until a dough forms. 3. Kneading technique for perfect consistency: Turn the dough onto a floured surface. Knead it for about 5 to 7 minutes. You want the dough to feel smooth and elastic. If it sticks, sprinkle a little more flour. 1. Ideal environment for dough to rise: Place your kneaded dough in a lightly oiled bowl. Cover it with a damp cloth. Find a warm spot in your kitchen. This will help your dough rise nicely. 2. Time required for the dough to double: Let it sit for about 1 hour. The dough should double in size. This means it is ready for the next step. 1. Rolling out the dough: After the dough has risen, punch it down gently. Turn it out onto a floured surface. Roll it out into a 12-inch round shape or shape it by hand. 2. Adding tomato sauce and cheese: Place the rolled-out dough on a baking sheet or a hot pizza stone. Spread 1 cup of crushed San Marzano tomatoes evenly on top. Sprinkle with salt and pepper to taste. Then, add 1 cup of sliced fresh mozzarella cheese on top. 3. Baking time and recommended temperatures: Preheat your oven to 475°F (245°C). Bake the pizza for 10 to 12 minutes. Look for a golden crust and bubbly cheese. This means it’s done! Follow these steps, and you'll create a classic Margherita pizza that is both savory and simple. For a complete guide, check out the Full Recipe. To get a crispy crust, you need good heat. Preheat your oven to 475°F (245°C) for at least 30 minutes. If you have a pizza stone, place it in the oven while it heats. This stone gives the pizza a great base and helps it cook evenly. When you roll out the dough, keep it about 12 inches wide. Thin crusts bake better. For the best flavor, choose high-quality tomatoes. San Marzano tomatoes are ideal. They have a sweet taste and make a great sauce. Use fresh mozzarella cheese for that perfect melt. Lastly, fresh basil adds a fragrant touch. It enhances the pizza’s taste and gives it a classic look. Many people overwork the dough, which makes it tough. Knead just until smooth, then let it rise. Another mistake is not seasoning enough. A pinch of salt on the sauce and cheese is key. It brings out the flavors of the fresh ingredients. For more tips, check the Full Recipe for details on making the perfect Margherita pizza! {{image_2}} You can make your Margherita pizza even better. Try adding different cheeses. Burrata is a creamy choice that melts beautifully. It adds a rich flavor that takes the pizza to the next level. You can also add toppings like prosciutto or arugula. Prosciutto brings a salty bite, while arugula adds a fresh peppery taste. Both give a unique twist to the classic flavor. If you need a gluten-free pizza, there are good options. You can use alternative flours like almond flour or rice flour. These flours work well in the dough. They give a nice texture without gluten. You can also find gluten-free store-bought pizza crusts. They save time and still taste great. Just check the labels to ensure they fit your needs. For a vegan version of Margherita pizza, swap out the cheese. There are many dairy-free cheese alternatives today. Brands offer mozzarella-style vegan cheese that melts nicely. You can also add extra plant-based toppings. Consider roasted vegetables, olives, or even a sprinkle of nutritional yeast. These add flavor and richness, making your pizza just as satisfying and delicious. To keep your Margherita pizza fresh, follow these steps: - Refrigeration: Wrap the leftover pizza tightly in plastic wrap or foil. Place it in an airtight container. Store it in the fridge for up to 3 days. - Freezing: For longer storage, freeze the pizza. Wrap each slice in plastic wrap, then place them in a freezer bag. This way, you can enjoy it later! To reheat your pizza for the best taste, use an oven. Preheat it to 375°F (190°C). Place the pizza on a baking sheet and heat for about 10-15 minutes. This method keeps the crust crispy and cheese gooey. Different ingredients have different storage times. Here’s a quick guide: - Dough: Fresh pizza dough can last in the fridge for up to 3 days. If frozen, it can last up to 3 months. - Tomato Sauce: Homemade sauce stays good for about 5 days in the fridge. In the freezer, it lasts up to 6 months. - Cheese: Fresh mozzarella lasts about a week in the fridge. If frozen, it can stay good for up to 3 months. Watch for the signs of spoilage. If the pizza looks dry or has an off smell, it’s best to throw it away. Enjoy your delicious Margherita pizza while it's fresh! For the full recipe, check out the link. Margherita pizza comes from Naples, Italy. It dates back to the late 1800s. This pizza is named after Queen Margherita of Savoy. During a visit to Naples, she tried three pizzas. The one with tomatoes, mozzarella, and basil won her heart. The colors of the toppings represent the Italian flag: red, white, and green. Today, Margherita pizza is a classic dish around the world. It shows the beauty of simple ingredients. Mozzarella cheese is the star of Margherita pizza. Its creamy texture melts perfectly. However, you can try other cheeses. Burrata has a rich and creamy center. It adds a lovely twist to the classic pizza. Provolone offers a sharper taste. It pairs well with tomatoes and basil too. Keep in mind that the flavor will change with different cheeses. For a fun experiment, mix mozzarella with other cheeses to find your favorite. Making pizza sauce is easy and fun. Here’s a simple recipe: - 1 cup canned San Marzano tomatoes, crushed - 1 teaspoon olive oil - 1 clove garlic, minced - Salt and pepper to taste 1. Heat olive oil in a pan over medium heat. 2. Add minced garlic and sauté for 1-2 minutes. 3. Pour in the crushed tomatoes and stir. 4. Season with salt and pepper. 5. Simmer for about 10 minutes. Now you have fresh sauce for your Margherita pizza! This sauce is bright and full of flavor. Using fresh ingredients makes a big difference. You can find the full recipe for Margherita pizza to try it out yourself! Making your own Margherita pizza is easy and fun. You learned about the key ingredients, like dough and fresh toppings. I shared step-by-step instructions to help you create perfect pizza at home. Remember, choosing high-quality ingredients makes a big difference. Avoid common mistakes for the best results. Try different variations based on your taste or dietary needs. Enjoy storing and reheating your leftovers so nothing goes to waste. With these tips, you can confidently impress your friends and family with delicious homemade pizza. Now, get cooking and enjoy every bite!

Classic Margherita Pizza Savory and Simple Recipe

If you love pizza, you can’t go wrong with a Classic Margherita Pizza. This simple dish offers fresh flavors in

To make a tasty Teriyaki Tofu Stir Fry, you need these main items: - 1 block (14 oz) firm tofu, drained and pressed - 2 tablespoons cornstarch - 2 tablespoons vegetable oil - 1 red bell pepper, sliced - 1 yellow bell pepper, sliced - 1 cup broccoli florets - 1 cup snap peas - 3 green onions, sliced - 4 cloves garlic, minced - 1 tablespoon freshly grated ginger - ½ cup teriyaki sauce (store-bought or homemade) - Sesame seeds for garnish - Cooked jasmine or brown rice, for serving These ingredients bring a mix of flavors and textures. The tofu gives protein, while the veggies add crunch and color. You can customize your stir fry with these fun options: - Carrots, sliced thin - Mushrooms, chopped - Zucchini, diced - Cashews or peanuts for crunch - Hot sauce for spice Feel free to mix and match based on what you like. This makes the dish more personal. To cook your Teriyaki Tofu Stir Fry, you will need: - A large skillet or wok - A cutting board and knife - A spatula for stirring - Measuring cups and spoons Having the right tools makes cooking easier and more fun. You can find the full recipe in the earlier sections. Enjoy your cooking adventure! First, take your block of firm tofu and drain it well. Press it to remove extra water. This helps the tofu soak up flavor. Next, cut the tofu into bite-sized cubes. Toss these cubes with cornstarch in a bowl. This gives the tofu a nice, crispy texture when cooked. Now, grab a large skillet or wok. Heat one tablespoon of vegetable oil over medium-high heat. Once hot, add the tofu cubes. Stir-fry them until they are golden and crispy, about 8 to 10 minutes. Then, remove the tofu and set it aside. In the same skillet, add another tablespoon of oil. Toss in the sliced bell peppers, broccoli, and snap peas. Stir-fry these for about 5 minutes. You want them tender, but still bright and colorful. After that, add minced garlic and freshly grated ginger. Stir-fry for one more minute until you smell the great aroma. Now it’s time to bring it all together. Return the crispy tofu to the skillet with the veggies. Pour the teriyaki sauce over everything. Toss gently to coat all the ingredients evenly. Cook for an additional 2 to 3 minutes. This step warms everything through and ensures the tofu and vegetables soak up the sauce. When finished, remove it from heat. Garnish with sliced green onions and sesame seeds. Serve it hot over cooked jasmine or brown rice. For the full recipe, check the details above. To get crispy tofu, start with firm tofu. Drain it well and press it. This step removes extra moisture. Cut the tofu into bite-sized cubes. Toss the cubes with cornstarch. This coating helps create a crispy outside. Heat oil in a skillet over medium-high heat. Add the coated tofu and stir-fry until golden. It takes about 8-10 minutes. Don’t crowd the pan; it can steam instead of fry. Making teriyaki sauce is easy and fun. You need just a few ingredients. Mix soy sauce, sugar, mirin, and sesame oil. You can also add ginger and garlic for extra flavor. Heat this mix in a small pot. Stir until the sugar dissolves. Let it simmer for a few minutes. This thickens the sauce. You can store any extra sauce in the fridge. It adds flavor to many dishes! Serve your teriyaki tofu stir fry over rice. Jasmine or brown rice works well. You can also use quinoa for a twist. Add extra green onions and sesame seeds on top. This adds color and crunch. You might pair it with a side salad for freshness. Enjoy with a slice of lime for zing. For more ideas, check out the Full Recipe. {{image_2}} This stir fry is already vegan! You can enjoy it as is. If you want to add more protein, try chickpeas or edamame. Both will work great and keep it plant-based. For a gluten-free version, use tamari instead of regular teriyaki sauce. Tamari is a great soy sauce alternative. Make sure your cornstarch is also gluten-free. Most brands are, but it's good to check. Feel free to mix in your favorite veggies. Carrots, zucchini, or mushrooms can all add flavor. If you prefer meat, chicken or shrimp can be tasty choices. Just cook them first and add them to the stir fry at the end. This flexibility makes the dish fun and unique for everyone. For the full recipe, check out the details above. To store leftovers, let the stir fry cool down. Place it in an airtight container. This helps keep the tofu and veggies fresh. Store it in the fridge for up to three days. To reheat, use a skillet over medium heat. Add a splash of water or oil to keep it moist. Stir until heated through, about 5-7 minutes. You can also use a microwave. Heat for 1-2 minutes, stirring halfway. You can freeze this stir fry for later. Place it in a freezer-safe container. It will last for up to three months. When ready to eat, thaw it in the fridge overnight. Reheat it on the stove for the best texture. Enjoy this quick and flavorful meal anytime! For the full recipe, check the earlier section. Yes, you can use other sauces. Soy sauce works well for a simple flavor. If you want a sweeter taste, try hoisin sauce. For a spicy kick, use sriracha or chili paste. Each sauce gives a unique flavor. Mix and match to find your favorite. To add heat, try red pepper flakes or sliced fresh chili peppers. You can also add a splash of hot sauce. Start with a small amount and taste as you go. This way, you can control the spice level. This stir fry pairs great with jasmine or brown rice. You can also serve it with quinoa for a healthy twist. For a crunchy side, add a salad or steamed veggies. Enjoying it with spring rolls makes for a fun meal! For the complete recipe, check [Full Recipe]. This blog post covered how to make a tasty teriyaki tofu stir fry. We explored key ingredients, helpful steps, and tips to enhance your meal. You learned how to achieve crispy tofu and create your own sauce. I shared options for different diets and how to store leftovers. Teriyaki tofu stir fry is easy to customize and delicious. Try different veggies or proteins to make it your own. Cooking can be fun, so enjoy making this dish!

Teriyaki Tofu Stir Fry Quick and Flavorful Meal

Looking for a quick and tasty meal? You’ve come to the right place! My Teriyaki Tofu Stir Fry is not

- 8 oz pasta (fusilli or penne) - 1 cup cherry tomatoes, halved - 1 cup fresh mozzarella balls, halved - 1 cup fresh basil leaves, chopped - 1/2 cup sun-dried tomatoes, chopped The star of this dish is the pasta. I always choose fusilli or penne for a great texture. The pasta holds the sauce well. Cherry tomatoes add a fresh, juicy bite. Fresh mozzarella brings a creamy taste that melts in your mouth. Basil adds a bright, aromatic flavor. Sun-dried tomatoes give a rich, tangy kick. - 1/4 cup balsamic glaze - 1/4 cup extra virgin olive oil - 1 teaspoon garlic powder - Salt and pepper to taste This dressing is simple yet full of flavor. The balsamic glaze adds sweetness and tang. Extra virgin olive oil enhances the richness. Garlic powder gives a subtle kick without overpowering the dish. Adjust salt and pepper to your liking. - 1/4 cup pine nuts, toasted (for added crunch) Pine nuts add a crunchy texture and nutty flavor. Toast them for a deeper taste. You can skip them if you want a lighter salad. Check out the Full Recipe for all the details! Start by boiling water in a large pot. Add 8 oz of pasta, like fusilli or penne. Cook it until it’s al dente, which takes about 8 to 10 minutes. Taste a piece to check if it is firm yet tender. Once ready, drain the pasta in a colander. Rinse it under cold water to stop the cooking process. This helps keep the pasta from getting mushy. In a large bowl, combine the cooled pasta with 1 cup of halved cherry tomatoes, 1 cup of halved fresh mozzarella balls, and 1 cup of chopped fresh basil leaves. Next, add 1/2 cup of chopped sun-dried tomatoes to the mixture. These ingredients bring bright colors and fresh flavors to your salad. In a small bowl, whisk together 1/4 cup of balsamic glaze, 1/4 cup of extra virgin olive oil, 1 teaspoon of garlic powder, and a pinch of salt and pepper. Mix until everything is well combined. Pour this dressing over the salad and toss gently. Make sure all the ingredients are evenly coated with the dressing. To add crunch, incorporate 1/4 cup of toasted pine nuts. Give it another gentle toss to mix everything well. Taste the salad and adjust the seasonings if needed. You can add more salt, pepper, or balsamic glaze to suit your taste. Let the salad sit for at least 15 minutes before serving. This waiting time allows the flavors to meld beautifully. Enjoy your vibrant Caprese Pasta Salad! For the complete recipe, check out the Full Recipe. To cook pasta just right, start with plenty of water. Add a pinch of salt to the boil. This salt helps flavor the pasta. Cook the pasta until it is al dente. This means it should be firm when you bite it. If you overcook it, the pasta becomes mushy. After draining the pasta, rinse it under cold water. This stops the cooking process. It also cools the pasta, which helps it mix better with the fresh ingredients. Use a good balsamic glaze for the best taste. I recommend brands like Colavita or Pompeian. They add a sweet tang that brightens the salad. Fresh herbs always beat dried ones. Fresh basil gives a lovely aroma and taste. If you use dried herbs, use less, as they are stronger. This salad shines when served chilled. You can also serve it at room temperature. Both ways taste great, so choose what you like. For a pretty presentation, garnish with extra basil leaves. Drizzle a bit more balsamic glaze on top for a stunning finish. This makes the salad look as good as it tastes! {{image_2}} You can easily change the pasta type in this dish. Try using bowtie or whole wheat pasta for a new twist. Different shapes add fun to your plate. For cheese, consider using feta or goat cheese. They bring a tangy flavor that pairs well with the tomatoes. This change can make your Caprese pasta salad unique. If you want more protein, think about adding chicken, shrimp, or chickpeas. Grilled chicken adds a nice smokiness while shrimp gives a light, fresh taste. Chickpeas are great for a vegetarian option. They also add fiber and make the salad more filling. Seasonal vegetables can elevate your salad. In summer, try adding zucchini or bell peppers for crunch. In fall, roasted butternut squash can add sweetness. You can also mix in fresh herbs based on the season. Try parsley in spring or sage in autumn. Each herb brings its own flavor, making your dish fun and fresh. For the full recipe, check out the Caprese Pasta Salad with a Twist. To keep your Caprese pasta salad fresh, use an airtight container. Glass or plastic containers work well. Store it in the fridge for up to three days. After that, the flavors may fade, and the pasta can get mushy. Pasta salad tastes best cold or at room temperature. If you want to reheat it, use a microwave. Heat it in short bursts, stirring in between. This way, you avoid overcooking the pasta. If the salad seems dry, add a splash of olive oil before heating. You can make this salad a day ahead. Just store it in the fridge after mixing. The flavors blend better overnight. If you add pine nuts, wait until just before serving. This keeps them crunchy. For the best taste, bring it to room temp before serving. You can find the full recipe for Caprese pasta salad [here](#). You can store Caprese Pasta Salad in the fridge for 3 to 5 days. Keep it in an airtight container to maintain freshness. The flavors will blend more over time, making it taste even better. If you notice any excess liquid, just drain it before serving. Yes, you can make this salad the night before. Just follow the recipe and store it in the fridge. This will help the flavors mix nicely. Before serving, give it a quick toss to refresh the ingredients and ensure even coating with the dressing. If you don’t like basil, you can use parsley, arugula, or spinach. These herbs and greens offer fresh flavors. Each one brings a different taste. For a unique twist, try using fresh mint or cilantro to surprise your taste buds. To make this recipe gluten-free, choose gluten-free pasta. There are many great options, like quinoa or brown rice pasta. Just cook them according to the package instructions. This way, everyone can enjoy a delicious bowl of Caprese Pasta Salad. For the best texture, look for pasta labeled "gluten-free." For the full recipe, check out the Caprese Pasta Salad with a Twist . This Caprese Pasta Salad is easy to make and full of flavor. You learned about the main ingredients, tasty dressing, and optional add-ons. I shared simple steps to cook and mix the salad, with tips for perfect pasta. You can customize it with different ingredients or proteins, making it your own. Remember, this dish works great chilled or at room temperature. Enjoy trying this recipe at your next meal or get-together. It’s sure to impress everyone!

Caprese Pasta Salad Fresh and Flavorful Summer Dish

Looking for a bright and fresh dish to elevate your summer meals? Caprese Pasta Salad is the perfect choice! This

- 1 package (16 oz) pizza dough - 4 tablespoons unsalted butter, melted - 3 cloves garlic, minced - 1/2 cup grated Parmesan cheese - 1 teaspoon dried Italian herbs (oregano, basil, or thyme) - Fresh parsley, chopped (for garnish) - 1/4 teaspoon red pepper flakes (optional for a little kick) - Salt to taste When making Easy Garlic Parmesan Knots, the ingredients are simple yet full of flavor. You start with a package of pizza dough. This dough is the base for your knots. It is soft, easy to work with, and perfect for tying. Next, you need unsalted butter. Melt it down to mix with garlic. The butter adds richness, while garlic gives a bold taste. You will also use minced garlic, which brings out the best flavor. For seasoning, grated Parmesan cheese is key. It adds a savory touch. Dried Italian herbs give your knots a burst of flavor. You can choose oregano, basil, or thyme. If you like a little spice, add red pepper flakes. They bring a nice kick. Finally, salt helps to enhance all the flavors. Don’t forget fresh parsley for garnish. It makes the knots look beautiful. You will enjoy this recipe and its fresh, tasty flavors. For the complete recipe, check out the Full Recipe. - Preheat your oven to 400°F (200°C). - Line a baking sheet with parchment paper. - Roll out pizza dough into a rectangle. - Cut dough into strips, about 1 inch wide and 6 inches long. - Tie each strip into a knot. - Place the knots on the prepared baking sheet, leaving space between them. - Mix melted butter, minced garlic, Italian herbs, and a pinch of salt. - Brush this mixture over each knot, covering them well. - Sprinkle grated Parmesan cheese over the knots. - Bake for 15-20 minutes until they turn golden brown and fluffy. To achieve fluffy knots, you need to handle the dough gently. Overworking it can make the knots tough. When you roll out the dough, aim for a thickness of about 1/4 inch. This thickness helps them rise nicely in the oven. Spacing on the baking sheet is key. Leave at least 2 inches between each knot. This space allows hot air to flow around them, making sure they bake evenly. If they are too close, they can stick together and lose their shape. Using fresh garlic makes a big difference in taste. It gives a strong and bright flavor that powdered garlic cannot match. When you mince fresh garlic, it releases oils that add depth to your dish. If you can’t find Parmesan cheese, try using Pecorino Romano or Grana Padano. Both offer a similar salty and nutty flavor. You can even use nutritional yeast for a vegan option. The best dips for garlic knots include marinara sauce or garlic butter. Marinara adds a nice tang, while garlic butter brings more garlic flavor. Both make great choices for dipping. For a pretty presentation, serve the knots warm on a rustic wooden board. Add some extra Parmesan on the side for a cheesy touch. A small bowl of marinara or garlic sauce will make the dish inviting and fun for everyone to enjoy. For the full recipe, check out the section above! {{image_2}} You can have fun with flavor infusions in your garlic knots. Adding herbs or cheese to the dough boosts taste. Try mixing in fresh basil or rosemary for a fragrant twist. A bit of mozzarella can give a cheesy center that melts in your mouth. If you like spice, you can make a spicy version. Add chopped jalapeños or pepperoni to the dough. These ingredients bring heat and flavor. The warm, bold taste pairs well with the garlic and cheese. For those on special diets, garlic knots can still shine. You can use gluten-free pizza dough. Many brands offer tasty options that work well. Just be sure to follow the package instructions for the best results. If you want a vegan version, swap the butter and cheese. Use olive oil instead of butter. Nutritional yeast can replace Parmesan cheese. This keeps the flavor while sticking to vegan needs. Garlic knots can fit any season. For holidays, try making themed knots. You can shape them like wreaths for Christmas or bunnies for Easter. These fun shapes add a festive touch to your table. You can also pair garlic knots with seasonal ingredients. In summer, add fresh tomatoes or basil. In fall, mix in pumpkin spice for a unique twist. This keeps your snacks fresh and exciting all year long. To keep your garlic knots fresh, store them at room temperature. Place them in a paper bag or a container with a lid. Avoid using plastic wrap, as it can make them soggy. They will stay good for about two days. If you have leftovers, refrigerate them to keep them safe. Use an airtight container to prevent them from drying out. Garlic knots can last in the fridge for up to four days. For longer storage, freezing is the best method. First, let the garlic knots cool completely. Then, place them in a single layer on a baking sheet. Freeze them for about an hour. Once frozen, transfer them to a freezer bag. This way, they won't stick together. Garlic knots can last in the freezer for up to three months. When you are ready to enjoy them, reheat the knots for the best texture. Preheat your oven to 350°F (175°C). Place the frozen knots on a baking sheet and bake for about 10-15 minutes. This will warm them up and restore their fluffy texture. For a crispy finish, you can broil them for a minute or two. Enjoy your delicious garlic knots again! For the full recipe, check out the section above. Can I use homemade pizza dough for garlic knots? Yes, you can use homemade pizza dough. It adds a personal touch. Just ensure it is stretchy and soft. Homemade dough can bring out great flavors. How can I troubleshoot dense garlic knots? If your knots are dense, check your dough. It might need more kneading. Also, ensure your oven is at the right temperature. Let the dough rise enough before shaping. What can I add to make my garlic knots more flavorful? You can add herbs like rosemary or thyme. Try mixing in some cheese into the dough too. A sprinkle of smoked paprika can add a nice twist. Can I make garlic knots ahead of time? Absolutely! You can shape the knots and chill them. Just cover them well before baking. Bake them fresh when you are ready to enjoy. What to serve with garlic parmesan knots? These knots pair well with marinara sauce. You can also serve them with garlic butter or ranch dip. A crisp salad adds a nice balance too. Can garlic knots be served cold? Yes, but they taste best warm. If you have leftovers, store them properly. Reheat them for a soft, tasty snack again. For the full recipe, check out the details mentioned earlier. In this post, we covered how to make delicious garlic knots using simple ingredients. From prepping the dough to baking, each step helps you create tasty knots that shine at any meal. Remember to try different flavors or even adjust for dietary needs. With these tips, your garlic knots will impress every time. Enjoy making and sharing this tasty snack!

Easy Garlic Parmesan Knots Tasty and Fun Snack Idea

Are you ready to impress your family and friends with a delicious snack? My Easy Garlic Parmesan Knots are the

- Flatbreads (store-bought or homemade) - Cooked chicken breast - Basil pesto - Cherry tomatoes - Fresh mozzarella cheese - Grated Parmesan cheese - Fresh arugula - Balsamic glaze - Seasoning (salt and pepper) For this pesto chicken flatbread, you need simple ingredients. Flatbreads serve as the base. You can buy them or make them at home. I often choose store-bought for quick meals. Next, use cooked chicken breast. Shredded chicken works best. You can use leftover chicken or cook it fresh. Basil pesto is key. It adds great flavor. You can buy it or make a batch at home. Cherry tomatoes add sweetness. Halve them for even cooking. Fresh mozzarella cheese melts well. It creates a gooey layer. Grated Parmesan cheese gives a nice salty bite. Fresh arugula adds a peppery crunch. Drizzle balsamic glaze for extra flavor. Don’t forget seasoning! Salt and pepper brighten all the tastes. - Average calories per serving: 450 - Macronutrient breakdown: - Protein: 30g - Carbohydrates: 45g - Fat: 20g This meal is not only tasty but also balanced. Each serving gives you a good amount of protein. The carbs from the flatbread power you up. Healthy fats from the cheese keep you satisfied. 1. Preheat the oven: Start by preheating your oven to 400°F (200°C). This step is key for getting a nice, crispy flatbread. 2. Prepare flatbreads: Place the flatbreads on a baking sheet lined with parchment paper. This helps prevent sticking and makes cleanup easy. 1. Spreading the pesto: Take the basil pesto and spread it evenly over each flatbread. This green layer adds great flavor and moisture. 2. Adding chicken and toppings: Next, distribute the shredded chicken evenly over the pesto. Then, scatter the halved cherry tomatoes on top. Finish by generously sprinkling the shredded mozzarella and grated Parmesan cheese. This combination will create a lovely melt when baked. 1. Temperature and time recommendations: Place the flatbreads in the preheated oven. Bake them for 10-12 minutes. Keep an eye on them! You're looking for melted cheese and golden edges. 2. Tips for achieving perfect cheese melt: To get that perfect cheese melt, make sure to use fresh mozzarella. It melts beautifully and creates a nice stretch. If you want extra browning, switch to broil for the last minute. Just watch carefully to avoid burning! Following these steps will lead you to a tasty Pesto Chicken Flatbread. For the complete recipe, check out the Full Recipe. If you want to switch things up, try different proteins. Ground turkey or shredded tofu works well. Both add great taste without losing texture. For cheese, use dairy-free options like cashew cheese or almond-based mozzarella. This keeps the flatbread tasty and friendly for those who avoid dairy. Making your own flatbread is simple and fun. Mix flour, water, and a pinch of salt. Roll out the dough and cook it on a hot skillet for a few minutes. You can also grill flatbreads for a smoky flavor. This method gives you nice grill marks and a crispy bite. Baking flatbreads in the oven makes them even crispier. To kick up the flavor, add spices like garlic powder or crushed red pepper. Fresh herbs like basil or oregano also work great. You can try different sauces, too. A drizzle of garlic aioli or a squeeze of lemon adds a nice zing. These small changes make a big difference in taste. For the full recipe, you can check the recipe section above. {{image_2}} For a vegetarian twist, you can switch out the chicken. Use grilled vegetables like zucchini, bell peppers, and mushrooms instead. You might also enjoy adding plant-based proteins, such as chickpeas or tofu. These options keep the dish hearty and satisfying without meat. Use the same basil pesto to enhance the flavor. To change up the taste, try different types of pesto. Sun-dried tomato pesto adds a rich, tangy flavor. You can also mix in spicy elements. Adding red pepper flakes gives each bite a little kick. Experimenting with these flavors can make your flatbread even more exciting. Seasonal produce can bring freshness to your flatbread. In spring, use asparagus or peas. In summer, add fresh corn or heirloom tomatoes. In fall, think about roasted butternut squash or apples. Each season offers unique flavors that can elevate your meal. You can keep your flatbread interesting and fresh by adapting to what’s in season. For more detailed instructions on making this dish, refer to the Full Recipe. To keep your pesto chicken flatbread fresh, store it in an airtight container. Wrap each flatbread in plastic wrap for extra protection. This will help keep the bread from drying out. Make sure to refrigerate the leftovers within two hours after cooking. If you need the flatbreads to stay fresh longer, use a vacuum-sealed bag. It reduces air and keeps flavors intact. When reheating flatbreads, the oven is your best friend. Preheat your oven to 350°F (175°C). Place the flatbreads directly on the rack or a baking sheet for 10-15 minutes. This method helps restore the crispiness. Avoid using the microwave, as it can make the bread soggy. If you must use a microwave, cover the flatbread with a damp paper towel. This can help keep some moisture. To freeze assembled flatbreads, prepare them as directed but do not bake. Wrap each flatbread tightly in plastic wrap and then in aluminum foil. This will help prevent freezer burn. You can freeze them for up to three months. When ready to bake, remove the wrapping and let them thaw in the fridge overnight. Then, bake as usual from the thawed state. This method keeps the flavors and textures just right. To make homemade pesto, you need fresh basil, garlic, nuts, olive oil, and cheese. Start by washing and drying the basil leaves. In a food processor, blend 2 cups of basil, 2 cloves of garlic, and 1/4 cup of nuts like pine nuts or walnuts. Add 1/2 cup of olive oil slowly while blending. Mix in 1/2 cup of grated Parmesan cheese. Pulse until smooth. This fresh pesto adds great flavor to the flatbread. Using raw chicken is not safe for this recipe. You must cook the chicken before adding it to the flatbread. Cooked chicken keeps the flatbread safe to eat and ensures even cooking. You can grill, bake, or sauté the chicken until fully cooked. Then shred it for easy topping. Great sides for pesto chicken flatbread include a simple salad or roasted vegetables. A fresh arugula salad pairs well. It adds crunch and freshness. You can also serve it with sweet potato fries or a light soup. These sides keep the meal balanced and tasty. To find restaurants with pesto chicken flatbread, search local eateries online. Use apps like Yelp or Google Maps. Look for places with Italian or Mediterranean menus. Many pizzerias and casual dining spots offer it. Reading reviews can help you find the best options near you. To customize for dietary restrictions, swap ingredients as needed. For a gluten-free option, use gluten-free flatbreads. If you're dairy-free, try plant-based cheese. For a vegan meal, replace chicken with grilled vegetables or chickpeas. Always check labels to ensure all ingredients fit your dietary needs. This blog post gave you an easy guide to making pesto chicken flatbreads. You saw the ingredients, steps, tips, and variations. You can use different proteins, cheeses, and toppings to fit your taste. Storage tips help keep your leftovers fresh, too. Pesto chicken flatbreads are fun and simple to make. Enjoy creating and sharing your delicious version! You now have all you need to impress friends and family with this tasty dish.

Pesto Chicken Flatbread Simple and Flavorful Meal

Looking for a quick and tasty meal? You’re in the right place! This Pesto Chicken Flatbread is simple, flavorful, and

Older posts
Newer posts
← Previous Page1 … Page34 Page35 Page36 … Page89 Next →

dsad

© 2025 So Yum Recipes • Built with GeneratePress

Our Policies

  • Copyright Policy
  • Cookie Policy
  • GDPR Policy
  • Privacy Policy
  • Disclaimer
  • Terms Of Use

More Information

  • Home
  • About
  • Contact
  • Appetizers
  • Dessert
  • Dinner
  • Drinks
©2025, So Yum Recipes About Back To Top