Skip to content
DisclaimerTerms Of UseGDPR PolicyCookie Policy

So Yum Recipes

  • Home
  • Drinks
  • Appetizers
  • Dinner
  • Dessert
  • About
  • Contact
  • Privacy Policy
DisclaimerTerms Of UseGDPR PolicyCookie Policy

Chloe

For a tasty Moroccan chickpea stew, gather these ingredients: - 1 can (15 oz) chickpeas, drained and rinsed - 1 medium onion, chopped - 2 cloves garlic, minced - 1 red bell pepper, diced - 1 carrot, diced - 2 medium potatoes, peeled and cubed - 1 can (14 oz) diced tomatoes - 2 cups vegetable broth - 1 tablespoon olive oil - 2 teaspoons ground cumin - 1 teaspoon ground coriander - 1 teaspoon paprika - 1/2 teaspoon cayenne pepper (adjust to taste) - 1 teaspoon ground cinnamon - Salt and pepper to taste - Fresh cilantro or parsley for garnish - Lemon wedges for serving I love using fresh ingredients when I can. Fresh onions, garlic, and bell peppers add bright flavors. However, canned chickpeas and tomatoes are great shortcuts. They save time and still taste good. If you're in a rush, don't worry about using canned ingredients. Just make sure to rinse the chickpeas well. This helps remove excess sodium and improves the taste. Spices are key in Moroccan cooking. They add warmth and depth. You’ll want ground cumin, coriander, paprika, and cinnamon for this stew. Each spice brings its unique flavor. Cumin gives a nutty taste, while coriander adds a hint of citrus. Paprika offers sweetness, and cinnamon brings warmth. If you like heat, cayenne pepper is your friend. Use it sparingly at first, then add more if you want. Mixing these spices well with the veggies makes a fragrant base for your stew. To make Moroccan chickpea stew, start with the right pot. I use a large pot for even cooking. First, heat one tablespoon of olive oil over medium heat. Add the chopped onion and sauté for about five minutes. You want the onion to become soft and clear. Then, stir in two cloves of minced garlic, one diced red bell pepper, and one diced carrot. Cook this mix for two to three minutes. The veggies should start to soften. Next, it's time for the potatoes. Add two cubed medium potatoes to the pot. Stir well, cooking for about five minutes. This step helps the potatoes absorb flavors. Now, sprinkle in the spices: two teaspoons of ground cumin, one teaspoon of ground coriander, one teaspoon of paprika, half a teaspoon of cayenne pepper, and one teaspoon of ground cinnamon. Stir everything to coat the veggies. Cook for one more minute to release those fragrant aromas. Now, pour in one can of diced tomatoes and their juice. Add the drained and rinsed chickpeas, plus two cups of vegetable broth. Bring this mixture to a gentle simmer. Cover the pot and let it cook for 25 to 30 minutes, or until the potatoes and carrots are tender. Stir occasionally. If the stew thickens too much, add a bit of water. Finally, season with salt and pepper to taste. Sautéing is key to building flavor. When you sauté, you unlock the natural sweetness in onions and garlic. Keep the heat moderate to avoid burning. Stir often to cook evenly. Simmering is just as important. It lets the flavors blend well. A gentle simmer keeps the stew from boiling too hard. This helps the ingredients cook through while keeping them intact. Timing is everything in cooking. When you sauté the onions, you want them just right. Overcooking can lead to bitterness. Temperature control is also vital. A medium heat works best for sautéing and simmering. Too hot can burn, while too low can lead to undercooking. Follow the times closely for the best results. This Moroccan chickpea stew is not just tasty; it’s also simple to make. You can find the full recipe above to guide you through the process. To enhance the flavors, start with fresh ingredients. Fresh garlic and onions bring out the best taste. Sauté them well until soft and fragrant. Add spices at the right time. This helps release their oils and flavors. You can also add a splash of lemon juice at the end. It brightens the dish and adds a nice zing. One common mistake is not seasoning enough. Always taste as you cook. You can add salt and pepper throughout to build layers of flavor. Another mistake is overcooking the vegetables. They should be tender, not mushy. Stir the stew gently to avoid breaking the chickpeas. This keeps your stew looking nice and fresh. Serve your Moroccan chickpea stew with warm bread or rice. This helps soak up all the delicious sauce. You can add a dollop of yogurt for creaminess. Fresh herbs like cilantro or parsley make a great garnish. For drinks, try a light white wine or mint tea. These pair well with the spices in the stew. For the full recipe, check out the complete instructions above. {{image_2}} You can easily make this stew vegetarian or vegan. The base is already meat-free since it uses chickpeas. This makes it rich in protein. You can also add more vegetables like zucchini or spinach. For a creamier texture, try adding coconut milk. This adds a nice twist to the classic flavor. If you have food allergies or dietary needs, adjustments work well. Use sweet potatoes instead of regular potatoes for a sweeter taste. If you're gluten-free, check your broth for any gluten ingredients. You can swap vegetable broth for low-sodium broth if salt is a concern. Moroccan stew can change based on the region. In some areas, people add dried fruits like apricots or raisins for a sweet touch. Others may include different spices like turmeric or saffron for unique flavors. Each variation gives the stew its own personality, making it fun to try new things. To keep your Moroccan chickpea stew fresh, let it cool first. Store the stew in an airtight container. You can place it in the fridge for up to four days. Make sure to label the container with the date. This helps you remember when to eat it. When it's time to enjoy your stew again, reheat it gently. You can use the stovetop or microwave. If using the stovetop, put the stew in a pot over medium heat. Stir often to heat it evenly. If using a microwave, heat in short bursts. Stir between each burst to avoid hot spots. If you want to keep the stew longer, freezing is a great option. You can freeze it for up to three months. Use a freezer-safe container or bag. Leave some space for the stew to expand. To thaw, move the container to the fridge overnight. Reheat as mentioned to enjoy your delicious meal again. For the full recipe, check the links provided. Moroccan Chickpea Stew has roots in North African cuisine. This region blends spices and flavors from many cultures. You can find dishes like this in Morocco, Algeria, and Tunisia. The stew reflects a mix of Berber, Arab, and Mediterranean influences. People enjoy it for its warmth and depth of flavor. It often showcases local ingredients like chickpeas, vegetables, and spices. These ingredients create a hearty meal perfect for sharing. Yes, you can make Moroccan Chickpea Stew in a slow cooker. It’s a great way to enhance the flavors. Start by sautéing the onion, garlic, and peppers in a pan. Then, add them to the slow cooker with the rest of the ingredients. Set the slow cooker on low for about 6-8 hours or high for 3-4 hours. This method allows the spices to meld together beautifully. You will enjoy a rich and tasty stew without much fuss. Chickpeas are a superfood packed with nutrients. They are high in protein and fiber, which can help keep you full. Eating chickpeas may also support heart health. They contain healthy fats that can lower cholesterol. Additionally, chickpeas are rich in vitamins and minerals like iron, magnesium, and folate. Including them in your diet can boost your overall health. Plus, they are versatile and can be used in many dishes. You can find the full recipe for Spicy Moroccan Chickpea Stew in the article above. It provides step-by-step guidance to help you create this delightful dish. Just follow the instructions, and you will have a wonderful meal ready in no time! Moroccan Chickpea Stew is simple yet full of flavor. We covered the key ingredients, from fresh produce to spice mixes. I shared step-by-step cooking techniques and tips to avoid common mistakes. You can adjust the recipe for dietary needs and enjoy regional variations. Remember to store leftovers properly to maintain their taste. This dish is healthy and easy to make. Try it now and enjoy each bite!

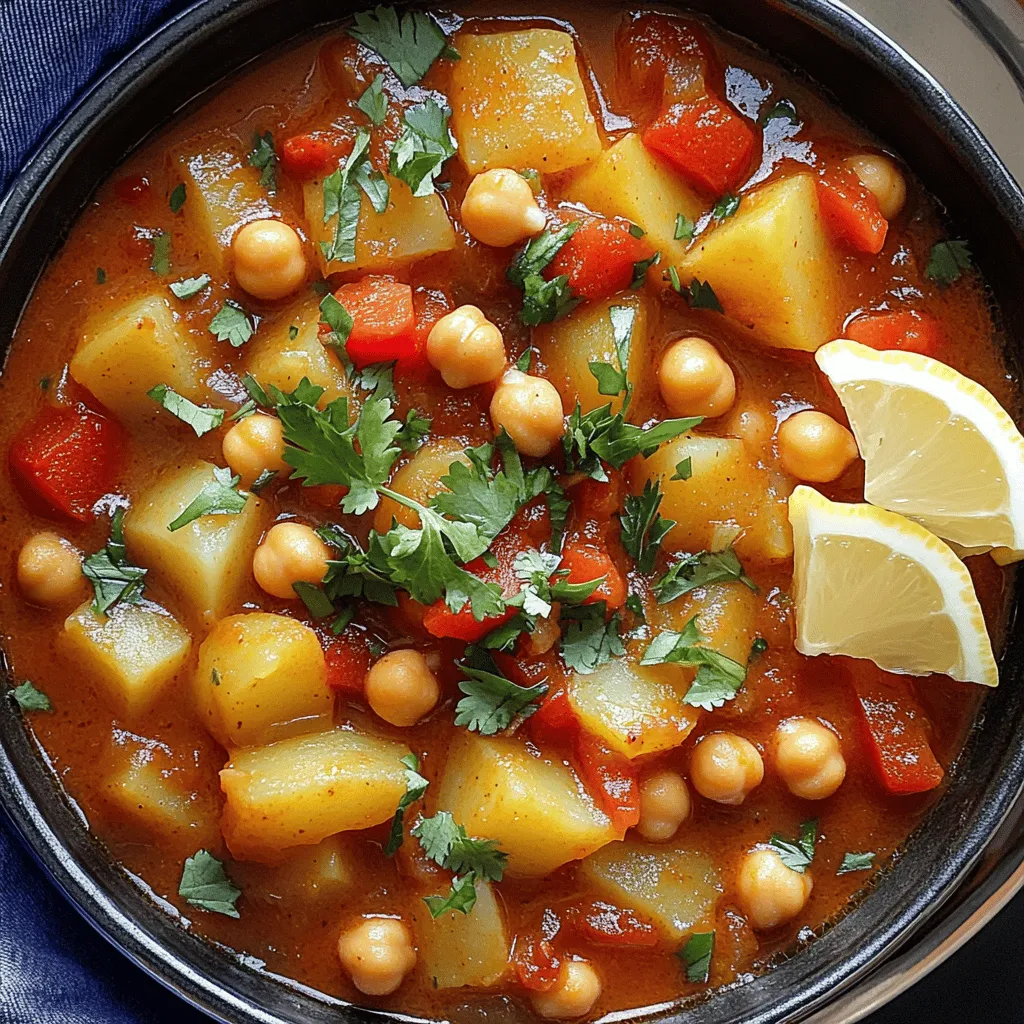
Moroccan Chickpea Stew Flavorful and Simple Recipe

Are you ready to dive into a bowl of warmth and flavor? Moroccan Chickpea Stew is simple to make and

To make Easy Garlic Naan Bread, you need a few key items. Here is a simple list: - 2 cups all-purpose flour - 1 teaspoon sugar - 1 teaspoon salt - 1 teaspoon baking powder - 1 tablespoon yogurt - 2 tablespoons milk - 3/4 cup warm water - 2 tablespoons garlic, minced (about 4 cloves) - 2 tablespoons butter, melted These ingredients come together to create a soft and flavorful bread. The all-purpose flour gives the naan its nice texture. The yogurt helps it rise and stay soft. The garlic adds a delightful aroma and taste. You can enhance your garlic naan with some fun extras. Here are a few ideas: - Fresh cilantro for garnish - A sprinkle of sesame seeds - A dash of chili flakes for heat These additions make your naan look great and taste even better. Feel free to mix and match based on your taste. Using the right flour makes a big difference. All-purpose flour works best for naan. It gives you a balance of softness and chewiness. If you want a healthier option, you can try whole wheat flour. Just remember that it may change the texture. Keep these tips in mind when making your Easy Garlic Naan Bread. You can find the full recipe above to guide you through the process! Start by gathering your ingredients. You will need flour, sugar, salt, baking powder, yogurt, milk, warm water, minced garlic, and melted butter. In a large bowl, mix the flour, sugar, salt, and baking powder. Make sure to combine them well. Next, create a well in the center of this mix. Add the yogurt and warm water into the well. Stir until the dough starts to form. Now, it's time to knead. Place the dough on a floured surface. Knead it for about 5 to 7 minutes. The dough should feel soft and elastic. If it sticks to your hands, add a bit more flour. After kneading, place the dough in a greased bowl. Cover it with a damp cloth. Let it rise in a warm spot for about one hour. You want it to double in size. Once it has risen, punch it down. Divide the dough into six equal parts. Roll each part into a ball and cover them with a cloth to keep them warm. Now, let's cook the naan! Preheat a skillet or flat griddle over medium-high heat. Take one dough ball and roll it out. Aim for an oval or teardrop shape, about 1/4 inch thick. Brush the top with melted butter. Then, sprinkle the minced garlic evenly over the surface. Place the naan on the hot skillet, garlic side up. Cook for about 2 to 3 minutes. Keep an eye on it; bubbles should form on the surface. Once you see bubbles, flip the naan. Cook for another 1 to 2 minutes until it turns golden brown. After cooking, remove it from the skillet. Brush it again with melted butter. To keep it warm, wrap it in a towel. Repeat this for the remaining dough balls. To get the best texture for your naan, kneading is key. Make sure to knead until the dough is smooth and elastic. This helps develop gluten, giving the naan a nice chew. Another tip is to let the dough rise fully. This step adds air pockets, making your naan soft. If you want a chewier naan, you can let it rise longer. Also, cook your naan on high heat. This ensures it puffs up nicely and gets those lovely charred spots. Don't rush the cooking process; each naan needs attention. Enjoy your cooking adventure with this easy garlic naan recipe! For the full recipe, check out the details above. To get the best flavor in your garlic naan, use fresh garlic. Fresh garlic gives a strong and rich taste. You can also add herbs, like cilantro, to boost the flavor. Mix some minced garlic into the dough for an extra kick. This adds a nice surprise when you take a bite. Use high-quality butter for brushing to enhance the taste. One common mistake is not letting the dough rise enough. If you skip this step, your naan will be dense. Another mistake is not using enough heat when cooking. If the skillet is too cool, the naan will not get those perfect brown spots. Also, don’t skip the butter brush after cooking. This keeps your naan soft and adds flavor. You can prepare the dough a day ahead. After kneading, place it in the fridge instead of letting it rise. When you're ready, let it sit at room temperature for about 30 minutes before rolling. You can also cook the naan and freeze it. Just reheat it in a skillet or microwave when you want to enjoy it. For the full recipe, check out Garlic Naan Delight. {{image_2}} You can easily change the flavor of your naan. Try adding herbs like rosemary or thyme. Mix in spices like cumin or coriander for a warm taste. You can also use cheese. Try adding mozzarella or feta for a creamy touch. For a spicy kick, add chopped jalapeños or chili flakes. Each change makes your naan unique. If you need a gluten-free naan, use gluten-free flour. You can find blends that work well for baking. Just replace the all-purpose flour with this blend. You might need to adjust the water. Start with less and add more until you get the right dough. This way, you can enjoy naan without gluten. Stuffed naan is a fun twist on the classic. You can fill it with your favorite foods. Try mashed potatoes, cheese, or curry. Simply flatten the dough, add your filling, and fold it over. Seal the edges well before cooking. This gives you a tasty and filling naan. Experiment with different stuffings to find your favorite! For the full recipe, check out the instructions above. To keep your naan fresh, let it cool first. Once cool, stack the naan and wrap it snugly in plastic wrap. This keeps air out and moisture in. You can also place naan in an airtight container. Store it at room temperature for up to two days. If you want to keep it longer, put it in the fridge for up to a week. When it’s time to enjoy your naan again, reheat it simply. Use a skillet over medium heat. Place the naan in the skillet for about 30 seconds on each side. You can also use the oven. Wrap the naan in foil and heat at 350°F for 10 minutes. For a quicker option, use the microwave for 15-20 seconds. Just be careful not to overheat it. Freezing naan is easy and a great way to save it. After cooling, place naan in a single layer between sheets of parchment paper. This prevents them from sticking together. Then, put them in a freezer-safe bag or container. Naan can last in the freezer for up to three months. When you're ready to eat, thaw it in the fridge overnight or at room temperature for a few hours. For the best taste, heat it up as mentioned before. You’ll have fresh-tasting naan ready to enjoy! The key to soft naan is the dough. You need to knead it well. Kneading helps develop gluten, making the bread chewy. After kneading, let the dough rise. It should double in size. This rising time adds air pockets, keeping the naan soft. Adding yogurt and warm water also helps with softness. Yes, you can use whole wheat flour. However, it may change the texture. Whole wheat flour makes naan denser and less soft. If you choose it, add a bit more water. This helps the dough stay moist. You can mix it with all-purpose flour for a lighter naan. To keep naan warm, stack them on a plate. Cover the plate with a clean towel. This keeps the heat in and the naan soft. If you have an oven, set it to low heat. Place the naan inside on a baking sheet. Just don't leave them too long, or they may dry out. You’ve learned how to make easy garlic naan bread, from key ingredients to expert tips. We covered dough preparation, cooking methods, and storage. With this knowledge, you can explore variations and avoid common mistakes. Homemade naan adds joy to meals. Remember, perfecting naan takes practice, but it’s worth it. Enjoy experimenting with flavors and storing your creations. Happy cooking!

Easy Garlic Naan Bread Simple and Flavorful Recipe

If you love the warm, buttery taste of naan bread, you’re in for a treat! This easy garlic naan bread

To make BBQ Ranch Chicken Wraps, you need fresh and tasty ingredients. Here’s what you’ll need: - 2 cups cooked chicken, shredded - 1/2 cup BBQ sauce - 1/4 cup ranch dressing - 1 cup romaine lettuce, chopped - 1/2 cup cherry tomatoes, halved - 1/4 cup red onion, thinly sliced - 1/2 cup shredded cheese (cheddar or pepper jack) - 4 large flour tortillas - Fresh cilantro for garnish (optional) - Salt and pepper to taste These ingredients bring bold flavors to your wraps. The BBQ sauce gives a sweet and smoky taste. The ranch dressing adds creaminess and balances the flavors. You can make your wraps even better with some optional add-ins. Here are a few ideas: - Avocado slices for creaminess - Jalapeños for heat - Corn for sweetness and texture - Black beans for extra protein Feel free to mix and match. These add-ins can enhance the taste and make your wraps unique. Seasoning is key to great flavor. Here are some suggested seasonings: - Garlic powder for depth - Smoked paprika for added smokiness - Chili powder for a spicy kick - Fresh herbs like cilantro or parsley for freshness Using these seasonings helps you create a wrap that’s full of flavor. You can adjust them to fit your taste. For the full recipe, check out the complete instructions! First, you need to prepare the chicken. Take 2 cups of cooked chicken and shred it. In a bowl, mix the shredded chicken with 1/2 cup of BBQ sauce. Ensure the chicken is well-coated. In another bowl, whisk 1/4 cup of ranch dressing with salt and pepper. This will add great flavor to your wraps. Now, lay out 4 large flour tortillas on a clean surface. Start by adding a cup of chopped romaine lettuce to the center of each tortilla. Next, spoon a generous amount of your BBQ chicken mixture over the lettuce. Then, toss in some halved cherry tomatoes, thinly sliced red onion, and 1/2 cup of shredded cheese. Finally, drizzle a spoonful of ranch dressing over the top. To wrap it up, fold the sides of each tortilla inward and roll tightly from the bottom to the top. This ensures all the tasty fillings stay inside. Repeat this step for each tortilla. For a crispy finish, grill the wrapped tortillas on a panini press or in a skillet for 2-3 minutes. This step gives them a nice golden brown color. You can also serve them cold if you prefer. Once done, slice each wrap in half. Serve with extra ranch dressing or BBQ sauce on the side for dipping. Enjoy your flavorful meal! For the complete recipe, check out the Full Recipe section. To make the perfect BBQ Ranch Chicken Wrap, start with fresh tortillas. They should be large and soft. Lay your tortilla flat and add your fillings in the center. Make sure not to overfill, or it will be hard to wrap. Fold the sides in first, then roll from the bottom up. This keeps all the tasty bits inside. If you want extra crunch, grill the wrap for a few minutes. This adds flavor and makes it warm. You can prepare these wraps ahead of time! Just follow the steps in the Full Recipe. After assembling, wrap each one in foil or plastic wrap. Keep them in the fridge for up to two days. When you are ready to eat, you can grill them or enjoy them cold. This is a great option for busy days or picnics. BBQ Ranch Chicken Wraps pair well with many sides. Try serving them with sweet potato fries or a fresh salad. You can also add extra dips on the side, like guacamole or salsa. For drinks, a cold iced tea or lemonade enhances the meal. These wraps are not just tasty; they are fun to eat, too! {{image_2}} You can easily make BBQ ranch chicken wraps gluten-free. Use corn tortillas instead of flour. They work well and taste great. For a low-carb option, use lettuce leaves instead of tortillas. This keeps your meal light and fresh. You can switch up the flavors by using different sauces. Try chipotle sauce for a smoky kick. You could also use honey mustard for a sweet twist. For toppings, add avocado for creaminess. You can also try jalapeños for extra heat. Mix and match to find your favorite combo! While chicken is a star in this wrap, feel free to change it up. Shredded pork or beef works well too. You could even use canned tuna for a quick meal. If you want a meat-free option, try black beans or chickpeas. They add protein and fiber, making your wrap healthy and filling. For the complete experience, check out the Full Recipe. To store leftover BBQ Ranch Chicken Wraps, first let them cool. Place them in an airtight container. This keeps them fresh in the fridge for up to three days. If you see any moisture, add a paper towel to absorb it. This helps prevent soggy wraps. To reheat the wraps, remove them from the fridge. You can use a microwave or skillet. If using a microwave, heat for about 30 seconds. Check if they are warm. If you want a crispy texture, use a skillet. Heat on medium for 2–3 minutes, turning often. This will bring back the crunch. You can freeze BBQ Ranch Chicken Wraps for later. Wrap each one in plastic wrap. Then, place them in a freezer bag. They last well for up to three months. To enjoy, thaw in the fridge overnight. Then, reheat as mentioned above. This keeps the flavors fresh and tasty. Yes, you can use many types of tortillas. Whole wheat, spinach, or corn tortillas work well. Each type adds a unique taste and texture. Just choose one that fits your diet or preference. These wraps can last about three days in the fridge. To keep them fresh, wrap them tightly in plastic wrap. This helps prevent them from getting soggy. You can serve these wraps with many sides. Try fresh veggie sticks, chips, or a simple salad. A fruit salad is also a great choice. Each adds color and balance to your meal. - Additional common questions regarding BBQ Ranch Chicken Wraps: - Can I prepare these wraps ahead of time? - What if I don’t have cooked chicken? - Can I use store-bought BBQ sauce? BBQ Ranch Chicken Wraps are easy, fun, and tasty. You learned about key ingredients, seasonings, and how to make these wraps. I shared tips for perfecting your wrap and how to store leftovers. You can even mix it up with different flavors or diets. Whether grilling or just preparing ahead, these wraps will impress. Enjoy your cooking and feel free to experiment with new twists. Feeding family and friends with this dish will bring smiles. Get ready to gather at the table!

BBQ Ranch Chicken Wraps Flavorful and Easy Meal

If you’re looking for a quick and tasty meal, BBQ Ranch Chicken Wraps are your answer! This dish is not

- 1 pound baby carrots, peeled - 2 tablespoons unsalted butter - 3 tablespoons pure maple syrup - 1 teaspoon ground cinnamon - 1/4 teaspoon nutmeg - Salt, to taste - Fresh parsley, chopped (for garnish) - Orange zest for added flavor - Maple-flavored syrup as a substitute - Additional spices like ginger or allspice In this recipe, use fresh baby carrots for the best sweet and tender flavor. They cook quickly, making them perfect for busy days. If you want a richer flavor, choose unsalted butter. Pure maple syrup gives a deep sweetness that pairs well with spices like cinnamon and nutmeg. If you want to change things up, consider adding orange zest. This adds a bright and fresh note to the dish. You can also swap maple syrup for maple-flavored syrup if you need a quick fix. Spices like ginger or allspice can offer a warm twist, too. For a beautiful finish, use fresh parsley to garnish your dish. This adds color and a hint of freshness. These ingredients combine to make maple glazed carrots a perfect side for any meal. You can find the full recipe and instructions below. - Rinse and peel the baby carrots. - Prepare your cooking tools (large skillet). First, you want to wash the baby carrots under cold water. This step is important. It removes any dirt and helps your dish taste fresh. If the carrots have skin, peel them to get a smooth finish. Next, grab a large skillet. This skillet will help cook the carrots evenly and allow for easy stirring. Set it aside for now; we will use it soon. - Melt butter in skillet over medium heat. - Sauté carrots for initial 5 minutes. - Add maple syrup and spices, cook until tender. Now, heat the skillet over medium heat. Add two tablespoons of unsalted butter. Watch it melt and start to bubble. This will add rich flavor to the dish. Once the butter is melted, toss in the peeled baby carrots. Stir them gently for about five minutes. This step helps them get a nice color and flavor. After five minutes, pour in three tablespoons of pure maple syrup. Stir the carrots well to coat them in the syrup. Then, add one teaspoon of ground cinnamon and a quarter teaspoon of nutmeg. These spices give the dish warmth and depth. Finally, sprinkle in a pinch of salt to balance the sweetness. Cook the carrots for another 10 to 15 minutes. Keep stirring until they become tender and the glaze thickens. Take your time here; the longer you cook, the more flavors blend. Once they reach your desired tenderness, remove the skillet from heat. If you want, adjust the seasoning one last time. Serve them warm and garnish with fresh parsley. This adds a pop of color and freshness to your dish. Enjoy this sweet and tender delight! For the full recipe, check out the details above. To get the best glaze, you want a mix of butter and maple syrup. Start by melting the butter in a skillet. Then, add the carrots and cook them for about five minutes. Once they soften, pour in the maple syrup. Stir well to coat every carrot. This helps them get that sweet glaze. For perfect tenderness, cook the carrots for 10 to 15 minutes. Check them with a fork. If they slide off easily, they are done. If not, give them a few more minutes. Remember, you can always add a pinch of salt to enhance the flavor. Maple glazed carrots pair well with roasted chicken or pork. They add a sweet touch to any meal. You can also serve them with a holiday feast. They shine next to turkey or ham. These carrots are great for family dinners as well. Their sweet taste makes them popular with kids. Serve them warm, and don’t forget to garnish with parsley for color. Enjoying these carrots brings a touch of joy to any table. For the complete recipe, check out the Full Recipe section. {{image_2}} You can change the type of carrots you use. Rainbow carrots add bright colors and unique flavors. They look great on the plate and taste sweet too. You can also try different sweeteners. Honey or agave syrup works well, but maple syrup gives the best flavor. Adding nuts can add crunch to your dish. Walnuts or pecans bring a nice texture contrast. You can chop them and mix them in right before serving. Herbs can also boost flavor. Try adding thyme or rosemary for a fresh taste. Just sprinkle them in while cooking. These swaps give you many ways to enjoy maple glazed carrots. To store leftovers, place the maple glazed carrots in an airtight container. Make sure they are cool before sealing. This helps keep them fresh. You can enjoy these sweet treats for up to 4 days in the fridge. If you want to store them longer, freezing is a great option. First, let the carrots cool completely. Then, spread them on a baking sheet in a single layer. Freeze them for about 1 hour until firm. After that, transfer the carrots to a freezer-safe bag. Squeeze out as much air as you can before sealing. They will keep well for up to 3 months. When you’re ready to eat, just thaw the carrots overnight in the fridge. To reheat, place them in a skillet over low heat. Add a splash of water or extra maple syrup to help them warm through. Stir gently until they are hot and ready to serve. Enjoy your tasty maple glazed carrots from the freezer! Can I use frozen carrots instead of fresh? Yes, you can use frozen carrots. They cook faster than fresh ones. Just reduce cooking time to ensure they do not get mushy. What is the best way to reheat maple glazed carrots? Reheat the carrots in a skillet over low heat. Add a little water or extra maple syrup. This keeps them moist and flavorful. Are maple glazed carrots healthy? Maple glazed carrots are healthy. They are packed with vitamins and minerals. The maple syrup adds a natural sweetness without refined sugars. How to adjust the sweetness level in the recipe? To adjust sweetness, add less maple syrup for a less sweet dish. You can also mix in a splash of lemon juice for balance. For a sweeter taste, increase the syrup a little. You can find the full recipe for maple glazed carrots to get started! In this article, we explored how to make delicious maple glazed carrots. You learned the main and optional ingredients you can use, along with simple steps to cook them. We discussed tips for perfect texture and suggested ways to serve these tasty carrots. Remember, variations can keep this dish fresh and exciting. Lastly, proper storage ensures you enjoy leftovers later. Maple glazed carrots are a great addition to any meal, bringing joy and flavor to your table.

Maple Glazed Carrots Perfectly Sweet and Tender Dish

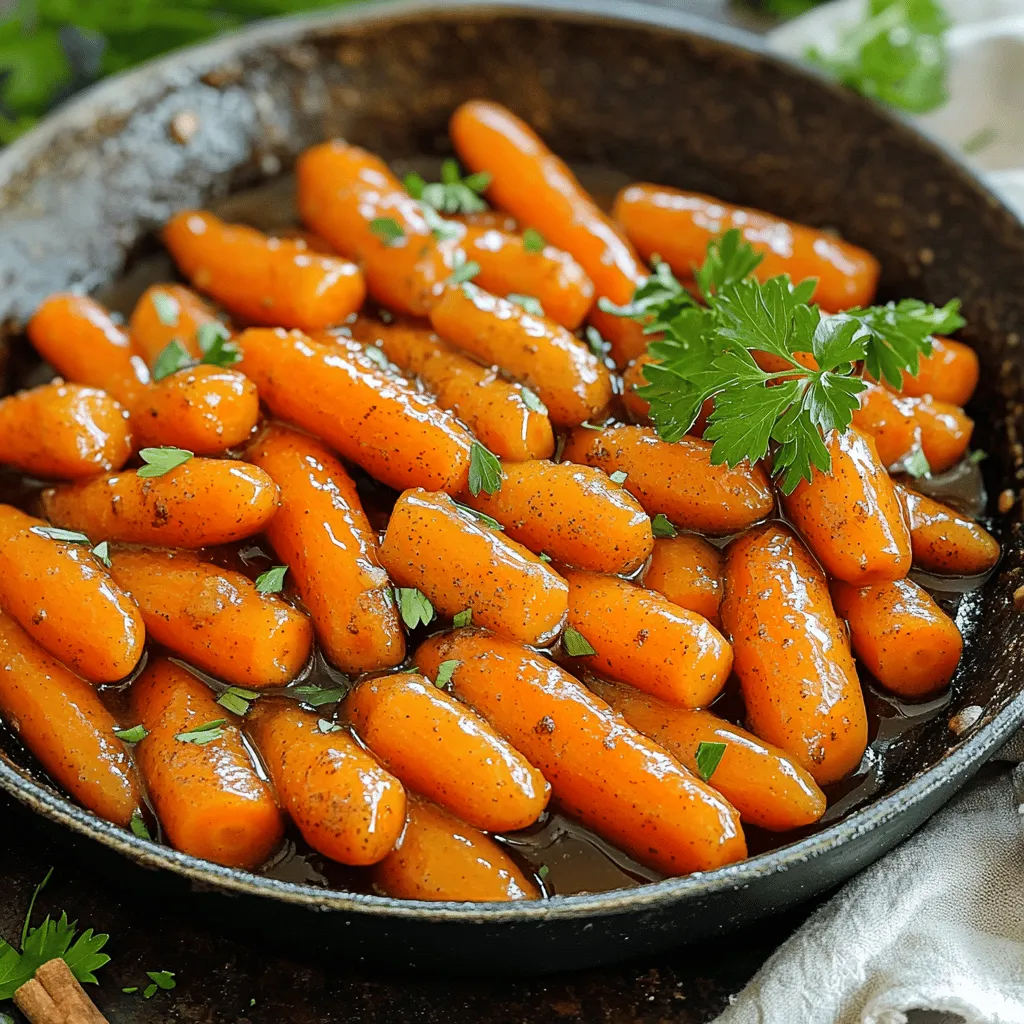
Looking to elevate your side dish game? Maple glazed carrots are the perfect choice! With their sweet syrupy coating and

To create delicious vegetarian sushi rolls, you'll need fresh and vibrant ingredients. Here's a list to get you started: - 1 cup sushi rice - 1 ¼ cups water - 2 tablespoons rice vinegar - 1 tablespoon sugar - 1 teaspoon salt - 4 nori sheets - ½ cucumber, julienned - 1 large carrot, julienned - 1 avocado, sliced - ½ bell pepper (any color), sliced into thin strips - ½ cup purple cabbage, thinly sliced - Sesame seeds (for garnish) - Soy sauce (for serving) - Pickled ginger and wasabi (optional, for serving) Having the right tools makes sushi making easy and fun. Here are some tools you should have: - Bamboo sushi mat - Sharp knife - Rice cooker or saucepan - Mixing bowl - Small bowl for the vinegar mixture You can be creative with your sushi rolls! Here are some ideas for substitutions: - Rice: Use brown rice for a healthier option. - Nori: Try soy paper or lettuce leaves for a different wrap. - Vegetables: Add bell peppers, zucchini, or even roasted sweet potatoes. - Garnish: Use crushed nuts or seeds instead of sesame seeds. Feel free to mix and match according to your taste! For the full recipe, check out the detailed instructions. First, rinse the sushi rice under cold water. Keep rinsing until the water runs clear. This step helps remove excess starch. Next, combine the rinsed rice with 1 ¼ cups of water in your rice cooker or a saucepan. If using a saucepan, bring it to a boil. After boiling, reduce the heat to low, cover it, and simmer for about 20 minutes. The rice should absorb all the water and become tender. Once the rice is cooked, transfer it to a large bowl. In a small bowl, mix 2 tablespoons of rice vinegar, 1 tablespoon of sugar, and 1 teaspoon of salt. Microwave this mixture for about 30 seconds to dissolve the sugar. Next, gently fold this vinegary mix into the warm rice until it is evenly coated. Let the rice cool to room temperature. This adds flavor and makes the rice sticky. Now, place your bamboo sushi mat on a flat surface. Lay a sheet of nori, shiny side down, on the mat. Wet your hands with water to prevent the rice from sticking. Take a handful of sushi rice and spread it evenly over the nori. Leave a 1-inch border at the top. Next, arrange your fillings. Lay julienned cucumber, carrot, avocado, bell pepper, and purple cabbage across the center of the rice-covered nori. To roll the sushi, start from the bottom edge, closest to you. Carefully roll the sushi tightly away from you. Use gentle pressure and the mat to keep the roll tight. When you reach the top, seal the edge of the nori with a little water. Finally, use a sharp, wet knife to slice the roll into 6-8 pieces. Wipe the knife with a damp cloth after each cut for cleaner slices. Sprinkle sesame seeds on top for garnish and serve with soy sauce, pickled ginger, and wasabi if you like. Enjoy your colorful and fresh vegetarian sushi rolls! For a detailed step-by-step guide, check the full recipe. To roll sushi well, you need some practice. Use a bamboo mat to help. Start with a nori sheet, shiny side down. Spread the rice evenly, but leave a bit of space at the top. Add your veggies in the center. Roll it tight, using the mat. This keeps your roll neat and firm. Sticky rice is key for good sushi. Rinse your sushi rice before cooking. This removes extra starch. Use the right water ratio, usually 1 cup of rice to 1.25 cups of water. Once cooked, mix in rice vinegar, sugar, and salt. Let it cool, but don’t let it dry out. Make your sushi look great on the plate. Slice rolls into equal pieces for a uniform look. Use a sharp knife dipped in water to prevent sticking. Sprinkle sesame seeds on top for a nice touch. You can also add colorful garnishes like sliced radishes or herbs to make it pop. For more detailed steps, check out the Full Recipe! {{image_2}} You can find many vegetarian sushi rolls. Some favorites include the cucumber roll, avocado roll, and sweet potato roll. Each of these rolls offers a unique taste and texture. The cucumber roll is crisp and refreshing. The avocado roll is creamy and rich. Sweet potato adds a hint of sweetness. Think outside the box with your fillings. Here are some fun options: - Mango: Adds a tropical touch. - Cream Cheese: Offers a rich flavor. - Tofu: Provides protein and absorbs flavors well. - Roasted Red Peppers: Adds a smoky taste. - Pickled Radish: Gives a tangy crunch. These fillings can transform your sushi rolls into something special. You can mix and match to find your favorite. Combining flavors makes sushi exciting. Try these combinations: - Spicy avocado with sweet mango: A sweet and spicy contrast. - Tofu with cucumber and sesame: A nutty twist. - Roasted red pepper, cream cheese, and chives: A savory flavor explosion. - Mango, avocado, and a hint of lime: Bright and fresh. Experiment with these ideas to create a roll that sings with flavor. For the perfect vegetarian sushi experience, check out the Full Recipe. Vegetarian sushi offers many health perks. First, it is rich in vitamins and minerals. Fresh veggies add fiber, which aids digestion. Avocado provides healthy fats that support heart health. Sushi rice gives you a good source of carbs for energy. Plus, nori, the seaweed used, is packed with iodine, which is great for thyroid function. Eating vegetarian sushi can help you feel full without the added calories of meat. Here's a quick look at the calories in the main ingredients: - Sushi Rice (1 cup): Approximately 200 calories - Nori Sheet (1 sheet): About 10 calories - Cucumber (½): Roughly 8 calories - Carrot (1 large): About 30 calories - Avocado (1 medium): Around 240 calories - Bell Pepper (½): About 12 calories - Purple Cabbage (½ cup): Roughly 12 calories - Rice Vinegar (2 tbsp): About 6 calories - Sugar (1 tbsp): Approximately 48 calories Overall, a serving of vegetarian sushi rolls contains about 300-400 calories, depending on the fillings you choose. Vegetarian sushi is great for many diets. It is gluten-free if you use gluten-free soy sauce. For those watching carbs, you can use cauliflower rice instead of sushi rice. Always check for food allergies, especially with soy sauce and sesame seeds. If you follow a vegan diet, ensure all ingredients are plant-based. This way, you can enjoy a fresh and healthy delight without worry. For the full recipe, check the section above and start rolling your own delicious vegetarian sushi! The best rice for sushi is sushi rice. This short-grain rice has a high starch content. This makes it sticky when cooked. Sticky rice holds together well in sushi rolls. You can find sushi rice in most grocery stores. Look for brands labeled as “sushi rice” or “short grain rice.” Always rinse the rice before cooking. This removes excess starch and helps achieve the right texture. Yes, you can make sushi rolls in advance. However, they are best eaten fresh. If you want to prepare them early, keep them covered in a damp cloth. This helps prevent the nori from getting soggy. Store them in the fridge for up to 4 hours. Just be aware that the texture may change. The nori will lose its crispness. So, for the best experience, make them close to meal time. Sushi is delicious with a variety of dips and sauces. Soy sauce is the most common choice. It adds a salty flavor that enhances the sushi. You can also try ponzu sauce. This citrus-based sauce brings a bright taste. For a kick, use spicy mayo or sriracha. These add creaminess and heat to each bite. You can also serve your sushi with pickled ginger and wasabi for extra flavor. Enjoy experimenting with different sauces! Vegetarian sushi is fun and tasty. We covered essential ingredients, tools, and how to create sushi rice. You learned to roll sushi and keep it sticky, with some great tips for presentation. I shared various roll ideas and health benefits, plus answers to common questions. Now, you can impress friends with delicious, homemade sushi! Enjoy experimenting with new flavors and fillings. Your sushi-making journey is just beginning. Keep trying and have fun!

Vegetarian Sushi Rolls Fresh and Healthy Delight

Are you ready to dive into the world of delicious vegetarian sushi rolls? In this guide, I’ll share my favorite

- 1 ripe mango, diced - 1 cup canned black beans, rinsed and drained - 1/2 red bell pepper, finely chopped - 1/2 red onion, finely chopped - 1 jalapeño, seeds removed and minced (optional for extra heat) - 1/4 cup fresh cilantro, chopped - Juice of 2 limes - 1 tablespoon olive oil - Salt and pepper to taste Using the right amount of each ingredient is key for great flavor. Accurate measurements make sure that the salsa tastes just right. If you add too much of one thing, it can throw off the balance. To choose a ripe mango, look for one that feels slightly soft when you squeeze it. It should also have a sweet smell near the stem. A ripe mango will give your salsa the best taste! For the black beans, use canned ones for ease. Just rinse them well to remove excess sodium and any canning liquid. These steps will help you create a Mango Black Bean Salsa that is fresh and tasty. Enjoy the vibrant colors and flavors in every bite! Check out the Full Recipe for detailed instructions. Start by gathering all your ingredients. You’ll need a ripe mango, black beans, red bell pepper, red onion, and jalapeño. Dice the mango into small pieces. Rinse and drain the black beans. Then, chop the red bell pepper and red onion finely. If you like heat, mince the jalapeño after removing the seeds. Next, take a large mixing bowl and combine all these ingredients. Add the chopped cilantro for a fresh touch. Now, drizzle the mixture with the juice of two limes and one tablespoon of olive oil. The lime juice adds zing, while the oil brings richness. It’s time to mix! Gently toss the salsa with a large spoon. Be careful not to mash the mango. You want each piece to shine in the mix. To ensure even flavor distribution, focus on folding the ingredients. This gentle motion helps coat everything with lime and oil, making each bite tasty. Chilling the salsa is key. It allows the flavors to blend nicely. This step also cools the salsa, making it refreshing. I recommend chilling for at least 30 minutes. This waiting time enhances the taste. Your salsa will burst with flavor after a good chill. For the full recipe, check out the complete instructions and tips! Adjust the salt and pepper to fit your taste. Start with a pinch of salt and a dash of pepper. Mix it well and taste it again. If it needs more flavor, add a bit more. For heat, you can add more minced jalapeño. If you like sweetness, try adding a touch of honey or agave. This will balance the flavors nicely. Serve the salsa in a bright bowl. A colorful bowl makes everything pop! You can add extra cilantro on top for a burst of green. Pair the salsa with crispy tortilla chips. This adds a fun crunch. Use a large spoon or a scoop for easy serving. This way, everyone gets a good amount. You can make this salsa a few hours before serving. It tastes even better after chilling. Store it in the fridge in an airtight container. This keeps it fresh and tasty. If you want it to last longer, make sure to keep it covered. The next day, check the salsa before serving. If it looks good, it will probably taste great too! {{image_2}} You can swap black beans for other beans, like pinto or kidney beans. These beans add a different taste and texture. If you want a unique flavor, try chickpeas. For herbs, parsley works well instead of cilantro. You can also use green onions for a milder taste. Want to add more fruit? Pineapple or peach gives a sweet twist. Both fruits add a juicy burst that pairs great with mango. You can mix in diced cucumber or corn for extra crunch. These additions make the salsa more colorful and fun! This salsa is vegan-friendly. It contains no animal products, making it great for plant-based diets. If you need low-sodium options, rinse the canned beans well. You can leave out the added salt for a healthier choice. Just taste as you go to find the right balance. To keep your Mango Black Bean Salsa fresh, refrigerate it right away. Place the salsa in an airtight container. This helps keep air out and flavors in. You can also use a glass jar with a tight lid. Make sure the salsa is cool before sealing it. This prevents condensation, which can make it watery. Mango Black Bean Salsa lasts about 3 to 5 days in the fridge. After that, check for signs of spoilage. Look for off smells or changes in color. If the salsa seems slimy, it's best to throw it out. Trust your senses; if it doesn’t smell or look right, don’t eat it. Can you freeze salsa? Yes, but it may change in texture. To freeze, use a freezer-safe container. Leave some space at the top since salsa expands when frozen. To thaw, place it in the fridge overnight. You can also run the container under warm water for quicker thawing. Use thawed salsa within a week for the best taste. For the full recipe to make this tasty dip, check out the [Full Recipe]. To make Mango Black Bean Salsa, start with the right tools. Use a sharp knife and a cutting board. Here are some steps for beginners: - Dice the ripe mango, making sure it's sweet and firm. - Rinse and drain the canned black beans well to remove excess salt. - Chop the red bell pepper and red onion finely for a nice crunch. - If you like heat, mince a jalapeño without the seeds. - Combine all ingredients in a large bowl. - Add fresh cilantro, lime juice, and olive oil. - Gently mix everything to blend the flavors. Let it chill in the fridge for about 30 minutes. This step helps the flavors come together. You can find the full recipe above for more details. Yes, you can use fresh black beans. Fresh beans have a great taste. However, they require more prep time. Here are some pros and cons of each option: Canned Black Beans: - Quick and easy to use. - Already cooked and ready to eat. - Consistent flavor and texture. Fresh Black Beans: - Better flavor and texture if cooked right. - You control the amount of salt. - Longer cooking time and more effort. Choose what works best for your time and taste! Mango Black Bean Salsa is versatile. It pairs well with many dishes. Here are some ideas for appetizers and main dishes: - Serve with tortilla chips for a fun snack. - Use it as a topping on grilled chicken or fish. - Add it to tacos for a fresh twist. - Pair it with quesadillas or nachos for a hearty meal. For parties, make a big bowl of salsa. Serve it with colorful bowls and a variety of chips. You can even offer it with grilled meats or as a dip for veggies! Mango Black Bean Salsa combines fresh, bright flavors that excite the palate. We discussed main and additional ingredients, measuring tips, and preparation steps for a tasty dish. I shared mixing techniques and why chilling enhances the salsa’s taste. You learned helpful tips for flavor and presentation, along with storage methods to keep it fresh. This salsa is easy to make and can fit many diets. Try different ingredients to suit your taste. Enjoy making and sharing this vibrant dish at your next gathering!

Mango Black Bean Salsa Flavorful Summer Dip Recipe

Looking for a fresh, vibrant dip that screams summer? This Mango Black Bean Salsa is packed with juicy mango, hearty

- Spinach: Fresh spinach is key for this salad. It adds a vibrant green color and a crisp texture. Look for bright leaves with no brown spots. Fresh spinach packs vitamins and minerals. It is best when it is young and tender. - Strawberries: Choose ripe strawberries for the best flavor. Look for berries that are bright red and firm. The tops (green leaves) should be fresh. Ripe strawberries are sweet and juicy, adding a delicious contrast to the spinach. - Feta cheese: Crumbled feta gives a nice flavor and texture. It melts into the salad well. Block feta can be harder to mix in. Crumbling it yourself lets you control the size. You can also adjust how much cheese to add. - Pecans: Toasting pecans brings out their rich flavor. Heat them in a pan for a few minutes. Stir often to avoid burning. Toasted pecans add a nice crunch and nuttiness to the salad. - Balsamic vinegar: You can use different types of balsamic vinegar. Traditional balsamic is rich and sweet. Aged balsamic has a deeper flavor. You can also try a lighter version for a tangy taste. - Honey and Olive oil: Honey adds sweetness, while olive oil gives smoothness. Together, they balance the tangy vinegar. If you need substitutes, maple syrup works well instead of honey. For oil, avocado or flaxseed oil can be good options. You can find the full recipe at the top. Enjoy making this colorful and tasty dish! To start, grab a large salad bowl. Add your washed and dried spinach as the base. Make sure to cover the bottom evenly. Next, layer the sliced strawberries on top of the spinach. Spread them out so every bite has flavor. The sweet strawberries pair well with the fresh spinach. Now, let's talk about the toppings. First, take your feta cheese. Crumble it gently with your fingers. This keeps the texture light and airy. Distribute the crumbled cheese over the strawberries. Next, it’s time for the pecans. To toast them, place them in a dry skillet over medium heat. Stir often for about 3 to 5 minutes. They should smell nutty and be slightly golden. This step boosts their flavor. Once toasted, sprinkle them on the salad. Now, let’s make the dressing. In a small bowl, combine balsamic vinegar, olive oil, honey, salt, and pepper. Use a whisk to mix them well. Whisking creates a smooth emulsion, which means the oil and vinegar blend nicely. Remember to taste your dressing. Adjust the salt and pepper as needed. This step is key to making the flavors pop. Once your salad is layered and dressed, toss gently. This mixes everything without bruising the spinach. You now have a fresh and tasty Strawberry Spinach Salad. For a detailed guide, check out the Full Recipe. To make a great Strawberry Spinach Salad, fresh ingredients are key. Look for spinach with bright green leaves. The leaves should feel crisp and firm. Avoid any yellow or wilted leaves. For strawberries, choose ones that are bright red and shiny. They should feel firm but not hard. Smell them; fresh strawberries have a sweet scent. Presentation can make your salad more appealing. You can serve it family-style in a large bowl. This way, everyone can help themselves. For a fancier look, serve individual plates. Use small bowls for the dressing on the side. You might add extra strawberry slices or a sprinkle of feta on top for color. This salad pairs well with many dishes. It works great with grilled chicken or fish. You can also serve it alongside a hearty sandwich. Consider adding a warm soup to make it a full meal. The fresh flavors of the salad balance rich entrees nicely. For the full recipe, check out the details above! {{image_2}} You can add a burst of flavor by including citrus segments. Oranges and grapefruits add a nice zing. Grilled chicken or shrimp can make this salad a full meal. Just toss them in with the spinach and strawberries. These additions make the salad tasty and filling. If you want a vegan option, try using vegan feta. It gives a similar taste without dairy. For those with nut allergies, skip the pecans. You can use sunflower seeds instead for crunch. This keeps your salad safe and still delicious. In summer, you might add fresh peaches. They bring sweetness and a juicy texture. In fall, consider adding walnuts. They add a warm, nutty flavor that pairs well with the spinach. Each season brings new options to keep the salad exciting. For more details on making this salad, check the Full Recipe. To keep your salad fresh, store each ingredient separately. This way, the spinach stays crisp. Place the fresh spinach in a sealed bag or container. Use a paper towel to absorb moisture. For strawberries, keep them in a container with air holes. This helps them breathe. Avoid washing them until you are ready to use them. Keep the feta cheese in its brine in a sealed container. This keeps it fresh longer. Store toasted pecans in an airtight jar. Keep them in a cool, dry place. If you have leftover dressed salad, eat it within a day. The dressing wilts the spinach quickly. Store the leftover salad in a sealed container. If you don't finish it all, keep the dressing separate. You can reuse the salad for a tasty lunch. Just add more dressing if needed. Remember, the salad tastes best fresh. You cannot freeze the entire salad. The spinach and strawberries will turn mushy when thawed. However, you can freeze individual ingredients. Wash and slice strawberries, then place them in a single layer on a tray. Once frozen, transfer them to a bag. For pecans, you can freeze them too. Just put them in a sealed bag. When you want to use them, thaw them in the fridge overnight. Enjoy your fresh salad ingredients all year long! A light and tangy dressing works best. I recommend balsamic vinaigrette. It adds a nice balance to the sweet strawberries and rich feta. You can also try a honey mustard dressing for a different flavor. Both choices enhance the salad without overwhelming it. To make this salad vegan, replace feta cheese with tofu or a vegan feta. You could also use avocado for creaminess. Instead of honey, use maple syrup or agave nectar for sweetness. These swaps keep the flavors bright while meeting your dietary needs. Yes, you can prepare it ahead, but keep some tips in mind. Store the dressing separately until serving. This keeps the spinach fresh and crisp. You can chop the strawberries and onions in advance, but add them closer to serving. This way, your salad looks and tastes its best. You learned how to make a fresh and tasty strawberry spinach salad. We discussed choosing quality ingredients, like the best spinach and ripe strawberries. You can make the dressing smooth and flavorful with proper whisking. Remember, variations can add fun twists to your salad. Store it right to keep it fresh. Enjoy your delicious creation, and feel free to experiment with flavors and ingredients. Your salad can impress anyone at any meal!

Strawberry Spinach Salad Flavorful and Nourishing Dish

If you’re looking for a dish that bursts with flavor and is nourishing, you’ve come to the right place! This

- 4 ears of fresh corn, husked - 3 tablespoons olive oil - 2 tablespoons lime juice - 1 teaspoon chili powder - 1/2 teaspoon smoked paprika - 1/4 teaspoon cayenne pepper (optional) - Salt and pepper to taste - 1/4 cup crumbled feta cheese (or cotija cheese) - Fresh cilantro, chopped (for garnish) - Lime wedges (for serving) You can swap fresh corn for frozen corn if needed. Just thaw it first. For cheese, use vegan options like cashew or almond cheese. Instead of chili powder, try cumin or taco seasoning for a fun twist. For grilling, you can use either a gas or charcoal grill. Each type gives a different flavor. You will need a brush to apply the oil mix, a bowl for mixing, and tongs to handle the hot corn. You can find the full recipe for Chili Lime Grilled Corn [here](#). First, husk the corn. Remove all the green leaves and silk. This step helps the corn cook evenly. Next, clean the corn under running water. This removes any dirt or debris. Now, let's make the chili lime seasoning. In a small bowl, mix together: - 3 tablespoons olive oil - 2 tablespoons lime juice - 1 teaspoon chili powder - 1/2 teaspoon smoked paprika - 1/4 teaspoon cayenne pepper (optional) - Salt and pepper to taste Whisk these ingredients well until combined. This blend adds a zesty kick to your corn. Before grilling, preheat your grill to medium-high heat. A hot grill gives that nice char and flavor. Once ready, place the corn directly on the grill. Cook the corn for about 10 to 15 minutes. Turn it occasionally so all sides get nice and blistered. You want that beautiful golden color and a slight char. After grilling, remove the corn from the grill and let it cool for a minute. This helps you avoid burns. Now, sprinkle the grilled corn with crumbled feta cheese or cotija cheese. Add some chopped cilantro on top for freshness. For serving, place lime wedges on the side. A squeeze of lime juice adds brightness and enhances the flavors. Enjoy your chili lime grilled corn as a tasty side or snack! For the full recipe, check out the specific instructions and ingredients. To get great grill marks on your corn, you need to know the right heat. Start with medium-high heat. This allows the corn to sear quickly. Watch the corn closely to avoid overcooking. If it cooks too long, it can dry out. For a nice smoky flavor, soak the corn in water for 30 minutes before grilling. This helps steam the corn while it cooks. You can also add wood chips to your grill for extra smoke. This adds depth to the flavor. You can easily boost the flavor of your grilled corn. Try adding spices like garlic powder or cumin. Fresh herbs, like basil or parsley, can also make a difference. For a fresh twist, add jalapeños for heat. Pair your corn with grilled meats or a fresh salad. It goes great with tacos or burgers. The zesty flavors complement many summer dishes. Sometimes, corn can burn if you leave it on too long. If this happens, move it to a cooler part of the grill. You can also wrap it in foil to slow cooking. Different grills can change how your corn cooks. Gas grills heat up quickly. Charcoal grills can take longer but give a great smoky taste. Adjust your cooking time based on your grill type. Always check the corn for doneness. It should be tender but not mushy. For the full recipe, check the details above. Enjoy your grilling! {{image_2}} You can make this dish even spicier by adding jalapeños. Just chop fresh jalapeños and mix them into your chili lime seasoning. You can also try using different spices. For example, smoked paprika adds depth. Just remember, start small when adding heat! For a hearty twist, add black beans or diced avocado. Both bring a creamy texture and boost flavor. You can swap out feta for cheddar cheese. This change gives a rich, melty topping that pairs well with the lime and chili. To balance flavors, try adding honey or agave syrup. This sweetness pairs nicely with lime's tartness. You can also switch lime juice for other citrus, like orange or lemon. Each option gives a unique taste, perfect for summer corn. For the complete recipe, check out the [Full Recipe]. After you enjoy your chili lime grilled corn, store any leftovers in the fridge. Place the corn in an airtight container. It stays fresh for about three days. When you want to reheat, use the grill or stove. This keeps the flavor strong and the corn juicy. Avoid the microwave, as it can make the corn rubbery. If you want to save grilled corn for later, freezing is a great option. First, let the corn cool completely. Wrap each ear tightly in plastic wrap, then place them in a freezer bag. This helps prevent freezer burn. You can store it for up to six months. When you're ready to eat, thaw the corn in the fridge overnight. If you're in a hurry, run it under cold water. Once thawed, grill it again to warm and bring back that smoky flavor. Enjoy your zesty treat anytime! Grilling corn usually takes about 10 to 15 minutes. This time can change based on grill heat and corn size. I recommend checking the corn often. Turn it every few minutes until you see nice char marks. The goal is to cook it through while keeping it juicy. You can use frozen corn, but fresh corn tastes better. Frozen corn is convenient and saves time. It cooks faster, but it may lack the crunch of fresh corn. If you choose frozen, thaw it first and drain any excess water. This helps keep your dish from getting too wet. You can add many tasty toppings to chili lime grilled corn. Here are some favorites: - Crumbled queso fresco or cotija cheese - Chopped green onions - Diced avocado - Sliced jalapeños for a kick - Drizzle of hot sauce for extra spice These toppings enhance the flavor and make your dish more exciting. Feel free to mix and match! For the full recipe, check out the complete guide. Grilling corn is simple and fun. We covered fresh ingredients, step-by-step grilling, and tasty variations. You can adapt this dish with spices, cheese, or special toppings. Don’t forget about storage tips for leftovers, too. Enjoying your corn comes down to what flavors you love. With the right techniques, you can make every bite amazing. Keep these tips in mind, and your grilled corn will shine at any meal.

Chili Lime Grilled Corn Zesty Flavor for Summer Fun

Ready to turn your summer barbecues into flavor-packed feasts? Chili Lime Grilled Corn is the perfect addition to your outdoor

For rainbow fruit skewers, you need fresh and colorful fruits. I like to use: - 1 cup strawberries, hulled and halved - 1 cup orange segments (or mandarins) - 1 cup pineapple chunks - 1 cup green grapes, halved - 1 cup blueberries - 1 cup kiwi, peeled and sliced These fruits not only look great, but they also taste amazing together. Each fruit brings a unique flavor and texture. Strawberries are sweet and juicy, while oranges add a bright tang. Pineapple gives a tropical touch, and grapes are crisp. Blueberries are small bursts of flavor, and kiwi adds a fun twist with its bright green color. You can make your skewers even more fun! Here are some optional items: - 1 tablespoon honey (for sweetness) - 1 tablespoon fresh mint, chopped (for garnish) Honey adds a nice sweetness. You can drizzle it over the skewers before serving. Fresh mint gives a lovely scent and flavor. It’s a great way to make your skewers look fancy too! To make these skewers, you’ll need a few simple tools: - Skewers (wooden or metal) If you use wooden skewers, soak them in water for about 30 minutes. This helps prevent burning when you grill or bake them. Using metal skewers is great too, as they are reusable and sturdy. This recipe is simple and fun, perfect for any party! For the full recipe, check the [Full Recipe]. First, wash all your fruit well. This keeps everything clean and safe. Next, cut the fruit as needed: - Hull the strawberries and slice them in half. - Segment the oranges or mandarins. - Cut the pineapple into chunks. - Halve the green grapes. - Peel and slice the kiwi. It’s important to have all the fruit ready before you start assembling. This makes the process smooth and fun. Grab your skewers and start with a piece of strawberry. Thread it onto the skewer first. After that, add an orange segment. Continue adding fruit in this order: 1. Strawberry 2. Orange 3. Pineapple 4. Green grape 5. Blueberry 6. Kiwi Repeat this until you use all the fruit. Make sure to alternate the colors to create a rainbow look. It’s a feast for the eyes! If you use wooden skewers, soak them in water for about 30 minutes. This helps them not burn while you cook. Once your skewers are ready, drizzle them with honey if you like. Honey adds a nice sweetness. Chill the skewers in the fridge for 15 to 20 minutes. This keeps them fresh and tasty. Just before serving, sprinkle some chopped mint on top. This adds a pop of flavor and color. Your rainbow fruit skewers are now ready to impress! For the full recipe, check out the details above. When making rainbow fruit skewers, pick fresh and ripe fruit. Choose strawberries that are bright red and firm. Look for oranges that feel heavy for their size. Pineapple should smell sweet and have a golden color. Grapes should be plump and green. Blueberries need to be deep blue, while kiwis should be slightly soft to touch. Mixing colors makes the skewers look fun and bright. You can also pick fruits based on what you like best. To make great-looking skewers, start with a strong base. Use a wooden skewer or metal one. If using wood, soak it in water for 30 minutes. This step helps prevent burning. Begin by threading fruit in a rainbow order: strawberry, orange, pineapple, green grape, blueberry, and kiwi. Push the fruit close together, but don’t squish it. This way, every bite is tasty. Feel free to change the order to create your design. Garnishes are a simple way to add more flavor. Drizzle honey over the skewers for sweetness. You can also add chopped mint for a fresh taste. Try lime juice for a zesty kick. These flavors really make the fruit shine. Plus, they add a nice touch to the presentation. For the full recipe, check the section above. {{image_2}} You can mix and match fruits based on the season. In spring, try sweet strawberries and juicy cherries. Summer brings ripe peaches and plump blueberries. Fall is great for apples and pears. In winter, go for citrus fruits like oranges and grapefruits. This keeps your skewers fresh and exciting. Seasonal fruits also taste better and are easier to find. Make these skewers fit your needs. If you want a vegan option, skip the honey. You can use agave or maple syrup instead. For a low-sugar version, pick fruits like berries and melon. If you need gluten-free options, all fruits are safe! You can also add nuts or seeds for extra crunch, but check for allergies first. Make your fruit skewers pop with fun ideas. Arrange them in a colorful vase for parties. You can also serve them on a large platter with a rainbow design. Try dipping them in yogurt or chocolate for added fun. Use cookie cutters to shape fruit into stars or hearts for special occasions. These ideas will make your skewers a hit! For the full recipe, check out the earlier section. To store leftover rainbow fruit skewers, place them in an airtight container. This helps keep them fresh. Keep the container in the fridge. They should stay good for up to two days. If you see any signs of browning or mushiness, it’s best to toss them. To maintain freshness, only assemble the skewers right before serving. Store the fruit separately if you plan to make them ahead. You can wash and cut fruits a day in advance. Just keep them covered in the fridge. This way, your fruits will taste crisp and bright when you’re ready to serve. Freezing fruit skewers is a fun way to enjoy them later. However, the texture may change when thawed. If you want to freeze them, it’s best to freeze the fruits first. Place each type of fruit in a separate bag. Once frozen, you can assemble the skewers with these fruits. When you’re ready to eat, thaw them in the fridge overnight. Enjoy them cold for a refreshing treat! You can use frozen fruit, but it will change the texture. Frozen fruit often becomes mushy when thawed. This can make your skewers less fun to eat. Fresh fruit is best for a crunchy bite. If you must use frozen fruit, thaw it and drain excess water. This will help keep the skewers from getting soggy. To make fruit skewers ahead of time, prepare the fruit and assemble them. You can cut the fruit a day in advance. Keep them in an airtight container in the fridge. Assemble the skewers a few hours before serving. This keeps the fruit fresh and vibrant. If you want to avoid browning, squeeze some lemon juice on the apples or bananas. Fruit skewers taste great with a variety of dips. You might enjoy yogurt, chocolate, or even honey. Here are some tasty ideas: - Yogurt Dip: Mix plain yogurt with honey and a splash of vanilla. - Chocolate Sauce: Melt dark or milk chocolate for a rich dip. - Honey Lime Dip: Combine honey, lime juice, and zest for a zesty kick. Each dip adds a fun twist to your skewers, making them even more enjoyable! We explored fruit skewers, detailing fresh fruit choices, optional extras, and essential tools. You learned how to prepare, assemble, and serve these delicious snacks. I shared tips for selecting the best fruits and creative presentation ideas to impress your guests. Remember, storing leftovers correctly keeps your fruit fresh. Feel free to mix frozen fruit into your skewers or try fun dips. Fruit skewers are tasty, easy, and perfect for any gathering. Enjoy making your fruity creations!

Rainbow Fruit Skewers Vibrant and Fun Party Treat

Looking for a fun and colorful treat for your next party? Rainbow fruit skewers are the answer! They’re easy to

To make Lemon Raspberry Muffins, you need fresh and simple ingredients. Here’s what you’ll need: - 1 ½ cups all-purpose flour - ½ cup granulated sugar - 1 tablespoon baking powder - ½ teaspoon salt - 1 large egg - ½ cup milk - ⅓ cup vegetable oil - 1 tablespoon lemon zest - 2 tablespoons fresh lemon juice - 1 cup fresh raspberries - 1 teaspoon vanilla extract - Optional: Powdered sugar for dusting Using quality ingredients makes a big difference. Fresh raspberries add a burst of flavor. Zest from a lemon gives a nice zing. You can use frozen raspberries too, but fresh ones taste best. When measuring flour, scoop it gently. Avoid packing it down. This keeps your muffins light and fluffy. If you want to add a sweeter touch, dust the tops with powdered sugar after baking. For the full recipe, check out the preparation steps and enjoy a tasty treat! - Preheat your oven to 375°F (190°C). - Prepare the muffin pan with liners or cooking spray. Getting your oven hot is key for great muffins. This helps them rise nicely. Use paper liners or spray the pan. This way, your muffins won’t stick. - Combine dry and wet ingredients carefully. - Fold in fresh raspberries gently. In a big bowl, mix flour, sugar, baking powder, and salt. In another bowl, whisk the egg, milk, oil, lemon zest, lemon juice, and vanilla. Pour the wet mix into the dry mix. Stir just until blended. It’s okay if the batter has a few lumps. Now, gently fold in the raspberries. Take care not to break them. - Divide batter into muffin cups. - Bake and check doneness. Use a spoon to fill each muffin cup about ¾ full. This helps them bake evenly. Bake for 18-20 minutes. The tops should be golden brown. To check doneness, insert a toothpick. If it comes out clean, your muffins are ready! To avoid overmixing, mix the wet and dry ingredients gently. Stir until the mix is just combined. A few lumps are okay. Overmixing can make the muffins tough. For the best rise and texture, let the batter rest for a few minutes. This allows the baking powder to activate. Ensure your oven is preheated to 375°F (190°C) before baking. This helps the muffins rise evenly. Serve your muffins on a bright platter. Add fresh raspberries and lemon slices around them for color. Dust them with powdered sugar for an extra touch. Pair these muffins with tea or coffee. The citrus flavor goes well with a light drink. Enjoy them as a breakfast treat or a snack. If your muffins are too dense, you might have overmixed the batter. Try mixing gently next time. If they are dry, your oven may be too hot. Use an oven thermometer to check. For muffins that stick, use liners or grease the pan well. If they don’t rise, check the baking powder’s freshness. Old baking powder won’t work well. For the full recipe, refer to the ingredients and steps above. {{image_2}} You can make these muffins even more exciting. Add nuts like walnuts or pecans for a crunchy bite. Chocolate chips are another fun addition, bringing a sweet contrast to the tart raspberries. You can also try different fruits. Blueberries and strawberries work well too. They add a lovely color and taste. If you need gluten-free options, use gluten-free flour. It works just as well in this recipe. For vegan substitutes, replace the egg with a flax egg. Mix one tablespoon of ground flaxseed with three tablespoons of water. Let it sit for a few minutes until it thickens. Swap the milk for almond milk or soy milk. These simple changes keep the muffins tasty while meeting dietary needs. Mix things up with seasonal flavors. In spring, try adding orange zest along with the lemon. In winter, use spices like cinnamon or nutmeg for a cozy feel. You can also create holiday-themed muffins. Add a splash of eggnog or swap raspberries for cranberries during the holidays. Each twist makes your muffins unique and fun! To keep your lemon raspberry muffins fresh, let them cool completely. Then, store them in an airtight container. This helps retain moisture and flavor. You can also wrap each muffin in plastic wrap for extra protection. For longer storage, freezing is a great option. Just place the muffins in a freezer-safe bag. Squeeze out excess air before sealing. When you want to enjoy one, simply thaw it at room temperature or warm it in the microwave for 15-20 seconds. These muffins will last about 3 to 5 days at room temperature. If you keep them in the fridge, they can last up to a week. However, the texture may change slightly. Always check for signs of spoilage. If you see mold or an off smell, it's best to throw them away. Freshness is key to enjoying these tasty treats! For the full recipe, check the earlier section. Can I use frozen raspberries? Yes, you can use frozen raspberries. Just make sure to thaw them first. This way, they won’t make the batter too wet. Be gentle when mixing them in, so they don’t break apart too much. How do I know when the muffins are done? The muffins are done when they are golden brown on top. You can test with a toothpick. If it comes out clean, the muffins are ready! What is prep time for Lemon Raspberry Muffins? The prep time for these muffins is about 15 minutes. You can mix the dry and wet ingredients quickly. It’s a fast and easy recipe! How can I adjust cooking time for different ovens? Every oven is different. If your oven runs hot or cold, keep an eye on the muffins. Start checking them a few minutes early. If you have an oven thermometer, use it to check the right temperature. What makes these muffins moist? These muffins stay moist because of the milk and oil. The raspberries also add moisture and a burst of flavor. This combination keeps each bite soft and tasty. How to enhance the lemon flavor even more? To boost the lemon flavor, add more lemon zest or juice. You can also mix in some lemon extract for extra zest. This will make your muffins shine with bright lemon taste! For the full recipe, check the details above. This blog post covered how to make delicious Lemon Raspberry Muffins. We discussed key ingredients and step-by-step instructions. I shared tips for success and variations to try. You can store the muffins with ease for fresh enjoyment. Remember, these muffins are easy to make and great for any occasion. Embrace your creativity, and don’t hesitate to experiment with flavors. Enjoy your baking adventure and savor each bite!

Lemon Raspberry Muffins Fresh and Flavorful Treat

Get ready to brighten your mornings with my fresh and flavorful Lemon Raspberry Muffins! Combining zesty lemon and juicy raspberries,

Older posts
Newer posts
← Previous Page1 … Page27 Page28 Page29 … Page86 Next →

dsad

© 2025 So Yum Recipes • Built with GeneratePress

Our Policies

  • Copyright Policy
  • Cookie Policy
  • GDPR Policy
  • Privacy Policy
  • Disclaimer
  • Terms Of Use

More Information

  • Home
  • About
  • Contact
  • Appetizers
  • Dessert
  • Dinner
  • Drinks
©2025, So Yum Recipes About Back To Top