![- 2 medium zucchini, chopped - 1 yellow squash, chopped - 1 small onion, diced - 2 cloves garlic, minced To start, you need fresh veggies. The zucchini and yellow squash create a soft base. The onion adds sweetness, while garlic gives a nice kick. These vegetables are crucial for flavor and nutrition. - 4 cups vegetable broth - Salt and pepper to taste - Fresh herbs for garnish Next, you need a good broth. Vegetable broth helps keep the soup light and healthy. Adjust the salt and pepper to your taste. Fresh herbs like parsley or basil add a bright finish and look lovely on top. - 1 large lemon (zest and juice) - 2 tablespoons olive oil Citrus brightens the soup. The lemon adds a refreshing zing. Use both the zest and juice for the best flavor. Olive oil gives a nice richness and helps sauté the onions and garlic. For the full recipe, check the section above. Enjoy making this simple and tasty dish! To start making Light Lemon Squash Soup, heat 2 tablespoons of olive oil in a large pot over medium heat. Once hot, add 1 small diced onion. Sauté the onion for about 4-5 minutes until it turns translucent. This step builds a strong flavor base for your soup. Next, stir in 2 cloves of minced garlic. Cook this mixture for an additional minute. You want to release the garlic's aroma without burning it. Now, it’s time for the main vegetables. Add 2 medium chopped zucchinis and 1 chopped yellow squash to the pot. Sauté these for about 5-7 minutes. Stir occasionally until they start to soften. This will help them cook evenly and blend nicely later. Once your squash is tender, pour in 4 cups of vegetable broth. Bring the mixture to a boil. Once boiling, reduce the heat and let it simmer for about 15-20 minutes. This allows the flavors to meld and the squash to become very soft. After simmering, you need to blend the soup. If you have an immersion blender, use it to blend the soup until smooth. If you like some texture, blend only half of it. This keeps some pieces intact for a heartier feel. Now for the best part: the lemon! Stir in the zest and juice of 1 large lemon. This adds a bright flavor that makes the soup refreshing. Don’t forget to season with salt and pepper to taste. Let it simmer for another 5 minutes. This step helps the flavors combine beautifully. Once it’s done, serve the soup warm. You can garnish it with fresh herbs like parsley or basil for a lovely touch. If you want to see the full recipe, check it out [Full Recipe]. To make your Light Lemon Squash Soup shine, consider adding fresh herbs. I love using basil and parsley. They bring bright notes to the soup. You can also add a pinch of red pepper flakes for heat. If you want a bolder flavor, try thyme or dill. These herbs work well with squash. When it comes to citrus, adjust the lemon to suit your taste. For a stronger lemon flavor, use more zest and juice. If you prefer a milder taste, add less. You can also try lime juice for a different twist. For a different texture, you can use a blender. An immersion blender gives a smooth finish. If you want some chunks, blend only half. Alternatively, use a traditional blender. Just be careful with hot soup. The cooking time is key for perfect squash. Aim for 15-20 minutes on low heat after boiling. This allows the squash to soften well. Overcooking can lead to a mushy texture. Keep an eye on it! This soup pairs great with crusty bread. A slice of sourdough or baguette complements the soup's flavors. You can also serve it with a fresh salad. A simple green salad adds crunch and freshness. For garnishing, sprinkle fresh herbs on top. This adds color and aroma. You can also drizzle a little olive oil for richness. A few lemon slices can brighten the dish visually. For the full recipe, check out the [Full Recipe]. {{image_2}} You can change the squash in this recipe to fit your taste. Try using butternut squash or even pumpkin for a sweet twist. You can also mix in other veggies like carrots or sweet potatoes. If you want a creamy soup, but do not use dairy, try coconut milk or almond milk. These options add a nice richness without dairy. You can also use cashew cream for a nutty flavor. To spice things up, consider adding red pepper flakes or smoked paprika. These spices give the soup a warm kick. If you prefer a fresh taste, add chopped basil or cilantro at the end. Want to make the soup more filling? You could add cooked chicken or chickpeas. Both options will add protein and turn this soup into a meal. In summer, use fresh zucchini and squash for a bright flavor. In winter, frozen vegetables work well if fresh ones are hard to find. Just remember to adjust cooking time based on what you use. In spring, add fresh peas or asparagus for a seasonal touch. In autumn, you might like to add roasted vegetables for a deeper taste. Each season brings new flavors to explore! For the full recipe, check out the complete guide. To store leftover soup, let it cool first. Then, pour it into a container. Use an airtight container for best results. This helps keep the soup fresh. I like to use glass jars or plastic containers. They are easy to stack in the fridge and save space. To freeze soup, use a freezer-safe container. Leave space at the top so it can expand. This is key for soup. You can freeze it for up to three months. When ready to eat, take it out and thaw in the fridge overnight. For quick thawing, use the microwave. Reheat on the stove over low heat, stirring often until hot. Light Lemon Squash Soup stays fresh in the fridge for about five days. Check for signs of spoilage. If it smells sour or has a strange color, toss it. Always trust your nose and eyes. Keeping track of dates helps avoid eating bad food. You can pair Light Lemon Squash Soup with many tasty sides. Here are some great options: - Crusty bread: A nice baguette or sourdough works well. - Salads: A light green salad adds freshness. - Grilled cheese: A classic choice that kids love. - Roasted vegetables: These add color and flavor. - Cheese platter: Soft cheeses can complement the soup well. These sides will enhance the soup and make your meal more satisfying. Yes, you can easily make this soup vegan! Here are a few tips: - Use vegetable broth: This recipe already calls for it. - Replace olive oil: Use any plant-based oil or vegan butter. - Skip cream: This soup does not need cream for richness. These small changes keep the soup full of flavor while being plant-based! You can modify this recipe to fit various diets. Here are some ideas: - Low-carb: Use only zucchini and skip the squash. - Gluten-free: The recipe is naturally gluten-free. - Low-calorie: Use less olive oil and limit any added salt. These simple tweaks can help you enjoy the soup while meeting your needs. Lemon and squash offer many health perks. Here are some key benefits: - Lemon: High in vitamin C, it boosts immunity and adds flavor. - Zucchini: Low in calories, it provides fiber and hydration. - Yellow squash: Packed with vitamins A and B, it supports eye health. Together, these ingredients create a nutritious and refreshing soup. Check the full recipe for all the details! In this blog post, we explored a light lemon squash soup. We covered fresh vegetables, flavorful broth, and key citrus ingredients. You learned the step-by-step process for preparation, blending, and final touches. I shared tips for flavor enhancements, cooking techniques, and serving suggestions. We even discussed variations, storage tips, and answered common questions. Enjoy making this soup as a healthy meal choice. With simple ingredients and easy steps, it's a fun dish to customize. Happy cooking!](https://soyumrecipes.com/wp-content/uploads/2025/07/7c79ad96-c26e-4f33-8143-900bfffb8acc.webp)
Light Lemon Squash Soup Refreshing and Nourishing Dish
Looking for a light and tasty dish that bursts with flavor? My Light Lemon Squash Soup is the perfect choice!
Looking for a light and tasty dish that bursts with flavor? My Light Lemon Squash Soup is the perfect choice!

Looking for a sweet, easy treat? You’ll love these No-Bake Peach Yogurt Bars! They combine creamy yogurt and juicy peaches
![- Fresh Okra Requirement You need 1 pound of fresh okra. Look for bright green, firm pods. Avoid any that are soft or brown. Slice them into 1/2-inch rounds. This size ensures even cooking and great texture. - Spices and Seasonings This dish needs flavor. Gather the following spices: - 1 teaspoon garlic powder - 1 teaspoon onion powder - 1/2 teaspoon cayenne pepper (use less if you prefer mild) - 1 teaspoon salt - 1/2 teaspoon black pepper These spices blend well and add depth to the fried okra. - Coatings and Oils For a perfect crust, you need: - 1 cup buttermilk - 1 cup cornmeal - 1/2 cup all-purpose flour The buttermilk adds moisture and flavor. Cornmeal gives that crispy texture. The flour helps the coating stick. For frying, use vegetable oil. Heat about 1 inch in your pan for best results. This combination will make your classic Southern fried okra crispy and flavorful. For the complete recipe, check the [Full Recipe]. First, I rinse the fresh okra in cold water. This step removes any dirt. Then, I slice the okra into 1/2-inch rounds. Next, I soak the sliced okra in buttermilk for 30 minutes. This soaking makes the okra tender and flavorful. While the okra soaks, I mix the coating ingredients. In a large bowl, I combine cornmeal, flour, garlic powder, onion powder, cayenne pepper, salt, and black pepper. I stir well to ensure all spices blend evenly. Now, I heat about 1 inch of vegetable oil in a large skillet. I set the heat to medium-high until the oil reaches 350°F (175°C). To check if the oil is ready, I drop a bit of the cornmeal mix in. If it sizzles, the oil is perfect. After the oil is hot, I take the okra from the buttermilk. Let any excess liquid drip off. I then toss the okra in the cornmeal mixture. I make sure each piece gets a good coating. Carefully, I place the coated okra in the hot oil. I fry them in batches to avoid crowding. Each batch cooks for about 3-4 minutes. I turn them occasionally until they are golden brown and crispy. Once done, I use a slotted spoon to transfer the fried okra to a paper towel-lined plate. I sprinkle a bit of salt on them while still hot. For serving, I like to keep the fried okra warm. I garnish them with fresh parsley and lemon wedges. This adds color and flavor. I often serve the okra with a tasty dipping sauce. Ranch or a spicy remoulade works great for extra flavor. For the full recipe, check out the detailed instructions. The Right Oil Temperature The key to crispy fried okra is the oil temperature. Heat your oil to 350°F (175°C). You can test it by dropping a bit of the cornmeal mixture in. If it sizzles, the oil is ready. If it's too hot, the okra will burn. If it's too cool, the okra will absorb oil and become soggy. Avoiding Oil Crowding Crowding the pan is a big no-no. Fry the okra in batches. This keeps the oil hot and allows each piece to cook evenly. If you add too many pieces at once, they will steam instead of fry, losing that desired crunch. Adjusting Spice Levels You can change the heat by adjusting the cayenne pepper. If you love spice, add more. If you prefer mild flavors, cut back. This allows you to tailor the dish to your taste. Combining Ingredients for Extra Flavor Mixing spices can boost your okra’s flavor. Try adding paprika for smokiness or a hint of lemon zest for brightness. Each tweak opens up new flavor profiles. Don't shy away from experimenting; it’s all part of the fun! {{image_2}} You can change how fried okra tastes with different coatings. If you want a gluten-free option, use only cornmeal. It gives a great crunch and flavor. You can also mix in some almond flour or chickpea flour for variety. This makes fried okra tasty for everyone! You can also spice up your coating. Try adding smoked paprika for a smoky flavor. If you like more heat, use more cayenne pepper. You can even mix in dried herbs like oregano or thyme. This can create a new twist each time you make it. Not everyone wants to fry food. You can make oven-baked fried okra for a healthier choice. To do this, preheat your oven to 425°F (220°C). Toss the coated okra in a little oil and spread it out on a baking sheet. Bake for 20-25 minutes, flipping halfway. This gets them crispy and keeps the flavors. If you own an air fryer, that works great too! Set the air fryer to 400°F (200°C) and cook the okra in a single layer. Cook for about 10-12 minutes, shaking the basket halfway. This method uses less oil while still giving you that crunch. You can find the full recipe to enjoy this classic Southern fried okra dish! To keep your fried okra fresh, start with proper cooling. Let the okra cool down on a plate. Avoid stacking them while they are hot. If you stack them, they can get soggy. Use a cooling rack if you have one. It helps air circulate and keeps the okra crispy. For storage, choose the right containers. Airtight containers work best for keeping your okra fresh. You can also use resealable plastic bags. Just make sure to remove as much air as possible. Store the fried okra in the fridge for up to 3 days. When it's time to enjoy your leftover fried okra, reheat it properly. The best method for crispiness is using the oven. Preheat your oven to 400°F (200°C). Spread the okra on a baking sheet in a single layer. Bake for about 10 minutes or until hot and crispy. If you’re short on time, you can use a skillet. Heat a small amount of oil over medium heat. Add the okra and cook for a few minutes, turning often. This method helps avoid sogginess. Avoid microwaving the okra, as it makes them soft and chewy. How Do I Select Fresh Okra? Choose okra that is bright green and firm. Look for small pods, about 2 to 4 inches long. Avoid okra that feels soft or is turning brown. Fresh okra should have a smooth skin and a slight sheen. When you squeeze it gently, it should feel solid. Can I Use Frozen Okra? Yes, you can use frozen okra. It’s a good option if fresh okra is not available. Just make sure to thaw and drain it well. Pat it dry to remove excess moisture before coating and frying. This helps achieve that perfect crispiness. What Are Some Serving Suggestions? Fried okra pairs well with many dishes. You can serve it as a side with fried chicken or catfish. It also tastes great alongside cornbread and collard greens. Don’t forget to add dipping sauces like ranch or remoulade for extra flavor! How Do I Make Fried Okra Spicier? To spice things up, add more cayenne pepper to your coating mix. You can also mix in some hot sauce with the buttermilk. Another option is to sprinkle chili powder or crushed red pepper over the fried okra after cooking. Is Fried Okra Healthy? Fried okra is not the healthiest option due to the oil. However, it does provide fiber and vitamins. To make it healthier, you could try baking or air frying it instead of deep frying. This cuts down on fat and calories. What Should I Serve with Fried Okra? Fried okra tastes delicious with many Southern dishes. Pair it with gumbo, jambalaya, or a bowl of chili. You can also enjoy it with a crisp salad or alongside grilled meats. The options are endless! For the full recipe, check out the crispy southern fried okra recipe. This post covered the key elements of making perfect Southern fried okra. We explored fresh ingredients, the step-by-step cooking process, and tips for crispiness. I shared variations, storage ideas, and answered common questions about fried okra. With this knowledge, you can enjoy a great dish that impresses everyone. Try experimenting with flavors and cooking methods. Enjoy the process and savor each bite!](https://soyumrecipes.com/wp-content/uploads/2025/07/f5c8864a-c269-4e6f-af1f-f3bd89df4e04.webp)
Are you ready to dive into the delicious world of Classic Southern Fried Okra? This crispy, flavorful dish brings a
. To get the best texture, use a box grater. Grate zucchinis and potatoes on the large holes. This keeps them chunky and flavorful. After grating, place them in a clean kitchen towel. Twist the towel to squeeze out extra moisture. This step is key. Too much moisture makes the tots soggy. For crispy tater tots, follow these tips: - Use oil: Lightly brush the tops with olive oil. This helps them get golden. - Don't crowd the pan: Space them out on the baking sheet. This allows hot air to circulate. - Flip halfway: Turn the tots halfway through baking. This helps both sides crisp up. Pair your Herby Zucchini Tater Tots with tasty dips. Here are some ideas: - Tzatziki: This yogurt dip adds a fresh taste. - Ketchup: A classic choice for a sweet touch. - Ranch dressing: Creamy and herb-filled, it’s a crowd favorite. Try serving them with a side salad for a light meal. You can find the full recipe above to get started! {{image_2}} To make these tater tots gluten-free, switch the all-purpose flour. Use almond flour or coconut flour instead. Both options work well and keep the texture nice. You can enjoy the same crispy bites without gluten. Just replace in equal amounts and mix as usual. For a vegan version, skip the egg and cheese. Use a flaxseed egg instead. Mix one tablespoon of flaxseed meal with three tablespoons of water. Let it sit for five minutes to thicken. Choose a plant-based cheese that melts well. This keeps your tater tots tasty and vegan-friendly. Herbs can change the taste of your tater tots. Try adding fresh basil or dill for a new twist. You can also use thyme or oregano for an earthy flavor. Mix and match herbs to find your favorite. This small change adds lots of flavor to each bite. For the full recipe, check the instructions above. After you enjoy your Herby Zucchini Tater Tots, store any leftovers in an airtight container. Make sure they cool down first. Place a paper towel at the bottom of the container. This helps absorb excess moisture and keeps them crispy. Store them in the fridge for up to three days. To reheat your tater tots, the oven is best for crispiness. Preheat your oven to 375°F (190°C). Spread the tater tots on a baking sheet. Bake for about 10-15 minutes, flipping them halfway through. This will make them nice and crispy again. You can also use an air fryer. Set it to 350°F (175°C) and cook for 5-7 minutes. If you want to freeze your tater tots, let them cool completely first. Place them in a single layer on a baking sheet. Freeze for about 1-2 hours. Once they are firm, transfer them to a freezer-safe bag. Label the bag with the date. You can freeze them for up to three months. When you're ready to eat, bake them straight from the freezer. No need to thaw! Check the Full Recipe for more tips. Yes, you can use frozen zucchini. However, fresh zucchini gives the best taste. If you use frozen, thaw and drain it well. This keeps your tater tots from being soggy. Soggy tater tots won't crisp up nicely in the oven. To make tater tots without cheese, leave it out entirely. You can add extra seasoning instead. Try adding a bit more garlic powder or herbs. This will keep the flavor strong and delicious. You might also use a vegan cheese substitute if you prefer. Herby Zucchini Tater Tots pair well with many sides. Here are a few ideas: - Fresh salad with greens and a light dressing. - A bowl of creamy tzatziki for dipping. - Grilled vegetables for a colorful plate. - Spicy ketchup for a kick. These sides make the meal fun and tasty. Feel free to mix and match! For the complete recipe, check out the Full Recipe link. In this blog post, we explored the tasty world of Herby Zucchini Tater Tots. We covered essential and optional ingredients, along with their nutrition. I gave you clear, easy instructions on how to make them. I also shared tips for perfect texture and fun variations. Plus, I detailed how to store and reheat your leftovers for later. Enjoy these tater tots as a snack or side dish. Try out your own flavors and enjoy a tasty twist on a classic!](https://soyumrecipes.com/wp-content/uploads/2025/07/a56f9819-5022-4ffa-afb6-0266a224cfa8.webp)
Craving a tasty snack that’s both crispy and healthy? You’ll love these Herby Zucchini Tater Tots! They are simple to
![- 2 cups fresh blueberries - 2 cups ripe peaches, peeled and diced - 1/4 cup granulated sugar - 1 tablespoon lemon juice - 1 teaspoon vanilla extract - 1/2 teaspoon cinnamon - 1 cup rolled oats - 1/2 cup all-purpose flour - 1/3 cup brown sugar - 1/2 cup unsalted butter, melted - Pinch of salt Choosing the right ingredients is key to a great blueberry peach crumble. I always start with fresh fruit. Using ripe peaches really brings out the flavor. You can tell if a peach is ripe by its sweet smell and soft feel. For blueberries, look for plump and shiny berries. - Freshness indicators: Smell the fruit. Sweet scents mean good flavor. - Alternate fruit options: If peaches are not in season, try nectarines or plums. They work well too. - Gluten-free options: Substitute the all-purpose flour with a gluten-free mix. It tastes great. - Brown sugar alternatives: You can use coconut sugar or maple syrup for a different flavor. This detailed ingredient list will help you create a delicious blueberry peach crumble. Check the full recipe for exact steps. 1. First, preheat your oven to 350°F (175°C). This step is key for even baking. 2. Next, grab a large mixing bowl. Here, mix 2 cups of fresh blueberries and 2 cups of diced peaches. Add 1/4 cup of granulated sugar, 1 tablespoon of lemon juice, 1 teaspoon of vanilla extract, and 1/2 teaspoon of cinnamon. Stir gently until everything is well combined. 3. Pour this fruity mixture into a greased 9x9 inch baking dish. Make sure it spreads out evenly. 1. In a separate bowl, add 1 cup of rolled oats, 1/2 cup of all-purpose flour, and 1/3 cup of brown sugar. Mix these dry ingredients together. 2. Now, pour in 1/2 cup of melted unsalted butter and a pinch of salt. Stir until the mixture looks like coarse crumbs. This will be your crumble topping. 1. Evenly sprinkle the crumble topping over the fruit mixture in the baking dish. Make sure to cover all the fruit. 2. Place it in the oven and bake for about 30-35 minutes. Look for a golden brown topping and bubbling fruit as signs that it's done. 3. Once done, take it out of the oven and let it cool for about 10 minutes. This cooling time helps the flavors meld together. You can find the full recipe for this delicious Blueberry Peach Crumble right here! To get the best texture, focus on your topping. You want it crunchy but not too dry. Mix the oats, flour, and sugar until they look like crumbs. When you add butter, make sure it’s melted. This helps all the ingredients stick together well. To prevent a soggy bottom, avoid over-mixing your fruit. Keep the blueberries and peaches whole. Their juices will blend well while baking, but too much mixing can make it mushy. You can also add a bit of cornstarch to absorb extra liquid. This simple step helps keep your crumble nice and firm. The best way to enjoy your Blueberry Peach Crumble is warm. Serve it in bowls and top it with vanilla ice cream. The cold ice cream melts into the warm crumble, creating a perfect mix. You can also add whipped cream for extra richness. For a fun presentation, sprinkle fresh blueberries on top. This adds color and makes your dish look even more appealing. Use a nice bowl to show off your dessert. A pretty dish makes every meal feel special. Adding spices can really boost the flavor of your crumble. A dash of nutmeg pairs well with cinnamon. You can also try a pinch of ginger for a warm kick. These spices add depth and warmth to your dessert. Consider flavor pairings too. Blueberries and peaches go well with lemon. The lemon juice in the recipe brightens the whole dish. You might also try a drizzle of honey over the top before serving. It adds a sweet touch that complements the fruit nicely. For the [Full Recipe], check out the details above. {{image_2}} To make this crumble gluten-free, swap the all-purpose flour for gluten-free flour. You can use almond or coconut flour as well. This change keeps the taste and texture yummy. When you bake a gluten-free crumble, you might need to adjust the baking time. Check it about 5 minutes earlier. Gluten-free options can bake quicker. You can mix other berries into your crumble. Try using raspberries or blackberries for a fun twist. Each berry adds its own sweet flavor. Seasonal fruits are another great option. In summer, use fresh strawberries. In fall, ripe apples or pears work well. Feel free to get creative with what’s in season! For a fun twist, bake your crumble in ramekins. This makes it easy to serve. You can create individual portions for guests or family. Keep an eye on the baking time. Ramekins often bake faster than a big dish. Start checking them after about 20 minutes. They are ready when the top is golden and the fruit bubbles. You can find the full recipe for Blueberry Peach Crumble [Full Recipe]. To keep your blueberry peach crumble fresh, use an airtight container. Glass or plastic containers work well. If you plan to eat it soon, store it in the fridge. It stays good there for about three days. For longer storage, you can freeze it. Wrap it tightly in plastic wrap, then place it in a freezer bag. This helps prevent freezer burn. When reheating, the oven is best for keeping the crumble crisp. Preheat your oven to 350°F (175°C). Place the crumble in a baking dish and cover it with foil. Heat it for about 15-20 minutes. This helps the topping stay crunchy. If you're in a hurry, the microwave works too. Heat it in short intervals, about 30 seconds at a time. Just know the topping may get a bit soft. Your blueberry peach crumble lasts for three days in the fridge. When frozen, it can last up to three months. Always check for signs of spoilage. If you see mold or smell something off, it's best to throw it away. Enjoy your delicious treat while it's fresh! For the full recipe, check the earlier section. To make this Blueberry Peach Crumble vegan, you can replace the butter and honey with plant-based choices. Use coconut oil or vegan butter instead of regular butter. For the sugar, use maple syrup or agave syrup instead of honey. Eggs are not in this recipe, so you don't need an egg substitute. If you want to add some binding, consider using a flaxseed meal mix. Just mix one tablespoon of flaxseed meal with three tablespoons of water and let it sit. This will act like an egg. To keep your crumble from getting soggy, layer it correctly. Start with the fruit layer, then sprinkle the crumble topping evenly on top. Make sure to cover all the fruit. Using cornstarch can help too. Mix one tablespoon of cornstarch with the fruit. This will help soak up extra juices and keep your crumble crisp. Yes, you can use frozen fruits. Just remember to thaw them first. Drain any excess juice to avoid a watery mixture. Frozen fruit may have a slightly different taste. They might not be as sweet or bright as fresh fruit. Consider adding a bit more sugar or lemon juice to balance the flavors. You can still enjoy a delicious crumble with frozen fruits! You learned about making a tasty Blueberry Peach Crumble. We covered the key ingredients and steps to create the perfect dish. Fresh fruit is vital for great flavor, while tips and tricks help avoid common mistakes. You can also make it gluten-free or try new fruit combos. In the end, this dessert is easy and fun. You can impress friends or enjoy it simply at home. Now, gather your ingredients and start baking!](https://soyumrecipes.com/wp-content/uploads/2025/07/b3b6f472-63ee-464e-bbf0-bd904f99eae1.webp)
Looking for a simple dessert that bursts with flavor? You’re in the right place! My Blueberry Peach Crumble combines juicy
![- Sweet corn kernels - Grated zucchini - All-purpose flour - Cornmeal - Eggs - Green onions - Fresh parsley - Baking powder - Garlic powder - Salt and pepper - Olive oil Gathering the right ingredients is key to making tasty fritters. Fresh sweet corn kernels add a sweet crunch. Grated zucchini brings moisture and flavor. All-purpose flour and cornmeal help bind everything together. You will need two eggs for a nice texture. Chopped green onions and parsley give your fritters a fresh taste. Baking powder makes them light and fluffy. Garlic powder enhances the flavor. Finally, salt and pepper add the perfect seasoning. You will fry the fritters in olive oil for that golden crust. - Gluten-free flour alternatives - Egg substitutes for vegan options - Fresh vs. frozen corn If you need gluten-free fritters, use almond flour or a gluten-free blend. For a vegan version, try flaxseed meal mixed with water instead of eggs. You can use frozen sweet corn if fresh corn isn’t available. Just thaw it and drain excess liquid before mixing. These substitutions will still give you delicious fritters. If you follow the Full Recipe, you will enjoy every bite! First, gather your ingredients. In a large bowl, mix the grated zucchini and sweet corn kernels. This combination brings bright flavors and textures. Next, add the chopped green onions and parsley, which add freshness and color. In a separate bowl, whisk the eggs until they are frothy. This step helps make the fritters light and airy. Once whisked, pour them into the vegetable mix. Now it's time to add the dry ingredients. Sprinkle in the all-purpose flour, cornmeal, baking powder, garlic powder, salt, and pepper. Stir gently until everything is just combined. The mixture should be thick but still spreadable, perfect for frying. Now, heat a skillet over medium heat. Add a drizzle of olive oil to the pan. When the oil is hot, take about 1/4 cup of the fritter mix. Drop it into the skillet and flatten it slightly with a spatula. Be careful not to overcrowd the skillet; you want space for each fritter. Cook for about 3-4 minutes on each side. Look for a golden-brown color and a crispy texture. When they are ready, remove the fritters from the skillet. Place them on a plate lined with paper towels to absorb any extra oil. Continue this process with the remaining batter, adding more oil as needed. For a beautiful presentation, serve the fritters on a colorful platter. A dollop of yogurt or sour cream on the side adds creaminess. Garnish with more fresh parsley for a pop of color. These fritters pair well with a fresh salad or a light dipping sauce. Enjoy your tasty delight! To keep your fritters from getting soggy, squeeze the grated zucchini well. Remove as much moisture as you can. This step is key for crispy fritters. Also, avoid adding too much flour. You want a thick but spreadable mix. If the mix is too runny, it won’t hold together. Frying at the right temperature is vital. Heat your oil over medium heat until it shimmers. This helps the fritters cook evenly and get golden brown. If the oil is too hot, they will burn. If it’s too cool, they will soak up oil and become greasy. Cook in batches to keep the frying temperature steady. Overcrowding the pan can lead to uneven cooking. Spices and herbs can elevate your fritters. Try adding paprika for a smoky kick or cumin for warmth. Fresh herbs like basil or cilantro can also brighten the flavor. Pair your fritters with yogurt or a spicy dipping sauce for extra taste. A squeeze of lemon juice can add a refreshing zing too. For the full recipe, check the previous section. {{image_2}} You can easily change the flavors of your fritters. Adding cheese gives them a rich taste. Try sharp cheddar or creamy feta for a great twist. You can also mix in other veggies. Bell peppers, carrots, or spinach add color and nutrition. These changes make each batch unique. Need a vegan option? Replace eggs with flaxseed meal or a banana. This keeps the fritters moist. For a low-carb version, try almond flour instead of all-purpose flour. This keeps the fritters light and tasty without all the carbs. Want to spice things up? Make Mexican-inspired fritters by adding cumin and chili powder. Serve these with a side of salsa for a zesty kick. For a Mediterranean twist, add herbs like oregano and basil. Serve with a dollop of tzatziki for a fresh taste. These international flavors can make your fritters exciting and new. Enjoy the Full Recipe for more ideas! To store leftovers, let the fritters cool first. Place them in an airtight container. They can last up to three days in the fridge. To reheat, put them in a hot skillet for a few minutes. This keeps them crispy and delicious. For freezing, place the cooled fritters in a single layer on a baking sheet. After they freeze solid, transfer them to a freezer bag. They can last up to three months in the freezer. Just make sure to label the bag with the date. To keep fritters crispy after storage, avoid stacking them. Use parchment paper between layers if needed. When reheating, preheat your oven to 375°F (190°C). Bake them for about 10 minutes until hot and crisp. This method keeps them tasty! For a quick fix, you could also use an air fryer. To make your fritters crispy, follow these simple tips: - Use hot oil: Heat your skillet well before adding the fritter mix. - Don't overcrowd: Fry a few fritters at a time to avoid steaming. - Use enough oil: Make sure there's enough oil to fry each fritter evenly. - Let them rest: After frying, place fritters on paper towels to absorb extra oil. These steps will help you achieve that perfect crunchy texture. Yes, you can make the batter ahead of time! Store it in the fridge for up to 24 hours. If you wait longer, the fritters may lose their texture. Always stir the batter before using. This helps mix any settled ingredients and keeps it fresh. These fritters pair well with many sides and dips. Here are some ideas: - Yogurt or sour cream: A creamy dip adds coolness to the fritters. - Fresh salsa: Bright flavors from salsa enhance the taste. - Mixed greens: Serve the fritters on a bed of fresh salad for crunch. - Grilled meats: Chicken or fish make a hearty meal with fritters. Feel free to mix and match to suit your taste! For the full recipe, check [Full Recipe]. We've covered all you need to make sweet corn and zucchini fritters. You learned about key ingredients, substitutions, and step-by-step instructions to prepare them perfectly. Tips and tricks help you avoid sogginess and enhance flavor. You can customize the fritters with various ingredients and store them for later use. Embrace these recipes and ideas to make delicious fritters at home. Enjoy experimenting and discovering your favorite combinations!](https://soyumrecipes.com/wp-content/uploads/2025/07/8335555d-0870-4e2e-871b-9da283f086b9.webp)
Craving a tasty treat that’s simple to make? Welcome to the world of Sweet Corn and Zucchini Fritters! These delightful
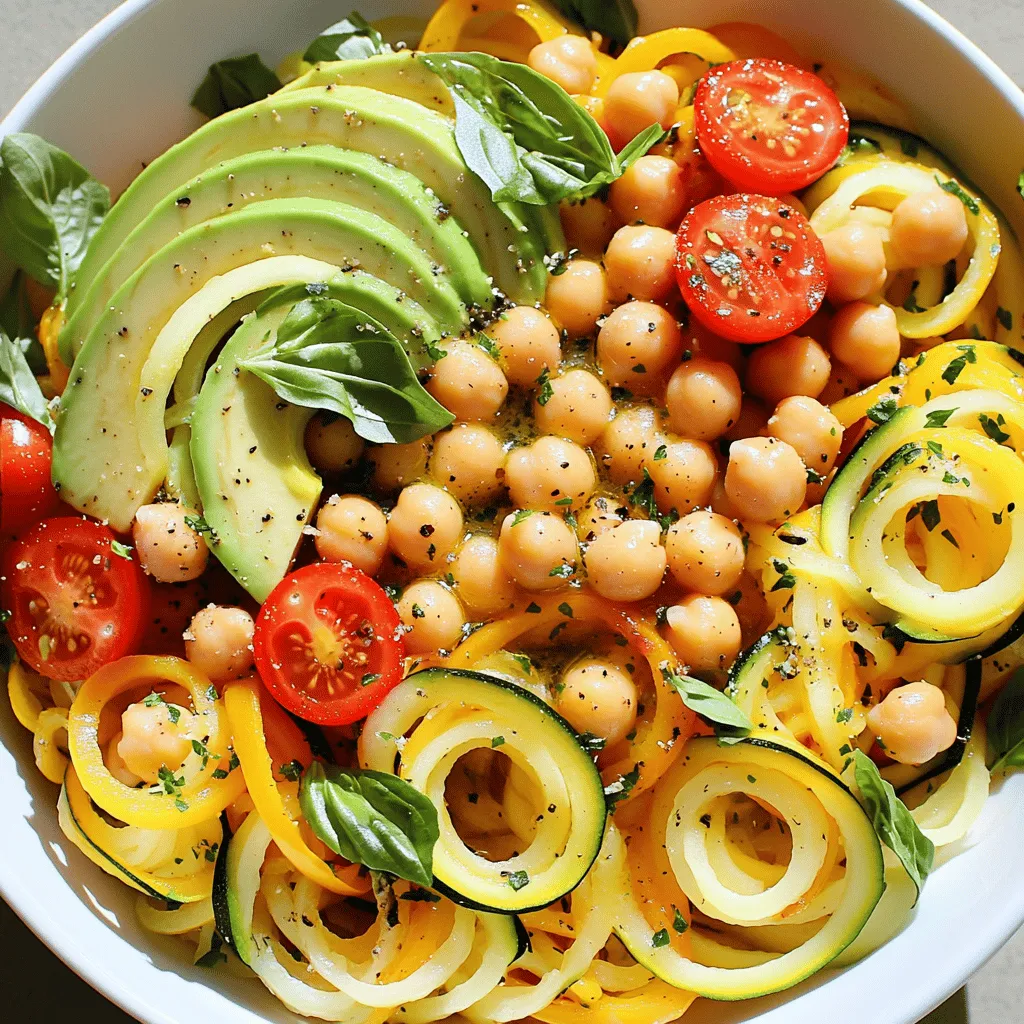
Are you ready to savor a dish that’s as healthy as it is delicious? My Savory Summer Squash Noodle Bowl

Are you ready for a delicious, healthy dish that’s easy to make? This Easy Zucchini Quiche is perfect for breakfast,
![To make a delicious avocado cucumber gazpacho, you need: - 2 ripe avocados, peeled and pitted - 1 large cucumber, peeled and diced - 1 cup ripe tomatoes, chopped - 1 small red onion, roughly chopped - 2 cloves garlic, minced - 2 cups vegetable broth (chilled) - 2 tablespoons fresh lime juice - 1 tablespoon olive oil - 1 teaspoon ground cumin - Salt and pepper to taste - Fresh cilantro or mint leaves for garnish Each ingredient plays an important role in the flavor and texture of the gazpacho. The ripe avocados add creaminess, while the cucumber keeps it light and fresh. Tomatoes bring color and sweetness. The red onion and garlic add depth. For the broth, use chilled vegetable broth to keep your soup cool. Lime juice gives it a nice zing, while olive oil adds richness. Ground cumin adds warmth, and salt and pepper balance everything. If you want to change things up, consider these substitutions: - Use Greek yogurt instead of olive oil for a creamier texture. - Swap fresh lime juice for lemon juice for a different citrus kick. - Try adding basil or dill instead of cilantro or mint for a unique flavor. - For heat, add chopped jalapeños or a dash of hot sauce. - If you prefer a chunkier soup, leave some diced veggies aside and stir them in after blending. You can find the full recipe to get all the steps for this refreshing dish. Start with your fresh ingredients. Gather two ripe avocados, one large cucumber, and one cup of ripe tomatoes. You also need one small red onion and two cloves of garlic. Peel and pit the avocados. Next, peel and dice the cucumber. Chop the tomatoes and roughly chop the red onion. Finally, mince the garlic. This prep work makes blending easier. Now, it’s time to blend. In a blender, add the avocados, cucumber, tomatoes, red onion, and minced garlic. Then pour in two cups of chilled vegetable broth. Add two tablespoons of fresh lime juice, one tablespoon of olive oil, and one teaspoon of ground cumin. Season with salt and pepper to taste. Blend this mixture on high. You want it to be smooth and creamy. If you want a thinner consistency, add more broth. After blending, taste the gazpacho and adjust the seasoning if needed. Pour it into a bowl or an airtight container. Cover it and refrigerate for at least 30 minutes. This chilling time lets the flavors mix together. When ready to serve, give it a good stir. Pour the gazpacho into bowls and garnish with fresh cilantro or mint leaves. Enjoy this refreshing dish as a light meal or appetizer. For the full recipe, check the details above. To get the best texture for your gazpacho, blend until smooth. Start with ripe avocados and cucumber. They create a creamy base. If the mixture is too thick, add more chilled vegetable broth. A little at a time works best. You want it silky, not too runny. This way, each spoonful feels rich and satisfying. Seasoning is key for great flavor. Start with salt and pepper to taste. You can always add more, but it's hard to take it out. The lime juice adds a nice zing and balances the creaminess. Taste as you go. You may want to add more cumin for warmth. Fresh herbs like cilantro or mint also boost the taste. Garnishes make your dish eye-catching. Use fresh cilantro or mint leaves for color. You can also add thin cucumber slices on top. A drizzle of olive oil adds shine and flavor. For a crunch, sprinkle some toasted seeds or nuts. These little touches make your gazpacho look gourmet and fun to eat. For the full recipe, check out the details above. {{image_2}} Want a kick? Add jalapeños to your gazpacho. Start with one small jalapeño, seeds removed. Chop it finely and blend it with the other ingredients. This adds heat and flavor. You can adjust the spice by adding more or less. The heat pairs well with the cool avocado. For a rich twist, mix in yogurt or sour cream. Add about half a cup when blending. This makes the soup creamy and adds a tangy taste. Greek yogurt works great if you want extra protein. The creaminess complements the fresh flavors beautifully. No blender? No problem! You can chop everything by hand. Dice the avocados, cucumber, tomatoes, and onion into small pieces. Mix them together in a bowl with garlic and lime juice. Add the cold broth and stir well. This gives your gazpacho a nice texture. Plus, it looks great with big chunks of veggies. For the full recipe, check out the [Full Recipe]. To keep your avocado cucumber gazpacho fresh, use an airtight container. This helps seal in flavors and maintain texture. Make sure to cool it down to room temperature before sealing. If you have extra, consider dividing it into smaller portions. This way, you can enjoy it later without opening the entire batch. Store your gazpacho in the fridge for the best taste. It stays fresh for about three days. If you want to keep it longer, freezing is an option. However, keep in mind that freezing may change the texture. Pour the gazpacho into freezer-safe containers, leaving space for expansion. Label them with the date, and you can enjoy it later! In the fridge, avocado cucumber gazpacho lasts about three days. After that, it may lose its freshness and flavor. Always check for any signs of spoilage before eating. If it smells off or has changed color, it’s better to toss it. Enjoy your gazpacho while it's still delicious! Avocado Cucumber Gazpacho is a cold soup. It blends ripe avocados and cucumbers with fresh tomatoes. This dish is creamy, smooth, and full of flavor. The lime juice adds brightness, while cumin gives depth. It’s refreshing and perfect for hot days. You can find the full recipe in the article for easy cooking. Yes, you can make this gazpacho a day ahead. It tastes even better after chilling overnight. Just store it in an airtight container. This helps the flavors mix well and improve. Make sure to stir it before serving. You can serve this gazpacho with crusty bread or crackers. A simple green salad pairs well too. Grilled shrimp or chicken can add protein to the meal. For a light lunch, you might enjoy it with a sandwich. Yes, this gazpacho is great for meal prep. It lasts up to three days in the fridge. Just keep it in an airtight container. Portion it out for easy meals throughout the week. Enjoy this healthy and simple dish anytime! Avocado cucumber gazpacho is fresh, easy, and full of flavor. We covered the key ingredients, how to prepare them, and tips for the best texture. You can make variations to suit your taste or use what you have. Remember to store leftovers properly to enjoy later. This dish is perfect for hot days or meal prep. By following these steps, you can make a delicious soup everyone will love. Now, grab your ingredients and get started on your refreshing gazpacho!](https://soyumrecipes.com/wp-content/uploads/2025/07/c5efed30-59f9-4be9-bb09-cffefb3b66e5.webp)
Looking for a refreshing dish that bursts with flavor? You’ve found it! This vibrant Avocado Cucumber Gazpacho is a cool,
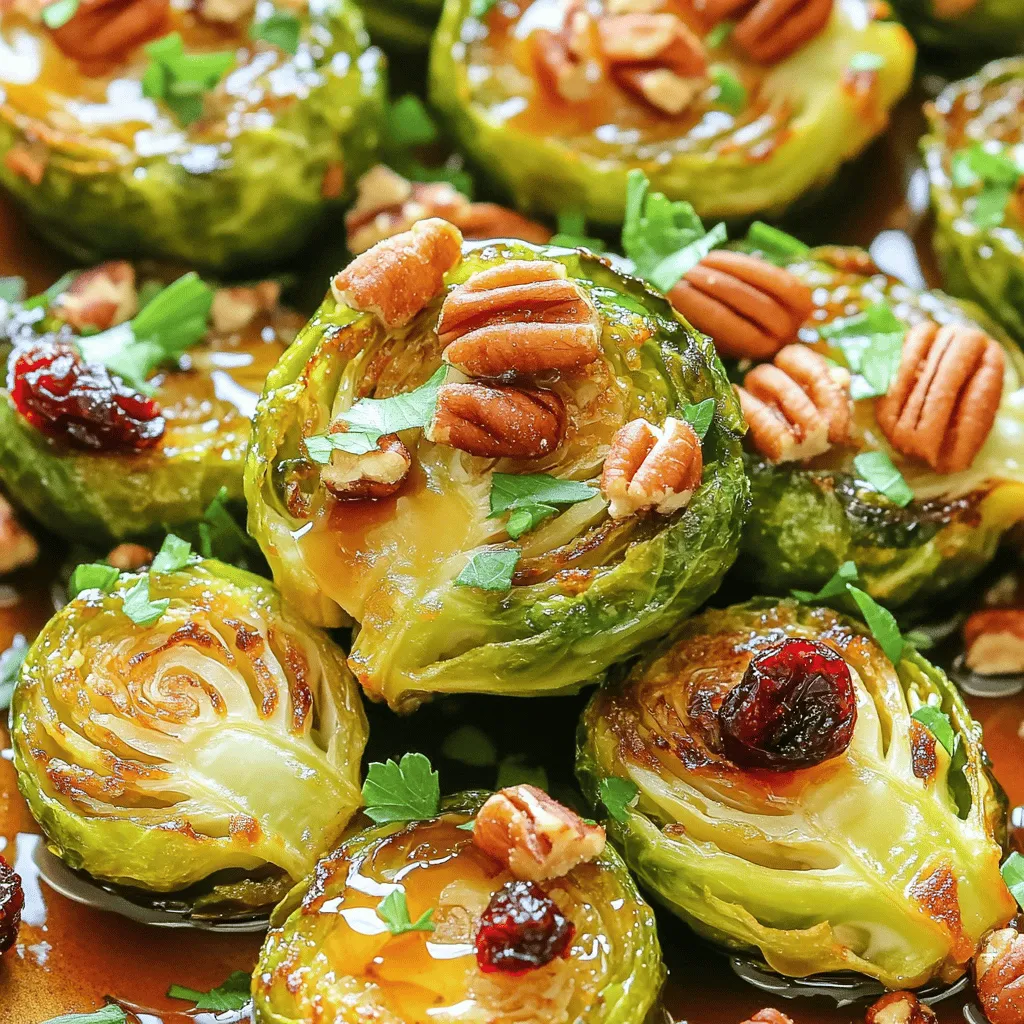
Looking for a simple, tasty dish that’s perfect for any occasion? Let me introduce you to maple roasted Brussels sprouts!
