![To make One-Pot Creamy Mushroom Pasta, gather these simple ingredients: - 300g pasta (fettuccine or tagliatelle) - 250g mushrooms (cremini or button), sliced - 1 tablespoon olive oil - 2 cloves garlic, minced - 1 onion, finely chopped - 1 teaspoon dried thyme - 1/2 teaspoon black pepper - 4 cups vegetable broth - 1 cup heavy cream (or coconut cream for a lighter version) - 1/2 cup grated Parmesan cheese (optional) - Fresh parsley, chopped (for garnish) - Salt to taste When picking ingredients, freshness matters. Here are my tips: - Mushrooms: Look for firm, smooth ones. Avoid any that are slimy or dark. - Pasta: Choose high-quality brands. Whole grain or gluten-free options are great too. - Garlic and Onion: Pick bulbs that feel heavy and solid. They should not sprout. - Herbs: Fresh herbs add much flavor. If using dried, check the expiration date. If you need alternatives, consider these swaps: - Pasta: Use any short pasta, like penne or fusilli. - Mushrooms: Try other types like shiitake or portobello for unique flavors. - Cream: For a dairy-free option, use cashew cream or silken tofu blended. - Parmesan: Nutritional yeast gives a cheesy taste without dairy. This detailed look at ingredients helps you create a flavorful dish. For the full recipe, check out the complete guide. Before you cook, gather all your ingredients. This makes cooking easier and faster. You will need: - 300g pasta (fettuccine or tagliatelle) - 250g mushrooms (cremini or button), sliced - 1 tablespoon olive oil - 2 cloves garlic, minced - 1 onion, finely chopped - 1 teaspoon dried thyme - 1/2 teaspoon black pepper - 4 cups vegetable broth - 1 cup heavy cream or coconut cream - 1/2 cup grated Parmesan cheese (optional) - Fresh parsley, chopped - Salt to taste Having everything ready helps you focus on cooking. Start by heating the olive oil in a large pot over medium heat. Once hot, add the chopped onion. Sauté for about 3-4 minutes until it becomes translucent. Next, add the minced garlic and sliced mushrooms. Cook for another 5-7 minutes until the mushrooms get brown and tender. Now stir in the dried thyme and black pepper. Pour in the vegetable broth and bring it to a boil. When it starts to boil, add the pasta. Stir well to combine everything. Lower the heat to a simmer. Cover the pot and follow the pasta package instructions, usually around 10-12 minutes. Stir occasionally to keep it from sticking. When the pasta is al dente, lower the heat again and stir in the heavy cream. If you want a richer taste, add the grated Parmesan cheese. Stir until the mixture becomes creamy. Taste it and add salt if needed. Remove the pot from the heat and let it sit for a minute to thicken slightly. Serve the pasta in bowls and sprinkle fresh parsley on top for a nice touch. To cook pasta without sticking, use a large pot with plenty of water. Salt the water well before adding the pasta. This helps flavor the pasta as it cooks. Stir the pasta during cooking to prevent clumping. Always check the pasta a minute before the time on the package. This helps you find that perfect al dente texture. For this dish, use a high-quality pasta for the best result. Fresh pasta cooks faster than dried pasta, so adjust your time accordingly. Remember, practice makes perfect! Each time you cook, you will improve. To boost the flavor of your One-Pot Creamy Mushroom Pasta, use fresh herbs. Fresh thyme or basil adds a burst of taste. You can also try adding a splash of white wine while cooking the mushrooms. This gives the dish a deep, rich flavor. For a twist, consider adding a bit of lemon zest. It brightens the creamy sauce. Don’t forget to taste as you cook. Adjust the salt and pepper to your liking. One common mistake is overcooking the pasta. Make sure it stays al dente for the best texture. Another mistake is not stirring enough while cooking. Stirring helps prevent the pasta from sticking together. Using too much cream can make the dish heavy. Start with one cup, then add more if needed. Lastly, don’t skip the garnish! Fresh parsley adds color and freshness to your dish. Serve your creamy pasta in deep bowls for a nice look. Pair it with a crisp green salad for balance. A simple side of garlic bread can also complement the meal. For a special touch, sprinkle extra Parmesan cheese on top. You can also add grilled chicken or shrimp for protein. This makes the dish even heartier. Enjoy your meal with friends or family for a cozy night in. For the complete recipe, check the [Full Recipe]. {{image_2}} You can easily add protein to this creamy pasta. Chicken, shrimp, or even tofu works well. Cook your choice of protein first, then add it in while mixing the pasta. For chicken, thinly slice and cook until golden. For shrimp, sauté until pink and tender. If using tofu, cube and fry until crispy. This boosts flavor and makes the meal more filling. If you want a vegetarian or vegan dish, swap out key ingredients. Use coconut cream instead of heavy cream. This gives a rich, creamy texture without dairy. For a cheesy taste, try nutritional yeast instead of Parmesan. This adds a nutty flavor that rounds out the dish perfectly. You can also use vegetable broth for a hearty base. Get creative with add-ins to make this dish your own! Add spinach for color and nutrients. You can toss in sun-dried tomatoes for a sweet burst. For a spicy kick, sprinkle in red pepper flakes. Fresh herbs, like basil or thyme, can elevate the taste. These simple tweaks can change the dish from good to great. Check out the Full Recipe for more ideas! To store your One-Pot Creamy Mushroom Pasta, first let it cool down. Then, place it in an airtight container. Be sure to cover it tightly. This helps keep the pasta fresh. You can store it in the fridge for up to three days. If you want to keep it longer, consider freezing it. When you’re ready to enjoy your leftovers, reheating is easy. Place the pasta in a pot over low heat. Add a splash of water or broth to help it steam. Stir gently until it's heated through. You can also use the microwave. Just cover it with a lid or a damp paper towel. Heat in short bursts, stirring in between to avoid hot spots. If you plan ahead, freezing this dish works great. After it cools, portion the pasta into freezer-safe bags. Squeeze out as much air as possible before sealing. Label the bags with the date. You can freeze it for up to three months. When you’re ready to eat it, defrost in the fridge overnight. Reheat as mentioned above for a quick meal. It takes about 25 minutes to make this dish. You’ll spend 10 minutes prepping ingredients and 15 minutes cooking. This quick time makes it great for busy weeknights. Yes, you can use any pasta you like. Fettuccine and tagliatelle work well, but penne or rotini are good too. Just adjust the cooking time based on your pasta choice. To reheat, place the pasta in a pot over low heat. Stir in a splash of broth or cream to help it stay creamy. Heat slowly to avoid burning. Absolutely! You can replace heavy cream with coconut cream. This keeps the dish creamy and adds a nice flavor. Use nutritional yeast instead of cheese for a cheesy taste. To lower calories, use whole wheat pasta and reduce the cream amount. You can also skip the cheese or use a lighter version. Adding more veggies can increase volume without adding too many calories. For a full recipe, check out the One-Pot Creamy Mushroom Pasta. This blog post covered everything you need for One-Pot Creamy Mushroom Pasta. We explored the essential ingredients and their best substitutes. I shared easy, step-by-step cooking instructions and key tips for perfect pasta. Additionally, we discussed common mistakes and suggested tasty variations. Finally, I provided storage tips to keep your dish fresh and safe. Enjoy making this recipe. Experiment with flavors and get creative! Your pasta will impress everyone.](https://soyumrecipes.com/wp-content/uploads/2025/07/fbb56613-e613-4423-bea0-cc5cc5f75c4e.webp)
One-Pot Creamy Mushroom Pasta Easy Weeknight Meal
Looking for a quick, tasty dinner that you can whip up in one pot? Try my One-Pot Creamy Mushroom Pasta.
Looking for a quick, tasty dinner that you can whip up in one pot? Try my One-Pot Creamy Mushroom Pasta.
![- 2 large apples (any variety, such as Fuji or Honeycrisp) - 1 teaspoon ground cinnamon - 1 tablespoon coconut sugar (or brown sugar) - A pinch of salt Baked cinnamon apple chips provide a healthy snack option. Each serving contains about 100 calories. They deliver 0.5 grams of protein, 25 grams of carbs, and 2 grams of fiber. The sugars from the apples and coconut sugar make them sweet but still healthy. When you choose apples, you get fiber and vitamins. The cinnamon adds flavor and may help with blood sugar control. Coconut sugar has a lower glycemic index than white sugar, making it a better choice for many. These chips are a great snack for kids and adults alike. They are crunchy, sweet, and full of flavor. Check out the Full Recipe for more details on making these tasty treats. 1. Preheat your oven to 200°F (90°C). Line two baking sheets with parchment paper. 2. Rinse and dry your apples. Cut them into thin slices, about 1/8 inch thick. A sharp knife or mandoline helps with even slices. 3. In a small bowl, mix together 1 teaspoon of ground cinnamon, 1 tablespoon of coconut sugar, and a pinch of salt. This blend adds flavor to your chips. 4. Place the apple slices in a large bowl. Sprinkle the cinnamon mixture evenly over them. Toss gently to coat each slice. 5. Arrange the apple slices in a single layer on your baking sheets. Make sure they do not overlap. 6. Bake in the preheated oven for about 2 hours. This time may vary based on slice thickness. Flip the slices halfway through to ensure even crispness. 7. Once the apple slices are golden brown and crisp, remove them from the oven. Let them cool completely on the baking sheets. 8. Store your baked cinnamon apple chips in an airtight container. This way, you can enjoy a crunchy snack anytime! For the complete recipe, check out [Full Recipe]. To get that perfect crisp, pay close attention to how you slice the apples. Aim for about 1/8 inch thick slices. If they are too thick, they won't crisp up well. Thin slices allow for even baking, leading to that delightful crunch. Another key step is flipping the apple slices halfway through baking. This ensures both sides get the same heat and helps them become evenly crispy. Feel free to get creative with flavors! You can add different spices like nutmeg or ginger to change the taste. If you want a sweeter kick, try using honey or maple syrup instead of sugar. Each option gives your baked cinnamon apple chips a unique twist, making snack time more fun. Presentation plays a big role in how we enjoy our food. Serve your apple chips in a rustic bowl and sprinkle a bit of extra cinnamon on top. This simple touch makes the dish look appealing. Pair them with almond butter for dipping. The creamy texture of the almond butter complements the crispness of the apple chips perfectly. For more ideas, check out the Full Recipe! {{image_2}} For baked cinnamon apple chips, the type of apple matters. You want crisp apples that hold up well during baking. My favorites are Fuji and Honeycrisp. Both offer a nice balance of sweet and tart. - Fuji Apples: These are sweet and juicy. They create a lovely flavor when baked. - Honeycrisp Apples: They have a crunchy texture and a refreshing taste. They make the chips extra tasty. Other good choices include Granny Smith for a tart kick or Pink Lady for a unique flavor. Each apple brings its own twist to your chips. While coconut sugar is great, you can try other sweeteners too. Honey or maple syrup can add a different taste. Just remember to adjust the amount. - Honey: This adds a floral note. It can make the chips a bit stickier. - Maple Syrup: This gives a warm, rich flavor. You may want to use less than coconut sugar. By playing with sweeteners, you can find the flavor that fits your taste buds best. Spices can elevate your baked apple chips. While cinnamon is classic, you can add nutmeg or ginger for a twist. - Nutmeg: This spice adds warmth and depth. Just a pinch can go a long way. - Ginger: It brings a zing that pairs well with apples. You can even create a pumpkin spice version. Mix cinnamon, nutmeg, ginger, and a touch of allspice for a seasonal treat. This makes your apple chips more exciting and fun! To keep your baked cinnamon apple chips crispy, store them in an airtight container. This keeps moisture out, which can make them soft. You can use a glass jar or a plastic container with a good seal. For the best flavor and texture, enjoy your apple chips within one week. If you keep them in a cool, dry place, they will last longer. If your apple chips lose their crunch, don’t worry! You can easily restore their crispness. To recrisp them, use an oven. Preheat it to 200°F (90°C) and bake the chips for about 10 minutes. Check them often to avoid burning. You can also use a microwave. Place a few chips on a microwave-safe plate. Heat them for 20 seconds. Check if they are crispy. If not, heat for another 10 seconds. These methods will help you enjoy your tasty snack again! Baked apple chips can last about one week. Store them in an airtight container. This keeps them fresh and crunchy. If stored well, they can remain tasty for days. Yes, you can use other fruits! Pears, mangoes, and bananas work well. Just remember to adjust the baking time. Each fruit has its own moisture level. If your apple chips aren't crisp, try these tips. First, ensure the slices are thin. Thicker slices take longer to bake. Second, increase the baking time slightly. Flip them halfway for better results. Baked apple chips are a healthy snack. They are low in calories and high in fiber. You get the sweetness of apples without added fats. Plus, you control the sugar level with your choice of sweetener. You can freeze baked apple chips, but they may lose some crispness. Place them in a freezer-safe bag. When ready, thaw them at room temperature. A quick re-bake can help restore some crunch. Baked apple chips are simple and fun to make. You need just a few ingredients and easy steps. Start with your apples, spice them, and bake until crisp. Remember to slice evenly for the best texture. You can also change flavors with different spices or sweeteners. These chips are not only tasty but a healthy snack option. Store them well to keep that crunch. Now you have all the tools to enjoy this delightful treat. Get baking and explore your own variations!](https://soyumrecipes.com/wp-content/uploads/2025/07/33dc01a6-ecfa-43a3-b125-861b4c817e5e.webp)
If you crave a tasty snack that satisfies both your sweet tooth and health goals, look no further! Baked Cinnamon
![To make the best Instant Pot mac and cheese, you need a few key items: - 2 cups elbow macaroni - 4 cups vegetable broth - 2 tablespoons unsalted butter - 1 cup sharp cheddar cheese, shredded - 1 cup mozzarella cheese, shredded - 1 teaspoon garlic powder - 1 teaspoon onion powder - 1 teaspoon dried basil - 1 teaspoon dried parsley - ½ teaspoon smoked paprika - Salt and pepper to taste - ½ cup heavy cream - Optional: Fresh herbs for garnish (like parsley or chives) These ingredients come together to create a creamy, rich dish that delights everyone. Cheese plays a huge role in mac and cheese. I love using sharp cheddar for its strong flavor. It gives the dish a nice bite. Mozzarella adds creaminess, making it melt perfectly. You can also mix in some Gruyère or Monterey Jack for unique tastes. Experimenting with different cheeses can elevate your mac and cheese game. Choosing the right pasta is key for good mac and cheese. Elbow macaroni is the classic choice. It holds the cheese sauce well. You can also try cavatappi or shells for a fun twist. Just make sure the pasta can withstand pressure cooking. This way, it stays tender but not mushy. First, gather your ingredients. You need 2 cups of elbow macaroni and 4 cups of vegetable broth. Add the macaroni to the Instant Pot. Pour the broth over the macaroni. Make sure all the pasta is under the broth. This helps it cook evenly. Next, close the lid tightly. Seal the valve to trap the steam. Select the "Manual" or "Pressure Cook" setting. Set the timer for 4 minutes. Cooking under pressure makes the pasta soft and creamy. When the timer is up, let it release pressure for 5 minutes naturally. Then, do a quick release for any remaining steam. After releasing the pressure, remove the lid. Stir the macaroni. It should be tender and some liquid should remain. Add 2 tablespoons of butter, garlic powder, onion powder, dried basil, dried parsley, and smoked paprika. Mix it well until the butter melts completely. Now, add ½ cup of heavy cream. Stir until the pasta is coated. Finally, add 1 cup of shredded cheddar and 1 cup of mozzarella cheese. Keep stirring until all the cheese melts smoothly. If the sauce is too thick, add a splash of broth or cream. For the full recipe, check the details above. Enjoy your creamy mac and cheese! When making Instant Pot mac and cheese, a few mistakes can ruin your dish. First, don't skip the natural pressure release. It helps the pasta finish cooking and keeps it tender. Second, avoid using too much broth. The pasta needs enough liquid to cook, but too much can make it soupy. Lastly, don’t rush when mixing in the cheese. Stir it slowly to create that creamy texture you want. You can boost the flavor of your mac and cheese with some fun add-ins. Try adding cooked bacon for a smoky touch. You can also mix in sautéed onions or garlic for extra depth. If you like spice, toss in some jalapeños. For a fresh kick, add a squeeze of lemon juice or some chopped fresh herbs like basil or chives. To speed things up, prep your ingredients ahead of time. Measure out your cheese and spices before you start. You can also use pre-shredded cheese to cut down on prep time. If you’re in a hurry, consider using a quick-cooking pasta. Just adjust the cooking time in your Instant Pot. For the full recipe, check out the detailed steps above. {{image_2}} You can easily make this dish vegan. Swap the butter for plant-based butter. Use cashew cream or coconut milk instead of heavy cream. For cheese, try a vegan cheese blend. Nutritional yeast adds a cheesy flavor, too. This way, you get a rich and creamy mac without any dairy. If you like heat, add jalapeños. Chop fresh jalapeños and mix them in with the macaroni. You can also use pickled jalapeños for a tangy kick. Adjust the amount based on your spice level. This twist makes the dish exciting and flavorful. Add protein to your mac and cheese for a complete meal. Cook diced chicken in the Instant Pot before adding the pasta. For a smoky flavor, use crispy bacon. If you prefer plant-based protein, add cubed tofu. Mix any of these in before serving for extra taste and texture. For more ideas, check out the [Full Recipe]. To store your leftover Instant Pot mac and cheese, place it in an airtight container. This helps keep it fresh. Make sure to let it cool first. Store it in the fridge for up to three days. Always label your container with the date. This way, you know when to eat it. You can freeze mac and cheese for later enjoyment. First, let it cool down completely. Then, transfer it to a freezer-safe container. Leave some space at the top because it will expand when frozen. You can freeze it for up to three months. When you are ready to eat, just thaw it in the fridge overnight. Reheating mac and cheese can be tricky. To keep it creamy, add a splash of milk or broth before reheating. You can use the microwave or the stovetop. If using the microwave, heat it in short bursts and stir often. If using the stovetop, heat it over low heat while stirring. This helps avoid drying it out. Enjoy your creamy dish again! It takes about 20 minutes to make this dish. You spend 5 minutes prepping and 15 minutes cooking. The pressure cooking takes just 4 minutes. After that, you need a few minutes for pressure release. Yes, you can use gluten-free pasta! It works well in the Instant Pot. Just ensure you check the cooking time on the package. You may need to adjust it a bit if the pasta cooks faster or slower. If you want to avoid heavy cream, try using milk or a dairy-free option. Unsweetened almond milk or coconut milk works well. Your mac and cheese will still be creamy and delicious. To make a small batch, reduce the ingredients by half. Use 1 cup of elbow macaroni and 2 cups of vegetable broth. Adjust the cheese and cream accordingly. This way, you get just enough for one or two servings. Yes, you can make mac and cheese on the stovetop. Cook the pasta in a pot with boiling water. Once it’s tender, drain and return it to the pot. Add butter, cheese, and cream, mixing until creamy. It takes a bit longer but still tastes great. For the full recipe, check out the Creamy Garlic & Herb Instant Pot Mac and Cheese. In this blog post, we covered everything you need for Instant Pot mac and cheese. You learned about key ingredients and cheese types that boost flavor. I shared step-by-step instructions to make it easy. You also found tips to avoid common mistakes and variations to try. Remember, cooking should be fun. Enjoy experimenting with new flavors and textures. Make this dish your own, and share it with friends and family!](https://soyumrecipes.com/wp-content/uploads/2025/07/e1087d90-33eb-4f2f-8155-cc62928ee604.webp)
Are you ready to elevate your mac and cheese game? In this Instant Pot Mac and Cheese Quick and Creamy
![- 2 pounds baby potatoes, halved - 4 tablespoons olive oil - 4 cloves garlic, minced - 2 tablespoons fresh rosemary, chopped - 2 tablespoons fresh thyme, chopped - 1 teaspoon paprika - Salt and pepper to taste - Zest of 1 lemon - 2 tablespoons fresh parsley, chopped (for garnish) - To convert tablespoons to teaspoons, remember that 1 tablespoon equals 3 teaspoons. For instance, 4 tablespoons equal 12 teaspoons. - The weight of 2 pounds of baby potatoes is about 900 grams. This is helpful for those who prefer metric measurements. - When selecting fresh herbs, look for vibrant colors and no signs of wilting. Fresh herbs add a strong flavor to your dish. - For potatoes, choose waxy types like baby red or fingerling potatoes. These varieties hold their shape well when roasted. They also get crispy on the outside while staying fluffy inside. This recipe for Garlic Herb Roasted Potatoes is not only simple but also full of flavor. You can find the full recipe above. 1. Preheating the oven: Start by preheating your oven to 425°F (220°C). A hot oven helps the potatoes roast well. 2. Preparing the potatoes: Take 2 pounds of baby potatoes and halve them. This size helps them cook evenly. Rinse them under cold water to remove dirt, then pat them dry. 1. How to evenly coat the potatoes: In a large bowl, combine the halved potatoes, 4 tablespoons of olive oil, 4 cloves of minced garlic, 2 tablespoons of chopped rosemary, 2 tablespoons of chopped thyme, 1 teaspoon of paprika, salt, and pepper. Toss the potatoes until each piece is well coated. This step is key for great flavor. 2. Importance of seasoning: Seasoning matters! Use enough salt and pepper to enhance the taste. Fresh herbs bring bright flavors that make the dish shine. 1. Spreading on the baking sheet: Line a baking sheet with parchment paper. Spread the potatoes in a single layer. Make sure they have space to roast evenly, which will help them turn crispy. 2. Checking for doneness and browning tips: Roast the potatoes in the oven for 25-30 minutes. Check them halfway through and turn them for even browning. They should be golden brown and crispy when done. A quick poke with a fork can tell you if they are soft inside. For the complete recipe, refer to the [Full Recipe]. To get that perfect crispiness, spacing on the baking sheet is key. If you crowd the potatoes, they will steam instead of roast. Give each piece space to breathe. This allows the hot air to circulate and makes them crispy all around. Oven temperature can vary, so keep an eye on your potatoes. If your oven runs hot, lower the temp by 25°F. This ensures they cook evenly and don’t burn. Garlic Herb Roasted Potatoes pair well with many main dishes. They complement roasted chicken or grilled steak nicely. You can also serve them with fish for a lighter meal. For dips, I recommend a creamy garlic aioli or a tangy yogurt sauce. Both add a nice touch to the dish. You can even try a zesty ranch dressing for a fun twist. Using fresh herbs makes a big difference. But if you can't find them, dried herbs work too! Just remember to use less. About one-third of the amount will do. If you need alternatives for rosemary and thyme, try oregano or basil. They give a different flavor but still taste great. You can mix and match to find your favorite combo. {{image_2}} You can get creative with Garlic Herb Roasted Potatoes. For a rich twist, add cheese. Cheddar or Parmesan works well. Just sprinkle it on top in the last few minutes of cooking. The cheese will melt and create a creamy layer. Want some heat? Add chili flakes before roasting. This will give your potatoes a spicy kick. Adjust the amount based on your taste. You can always add more later. If you follow a vegan diet, skip the cheese and use olive oil for flavor. The herbs and garlic provide plenty of taste. You won’t miss the dairy at all. For gluten-free eaters, this dish is safe. All the listed ingredients are gluten-free. Just ensure your spices and oils are also gluten-free. Using seasonal vegetables can elevate your dish. In summer, try adding bell peppers or zucchini. In the fall, sweet potatoes or butternut squash can add great flavor. You can also mix in other root vegetables. Carrots and parsnips roast well alongside potatoes. They add a sweet, earthy taste to the mix. Adjust the cooking time if you add larger chunks. For the full recipe, check the section above. After enjoying your Garlic Herb Roasted Potatoes, store the leftovers in the fridge. Place them in an airtight container. This helps keep them fresh and tasty. If you don’t have a container, wrap them tightly in plastic wrap. Make sure to eat the leftovers within three days for the best flavor. When it’s time to eat the leftovers, you have two great options: the oven or the microwave. - Oven: Preheat the oven to 400°F. Spread the potatoes on a baking sheet. Heat them for about 10-15 minutes. This method keeps them crispy and delicious. - Microwave: Place the potatoes on a microwave-safe plate. Heat them in 30-second bursts. Stir between each time to ensure even heating. However, this method can make them a bit soft. To keep them crispy, using the oven is always the best choice. You can also freeze your Garlic Herb Roasted Potatoes. First, let them cool completely. Then, spread them in a single layer on a baking sheet. Freeze them for about an hour until they are firm. After freezing, transfer the potatoes to a freezer bag. Remove as much air as possible before sealing. When you’re ready to enjoy them, thaw the potatoes in the fridge overnight. Reheat them in the oven for the best results. This way, they stay tasty and crispy. How long should I roast Garlic Herb Roasted Potatoes? Roast these potatoes for 25 to 30 minutes at 425°F (220°C). They should turn golden brown and crisp. Turn them halfway through to ensure even cooking. This method gives you the best texture and flavor. Can I make this recipe ahead of time? Yes, you can prepare the potatoes ahead of time. Cut and season them, then cover and refrigerate. When ready, just roast them as usual. This makes meal prep easier and quicker. What herbs can I substitute for rosemary and thyme? You can use sage, oregano, or basil as substitutes. These herbs will add their unique flavors. Feel free to mix and match to find what you enjoy most. How can I enhance the garlic flavor? To boost garlic flavor, try using garlic powder in addition to fresh garlic. You can also roast garlic cloves and mash them into a paste before mixing with the potatoes. This will give you a deeper, richer taste. Can I use an air fryer for this recipe? Absolutely! An air fryer works great for roasting potatoes. Cook them at 400°F (200°C) for about 15 to 20 minutes. Shake the basket halfway through for even cooking. What type of potatoes work best for roasting? Baby potatoes are ideal for roasting. They cook evenly and get crispy. You can also use Yukon Gold or red potatoes for a different texture and flavor. In this article, we explored how to make Garlic Herb Roasted Potatoes. We covered key ingredients, measurement conversions, and tips for selecting fresh produce. You learned how to prepare, mix, and roast potatoes for perfect crispiness. We also looked at serving suggestions, variations, and storage options. Always remember, cooking is about creativity. Feel free to experiment with flavors and ingredients. Enjoy your delicious potatoes!](https://soyumrecipes.com/wp-content/uploads/2025/07/10ae7e61-e584-4e58-9560-f2380bcbb628.webp)
If you’re craving a delicious side dish that’s simple yet bursting with flavor, look no further than Garlic Herb Roasted
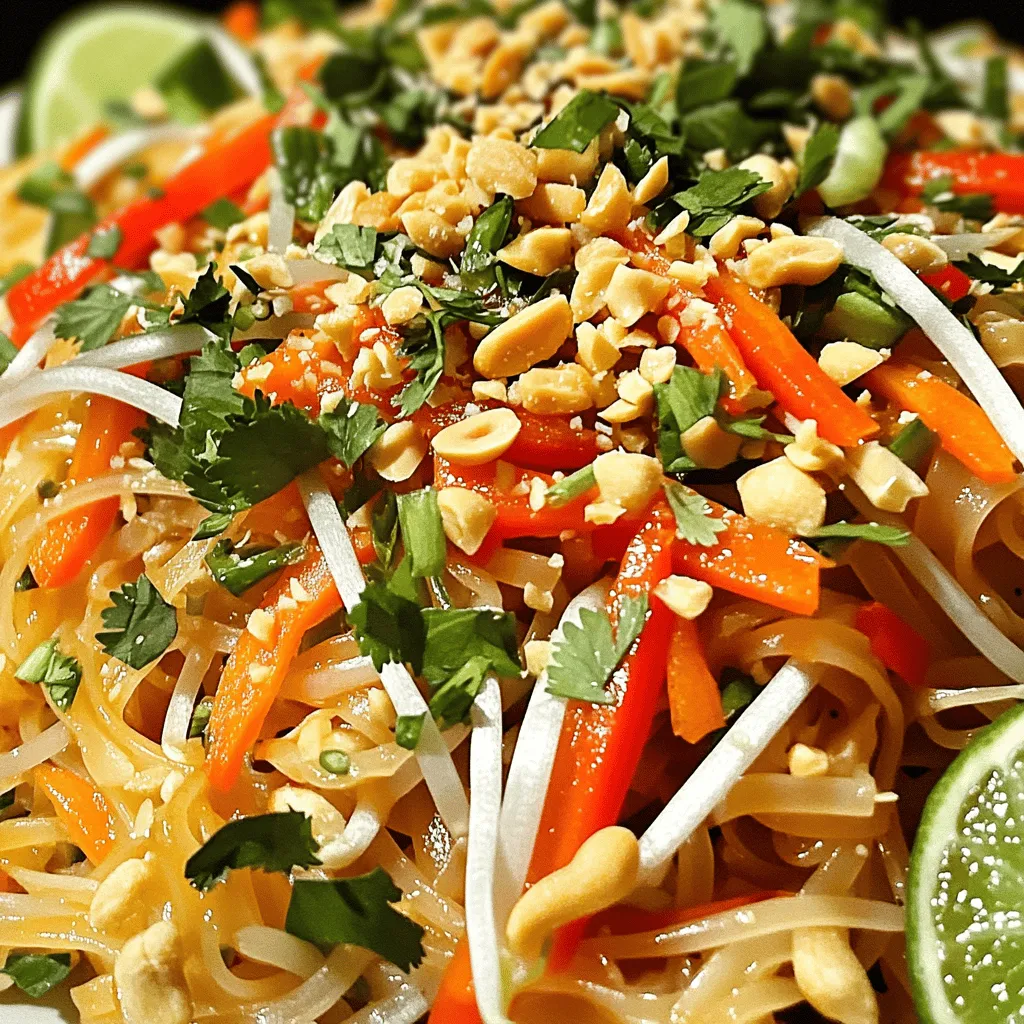
Looking to make a quick and tasty meal? You’re in the right place! My Easy Vegetable Pad Thai recipe brings
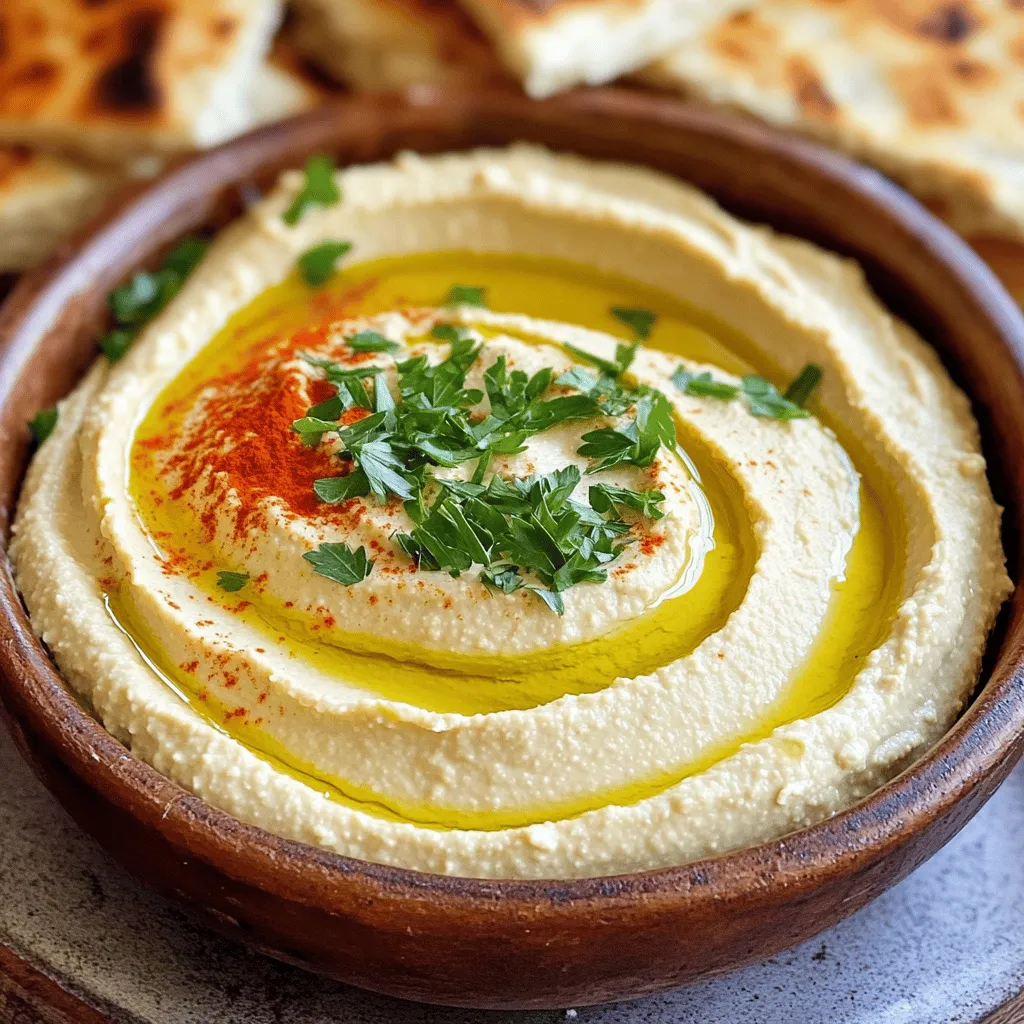
Looking for a tasty way to eat healthy? This Classic Hummus Recipe is your answer! With a few simple ingredients,
![- 12 large portobello mushrooms - 2 cups fresh spinach - 1 cup cream cheese - 1/2 cup shredded mozzarella cheese - 1/4 cup grated Parmesan cheese - 2 cloves garlic - Black pepper - Red pepper flakes (optional) - Olive oil - Salt to taste - Fresh parsley for garnish Gathering the right ingredients is key to making Cheesy Spinach Stuffed Mushrooms. Start with fresh portobello mushrooms. You want them large and firm. Clean the mushrooms gently with a damp cloth. Remove the stems, making room for the filling. Next, fresh spinach adds color and nutrients. Chop it finely to mix well with cheeses. The cream cheese provides a rich base for the filling. Use softened cream cheese for easy mixing. Mozzarella adds that ooey-gooey texture. Parmesan gives a salty kick. You’ll also need garlic for flavor. Mince it finely so it blends into the filling. For seasoning, use black pepper. If you like heat, add red pepper flakes. Olive oil will help sauté the garlic and spinach. Don’t forget salt to taste. Finally, fresh parsley makes a lovely garnish. Check out the Full Recipe for all the steps! First, preheat your oven to 375°F (190°C). This step helps cook the mushrooms evenly. Next, clean the portobello mushrooms by wiping them with a damp cloth. Remove the stems and place the caps, open side up, on a baking sheet. In a medium skillet, heat one tablespoon of olive oil over medium heat. Add two minced garlic cloves and sauté for about one minute. The garlic should smell good but not burn. Next, stir in two cups of chopped fresh spinach. Cook it until it wilts, which takes about two to three minutes. Once done, take it off the heat. In a mixing bowl, combine the wilted spinach with one cup of softened cream cheese, half a cup of shredded mozzarella cheese, and a quarter cup of grated Parmesan cheese. Add a pinch of black pepper and red pepper flakes if you want some heat. Mix everything until it’s well blended. Now, use a spoon to fill each mushroom cap generously with this cheese and spinach mixture. Put the stuffed mushrooms in the preheated oven and bake them for 20 to 25 minutes. They are ready when the tops are golden and bubbly. After baking, take them out and let them cool for a few minutes. Finally, garnish with chopped fresh parsley before serving. Check out the Full Recipe for more tips and ideas! Using fresh spinach is best for this dish. It brings a bright flavor and nice texture. Frozen spinach can work, but you need to squeeze out the water. This step is key to avoid a soggy filling. When cleaning mushrooms, use a damp cloth. Do not soak them in water. This keeps them firm and flavorful. To avoid soggy mushrooms, bake them cap side up. This helps the moisture escape. You can also pre-bake the mushrooms for 5 minutes. This step dries them out a bit. Adjusting seasoning is easy. Taste your filling before stuffing the mushrooms. Add more salt or pepper to suit your taste. You can even mix in some herbs for extra flavor. {{image_2}} You can change the cheese in this recipe for more flavor. Try using feta, gouda, or cheddar. Each cheese gives a unique twist. You can also mix different cheeses for a richer taste. Adding chopped vegetables or herbs can boost flavor and nutrition. Bell peppers, onions, or artichokes work well. Fresh herbs like basil or thyme add a nice touch. Just make sure to chop them small for even cooking. If you want to make this dish dairy-free, use vegan cream cheese and dairy-free cheese. There are many great options available now. These will still give you a creamy filling. For gluten-free options, ensure your cheese and any added ingredients are gluten-free. Portobello mushrooms are naturally gluten-free, so you’re already on the right track! Enjoy your tasty creation without worry! To keep your cheesy spinach stuffed mushrooms fresh, store them in the fridge. Place them in an airtight container. They can last for about 3-4 days. When you want to reheat them, set your oven to 350°F (175°C). Place the mushrooms on a baking sheet. Bake for around 10-15 minutes until they're warm. If you want to freeze stuffed mushrooms, let them cool first. After that, put them in a freezer-safe container. You can keep them for up to 3 months. When you're ready to eat them, take them out of the freezer and thaw them in the fridge overnight. To reheat, bake them at 350°F (175°C) for 15-20 minutes. This keeps them tasty and warm. For more details on making the recipe, check the Full Recipe. Can I make Cheesy Spinach Stuffed Mushrooms ahead of time? Yes, you can make these stuffed mushrooms ahead. Prepare the filling and stuff the mushrooms. Cover them tightly and store in the fridge for up to 24 hours. When ready, bake them as directed. What can I serve with Cheesy Spinach Stuffed Mushrooms? These mushrooms pair well with many dishes. Serve them with a fresh salad, grilled chicken, or pasta. They also work great as a party appetizer. How long do Cheesy Spinach Stuffed Mushrooms last in the fridge? These stuffed mushrooms last about 3 days in the fridge. Store them in an airtight container. Reheat in the oven or microwave before serving. Can I use other types of mushrooms? Absolutely! You can use button or shiitake mushrooms if you prefer. Just adjust the baking time as needed. Larger mushrooms may need a bit more time to cook. What should I do if the filling is too watery? If the filling is too watery, squeeze out extra moisture from the spinach. You can also add more cream cheese to thicken it up. This will help keep your mushrooms firm and delicious. For the complete recipe, check out the [Full Recipe]. In this blog post, we explored how to make Cheesy Spinach Stuffed Mushrooms. You learned about the key ingredients, including portobello mushrooms, cheese, and fresh spinach. We also covered easy preparation steps, baking instructions, and useful tips to perfect your dish. Remember, you can customize the recipe with different cheeses or make it dairy-free. Enjoy experimenting with flavors and make these tasty bites your own. They are sure to impress at your next gathering!](https://soyumrecipes.com/wp-content/uploads/2025/07/9f0833e7-f0e0-4921-b951-2897c3f69098.webp)
Are you ready to impress your friends and family with a tasty treat? My Cheesy Spinach Stuffed Mushrooms are simple
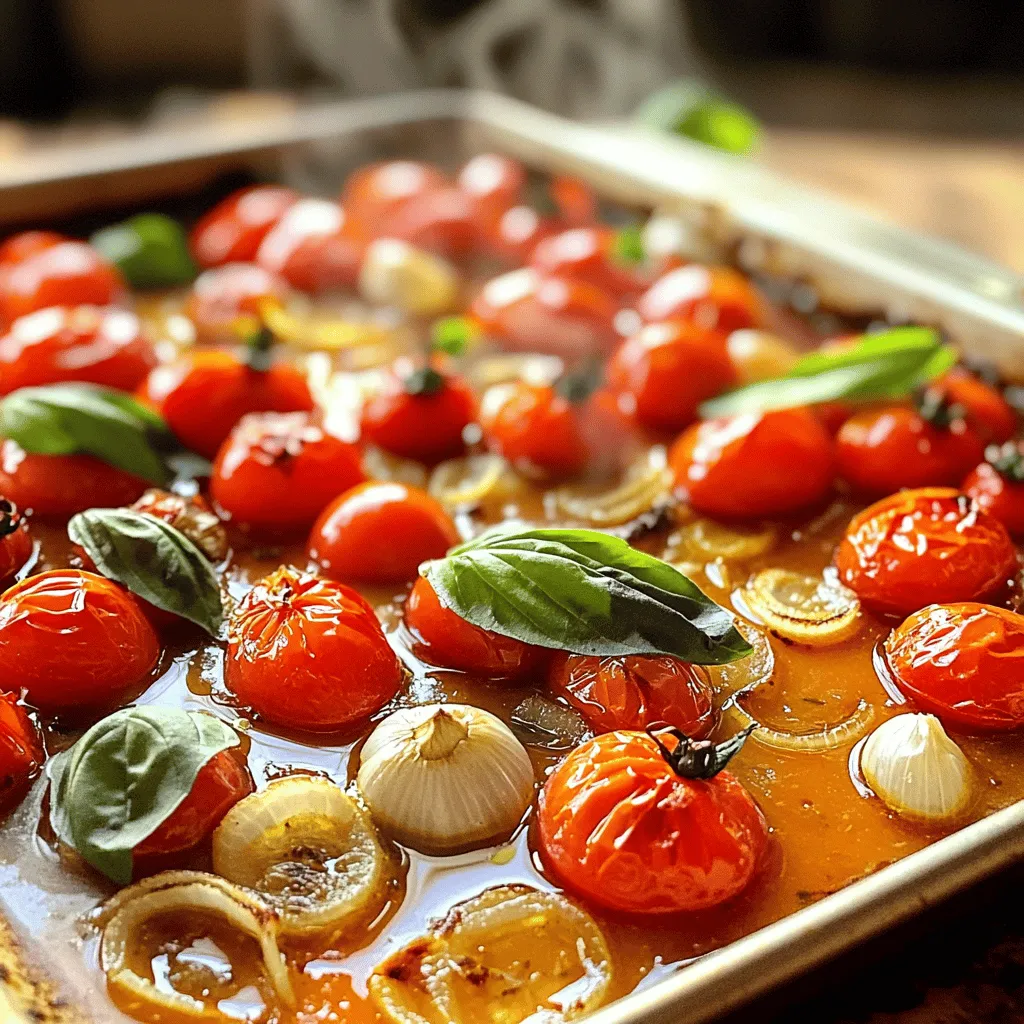
Warm up with my easy and flavorful Roasted Tomato Basil Soup! This comforting dish combines ripe tomatoes, fresh basil, and
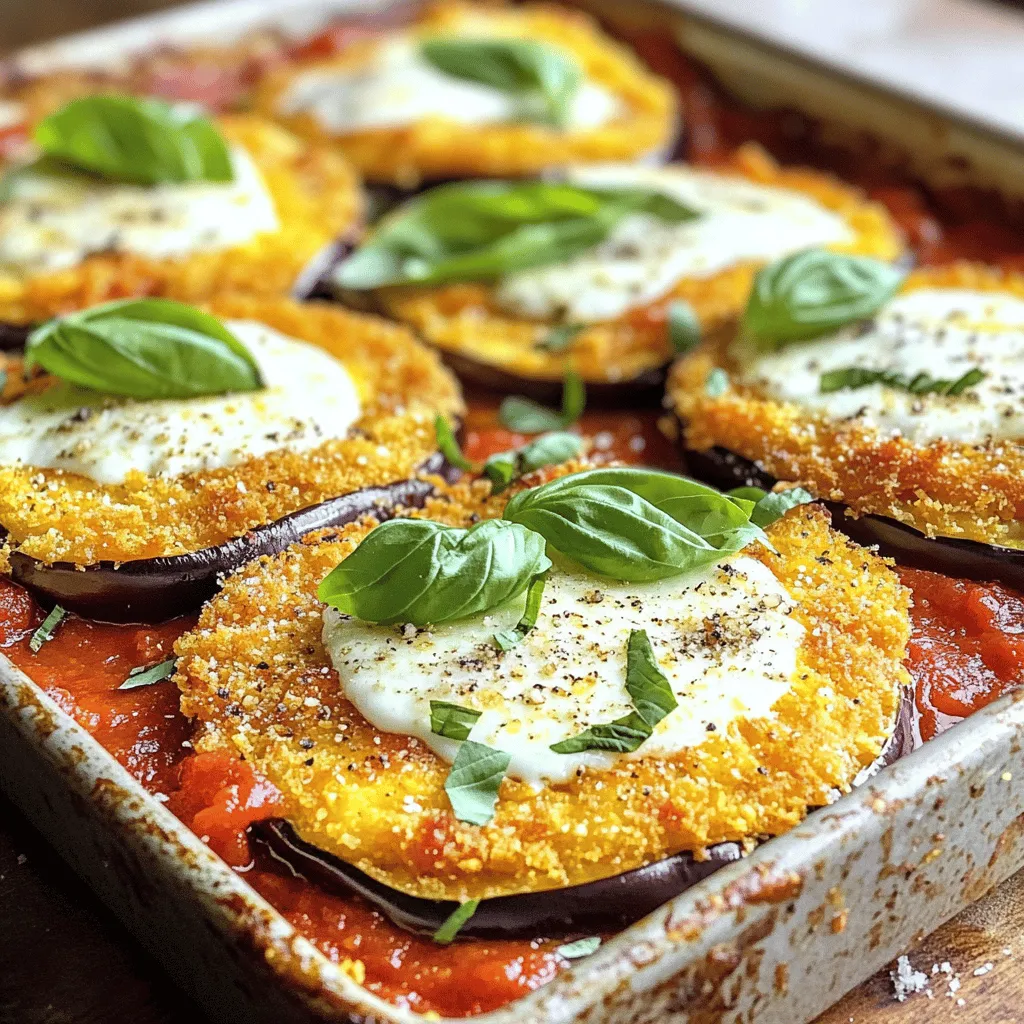
Are you ready to whip up a delicious Easy Eggplant Parmesan? This recipe brings rich flavors together in a simple

Looking for a simple yet flavorful side dish that steals the spotlight? Baked Garlic Parmesan Cauliflower is your answer! This
