![- 2 cups rolled oats - 1/2 cup chopped pecans - 1/4 cup maple syrup - 1/2 cup almond milk - 1/2 cup unsweetened applesauce The main ingredients create the base of this dish. Rolled oats give this baked oatmeal its hearty texture. Chopped pecans add a nice crunch and rich flavor. Maple syrup serves as a natural sweetener, making each bite delightful. Unsweetened applesauce keeps it moist and adds a hint of fruitiness. Almond milk adds creaminess without overpowering the taste. - 2 large eggs - 1 teaspoon vanilla extract - 1 teaspoon baking powder - 1/2 teaspoon cinnamon - 1/4 teaspoon salt The additional ingredients are key for texture and taste. Eggs act as a binder, helping the oatmeal hold together. Vanilla extract brings warmth and depth to the flavor. Baking powder gives the dish a fluffy rise. Cinnamon adds a comforting spice, while salt enhances all the flavors. - Fresh fruit (e.g., sliced bananas, berries) - Additional maple syrup Toppings can elevate your baked oatmeal. Fresh fruit adds color and freshness. Sliced bananas or berries pair well with the maple and pecans. A drizzle of maple syrup on top gives extra sweetness. You can get creative with your toppings based on what you enjoy. For the full recipe and all the steps to make this tasty morning delight, check out the [Full Recipe]. - Preheat your oven to 350°F (175°C). - Lightly grease an 8x8-inch baking dish. - In a large bowl, mix together the rolled oats, chopped pecans, baking powder, cinnamon, and salt. Stir until everything is well blended. - In another bowl, whisk together the almond milk, maple syrup, applesauce, eggs, and vanilla extract. Mix until smooth. - Pour the wet mix into the bowl with the dry mix. Stir until everything is nicely combined. - Transfer the mixture to your prepared baking dish. Spread it evenly across the dish. - Bake in the preheated oven for 25-30 minutes. You want the top to be golden and the oatmeal set. - Once done, take it out and let it cool for a few minutes. Cut into squares and serve warm. - Top with fresh fruit and a drizzle of more maple syrup if you'd like. To get your baked oatmeal just right, pay close attention to the baking time. If you like a softer texture, bake it for about 25 minutes. For a firmer texture, let it bake for up to 30 minutes. Keep an eye on it as it cooks. Mixing is key to great flavor. Combine the dry and wet ingredients well. You want every bite to be full of taste. If you skip this step, some parts may turn out bland. You can make this dish your own by swapping nuts or fruits. Try walnuts or almonds instead of pecans. You can also add dried fruits like cranberries or raisins for a chewy texture. Adjust the sweetness to your liking. If you prefer a sweeter taste, add more maple syrup. For a less sweet dish, cut back on the syrup. You can even add spices like nutmeg for a new flavor twist. This baked oatmeal pairs well with yogurt or milk. A dollop of yogurt adds creaminess. Pouring milk over it makes each bite more enjoyable. Serve it warm for breakfast or brunch. It’s great for gatherings, as everyone loves a tasty and healthy option. Top with fresh fruit or a drizzle of maple syrup for extra flair. Check out the Full Recipe for more ideas! {{image_2}} Dietary adjustments can make Maple Pecan Baked Oatmeal fit many diets. For a vegan option, swap eggs with flaxseed meal or chia seeds. Use 1 tablespoon of either mixed with 2.5 tablespoons of water per egg. This mix binds well and keeps the dish moist. For a gluten-free version, select certified gluten-free oats. This makes the dish safe for those with gluten allergies. Flavor variations can elevate your oatmeal experience. Try adding spices like nutmeg or ginger for a warm kick. Just a pinch can transform the taste. You might also want to mix in chocolate chips or dried fruits like raisins or cranberries. These additions bring sweetness and a fun texture. Creative serving suggestions make your oatmeal even more delightful. You can turn it into overnight oats by soaking the baked oatmeal in milk overnight. This gives it a creamy texture. Another idea is to layer it into a parfait. Alternate layers of baked oatmeal with yogurt and fresh fruit. This adds a beautiful touch and makes breakfast feel special. For the full recipe, check the original instructions above. After enjoying your Maple Pecan Baked Oatmeal, you may have some leftovers. To keep them fresh, store the oatmeal in an airtight container. Place it in the fridge, and it will last for about five days. When you are ready to enjoy it again, you can reheat it. Just scoop out a portion, place it in a microwave-safe bowl, and heat it for about one minute. Stir and check the temperature. If it’s not warm enough, heat it for another 30 seconds. If you want to save some for later, you can freeze the baked oatmeal. First, let it cool completely. Then, cut it into squares and wrap each piece tightly in plastic wrap. Place the wrapped squares in a freezer bag or container. This way, they will last up to three months in the freezer. When you want to eat it, take a square out and let it thaw in the fridge overnight. For a quick option, you can microwave it straight from the freezer. Heat for two to three minutes, checking often to avoid overcooking. For best taste, eat your Maple Pecan Baked Oatmeal within five days if stored in the fridge. If frozen, aim to eat it within three months. To spot spoilage, look for changes in smell or texture. If it smells sour or has a slimy feel, throw it out. Enjoy your oatmeal fresh for the best flavor! To check if your baked oatmeal is done, look for a golden top. The edges should be set, and the middle should not jiggle. A toothpick inserted in the center should come out clean. This means the oats have cooked through. Yes, you can prepare this dish ahead. Mix the dry and wet ingredients separately. Store them in the fridge overnight. In the morning, combine them and bake. You can also bake it in advance. Let it cool and store it in an airtight container. Just reheat it in the oven or microwave when you're ready to enjoy. Absolutely! To adjust the serving size, you can scale the ingredients. For half the recipe, use 1 cup of oats and 1/4 cup of syrup. For double, use 4 cups of oats and 1 cup of syrup. Make sure to keep the ratio of wet to dry ingredients the same for the best results. You can find the full recipe in the earlier sections. Maple pecan baked oatmeal is a tasty, easy dish to make. We covered key ingredients, like oats and maple syrup, and explored step-by-step instructions. You learned tips for perfect oatmeal and customization ideas to suit your taste. Plus, you now know how to store leftovers and modify the recipe for different sizes. Enjoy making this treat for breakfast or brunch. With simple steps and fun options, this dish can become a favorite staple in your home. Dive in and let your creativity shine!](https://soyumrecipes.com/wp-content/uploads/2025/07/6207140c-0000-48b0-b231-8e12e21811f1.webp)
Maple Pecan Baked Oatmeal Tasty Morning Delight
Are you ready for a sweet start to your day? Maple Pecan Baked Oatmeal is a tasty treat that combines
Are you ready for a sweet start to your day? Maple Pecan Baked Oatmeal is a tasty treat that combines
![- 1 cup sushi rice - 1 1/4 cups water - 2 tablespoons rice vinegar - 1 tablespoon sugar - 1/2 teaspoon salt - 1 medium cucumber, julienned - 1 medium carrot, julienned - 1 ripe avocado, sliced - 1/2 cup edamame, shelled - 1 small radish, thinly sliced These ingredients form the base of your veggie sushi bowls. Sushi rice is key for that perfect sticky texture. Fresh vegetables bring bright colors and crunch. The rice vinegar, sugar, and salt balance the flavors beautifully. - 2 sheets nori, cut into strips - 2 tablespoons sesame seeds - Soy sauce, for drizzling - Pickled ginger (optional) Adding nori sheets gives a fun twist. Sesame seeds add a nice crunch and nutty flavor. Soy sauce and pickled ginger enhance the dish, making it more authentic. - Makes 2 servings - Tips for scaling the recipe This recipe makes two hearty bowls. If you want to serve more, just double the ingredients. You can mix and match veggies based on what you have. This flexibility makes it easy to enjoy sushi bowls anytime. For the full recipe, check out [Full Recipe]. To make sushi rice, start by rinsing it. Put the rice in a bowl and cover it with cold water. Swirl the rice gently and drain the water. Repeat this until the water runs clear. This step removes excess starch. Next, cook the rice. In a medium saucepan, combine the rinsed rice and 1 1/4 cups of water. Bring it to a boil over medium heat. After it boils, lower the heat, cover, and let it simmer for 20 minutes. The rice should absorb all the water. While the rice cooks, mix the seasoning. In a small saucepan, combine 2 tablespoons of rice vinegar, 1 tablespoon of sugar, and 1/2 teaspoon of salt. Heat it over low heat until the sugar and salt dissolve. Let this mixture cool. Once the rice is cooked, fluff it with a fork. Drizzle the vinegar mixture over the rice and gently fold it in. Be careful not to mash the rice. Allow it to cool to room temperature. Now, it's time to build your veggie sushi bowl. Start with a generous scoop of sushi rice as the base. Next, arrange your veggies on top. Add julienned cucumber, carrot, sliced avocado, shelled edamame, and thinly sliced radish. Make it colorful and appealing! For added texture, sprinkle 2 tablespoons of sesame seeds on top. Also, place strips of nori around the bowl. This adds flavor and makes it look great. To finish, add sauces and garnishes. Drizzle soy sauce over the bowl. If you like, you can add pickled ginger on the side for extra flavor. When serving, remember that these bowls are best fresh. Enjoy your easy veggie sushi bowls with friends or family! To make great sushi rice, avoid overcooking it. Use the right water ratio. Too much water makes it mushy. Too little makes it hard. So, always measure carefully. Rinse the rice well to remove excess starch. This step helps the rice stick together without being gummy. To fluff sushi rice, use a fork. Gently stir it after cooking. Be careful not to mash it. Drizzle the vinegar mix over the rice while fluffing. This adds flavor and gives it a nice shine. Julienning veggies is easy with a sharp knife. Cut your cucumber and carrot into thin strips. This makes them easy to eat and pretty to look at. You can also use a julienne peeler for quick work. For sushi bowls, choose fresh, colorful vegetables. Cucumber adds crunch. Avocado gives creaminess. Edamame adds protein. Radishes add a peppery taste. Mix textures and colors for a beautiful bowl. Toppings can make your sushi bowl pop. Try adding sesame seeds for crunch. You can also add sliced green onions for a fresh taste. Seaweed strips give a nice umami flavor. To balance flavors, think about sweet and salty. Use soy sauce to add saltiness. If you want sweetness, add a bit of sugar or pickled ginger. This will make every bite exciting! {{image_2}} You can change the vegetables based on what you have or what is fresh. Try adding bell peppers, zucchini, or radishes for a fun twist. Seasonal veggies like asparagus or snap peas can bring new flavors. If you want more protein, add tofu or tempeh. Just pan-fry them until they are golden. You can also try marinating them for extra taste. Soy sauce is classic, but you can explore other sauces too. Try a spicy mayo made from mayo and sriracha. A sesame dressing adds a nutty flavor. For something sweet, mix honey with rice vinegar. You can also try a tangy ponzu sauce for brightness. Each sauce can change the whole vibe of your bowl! Think outside the box for your sushi bowls. You might create a Mexican-inspired bowl with black beans and avocado. Or go Italian with basil, tomatoes, and mozzarella. You can even have a themed sushi night! Set up a bar with various toppings and let everyone build their own bowl. It’s fun and creative, making dinner a special event. Check out the Full Recipe for more ideas! To store leftover veggie sushi bowls, place them in an airtight container. Keep the rice and veggies separate if you can. This helps keep everything fresh. If you store them together, the rice can make the veggies soggy. Use the bowls within three days for the best taste. You do not need to reheat sushi rice. Serving it cold or room temperature is best. To keep your veggies fresh, eat them raw. If you need to warm them, use a quick steam method. This helps them stay crisp and bright. You can freeze sushi bowls, but it's best to freeze rice and veggies separately. Sushi rice can freeze well. Just make sure it's cooled first. For veggies, blanch them before freezing to keep their color and taste. Avoid freezing avocado, as it does not thaw well. To make sushi rice, first rinse one cup of sushi rice under cold water. Keep rinsing until the water runs clear. This step removes extra starch. Next, add the rinsed rice and 1 ¼ cups of water to a medium saucepan. Bring it to a boil over medium heat. Once boiling, reduce the heat to low, cover, and simmer for 20 minutes. Check that the water has absorbed fully. After cooking, fluff the rice with a fork. In a small saucepan, mix 2 tablespoons of rice vinegar, 1 tablespoon of sugar, and ½ teaspoon of salt. Heat this until dissolved, then let it cool. Drizzle the mixture over the rice and fold gently. Let it cool to room temperature before using it in your bowls. Yes, you can use brown rice, but the texture is different. Brown rice has a nutty flavor and chewy texture. It takes longer to cook than white sushi rice. This can change the cooking time and water ratio. Brown rice also has more fiber and nutrients. If you prefer a softer texture, stick with sushi rice for this recipe. If you don’t have nori, try using lettuce leaves or rice paper. They add a nice crunch and fresh flavor. You can also use thin slices of cucumber for a fun twist. For a unique option, try using seaweed snacks. They have a similar taste and can work well in veggie sushi bowls. Veggie sushi bowls last about 2 to 3 days in the fridge. Store them in an airtight container to keep them fresh. To avoid soggy veggies, store the rice and toppings separately if possible. Always check for freshness before eating. If anything looks or smells off, it’s best to throw it away. This blog post covered how to make delicious veggie sushi bowls. You learned about the main ingredients, like sushi rice and fresh veggies. We walked through step-by-step instructions for cooking rice and assembling bowls. Tips for perfect sushi rice and variations helped enhance your dish. Now, you can enjoy customizing your sushi bowls. Use seasonal veggies or creative sauces to make each meal unique. Remember to store leftovers properly so you can savor them later. Enjoy the fun of sushi-making!](https://soyumrecipes.com/wp-content/uploads/2025/07/134e6c6f-8d00-467c-98ee-51d3e3b6b919.webp)
Looking for a fun and healthy meal? My easy veggie sushi bowls are the perfect solution! Packed with fresh veggies
![To make delicious Buffalo Chicken Stuffed Peppers, you will need the following items: - 4 large bell peppers (any color) - 2 cups cooked chicken, shredded - 1/2 cup buffalo sauce (adjust to taste) - 1/2 cup cream cheese, softened - 1 cup shredded cheddar cheese, divided - 1/2 cup Greek yogurt or sour cream - 1/4 cup chopped green onions - Celery salt, to taste - Pepper, to taste - Fresh parsley, for garnish These ingredients come together to create a tasty meal that everyone will love. If you have dietary needs, you can easily swap some ingredients. Here are a few ideas: - For a dairy-free option, use vegan cream cheese and cheese. - If you want to make it lighter, use shredded turkey instead of chicken. - You can replace Greek yogurt with dairy-free sour cream or omit it altogether. - For those who like less spice, use a mild sauce or barbecue sauce. These substitutions help you tailor the dish to your needs without losing flavor. Choosing the right bell peppers can enhance your dish. Here are some tips: - Look for firm peppers without soft spots or blemishes. - Choose peppers that feel heavy for their size; this means they are fresh. - Bright colors usually indicate better flavor, so pick red, yellow, or orange peppers. - If you can, smell the peppers; a fresh scent means they are ripe. Selecting the best bell peppers makes your stuffed peppers even more delicious. 1. First, preheat your oven to 375°F (190°C). 2. Take the bell peppers and slice the tops off. Remove the seeds and set the tops aside. 3. In a big bowl, mix shredded chicken, buffalo sauce, and softened cream cheese. 4. Add half of the shredded cheddar cheese, Greek yogurt, and green onions. Stir well. 5. Season the mix with celery salt and pepper to fit your taste. 6. Stuff each pepper with the buffalo chicken mix. Pack it tightly. 7. Place the stuffed peppers in a baking dish, standing upright. If needed, cut a little off the bottom. 8. Top each pepper with the other half of the cheddar cheese. 9. Cover the dish with foil and bake for 25 minutes. 10. Remove the foil and bake for 10-15 more minutes. Wait until the cheese is golden. 11. Let the peppers cool for a few minutes before adding fresh parsley on top. - Prep Time: 15 minutes - Total Time: 55 minutes Serve your stuffed peppers on a bright platter. Add extra green onions on top for color. You can also offer extra buffalo sauce or Greek yogurt on the side for dipping. For the full recipe, check out the details above. Enjoy your meal! To make the best stuffed peppers, start with fresh bell peppers. Choose firm ones without soft spots. Cut the tops off and remove the seeds. This step helps them cook evenly. When you stuff them, pack the filling tightly. This way, every bite is full of flavor. One common mistake is overcooking the peppers. Keep an eye on them while baking. If they get too soft, they may fall apart. Also, be sure to not skip seasoning. A little celery salt and pepper make a big difference. Make sure to taste the filling before stuffing. Adjust the buffalo sauce for your heat preference. To add more flavor, consider these tips. Mix in extra spices like garlic powder or onion powder. You can also add chopped jalapeños for heat. A splash of lime or lemon juice brightens the dish. Try drizzling extra buffalo sauce on top before serving. This adds a nice kick and looks great too. For the full recipe, check the detailed instructions. {{image_2}} You can easily make a vegetarian version of buffalo chicken stuffed peppers. Swap the chicken for chickpeas or cauliflower. Both options add great texture and flavor. Use the same buffalo sauce to keep the spicy kick. Cream cheese can be replaced with ricotta or a vegan cream cheese. This keeps the filling creamy and delicious. For a low-carb take, skip the peppers and use zucchini or eggplant instead. They have fewer carbs and soak up flavors well. You can still use the buffalo chicken mixture. Just hollow out the zucchini or eggplant and fill them up. This way, you enjoy the same great taste while staying on track with your diet. Don't be afraid to get creative with flavors! Try adding different cheeses like blue cheese or pepper jack for a twist. You can also mix in ingredients like black beans or corn for added texture. Experiment with spices, too. A little cumin or smoked paprika can change the whole dish. The beauty of stuffed peppers is their versatility. For the full recipe and cooking instructions, check out the [Full Recipe]. After you enjoy your buffalo chicken stuffed peppers, store any leftovers in a tight container. Place them in the fridge for up to three days. Make sure to let them cool down first. This keeps them fresh and tasty for your next meal. If you want to save stuffed peppers for later, freezing is a great option. Wrap each stuffed pepper in plastic wrap. Then, place them in a freezer-safe bag or container. Make sure to remove as much air as possible. You can freeze them for up to three months. When you're ready to eat, just thaw them in the fridge overnight. To reheat your stuffed peppers, preheat the oven to 350°F (175°C). Place the peppers in an oven-safe dish. Cover with foil to keep them moist. Heat for about 20-25 minutes until warm. You can also microwave them for faster results. Just place a pepper on a microwave-safe plate and heat for about 2-3 minutes. Enjoy your meal as if it was fresh from the oven! To make buffalo chicken stuffed peppers, first, gather your ingredients. You will need bell peppers, cooked chicken, buffalo sauce, cream cheese, cheddar cheese, Greek yogurt, and green onions. Preheat your oven to 375°F (190°C). Cut the tops off the bell peppers and clean out the seeds. In a bowl, mix shredded chicken, buffalo sauce, cream cheese, half the cheddar cheese, Greek yogurt, and green onions. Add celery salt and pepper to taste. Stuff the mixture into the peppers, top with cheese, and bake for 25 minutes covered, then 10-15 minutes uncovered. For the full recipe, check the earlier section. Yes, you can use various sauces. If you want a milder flavor, try barbecue sauce or ranch dressing. For a spicy kick, use a hot sauce like Sriracha or a spicy habanero sauce. You can also try teriyaki or sweet chili sauce for a unique twist. Just make sure the sauce complements the chicken well. If you need a substitute for cream cheese, try using Greek yogurt or cottage cheese. Both options add creaminess and a bit of tang. You can also use ricotta cheese for a lighter texture. Just remember that each option will change the flavor slightly, so pick one that fits your taste. This blog post covered ingredients, cooking steps, and variations for buffalo chicken stuffed peppers. We explored ingredient swaps for different diets and tips for picking the best peppers. I shared handy tips to avoid mistakes and enhance flavors. You can store leftovers well, freeze them, and reheat easily. Buffalo chicken stuffed peppers are fun to make and enjoy. With these insights, you can create tasty dishes your family will love. Happy cooking!](https://soyumrecipes.com/wp-content/uploads/2025/07/9cfa48ac-a58b-43cf-bb3a-9f277bfb89c1.webp)
Buffalo chicken stuffed peppers are a tasty and easy way to spice up your dinner. This dish combines hearty bell
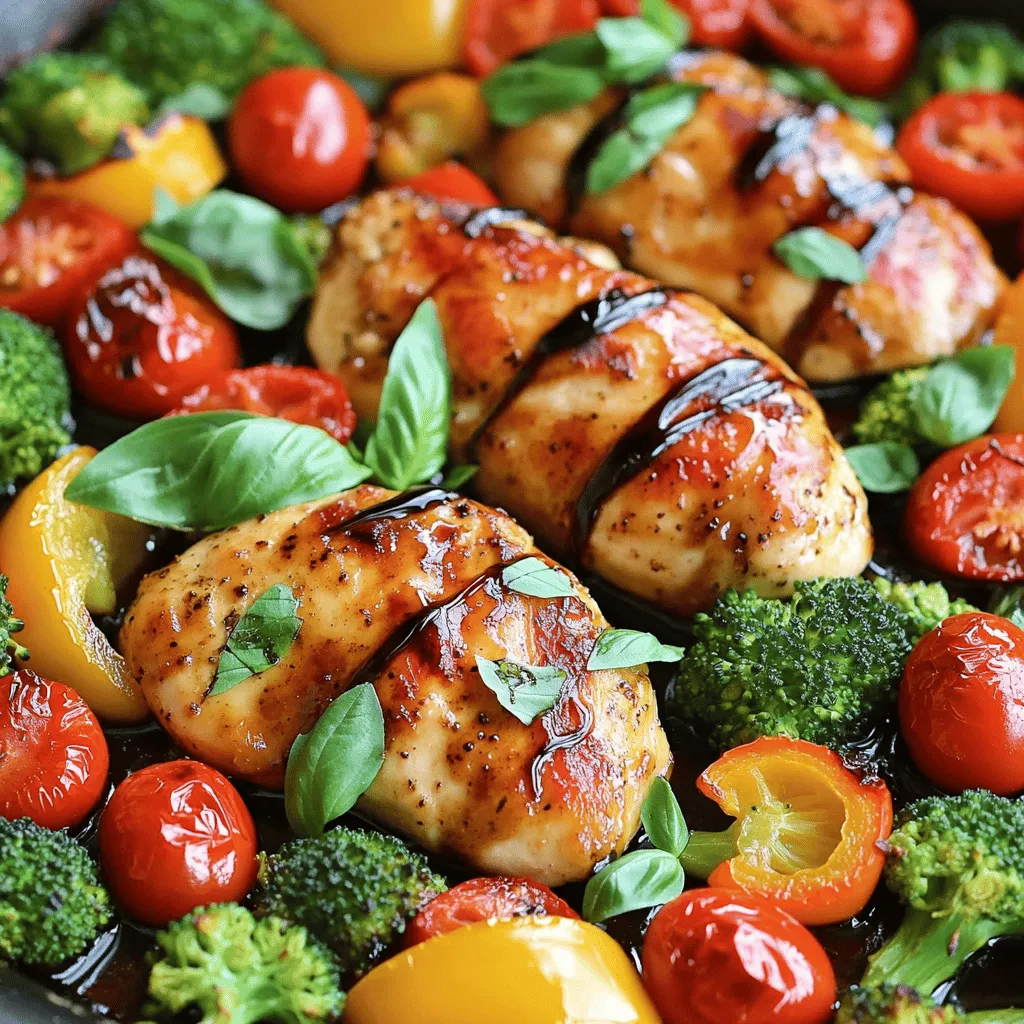
Are you ready to whip up a delicious dinner with just one pan? My Savory One-Pan Balsamic Chicken and Veggies
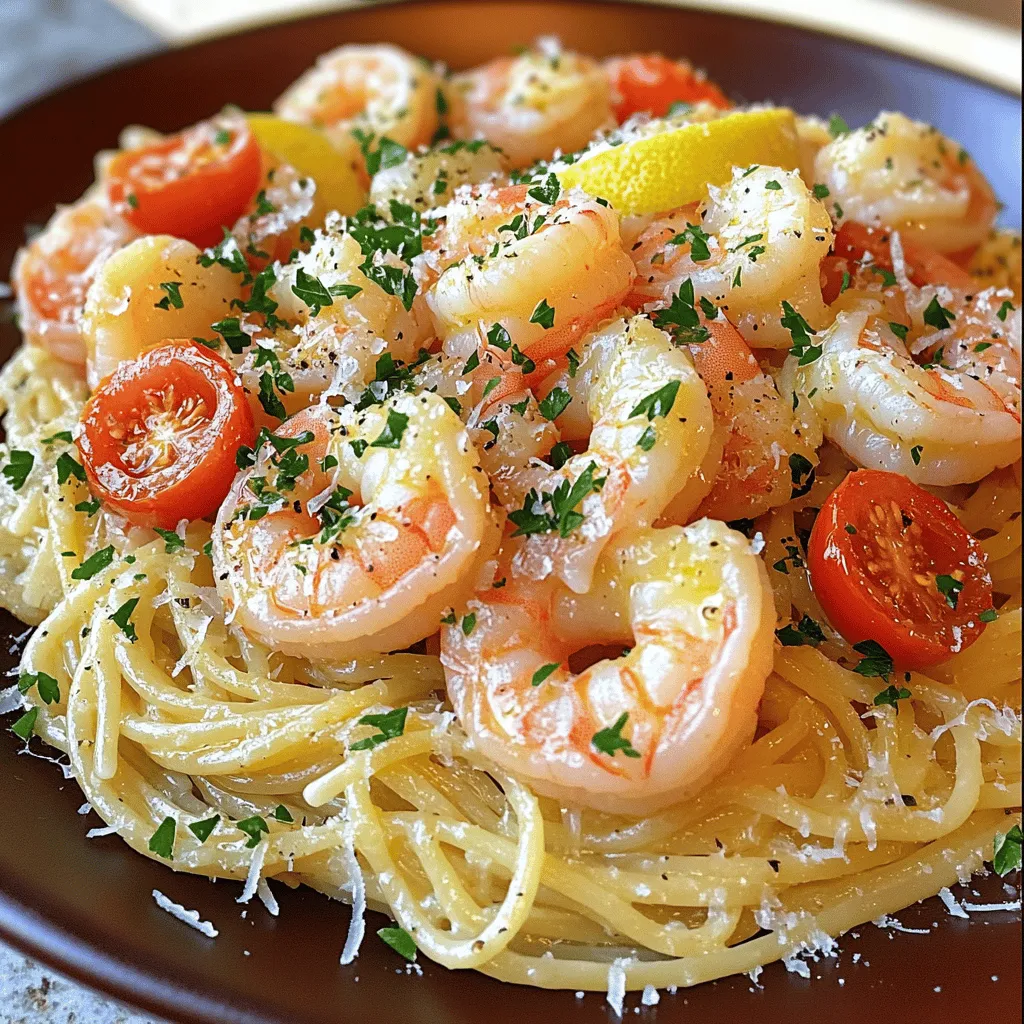
Are you craving a quick and tasty dinner? Try my Easy Shrimp Scampi! This dish combines succulent shrimp, fresh pasta,

If you’re craving a dish bursting with flavor, try my Garlic Herb Butter Steak Bites. This simple recipe combines tender
![To make Baked Eggplant Parmesan, begin with these key ingredients: - Eggplants and their preparation - 2 medium eggplants, sliced into 1/4 inch rounds - 1 teaspoon salt I recommend salting the eggplant slices. This step helps draw out moisture and bitterness, giving you a better flavor. Let them sit for about 30 minutes. Afterward, rinse the slices and pat them dry. - Cheese varieties and alternatives - 2 cups marinara sauce (homemade or store-bought) - 2 cups shredded mozzarella cheese - 1 cup grated Parmesan cheese For a creamy texture, use both mozzarella and Parmesan. You can swap mozzarella for provolone if you like a sharper taste. - Breading and seasoning components - 1 cup all-purpose flour - 3 large eggs, beaten - 1 cup breadcrumbs (preferably Italian seasoned) - 2 teaspoons dried basil - 1 teaspoon dried oregano - Olive oil spray These ingredients create a crispy layer on the eggplant. The Italian seasoned breadcrumbs add depth to the flavor. Fresh herbs are great too, if you have them on hand! This list covers everything you need to whip up a delicious Baked Eggplant Parmesan. For the complete recipe, check the Full Recipe section above. First, preheat your oven to 375°F (190°C). This helps cook everything evenly. Next, slice the eggplants into 1/4 inch rounds. Lay them on a paper towel and sprinkle with salt. The salt draws out moisture and bitterness. Let them sit for about 30 minutes. After that, rinse the slices and pat them dry with another paper towel. This step is key for a great texture. Now, let’s set up our breading station. Place flour in one shallow dish. In another dish, pour the beaten eggs. In a third dish, mix breadcrumbs with dried basil and oregano. This setup makes breading easy and fun. Now it’s time to coat the eggplant slices. Dip each slice first into the flour. Then, dunk it into the beaten eggs. Finally, coat it with the breadcrumb mix. Press lightly to make sure it sticks well. This creates a crunchy outer layer. Place the breaded eggplant slices on a baking sheet lined with parchment paper. Spray them lightly with olive oil spray. This helps them get golden brown. Bake in the preheated oven for 25-30 minutes, flipping halfway through. You want them crispy and brown. Let’s build our Baked Eggplant Parmesan. Start by spreading a thin layer of marinara sauce on the bottom of a 9x13 inch baking dish. Then, arrange a layer of baked eggplant slices over the sauce. Top with a mix of mozzarella and Parmesan cheese. Repeat these layers: sauce, eggplant, and cheeses until you use all the ingredients. Finish with a final layer of marinara and a generous amount of mozzarella and Parmesan on top. Cover the dish with aluminum foil. Bake for 25 minutes, then remove the foil. Bake for an additional 15-20 minutes until the cheese is bubbly and golden. This creates a beautiful, hearty dish. Let it cool for about 10 minutes before slicing. If you like, garnish with fresh basil leaves for a touch of color. For the complete recipe, check out the Full Recipe. When handling eggplants, wash them well to remove dirt. Use a sharp knife to slice them. Always cut away from your body to stay safe. To save time, set up your tools and ingredients before you start. This helps you work faster and stay organized. Baking gives a lighter dish than frying. Frying can add extra oil, making it heavy. To keep eggplant from being soggy, salt it before cooking. Let it sit for about 30 minutes. This step draws out moisture and helps with texture. Herbs can boost flavor. I suggest using dried basil and oregano. Fresh herbs like parsley or thyme can also add freshness. For marinara sauce, homemade is best, but store-bought works too. Choose a sauce with simple, natural ingredients for the best taste. For the full recipe, check out the detailed instructions! {{image_2}} If you need gluten-free options, swap regular flour and breadcrumbs for gluten-free versions. Use almond flour or rice flour for breading. This keeps the texture crispy without gluten. For a vegan version, replace the cheeses with dairy-free alternatives. Nutritional yeast can add a cheesy flavor. Use cashew cheese or other plant-based cheese for a creamy texture. Want to boost nutrition? Add spinach or mushrooms to your layers. These ingredients add flavor and texture. For a spicy kick, try red pepper flakes or diced jalapeños. Mix them into your marinara sauce for extra heat. Adjust to your taste and enjoy the punch! Pair Baked Eggplant Parmesan with a fresh side salad. A simple green salad offers a great contrast. Garlic bread also complements this dish well. If you have leftovers, use them in a wrap or sandwich. The flavors meld beautifully, making a tasty lunch option. To keep your Baked Eggplant Parmesan fresh, place it in the fridge. Use an airtight container. It will last for about three to four days. If you want to store it longer, consider freezing. Cut portions into smaller pieces. Wrap them tightly in plastic wrap, then place in a freezer bag. This helps prevent freezer burn. Baked Eggplant Parmesan can last up to three months in the freezer. When reheating, take it from the fridge or freezer. Preheat your oven to 350°F (175°C). If frozen, let it thaw overnight in the fridge. Place the dish in the oven for about 20-25 minutes. Cover it with foil to avoid burning the cheese. Choose glass or plastic containers with tight lids. Glass containers are durable and help keep moisture in. If using plastic, ensure it's BPA-free. Always label your containers with the date. This helps track how long your leftovers last. To keep your dish fresh, avoid stacking heavy items on top. This helps keep the layers intact and prevents spills. For extra freshness, line your container with parchment paper before adding the dish. This adds a layer of protection against moisture. How long can Baked Eggplant Parmesan be stored? You can store Baked Eggplant Parmesan in the fridge for up to five days. Make sure to cover it tightly. For longer storage, freeze it for up to three months. Can I prepare this dish in advance? Yes, you can prepare Baked Eggplant Parmesan ahead of time. Assemble it, then cover and refrigerate. Bake it when you are ready to eat. What is the best way to reheat Baked Eggplant Parmesan? The best way to reheat it is in the oven. Preheat to 350°F (175°C). Cover with foil and heat for about 20 minutes. Why is my eggplant soggy? Soggy eggplant may happen if it was not salted enough. Salting helps draw out moisture. Let the slices sit for at least 30 minutes, then rinse and dry well. How can I make my Baked Eggplant Parmesan more flavorful? To boost flavor, add fresh herbs like basil or parsley. You can also mix different cheese types or use spicy marinara sauce. Caloric breakdown of the dish One serving of Baked Eggplant Parmesan has about 350 calories. This can vary based on serving size and ingredients used. Key nutritional benefits of the main ingredients Eggplants are low in calories and high in fiber. They help with digestion. Cheese provides calcium and protein, while marinara sauce adds vitamins from tomatoes. Enjoying this dish gives a balance of nutrients. For the full recipe, check [Full Recipe]. Baked Eggplant Parmesan is a tasty dish that anyone can make. We covered easy steps to prepare eggplants, layer cheese, and bake everything perfectly. I shared tips for achieving a great texture and adding flavor. Remember to store leftovers correctly so they stay fresh. Variations like gluten-free or vegan options make this dish easy to enjoy for everyone. With these techniques, you can impress your family and friends with delicious meals. Enjoy making and sharing your own Baked Eggplant Parmesan!](https://soyumrecipes.com/wp-content/uploads/2025/07/385c9dda-462a-4195-bdbf-6b72173b7655.webp)
If you’re craving a dish that’s both hearty and full of flavor, look no further than Baked Eggplant Parmesan. This
![- 1 pre-made flatbread or pizza dough - 1 cup mozzarella cheese, shredded - 2 ripe tomatoes, thinly sliced The main ingredients create a classic Margherita flatbread. You start with a flatbread or pizza dough as your base. Then, you add a cup of fresh mozzarella cheese. This cheese melts beautifully and adds creaminess. Next, you need two ripe tomatoes. Their sweetness balances the cheese and brings freshness. - 1/4 cup fresh basil leaves - 2 tablespoons olive oil - 1 teaspoon balsamic glaze - Salt and pepper to taste Optional ingredients can elevate your flatbread. Fresh basil leaves add a lovely aroma and flavor. Olive oil gives a rich taste and helps the flatbread crisp. Balsamic glaze adds a touch of sweetness and complexity. Finally, don’t forget salt and pepper. They enhance all the flavors. Each serving of this flatbread has about 300 calories. It contains 15 grams of fat, 30 grams of carbs, and 12 grams of protein. This makes it a tasty yet balanced meal option. It’s perfect for lunch or dinner. Enjoy the rich flavors without too much guilt. For the complete guide, check the Full Recipe. 1. First, preheat your oven to 450°F (232°C). This ensures a crispy base. 2. If you use pizza dough, roll it out into a flat shape. Aim for about 1/4 inch thick. 3. Place your dough or pre-made flatbread onto a baking sheet lined with parchment paper. This makes cleanup easier. 1. Brush the flatbread lightly with olive oil. Spread it evenly across its surface. 2. Next, add the mozzarella cheese. Make sure it covers the entire flatbread. 3. Now, arrange the thin slices of tomato over the cheese. 4. Sprinkle a little salt and pepper for flavor. This step is key for a tasty flatbread. 1. Bake the flatbread in the preheated oven for 10 to 12 minutes. Look for the cheese to be bubbly and slightly golden. 2. Once done, take it out and add fresh basil leaves. 3. If you like, drizzle with balsamic glaze for extra sweetness. 4. Let it cool for a minute, then slice into pieces and serve warm. For the full recipe, check out the details above. To get a crispy base for your flatbread, I recommend using a hot oven. Set your oven to 450°F (232°C) and preheat it well. This helps the flatbread cook evenly. If you use pizza dough, roll it out thin. A thinner base will cook faster and get crispier. When you brush the flatbread with olive oil, make sure to cover it well. This also helps create that nice crunch. To avoid soggy flatbread, do not overload it with toppings. Use just enough cheese and tomatoes to keep it light. If you add too much, the moisture will make it soggy. To add more flavor to your Margherita flatbread, think about extra toppings. You can use sliced olives, roasted garlic, or even arugula. Fresh herbs like oregano or thyme work well, too. They add great taste and aroma. Switching up the cheese can also change the flavor. While mozzarella is classic, try using goat cheese or feta for a twist. Each type of cheese brings its own unique taste to the dish. When it comes to serving, pairing the flatbread with a light salad is great. A simple arugula salad with lemon dressing complements it well. For drinks, a glass of chilled white wine or sparkling water works nicely. For a fun presentation, cut the flatbread into small squares or triangles. Serve it on a wooden board with fresh basil sprigs. This makes it look inviting and tasty. For the full recipe and all the details, check out the [Full Recipe]. {{image_2}} You can change your flatbread with fresh, seasonal toppings. In spring, add tender asparagus or sweet peas. In summer, try juicy peaches or zucchini slices. Fall brings squash or roasted peppers. Winter can feature hearty kale or Brussels sprouts. Each season offers delicious options! These toppings keep your flatbread exciting and fresh. If you need a gluten-free option, use a gluten-free flatbread. Many stores sell these now. You can also make your own with almond flour or chickpea flour. For vegan choices, swap the mozzarella with vegan cheese. Nutritional yeast can add a cheesy flavor. Load up on veggies for toppings instead! Want to add some heat? Sprinkle crushed red pepper flakes on top. For a herby taste, mix in some dried oregano or thyme. You can also drizzle unique sauces. Try pesto, sriracha, or a balsamic reduction. These small changes can create big flavor shifts in your flatbread. Enjoy experimenting! To keep your Margherita flatbread fresh, store it in an airtight container. This helps prevent it from drying out. If you want to freeze it, wrap it tightly in plastic wrap and then in foil. This method keeps out air and moisture. The flatbread can last up to three days in the fridge. In the freezer, it stays good for up to three months. When you store it properly, you maintain its texture and taste. To reheat your flatbread, use the oven for the best results. Preheat it to 350°F (177°C). Place the flatbread on a baking sheet. Heat for about 5-10 minutes until it’s warm and the cheese is melted. This method keeps the base crispy. You can also use a toaster oven for quick reheating. Avoid using the microwave if you want to keep that delightful crunch. You can make the flatbread ahead of time to save time. Assemble it fully, then cover it and store it in the fridge for up to a day. When ready, bake it straight from the fridge. This dish works well in a meal plan. Serve it with a salad or soup for a complete meal. You can also cut it into smaller pieces for appetizers or snacks at gatherings. Enjoy the ease of having this delicious flatbread ready to go! To make Margherita flatbread from scratch, you need simple ingredients. Here’s what you will need: - 2 cups all-purpose flour - 1 teaspoon salt - 1 teaspoon sugar - 1 packet (2 1/4 teaspoons) of yeast - 3/4 cup warm water - 1 tablespoon olive oil Start by mixing the flour, salt, and sugar in a bowl. In another bowl, mix the yeast with warm water. Let it sit for about 5 minutes until it bubbles. Then, combine both mixes and add olive oil. Knead the dough for about 5-7 minutes. Let it rise in a warm place for 1 hour. After it doubles, roll it out to your desired shape. Now you are ready to assemble your flatbread. Yes, you can use other cheeses. Cheddar, provolone, or gouda can add unique flavors. If you want a tangy taste, try feta cheese. Each cheese changes the dish's flavor, so feel free to experiment. Just keep in mind that mozzarella melts nicely, which is perfect for flatbread. If you don’t have fresh basil, dried herbs work well too. Oregano or thyme can add flavor. Alternatively, you can use spinach or arugula for a fresh touch. If you have pesto, that can also be a great substitute. Just spread it on before adding cheese and tomatoes. Baking the flatbread takes about 10 to 12 minutes at 450°F (232°C). Look for the cheese to bubble and turn golden. After baking, let it cool for a minute before slicing. This helps the cheese set a little, making it easier to cut. Yes, grilling is a fun way to cook Margherita flatbread. Preheat your grill to medium heat. Make sure to oil the grill grates to prevent sticking. Place the flatbread on the grill for about 3-5 minutes per side. This gives it a smoky flavor and nice grill marks. Keep an eye on it to avoid burning. We covered a lot about making Margherita flatbread. You learned about main and optional ingredients, with tips for perfecting crispiness and flavor. The post also explored variations for different diets and seasons. Lastly, we discussed storage, reheating, and meal prep ideas. Making this dish is fun and flexible. Whether you try new toppings or stick with the classic, you can’t go wrong. Enjoy your tasty creation!](https://soyumrecipes.com/wp-content/uploads/2025/07/f5c17a1f-b243-432c-94d6-0e39f22c2c83.webp)
If you love a fresh and simple dish, you’ll adore this Easy Margherita Flatbread. With just a few ingredients, you
. How to sauté the vegetables Start by heating olive oil in a large pot over medium heat. Add diced onion, chopped carrots, and celery. Cook these for about 5 to 7 minutes. You want them to soften but not brown. Stir them often so they cook evenly. This step builds a great flavor base. Properly cooking the chicken Once the vegetables soften, add low-sodium chicken broth to the pot. Bring the broth to a boil. After boiling, reduce the heat and add boneless chicken breasts. Cover the pot and let it simmer for 15 to 20 minutes. The chicken should be fully cooked and tender. Shredding chicken technique After cooking, remove the chicken from the pot. Use two forks to shred the chicken. Make sure to pull it apart into bite-sized pieces. This makes it easier to eat and blends well into the soup. Return the shredded chicken to the pot to keep all the flavors together. Adding the broth and spices You already added broth when cooking the chicken. After shredding, check the broth flavor. Add dried thyme and parsley for depth. Stir in salt and pepper to enhance the taste. A pinch of salt can make a big difference. Cooking noodles for perfect texture Now it's time to add the egg noodles. Follow the package instructions for cooking time. Usually, it takes about 6 to 8 minutes. Stir them occasionally to prevent sticking. Perfect noodles will be tender yet firm. Final seasoning tips Once the noodles are cooked, taste the soup again. Adjust the seasoning with more salt and pepper if needed. The soup should feel warm and comforting. Serve it hot and garnish with fresh parsley. This adds a pop of color and fresh flavor. For the full recipe, check out the [Full Recipe]. To make your chicken noodle soup shine, start with homemade broth. It has a rich flavor that store-bought broth can't match. If you have time, simmer bones and veggies for hours. This step adds depth to your soup. Next, add fresh herbs. They brighten up the dish. Fresh parsley or thyme works well. Toss them in at the end to keep their flavor strong. Also, balance flavors with salt. Taste as you go. This step helps you find the right seasoning. Too much salt can ruin your soup, but too little makes it bland. Using a slow cooker opens up new options. Simply add all ingredients and let it cook on low. This method allows flavors to meld over time. You can enjoy a hot meal when you get home. If you're short on time, try an Instant Pot. It cooks everything quickly. Put all your ingredients in, seal the lid, and set it to the soup setting. In about 30 minutes, you’ll have warm, comforting chicken noodle soup. For complete instructions, check out the Full Recipe. {{image_2}} When you make classic chicken noodle soup, you can change it to fit your needs. Here are some great options. - Gluten-free versions: Use gluten-free egg noodles. They taste great and work well in the soup. Check the package for cooking times, as they may differ from regular noodles. - Low-sodium options: Opt for low-sodium chicken broth. This choice helps reduce salt and keeps the soup healthy. You can also skip added salt while cooking. - Different proteins: If you have turkey, use it instead of chicken. Cook it the same way. You can also use rotisserie chicken for a quick meal. This saves time and adds flavor. - Vegetable substitutions: Feel free to swap in your favorite veggies. Peas, green beans, or corn can add color and taste. Use what you have on hand, and keep it fun! Explore more ideas and tips in the [Full Recipe]. To keep your chicken noodle soup fresh, store it in a tight container. Place it in the fridge. It will stay good for about three to four days. If you want to save it longer, freeze the soup. Use freezer-safe containers or bags for this. Make sure to leave some space at the top. The soup will expand as it freezes. When it's time to eat again, you can use two methods to reheat the soup: microwave or stovetop. If you use the microwave, heat it in short bursts. Stir after each burst to get even heat. For stovetop, pour the soup into a pot and heat on low. Stir often to prevent any sticking. To keep the noodles from getting mushy, try this tip: add fresh noodles when you reheat. If you have leftover noodles, cook them separately and mix them in just before serving. This way, they stay firm and tasty. Enjoy your comforting bowl of soup again! How long does chicken noodle soup last in the fridge? Chicken noodle soup lasts about 3 to 4 days in the fridge. It's best to store it in an airtight container. This keeps it fresh and tasty for your next meal. Can I use rotisserie chicken in this recipe? Yes, you can use rotisserie chicken! It saves time and adds great flavor. Just shred the chicken and add it to the soup near the end. This way, it warms up nicely without cooking too long. What can I serve with chicken noodle soup? Chicken noodle soup pairs well with many sides. You can serve it with crusty bread, a simple salad, or crackers. These options enhance the meal and make it feel more filling. For the complete recipe, check out the Full Recipe section. In this post, we covered how to make a tasty chicken noodle soup. We explored the key ingredients, including chicken, broth, and veggies. You learned step-by-step how to prepare and cook the soup, plus tips for great flavor. Variations for different diets and storing leftovers were also shared. Remember, making soup at home is simple and allows for creativity. Enjoying your warm bowl of soup can bring comfort and joy on any day.](https://soyumrecipes.com/wp-content/uploads/2025/07/43cfbef4-4130-4667-bf7b-8aeeccb8fcfb.webp)
When you crave comfort, nothing beats a warm bowl of Classic Chicken Noodle Soup. This dish brings joy to your
![- 4 salmon fillets - 1 cup teriyaki sauce (store-bought or homemade) - 1 tablespoon sesame oil - 2 cups broccoli florets - 1 cup snap peas - 1 red bell pepper, sliced - 2 green onions, chopped - 1 tablespoon sesame seeds - Cooked jasmine rice (for serving) When I cook this dish, I love using fresh ingredients. They make the meal taste amazing. Salmon fillets are the star, providing a rich flavor. Teriyaki sauce gives a sweet and savory touch. Sesame oil adds a nice nuttiness that ties everything together. For the veggies, I choose broccoli florets, snap peas, and red bell pepper. They add color and crunch. Green onions and sesame seeds are perfect garnishes, bringing a pop of taste. - Alternatives for Salmon: If you want to switch things up, you can use chicken or tofu. Both options will soak up the teriyaki sauce well. - Homemade vs. Store-Bought Teriyaki Sauce: I often use store-bought sauce for ease. But, homemade sauce is fun to make and can taste fresher. Just mix soy sauce, honey, garlic, and ginger. - Other Vegetable Options: Feel free to swap in your favorite veggies. Zucchini, carrots, or bell pepper can work great. The key is to use what you love. For the full recipe, check out [Full Recipe]. Enjoy making this dish! First, preheat your oven to 400°F (200°C). This temperature cooks the salmon perfectly. While the oven heats, grab a large rimmed baking sheet. Line it with parchment paper. This makes cleanup a breeze and keeps food from sticking. Now, let’s get to the fun part! Take the salmon fillets and place them on one side of the baking sheet. In a bowl, mix the teriyaki sauce with sesame oil. Brush this sauce on each salmon fillet. Make sure to coat them well for great flavor. Next, let’s prepare the veggies. In another bowl, toss the broccoli, snap peas, and sliced red bell pepper. Use the remaining teriyaki sauce to coat the vegetables evenly. Once mixed, spread the veggies on the baking sheet next to the salmon. Make sure they are not crowded. This helps them cook evenly. It’s time to bake! Slide the baking sheet into your preheated oven. Bake for about 12 to 15 minutes. The salmon is done when it flakes easily with a fork. The vegetables should be tender but still crisp. Keep an eye on your meal as it cooks. You want to see that beautiful caramelization on the salmon. When it looks ready, carefully take the sheet pan out of the oven. Let it rest for a few minutes. Drizzle the reserved teriyaki sauce over everything for added flavor. For the final touch, sprinkle chopped green onions and sesame seeds on top. This adds a nice crunch and a pop of color. Enjoy your colorful and tasty sheet pan teriyaki salmon! For the complete recipe, check out the Full Recipe link above. - Ensuring Moist Salmon To keep your salmon moist, avoid overcooking. Bake at 400°F for 12-15 minutes. The salmon should flake easily when done. Brush it with teriyaki sauce before baking to seal in flavor and moisture. - Keeping Vegetables Crisp For crisp vegetables, spread them evenly on the baking sheet. Don't overcrowd them. Baking at high heat helps keep their texture. Check for doneness; they should be tender but still have a crunch. - Pairing with Jasmine Rice Serve your teriyaki salmon over a bed of jasmine rice. The rice absorbs the sauce and adds a nice base to the dish. Cook the rice according to package instructions for the best results. - Garnishing Ideas Garnish with chopped green onions and sesame seeds. This adds color and a fresh touch. You can also add a slice of lime for a zesty kick. - Adding Spices For extra flavor, consider adding spices such as garlic powder or ginger. A pinch of red pepper flakes can add a nice heat. Mix them into the teriyaki sauce for an easy boost. - Using Fresh Herbs Fresh herbs like cilantro or basil can brighten the dish. Chop and sprinkle them on top just before serving. This adds freshness and elevates the overall flavor. For the Full Recipe, check out the detailed steps and ingredients. {{image_2}} You can easily swap salmon for chicken. Use chicken breasts or thighs. The cooking time may change. Bake chicken for about 20-25 minutes. Check if it reaches 165°F (75°C) for safety. For vegan options, use tofu instead of salmon. Firm tofu works best. Press it to remove extra water, then marinate it in teriyaki sauce. Bake the tofu for about 20 minutes. This gives you a delicious, plant-based meal. Want some heat? Add red pepper flakes to your teriyaki sauce. You can also mix in fresh ginger for an extra kick. This sweet and spicy twist makes the dish exciting. If you want more sauce ideas, try hoisin or sweet chili sauce. These can add depth to your meal. You can also make a garlic-soy sauce blend for a savory option. In spring, use asparagus and snap peas. These bright vegetables add color and flavor. They cook quickly and pair well with teriyaki. In fall, consider adding butternut squash and Brussels sprouts. These heartier vegetables bring warmth to your dish. Just chop them into bite-sized pieces and bake as usual. For the Full Recipe, check the main article. To store your leftover teriyaki salmon, use airtight containers. Glass or plastic containers work well. Make sure they are clean and dry before adding food. Cool the dish to room temperature before sealing. Place the salmon and vegetables in the container together for best flavor. - Recommended Containers: Glass or BPA-free plastic containers. - Best Practices for Refrigeration: Store in the fridge for up to three days. You can reheat your salmon in the oven or microwave. Each method has its perks. The oven keeps the salmon moist and adds a little crispness. The microwave is quicker but may make the salmon soggy. - Oven vs. Microwave Reheating: Preheat the oven to 350°F (175°C). Place salmon on a baking sheet. Heat for about 10 minutes. For the microwave, place salmon in a microwave-safe dish. Heat for 1-2 minutes, checking often. - Tips for Maintaining Texture: Cover the salmon with a damp paper towel in the microwave to keep it moist. If you want to save some salmon for later, freezing works great. This dish freezes well if you store it properly. - How to Freeze the Dish: Allow the salmon and veggies to cool completely. Then, wrap them tightly in plastic wrap or place them in freezer bags. Squeeze out as much air as possible. Label the bags with the date. - Thawing and Cooking Tips: To thaw, place the bag in the fridge overnight. For cooking, reheat from frozen in the oven at 350°F (175°C) for 20-25 minutes, or until warmed through. For the full recipe, check the details above! Bake teriyaki salmon for 12-15 minutes at 400°F (200°C). The salmon is done when it flakes easily with a fork. Timing may vary based on thickness. Always check the center for doneness. This quick cooking makes it easy to enjoy a delicious meal on busy nights. Yes, you can use frozen salmon. Just adjust your cooking time. Bake it for about 15-20 minutes instead of 12-15 minutes. If possible, thaw the salmon in the fridge overnight for best results. If you're in a hurry, you can cook it from frozen. Just remember to check if it’s fully cooked before serving. Pair teriyaki salmon with jasmine rice for a complete meal. The rice soaks up the delicious sauce. You can also serve it with steamed vegetables, like broccoli and snap peas. A light salad or pickled veggies also works well. These sides add color and nutrition to your plate. This blog post covered how to make delicious teriyaki salmon with fresh veggies. You learned about essential ingredients, including salmon, teriyaki sauce, and different vegetables. I shared step-by-step baking instructions to ensure perfect results. You also found tips for enhancing flavor and storing leftovers. In conclusion, making teriyaki salmon is simple and rewarding. With easy swaps and variations, anyone can enjoy this tasty dish. Let your creativity shine in the kitchen!](https://soyumrecipes.com/wp-content/uploads/2025/07/70966695-aebb-463a-a906-2e7ae5f0c3d3.webp)
Are you ready for a quick, tasty meal? This Sheet Pan Teriyaki Salmon is here to impress! With simple ingredients
