Skip to content
DisclaimerTerms Of UseGDPR PolicyCookie Policy

So Yum Recipes

  • Home
  • Drinks
  • Appetizers
  • Dinner
  • Dessert
  • About
  • Contact
  • Privacy Policy
DisclaimerTerms Of UseGDPR PolicyCookie Policy

Chloe

- 2 cups all-purpose flour - 1/3 cup granulated sugar - 1 tablespoon baking powder - 1/2 teaspoon salt - 1/2 cup unsalted butter, chilled and cubed - 1/2 cup heavy cream - 1 large egg - 1 teaspoon vanilla extract - 1 cup fresh or frozen cherries, pitted and chopped - 1/2 cup semi-sweet chocolate chips - 1 egg wash (for brushing) When making cherry chocolate chip scones, the main ingredients are simple and easy to find. Each ingredient plays a key role in creating a light and flaky scone. The flour gives structure, while sugar adds sweetness. The baking powder helps the scones rise. The butter is crucial; it creates that tender crumb we all love. Heavy cream adds richness, while the egg binds everything together. Don’t forget the cherries and chocolate chips; they bring joy in every bite! - Powdered sugar for dusting - Whipped cream for serving Optional ingredients can enhance your scones. Dusting with powdered sugar gives a lovely finish. Whipped cream also makes for a delightful topping. You can serve these scones warm, with a dollop of whipped cream. It adds a touch of elegance to your dish. For the full recipe, check out the details above. - Preheat your oven to 400°F (200°C). - Line a baking sheet with parchment paper. - In a large bowl, mix together 2 cups of flour, 1/3 cup sugar, 1 tablespoon baking powder, and 1/2 teaspoon salt. This creates a solid base for your scones. - Add 1/2 cup of cold, cubed butter to the flour mix. - Use your fingers or a pastry cutter to blend the butter. You want it to look like coarse crumbs. - In another bowl, whisk together 1/2 cup heavy cream, 1 large egg, and 1 teaspoon vanilla extract. This mix brings moisture and flavor. - Pour the wet mix into the dry ingredients. Gently fold them together until just combined. Don’t overmix; a few lumps are okay! - Fold in 1 cup of chopped cherries and 1/2 cup of chocolate chips. This adds sweetness and texture to the dough. - Transfer the dough to a floured surface. Knead it gently a couple of times until it holds together. - Pat the dough into a circle, about 1-inch thick. Cut it into 8 wedges and place them on the baking sheet. - Brush the tops with an egg wash made from 1 egg whisked with 1 tablespoon water. This gives them a beautiful golden color. - Bake the scones for 15-20 minutes. They should turn lightly golden on top. - Let them cool for a few minutes on the baking sheet before moving them to a wire rack. Enjoy them warm for the best taste! For the full recipe, check out the Cherry Chocolate Chip Scones section. To make the best cherry chocolate chip scones, focus on texture. You want them light and fluffy. Here are a few tips to help you achieve that perfect texture: - Use cold butter: Chilled butter creates steam, helping the scones rise. - Do not overmix: Gently fold the dough until just combined. Overmixing can lead to tough scones. - Add moisture wisely: Use heavy cream to keep scones moist without making them too wet. When incorporating fruit, like cherries, consider these guidelines: - Chop cherries evenly: Cut them into small pieces for even distribution. - Use fresh or frozen: Both work well. If using frozen, do not thaw them first. - Toss in flour: Lightly coat the cherries with flour before adding them to the dough. This prevents them from sinking. Baking temperature is key to perfect scones. I recommend preheating your oven to 400°F (200°C). This high heat helps the scones rise quickly. For baking time, aim for 15-20 minutes. Your scones should be lightly golden on top. If they look pale, leave them in for a few more minutes. Cherry chocolate chip scones shine when served warm. Dust them with powdered sugar for a sweet touch. You can also add fresh cherries or a dollop of whipped cream on the side. For drinks, try pairing your scones with: - Coffee: The rich flavor balances the sweetness. - Tea: A nice herbal tea enhances the fruit notes. - Milk: Cold milk adds a creamy contrast. Explore these serving ideas to make your scones even more delightful! For the complete recipe, check out the [Full Recipe]. {{image_2}} Scones are fun to mix up! You can try different fruits like blueberries or raspberries. These fruits add a fresh twist. If you love chocolate, you can swap the semi-sweet chocolate chips for dark or white chocolate. Each type brings out new flavors. Experiment and find your favorite! If you need dairy-free options, use almond or coconut milk instead of heavy cream. For the butter, try a dairy-free spread. To make these scones gluten-free, use a gluten-free flour blend. This way, everyone can enjoy them! You can create mini scones for a fun twist. Just cut smaller shapes from the dough. They are great for parties! For a fancy touch, serve them on a tiered stand. You can also dust them with powdered sugar or add a dollop of whipped cream. This makes your scones look beautiful and inviting. For the full recipe, check out the Cherry Chocolate Chip Scones section above! To store your scones at room temperature, place them in an airtight container. This keeps them fresh for about two days. You can also wrap them in plastic wrap. Avoid storing them in a humid place. If you want to enjoy them longer, think about freezing. To freeze your scones, first, let them cool completely. Then, wrap each scone tightly in plastic wrap. Place them in a freezer bag or airtight container. They stay good for up to three months. For reheating, take the scones out of the freezer and let them thaw at room temperature. You can warm them in the oven at 350°F for about 10 minutes. This helps keep them soft and tasty. Enjoy your cherry chocolate chip scones anytime! For the full recipe, check the earlier section. How can I make my scones fluffier? To make your scones fluffier, use cold butter. Cut it into small pieces. This keeps the butter from melting before baking. Also, don't overmix the dough. Mix just until it comes together. This helps keep the scones light. Can I use frozen cherries? Will it affect the recipe? Yes, you can use frozen cherries. Just make sure to thaw and drain them first. This prevents extra moisture in your scones. They will taste just as good as fresh cherries. What's the difference between scones and biscuits? Scones are sweeter and richer than biscuits. They often contain sugar, fruits, or chocolate. Biscuits are usually flaky and buttery, with less sweetness. Both are delicious but serve different purposes. How to tell when the scones are done baking? Look for a light golden color on top. You can also tap the bottom of a scone. If it sounds hollow, it's done. A toothpick inserted should come out clean. What to do if the dough is too sticky? If your dough is too sticky, add a bit more flour. Sprinkle it in slowly while mixing. Be careful not to add too much. You want a soft but manageable dough. Solutions for dry scones If your scones turn out dry, you may have added too much flour. Make sure to measure the flour properly next time. Adding a little cream or butter on top can help fix dry scones once baked. In this post, we explored how to make delicious cherry chocolate chip scones. You learned about the main and optional ingredients, along with easy steps for preparation and baking. I shared tips for perfecting your scones and variations to try, like using other fruits or flavors. Remember, storing your scones correctly keeps them fresh. Now, you can enjoy warm, tasty scones with your favorite drink, impressing family and friends alike. Happy baking, and enjoy your delightful creation!

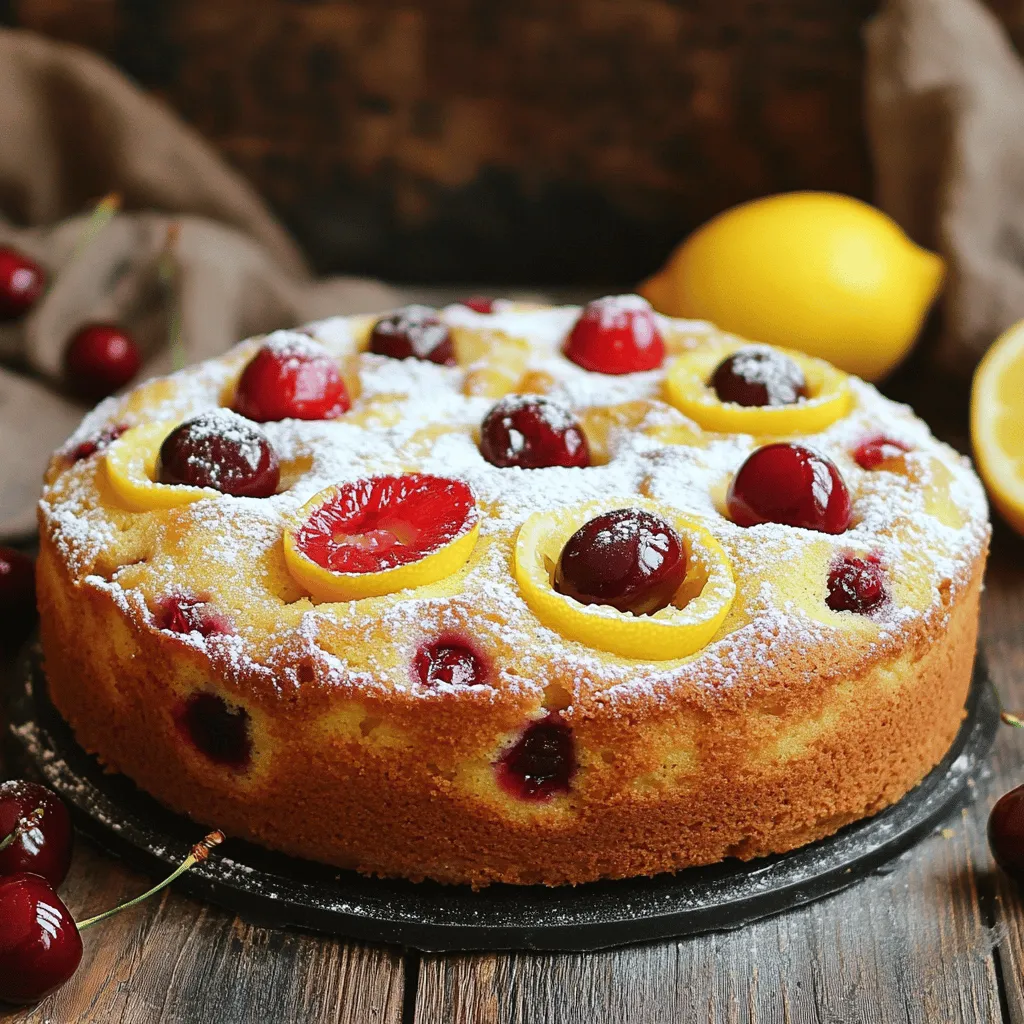
Cherry Chocolate Chip Scones Delightful and Easy Recipe

Are you ready to bake something sweet and delightful? My Cherry Chocolate Chip Scones are the perfect treat for breakfast

- 4 large russet potatoes, peeled and diced - 1 cup dill pickles, chopped - 1 cup sour cream - 1 cup ranch dressing - 1 cup shredded cheddar cheese - 1/2 cup green onions, chopped - 1/2 teaspoon garlic powder - 1/2 teaspoon salt - 1/4 teaspoon black pepper - 1/2 cup breadcrumbs (for topping) - 2 tablespoons olive oil (for topping) To create a delightful Pickle Ranch Potato Casserole, you need simple yet flavorful ingredients. First, we start with russet potatoes. These potatoes give a nice texture. You will dice them into bite-sized pieces. Next, we add dill pickles. They bring a tangy crunch that pairs well with creamy elements. Sour cream and ranch dressing add richness and zest. The shredded cheddar cheese melts beautifully, making every bite cheesy and satisfying. Green onions provide a fresh crunch. Garlic powder, salt, and black pepper round out the flavors, ensuring every spoonful is seasoned well. For the topping, breadcrumbs mixed with olive oil create a crispy layer. This adds a nice contrast to the creamy filling. Gather all these ingredients, and you are ready to make this tasty casserole. For the complete method, check out the Full Recipe. - Preheat the oven to 375°F (190°C). - Boil and drain diced potatoes. Start by preheating your oven. This step is key to getting the casserole nice and bubbly. Next, take your peeled and diced russet potatoes. Boil them in a large pot of water for about 15 minutes. You want them tender but not mushy. Once cooked, drain the potatoes and set them aside. - Combine sour cream, ranch dressing, and seasonings. - Fold in potatoes and pickles. Now, grab a big mixing bowl. Add one cup of sour cream and one cup of ranch dressing. Then sprinkle in garlic powder, salt, and black pepper. Mix these ingredients well. This will be the creamy base for your casserole. Next, gently fold in the cooked potatoes and one cup of chopped dill pickles. This adds a nice tangy flavor. - Transfer to baking dish. - Top with breadcrumbs and cheese. Once everything is mixed, transfer it to a greased 9x13 inch baking dish. Spread it out evenly. Now for the topping! In a small bowl, mix half a cup of breadcrumbs with two tablespoons of olive oil. Sprinkle this mixture evenly over the top. Lastly, add the remaining half cup of shredded cheddar cheese. This will melt beautifully as it bakes. - Bake for 25-30 minutes. - Cool before serving. Place your casserole in the preheated oven. Bake for about 25 to 30 minutes. Look for a golden brown color on top. When it's done, take it out and let it cool for a few minutes. This helps the flavors settle. Now your Pickle Ranch Potato Casserole is ready to serve! Check out the Full Recipe for more details. How to achieve perfectly tender potatoes To get tender potatoes, start with russets. Cut them into even pieces. This helps them cook evenly. Boil them for about 15 minutes. Check for tenderness by poking with a fork. They should feel soft but not mushy. Best practices for mixing without mashing When you mix the potatoes with the other ingredients, be gentle. Use a spatula or a wooden spoon. This helps keep the potato pieces intact. Fold the mixture carefully. You want to blend the flavors, not turn it into mush. Serving suggestions for garnishing To make your casserole look nice, serve it in individual portions. Add a sprinkle of chopped green onions on top. You can also add a few pickle slices for color. This makes your dish pop on the plate. Ideas for accompanying dishes Pair this casserole with a fresh salad or some grilled veggies. You can also try serving it with a simple protein, like grilled chicken or fish. This adds balance to your meal. Gluten-free options for breadcrumbs If you need a gluten-free option, use crushed rice crackers or gluten-free breadcrumbs. These will give you the same crunchy topping without gluten. Vegan alternatives for sour cream and ranch dressing For a vegan version, swap the sour cream with cashew cream or vegan yogurt. Use a plant-based ranch dressing. These swaps keep the flavor but fit a vegan diet. {{image_2}} You can add bacon bits to the casserole for extra flavor. They give a nice crunch and a savory touch. Just sprinkle them in with the potatoes. Another option is to use different types of cheese. Try pepper jack for a spicy kick, or mozzarella for a milder taste. Each cheese brings its own unique flavor, making the dish even better. Seasonal veggies can brighten your casserole. Adding broccoli or bell peppers gives color and nutrition. You can also adjust the recipe for holidays. For example, using sweet potatoes instead of russets adds a festive twist. This makes it perfect for Thanksgiving or Easter dinners. If you have a big group, you can scale up the recipe. Just double the ingredients and use a larger baking dish. This way, you can feed everyone without stress. For smaller gatherings, consider making mini casseroles. You can use small ramekins for individual servings. This makes serving easy and fun! For the complete recipe, check out the [Full Recipe]. To store your leftover casserole, use airtight containers. Glass or plastic containers work well. Make sure the casserole cools down first. This helps avoid condensation. Seal the containers tightly to keep the flavors fresh. Place them in the fridge. Enjoy leftovers within three to four days for the best taste. You can freeze this casserole for later. First, let it cool completely. Then, cut it into portions. Wrap each piece in plastic wrap. Place wrapped portions in a freezer bag. Remove as much air as you can. This helps keep the texture nice when you reheat. To thaw, move it to the fridge overnight. Reheat in the oven for about 20-25 minutes at 350°F (175°C). In the fridge, leftover Pickle Ranch Potato Casserole lasts about three to four days. If you freeze it, it stays good for up to two months. After that time, it may lose flavor and texture. Always check for any off smells or changes before eating. Pickle Ranch Potato Casserole is a creamy and tasty dish. It combines potatoes, dill pickles, and ranch dressing. You bake it until golden. This dish is both simple and fun to make. It’s a great side for gatherings or a family dinner. Each bite brings a mix of flavors that are hard to resist. Yes, you can prepare this casserole ahead of time. Just follow the recipe steps but stop before baking. Cover the dish and place it in the fridge. When you are ready, bake it as usual. This saves time and adds convenience on busy days. If you want to switch the ranch dressing, try using blue cheese dressing. You can also make a homemade ranch. Mix buttermilk, mayo, garlic powder, and herbs like dill. This gives you a fresh and tasty option. Yes, you can use other potatoes. Red potatoes work well for a different texture. Sweet potatoes add a nice sweetness, too. Just remember to adjust cooking time as needed. To add spice, mix in some diced jalapeños or hot sauce. You can also sprinkle crushed red pepper flakes on top. Another option is to use spicy ranch dressing. These little tweaks bring heat and excitement to the dish. For the full recipe, click here. This blog post explains how to make a delicious Pickle Ranch Potato Casserole. You learned about the key ingredients, step-by-step instructions, and helpful tips. You can adapt the recipe for dietary needs or seasonal flavors. Remember, you can also store leftovers and make your dish ahead of time. This casserole is a great choice for family meals or gatherings. With its creamy taste and crunchy topping, everyone will love it. Try it out and enjoy the comforting flavors!

Pickle Ranch Potato Casserole Tasty and Simple Dish

Looking for a unique twist on your favorite potato dish? Try my Pickle Ranch Potato Casserole! This easy recipe mixes

To start, you need some key ingredients. Here’s what you will need: - 1 cup plain Greek yogurt - 1 cup granulated sugar - 3 large eggs - Zest of 1 lemon - 1/4 cup fresh lemon juice - 1/2 cup vegetable oil - 1 3/4 cups all-purpose flour - 2 teaspoons baking powder - 1/2 teaspoon baking soda - 1/2 teaspoon salt - 1 cup fresh cherries, pitted and halved - Powdered sugar for dusting (optional) These simple items make this cake moist and tasty. The yogurt gives it a rich flavor, while the lemon zest adds a bright touch. You can make this cake with some easy swaps. If you do not have Greek yogurt, plain yogurt works too. You can also use other oils like canola or melted butter. For the cherries, frozen ones work fine, but make sure to thaw and drain them first. If you don’t have fresh lemons, bottled lemon juice can work in a pinch. Just use a bit less since it’s more potent. To take your cake to the next level, try adding some extras. Vanilla extract can add warmth. A pinch of almond extract gives a nice twist. You could even add some poppy seeds for crunch. If you want, you can also fold in some chocolate chips or nuts for added texture. Each of these choices can make your Cherry Lemon Yogurt Cake even more delightful. For the full recipe, check the details above. Start by gathering all your ingredients. You will need Greek yogurt, sugar, eggs, lemon zest, lemon juice, and more. Preheat your oven to 350°F (175°C). Grease and flour a 9-inch round cake pan. This step helps the cake come out easily later. In a large bowl, whisk together the Greek yogurt, sugar, and eggs. Mix until the texture is smooth. Next, add the lemon zest and lemon juice. Whisk again until everything is well mixed. Now, slowly pour in the vegetable oil. Mix gently until you see no oil streaks. In another bowl, sift together flour, baking powder, baking soda, and salt. Gradually add this dry mix to the wet mix. Fold them together carefully. Avoid overmixing to keep the cake light. Finally, gently fold in the halved cherries. This adds a sweet burst to each slice. Pour the batter into your prepared cake pan. Smooth the top with a spatula for an even finish. Place it in the preheated oven. Bake for 30 to 35 minutes. I recommend checking at the 30-minute mark. To check if your cake is ready, insert a toothpick into the center. If it comes out clean, your cake is done. If not, give it a few more minutes. Once baked, remove the cake from the oven. Let it cool in the pan for 10 minutes. After that, transfer it to a wire rack to cool completely. For a sweet touch, dust the top with powdered sugar before serving. You can find the full recipe in the earlier section. Enjoy your Cherry Lemon Yogurt Cake! To get the best texture for your Cherry Lemon Yogurt Cake, follow these tips: - Use room temperature eggs for a smoother batter. - Mix the wet and dry ingredients gently. Overmixing can make the cake tough. - Let the cake cool in the pan for a bit. This helps keep it moist. Avoid these common mistakes to ensure your cake turns out great: - Don’t skip the baking powder or baking soda. They help the cake rise. - Make sure your oven is at the right temperature. An oven thermometer can help. - Don’t add too many cherries. They can make the cake too wet. To boost the flavor of your cake, try these ideas: - Add a splash of vanilla extract for extra warmth. - Experiment with different fruits like raspberries or blueberries. - Serve it with a drizzle of lemon glaze for a sweet touch. For a complete guide, check out the Full Recipe for Cherry Lemon Yogurt Cake. {{image_2}} You can mix things up by using other fruits. Berries like blueberries or raspberries work well. You can also try peaches or strawberries for a fruity twist. Chop the fruit into small pieces and fold them in like the cherries. This keeps the cake moist and adds fresh flavor. Greek yogurt is great, but you can use other types too. Try regular yogurt for a lighter texture. If you want a dairy-free option, coconut yogurt is tasty. It gives a unique flavor that pairs well with the lemon. Just make sure it’s plain to keep the cake balanced. You can make this cake gluten-free easily. Substitute the all-purpose flour with a gluten-free blend. Look for a blend that includes xanthan gum for better texture. This way, everyone can enjoy a slice without worry. The taste remains just as good with this simple swap. For the full recipe, make sure to check our detailed instructions! To keep your Cherry Lemon Yogurt Cake fresh, wrap it tightly in plastic wrap. You can also place it in an airtight container. Store it at room temperature for up to three days. If you want to keep it longer, the fridge works too. Just remember that cold can change its texture a bit. You can freeze this cake for later enjoyment! First, let the cake cool completely. Wrap it tightly in plastic wrap and then in aluminum foil. Label it with the date. You can freeze it for up to three months. When you’re ready to eat, simply thaw it in the fridge overnight. For the best taste, heat individual slices in the microwave. Just 10-15 seconds should do the trick. If you have a whole cake, you can place it in a preheated oven at 350°F (175°C) for about 10-15 minutes. This warms it nicely without drying it out. Enjoy your cake warm, and it will taste like fresh-baked again! Yes, you can use different types of yogurt. Greek yogurt gives the best texture. If you use regular yogurt, the cake might be a bit softer. You can also try flavored yogurts, but it will change the taste. To make the cake moister, add a bit more yogurt or oil. You can also add an extra egg. Another tip is to bake it for less time. Check it a few minutes early to avoid dryness. This cake pairs well with fresh fruits or whipped cream. You can also serve it with a scoop of vanilla ice cream. The tartness of the cake matches well with sweet toppings. To reduce the sweetness, cut back on the sugar. You can use half the amount or substitute it with a sugar alternative. You can also add more lemon juice to balance the sweetness. This cake can fit into many diets with some tweaks. For a gluten-free option, use almond or coconut flour. If you want it dairy-free, use dairy-free yogurt and oil. Always check the labels for allergens. Cherry lemon yogurt cake is simple and tasty. You learned about key ingredients, fun substitutions, and optional flavors. The step-by-step guide made baking easier, like checking for doneness. I shared tips for a perfect texture and common mistakes to avoid. You can explore variations with different fruits or yogurt types too. Store your leftovers properly or freeze them for later. Use the FAQs to guide your baking journey. Enjoy making this cake your own, and remember, every baker makes it unique. Keep experimenting; baking should always be fun!

Cherry Lemon Yogurt Cake Simple and Tasty Treat

If you’re craving a delicious treat that’s both simple to make and bursting with flavor, look no further than this

- 1 cup sour cream - 1/2 cup cream cheese, softened - 1/4 cup dill pickles, finely chopped - 2 tablespoons pickle juice - 1 tablespoon ranch seasoning mix - 1 tablespoon fresh chives, chopped - 1/2 teaspoon garlic powder - 1/4 teaspoon black pepper To create a tasty Pickle Ranch Veggie Dip, you need simple and fresh ingredients. Each item brings its own flavor and texture to the mix. Sour cream adds creaminess, while cream cheese gives a rich taste. Dill pickles are the star here, giving that crunch and tang. Pickle juice adds extra zing, making the dip more lively. Ranch seasoning gives a classic flavor that ties everything together. Chives bring a fresh touch, while garlic powder and black pepper add depth. For those who want to play with flavors, consider these options: - Variations for flavor enhancement: Add a teaspoon of hot sauce for some heat. You can also mix in some shredded cheese for a cheesy twist. - Suggestions for low-fat or vegan substitutes: Use Greek yogurt instead of sour cream for a healthier option. For vegan diets, swap the cream cheese for a plant-based version. Coconut cream is a great alternative for a rich, dairy-free dip. These options allow you to customize the dip to your taste or dietary needs. Check out the Full Recipe for all the details you need to make this delicious dip! To start, you need to blend the cream cheese and sour cream. First, take a mixing bowl. Add 1/2 cup of softened cream cheese and 1 cup of sour cream. Use a hand mixer to blend them together. Mix until the texture is smooth and creamy. This makes a great base for your dip. Next, it's time to mix in the dill pickles and pickle juice. Chop 1/4 cup of dill pickles into small pieces. Add these to your creamy mix along with 2 tablespoons of pickle juice. Stir well until everything is well combined. The pickles give a tasty crunch to the dip. Now, let’s incorporate the seasonings and garnishing. Add 1 tablespoon of ranch seasoning mix, 1 tablespoon of fresh chives, 1/2 teaspoon of garlic powder, and 1/4 teaspoon of black pepper. Stir until all the ingredients blend well. This step adds layers of flavor to your dip. For the best taste, cover the bowl with plastic wrap. Refrigerate the dip for at least 30 minutes. This cooling time allows the flavors to meld and enhance. After chilling, you can serve it with fresh veggies. You can find the full recipe details in the above sections. Enjoy your Pickle Ranch Veggie Dip! To make your Pickle Ranch Veggie Dip just right, adjust the seasoning to fit your taste. If you like it tangy, add more pickle juice. For a garlic kick, increase the garlic powder. Just take small steps so you can find the perfect balance. Taste as you go; this is key! For a creamy texture, ensure your cream cheese is soft. This makes mixing easy. I recommend letting it sit out for 10-15 minutes before you start. You can also use a hand mixer. This helps blend everything smoothly, making your dip rich and creamy. Serving your dip well makes it more fun. Use a colorful bowl to hold your dip. A clear bowl shows off the colors and textures, making it look tasty. Garnishing adds flair! Top your dip with extra chopped chives and a few pickle slices. This creates a pop of color. Arrange fresh veggies around the bowl for a bright, inviting platter. Carrots, bell peppers, and cucumbers work great. They not only look good but also taste amazing with the dip. For more ideas, check the Full Recipe for serving suggestions! {{image_2}} You can change up the Pickle Ranch Veggie Dip to suit your taste. - Spicy Pickle Ranch Veggie Dip: Want some heat? Add diced jalapeños or a splash of hot sauce to the mix. This gives the dip a nice kick while keeping the tangy pickle flavor. - Cheese-Infused Pickle Ranch Dip: For a cheesy twist, mix in shredded cheddar or crumbled feta. This adds richness and depth to the dip, making it even more satisfying. The right veggies make all the difference for dipping. - Best vegetables for dipping: Carrots, bell peppers, cucumbers, and cherry tomatoes are great choices. They add crunch and freshness. You can also use celery sticks for a classic touch. - Pairing suggestions with crackers or chips: Serve with your favorite crackers or pita chips for a fun crunch. Tortilla chips also pair well, adding a nice saltiness that balances the dip’s flavors. Feel free to explore these variations and serving options to make your Pickle Ranch Veggie Dip your own! Check out the Full Recipe for all the details. To keep your Pickle Ranch Veggie Dip fresh, store any leftovers in an airtight container. This keeps air out and helps it stay tasty. Make sure to cover the dip well to avoid drying out. You can also use plastic wrap over the top of the container for extra protection. There’s no need to reheat this dip, as it is best served cold. Simply take it out of the fridge and enjoy with fresh veggies. For the best taste, eat your dip within 3 to 5 days. You can still eat it after this time, but the flavors may fade. Always check for signs of spoilage. If you see any mold or if it has an off smell, it’s best to toss it out. Keeping track of the date you made it can help you know when to use it all up. Enjoy your dip while it is fresh and delicious! What is the best way to adjust the flavor of the dip? To adjust the flavor, you can change the seasonings. Add more ranch mix for a stronger taste. If you like heat, try a pinch of cayenne pepper. More dill pickles can also boost the pickle flavor. Taste as you go to find your perfect balance. Can I make Pickle Ranch Veggie Dip ahead of time? Yes, you can make this dip ahead of time. It tastes better after chilling in the fridge. Make it a few hours or even a day before your event. Just cover it tightly and store it in the fridge. Where can I find store-bought versions of Pickle Ranch Veggie Dip? Many grocery stores carry store-bought versions of Pickle Ranch Veggie Dip. Check the deli or refrigerated section. Some brands may offer it in jars or tubs. Read labels to find one that fits your taste. Breakdown of calories and key nutrients This dip has about 100 calories per serving. It contains protein from the cream cheese and sour cream. You also get vitamins from the pickles and chives. Health benefits of the ingredients used The dill pickles add crunch and flavor. They are low in calories but high in flavor. Chives contain vitamins A and C. They also provide antioxidants that help your body. Enjoy this dip as a tasty way to eat more veggies! In this blog post, I shared a simple recipe for Pickle Ranch Veggie Dip. We covered the key ingredients, preparation steps, and tips for the best flavor and texture. You can customize this dip with optional ingredients and variations to suit your taste. Proper storage ensures you can enjoy leftovers. Making this dip ahead of time adds convenience for gatherings. Enjoy experimenting with flavors and serving ideas. Your next snack time will be both fun and delicious!

Pickle Ranch Veggie Dip Easy and Flavorful Delight

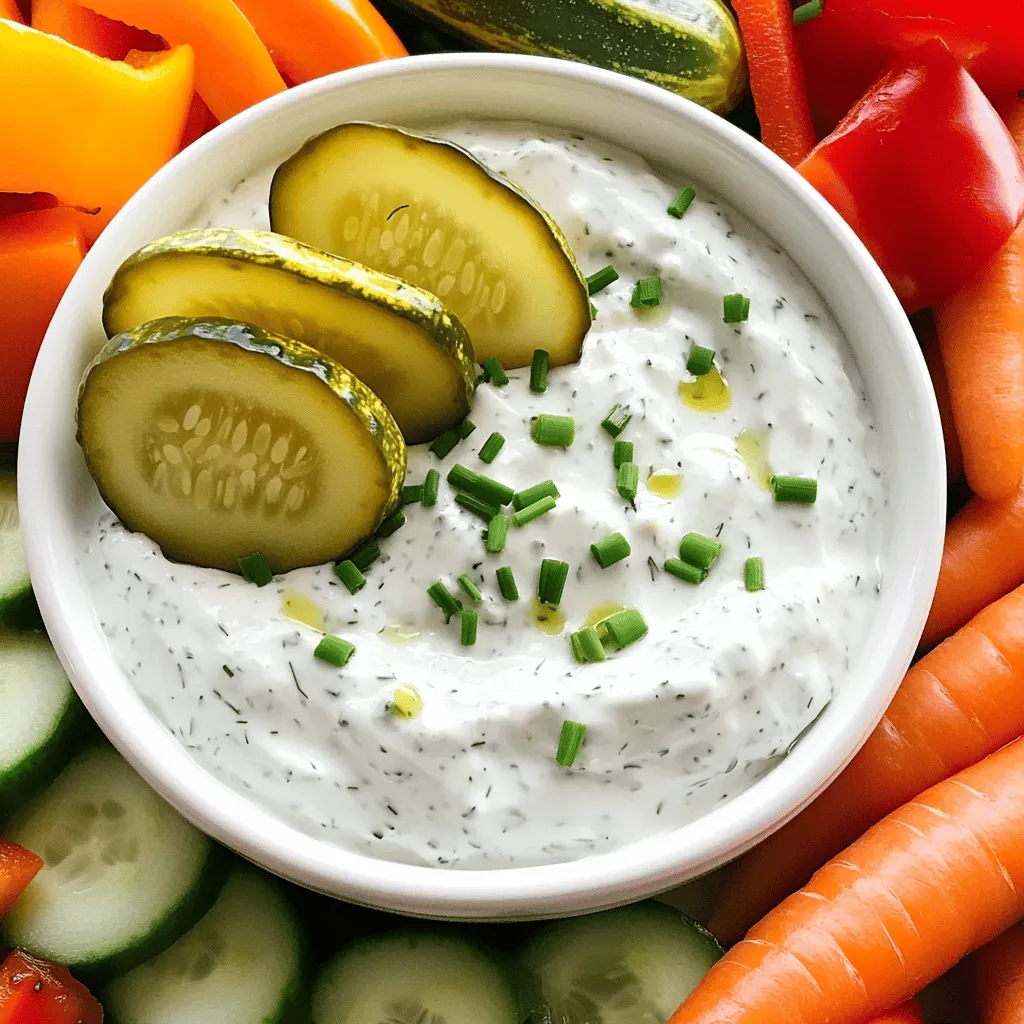
Are you ready to elevate your snack game? This Pickle Ranch Veggie Dip is an easy and flavorful delight! With

Making Cherry Almond Crumble Muffins is simple. You need fresh or frozen cherries and almond flavors. The result is a tasty treat that is perfect for breakfast or a snack. Here’s what you need for the muffins: - 1 cup fresh or frozen cherries, pitted and halved - 1 cup almond flour - 1 cup all-purpose flour - 1/2 cup granulated sugar - 1/2 cup packed brown sugar - 1/2 teaspoon salt - 1 teaspoon baking powder - 1/2 teaspoon baking soda - 1/2 teaspoon almond extract - 1/2 teaspoon vanilla extract - 1/2 cup unsalted butter, melted - 2 large eggs - 1/2 cup oats (for topping) - 1/4 cup sliced almonds (for topping) - Additional butter or cooking spray for greasing If you want to switch things up, consider these ideas: - Use blueberries instead of cherries for a different fruit flavor. - Try coconut flour instead of almond flour for a new texture. - Swap in maple syrup for the granulated sugar for a richer taste. - Replace the sliced almonds with walnuts or pecans for a crunchy twist. These changes keep your muffins fun and fresh! To make these muffins, gather all your tools and ingredients first. You need a muffin tin, mixing bowls, and a whisk. Preheat your oven to 375°F (190°C). Grease your muffin tin or line it with paper liners. This helps the muffins pop out easily later. In a large bowl, combine the almond flour, all-purpose flour, granulated sugar, brown sugar, salt, baking powder, and baking soda. Use a whisk to mix these dry ingredients well. This step is important. It helps ensure that the baking powder and baking soda spread evenly throughout the batter. In another bowl, whisk together the melted butter, eggs, almond extract, and vanilla extract until smooth. Then, slowly add this wet mixture into the dry mixture. Mix gently until just combined. It's okay if the batter is a bit lumpy. Next, fold in the pitted and halved cherries. Make sure they are evenly distributed. - Baking and Cooling Instructions Divide the batter evenly among your muffin cups, filling each about two-thirds full. In a small bowl, combine oats, sliced almonds, and a tablespoon of melted butter. Sprinkle this mixture generously on top of each muffin. Bake in your preheated oven for 18-20 minutes. They are done when golden brown and a toothpick comes out clean. Let the muffins cool in the pan for about 5 minutes before transferring them to a wire rack. These steps ensure a perfect texture and flavor. Enjoy! For the complete recipe, refer to the Full Recipe section above. To get that soft and fluffy muffin texture, avoid overmixing. Mix the wet and dry ingredients until just combined. Lumps are okay! This keeps the muffins light. Also, use room temperature eggs and butter. They mix better and help the muffins rise. One common mistake is using too much flour. Always measure accurately. Spoon flour into the measuring cup, then level it off. Another mistake is skipping the oven preheating. Always preheat your oven to 375°F. This ensures even baking. Serve your muffins warm for the best taste. They pair well with coffee or tea. For a fun twist, add a dollop of yogurt on the side. You could also sprinkle some extra sliced almonds on top for crunch. For the full recipe, check the details above. Enjoy your baking! {{image_2}} You can swap cherries for other fruits. Try blueberries, raspberries, or even diced apples. Each fruit brings its own taste. Blueberries add a sweet burst, while apples offer a crunchy texture. Adjust the sugar based on the fruit's sweetness. This way, you can enjoy muffins all year round. If you want a vegan version, replace eggs with flax eggs. Mix one tablespoon of ground flaxseed with three tablespoons of water. Let it sit for a few minutes to thicken. For gluten-free muffins, use gluten-free flour instead of all-purpose flour. Almond flour works well here, too. These simple swaps keep your muffins tasty and inclusive. To elevate your muffins, try adding spices or zests. A pinch of cinnamon or nutmeg can enhance the flavor. Lemon or orange zest brightens the taste and adds freshness. You can also mix in some shredded coconut for a fun twist. Experimenting with these flavors makes each batch unique and exciting. To keep your Cherry Almond Crumble Muffins fresh, store them in an airtight container. This method helps maintain moisture and flavor. Place the muffins in a single layer to prevent them from sticking together. If you stack them, add parchment paper between layers. Store them at room temperature for up to three days. For longer storage, consider refrigerating them to extend their life. If you want a warm muffin, reheating is easy. You can use a microwave or an oven. For a microwave, heat each muffin for about 15-20 seconds. Check if it's warm enough. For the oven, preheat it to 350°F (175°C). Place the muffins on a baking sheet and warm them for 5-7 minutes. This method makes the muffins soft and delicious again. Freezing muffins is a great way to save them for later. Allow the muffins to cool completely. Wrap each muffin in plastic wrap, then place them in a freezer bag. This method prevents freezer burn. You can freeze them for up to three months. When you're ready to enjoy, thaw them overnight in the fridge or let them sit at room temperature for a few hours. For an extra treat, reheat them after thawing! You can tell when the muffins are done by checking their color. They should be golden brown. Insert a toothpick into the center of a muffin. If it comes out clean, they are ready. The edges will pull away from the muffin tin, showing they are baked. Yes, you can make the batter ahead of time. Just mix the dry and wet ingredients separately. Keep them in the fridge until you are ready to bake. This can save time on busy mornings. Just make sure to fold in the cherries right before baking. To store leftover muffins, place them in an airtight container. They stay fresh at room temperature for up to three days. If you want them to last longer, freeze them. Just wrap each muffin in plastic wrap and place them in a freezer bag. They will keep well for about three months. Enjoy them warm after thawing! You learned how to make delicious Cherry Almond Crumble Muffins. This recipe combines easy steps with tasty ingredients. Remember to mix dry and wet items well for best results. Avoid common mistakes to make perfect muffins every time. You can also change up the recipe with fruits or flavors. Store any extras properly to keep them fresh. Now, it's time to bake and enjoy your yummy muffins!

Cherry Almond Crumble Muffins Delightful and Easy Recipe

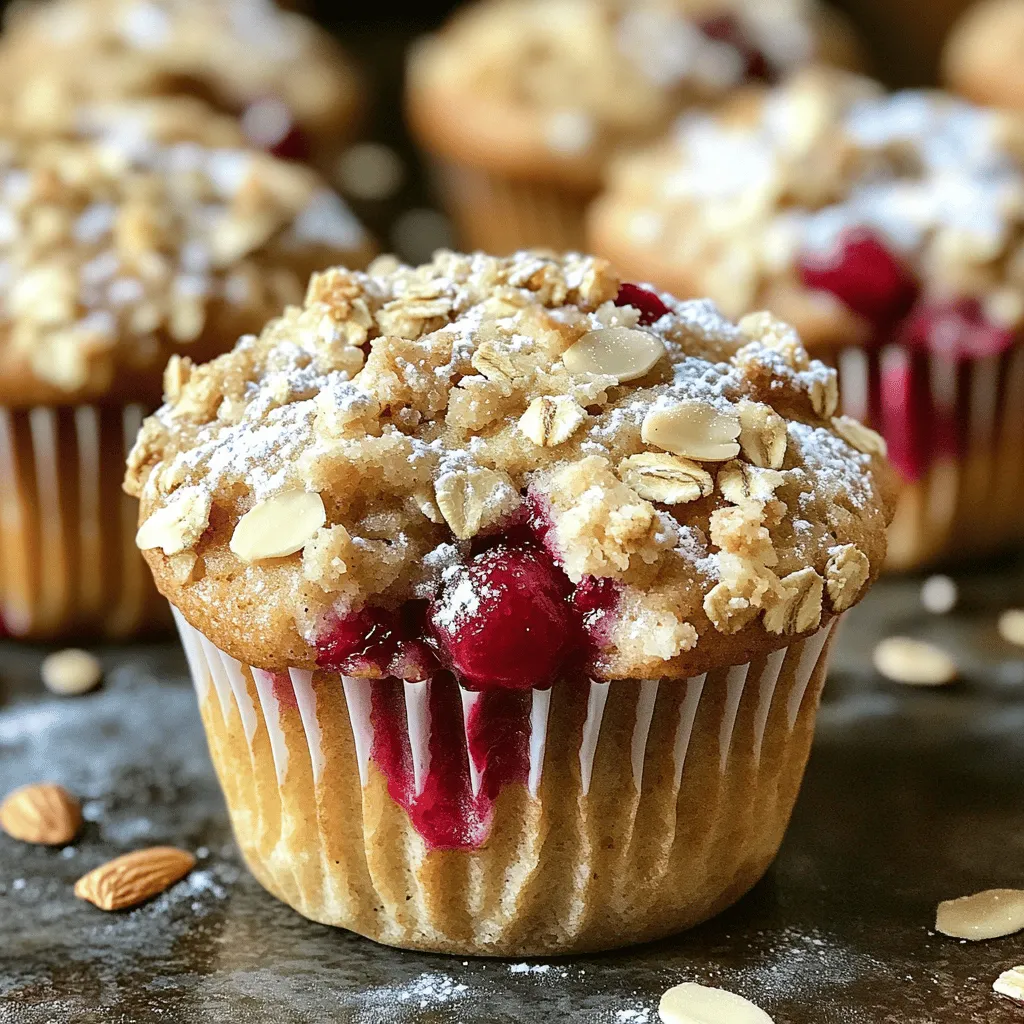
Ready to bake something special? These Cherry Almond Crumble Muffins are simple and delicious! With juicy cherries and a crunchy

- 2 packets of instant ramen noodles (discard the seasoning packets) - 1 cup dill pickles, chopped - 1 cup cherry tomatoes, halved - 1 cup shredded carrots - 1/2 cup red bell pepper, diced - 1/4 cup green onions, sliced - 1/2 cup ranch dressing - 2 tablespoons pickle juice - Salt and pepper to taste - 1/4 cup feta cheese (optional) The main star of this salad is the ramen noodles. They bring a chewy texture. I use instant noodles for ease, but you can use fresh ones too. Dill pickles add a tangy crunch. They give the salad a kick that wakes up your taste buds. Cherry tomatoes add sweetness and color. Chopped carrots bring a nice crunch and a pop of orange. Red bell pepper adds sweetness and a crisp bite. Green onions give a mild onion taste. Finally, ranch dressing ties everything together, making it creamy and flavorful. Using fresh ingredients like cherry tomatoes and carrots makes the salad vibrant. They provide great flavor and texture. Dill pickles are key for that tangy flavor. Pickles contrast nicely with the fresh veggies. The pickle juice adds a bit of zing to the dressing. This mix of fresh and pickled ingredients creates balance. It keeps each bite interesting. For the best taste, use fresh produce and high-quality pickles. You can find the Full Recipe [here]. Start by boiling water in a pot. Add the instant ramen noodles. Cook them for about three minutes. Once they are soft, drain the noodles. Rinse them under cold water. This stops the cooking and cools them down. Set the noodles aside while you prepare the other ingredients. Grab a large mixing bowl. Chop 1 cup of dill pickles into small pieces. Cut 1 cup of cherry tomatoes in half. Shred 1 cup of carrots. Dice 1/2 cup of red bell pepper. Slice 1/4 cup of green onions. Add all these veggies to the mixing bowl. They add crunch and flavor to your salad. Now it’s time to mix everything together. Add the cooled ramen noodles to the vegetable mixture. Gently toss these ingredients to combine them well. In a small bowl, whisk together 1/2 cup of ranch dressing and 2 tablespoons of pickle juice. This will create a creamy and tangy dressing. Pour the dressing over the salad. Toss it all again until every piece is coated. If you like feta cheese, add 1/4 cup of crumbled cheese on top. This adds a nice salty flavor. Give the salad one last gentle toss to mix in the cheese. Season the salad with salt and pepper to taste. Chill it in the fridge for at least 30 minutes. This helps the flavors blend together nicely. For the full recipe, check out the complete instructions. When making Pickle Ranch Ramen Noodle Salad, you want to avoid a few common mistakes. First, don't skip rinsing the ramen noodles after cooking. This step cools them and keeps them from getting mushy. Second, use fresh veggies. Wilting or soggy veggies can ruin your salad’s crunch. Lastly, be careful with salt. The ranch dressing and pickles add salt, so taste before adding more. You can prepare this salad ahead of time. Cook the ramen and chop the veggies a day before. Store them in the fridge separately. When you're ready to eat, mix everything together with the dressing. This method allows the flavors to blend better, making it even more tasty. Just remember to add the dressing right before serving for the best texture. Presentation matters! Serve the salad in a large bowl for a family style meal or in individual bowls for a nice touch. Top it with extra green onions and a few pickle slices for color. If you like, sprinkle some feta cheese on top for a creamy finish. This salad looks great and tastes even better, so enjoy sharing it with friends and family! For the full recipe, see the earlier section. {{image_2}} You can make your Pickle Ranch Ramen Noodle Salad more filling by adding protein. Some great choices include cooked chicken, shrimp, or tofu. Shredded rotisserie chicken works well for a quick fix. Grilled shrimp adds a nice touch of flavor. For a vegetarian option, try marinated tofu. Cooked proteins mix nicely with the crunchy veggies. If you want a vegetarian or vegan salad, swap the ranch dressing for a plant-based version. Many stores sell dairy-free ranch dressings. You can also make your own using vegan mayo and herbs. For added texture, consider chickpeas or black beans. These beans pack protein and fiber, making your salad hearty. To amp up the flavor, think about adding spices or herbs. Fresh dill pairs perfectly with the pickles. You can also sprinkle in some garlic powder or onion powder. For a spicy kick, add red pepper flakes or a dash of hot sauce. Mixing in fresh herbs like cilantro or parsley brightens the dish. Each of these additions makes the salad unique and exciting. For the complete recipe, check out the Full Recipe section. To store leftover Pickle Ranch Ramen Noodle Salad, place it in a container. Cover it tightly with a lid to keep it fresh. Make sure to refrigerate it right away. This salad tastes best when chilled, so store it promptly. Choose a glass or plastic container with a tight seal. Glass containers are great for keeping flavors. They also help you see the salad easily. If using plastic, make sure it is BPA-free. This ensures safety and keeps your salad fresh. Reheat this salad only if needed. If you want it warm, use the microwave. Heat in short bursts to avoid cooking it too much. Check the salad frequently to keep it from getting soggy. Most people enjoy this salad cold, so consider serving it that way instead. For the best taste, enjoy it fresh after making it. For more details, check the Full Recipe. Yes, you can use different noodles. Try soba, udon, or even rice noodles. Each type gives a unique twist to the salad. Just cook them according to the package instructions. Rinse them in cold water after cooking. This keeps the noodles from getting mushy. This salad can last for up to three days in the fridge. The flavors will meld together over time. However, the veggies may lose some crunch. It’s best to enjoy it fresh, but you can still savor it later. Yes, this recipe is great for meal prep. You can make it ahead for lunches or snacks. Just store it in airtight containers. Keep the dressing separate until you are ready to eat. This keeps the salad fresh and crisp. Absolutely! You can use yogurt dressing, vinaigrette, or even a spicy mayo. Each dressing will change the flavor a bit. Feel free to experiment and find your favorite! The full recipe gives a great base, but make it your own. This blog post covered creating a delicious ramen salad, from ingredients to storage tips. You learned about key ingredients, cooking steps, and how to avoid common mistakes. I shared ways to personalize your dish with protein and spices and provided helpful storage info. Always feel free to experiment with flavors. Making this salad fun and easy can lead to a tasty meal that you enjoy. Happy cooking!

Pickle Ranch Ramen Noodle Salad Fresh and Flavorful Dish

Looking for a fresh and flavorful dish? You’ll love this Pickle Ranch Ramen Noodle Salad! It’s a fun twist on

To make this tasty cherry chia jam, gather these simple ingredients: - 2 cups fresh or frozen cherries, pitted - 1/4 cup honey or maple syrup (adjust based on sweetness preference) - 2 tablespoons chia seeds - 1 tablespoon lemon juice - 1/2 teaspoon vanilla extract (optional) - A pinch of salt You can swap ingredients if needed. Use agave syrup instead of honey or maple syrup for a vegan option. If you lack fresh cherries, frozen ones work just as well. You can also leave out the vanilla extract if you prefer a more straightforward cherry flavor. If you do not have chia seeds, you can use ground flaxseeds, but the texture will be different. Cherries pack a punch of nutrients. They are high in vitamins and antioxidants. These compounds help fight inflammation and support heart health. Chia seeds add even more benefits. They are rich in fiber, omega-3 fatty acids, and protein. This combination helps you feel full and supports digestion. Together, cherries and chia seeds make this jam not just tasty but also good for your body. To start, you need to prepare the cherries. If you use fresh cherries, wash them well. Next, pit and halve each cherry. If you choose frozen cherries, let them thaw for a bit. This makes blending easier. Now, place the cherries into a medium saucepan. Add honey or maple syrup based on your taste. Cook on medium heat for about 5-7 minutes. You will see the cherries release their juices and soften. Stir occasionally to avoid burning. Once soft, take a potato masher or a fork to mash the cherries. Mash until you reach your desired consistency. You can use an immersion blender for a smoother jam if you prefer. Once mashed, it’s time to add chia seeds, lemon juice, and salt. Stir well to mix all the ingredients. Lower the heat and let it simmer for 5-10 minutes. This will help the jam thicken nicely. The chia seeds will absorb some liquid and create that perfect jam texture. After cooking, remove the saucepan from heat. Allow the jam to cool at room temperature. When it cools, transfer it to a clean jar. Refrigerate for at least one hour. Your cherry chia jam will thicken even more in the fridge. Enjoy your delicious treat! For the full recipe, check the previous section. To get the right texture for your cherry chia jam, you need to manage the cooking time. Cook the cherries until they are soft and juicy. When mashing, stop when you reach your preferred chunkiness. If you like a smoother jam, use a blender. Add chia seeds after mashing. They will absorb liquid and thicken the jam. Let it simmer for about 10 minutes. This will help it set nicely. Cherry chia jam is versatile and fun to use. You can spread it on toast or pancakes. It also works well as a filling for pastries. For a fancy touch, serve it in small jars. Drizzle honey on top and add a fresh cherry or mint leaf for color. You can mix it into yogurt or oatmeal for added flavor and nutrition. One common mistake is not mashing the cherries enough. This can lead to a jam that is too chunky. Another mistake is not letting it cool completely before storing. If you store it warm, it can spoil faster. Lastly, using too few chia seeds can result in a runny jam. Follow the recipe closely to avoid these issues. For the full recipe, check out the Cherry Chia Jam section. {{image_2}} You can swap cherries with other fruits. Try using blueberries, strawberries, or peaches. Each fruit brings its own flavor. You can follow the same recipe. Just remember to adjust the sweetness. Some fruits are sweeter than cherries, like bananas. Others, like cranberries, may need more sugar. You can change the sweetness to fit your taste. Use honey, maple syrup, or stevia. Taste as you mix, and add more if needed. For added flavor, consider spices like cinnamon or ginger. A dash of almond extract can also add a nice twist. Cherry chia jam is not just for toast. Use it in yogurt or oatmeal for a fruity touch. You can also mix it into smoothies for extra flavor. Try it in baking, like filling for muffins or cakes. It also works well as a topping for pancakes or waffles. This jam adds a pop of color and flavor to many dishes. Check out the Full Recipe for more ideas! To keep your cherry chia jam fresh, use a clean, airtight jar. Make sure the jar is dry before adding the jam. Store the jam in the refrigerator for the best flavor and texture. Avoid leaving the jam out at room temperature. This can spoil the jam quickly. If you have leftover jam, always use a clean spoon when serving. This helps prevent bacteria from getting in. Cherry chia jam lasts about two weeks in the fridge. If you want to save it for longer, consider freezing it. To freeze, put the jam in a freezer-safe container. Leave some space at the top, as the jam expands when frozen. It can stay good for up to six months in the freezer. When you want to use it, thaw it in the fridge overnight or at room temperature. If the jam gets old, don’t throw it away! You can use it in many ways. Stir it into yogurt for a tasty breakfast. Mix it into smoothies for extra flavor. You can also use it as a topping for pancakes or waffles. If the jam has thickened too much, add a splash of water to loosen it up. This way, you can enjoy every last bit of your cherry chia jam! Homemade cherry chia jam lasts about 1 to 2 weeks in the fridge. Store it in a clean, airtight jar. If you want it to last longer, try freezing it. The jam can keep for up to 6 months in the freezer. Just thaw it in the fridge when you're ready to enjoy it! Yes, you can use frozen cherries! They work just as well as fresh ones. Just thaw them a bit before cooking. This makes it easier to mash them. Plus, using frozen cherries can save you time and effort. Chia seeds are tiny but packed with nutrition. They are high in fiber, which helps digestion. They also provide omega-3 fatty acids, good for heart health. Chia seeds are rich in protein, making them a great addition to your diet. Plus, they are low in calories, so you can enjoy them guilt-free! To adjust the sweetness, simply add more or less honey or maple syrup. Start with the recommended 1/4 cup. Taste the mixture as it cooks and add more if needed. You can also use other sweeteners like agave syrup or stevia to suit your taste. This blog post covers all you need for making cherry chia jam. We explored key ingredients and substitutions. You learned to prepare, cook, and cool your jam. Tips on consistency and serving enhance your experience. We discussed fruit variations and storage options. I'm confident you now have the tools to succeed. Enjoy your delicious, healthy jam, and experiment with your favorite flavors!

Cherry Chia Jam Simple and Nutritious Recipe

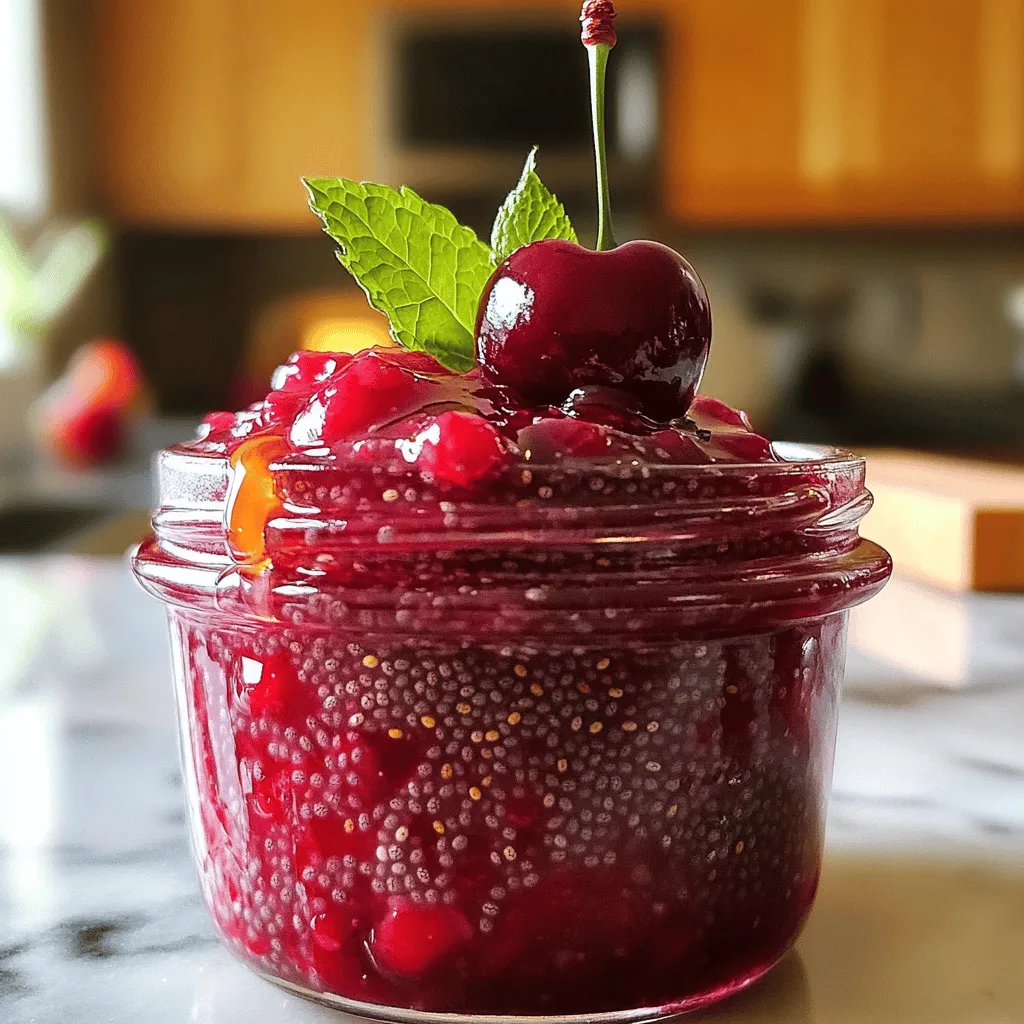
If you love delicious and healthy spreads, you need to try this Cherry Chia Jam! It’s easy, quick, and full

- Zucchini (4 medium, spiralized) - Heavy cream (1 cup, or coconut cream for dairy-free) - Parmesan cheese (1/2 cup, or nutritional yeast for dairy-free) - Unsalted butter (2 tablespoons) - Garlic (2 cloves, minced) - Nutmeg (1/4 teaspoon) - Salt and pepper to taste - Fresh parsley (for garnish) - Cherry tomatoes (optional, for garnish) The main part of this dish is the zucchini. I love using fresh zucchini because it gives a light and fresh taste. You can spiralize the zucchini into noodles. This makes a great low-carb option. You can find spiralizers at most stores. They are easy to use and fun! For the sauce, heavy cream adds a rich flavor. If you want a dairy-free version, coconut cream works well too. It gives a unique taste that blends perfectly with the zucchini. Parmesan cheese adds a salty kick. You can swap it for nutritional yeast if you're going dairy-free. Don't forget the flavor enhancers! Butter brings a nice richness. Garlic adds depth to the sauce. Just a bit of nutmeg gives a warm touch. Finally, season with salt and pepper to balance the flavors. Fresh parsley on top makes the dish look nice. Cherry tomatoes add a pop of color and sweetness if you like. This simple mix of ingredients creates a dish that feels fancy but is easy to make. For the complete recipe, check out the full recipe section! First, you need to spiralize the zucchinis. Use a spiralizer to make long, thin noodles. After spiralizing, place the noodles in a colander. Sprinkle a little salt on them and let them sit for 10 to 15 minutes. This step helps pull out extra moisture. Once the time is up, pat the noodles dry with a paper towel. Set them aside for sautéing later. In a large skillet, melt the butter or heat the olive oil over medium heat. Add the minced garlic and cook for about one minute. Watch closely so it doesn’t burn. Next, pour in the heavy cream or coconut cream. Stir often and bring it to a gentle simmer. Cook for 3 to 5 minutes until it thickens slightly. Now, slowly whisk in the grated Parmesan cheese or nutritional yeast. Add the nutmeg and keep stirring until smooth. If the sauce seems too thick, add a splash of water or more cream. After the zucchini noodles are dry, heat a separate pan. Lightly sauté the noodles in a bit of olive oil for 2 to 3 minutes. Aim for them to be just tender, not mushy. Remove the noodles from the heat. Then, add them to the skillet with the Alfredo sauce. Gently toss to coat the noodles well. Season with salt and pepper to taste. Serve your dish right away, garnished with fresh parsley and cherry tomatoes if you like. For the complete cooking details, check out the Full Recipe. To get the sauce just right, you may need to adjust its thickness. If your sauce is too thick, add a splash of water or more cream. This will help create a smooth and creamy texture. Stir well to combine everything. Remember, a little goes a long way! Salting and drying the zucchini noodles is key. After spiralizing, sprinkle salt on the noodles. Let them sit for 10-15 minutes. This draws out excess moisture. After that, pat them dry with a paper towel. This step keeps your dish from becoming watery. You can easily change the flavor of your Alfredo sauce. Adding herbs like basil or parsley can brighten the dish. A pinch of red pepper flakes adds a nice kick. You can even experiment with spices like garlic powder or Italian seasoning. These tweaks make your Zucchini Noodle Alfredo unique and exciting. For the complete details on making this dish, check out the Full Recipe. {{image_2}} To make a vegan version of zucchini noodle Alfredo, swap out key ingredients. Use coconut cream instead of heavy cream. Nutritional yeast replaces Parmesan cheese. For butter, try olive oil. This keeps the dish creamy without dairy. You still get a rich flavor. You can even add a splash of lemon juice for brightness. It’s so tasty and pure plant-based joy! Want to boost the protein in your meal? You can add grilled chicken, shrimp, or tofu. Each option brings its unique flavor to the dish. If using chicken, grill it and slice it thinly. For shrimp, sauté them for a few minutes until pink. If you prefer tofu, choose firm tofu and sauté until golden. These additions make the dish hearty and filling. Feel free to add more veggies to your Alfredo. Spinach is a great choice; it wilts down nicely. Bell peppers add color and crunch, too. You can toss in peas or broccoli for some green goodness. These vegetables not only make the dish more vibrant, but they also boost the nutrition. Mix and match your favorites for a fun twist! To store leftovers in the fridge, let the Zucchini Noodle Alfredo cool first. Place it in an airtight container. Make sure to seal it well to keep out moisture and air. It will stay fresh for about 3 days. When you are ready to eat, just reheat it gently on the stove or in the microwave. Freezing Zucchini Noodle Alfredo is easy but requires some care. First, store the sauce in a separate container. Zucchini noodles can become mushy when frozen. For best results, freeze only the sauce. When you want to eat it, thaw the sauce in the fridge overnight. Then, sauté fresh zucchini noodles and mix them with the reheated sauce. To know when it’s time to discard your Zucchini Noodle Alfredo, watch for signs of spoilage. If you see mold, a change in color, or an off smell, it’s best to toss it. Proper storage helps extend its shelf life, but always trust your senses. Yes, you can use them. They save time and effort. However, they may lack flavor. Store-bought noodles can also be softer. This can affect the texture of your dish. If you choose this option, look for fresh noodles. They often taste better than frozen ones. You can use several options. Coconut cream is a great dairy-free choice. Silken tofu blended until smooth also works well. For a lighter option, try Greek yogurt or cashew cream. Each will give your dish a unique taste and texture. You can spiralize zucchinis ahead of time. Keep them in the fridge for up to two days. Just remember to salt them lightly. This helps draw out moisture. After salting, pat them dry before cooking. This keeps your noodles from becoming soggy. Zucchini Noodle Alfredo is a simple and tasty dish. You learned about key ingredients, like zucchini, cream, and cheese. I shared steps to make creamy sauce and perfect noodles. Tips help you avoid sogginess and adjust flavors. You can also explore vegan options and add proteins or veggies. This meal is versatile and fun. Enjoy making it your own!

Zucchini Noodle Alfredo Simple and Creamy Dish

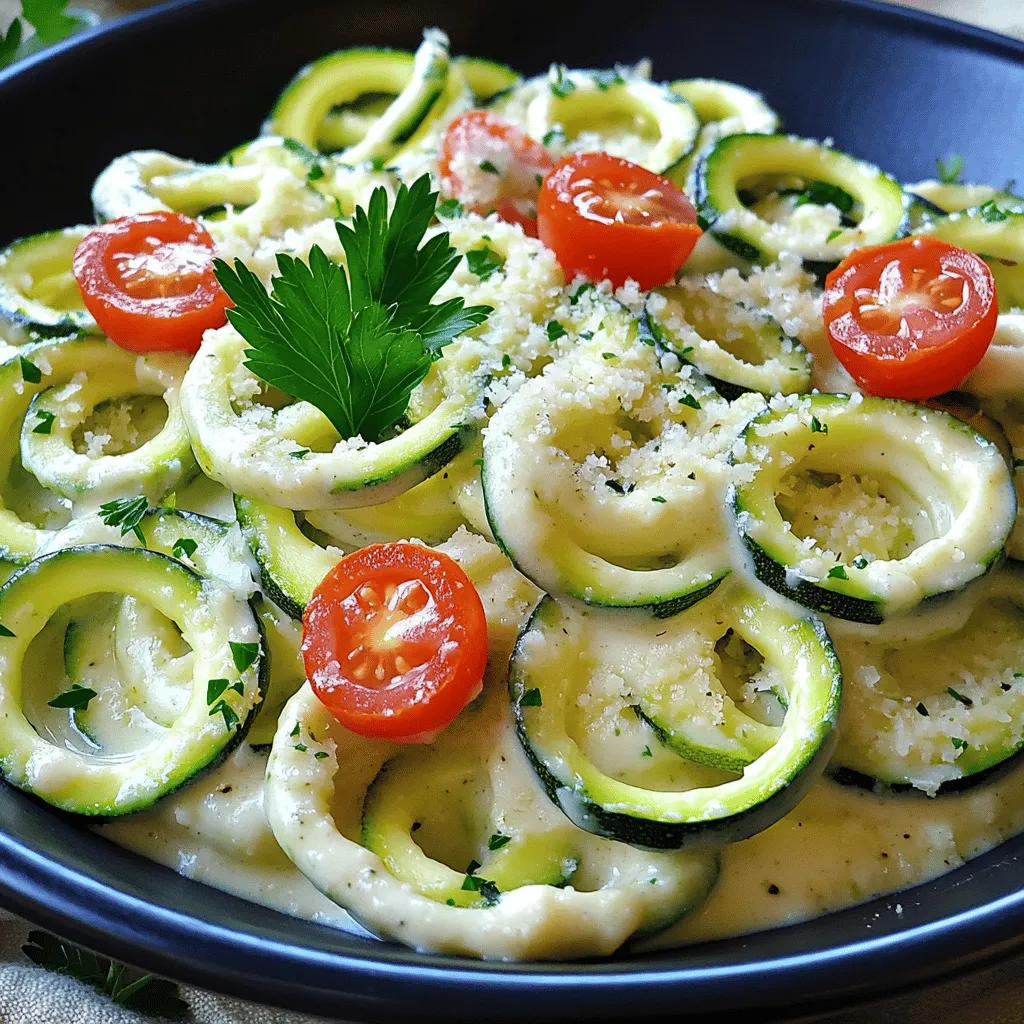
If you love creamy pasta but want a healthier twist, you’ve found the perfect recipe! Zucchini Noodle Alfredo is simple

To make these tasty energy balls, you need a few key ingredients. Here’s what you’ll need: - 1 cup rolled oats - 1/2 cup almond butter (or peanut butter) - 1/2 cup canned pumpkin puree - 1/4 cup honey or maple syrup - 1 tablespoon pumpkin spice blend (or a mix of cinnamon, nutmeg, and ginger) - 1/4 teaspoon salt - 1/2 cup ground flaxseed - 1/2 cup chocolate chips or dried cranberries (optional) - 1/4 cup chopped nuts (walnuts or pecans) These ingredients work together to create a delicious and nutritious snack. The oats give you fiber, while the pumpkin adds moisture and flavor. Almond butter provides healthy fats, making these energy balls filling. You can make these energy balls your own by adding extras. Here are some fun options: - Chia seeds for added fiber - Coconut flakes for a tropical twist - Protein powder for an extra boost - Dried fruits like raisins or apricots Mix and match these add-ins to suit your taste. The best part is that you can switch them up each time you make a batch! If you have dietary needs, don’t worry! You can easily swap out some ingredients. Here are a few simple substitutions: - Use sunflower seed butter instead of almond butter for nut-free options. - Maple syrup can replace honey for a vegan recipe. - Rolled oats can be substituted with gluten-free oats if needed. These swaps help you enjoy pumpkin spice energy balls no matter your diet. Just keep the ratios similar so that the texture stays right. For the full recipe, check out the instructions. Enjoy making these easy and tasty treats! To start, gather your ingredients for pumpkin spice energy balls. You need rolled oats, almond butter, pumpkin puree, honey, pumpkin spice, salt, ground flaxseed, chocolate chips (or dried cranberries), and nuts. In a large bowl, combine the rolled oats, almond butter, pumpkin puree, honey, pumpkin spice, and salt. Mix well. You want a smooth blend. Next, add ground flaxseed, chocolate chips, and nuts. Stir until everything is well mixed. Now, it's time to shape the mixture into balls. Use your hands to form small balls, about 1 inch in size. If the mixture feels sticky, dampen your hands with a little water. This will help you roll the balls more easily. Place each ball on a baking sheet lined with parchment paper. Keep them evenly spaced so they don't stick together. After forming the balls, put the baking sheet in the fridge. Let them chill for about 30 minutes. This helps the energy balls firm up. Once chilled, transfer them to an airtight container. You can enjoy them right away, or store them in the fridge for up to a week. They make a great snack anytime! For the full recipe, check out the details above. To stop your mixture from being too sticky, wet your hands. A little water helps you shape the balls easily. If the mix is still sticky, chill it for a bit in the fridge before rolling. This makes it firmer and easier to work with. You can boost the taste of your energy balls in simple ways. Consider adding a splash of vanilla extract for a rich flavor. You can also try mixing in dried fruits like raisins or apricots for a sweet touch. If you love crunch, add chopped nuts or seeds. These extras can really change the taste! Want a healthier snack? Swap out honey for mashed bananas to cut sugar. You can also replace almond butter with unsweetened applesauce for fewer calories. If you are looking to add protein, mix in a scoop of your favorite protein powder. Each change keeps it tasty while making it better for you. Check out the Full Recipe for more ideas! {{image_2}} Pumpkin spice energy balls offer a great mix of nutrients. They are packed with fiber, protein, and healthy fats. The oats and flaxseed provide energy and help digestion. Almond butter adds protein and good fats. Plus, pumpkin puree is low in calories and high in vitamins. These energy balls also make a good snack for busy days. Each energy ball has about 90 calories. This makes them a smart choice for a snack. If you eat two, you get around 180 calories. It’s easy to enjoy these without feeling guilty. You can keep your portions in check while enjoying their tasty flavor. - Rolled oats: Good for heart health and digestion. - Almond butter: Boosts energy and keeps you full longer. - Pumpkin puree: Rich in vitamins A and C, and low in calories. - Flaxseed: Contains omega-3 fats and fiber, great for the heart. - Honey or maple syrup: Natural sweeteners that provide quick energy. These ingredients combine to make a healthful and tasty treat. You can find the full recipe [here] and enjoy making these delicious energy balls at home. You can boost your energy balls by adding protein powder. This makes them ideal for workouts. Just mix in one scoop of your favorite protein powder into the main mix. It blends well with the other ingredients. You still get that great pumpkin flavor. The result is a filling snack that helps with muscle recovery. If you want a quick treat, skip the chilling step. You can enjoy them right after rolling! For flavor twists, try adding a splash of vanilla or almond extract. You can also swap pumpkin spice for chai spice. Each option gives a new taste to your energy balls. Feel free to use dried fruits or seeds for a fun crunch. These energy balls are great for every season. For Halloween, add some chocolate chips for a spooky touch. During Christmas, try a hint of peppermint extract. You can even add some festive sprinkles on top. For spring, mix in some lemon zest for a fresh twist. Each season brings a new flavor, making these energy balls fun all year round. For the full recipe, check out the earlier section. Pumpkin Spice Energy Balls stay fresh for up to one week in the fridge. Store them in an airtight container. If you keep them at room temperature, they may last only a few days. Always check for any signs of spoilage, like an off smell or changed texture. Yes, you can freeze Pumpkin Spice Energy Balls! Place them in a single layer on a baking sheet. Freeze them for about an hour, then transfer to an airtight container. They can last for up to three months in the freezer. Just thaw them in the fridge overnight before eating. Pumpkin spice offers several health benefits. It often contains cinnamon, ginger, and nutmeg. These spices can help with digestion and reduce inflammation. Cinnamon may also help control blood sugar. Plus, pumpkin puree is high in fiber and vitamins. It supports your immune system and keeps your skin healthy. Absolutely! You can use peanut butter, cashew butter, or sunflower seed butter. Each nut butter adds a unique flavor and texture. Just make sure the consistency is similar to almond butter. This ensures the energy balls hold their shape well. For those with nut allergies, sunflower seed butter is a great choice. In this blog post, we explored how to make delicious Pumpkin Spice Energy Balls. We discussed key ingredients and options to customize your recipe. I shared simple steps for mixing, shaping, and storing these treats. You also learned tips for flavor and how to avoid stickiness. We covered nutritional benefits and possible variations to try. Remember, these energy balls are easy to make and fun to enjoy. Experiment with flavors, and make them your own. Enjoy your healthy snack any time of the year!

Pumpkin Spice Energy Balls Tasty and Nutrient-Rich

Are you ready to fuel your day with a tasty treat? Pumpkin Spice Energy Balls are not just delicious; they’re

- 1 lb baby carrots, trimmed - 4 cloves garlic, minced - 3 tablespoons olive oil - 2 teaspoons dried thyme - 1 teaspoon dried rosemary - Salt and pepper to taste - Fresh parsley, chopped (for garnish) Carrots are rich in vitamins. They are a great source of vitamin A. This vitamin helps with eye health and skin. Carrots also have fiber. Fiber aids digestion and keeps you full longer. Garlic has many health perks too. It can boost your immune system. Studies show garlic may lower blood pressure. It also has antioxidants, which can help protect your cells. Herbs like thyme and rosemary add flavor and health benefits. Thyme has antibacterial properties. It can help fight infections. Rosemary may improve digestion and boost memory. Using these herbs adds health and taste to your meals. Using fresh parsley as a garnish adds color and taste. It is also rich in vitamins K and C. These vitamins are great for your bones and skin. For the full recipe, check out the Garlic Herb Roasted Carrots guide. - Preheat your oven to 425°F (220°C). - In a large mixing bowl, combine the trimmed baby carrots with: - 1 lb baby carrots, trimmed - 4 cloves garlic, minced - 3 tablespoons olive oil - 2 teaspoons dried thyme - 1 teaspoon dried rosemary - Salt and pepper to taste Toss the carrots well. Make sure all the carrots are coated in the oil and herbs. This step adds flavor to every bite. Next, arrange the carrots on a baking sheet. Place them in a single layer. This helps them roast evenly. Roast the carrots in the oven for 25-30 minutes. Stir them halfway through for even cooking. You want them to be tender and caramelized. The high heat brings out their natural sweetness. Once the carrots are ready, transfer them to a serving dish. Garnish with chopped fresh parsley for color. These roasted carrots go well with many dishes. They pair nicely with roasted chicken or grilled fish. You can also serve them with a light salad or grain dish. Enjoy this flavorful side dish delight with your favorite meals. To make your Garlic Herb Roasted Carrots shine, focus on caramelization. This sweet, rich flavor comes from the sugars in the carrots. To achieve this, roast at 425°F (220°C). This high heat helps the carrots brown nicely. Next, season your carrots well. Start with olive oil; it brings out their natural taste. Add minced garlic, thyme, and rosemary for depth. Use salt and pepper to enhance these flavors. Toss everything together in a bowl to coat each carrot evenly. One common mistake is overcrowding the baking sheet. When you crowd the carrots, they steam instead of roast. This prevents that lovely caramelization. Make sure to space them out in a single layer. Another mistake is skipping the tossing step. Tossing the carrots halfway through cooking helps them cook evenly. This way, all sides get that perfect golden color. Don’t rush this step; it’s key to great results. For the full recipe, just refer to the complete Garlic Herb Roasted Carrots recipe. {{image_2}} You can play with different types of carrots. Rainbow carrots add color and fun. Regular orange carrots work great too. Each type brings its taste. You can also swap herbs. Try fresh thyme instead of dried. Basil or dill can add new flavors. For spice, consider adding paprika or cumin. These changes can make your dish unique and exciting. Roasting is fantastic, but other methods shine too. Steaming keeps the carrots bright and tender. It is quick and easy. Sautéing with a little oil gives a nice sear. This method adds a different texture. You can also grill carrots for a smoky flavor. Grilling caramelizes the sugars and adds depth. Just toss them in olive oil and herbs before grilling. This will make your Garlic Herb Roasted Carrots even more delightful! To keep your Garlic Herb Roasted Carrots fresh, use airtight containers. Glass or plastic containers work well. Make sure they are sealed tight. Store them in the fridge. They will last for up to four days. If you want to keep them longer, consider freezing. Use freezer-safe bags or containers for best results. When reheating, you want to keep the carrots tasty. The oven is a great choice. Preheat it to 350°F (175°C). Place the carrots on a baking sheet. Heat for about 10 minutes or until warm. This keeps the texture nice and firm. If you prefer a quick method, use the microwave. Place the carrots in a microwave-safe dish. Add a splash of water to keep them moist. Cover the dish with a lid or wrap. Heat in short bursts of 30 seconds. Stir in between to avoid hot spots. To refresh your leftovers, try adding more seasoning. A pinch of salt or fresh herbs can bring them back to life. You can also drizzle a bit of olive oil for added flavor. Enjoy your flavorful side dish delight! Yes, you can make these carrots ahead of time. Roast them and cool fully. Store them in an airtight container in the fridge for up to three days. When you are ready to serve, reheat them in the oven. Just warm them at 350°F (175°C) until heated through. This helps keep their sweet flavor and soft texture. These carrots pair well with many dishes. Try serving them with grilled chicken or baked fish. They also complement quinoa or rice dishes nicely. For a full meal, add a fresh salad with a tangy dressing. The sweet and savory flavors of the carrots will balance well with these options. To make this recipe vegan, simply swap the olive oil with any vegetable oil. You can also use vegan butter instead of oil for a richer taste. All other ingredients are already vegan-friendly. This way, you keep the tasty flavor while catering to vegan diets. For the complete Garlic Herb Roasted Carrots recipe, click [here](#). Roasting baby carrots with garlic and herbs is simple and tasty. We reviewed key ingredients and their health benefits. Then, I shared steps to prepare and roast them perfectly. Use the tips to avoid common mistakes and explore fun variations. Store leftovers properly and reheat to keep their taste. Enjoy these flavorful carrots with various dishes, and don’t forget to try the vegan options. I hope this guide helps you create delicious meals with ease.

Garlic Herb Roasted Carrots Flavorful Side Dish Delight

Looking for a simple yet delicious side dish? Garlic Herb Roasted Carrots are a perfect choice! These vibrant veggies burst

Older posts
Newer posts
← Previous Page1 … Page18 Page19 Page20 … Page85 Next →

dsad

© 2025 So Yum Recipes • Built with GeneratePress

Our Policies

  • Copyright Policy
  • Cookie Policy
  • GDPR Policy
  • Privacy Policy
  • Disclaimer
  • Terms Of Use

More Information

  • Home
  • About
  • Contact
  • Appetizers
  • Dessert
  • Dinner
  • Drinks
©2025, So Yum Recipes About Back To Top