Skip to content
DisclaimerTerms Of UseGDPR PolicyCookie Policy

So Yum Recipes

  • Home
  • Drinks
  • Appetizers
  • Dinner
  • Dessert
  • About
  • Contact
  • Privacy Policy
DisclaimerTerms Of UseGDPR PolicyCookie Policy

Chloe

To make Chewy Salted Caramel Pretzel Brownies, you need some simple ingredients. Here’s what you will need: - 1 cup unsalted butter, melted - 1 ¼ cup granulated sugar - 3 large eggs - 1 teaspoon vanilla extract - 1 cup all-purpose flour - ½ cup unsweetened cocoa powder - ½ teaspoon baking powder - ½ teaspoon salt - 1 cup crushed pretzels - 1 cup semi-sweet chocolate chips - 1 cup caramel sauce (store-bought or homemade) - Sea salt flakes, for topping These ingredients blend together for a rich and sweet treat. The pretzels add a nice crunch and saltiness. The chocolate chips melt into the brownies, giving them a gooey texture. The caramel sauce swirled in creates a delightful sweetness. Using fresh ingredients will make your brownies taste even better. For the best results, measure everything carefully. This will help you achieve that perfect chewy texture. If you want the full recipe, you can find it included in the article. Start by preheating your oven to 350°F (175°C). Grease a 9x13-inch baking pan or line it with parchment paper. This step helps with easy removal later. In a large mixing bowl, combine 1 cup of melted unsalted butter and 1 ¼ cups of granulated sugar. Whisk them together until the mixture looks smooth and glossy. This process adds air and makes the batter light. In a separate bowl, whisk together the dry ingredients. You will need 1 cup of all-purpose flour, ½ cup of unsweetened cocoa powder, ½ teaspoon of baking powder, and ½ teaspoon of salt. Whisking these ingredients ensures they mix well. Gradually add this dry mix to the wet ingredients. Stir until just combined. You want to avoid over-mixing to keep the brownies chewy. Now it's time to make the brownie batter. Gently fold in 1 cup of crushed pretzels and 1 cup of semi-sweet chocolate chips. This adds a delightful crunch and rich chocolate flavor. Next, pour half of the brownie batter into your prepared pan, spreading it evenly. Drizzle half of 1 cup of caramel sauce over this layer. Then, pour the remaining brownie batter on top and spread it evenly again. Drizzle the rest of the caramel sauce on top. Use a knife to swirl it slightly for a nice marbled effect. Finally, sprinkle sea salt flakes over the top before baking. For the full recipe, you can refer to the earlier section. Enjoy your baking! To get that chewy texture, you need to mix well but not too much. Overmixing can make brownies tough. Combine the wet and dry ingredients gently until just mixed. Use a spatula to fold in the pretzels and chocolate chips. This helps keep the brownies soft and chewy. For baking, set your oven to 350°F (175°C). Bake for 25-30 minutes. Check with a toothpick; it should have some moist crumbs. If the toothpick is clean, you might overbake them. If you want a rich caramel taste, make your own. Simply melt sugar until golden, then mix in butter and cream. This homemade caramel brings depth to your brownies. Balancing sweetness is key. Use sea salt flakes to cut the sweetness of the caramel. A little salt goes a long way in enhancing flavor. Sprinkle some on top right before serving for a lovely finish. These brownies shine with a scoop of vanilla ice cream. The cold ice cream pairs well with the warm brownies. Drizzle more caramel sauce on top for extra indulgence. For a stunning presentation, cut the brownies into neat squares. Place them on a nice plate and garnish with pretzel pieces. This adds a fun crunch and looks great. For the full recipe, check the details above. {{image_2}} For those who need gluten-free options, swap all-purpose flour for a gluten-free blend. Many brands work well in brownies and keep them chewy. If you want to change up the chocolate, try dark chocolate chips instead of semi-sweet. This adds a rich depth to the flavor. You can add nuts like walnuts or pecans for extra crunch. Chopped candies like toffee or peanut butter cups can also jazz up your brownies. For a twist, try adding a splash of almond or mint extract. These flavors create a fun surprise in every bite. For a cozy fall or winter treat, add spices like cinnamon or nutmeg. This gives the brownies a warm flavor that pairs well with the caramel. You can also mix in pumpkin puree for a festive touch. Each season offers a chance to get creative with these chewy treats! To keep your brownies fresh, store them in an airtight container. This helps prevent them from drying out. If you want to save some for later, you can freeze them. Cut the brownies into squares first. Wrap each piece tightly in plastic wrap. Then place them in a freezer bag. They can last up to three months in the freezer. When you’re ready to enjoy them, take them out of the freezer. Let them thaw in the fridge for a few hours or overnight. If you’re in a hurry, you can leave them at room temperature for about an hour. This way, they stay soft and tasty. Brownies can stay fresh at room temperature for about four to five days. Keep them in a cool, dry place. A sealed container is best. Avoid direct sunlight to help maintain their texture. If you live in a hot climate, refrigeration may help. Just remember, cold brownies can be a bit firmer. To reheat your brownies, use the microwave. Place a square on a plate and heat it for 10-15 seconds. Check if it's warm enough. You can also use the oven. Preheat it to 350°F (175°C). Wrap the brownies in foil and heat for about 5-10 minutes. This keeps them soft while warming them up. Enjoy your chewy salted caramel pretzel brownies just like fresh! Chewy Salted Caramel Pretzel Brownies can last up to a week. Store them in an airtight container to keep them fresh. Place parchment paper between layers to prevent sticking. If you want, you can refrigerate them for longer freshness. Just remember to let them come to room temperature before enjoying. Yes, you can make these brownies ahead of time! Bake them and let them cool completely. Then, wrap them tightly in plastic wrap. You can store them at room temperature for about five days. If you want to keep them longer, freeze them for up to three months. Just thaw them in the fridge when you're ready to eat. If you don’t have pretzels, you can use other crunchy toppings. Crushed potato chips add a salty bite. Chopped nuts give a nice crunch too. Crushed graham crackers can replace pretzels for more sweetness. Each option changes the flavor, so choose what you like best! The recipe for Chewy Salted Caramel Pretzel Brownies is tasty and fun. You learned how to mix simple ingredients, making this dessert special. With easy steps, you can create a chewy texture and enhance flavor with salt. Try variations to make it your own, or store them for later delight. Remember, sharing with friends or family makes these treats even better. Enjoy baking and impressing everyone with your delicious brownies!

Chewy Salted Caramel Pretzel Brownies Delightful Treat

Are you ready to indulge in a treat that combines sweet, salty, and chewy goodness? These Chewy Salted Caramel Pretzel

To make Spicy Firecracker Shrimp Tacos, you'll need some simple and fresh ingredients. Here’s what you need: - 1 pound shrimp, peeled and deveined - 1 tablespoon olive oil - Spices: chili powder, smoked paprika, cayenne pepper, garlic powder, onion powder - Salt and pepper to taste - 8 small corn tortillas - 1 cup red cabbage, shredded - 1 avocado, sliced - ½ cup fresh cilantro, chopped - ½ cup sour cream - 1 lime, cut into wedges These ingredients come together to create a bold and flavorful meal. The shrimp adds protein, while the spices kick up the heat. The corn tortillas serve as the perfect vessel for all the toppings. I love using fresh red cabbage for crunch. The avocado adds creaminess, and cilantro gives it a fresh finish. With sour cream on top, these tacos are truly delicious. For the full details on how to make it all come together, check out the Full Recipe. First, grab a large bowl. In it, mix the shrimp with olive oil and spices. Use 1 tablespoon of olive oil. Then, add 1 teaspoon of chili powder, 1 teaspoon of smoked paprika, and ½ teaspoon each of cayenne pepper, garlic powder, and onion powder. Sprinkle salt and pepper to taste. Toss well to coat the shrimp evenly. Make sure every piece is covered in spices. This adds rich flavor and makes them pop! Next, heat a large skillet over medium-high heat. Once hot, add the shrimp in a single layer. Cook for about 2-3 minutes on each side. The shrimp should turn pink and opaque when done. Avoid overcrowding the pan, as this can steam them instead of searing. Perfect shrimp should be tender and juicy, not rubbery. Remove them from heat to keep that great texture. Now, let’s warm the corn tortillas. Use a separate pan and heat them over medium heat for about 30 seconds on each side. You want them pliable but not crispy. To assemble, place a few pieces of shrimp on each warm tortilla. Top with shredded red cabbage, slices of avocado, and a sprinkle of fresh cilantro. Finish it off with a drizzle of sour cream. Serve with lime wedges for a zesty kick. For the complete recipe, check the Full Recipe section. To ensure your shrimp are cooked just right, look for a pink color. This means they are done. Cook them for about 2-3 minutes on each side. If you overcook shrimp, they can turn rubbery. You can try other cooking methods too. Grilling adds a nice smoky flavor. Just skewer the shrimp for easy grilling. Baking is another option. Spread the shrimp on a baking sheet and bake at 400°F for about 8-10 minutes. These tacos pair well with side dishes. Rice and beans work great. You can also serve them with a fresh salad for a light meal. For drinks, a cold beer or a fruity margarita complements the spice. You can also enjoy a refreshing iced tea. Each drink adds a nice touch to your meal. For the Full Recipe, check the details above! {{image_2}} You can change the shrimp to chicken or tofu for a different taste. Both options work well with the spices. If you want a fresh twist, try mango salsa or avocado crema as toppings. They add sweetness and creaminess to your tacos. To make your tacos milder, reduce the cayenne pepper. You can also add more sour cream to tone it down. For those who crave heat, add extra cayenne or a splash of hot sauce. Paprika and garlic powder can boost flavor without adding too much heat. These variations let you customize your Spicy Firecracker Shrimp Tacos to fit your mood. Feel free to experiment and find your perfect combination! For the complete recipe, check out the Full Recipe section. To store your shrimp tacos, first, let them cool. Place the shrimp and toppings in separate, airtight containers. This keeps each part fresh. You can store the tortillas in a zip-top bag. When stored this way, the shrimp stays tasty for 2 to 3 days in the fridge. The tortillas can last about a week if sealed well. Always check for any signs of spoilage before using leftovers. If you want to save some tacos for later, you can freeze the components. For best results, freeze the shrimp and tortillas separately. Place the shrimp in a freezer-safe bag and squeeze out the air. They can stay fresh for up to 3 months. For the tortillas, wrap them tightly in plastic wrap and then place in a freezer bag. When you are ready to eat, take the shrimp out and defrost them in the fridge overnight. You can warm the tortillas in a pan or microwave after they thaw. This way, your Spicy Firecracker Shrimp Tacos will taste fresh and delicious again! Spicy Firecracker Shrimp Tacos pack a bigger punch. They have a bold flavor profile with a spicy kick. The mix of chili powder, smoked paprika, and cayenne pepper really makes them pop. Regular shrimp tacos tend to be milder and less exciting. These spicy tacos bring heat and depth that can wake up your taste buds. If you're a fan of spice, you'll love these! Yes, you can prep these tacos in advance. Start by marinating the shrimp in the spices. Store it in the fridge for up to 24 hours. This allows the flavors to blend well. You can also chop the veggies ahead of time. Keep everything in separate containers until you are ready to cook. This makes meal prep easy and quick. When it's taco time, just cook the shrimp and warm the tortillas! If you want a dairy-free option, try using cashew cream. You can also use plain Greek yogurt for a tangy taste. Avocado crema is another delicious choice. Just blend ripe avocado with lime juice and a pinch of salt. All these options work well to add creaminess to your tacos. You can find the Full Recipe for Spicy Firecracker Shrimp Tacos in the main article. It gives you all the details you need to create this bold meal. You now have all the tools to make tasty Spicy Firecracker Shrimp Tacos. We covered the key ingredients, cooking tips, and fun variations. Don't forget how you can adjust spice levels or swap proteins. These tacos are perfect for any meal or event. With easy storage methods, you can enjoy leftovers too. Try this simple recipe to impress family and friends. Enjoy the vibrant flavors and quick prep that make these tacos a hit!

Spicy Firecracker Shrimp Tacos Bold and Flavorful Meal

Are you ready for a flavor explosion? These Spicy Firecracker Shrimp Tacos pack a punch of bold taste in every

- 2 cups rotini pasta - 2 cups cooked chicken breast, shredded - 3 cups broccoli florets - 2 cups heavy cream - 1 cup grated Parmesan cheese - 1 cup shredded mozzarella cheese - 4 cloves garlic, minced - 1 tablespoon olive oil - 1 teaspoon Italian seasoning - Salt and pepper to taste - Fresh parsley, chopped The main ingredients create a hearty dish that warms the soul. I love using rotini pasta because it holds sauce well. Shredded chicken adds protein and makes the dish filling. Broccoli adds a nice crunch and bright color. Heavy cream makes the sauce rich and creamy. Parmesan cheese gives that cheesy goodness, while mozzarella adds a melty touch. For spices, garlic brings a wonderful aroma. Olive oil keeps your garlic from burning. Italian seasoning adds a classic flavor. Salt and pepper are key to enhancing all the tastes. Finally, fresh parsley not only looks great but adds a pop of flavor. It’s the perfect finish to this comforting bake. If you want to see detailed steps on how to use these ingredients, check out the Full Recipe. - Preheat the oven to 375°F (190°C). - Cook the rotini pasta until al dente. How do I cook rotini pasta? To cook rotini pasta, bring a large pot of salted water to a boil. Add the pasta and cook it according to the package instructions. This usually takes about 8 to 10 minutes. You want it firm but not hard. Drain the pasta and set it aside for later. - Sauté garlic and broccoli. - Make the Alfredo sauce with heavy cream and Parmesan. What is the best way to sauté garlic and broccoli? In the same pot used for the pasta, heat one tablespoon of olive oil over medium heat. Add minced garlic and sauté for about 1–2 minutes until it smells good. Then, add the broccoli florets. Cook for about 5 minutes, stirring often, until they are bright green and just tender. How do I make the Alfredo sauce? Once the broccoli is ready, reduce the heat to low. Pour in 2 cups of heavy cream and stir in a teaspoon of Italian seasoning, salt, and pepper. Gradually add one cup of grated Parmesan cheese, stirring until the sauce is creamy and smooth. - Combine all ingredients in a large mixing bowl. - Transfer to the baking dish and top with mozzarella. - Bake until bubbly and golden. How do I combine the ingredients? In a large mixing bowl, add the cooked rotini, shredded chicken, sautéed broccoli, and creamy Alfredo sauce. Mix everything well until the pasta and chicken are fully coated with the sauce. What should I do before baking? Pour the mixture into a greased 9x13 inch baking dish. Make sure it’s spread evenly. Then, sprinkle one cup of shredded mozzarella cheese over the top. How long do I need to bake it? Place the baking dish in the preheated oven and bake for 25–30 minutes. You want it to be bubbly and golden. When it’s done, let it cool slightly before serving. For the full recipe, check out the link! - How to prevent pasta from overcooking: To keep your pasta firm, cook it until al dente. This means it should be slightly firm when bitten. Be sure to check the package for the right cooking time, and start tasting a minute or two before it finishes. Drain it right away to stop the cooking process. - Tips for shredding chicken quickly: Use two forks to shred warm chicken. Hold one fork steady and pull the chicken apart with the other. You can also use a stand mixer with a paddle attachment on low speed. This method works fast and gives you perfectly shredded chicken. - Best sides to serve with Chicken Alfredo Bake: Pair your bake with a simple green salad. A side of garlic bread or roasted vegetables works great too. These sides balance the creamy richness of the Alfredo. - Suggested wine pairings: A crisp Chardonnay or a light Pinot Grigio complements this dish well. Their acidity cuts through the creaminess and enhances the flavors of the chicken and cheese. - Adding spices for extra kick: To spice things up, try adding red pepper flakes or a dash of cayenne pepper. Fresh herbs like basil or thyme also add a nice touch. Simply mix them into your Alfredo sauce. - Substitute ingredients for variety: You can swap rotini with penne or fusilli pasta. For a twist, use different cheeses, like Gouda or Fontina. Adding spinach or bell peppers can also change the flavor profile while boosting nutrition. {{image_2}} You can make this Chicken Alfredo Bake healthier with some easy swaps. Using whole grain pasta helps cut down calories and adds fiber. It fills you up better than regular pasta. Add more vegetables like spinach, bell peppers, or peas for extra nutrition. This not only boosts vitamins but also adds color to your dish. Want to change the taste? Try different cheese combinations. Mix in gouda or cheddar for a new twist. If you like heat, add red pepper flakes to make a spicy Chicken Alfredo Bake. This gives your dish a nice kick and keeps it exciting. If you need gluten-free options, use gluten-free pasta instead. Many brands make great pasta that tastes just as good. For those who do not eat meat, try a vegetarian version. Use plant-based chicken or mushrooms for a hearty alternative. You can still enjoy all the creamy goodness without the meat. For the full recipe, check out the detailed steps above. To keep your Chicken Alfredo Bake fresh, store it in the fridge. Use an airtight container. This helps keep it moist and tasty. Make sure it cools down first. You can keep it for 3 to 4 days in the refrigerator. If you want to save it longer, consider freezing it. When reheating, I recommend using the oven. Preheat the oven to 350°F (175°C). Place the Chicken Alfredo Bake in an oven-safe dish. Cover it with foil to keep it from drying out. Heat for about 20 minutes or until hot. You can also use the microwave, but it may not taste as good. If you use the microwave, heat it in short bursts. Stir in between to warm it evenly. To freeze your Chicken Alfredo Bake, let it cool completely first. Use a freezer-safe container. You can also wrap it tightly with plastic wrap and then foil. This helps prevent freezer burn. It can last up to 3 months in the freezer. When ready to eat, thaw it in the fridge overnight. Then, follow the reheating tips to enjoy your dish again. How long does Chicken Alfredo Bake last in the fridge? Chicken Alfredo Bake lasts about 3 to 5 days in the fridge. Store it in an airtight container. This keeps it fresh and safe to eat. Always check for any signs of spoilage before eating leftovers. Can I use frozen chicken for this recipe? Yes, you can use frozen chicken. Just make sure to thaw it first. You can either leave it in the fridge overnight or use the microwave. Cook it fully before shredding it for the bake. This will ensure even cooking. What can I substitute for heavy cream? If you want a lighter option, use half-and-half or whole milk. You can also mix milk with a bit of flour or cornstarch for a thicker sauce. This will still give you a creamy texture without the full heaviness. Can I add other vegetables? Absolutely! You can add bell peppers, spinach, or even mushrooms. Just make sure to sauté them first to soften them up. This adds more flavor and nutrition to your Chicken Alfredo Bake. How do I know when the Chicken Alfredo Bake is done? Your Chicken Alfredo Bake is done when the top is bubbly and golden brown. You can also check the middle with a knife. It should be hot and the cheese melted. Let it cool for a few minutes before serving. What’s the best pasta to use for this dish? Rotini works great for this recipe. Its shape holds the sauce well. You can also use penne or fusilli. These shapes create a perfect bite with every scoop. You learned how to make a delicious Chicken Alfredo Bake from scratch. We covered the ingredients, cooking steps, and tips to enhance flavor. I shared ways to store leftovers and answered common questions. This dish is not just tasty; it offers many ways to adapt for health needs. Try different seasonings or vegetables to make it your own. Enjoy creating this meal, and make it a family favorite!

Best Ever Chicken Alfredo Bake Simple and Comforting

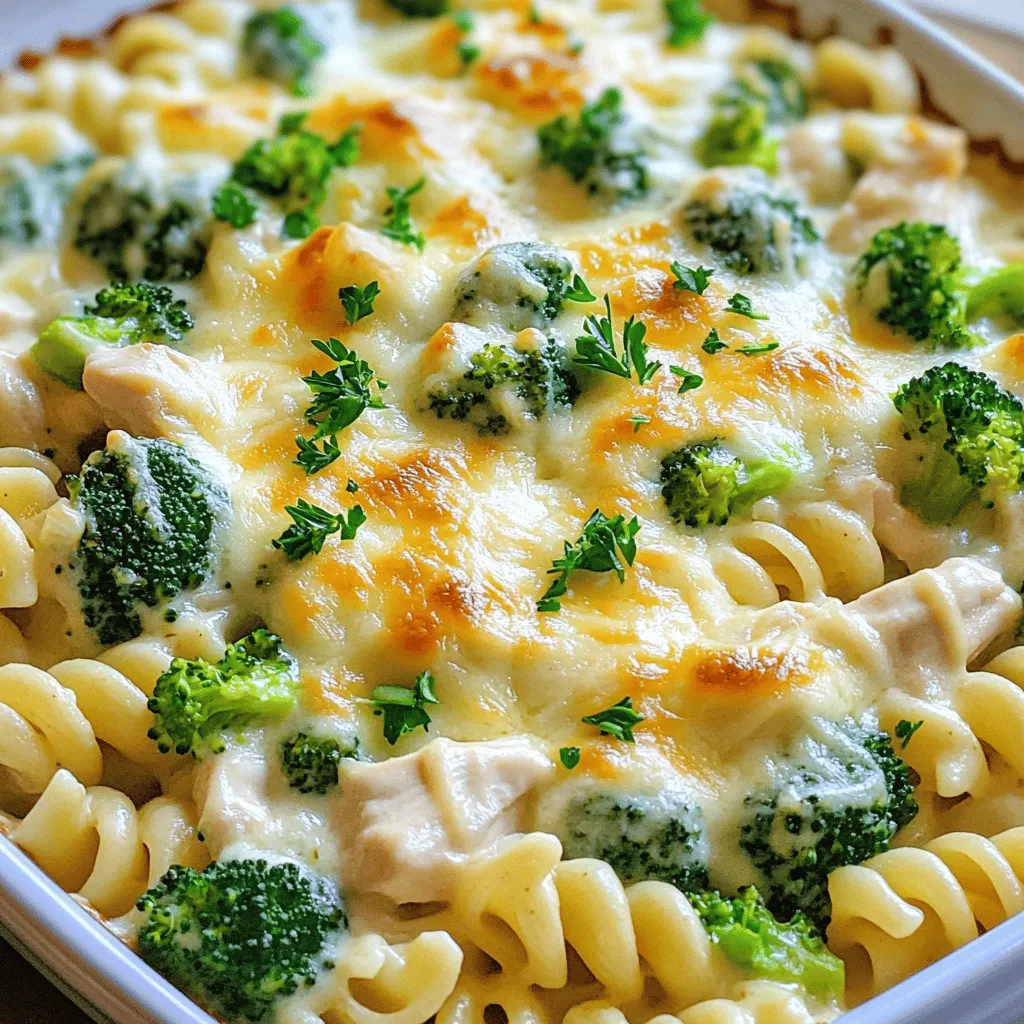
Are you ready for comfort food that warms your heart? My Best Ever Chicken Alfredo Bake is just what you

To make Easy Air Fryer Mozzarella Sticks, you need a few simple ingredients. Here’s what you will need: - 12 mozzarella string cheese sticks - 1 cup all-purpose flour - 2 large eggs, beaten - 1 cup breadcrumbs (preferably Italian-style) - 1 teaspoon garlic powder - 1 teaspoon Italian seasoning - ½ teaspoon paprika - Salt and pepper to taste - Cooking spray or olive oil spray - Marinara sauce for dipping Each ingredient adds its own flavor and texture. The mozzarella sticks bring all the cheesy goodness. The flour helps the cheese sticks stick. The eggs make the breadcrumbs adhere well. The breadcrumbs give a nice crunch. The spices add extra zest. You can use different cheese sticks if you want. Cheddar or a mix can work too. Just remember to adjust the cooking time if you change the cheese type. The marinara sauce is perfect for dipping. It adds a nice tang that pairs well with the cheesy taste. With these ingredients, you can create a tasty treat. Check out the Full Recipe for all the steps to make these yummy mozzarella sticks! 1. Cutting mozzarella sticks: Start by cutting each mozzarella stick in half. This gives you two shorter sticks. Shorter sticks are easier to dip and eat. 2. Setting up the breading station: Get three shallow dishes. Put the flour in one dish, the beaten eggs in another, and mix the breadcrumbs, garlic powder, Italian seasoning, paprika, salt, and pepper in the third dish. This setup makes it easy to coat the cheese. 1. Coating with flour: Take a mozzarella stick and roll it in the flour. Make sure it is covered well. Shake off any extra flour. 2. Dipping in beaten eggs: Next, dip the floured stick into the beaten eggs. Let any excess egg drip off. This helps the breadcrumbs stick better. 3. Rolling in breadcrumb mixture: Now, roll the stick in the breadcrumb mix. Press gently so the crumbs stick well. Repeat this for all the mozzarella sticks. 1. Freezing the breaded sticks: Place the breaded sticks on a baking sheet. Freeze them for at least 30 minutes. This step helps keep their shape when you cook them. 2. Preheating the air fryer: Preheat your air fryer to 390°F (200°C). While it heats up, lightly spray the basket with cooking spray. 3. Air frying instructions: Arrange a batch of mozzarella sticks in a single layer. Make sure they do not touch. Spray the tops lightly with cooking spray for extra crispiness. Cook for about 6-8 minutes, or until they are golden brown. Adjust the cooking time if needed, based on your air fryer model. Now you are ready to enjoy your crunchy, gooey mozzarella sticks! For more details, check the Full Recipe. To make your air fryer mozzarella sticks great, freezing is key. Freezing the breaded sticks for at least 30 minutes helps them keep their shape. If you skip this step, they may melt too much while cooking. Trust me; this makes a big difference. Different air fryers cook differently, so you might need to adjust the time. Most recipes suggest 6-8 minutes at 390°F (200°C). Check your sticks around the 6-minute mark. If they need more time, watch closely to avoid burning. Adding seasonings can boost the taste of your mozzarella sticks. I like garlic powder and Italian seasoning. These add a nice herby flavor. You can also try a bit of paprika for a hint of smokiness. Feel free to get creative with your favorite spices! While mozzarella is the classic choice, you can experiment with other cheeses too. Cheddar cheese sticks work well and offer a sharp flavor. A blend of mozzarella and cheddar gives you a rich taste. Just remember, softer cheeses may melt faster, so adjust your cooking time accordingly. For the full recipe, check out the details above. {{image_2}} You can switch up the cheese for fun. Cheddar cheese sticks give a sharp taste. Their creamy melt pairs well with the crunchy coating. You can also mix mozzarella and cheddar. This blend creates a rich flavor and gooey texture. Feel free to explore with other cheeses too. Think about pepper jack for a spicy kick. Want to make your sticks extra crunchy? Use panko breadcrumbs instead of regular ones. They add a nice crunch that is hard to beat. You can also spice up your breadcrumbs. Add garlic powder, onion powder, or even crushed red pepper. This makes each bite burst with flavor. Personalizing your coating can take these sticks to the next level. Check out the Full Recipe for more ideas! To keep your air fryer mozzarella sticks fresh, store them in the fridge. Place them in an airtight container. They will last for about three days. If you want to keep them longer, consider freezing them. To freeze the breaded sticks, first, lay them on a baking sheet. Make sure they are not touching each other. Freeze them for about two hours until they are firm. Then, transfer them to a freezer bag. Be sure to remove as much air as possible. When it’s time to enjoy your leftover mozzarella sticks, here are the best ways to reheat them: - Air Fryer: Preheat the air fryer to 350°F (175°C). Cook for about 4-5 minutes until they are hot and crispy. - Oven: Preheat your oven to 375°F (190°C). Spread the sticks on a baking sheet and bake for 10-12 minutes. - Microwave: This is quick but not the best for texture. Heat them for about 30 seconds. Check and add more time if needed. These methods will help you enjoy that gooey cheese and crispy outside again! To make Easy Air Fryer Mozzarella Sticks, follow these steps: 1. Cut each mozzarella stick in half. 2. Set up three shallow dishes: one with flour, one with beaten eggs, and one with breadcrumbs mixed with garlic powder, Italian seasoning, paprika, salt, and pepper. 3. Coat each mozzarella stick in flour, shake off excess. 4. Dip the stick in eggs, letting the extra drip off. 5. Roll in the breadcrumb mix, pressing gently. 6. Place the sticks on a baking sheet and freeze for at least 30 minutes. 7. Preheat the air fryer to 390°F (200°C) and spray the basket. 8. Arrange sticks in a single layer, spray tops lightly. 9. Air fry for 6-8 minutes until golden and crispy. 10. Cool for a minute, serve with marinara sauce. Yes, you can use other types of cheese! Here are some options: - Cheddar cheese sticks provide a sharp flavor. - Pepper jack gives a spicy kick. - String cheese blends well with different flavors. - Gouda offers a rich, smoky taste. Air fry mozzarella sticks for about 6-8 minutes. Cooking time may vary: - If they are larger, increase the time by 1-2 minutes. - For smaller sticks, check them at 5 minutes. - Always look for a golden-brown color as a sign they are done. Pair mozzarella sticks with tasty dips and sides like: - Marinara sauce is classic and delicious. - Ranch dressing adds a creamy touch. - Garlic aioli offers a gourmet spin. - Serve with a side salad for a fresh contrast. This post covered how to make delicious air fryer mozzarella sticks. We discussed the ingredients, from cheese to spices. You learned step-by-step instructions for preparation, breading, and cooking. Tips for the best texture and flavor helped enhance your dish. We explored variations and storage tips to keep leftovers fresh. Now you’re ready to impress friends and family with your tasty snacks. Enjoy your cooking adventure!

Easy Air Fryer Mozzarella Sticks Simple and Tasty

Craving a crispy, cheesy snack? You’re in the right place! My Easy Air Fryer Mozzarella Sticks recipe offers the perfect

To make these fluffy pumpkin pancakes, you need: - 1 cup all-purpose flour - 1 teaspoon baking powder - 1/2 teaspoon baking soda - 1/2 teaspoon salt - 1 teaspoon ground cinnamon - 1/2 teaspoon ground nutmeg - 1/4 teaspoon ground ginger - 3/4 cup pumpkin puree (canned or fresh) - 2 tablespoons brown sugar - 1 large egg - 1 cup buttermilk (or milk + 1 tsp vinegar mixed) - 2 tablespoons melted butter - Cooking spray or more butter for the pan If you need to convert measurements, here are some quick tips: - 1 cup of flour is about 120 grams. - 1 tablespoon of butter is about 14 grams. - 1 cup of buttermilk equals about 240 milliliters. - 1 teaspoon is about 5 milliliters. Using these conversions can help you adjust your recipe easily. Choose the best ingredients for the best taste: - Flour: Look for unbleached all-purpose flour for a richer flavor. - Pumpkin Puree: Use 100% pure pumpkin. Check the label for added sugars or spices. - Spices: Fresh spices make a big difference. Smell them to check freshness. - Eggs: Use large, fresh eggs for better texture. - Dairy: Choose whole milk or buttermilk for creaminess. These tips will help you create the most delicious fluffy pumpkin pancakes. For the full recipe, refer to the earlier instructions. Start by taking a large bowl. Add 1 cup of all-purpose flour. Then sprinkle in 1 teaspoon of baking powder and 1/2 teaspoon of baking soda. Next, add 1/2 teaspoon of salt. For spice, mix in 1 teaspoon of ground cinnamon, 1/2 teaspoon of ground nutmeg, and 1/4 teaspoon of ground ginger. Whisk these dry ingredients together until they blend well. This step is key for even flavor. In another bowl, place 3/4 cup of pumpkin puree. You can use canned or fresh. Add 2 tablespoons of brown sugar and 1 large egg. Mix these until smooth. Next, pour in 1 cup of buttermilk or milk mixed with 1 teaspoon of vinegar. Then add 2 tablespoons of melted butter. Stir these wet ingredients together until they are fully combined and creamy. Now, pour the wet mixture into the dry mixture. Gently stir them together. It is important not to overmix. A few lumps are okay because they help make the pancakes fluffy. After mixing, preheat a non-stick skillet or griddle over medium heat. Lightly grease it with cooking spray or butter. Pour about 1/4 cup of batter per pancake onto the skillet. Cook until bubbles form, which takes about 2-3 minutes. Flip the pancakes and cook for another 2-3 minutes until they are golden brown. Repeat this with the remaining batter. For the full recipe, check the details above. To get fluffy pancakes, focus on two key steps: mixing and resting. First, mix your dry and wet ingredients separately. When you combine them, only stir until you see a few lumps. Overmixing makes pancakes dense. Next, let the batter rest for about 5-10 minutes. This allows the baking powder to activate. The result? Fluffy pancakes that rise beautifully on the skillet. Many home cooks make a few common mistakes. One big mistake is using old baking powder. Always check the expiration date. Another mistake is cooking on too high heat. If the skillet is too hot, the outside burns while the inside stays raw. Lastly, don’t skip the buttermilk. It adds moisture and helps create that perfect fluffy texture. For cooking pumpkin pancakes, I recommend using a non-stick skillet or a griddle. A skillet works well for small batches, while a griddle is great for cooking larger amounts at once. Make sure to preheat your cooking surface. A medium heat is best. This temperature cooks the pancakes evenly and helps them rise. Use a light coating of cooking spray or butter to prevent sticking. Enjoy your cooking experience and have fun flipping those pancakes! {{image_2}} You can make your pumpkin pancakes even more fun by adding chocolate chips or nuts. I love using semi-sweet chocolate chips. They melt slightly and make each bite sweet and rich. If you prefer nuts, try walnuts or pecans for a nice crunch. Just sprinkle a handful into the batter before cooking. This small change can turn a simple pancake into a tasty treat! If you need gluten-free pancakes, you can swap the all-purpose flour. Use a blend of gluten-free flours, like almond flour or oat flour. These flours can add a nice flavor and texture. Just remember, you may need to adjust the liquid in the recipe. Start with the same amount, then add more if the batter seems too thick. This makes it easy for everyone to enjoy pumpkin pancakes! Want to try different flavors? You can add other ingredients for a unique twist. A splash of vanilla extract can enhance the sweetness. Maple extract can give a warm, rich flavor. You can also mix in a bit of orange zest for a fresh taste. These options allow you to create pancakes that match your mood. The full recipe gives you a great base to start from, but feel free to explore! To keep your fluffy pumpkin pancakes fresh, place them in an airtight container. Let them cool to room temperature first. Layer the pancakes with parchment paper to prevent sticking. You can store them in the fridge for up to three days. If you want to keep them longer, freezing is a great option. Reheating pancakes properly keeps them fluffy and tasty. You can use the microwave or a skillet. For the microwave, place a pancake on a plate and cover it with a damp paper towel. Heat for about 20 to 30 seconds. This adds moisture and keeps them soft. If using a skillet, warm it over low heat. Flip the pancake after about a minute. This method keeps the pancakes fluffy and nice. Freezing pancakes is easy and perfect for quick meals. Stack pancakes with parchment paper in between. Wrap them tightly in plastic wrap and then in foil. Place them in the freezer for up to two months. To thaw, take out the pancakes and let them sit at room temperature for about 30 minutes. You can also microwave them directly from frozen for about one minute. Enjoy your delicious pancakes anytime! For the full recipe, refer to the earlier section. You can make pumpkin pancakes without eggs by using substitutes. Common substitutes include mashed bananas or applesauce. Use 1/4 cup of either for each egg. This keeps the pancakes moist and fluffy. You can also try flaxseed meal mixed with water. Mix 1 tablespoon of flaxseed meal with 3 tablespoons of water. Let it sit for about five minutes until it thickens. Yes, you can substitute all-purpose flour with whole wheat flour. Whole wheat flour adds more fiber and nutrients. Use the same amount as the recipe calls for. Note that this can make the pancakes a bit denser. To lighten them, you can mix half whole wheat and half all-purpose flour. The best toppings for pumpkin pancakes are maple syrup, whipped cream, and nuts. You can also try fresh fruit like bananas or berries. A sprinkle of cinnamon or powdered sugar adds a nice touch too. For a fun twist, consider adding chocolate chips or a dollop of yogurt. These toppings enhance the flavor and make your pancakes even more delicious. For the full recipe, check out the main section. Fluffy pumpkin pancakes require quality ingredients and precise steps. We covered how to mix wet and dry ingredients for the best texture. Tips on achieving fluffiness and avoiding mistakes can guide you. You can also try fun variations, from gluten-free options to tasty toppings. In the end, enjoy these pancakes. Store leftovers well, and don’t forget the reheating tips for that perfect fluff. Happy cooking!

Fluffy Pumpkin Pancakes Easy and Delicious Recipe

Looking to spice up your breakfast with something special? You’re in for a treat! These fluffy pumpkin pancakes are not

To make Loaded Ranch Potato Wedges, gather the following fresh items: - 4 large russet potatoes, washed and cut into wedges - 3 tablespoons olive oil - 1 teaspoon garlic powder - 1 teaspoon paprika - Salt and pepper to taste - 1 cup shredded cheddar cheese - 1 cup cooked bacon bits (or a plant-based alternative) - ½ cup sour cream (or Greek yogurt) - ¼ cup ranch dressing - 2 green onions, chopped - Fresh parsley for garnish Using high-quality ingredients makes a big difference. Choose firm, fresh potatoes for the best texture. Olive oil adds rich flavor and helps create a crispy crust. Garlic powder and paprika give these wedges a savory kick. You can adjust salt and pepper to match your taste. I love using shredded cheddar cheese for its meltiness. Bacon bits add a smoky crunch, but you can swap them for plant-based options if you prefer. Sour cream combined with ranch dressing provides a creamy topping. Green onions and parsley not only add color but also fresh flavor. This recipe is simple yet so satisfying. You can find the full recipe above to guide you step-by-step! - Preheat the oven to 425°F (220°C). - Toss the potato wedges with olive oil, garlic powder, paprika, salt, and pepper. Start with fresh russet potatoes. Cut them into thick wedges. The thicker the wedge, the better the crunch. Use a large bowl to mix the olive oil and spices. This helps each wedge get an even coat. Olive oil not only adds flavor but also helps achieve that golden crisp. Garlic powder and paprika give the wedges a tasty kick. - Arrange in a single layer on a baking sheet lined with parchment paper. - Bake in the preheated oven for 30-35 minutes, turning halfway through. Lay the wedges on the baking sheet. Make sure they’re not touching each other. This space allows hot air to circulate. You want them crispy, not soggy. Bake until the edges turn golden brown. Turning them halfway ensures even cooking. - Remove from the oven, sprinkle with cheddar cheese and bacon bits. - Return to oven for 5 minutes until cheese is melted and bubbly. Once the wedges are baked, take them out. The smell will be amazing! Sprinkle the cheddar cheese and bacon bits on top. The cheese melts and binds everything together. Baking them for another five minutes allows the cheese to get gooey. Enjoy this step; it’s where the magic happens! For the full experience, check the Full Recipe to see how to finish them off with ranch dressing and green onions. To get the best crispy potato wedges, you need to focus on two main points. First, ensure your potatoes are dry before cooking. Wet potatoes will steam, not crisp. I like to pat them down with a clean towel after washing. Second, avoid overcrowding your baking sheet. If the wedges touch, they will not cook evenly. Give each wedge space to breathe. This step makes a big difference in texture. For those who love a kick, try adding chili powder to your spice mix. It gives a nice heat that pairs well with the ranch. You can also play with different cheeses. Cheddar is classic, but gouda or pepper jack add interesting flavors. Try them out and see what you like best. Each twist can make your Loaded Ranch Potato Wedges feel unique and exciting. For the full recipe, check out the [Full Recipe]. {{image_2}} You can make these Loaded Ranch Potato Wedges vegetarian. Just swap out the bacon for plant-based options or leave it out completely. You won’t miss the meat with all the flavors packed in. Want to mix it up? Try using blue cheese dressing instead of ranch. It adds a rich, tangy kick that pairs well with the crispy potatoes. This change gives a whole new taste to your dish. Feel free to get creative with toppings. Add jalapeños for some heat, olives for a briny bite, or diced tomatoes for fresh flavor. Each topping brings its own twist, making every bite exciting. The Full Recipe provides all the details you need to get started! To keep your loaded ranch potato wedges fresh, let them cool down first. After cooling, place them in an airtight container. This helps avoid sogginess and keeps the flavors intact. You can store them in the fridge for three to five days. For the best taste, reheat your wedges in the oven. Set your oven to 350°F (175°C) and place the wedges on a baking sheet. Heat them for about 10 to 15 minutes. This method keeps them crispy, just like when they were first baked. You can also use an air fryer for a quick option. If you want to save some for later, freeze the wedges after baking. Allow them to cool completely, then spread them out on a baking sheet to freeze for a couple of hours. Once frozen, transfer the wedges to a freezer bag. They can last for up to three months. When you’re ready to eat them, bake them directly from the freezer at 425°F (220°C) until they are hot and crispy. This method makes for easy meals in the future. For the full recipe, check out Loaded Ranch Potato Wedges. Yes, you can use Yukon Gold or sweet potatoes. Each type gives a unique taste. Yukon Golds are buttery, while sweet potatoes add a hint of sweetness. Both options work great for Loaded Ranch Potato Wedges. They will last for 3-5 days in the refrigerator. To keep them fresh, store them in an airtight container. Just remember, they taste best when warm and crispy! Yes, you can prep the wedges and store them in the refrigerator before baking. Just toss them with oil and spices, then cover. When you are ready, pop them in the oven for a tasty snack. They pair well with burgers, grilled meats, or as a snack/appetizer. These wedges also shine as a side dish for a fun dinner. For a twist, serve them with a zesty dipping sauce or a fresh salad. Loaded Ranch Potato Wedges are simple to make and packed with flavor. You learned how to prepare crispy potato wedges and add tasty toppings like cheese and bacon. Remember to experiment with seasonings and toppings to make these wedges your own. Store any leftovers properly or freeze them for later. Enjoy this fun dish at your next meal or gathering. Dive into cooking, and savor every bite!

Loaded Ranch Potato Wedges Crispy and Flavorful Treat

If you’re craving a tasty treat, these Loaded Ranch Potato Wedges are perfect! They are crispy, flavorful, and packed with

- 1/2 cup unsalted butter - 2 ripe bananas, mashed - 1/2 cup brown sugar - 1/4 cup granulated sugar - 1 large egg - 1 teaspoon vanilla extract - 1 cup all-purpose flour - 1 teaspoon baking soda - 1/2 teaspoon salt - 1/2 cup semi-sweet chocolate chips - 1/4 cup chopped walnuts (optional) Benefits of using brown butter Brown butter adds a rich, nutty flavor. It elevates the taste of the muffins. The browning process creates depth and complexity. I love the warm, toasted notes it brings. Simply melt the butter in a pan until golden. Choosing ripe bananas for sweetness Ripe bananas are key to a truly tasty muffin. Look for bananas with brown spots. They provide natural sweetness and moisture. The riper, the better! Mashed, they blend smoothly into the batter. Types of chocolate chips to use Semi-sweet chocolate chips are my go-to for balance. They add a sweet touch without being overpowering. You can also try dark chocolate chips for a richer flavor. White chocolate adds a fun twist too! For complete details, check the Full Recipe. First, get your baking pan ready. Line your muffin tin with paper liners or lightly grease it. This helps the muffins come out cleanly. Now, let's melt and brown the butter. In a small saucepan, place the unsalted butter over medium heat. Watch it closely as it melts. Stir it often. After a few minutes, the butter will foam. Keep cooking until it turns a lovely golden brown and smells nutty. This takes about 5-7 minutes. Once it looks perfect, remove it from the heat and let it cool slightly. Next, we combine the wet ingredients. In a large mixing bowl, mash the ripe bananas well. Add the brown sugar and granulated sugar to the bowl. Stir this mixture until it’s smooth and creamy. Now, slowly pour in the slightly cooled brown butter. Mix well until everything is blended. Beat in the egg and the vanilla extract. Make sure it’s all mixed together. In another bowl, whisk the dry ingredients. Combine the all-purpose flour, baking soda, and salt. Gradually add this dry mix to the wet ingredients. Stir gently until just combined. Don’t overmix; it’s okay if a few lumps remain. Next, it's time to fold in the chocolate chips and walnuts. If you choose to use walnuts, be gentle. Use a spatula to lift and fold, not stir. This helps keep the chocolate chips whole and the walnuts intact. Before you bake, preheat your oven to 350°F (175°C). This step is important for even baking. Once it’s hot, evenly divide the muffin batter among the muffin cups. Fill each cup about 2/3 full. Now, bake the muffins for 18-20 minutes. To test for doneness, insert a toothpick into the center of a muffin. If it comes out clean, they’re ready. If there’s batter on it, give them a few more minutes. After baking, let the muffins cool in the tin for 5 minutes. Then, transfer them to a wire rack to cool completely. To make the best Brown Butter Banana Chocolate Chip Muffins, avoid common mistakes. - Overmixing the batter: This can lead to tough muffins. Mix just until combined. - Not using ripe bananas: Ripe bananas bring natural sweetness. Choose bananas with brown spots. To get a moist muffin texture, here are some key tips: - Use brown butter: This adds a rich flavor. It also keeps muffins moist. - Don’t skip the eggs: Eggs provide structure and moisture. Make sure to use a large egg. Enjoy muffins warm for the best taste. Warm muffins have a soft texture and a lovely aroma. If you prefer cooled muffins, they still taste great. Serve with toppings like: - Butter: A simple spread can enhance flavor. - Honey or maple syrup: These add sweetness and richness. Consider pairing muffins with a hot cup of coffee or tea. The flavors complement each other nicely. Want to bake in larger quantities? Double the recipe! This gives you 24 muffins, perfect for sharing. When baking in batches, use multiple muffin tins. This speeds up the process. For gift-wrapping homemade muffins, follow these ideas: - Wrap in parchment paper: It looks nice and keeps muffins fresh. - Tie with twine: This adds a rustic touch that makes the gift special. You can find the full recipe for Brown Butter Banana Chocolate Chip Muffins to help you create these treats at home! {{image_2}} You can jazz up your muffins with spices. Try adding cinnamon or nutmeg. These spices bring warmth and depth. You can also swap in dark chocolate chips or white chocolate. Each choice gives a new twist to your muffins. Dark chocolate adds a rich taste, while white chocolate brings sweetness. If you need gluten-free muffins, use almond flour or gluten-free all-purpose flour. These options keep the muffins soft and tasty. For a vegan version, replace the butter with coconut oil. You can use flax eggs instead of a regular egg. This keeps your muffins moist and flavorful. Get creative by mixing in fruits or nuts. Chopped apples or berries work well. You can also add nuts like pecans or almonds for crunch. If you want a creamy taste, try adding nut butters. Peanut or almond butter gives extra flavor and a rich texture. For the full recipe, check out the details above. Let your muffins cool on a wire rack. This keeps them from getting soggy. After about 10 minutes, place them in an airtight container. This helps lock in freshness. Store them at room temperature for up to three days. You can also refrigerate them, but this may change their texture. To freeze muffins, wrap each one in plastic wrap. This helps prevent freezer burn. Place the wrapped muffins in a freezer-safe bag or container. They can last up to three months in the freezer. When you want to eat them, take them out and let them thaw in the fridge overnight. You can also warm them in the microwave for a quick treat. The best way to reheat muffins is in the oven. Preheat your oven to 350°F (175°C). Place the muffins on a baking sheet and warm them for about 5-10 minutes. This keeps them soft and tasty. You can also use the microwave. Heat each muffin for about 15-20 seconds. Enjoy your delicious Brown Butter Banana Chocolate Chip Muffins warm! For the complete recipe, refer to the Full Recipe section. Can I skip the walnuts? Yes, you can skip the walnuts. They add crunch and flavor, but muffins taste great without them. Simply leave them out when mixing the batter. How ripe should bananas be for the best flavor? Use very ripe bananas. They should have lots of brown spots. The riper they are, the sweeter and more flavorful your muffins will be. Can I use less sugar? Yes, you can reduce the sugar. Start with a quarter cup less. This may change the texture slightly but will still yield tasty muffins. What if I don’t have brown sugar? If you lack brown sugar, use white sugar instead. You can add a bit of molasses to mimic the flavor. Use one tablespoon of molasses for each cup of white sugar. What to do if muffins turn out dry? If your muffins are dry, check your oven temperature. It may be too hot. Also, ensure you do not overmix the batter, as this can dry out muffins. How to fix muffins that overflow in the pan? If muffins overflow, your batter may be too full. Fill each cup only two-thirds full next time. This allows room for rising without spilling. This blog post taught you how to make delicious muffins using simple ingredients. We covered everything from choosing the right bananas to perfect baking tips. Always aim to use fresh, ripe items for the best taste. Remember to be creative with flavors and adjust the recipe to your needs. Baking should be fun and easy! With the right tips and tricks, you can enjoy moist muffins every time. Now, grab your ingredients and start baking your own tasty treats!

Brown Butter Banana Chocolate Chip Muffins Delight

Welcome to the delicious world of Brown Butter Banana Chocolate Chip Muffins! You’re about to discover a simple recipe that

This dip needs a few simple ingredients to shine. Here’s what you will need: - 2 large apples (Granny Smith or Honeycrisp), diced - 1 cup brown sugar - 1/2 cup white sugar - 1 teaspoon cinnamon - 8 oz cream cheese, softened - 1/2 cup caramel sauce (plus extra for drizzling) - 1/2 teaspoon vanilla extract - 1 cup cool whip (or whipped topping) - 1 cup crushed graham crackers (for serving) These items create the sweet and creamy base for your dip. For the best flavor, I recommend using Granny Smith or Honeycrisp apples. These apples add a nice crunch and tartness. Their flavor contrasts well with the sweet caramel and creamy dip. You can try other apples too. Fuji or Gala apples also work well. They bring a sweeter taste if you prefer that. To make this dip even more exciting, add some fun toppings. Here are a few ideas: - Chopped nuts (like pecans or walnuts) for crunch - Mini chocolate chips for a sweet twist - Extra caramel sauce drizzled on top - A sprinkle of sea salt for balance Feel free to mix and match these toppings. They add layers of flavor and texture, making this dip even more delightful. For the full recipe, check out the details above. First, pick your apples. I love using Granny Smith or Honeycrisp. Both add a nice crunch. Dice the apples into small pieces. In a medium bowl, mix the diced apples with brown sugar, white sugar, and cinnamon. Toss well to coat every piece. Let the apples sit for 10-15 minutes. This will help them get sweet and juicy. Now, take a large bowl and add the softened cream cheese. Use a hand mixer or stand mixer to beat it until fluffy. This makes the dip smooth and creamy. Next, add the caramel sauce and vanilla extract. Mix until everything is well combined. Take your apple mixture and gently fold it into the cream cheese blend. Be careful not to mash the apples. You want chunks for texture. Finally, fold in the cool whip until it is light and fluffy. Transfer the dip to a serving bowl. Drizzle extra caramel sauce on top for a sweet touch. Serve with crushed graham crackers for dipping. Enjoy this delightful treat! For the full recipe, check out the full recipe section. To get the best texture for your dip, choose the right apples. I recommend using Granny Smith or Honeycrisp apples. These apples stay firm and add a nice crunch. Dice the apples small but not too tiny. This way, they hold their shape in the mix. When mixing the cream cheese, beat it until it's fluffy. This makes your dip light and airy. Gently fold in the cool whip to keep it soft and creamy. Serve your dip with crushed graham crackers. They add a great crunch and flavor. You can also use pretzels for a salty twist. Sliced fruits like pears or bananas work well too. For an extra touch, drizzle more caramel sauce on top. This makes it look even more inviting. You can even add chopped nuts for added crunch. I love making this dip ahead of time. You can prepare it a day before. Just keep it in the fridge until you are ready to serve. If you need a quick option, you can mix the ingredients in just a few minutes. Just remember to let the apples sit with sugar for a bit to soften. This helps them soak up the flavors. For a fun twist, serve it in small cups for easy sharing. For the full recipe, check out the detailed instructions above! {{image_2}} You can swap some ingredients for a healthier dip. Use Greek yogurt instead of cream cheese. This change lowers fat but keeps the dip creamy. You can also try honey or maple syrup instead of brown sugar. This makes the dip a bit sweeter and adds a unique flavor. Feel free to change up the flavor. Add a pinch of nutmeg for warmth. Mix in some chopped nuts for crunch. You can also use different fruits like pears or peaches. They bring new tastes to the dip while keeping it delicious. Graham crackers are great, but you can try other dippers too. Sliced pears or strawberries work well. Pretzels add a nice salty bite. You can even use mini cookies for a fun twist. Each dipper adds its own flavor, making every bite special. For the full experience, check the Full Recipe. After enjoying your Caramel Apple Pie Dip, store any leftovers in an airtight container. Keep it in the fridge. This keeps the dip fresh for up to three days. Before serving again, check if it's still good. If it smells off or looks strange, toss it. You can freeze this dip too! Use a freezer-safe container to store it. Make sure you leave some space at the top for expansion. It can last for up to two months in the freezer. When you're ready to eat it, move it to the fridge overnight to thaw. To reheat your dip, use a microwave or a small pot. If microwaving, heat it in short bursts. Stir it often to avoid hot spots. If using a pot, warm it over low heat. Add a splash of cream or milk if it seems too thick. Always stir well, and enjoy your delicious dip again! Caramel Apple Pie Dip stays fresh for about three days in the fridge. Make sure you store it in an airtight container. This keeps the dip tasty and safe to eat. If you notice any change in smell or texture, it's best to throw it away. Yes, you can use other fruits! Pears, peaches, or even bananas work well in this dip. Just make sure to adjust the sugar if the fruit is sweeter or less sweet. Mixing different fruits can add fun flavors and textures too. If you want a different option, try Greek yogurt or mascarpone cheese. These choices offer a creamy texture and taste. You can also use dairy-free cream cheese for a vegan option. Make sure to check the flavor, as it might change slightly. This blog post has shared a simple guide to making delicious Caramel Apple Pie Dip. You learned about key ingredients, prep steps, and helpful tips. I also covered variations and storage, so your dip stays fresh. Remember, you can customize this dish to suit your taste. Enjoy making it for gatherings or as a tasty snack. No matter how you serve it, this dip will surely impress everyone. Happy dipping!

Caramel Apple Pie Dip Delightfully Sweet Treat

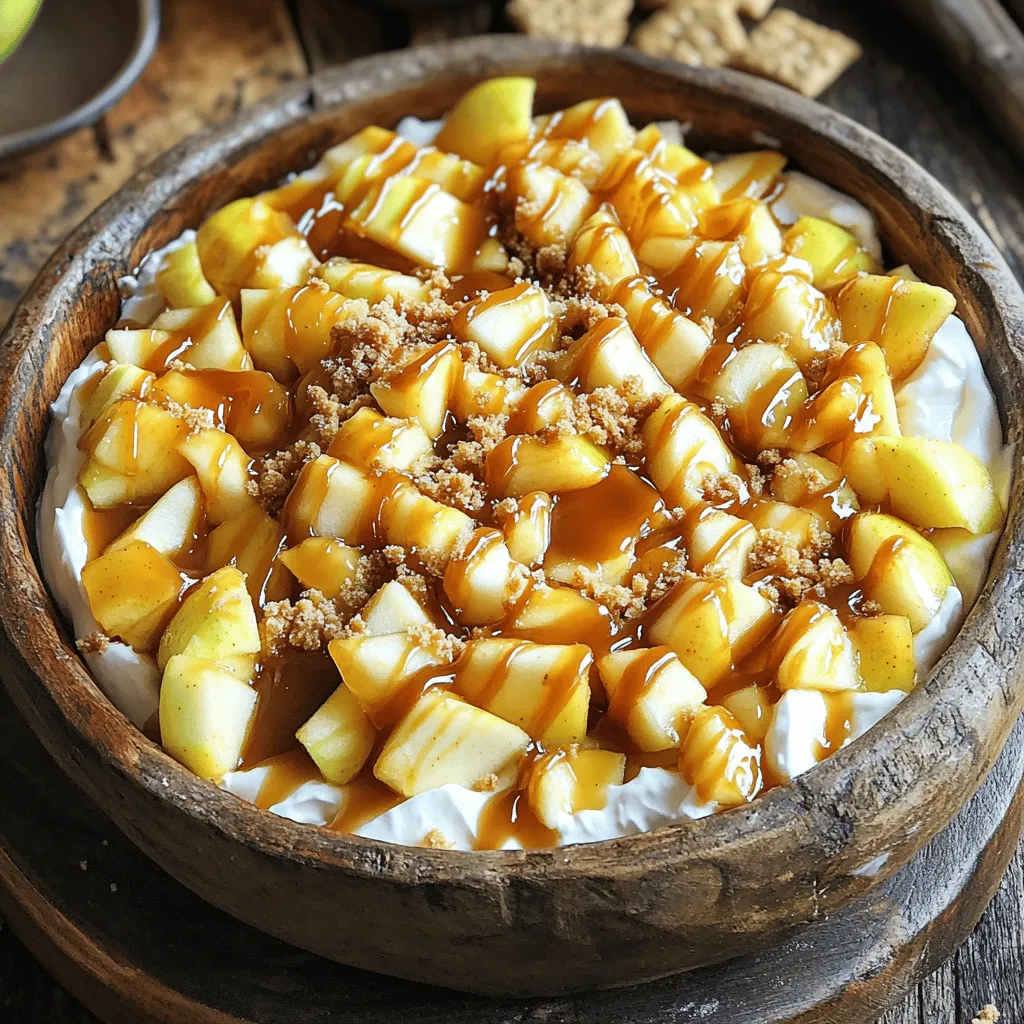
Get ready to dive into a sweet treat that’s perfect for any occasion: Caramel Apple Pie Dip! If you love

- Fresh produce: limes, cilantro, cherry tomatoes, avocado - Pantry staples: long-grain white rice, vegetable broth, black beans, corn - Spices and seasonings: garlic powder, cumin, salt, black pepper - Optional toppings: jalapeño slices, feta cheese For my Zesty Cilantro Lime Rice Bowls, I focus on fresh and tasty ingredients. The lime and cilantro bring a bright flavor that wakes up any meal. You start with fresh produce. Limes give the dish its zesty kick. Fresh cilantro adds a herbal touch. Cherry tomatoes offer sweetness, and avocado gives a creamy texture. Next, we have pantry staples. Long-grain white rice serves as the base. Vegetable broth adds depth. Black beans give protein, while corn brings sweetness and crunch. Don’t forget the spices! Garlic powder adds a warm flavor. Cumin brings earthiness, while salt and black pepper enhance all the other tastes. Finally, you can customize your bowl with optional toppings. If you like heat, jalapeño slices work well. For a creamy touch, sprinkle some feta cheese on top. This combination makes a colorful, healthy meal. You can find the Full Recipe linked in this article. 1. Rinse the long-grain white rice under cold water until the water runs clear. This step washes away extra starch. It helps the rice turn out fluffy. 2. In a medium saucepan, bring the vegetable broth to a boil over medium-high heat. Once boiling, add the rinsed rice. 3. Lower the heat to a simmer and cover the pan. Cook the rice for about 15-18 minutes. The rice is done when all the liquid is absorbed. 1. In a bowl, mix together the juice and zest of the limes. Add the chopped cilantro, olive oil, garlic powder, cumin, salt, and black pepper. This mixture gives the rice a zesty flavor. 2. Stir well until all the ingredients blend together. The fresh cilantro adds a bright taste. 1. After the rice is done cooking, fluff it with a fork. While it is still warm, add the lime cilantro mixture and stir well. This infuses the rice with fresh flavors. 2. Spoon a generous serving of the cilantro lime rice into each bowl. 3. Top the rice with black beans, halved cherry tomatoes, sliced avocado, and corn. Arrange the toppings in sections for a colorful look. 4. For extra heat, add jalapeño slices on top if you like. 5. Drizzle more lime juice over the bowls for an added burst of flavor. Serve them right away for the best taste. For the full recipe, refer to the detailed instructions in the recipe section. Rinsing your rice helps remove extra starch. This step makes the rice fluffy and light. To rinse, place rice in a fine-mesh strainer. Run cold water over it until the water runs clear. This will wash away the starch that can cause clumping. To cook the rice properly, follow these steps: - Use a medium saucepan. - Add 1 3/4 cups of vegetable broth or water for every cup of rice. - Bring the liquid to a boil before adding the rinsed rice. - Lower the heat to a simmer, cover, and let it cook for 15-18 minutes. - Avoid lifting the lid while cooking. This keeps steam inside for even cooking. You can add more spices to boost the dish's taste. Consider adding smoked paprika or a pinch of cayenne pepper for heat. Fresh herbs like parsley or green onions can also enhance flavor. Adjusting lime levels is key to getting the right tanginess. Start with the juice of 2 limes, but feel free to add more. Taste the rice after mixing in the lime mixture. If you want more zing, squeeze in additional lime juice. For a stunning look, serve the rice in colorful bowls. Layer the toppings neatly for visual appeal. Use sections for black beans, cherry tomatoes, avocado, and corn. This makes each bowl look inviting. Garnish with extra cilantro and lime wedges. A sprinkle of feta cheese adds a nice touch, too. These small details make your Zesty Cilantro Lime Rice Bowls stand out. For the complete recipe, check the [Full Recipe]. {{image_2}} You can easily make your Zesty Cilantro Lime Rice Bowls even heartier by adding protein. Grilled chicken or shrimp are great choices. They both bring a nice flavor and texture to the dish. Simply marinate them with lime juice and spices before grilling. If you prefer a vegetarian option, try adding tofu or chickpeas. Tofu can soak up the flavors well, and chickpeas add a satisfying bite. Switching up the grain can change the whole bowl. Instead of long-grain white rice, you might use quinoa for a nutty taste. Brown rice adds more fiber and a chewy texture. If you want a low-carb option, cauliflower rice is perfect. It takes on the zesty flavors well and keeps the dish fresh. Enhancing the flavor is easy with extra herbs or sauces. Fresh parsley or green onions can add bright notes. You can also try different sauces, like a spicy salsa or a drizzle of tahini for creaminess. Don’t forget to adjust the vegetables based on what’s in season. Bell peppers, zucchini, or corn can add color and crunch to your bowls. The options are endless! For a complete guide, check out the Full Recipe. To store leftover rice bowls, let them cool to room temperature first. This helps prevent moisture build-up. Use airtight containers to keep them fresh. Store them in the fridge for up to three days. I recommend glass containers as they don’t stain and are easy to clean. When reheating, you want to keep the rice fluffy. The best way is to add a splash of water before reheating. Cover the bowl with a damp paper towel. This keeps moisture in. You can use the microwave for quick reheating. If you prefer, use the stovetop. Just heat on low, stirring gently. To freeze your rice bowls, let them cool completely. Then, use freezer-safe containers. Make sure to leave some space for expansion. They can last in the freezer for up to three months. When you’re ready to eat, thaw overnight in the fridge. Reheat as mentioned above for the best texture. Yes, you can use brown rice. However, it takes longer to cook. Brown rice needs about 40-45 minutes. Also, it has a chewier texture than white rice. If you use brown rice, adjust the water amount to 2 1/4 cups for 1 cup of rice. To add heat, try fresh jalapeños or chili flakes. These will give your bowl a nice kick. You can also add a dash of hot sauce for more flavor. Pairing spices like cayenne or smoked paprika works well too. Just remember, start small to avoid overpowering the dish. Yes, this recipe is gluten-free. All the ingredients, like rice, beans, and vegetables, do not contain gluten. Just check the labels on canned items to ensure no added gluten-containing ingredients. This makes it a great option for those who are gluten-sensitive. Making this dish vegan is easy! The base ingredients are already plant-based. Just skip any non-vegan toppings, like cheese or sour cream. You can enhance the flavor with avocado or a dollop of vegan yogurt. Also, ensure your vegetable broth is vegan-friendly. For the complete recipe for Zesty Cilantro Lime Rice Bowls, check out the [Full Recipe]. This guide helps you make tasty cilantro lime rice bowls. You learned about key ingredients like fresh produce, spices, and pantry staples. We covered cooking rice, mixing flavors, and adding toppings. I shared tips to perfect your rice texture and enhance flavor. You can also explore fun variations and how to store leftovers. Whether you go vegetarian or add protein, these rice bowls are flexible and delicious. With a little creativity, your meals can be exciting and enjoyable every time.

Zesty Cilantro Lime Rice Bowls Flavorful Meal Idea

Looking for a fresh and tasty meal idea? Zesty Cilantro Lime Rice Bowls bring vibrant flavors to your table. These

To make chewy salted caramel pretzel brownies, gather these ingredients: - 1 cup unsalted butter (2 sticks) - 1 cup brown sugar, packed - 1 cup granulated sugar - 4 large eggs - 1 teaspoon vanilla extract - 1 cup all-purpose flour - 1 cup unsweetened cocoa powder - 1 teaspoon baking powder - 1/2 teaspoon salt - 1 cup pretzel sticks, crushed (plus more for topping) - 1 cup chocolate chips - 1 cup caramel sauce (store-bought or homemade) - Sea salt for sprinkling Measuring accurately is key to great brownies. Here are some tips: - Use dry measuring cups for flour and cocoa powder. - Pack the brown sugar firmly in the cup for the right sweetness. - Use a liquid measuring cup for butter and eggs. - Level off the flour and cocoa with a straight edge for precision. You can swap some ingredients if needed: - Use coconut oil instead of butter for a dairy-free option. - Substitute brown sugar with coconut sugar for a lower glycemic index. - Use gluten-free flour for a gluten-free version. - Replace chocolate chips with white chocolate or butterscotch chips for a twist. These tips and substitutes can help you make the best chewy salted caramel pretzel brownies. For the full recipe, check out the detailed steps. First, gather your tools. You will need a 9x13 inch baking dish, a whisk, and a mixing bowl. Get a saucepan ready for melting butter. Also, have some measuring cups and spoons nearby. Grease the baking dish or line it with parchment paper. This step helps when you want to remove the brownies easily. Start by preheating your oven to 350°F (175°C). In the saucepan, melt the butter over medium heat. Once it melts, take it off the heat. Add the brown sugar and granulated sugar to the butter. Whisk until it is smooth. Let this mix cool down a bit. Now, add the eggs one at a time. Mix well after each egg. Next, stir in the vanilla extract for flavor. In another bowl, mix the flour, cocoa powder, baking powder, and salt. Gradually fold this dry mix into the wet ingredients. Be gentle; this keeps the brownies soft. Now, fold in the crushed pretzels and chocolate chips. This adds crunch and sweetness. Pour half of this batter into your prepared dish. Spread it out evenly. Drizzle half of the caramel sauce over this layer. Carefully spread the remaining brownie batter on top. Drizzle the rest of the caramel sauce over this layer. Use a knife to swirl the caramel into the batter. Top it off with more crushed pretzels and a sprinkle of sea salt. Bake these brownies for 25-30 minutes. A toothpick should come out with a few moist crumbs when they are done. After baking, let the brownies cool completely in the dish. This cooling time is key for nice cuts. Once cool, slice them into squares. For a fun touch, serve on a rustic wooden board. Drizzle extra caramel sauce on top and add whole pretzels for decoration. Enjoy them with a glass of cold milk! For the full recipe, refer to the earlier section. To get chewy salted caramel pretzel brownies just right, focus on timing. Bake them for 25 to 30 minutes. Check with a toothpick; it should have a few moist crumbs. This helps keep the center soft. Use room temperature eggs for a better mix. They blend well with other ingredients. Also, don’t overmix your batter. Fold until you see no flour. This keeps the brownies fluffy. Watch out for these common errors. First, don’t skip the sea salt. It balances the sweetness. Second, avoid using cold butter. Melt it before mixing with sugar. Cold butter can lead to uneven texture. Third, do not overbake the brownies. They may turn dry and crumbly. Lastly, be careful with the caramel. Too much can make brownies soggy. Just drizzle enough for flavor. Want to boost your brownies? Try these ideas. Add a splash of espresso to deepen the chocolate taste. You can also mix in nuts like pecans or walnuts for crunch. If you like spice, add a pinch of cinnamon. For a fun twist, use flavored pretzels, like honey or chocolate-covered ones. These small changes can make a big difference. For the full recipe, check the earlier section. {{image_2}} You can easily make these brownies gluten-free. Just swap the all-purpose flour with a 1-to-1 gluten-free blend. Check the label to ensure it works for baking. This switch keeps the texture chewy, just like the original. Want more crunch? Add nuts! Chopped pecans or walnuts work great. They add a nice texture. You can also mix in crushed candy bars or toffee bits for extra flavor. Just keep the total mix-ins to around one cup. This way, the brownies stay rich and gooey. For a fun twist, try white chocolate chips instead of dark. They bring a sweeter touch to each bite. You can even mix both types of chocolate for a unique taste. Remember, balance is key. Enjoy the different flavors while keeping the chewy texture. For the full recipe, check out the Chewy Salted Caramel Pretzel Brownies 🥨 section above! To keep your chewy salted caramel pretzel brownies fresh, store them in an airtight container. Make sure they cool completely before sealing. This helps keep them moist and chewy. You can keep them at room temperature for up to three days. If you want them to last longer, consider refrigeration. Just note that chilled brownies may be denser. Freezing these brownies is easy. First, let them cool completely. Cut them into squares and wrap each piece tightly in plastic wrap. Place the wrapped brownies in a freezer-safe bag or container. They can last in the freezer for up to three months. When you’re ready to enjoy them, just let them thaw in the fridge overnight. For warm, gooey brownies, reheat individual pieces in the microwave. Heat for about 15-20 seconds. Check to avoid overheating. If you prefer, you can warm them in a preheated oven at 350°F (175°C) for about 5-10 minutes. Reheating brings back that fresh-baked taste and soft texture. For a treat, drizzle some extra caramel on top before serving! To make these brownies even more rich, you can add more chocolate. Try mixing in extra chocolate chips or chunks. You can also add a layer of melted chocolate on top after baking. Another great idea is to use a richer caramel sauce. This adds depth to the flavor. You could also sprinkle chopped nuts for crunch. Each of these tips boosts the taste and texture of your brownies. Yes, you can use store-bought caramel sauce. It saves time and still tastes great. Just make sure to choose a high-quality brand for the best flavor. If you want a homemade touch, you can warm the store-bought sauce. This makes it easier to drizzle over the brownie batter. It also helps create a lovely swirl effect. To cut brownies cleanly, start with a sharp knife. Dip the knife in hot water, then wipe it dry before cutting. This helps the knife glide through the brownie without sticking. Make sure to let the brownies cool completely before slicing. For neat edges, cut in a straight line and clean the knife between slices. This method keeps your brownies looking beautiful and appealing. In this article, we explored the key ingredients needed for your recipe, along with measuring tips and substitutions. I shared step-by-step instructions for preparation, mixing, and baking. We also discussed how to achieve the perfect texture and avoid common mistakes. Finally, I provided storage tips and answers to your FAQs. Remember, with the right ingredients and techniques, you can create delicious brownies that everyone will enjoy. Happy baking!

Chewy Salted Caramel Pretzel Brownies Delight

Get ready to indulge in a sweet and salty treat that you won’t forget! My Chewy Salted Caramel Pretzel Brownies

Older posts
Newer posts
← Previous Page1 … Page16 Page17 Page18 … Page85 Next →

dsad

© 2025 So Yum Recipes • Built with GeneratePress

Our Policies

  • Copyright Policy
  • Cookie Policy
  • GDPR Policy
  • Privacy Policy
  • Disclaimer
  • Terms Of Use

More Information

  • Home
  • About
  • Contact
  • Appetizers
  • Dessert
  • Dinner
  • Drinks
©2025, So Yum Recipes About Back To Top