Skip to content
DisclaimerTerms Of UseGDPR PolicyCookie Policy

So Yum Recipes

  • Home
  • Drinks
  • Appetizers
  • Dinner
  • Dessert
  • About
  • Contact
  • Privacy Policy
DisclaimerTerms Of UseGDPR PolicyCookie Policy

Chloe

- 2 salmon fillets - 1 cup jasmine rice - 1/4 cup soy sauce (low sodium) - 2 tablespoons honey - 1 tablespoon rice vinegar - 1 tablespoon sesame oil - 2 garlic cloves, minced - 1 teaspoon fresh ginger, grated The salmon fillets are the star here. They provide rich flavor and healthy fats. Jasmine rice offers a light and fragrant base. The teriyaki sauce combines soy sauce, honey, rice vinegar, sesame oil, garlic, and ginger. These ingredients create a sweet and savory blend that perfectly complements the fish. - 1 cup broccoli florets - 1/2 red bell pepper, sliced Broccoli florets add crunch and color. They are full of vitamins. Sliced red bell pepper brings a sweet and vibrant touch to the dish. Both vegetables cook quickly and enhance the meal's overall nutrition and taste. - 1 green onion, chopped (for garnish) - Sesame seeds (for garnish) - Salt and pepper to taste Chopped green onion adds freshness and a pop of color. Sesame seeds provide a nutty flavor and a nice crunch. Salt and pepper enhance the dish, balancing the sweetness of the teriyaki sauce. These garnishes make the dish visually appealing and tasty. For the full recipe, check out the details above. To make fluffy jasmine rice, start by rinsing the rice. Place it in a fine-mesh strainer and run it under cold water. Keep rinsing until the water runs clear. This removes excess starch and helps prevent sticking. Next, in a medium saucepan, add 1 cup of rinsed rice and 2 cups of water. Bring it to a boil over medium heat. Then, reduce the heat to low. Cover the pot and let it simmer for about 15 minutes. The rice will absorb the water and cook perfectly. After 15 minutes, remove the pot from heat but keep it covered. Let it sit for another 5 minutes. This resting time makes the rice even fluffier. Now, let's make the teriyaki sauce. In a small saucepan, combine 1/4 cup of low-sodium soy sauce, 2 tablespoons of honey, 1 tablespoon of rice vinegar, and 1 tablespoon of sesame oil. Add 2 minced garlic cloves and 1 teaspoon of grated ginger. Whisk the ingredients together. Heat the mixture over medium heat. Bring it to a gentle simmer, stirring often. Let it cook for about 5 minutes until it thickens slightly. Remove it from heat and set it aside. This sauce is sweet and savory, enhancing the salmon's flavor. For the salmon, season both fillets with salt and pepper. Heat a skillet over medium-high heat. Once hot, place the salmon skin-side down in the pan. Cook it for about 4 to 5 minutes without moving it. Carefully flip the fillets. Brush some teriyaki sauce on top. Cook for an additional 3 to 4 minutes. The salmon should be cooked through but still tender. The skin will be crispy, adding great texture to the dish. Now, let’s prepare the vegetables. In the same skillet, add 1 cup of broccoli florets and 1/2 sliced red bell pepper. Sauté them for about 3 to 4 minutes. You want them to stay tender-crisp, so avoid overcooking. If they seem dry, add a splash of water. This helps steam them slightly. The bright colors and crunch will make your rice bowls pop. To serve, take a bowl and add a scoop of fluffy jasmine rice. Place the teriyaki salmon on top of the rice, along with the sautéed vegetables. Drizzle the remaining teriyaki sauce over everything. For a finishing touch, sprinkle chopped green onion and sesame seeds on top. This adds flavor and a nice look to your bowls. Enjoy your delicious teriyaki salmon rice bowls! For the complete recipe, check out the Full Recipe. To make your teriyaki salmon rice bowls even better, try adding spices like chili flakes or black pepper. You can also mix in a splash of orange juice for a citrus twist. Pair your dish with pickled ginger or a side of miso soup. This adds depth and makes the meal feel complete. If you want to switch things up, you can use chicken or tofu instead of salmon. Both options work well with teriyaki sauce. For rice, jasmine is great, but brown rice or quinoa can also be delicious. You can swap vegetables too! Try snap peas, carrots, or bok choy for a new flavor. To get that perfect pan-sear, heat your skillet well before adding salmon. Cook skin-side down for a crisp finish. If you prefer grilling, marinate the salmon first for extra flavor. Baking is another option; just place the salmon on a parchment-lined tray and bake at 400°F for about 12-15 minutes. Each method brings out unique flavors in the salmon. For the full recipe, check the previous section. {{image_2}} You can switch up the protein in this dish easily. If you want chicken, use boneless, skinless thighs. They will soak up the teriyaki sauce well. For a plant-based choice, go for tofu. Choose firm tofu, press it, and cut it into cubes. Cook it the same way as salmon. It will absorb the sauce and taste great. You can use different types of rice for these bowls. Brown rice adds a nutty flavor and is a bit chewy. Cauliflower rice is a low-carb option and cooks quickly. If you want a protein boost, try quinoa. It cooks fast and has a pleasant texture. All these options work well with the teriyaki flavor. Adding seasonal veggies makes your bowl fresh and colorful. In spring, use asparagus or snap peas. In summer, try zucchini or corn. Fall brings great choices like butternut squash. Winter is perfect for root veggies like carrots or sweet potatoes. Don't forget leafy greens like spinach or kale. They add nutrition and a nice crunch! To keep your teriyaki salmon rice bowls fresh, store leftovers in the fridge. Place the salmon and rice in separate containers. This helps maintain their textures. Use airtight containers to avoid air exposure. Consume leftovers within three days for the best taste. When reheating salmon, do it gently to keep it moist. You can use the microwave on low power. Cover the salmon with a damp paper towel to trap steam. For rice, add a splash of water before microwaving. This helps prevent it from drying out. Heat the rice for about one minute. Stir and check if it's warm enough. If you want to freeze portions, let the salmon and rice cool first. Place them in freezer-safe bags. Squeeze out as much air as you can. Label the bags with the date. For the best taste, eat frozen portions within three months. When you’re ready to eat, thaw overnight in the fridge. This keeps the food safe and tasty. Making Teriyaki Salmon Rice Bowls takes about 30 minutes. - Prep time is around 10 minutes. - Cooking time is about 20 minutes. Yes, you can use store-bought teriyaki sauce. However, homemade sauce gives better flavor. Homemade sauce uses fresh ingredients. This makes it taste bright and vibrant. Store-bought options may contain preservatives. Always check labels for quality. Salmon is packed with nutrients. It is rich in omega-3 fatty acids, which help your heart. - Salmon supports brain health and reduces inflammation. - It is a great source of protein and vitamins. Eating salmon can boost your mood and energy levels. Yes, you can make this recipe ahead. Cook the salmon and rice, then store them. - Keep them in airtight containers in the fridge. - You can prepare the teriyaki sauce in advance too. When ready to eat, just reheat everything together. Many sides pair well with Teriyaki Salmon Rice Bowls. Here are some great options: - Steamed edamame - Cucumber salad - Miso soup - Pickled vegetables These sides add flavor and texture to your meal. Try mixing and matching! In this post, we explored how to make tasty Teriyaki Salmon Rice Bowls. We covered key ingredients like salmon, jasmine rice, and fresh veggies. You learned how to cook rice, make flavorful teriyaki sauce, and perfectly sauté vegetables. I shared tips on storage and variations, ensuring you can customize your dish. These bowls are not only easy but also packed with nutrition. Now, enjoy creating memorable meals that your whole family will love. Happy cooking!

Teriyaki Salmon Rice Bowls Flavorful and Easy Recipe

If you’re searching for a quick and tasty meal, look no further! Teriyaki Salmon Rice Bowls are packed with flavor

- 1 lb sirloin steak, cut into bite-sized cubes - 4 tablespoons unsalted butter - 4 cloves garlic, minced - 1 teaspoon fresh rosemary, chopped (or ½ teaspoon dried) - 1 teaspoon fresh thyme, chopped (or ½ teaspoon dried) - Salt and pepper to taste - 1 tablespoon olive oil - Fresh parsley, chopped (for garnish) To make garlic butter steak bites, you need simple and fresh ingredients. The star is the sirloin steak. It’s tender and full of flavor. Cut the steak into bite-sized cubes. This helps with even cooking and makes it easy to eat. Next, gather your garlic and unsalted butter. Garlic adds aroma and flavor. Butter creates a rich sauce that makes the bites irresistible. Don't forget the herbs! Fresh rosemary and thyme brighten the dish. If you don't have fresh herbs, dried ones work too. Season the steak with salt and pepper. This step is key for taste. You will also need olive oil for cooking. It helps sear the steak for a nice crust. Finally, fresh parsley provides a pop of color and freshness. For detailed cooking steps, check out the Full Recipe. Happy cooking! Start by seasoning the steak cubes. Use salt and pepper. You want to coat every piece well. This step boosts the flavor. Next, prepare your cooking space. Clear your counter and gather all ingredients. This helps you cook smoothly. Now, let’s preheat the pan. Use a large skillet and heat olive oil over medium-high heat. Wait until it shimmers. This shows it's ready. Then, it's time to sear the steak bites. Add them to the pan in one layer. Cook for 2-3 minutes on each side. Check for your desired doneness. Medium-rare is best for tenderness. Avoid overcrowding the pan. If needed, cook in batches. Once the steak bites are done, transfer them to a plate. Keep them warm by covering them. In the same skillet, lower the heat to medium. Add butter and melt it down. Once melted, add the minced garlic, rosemary, and thyme. Sauté these for 1-2 minutes. You want the garlic to be fragrant, not burnt. Now, it's time to combine everything. Return the steak bites to the skillet. Toss them in the garlic butter sauce until coated. Heat them for one more minute. This warms them through. Finally, remove from heat and garnish with chopped parsley. Plate it beautifully and enjoy your dish. For the full recipe, refer to the earlier sections. For garlic butter steak bites, I love using sirloin. It's tender and full of flavor. You can also try ribeye for extra juiciness. When cutting the steak, slice it into cubes about one inch wide. This size cooks evenly and stays tender. Everyone likes their steak a bit different. For medium-rare, cook for 2-3 minutes on each side. If you prefer medium, add an extra minute. To get a great sear, make sure your pan is hot before adding the steak. This step locks in juices and gives a nice crust. Think about pairing these bites with fresh salad or roasted veggies. You can also serve them with toothpicks for easy snacking. For a nice touch, place the bites on a wooden board and drizzle with extra garlic butter. Garnish with fresh parsley for a pop of color. For the full recipe, check out the detailed steps to make this dish perfect every time. {{image_2}} To make garlic butter steak bites even better, try adding spices. A pinch of cayenne gives a nice kick. If you like herbs, add fresh basil or oregano. These extra flavors make each bite more exciting. For a low-carb option, skip the bread and serve with vegetables. You can use zucchini noodles or a fresh salad. If you need a gluten-free choice, check that your butter and seasonings are gluten-free. This way, everyone can enjoy the dish. You can grill the steak bites for a smoky flavor. Just skewer them on sticks and grill until cooked through. Another option is using an air fryer. This method cooks the bites fast and keeps them juicy. It's a healthier choice without losing taste. For a full recipe, refer to the earlier section. To keep your garlic butter steak bites fresh, store them in an airtight container. Place the container in the fridge. They stay tasty for up to three days. If you want to keep them longer, freezing is a good option. For freezing steak bites, let them cool first. Arrange them in a single layer on a baking sheet. Freeze them for one to two hours, then transfer to a freezer bag. This method helps keep them from sticking together. They can last up to three months in the freezer. When you're ready to eat, thaw them overnight in the fridge. When reheating, use a skillet on low heat. This method keeps the texture nice. You can also use the oven at a low temperature. Avoid using high heat, as it can overcook the steak. Just warm them until they are heated through, and you’ll enjoy their full flavor again. The best steak for Garlic Butter Steak Bites is sirloin. Sirloin is tender and flavorful. Other great choices include ribeye or filet mignon. These cuts cook well and stay juicy. They also absorb the garlic butter flavor nicely. Yes, you can use olive oil instead of butter. It adds a nice flavor and is healthier. You can also try ghee or avocado oil. These options will change the taste a bit but still work well. Cooking steak bites takes about 10 minutes. You will need 2-3 minutes per side for a nice sear. The total time depends on how you like your steak cooked. Make sure to check for doneness while cooking. You can prepare the garlic butter sauce ahead of time. Just store it in the fridge in an airtight container. When ready to use, reheat gently on low heat. This keeps the flavors fresh and tasty. Garlic Butter Steak Bites pair well with many sides. Consider serving them with a fresh salad or roasted vegetables. You can also enjoy them with rice or mashed potatoes. For a fun twist, serve them on skewers with toothpicks. For those seeking step-by-step guidance, check out the Full Recipe for Garlic Butter Steak Bites. To prepare Garlic Butter Steak Bites, you need simple, quality ingredients. Start with sirloin steak, butter, garlic, and fresh herbs. As discussed, seasoning and cooking your steak properly makes a big difference. Use tips for different cuts and cooking methods to enhance flavor. Keep experimenting with variations for your taste. Remember, these bites can be frozen or stored well for later. Easy reheating methods help you enjoy them again. Enjoy your cooking journey, and savor each delicious bite!

Garlic Butter Steak Bites Flavorful and Easy Dish

Are you ready to elevate your dinner game? Garlic Butter Steak Bites are both flavorful and easy to make. With

- 1 lb Brussels sprouts, trimmed and halved - 3 tablespoons olive oil - 2 tablespoons pure maple syrup - 1/2 cup pecans, roughly chopped - 1 tablespoon balsamic vinegar - Fresh thyme leaves for garnish - 1 teaspoon garlic powder - 1 teaspoon onion powder - Salt and pepper to taste The main ingredients are simple yet powerful. The Brussels sprouts bring a nice crunch. Olive oil helps with roasting, while maple syrup adds a sweet touch. The pecans give a nutty flavor and great texture. You can also use balsamic vinegar for a tangy kick. Fresh thyme leaves can brighten up the dish. Seasoning is key! Garlic powder and onion powder add depth. Don’t forget salt and pepper to taste. These ingredients work together to create magic. For the full recipe, check out the complete guide. Enjoy every bite of these flavorful bites! 1. Preheat the oven to 400°F (200°C). This is key for good roasting. 2. In a large bowl, combine the halved Brussels sprouts with olive oil, maple syrup, garlic powder, onion powder, salt, and pepper. Toss well to coat the sprouts evenly. 1. Spread the Brussels sprouts on a baking sheet cut side down. This helps them brown nicely. 2. Roast for 20 minutes before adding pecans. This step builds great flavor. 1. After 20 minutes, gently toss the sprouts and sprinkle the chopped pecans over them. 2. Roast for an additional 10-15 minutes. You want them tender and brown, stirring once halfway through. 3. Optionally, drizzle with balsamic vinegar before serving. Toss to combine for added taste. 4. Finally, remove from the oven and garnish with fresh thyme leaves. This adds a lovely touch. For the full recipe, check out the Maple-Pecan Roasted Brussels Sprouts. - Make sure to coat the sprouts well with oil and seasonings. This helps them cook evenly. - Use parchment paper on your baking sheet. It makes for easy cleanup after roasting. - If you like some spice, add a pinch of red pepper flakes. It gives a nice kick. - Try using different nuts, like walnuts or almonds, for added crunch and flavor. - Serve the roasted Brussels sprouts on a large platter. - Garnish with extra pecans and thyme for a beautiful look. This adds a touch of elegance to your dish. For the full recipe, check out the details above. {{image_2}} You can add seasonal veggies to your Brussels sprouts. Try carrots or sweet potatoes for color and taste. They roast well and add a nice texture. If you want extra flavor, try adding crispy bacon or pancetta. This gives a savory twist that many love. For a unique taste, make a maple mustard mix. Combine Dijon mustard with maple syrup. This brings a tangy sweetness that brightens the dish. You can also try a honey-lemon version. The citrus burst from the lemon adds freshness to the roasted sprouts. If you want a lighter option, use avocado oil instead of olive oil. It has a mild flavor and is great for cooking. For those who follow a vegan diet, pick pure maple syrup without additives. It keeps your dish both sweet and plant-based. For the full recipe, check the earlier section. To keep your Maple Roasted Brussels Sprouts fresh, let them cool completely. This step is key. Once cool, place them in an airtight container. Store the container in the fridge. The sprouts will stay good for about 3 to 4 days. For the best taste, reheat leftovers in the oven. Set the oven to 350°F (175°C) and warm them for about 10-15 minutes. This method helps to maintain their crispy texture. If you need a quick option, you can use the microwave. However, be aware that they may become a bit soggy. I do not recommend freezing these sprouts. Freezing can change their taste and texture. To enjoy the best flavor, eat them fresh or store leftovers in the fridge. If you have extra, consider sharing with friends instead of freezing! The best temperature for roasting Brussels sprouts is 400°F (200°C). This heat helps them caramelize nicely. You want that golden brown color. It also brings out their sweet flavor. You can use frozen Brussels sprouts if needed. However, fresh sprouts taste better and have a better texture. Frozen sprouts can be a quick fix, but they may not roast as well. Brussels sprouts are done when they are tender and caramelized. You do not want them mushy. Check for a nice brown color on the outside. This shows they are ready to eat. Maple roasted Brussels sprouts pair well with many dishes. You can serve them with roasted meats like chicken or beef. They also go great in grain bowls. They work well as a side for holiday meals too. Try them with your favorite proteins! For the full recipe, check out the details above. These maple roasted Brussels sprouts are easy to make and delicious. You learned the key ingredients, step-by-step instructions, and handy tips to enhance flavor. The variations and storage advice will help you enjoy them longer. Don't hesitate to try new flavors or veggies for a fun twist. These Brussels sprouts work well on any plate, from casual meals to special occasions. Enjoy your cooking adventure and the tasty results it brings!

Maple Roasted Brussels Sprouts Flavorful and Easy Recipe

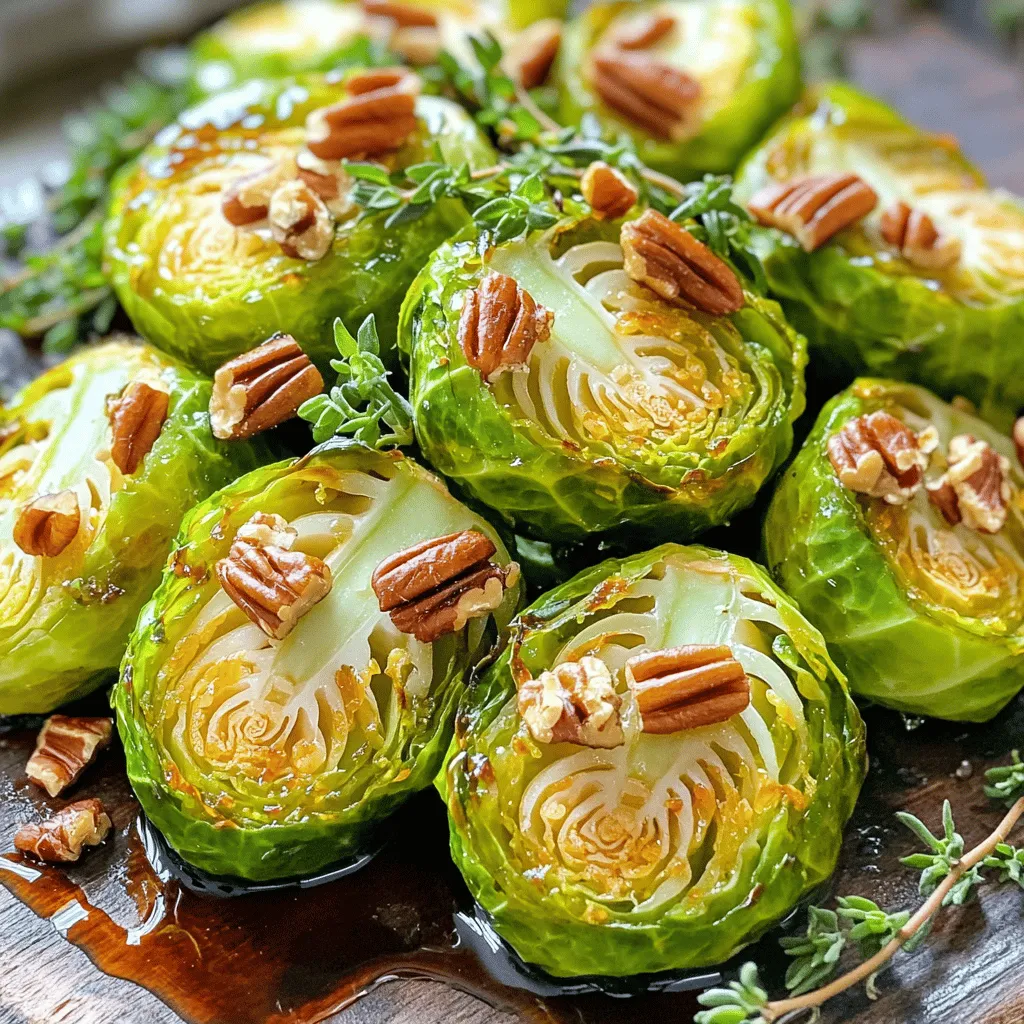
Are you looking for a quick and tasty side dish? Maple Roasted Brussels Sprouts might be your answer! This easy

- 1 block extra-firm tofu - 2 tablespoons cornstarch - 3 tablespoons vegetable oil - 1 red bell pepper, sliced - 1 yellow bell pepper, sliced - 1 cup snap peas, trimmed - 1 carrot, julienned - 1/2 cup fresh orange juice - 2 tablespoons soy sauce - 1 tablespoon maple syrup - 1 teaspoon sesame oil The ingredients for this Orange Glazed Tofu Stir Fry are simple and fresh. You need extra-firm tofu for a nice, crispy texture. Cornstarch helps give the tofu a crunchy coating when cooked. For the vegetables, I love using bright bell peppers and snap peas. They add color and crunch to the dish. The carrot brings sweetness and a nice bite. The orange glaze is what really makes this dish pop. Fresh orange juice adds a bright flavor. Soy sauce gives it a savory taste. Maple syrup adds sweetness, and sesame oil brings a hint of nuttiness. You can find the full recipe with all these ingredients and steps. Enjoy the cooking process! First, press the tofu to remove extra moisture. This step is key for crispiness. After draining, cut the tofu into 1-inch cubes. Next, toss the cubes in cornstarch until they are fully coated. This coating helps create a nice, crispy texture when cooked. Heat 2 tablespoons of vegetable oil in a large skillet over medium-high heat. Once hot, add the tofu cubes. Sauté the tofu for about 8-10 minutes, turning until golden brown on all sides. Once cooked, remove the tofu from the skillet and set it aside. In the same skillet, add 1 tablespoon of vegetable oil. Then, add minced garlic and grated ginger. Sauté them for about 30 seconds until they smell great. Now, add the sliced red and yellow bell peppers, snap peas, and julienned carrot. Stir-fry these veggies for about 5-7 minutes until they are tender but still crisp. In a small bowl, whisk together fresh orange juice, soy sauce, maple syrup, and sesame oil. This glaze adds a sweet and tangy flavor. Pour this mixture into the skillet with the veggies. Stir well to ensure everything is coated. Now, add the crispy tofu back into the skillet. Gently stir to mix the tofu with the vegetables and glaze. Cook for an additional 2-3 minutes. This helps the tofu soak up the tasty orange glaze and heat through. Once ready, remove the skillet from heat. Garnish your dish with toasted sesame seeds and fresh cilantro. Serve this vibrant stir fry over cooked rice or quinoa for a complete meal. For the full recipe, check out the details provided earlier. To get crispy tofu, start by pressing it. Use a clean kitchen towel to remove excess water. Place something heavy on top for about 15 minutes. This helps the tofu soak up flavor. When frying, heat your pan well. Use medium-high heat to get that nice golden crust. Add oil to the pan, then carefully place the tofu cubes in. Don’t overcrowd the pan; this will make them soggy. Fry until they are crispy on all sides, about 8-10 minutes. For your stir fry, pick colorful veggies. I love using red and yellow bell peppers, snap peas, and carrots. They not only taste great but also look good on your plate. Cut your veggies evenly. This way, they cook at the same time. Slice bell peppers into thin strips and julienne the carrots for even cooking. Trim the snap peas to keep them crisp. To boost the flavor, think about adding spices. A pinch of red pepper flakes gives a nice kick. You can also try a dash of five-spice powder for a unique twist. If you like umami, add a splash of mushroom sauce or a bit of miso. These options can deepen the flavor of your stir fry. Play around with these ideas to find what you love best. For the full recipe, check out the details. {{image_2}} You can switch the tofu for different proteins. Tempeh is a great plant-based choice. It has a nutty flavor and holds up well in stir-fries. If you prefer meat, chicken adds a nice touch. Simply cut it into cubes and cook it until golden. Shrimp is another fun option. It cooks fast and adds a sweet flavor to the dish. Just remember to adjust your cooking times based on what you choose. This recipe is mostly vegan already, thanks to the tofu. To keep it vegan, use maple syrup instead of honey. For a gluten-free option, swap soy sauce for tamari. This way, you don’t lose any flavor. Make sure to check all your ingredients. Some sauces or oils may contain gluten, so read labels carefully. You can change the vegetables based on what’s fresh. In spring, add asparagus or snap peas. In summer, zucchini or bell peppers work well. Fall is perfect for adding squash or broccoli. In winter, try carrots or Brussels sprouts. These swaps keep the dish exciting and let you use what's in season. Plus, it helps you get all the nutrients you need. Check out the Full Recipe for more ideas on how to customize your stir fry! To keep your orange glazed tofu stir fry fresh, store it in an airtight container. Place it in the fridge within two hours of cooking. This helps reduce bacteria growth. It will stay good for up to three days. If you want to enjoy it later, make sure to use a container that seals well. This keeps the flavors locked in. When reheating, use a non-stick pan over low heat. This method helps maintain the tofu's texture. Add a splash of water or broth to keep it moist. Stir gently to avoid breaking the tofu. Heat until warm, about 5-7 minutes. You can also use the microwave, but be cautious. Heat in short bursts to prevent sogginess. If you want to freeze your stir fry, it’s best to do so before adding the glaze. Cool the dish completely, then transfer it to a freezer-safe container. It can last for up to three months in the freezer. When you’re ready to eat, thaw it in the fridge overnight. Reheat it on the stovetop, then add the orange glaze for a fresh taste. For stir frying, extra-firm tofu is best. It holds its shape well. Regular firmness tofu can be too soft, leading to a mushy texture. Extra-firm tofu has less water, which means it crisps up nicely. This is key for a tasty stir fry. You can press the tofu to remove any remaining moisture. This step makes it even better for frying. You can use bottled orange juice, but fresh juice is better. Fresh orange juice offers a bright, vibrant flavor. Bottled juice often has additives that change the taste. If you choose bottled juice, pick one without added sugars. This choice helps maintain the dish's quality. Fresh juice will give your glaze a zesty kick that makes the dish shine. To serve more people, simply double the ingredients. This means two blocks of tofu and more veggies. Adjust the cooking time slightly. Cook in batches if your skillet is small. It helps to keep the tofu crispy. Make sure the glaze is enough to coat all the tofu and veggies. This stir fry pairs well with rice or quinoa. Both grains soak up the orange glaze nicely. You can also try it with noodles for a different texture. Steamed broccoli or bok choy are great side dishes. They add color and crunch to the meal. For a full meal, serve with a simple salad on the side. Orange Glazed Tofu Stir Fry lasts about three to four days in the fridge. Store it in an airtight container to keep it fresh. When reheating, do it gently to avoid soggy tofu. Heat in a pan over medium heat for the best results. This keeps the tofu crispy and the veggies firm. This blog post gave you a complete guide to making Orange Glazed Tofu Stir Fry. We covered key ingredients, step-by-step cooking instructions, and tips for the best outcome. Remember, pressing your tofu well is crucial for crispiness. Feel free to swap in your favorite veggies or proteins. With these steps, you can create a dish packed with flavor and nutrition. Enjoy your cooking adventure, and don't hesitate to try new variations along the way. Your kitchen can be a place of creativity and delight.

Orange Glazed Tofu Stir Fry Flavorful and Easy Recipe

Are you ready to elevate your weeknight meals? This Orange Glazed Tofu Stir Fry is not just flavorful; it’s also

This easy Air Fryer Mozzarella Sticks recipe uses simple ingredients. You will need just a few items to create this tasty snack. - 12 string cheese sticks - 1 cup all-purpose flour - 2 large eggs, beaten - 1 cup breadcrumbs (panko for extra crunch) - 1 teaspoon Italian seasoning - ½ teaspoon garlic powder - ½ teaspoon salt - Cooking spray Each ingredient plays a key role in making your mozzarella sticks crispy and flavorful. For this recipe, I recommend using string cheese. It melts well and is easy to handle. You can also try other cheeses like cheddar or gouda. However, remember that they may melt differently than mozzarella. Stick with mozzarella for the classic taste. Start with 12 string cheese sticks. Cut each stick in half to make shorter pieces. This helps them cook evenly and makes them easier to dip. Next, set up a dredging station. You will need three shallow bowls: - Flour: Place 1 cup of all-purpose flour in the first bowl. - Eggs: Beat 2 large eggs in the second bowl. - Breadcrumbs: In the third bowl, mix 1 cup of breadcrumbs with 1 teaspoon of Italian seasoning, ½ teaspoon of garlic powder, and ½ teaspoon of salt. Now, it’s time to coat the cheese sticks. 1. First, dip each cheese stick in the flour, shaking off any extra. 2. Then, dip it in the beaten eggs, covering it well. 3. Roll it in the breadcrumb mix, pressing lightly to stick the crumbs. Once all sticks are coated, lay them on a parchment-lined baking sheet. Freeze them for 30 minutes. This step helps them hold their shape while cooking. Preheat your air fryer to 390°F (200°C). Lightly spray the air fryer basket with cooking spray. Arrange the frozen mozzarella sticks in a single layer. Make sure they do not touch. You may need to cook in batches. Cook the sticks for 6-8 minutes. Flip them halfway through for even cooking. They should turn golden brown and crispy. Once done, remove them carefully and serve with marinara sauce for dipping. Enjoy your delicious air fryer mozzarella sticks! To get the best crunch on your mozzarella sticks, freeze them before cooking. The cold helps keep the cheese from melting too fast. I usually freeze them for about 30 minutes. This way, they stay firm while the coating gets nice and crispy. Use panko breadcrumbs for extra crunch. They make a big difference! One common mistake is overcrowding the air fryer. If you place too many sticks at once, they won’t cook evenly. Always leave space between them. Another mistake is skipping the freeze. This can lead to melted cheese oozing out during cooking. Make sure to coat the sticks well, too; this helps hold everything together. Serve these mozzarella sticks hot for the best taste. Marinara sauce is a classic choice, but you can get creative! Try ranch dressing or spicy aioli for a twist. You can also add a sprinkle of fresh herbs on top for color. This makes your dish look even more inviting! For a fun snack tray, pair the sticks with veggies or pepperoni. {{image_2}} You can spice up your mozzarella sticks easily. Try adding a pinch of cayenne for heat. If you like herbs, mix in dried oregano or basil. These flavors blend well with cheese. For a twist, add a bit of paprika for smokiness. Don’t be shy to experiment! You can even add crushed red pepper flakes for a kick. Just remember, start small and taste as you go. If you need gluten-free mozzarella sticks, swap the flour and breadcrumbs. Use gluten-free flour and gluten-free breadcrumbs instead. Both are easy to find in stores. You can also use crushed rice cereal for a crunchy coating. This option keeps your dish tasty and safe for gluten-sensitive friends. Just follow the same steps in the recipe, and you are good to go! While mozzarella is classic, you can try other cheeses too. Cheddar, pepper jack, or gouda all work well. Each cheese gives a different taste and texture. For a fun mix, use a combination of cheeses. Just keep the same coating method from the recipe. Get creative and see what you like best! After making air fryer mozzarella sticks, let them cool first. Place any leftovers in an airtight container. Store them in the fridge for up to three days. If you want them to stay fresh longer, consider freezing them. To reheat mozzarella sticks, use the air fryer for best results. Preheat your air fryer to 350°F (175°C). Place the sticks in a single layer and cook for about 3-5 minutes. This method keeps them crispy and warm. You can also use a microwave, but they won’t be as crunchy. You can freeze uncooked mozzarella sticks for later use. After coating them, lay them on a baking sheet. Make sure they don’t touch. Freeze for about 30 minutes until firm, then transfer them to a freezer bag. They can stay in the freezer for up to three months. When ready to cook, you can air fry them straight from the freezer. Just add a couple of extra minutes to the cooking time. Yes, you can use regular mozzarella. Cut it into sticks. Make sure the pieces are thick enough to hold their shape. String cheese has a nice, stretchy texture. Regular mozzarella may not stretch as much when melted. Experiment with both to see which you like better. Cook mozzarella sticks for 6 to 8 minutes at 390°F (200°C). Halfway through, flip them for even cooking. Watch for a golden-brown color. This shows they’re crispy and ready to eat. Cooking times may vary by air fryer, so check often. If your mozzarella sticks aren’t crispy, try a few tips. First, make sure to freeze them before cooking. This helps them keep their shape. Second, check the oil spray on the basket. A light spray can help them crisp up. Lastly, avoid overcrowding the basket. Cook in batches if needed. You learned how to make great cheese sticks with this guide. We covered ingredients, step-by-step cooking, and tips for the best results. Remember to try different cheese and add fun spices. Store leftovers well, and you can enjoy them later. Air frying can give you crispy cheese sticks every time. With these tips, you can avoid common mistakes and impress anyone. Now, gather your ingredients and start cooking! Enjoy the delicious cheese goodness.

Easy Air Fryer Mozzarella Sticks Crispy Treat Recipe

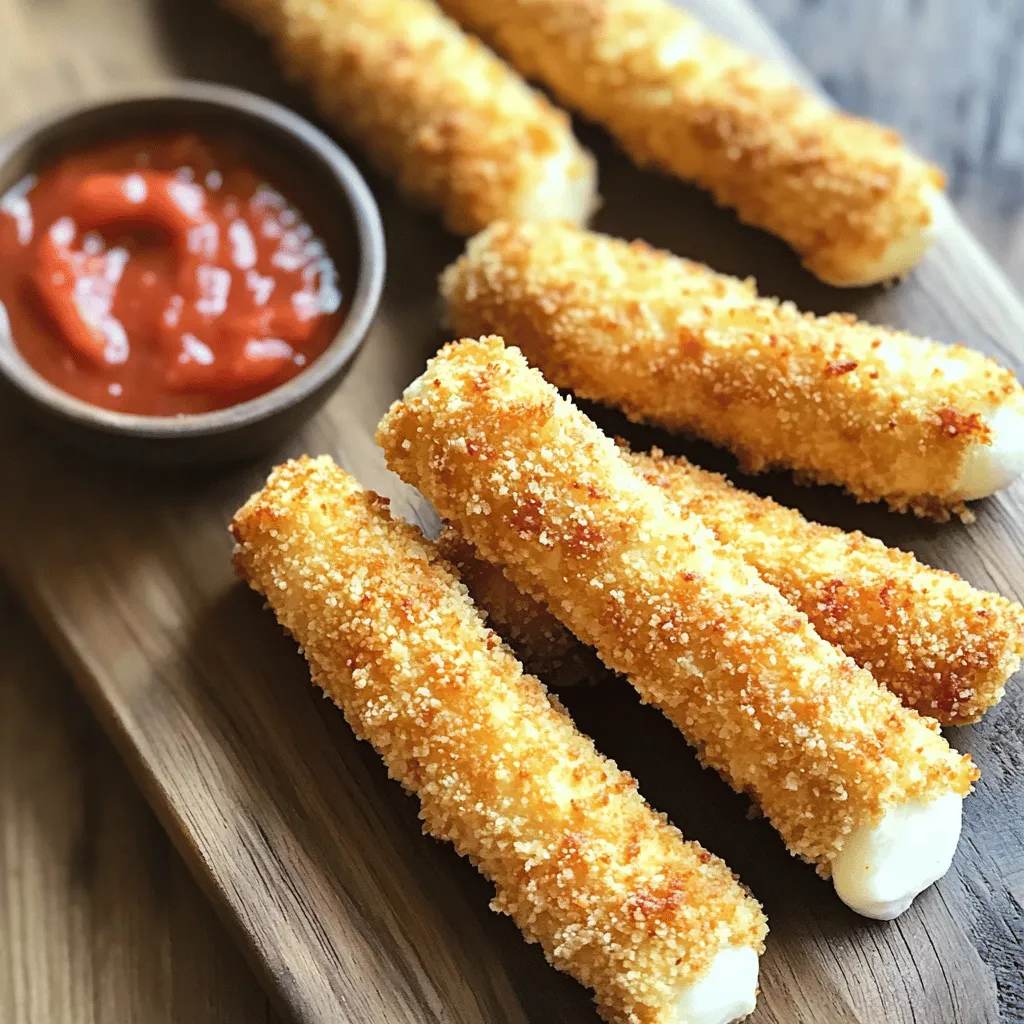
Do you love crispy, gooey mozzarella sticks? Let me show you how to make Easy Air Fryer Mozzarella Sticks that

- 1 cup all-purpose flour - 1/2 cup pumpkin puree (canned or fresh) - 2 tablespoons brown sugar - 2 tablespoons granulated sugar - 1 teaspoon baking powder - 1/2 teaspoon baking soda - 1/2 teaspoon ground cinnamon - 1/4 teaspoon ground nutmeg - 1/4 teaspoon ground ginger - 1/4 teaspoon salt - 1 cup buttermilk - 1 large egg - 2 tablespoons melted butter - Optional toppings: maple syrup, whipped cream, chopped pecans Let’s talk about the ingredients you need to make fluffy pumpkin pancakes. The first star is all-purpose flour, which gives the pancakes their structure. You can use either canned or fresh pumpkin puree, but I prefer the canned version for its ease. Brown sugar and granulated sugar add sweetness and depth. Baking powder and baking soda help the pancakes rise and stay fluffy. Spices like ground cinnamon, nutmeg, and ginger add warmth and flavor. Salt enhances all the flavors in your pancakes. Buttermilk is key for moisture and richness; it makes the pancakes soft. You need one large egg for binding, and melted butter gives a nice taste and texture. Lastly, consider some optional toppings. Maple syrup, whipped cream, and chopped pecans can elevate your pancakes into a true breakfast treat. You can find the full recipe at the start of this article for more details. - First, grab a large mixing bowl. - Whisk together 1 cup of flour, 2 tablespoons of brown sugar, and 2 tablespoons of granulated sugar. - Add 1 teaspoon of baking powder, 1/2 teaspoon of baking soda, 1/2 teaspoon of ground cinnamon, 1/4 teaspoon of ground nutmeg, 1/4 teaspoon of ground ginger, and 1/4 teaspoon of salt. Mix well. - In another bowl, mix 1 cup of buttermilk, 1/2 cup of pumpkin puree, 1 large egg, and 2 tablespoons of melted butter. Blend until smooth. - Pour the wet mix into the dry mix. - Use a spatula to fold them together gently. - Be careful not to overmix; lumps are fine. - Heat a non-stick skillet over medium heat. - Add a little melted butter to coat the skillet. - For each pancake, pour about 1/4 cup of batter onto the skillet. - Cook until bubbles form on the surface, about 2-3 minutes. - Flip the pancake and cook for another 2-3 minutes until golden brown. - To flip pancakes correctly, wait for bubbles. This means they are ready! - Always check the heat. If they cook too fast, lower the temperature. Enjoy making your fluffy pumpkin pancakes! For more details, check the Full Recipe. To make fluffy pancakes, avoid overmixing your batter. Overmixing can make pancakes dense and tough. When you combine wet and dry ingredients, mix just until you see no dry flour. It's okay if some lumps remain; they help keep the pancakes light. To get the best fluffiness, use fresh baking powder and baking soda. Make sure your buttermilk is fresh, too. If you want to add extra lift, gently fold in some whipped egg whites at the end. This little trick can really boost fluffiness! Spices can take your pumpkin pancakes to the next level. Besides cinnamon, try adding nutmeg and ginger for warmth. You could also add a pinch of cloves for more depth. If you like, mix in some chocolate chips or nuts for texture. When choosing pumpkin, fresh is often best. If you use canned pumpkin, check for 100% pumpkin puree. Some canned products have added sugar and spices. Fresh pumpkin gives you a richer taste, but both can work well. To know when to flip your pancakes, watch for bubbles on the surface. When bubbles form and start to pop, it’s time to flip. This usually takes about 2-3 minutes on medium heat. Cooking at the right temperature is key. If the skillet is too hot, pancakes can burn outside and stay raw inside. Start with medium heat and adjust as needed. For even cooking, use a non-stick skillet or griddle and add melted butter to grease the pan. For the full recipe, check out the detailed instructions. {{image_2}} You can easily make gluten-free pumpkin pancakes. Just swap the all-purpose flour for a gluten-free blend. Look for a blend that includes xanthan gum. This helps the pancakes hold together well. For a dairy-free version, use almond milk or oat milk instead of buttermilk. You can also replace the melted butter with coconut oil or a dairy-free butter substitute. Both options work great and keep the pancakes tasty. Want to add some fun? Toss in chocolate chips or chopped nuts to the batter. They add richness and crunch. You can also try pumpkin spice latte-inspired pancakes. Mix in a bit of espresso powder for that coffee flavor. It’s a fun twist! Get creative with toppings! Drizzle warm maple syrup over the pancakes. You can add whipped cream for extra fluffiness. Chopped pecans add a nice crunch too. Pair your pancakes with crispy bacon or fresh fruit. Sliced bananas or berries make a great side. They balance sweetness and add freshness. Enjoy your breakfast! For the full recipe, check out [Full Recipe]. To keep your fluffy pumpkin pancakes fresh, store them in an airtight container. Line the container with parchment paper to avoid sticking. You can keep them in the fridge for up to three days. If you want to save them for later, freezing is a great option. Place pancakes in a single layer on a baking sheet. Freeze for about an hour, then transfer to a freezer bag. This keeps them from sticking together. To reheat pancakes, use your microwave or a skillet. If using the microwave, heat for about 20-30 seconds. For a crispy edge, reheat in a skillet over low heat. Add a touch of butter to the pan for extra flavor. Avoid sogginess by not covering the pancakes while reheating. This helps keep them fluffy and delicious. In the fridge, fluffy pumpkin pancakes last about three days. If frozen, they can last for up to two months. Always check for any signs of freezer burn before using frozen pancakes. These tips ensure your tasty breakfast remains as delightful as the first bite. For the Full Recipe, visit the recipe section. Yes, you can use regular milk. To mimic buttermilk, add one tablespoon of vinegar or lemon juice to a cup of milk. Let it sit for five minutes. This method creates a similar tangy flavor. It helps the pancakes rise and stay fluffy. Look for bubbles forming on the surface of the pancake. This takes about two to three minutes. When the edges look set and the center is bubbly, it’s time to flip. Cook the other side until golden brown, which takes another two to three minutes. To achieve that perfect golden brown, keep your heat at medium. If it’s too high, the outside will burn before the inside cooks. Adding melted butter to the pan helps too. It gives the pancakes a nice color and enhances flavor. Yes, you can make the batter ahead. Store it in the fridge for up to one hour. Just mix it gently before cooking. If it thickens, add a splash of milk to reach your desired consistency. This makes breakfast quick and easy. If your batter is too thick, add a little buttermilk or milk. Start with one tablespoon at a time. Mix gently until you reach the right consistency. A good pancake batter should be pourable but not too runny. This keeps your pancakes fluffy and light. In this article, we covered how to make delicious pumpkin pancakes. We talked about the key ingredients, the tools you'll need, and the steps to cook them perfectly. I also shared tips for fluffiness and serving options, along with storage info for leftovers. Now, you have the tools to whip up fluffy pumpkin pancakes easily. Enjoy your cooking, and don't be afraid to experiment! Happy cooking!

Fluffy Pumpkin Pancakes Perfectly Delicious Breakfast

Start your morning with a treat you won’t forget: fluffy pumpkin pancakes! They bring fall flavors to your breakfast table

To make Loaded Ranch Potato Wedges, you need the following: - 4 large russet potatoes, cut into wedges - 3 tablespoons olive oil - 1 teaspoon garlic powder - 1 teaspoon onion powder - 1 teaspoon smoked paprika - Salt and pepper to taste - 1 cup shredded cheddar cheese - ½ cup cooked bacon bits (or a vegetarian alternative) - ½ cup sour cream - ¼ cup ranch dressing - 2 green onions, sliced - Fresh parsley, chopped for garnish These ingredients create a tasty and crunchy snack. Each one plays a key role in flavor and texture. You can make simple swaps to lighten the dish. Here are some ideas: - Use sweet potatoes instead of russet potatoes for extra nutrients. - Swap olive oil for a cooking spray to cut down on fat. - Choose low-fat cheese or dairy-free cheese for a lighter option. - Replace sour cream with Greek yogurt for added protein. - Use turkey bacon or omit bacon for a vegetarian dish. These changes keep the taste while making it healthier. Choosing the right potatoes is important for great results. Here are some tips: - Go for russet potatoes. They are starchy and get crispy. - Look for firm potatoes without soft spots or sprouts. - Choose potatoes that are similar in size for even cooking. - Store them in a cool, dark place to keep them fresh longer. Picking good potatoes sets you up for success in this recipe. First, gather your ingredients. You need: - 4 large russet potatoes, cut into wedges - 3 tablespoons olive oil - 1 teaspoon garlic powder - 1 teaspoon onion powder - 1 teaspoon smoked paprika - Salt and pepper to taste - 1 cup shredded cheddar cheese - ½ cup cooked bacon bits (or a vegetarian alternative) - ½ cup sour cream - ¼ cup ranch dressing - 2 green onions, sliced - Fresh parsley, chopped for garnish Next, preheat your oven to 425°F (220°C). This step is key to getting those wedges crispy. In a big bowl, toss the potato wedges with olive oil and all the spices. Make sure each wedge is covered well. Then, lay the wedges on a baking sheet lined with parchment paper. Spread them out so they aren’t touching. Bake the potato wedges for 30-35 minutes. Halfway through, flip them to ensure even cooking. You want them golden brown and crunchy. Keep an eye on them towards the end of the baking time. If they start to look too dark, pull them out early! When the wedges are done baking, remove them from the oven. Sprinkle the shredded cheddar cheese and bacon bits on top. Return them to the oven for another 5 minutes. This step helps the cheese get gooey and melty. For an extra kick, you can turn on the broiler for the last minute, but watch closely to avoid burning. For serving, mix sour cream and ranch dressing together in a small bowl. Drizzle this over the hot wedges, then add the sliced green onions and parsley. Enjoy your Loaded Ranch Potato Wedges! For the full recipe, check out the previous section. To make your Loaded Ranch Potato Wedges easy to prepare, use the right tools. Here are my top picks: - Cutting board: A sturdy one helps you slice the potatoes safely. - Sharp knife: A good knife cuts through the potatoes with ease. - Mixing bowl: A large bowl lets you toss the wedges with oil and spices well. - Baking sheet: Use a rimmed baking sheet to catch any drips. - Parchment paper: This keeps the wedges from sticking and makes cleanup easy. Avoiding mistakes can help you get the best flavor and crunch. Here are some pitfalls to watch for: - Not drying the potatoes: After washing, dry them well. Moisture can make them soggy. - Cutting uneven wedges: Make sure all pieces are the same size. This helps them cook evenly. - Overcrowding the baking sheet: Spread the wedges out. This allows air to circulate, giving you crispiness. - Skipping the seasoning: Don’t be shy with spices. They boost the flavor significantly. For perfectly cooked and browned potato wedges, follow these tips: - Preheat the oven: Always preheat to the right temperature before baking. This helps with browning. - Turn halfway through: Flip the wedges once while baking. This promotes even browning on both sides. - Use a convection setting: If your oven has one, it circulates air and helps achieve a crispy finish. - Check for doneness: Use a fork to poke a wedge. It should be soft inside and crispy outside. For the complete recipe, check out the Full Recipe section. {{image_2}} You can change up the toppings for loaded ranch potato wedges to fit your taste. For a vegetarian option, skip the bacon and add more veggies. Try diced bell peppers or jalapeños for a spicy kick. You can also add black olives or corn for extra flavor and texture. If you love spice, sprinkle on some chili powder or hot sauce before baking. These potato wedges pair well with many side dishes. You can serve them with a fresh salad for a light meal. A creamy coleslaw also works great to balance the crunch. If you want something heartier, try chili or a bowl of soup. These sides make a lovely meal together. You can easily change the flavor of your potato wedges using different seasonings. Try adding Italian herbs like oregano and basil for an Italian twist. If you love Asian flavors, sprinkle on some sesame seeds and drizzle with soy sauce. You can also experiment with ranch seasoning, taco seasoning, or even curry powder. This lets you create unique flavors with each batch. To store your leftover Loaded Ranch Potato Wedges, first let them cool down. Place them in an airtight container. Keep them in the fridge for up to three days. When storing, try to layer them with paper towels. This helps absorb extra moisture. Avoid stacking too many on top of each other. This keeps them crispy for when you reheat them. To reheat your potato wedges, use your oven or air fryer. Preheat your oven to 400°F (200°C). Spread the wedges on a baking sheet. Bake them for about 10 to 15 minutes. This makes them hot and crispy again. If using an air fryer, set it to 375°F (190°C) and cook for 5 to 7 minutes. This method keeps the flavors fresh and the texture just right. You can freeze Loaded Ranch Potato Wedges, but there are some things to know. The pros include saving leftovers for later and easy meal prep. To freeze, let the wedges cool completely. Place them in a freezer-safe bag or container. They can last for up to a month. The cons are that the texture may change after thawing. They might not be as crispy when reheated. If you want to enjoy them fresh, it’s best to eat them right after cooking. For the full recipe, check the recipe section. To make Loaded Ranch Potato Wedges vegan, swap out the cheese and bacon. Use vegan cheese for a creamy touch. You can use plant-based bacon bits or skip them altogether. Replace sour cream with a dairy-free alternative, like cashew cream or coconut yogurt. Finally, check your ranch dressing. Choose a vegan version for the best flavor. Yes, you can use any cheese you like. Try mozzarella for a milder taste or pepper jack for some heat. Crumbled feta adds a tangy twist. Just remember that cheese melts differently. Choose based on how melty you want your wedges. These wedges go great with many dishes. Serve them as a side with burgers or grilled chicken. They make a fun snack for game day. Add a fresh salad for a balanced meal. You can also pair them with dips like guacamole or salsa for extra flavor. Loaded Ranch Potato Wedges are a fun and tasty snack. We covered the best ingredients, prepping steps, and cooking tips for a crispy finish. I shared alternative ideas for healthier wedges and fun toppings to try. Don’t forget to avoid common mistakes to get that perfect bake. Store leftovers properly for later, and reheat them right to keep their flavor. Whether you make them vegan or change the cheese, you can customize these wedges as you like. Dive into this delicious dish and enjoy!

Loaded Ranch Potato Wedges Crunchy and Flavorful Treat

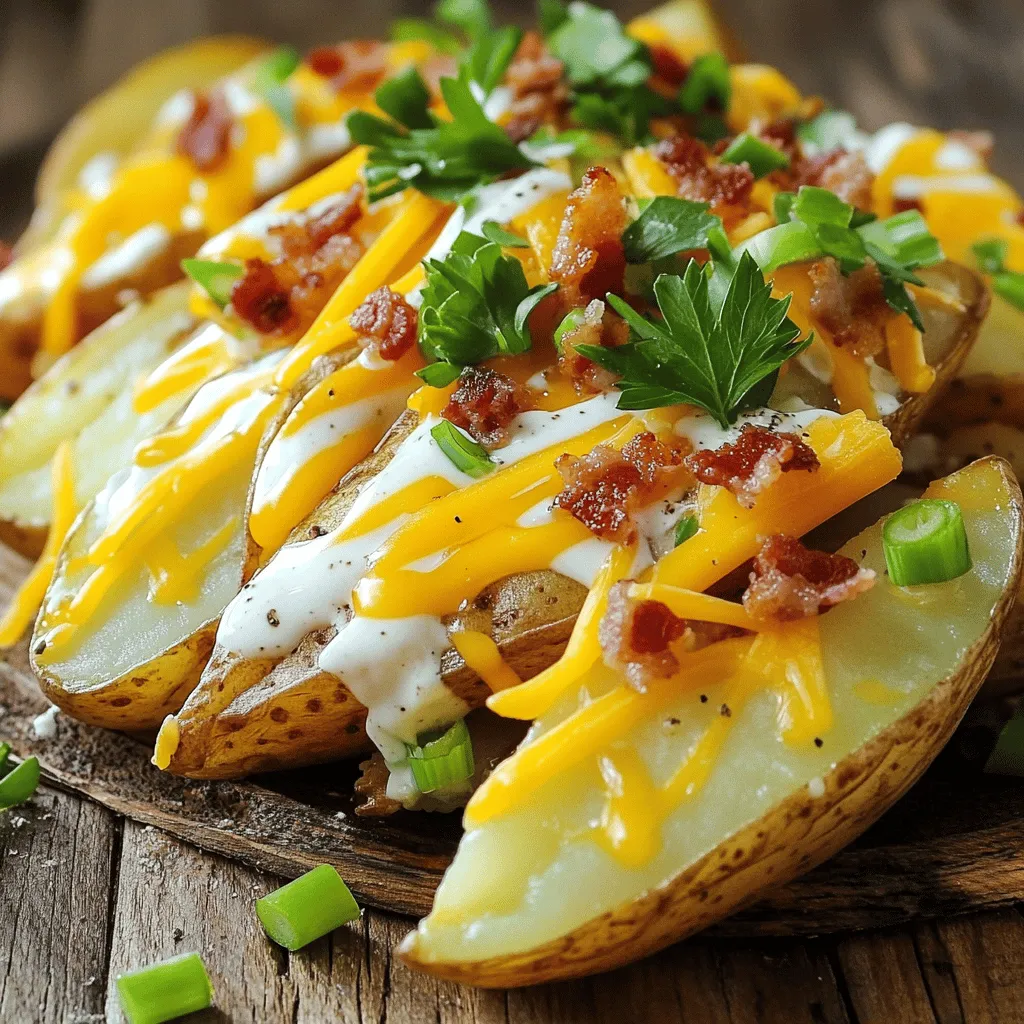
Get ready for a snack that’s both crunchy and packed with flavor! Loaded Ranch Potato Wedges are the perfect treat

Let's dive into the ingredients for these tasty Brown Butter Banana Chocolate Chip Muffins. Here’s what you need: - 1 cup ripe bananas, mashed (about 2-3 bananas) - ½ cup unsalted butter - ¾ cup brown sugar - ½ cup granulated sugar - 2 large eggs - 1 teaspoon vanilla extract - 1 teaspoon baking soda - ½ teaspoon baking powder - ½ teaspoon salt - 1¾ cups all-purpose flour - 1 cup semi-sweet chocolate chips - Optional: ½ cup chopped walnuts or pecans These ingredients work together to create a rich, sweet muffin. The ripe bananas give moisture and flavor. Brown butter adds a nutty twist that makes these muffins stand out. The mix of brown and granulated sugar ensures a perfect sweetness. Using two types of sugar helps the muffins rise and stay soft. I love adding chocolate chips for that melty goodness. If you want a crunch, toss in some walnuts or pecans. They add texture and flavor. For the full recipe, check out the complete guide. Enjoy baking! To start, melt the unsalted butter in a small saucepan over medium heat. You will want to stir it often. Keep cooking until the butter turns a deep golden brown and smells nutty. This should take about 5 to 7 minutes. Be careful not to burn it! Once done, take it off the heat and let it cool slightly before you use it. In a large mixing bowl, mash about 2 to 3 ripe bananas until smooth. Then, add the warm brown butter, brown sugar, and granulated sugar to the bowl. Mix these well until combined. Next, crack in the eggs one at a time, mixing well after each addition. Finally, stir in the vanilla extract until everything is smooth and creamy. Take another bowl and whisk together the all-purpose flour, baking soda, baking powder, and salt. This step is key to making sure your muffins rise well and have a nice texture. Now, it's time to combine everything. Gradually add the dry ingredients to the wet mixture. Stir gently until just incorporated. Be careful here; you don’t want to overmix! Once combined, fold in the semi-sweet chocolate chips and, if you like, some chopped walnuts or pecans for extra crunch. Preheat your oven to 350°F (175°C). While it heats, prepare your muffin tin. You can line it with paper liners or grease it with cooking spray. Next, spoon the batter into the muffin cups, filling each about three-quarters full. Now, it's time to bake! Place the tin in the oven and let them bake for 18 to 20 minutes. You can check for doneness by inserting a toothpick into the center. If it comes out clean, they’re ready! Once baked, remove the muffins from the oven. Let them cool in the pan for about 5 minutes. After that, transfer them to a wire rack to cool completely. Enjoy these muffins warm for the best taste! For a special touch, consider drizzling them with honey or maple syrup. You can find the full recipe for these delightful muffins in the earlier section. - Use room temperature ingredients for better mixing. Cold eggs or butter can make lumps. - Mix the batter just enough until combined. Overmixing makes muffins tough, not fluffy. To brown butter, melt it slowly over medium heat. Stir it often. Watch for bubbling. After a few minutes, it will foam. When the foam clears, look for a golden color. The nutty smell means it's ready! Remove it from heat just before it gets too dark. Burnt butter tastes bitter. Serve these muffins warm for the best taste. Drizzle honey or maple syrup on top. A light dusting of powdered sugar adds a nice touch. Enjoy with coffee or milk for a perfect pairing. Try serving them with fresh fruit for a colorful plate. Want to share flavors? Try adding a scoop of ice cream on the side! You can find the full recipe for Brown Butter Banana Chocolate Chip Muffins to get started. {{image_2}} You can change the chocolate types for fun flavors. Try dark chocolate for a richer taste. Milk chocolate offers sweetness, while white chocolate adds creaminess. Each type brings its unique charm. You might also enjoy adding mix-ins like dried fruits. Chopped dates or cranberries give a chewy texture. They also add a burst of flavor that pairs well with banana. If you want a gluten-free version, use gluten-free flour blends. These blends often replace wheat flour with rice or almond flour. They keep your muffins soft and tasty. Whole wheat flour is another option. It adds fiber and nutrients, making your muffins healthier. Use the same amount as all-purpose flour for a lovely, hearty result. Seasonal fruits can make your muffins exciting. In summer, add fresh blueberries or strawberries for a burst of freshness. In fall, consider pumpkin or apples with cinnamon for cozy flavors. Adjust spices too; a hint of nutmeg or ginger can enhance the taste. These changes keep the muffins fun and fitting for any time of year. To keep your Brown Butter Banana Chocolate Chip Muffins fresh, store them properly. You can store muffins at room temperature by placing them in an airtight container. This helps keep them moist and tasty for a few days. If you want to store them longer, freezing is a great option. Wrap each muffin in plastic wrap and place them in a freezer bag. Make sure to remove as much air as possible before sealing. They can last for up to three months in the freezer. When it's time to enjoy your muffins again, reheating is key. You can use the microwave for quick warming. Place one muffin on a plate and heat it for about 10-15 seconds. This brings back the softness. If you prefer a crisp top, use an oven. Preheat it to 350°F (175°C) and warm the muffins for about 5-7 minutes. This keeps them fresh and tasty, just like when they were baked. These muffins stay fresh for about 2-3 days at room temperature. Keep an eye on them. If you see any mold or they smell off, it's time to toss them. Muffins can last much longer in the freezer. Just remember to check for signs of freezer burn, which can affect their taste. You’ll know they are no longer good if they become dry or crumbly. Enjoy the delightful flavors of these muffins while they last! You can use gluten-free flour blends. Look for blends that include rice flour, almond flour, or oats. I recommend a one-to-one gluten-free flour mix for the best results. Just replace the all-purpose flour in the recipe with the gluten-free blend. Yes, you can substitute butter with oil. Use a neutral oil like canola or vegetable oil. If you want a non-dairy option, look for vegan butter or coconut oil. These will keep the muffins moist and tasty. These muffins take about 18-20 minutes to bake. To check for doneness, insert a toothpick into the center. If it comes out clean, the muffins are ready. If not, give them a few more minutes. If you have no bananas, you can use applesauce or pureed pumpkin. You might need to adjust the sugar since these fruits are sweeter. Start with a half cup and taste the batter before adding more. Yes, you can make these muffins ahead of time. Bake them and let them cool completely. Store them in an airtight container at room temperature for up to three days. For longer storage, freeze them in a bag or container. Just thaw when ready to eat. For the full recipe, check out the details above! Banana chocolate chip muffins are easy to make and delicious. You learned about key ingredients like bananas, butter, and chocolate chips. I explained how to prepare the brown butter and mix the wet and dry ingredients. We also covered tips for making your muffins fluffy and tasty. Feel free to explore different add-ins or flour swaps for unique flavors. Whether you serve them warm or store them for later, these muffins are sure to be a hit! Enjoy your baking adventure!

Brown Butter Banana Chocolate Chip Muffins Delight

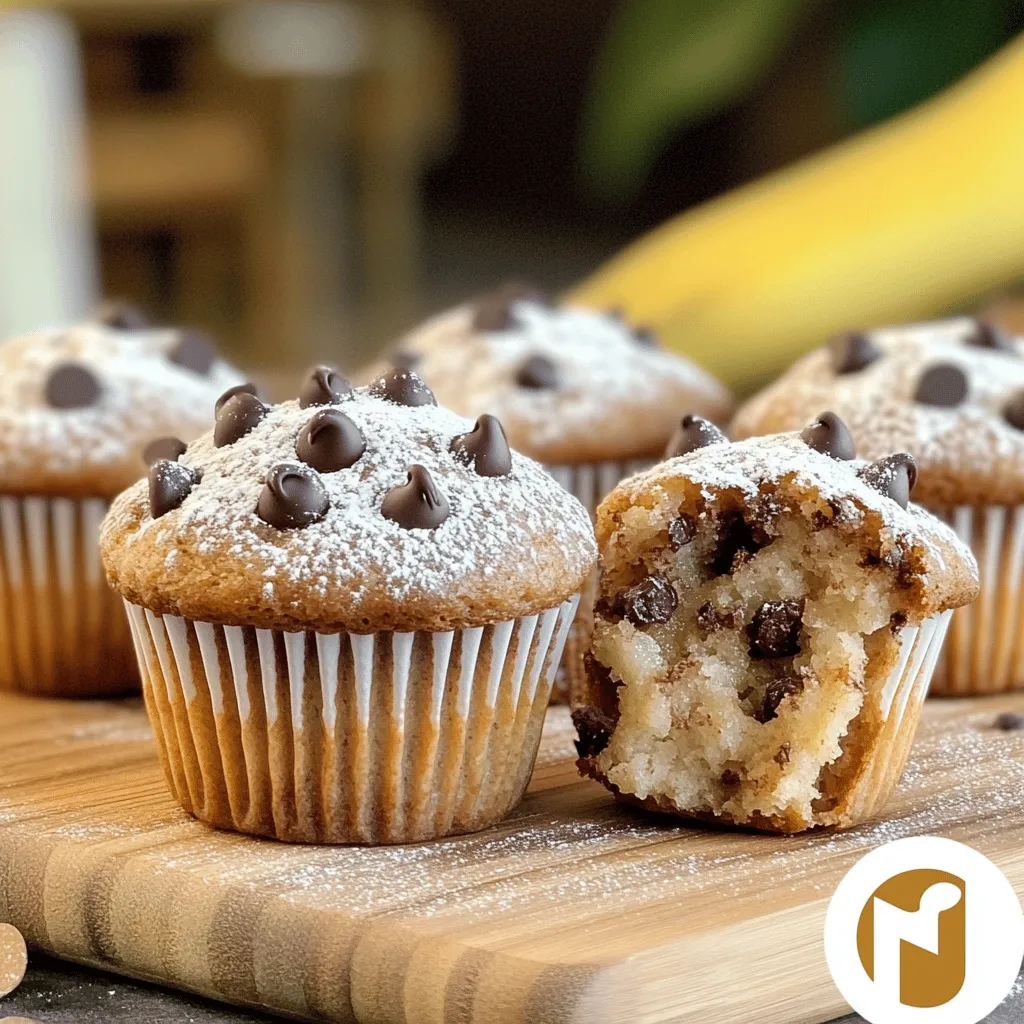
Are you craving a warm, cozy treat? Look no further than these Brown Butter Banana Chocolate Chip Muffins! This recipe

- Apples: Types and Recommendations Use 2 large apples like Granny Smith or Honeycrisp. These apples are tart and crisp. They add a nice contrast to the sweet dip. I prefer these types for the best flavor. - Dairy: Cream Cheese Specifications One cup of cream cheese is key. Make sure it is softened. This helps it mix well with the sugars. You want a smooth and creamy base. - Sweeteners: Brown and Powdered Sugar You need 1/2 cup of brown sugar and 1/2 cup of powdered sugar. The brown sugar adds depth, while the powdered sugar helps with texture. This combination makes the dip sweet and delightful. - Flavorings: Vanilla Extract and Cinnamon Add 1 teaspoon of vanilla extract and 1/2 teaspoon of cinnamon. These flavors give warmth and richness. They make the dip taste like a cozy dessert. - Toppings: Caramel Sauce and Nuts Use 1/4 cup of caramel sauce for a sweet drizzle. You can also add 1/4 cup of chopped pecans or walnuts. These toppings create a lovely crunch and visual appeal. For the Full Recipe, follow the steps to make this tasty treat. Enjoy making your caramel apple pie dip! Start with a medium bowl. Add the softened cream cheese, brown sugar, and powdered sugar. Use a hand mixer to mix these until smooth and fluffy. It should feel creamy and light. Next, add the vanilla extract and cinnamon. Mix again until fully combined. This adds flavor and warmth to the dip. You want the consistency to be smooth but thick enough to hold the apples. For this dip, you need apples that are crisp and tart. I like to use Granny Smith or Honeycrisp. Dice the apples into small pieces for easy dipping. Then, gently fold the diced apples into the cream cheese mixture. If you are using nuts, add them in too. Use a gentle folding technique to avoid crushing the apples. This ensures every bite has a perfect balance of flavors. Now comes the fun part—adding the caramel sauce! Drizzle half of the caramel over the dip. Use a spatula to gently swirl it into the mixture. This creates a beautiful marbled effect. Then, transfer the dip to a serving dish. Drizzle the rest of the caramel on top for added sweetness. The presentation looks stunning and makes everyone eager to dig in. For the full recipe, check out the details above. Enjoy your delicious caramel apple pie dip! To make a smooth dip, keep these tips in mind: - Avoiding Lumps in the Mixture: Start by softening the cream cheese fully. If it’s cold, it can create lumps. I suggest leaving it out for a bit before mixing. Use a hand mixer to beat the cream cheese and sugars until smooth. This step is key for a creamy texture. - Ensuring Ingredients are at Room Temperature: Make sure all ingredients are at room temperature. Cold ingredients can make it hard to mix. When the cream cheese, sugars, and spices warm up, they blend better. This helps create that silky smooth dip you want. Your dip deserves the best pairings. Here are some ideas: - Ideal Pairings: Dippers to Use: Sliced apple wedges are a classic choice. They add a fresh crunch. You can also use graham crackers for sweetness. Pretzel sticks give a nice salty contrast. Mix and match these dippers for fun! - Presentation Tips for Parties: Use a nice serving dish. Drizzle extra caramel sauce on top for a showy look. Place the dip in the center, and arrange dippers around it. This makes it easy for guests to grab and enjoy. Feel free to make this dip your own: - Ingredient Substitutions: If you want a lighter dip, replace cream cheese with Greek yogurt. This change keeps the dip creamy while adding protein. You can also swap out apples for pears for a different taste. - Adjusting Sweetness Levels: Taste the dip before serving. If you like it sweeter, add more powdered sugar or caramel. If it’s too sweet for your taste, add a pinch of salt. This can balance the flavors nicely. Use these tips to make your caramel apple pie dip a hit at any gathering! For the full recipe, check out the link. {{image_2}} Fall-Inspired Additions (Pumpkin Spice) In fall, I love to add pumpkin spice to my caramel apple pie dip. Just mix in 1 teaspoon of pumpkin pie spice when combining the cream cheese and sugars. This gives the dip a warm, cozy flavor that pairs well with the apples. Serve it with cinnamon graham crackers for a fun twist. Winter Variations (Cranberries) In winter, I like to include dried cranberries. Chop them up and fold them into the dip for a pop of color and tartness. You can also sprinkle some on top for a festive look. This adds a nice contrast to the sweet caramel and creamy base. Gluten-Free Options If you need a gluten-free dip, use gluten-free graham crackers or pretzel sticks for dipping. Make sure to check the labels on your ingredients. This way, everyone can enjoy the dip without worry. Vegan Adaptations To make this dip vegan, swap the cream cheese for a dairy-free alternative. Use coconut cream or cashew cream for a rich, creamy texture. You can also use maple syrup instead of brown and powdered sugar for sweetness. This keeps the dip delicious and plant-based. Adding Chocolate or Other Toppings For a chocolatey twist, melt some chocolate chips and drizzle them on top. This adds a rich flavor that pairs great with the apples. You can also sprinkle mini chocolate chips over the dip for extra crunch and sweetness. Experimenting with Different Nuts Try using different nuts to enhance the flavor. Almonds or hazelnuts can bring a unique taste. Chop them finely and mix them in for added texture. This makes your dip even more exciting and fun to eat. Enjoy these variations to make your caramel apple pie dip even more delightful! You can find the full recipe earlier in this article. To keep your caramel apple pie dip fresh, store it in the fridge. Use an airtight container to prevent it from absorbing odors. This helps maintain the dip's creamy texture and flavor. If you don’t have an airtight container, cover the dish tightly with plastic wrap. In the fridge, your dip will last about 3 to 5 days. After that, it may lose its taste and texture. To check if the dip has spoiled, look for changes in smell or appearance. If you see mold or if it smells sour, throw it away. You can enjoy this dip cold or warm it up. To reheat, place it in the microwave for about 15 to 30 seconds. Stir it well after heating to keep the texture smooth. If you prefer to serve it cold, just take it out of the fridge and dip away! Enjoy it with apple wedges, graham crackers, or pretzel sticks. For the full recipe, check out the earlier section. Can I make this dip ahead of time? Yes, you can make this dip ahead of time. I often prepare it a few hours before serving. Just store it in the fridge. Give it a stir before serving to mix any settled ingredients. What types of apples work best? I recommend using Granny Smith or Honeycrisp apples. These types add a nice crunch and balance the sweetness. Their tartness works well with the creamy dip and caramel. Why is my dip too runny? If your dip is too runny, it could be due to excess cream cheese or not enough sugar. Ensure you measure your ingredients carefully. Chilling the dip for a bit can also help thicken it. How do I make a thicker dip? To thicken your dip, add more cream cheese. You can also use less caramel sauce. Mixing in a bit of powdered sugar helps too. Mix well to get the right consistency. Caloric Content per Serving Each serving of this dip has about 150 calories. This can vary based on the apples and nuts you use. Dietary Considerations (Allergens, etc.) This dip contains dairy and nuts if you add them. Keep that in mind for guests with allergies. Always check labels for any hidden allergens. For a nut-free version, skip the nuts. This blog post shared how to make a delicious caramel apple pie dip. We covered the right ingredients, from types of apples to sweeteners. You learned step-by-step instructions for mixing, adding toppings, and creating beautiful swirls. I also provided tips for a creamy dip and ways to customize your dish for any season. In conclusion, whether you serve it at a party or enjoy it at home, this dip is sure to be a hit. Keep experimenting and have fun in the kitchen!

Caramel Apple Pie Dip Delightful and Creamy Treat

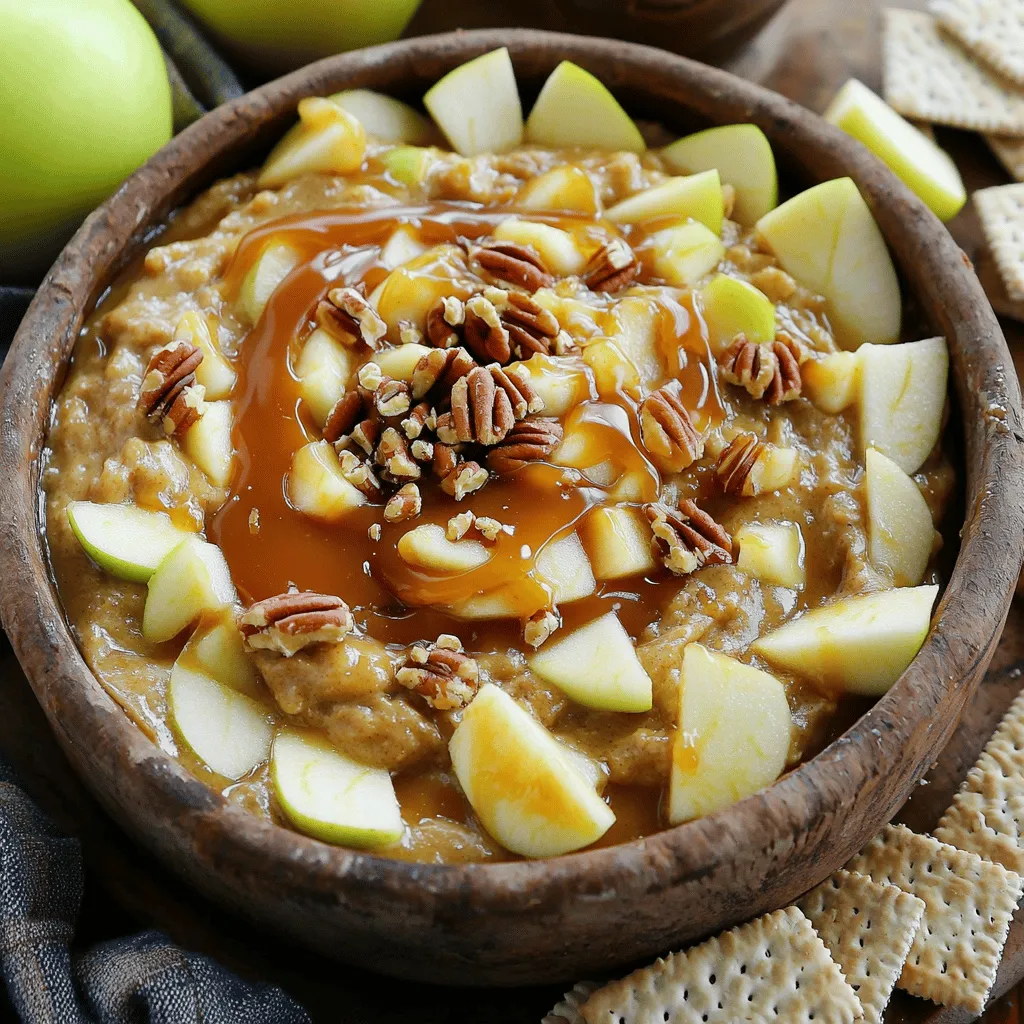
Looking for a sweet treat that’s both easy and delicious? You’re in the right place! My Caramel Apple Pie Dip

To make my zesty cilantro lime rice bowls, gather these fresh ingredients. They create a bright and tasty meal that everyone will love. Here’s the complete list of ingredients you need: - 1 cup jasmine rice - 2 cups vegetable broth - 1 teaspoon olive oil - Zest of 1 lime - Juice of 2 limes - 1/2 cup fresh cilantro, chopped - 1 can black beans, drained and rinsed - 1 red bell pepper, diced - 1 avocado, sliced - 1/2 cup corn (fresh or frozen) - 1 teaspoon ground cumin - Salt and pepper to taste Each ingredient plays a role in making this dish special. The jasmine rice gives a lovely texture. The lime zest and juice add bright flavors. Fresh cilantro brings a fragrant touch, making every bite refreshing. Black beans are a great source of protein. Diced red bell pepper adds crunch and color. Sliced avocado adds creaminess. Corn adds sweetness. Ground cumin ties it all together with warmth. You can find the full recipe in the article for easy reference. These ingredients make a meal that is not only quick to prepare but also satisfying and delicious. Start by rinsing the jasmine rice. Place it in a fine mesh strainer. Run cold water over it until the water runs clear. This step removes extra starch and prevents the rice from being sticky. Next, heat olive oil in a medium saucepan over medium heat. Add the rinsed rice to the pan. Toast the rice for about 2 minutes, stirring often. This adds a nice nutty flavor to your rice. After toasting, pour in the vegetable broth. Add ground cumin and a pinch of salt. Bring the mixture to a boil, then cover the pan. Reduce the heat to low and let it simmer for 15 minutes. The rice will soak up all the liquid and become tender. Once the time is up, remove the pan from heat. Let it sit for 5 minutes with the lid on. This allows the rice to finish cooking. Now, use a fork to fluff the rice gently. This helps keep the grains separate. Stir in the lime zest, lime juice, and chopped cilantro. The fresh flavors will brighten the rice. This step is key to making your dish zesty. Your cilantro lime rice is now ready to serve! For the full recipe, check the full recipe section. To make the best cilantro lime rice, start with rinsed jasmine rice. Rinsing removes extra starch. This helps the rice stay fluffy. Toast the rice in olive oil for two minutes. This step adds a nice nutty flavor. Use fresh lime juice and zest for the best taste. Fresh cilantro is key for that bright flavor. Stir in the lime and cilantro after cooking for maximum freshness. You can change the rice bowl with fun variations. Try adding grilled chicken or shrimp for protein. A sprinkle of feta cheese adds a salty kick. You can swap black beans for pinto or kidney beans. For a spicy touch, add diced jalapeños or hot sauce. Enjoy different vegetables like zucchini or cherry tomatoes. Each variation brings a new twist to your bowl. Avoid overcooking the rice. This can make it mushy. Make sure to measure your liquid correctly. Too much broth can lead to soggy rice. Don't skip the rinsing step. It is vital for perfect texture. When adding lime juice, do it after cooking. This keeps the flavors bright and fresh. Lastly, taste and adjust seasonings before serving. A pinch of salt can enhance all the flavors. If you want to try this delicious recipe, check out the Full Recipe for Zesty Cilantro Lime Rice Bowls! {{image_2}} If you want to add more protein to your Zesty Cilantro Lime Rice Bowls, consider these options: - Chickpeas: Use one can of drained chickpeas. They add a nice texture. - Tofu: Cube and pan-fry tofu until golden. It soaks up flavors well. - Tempeh: This nutty protein works great when marinated and grilled. These proteins not only fill you up but also boost nutrition. They pair nicely with the fresh lime and cilantro flavors. Toppings can take your rice bowl to the next level. Here are some fun ideas: - Salsa: Fresh or jarred salsa adds a kick. - Cheese: Crumbled feta or shredded cheese gives creaminess. - Nuts or Seeds: Toasted pumpkin seeds or chopped nuts add crunch. - Greens: Spinach or kale can add extra color and nutrients. Mix and match toppings to suit your taste. Each addition can change the dish's vibe. If you love spice, here are some ways to heat things up: - Jalapeños: Add fresh or pickled jalapeños for a spicy kick. - Hot Sauce: Drizzle your favorite hot sauce on top. - Chili Flakes: Sprinkle chili flakes while cooking for a subtle heat. - Spicy Seasoning: Try a spicy seasoning blend for extra flavor. These simple changes can make your rice bowl exciting and bold. Enjoy experimenting with different levels of heat! For the complete recipe, check the Full Recipe section above. To keep your Zesty Cilantro Lime Rice Bowls fresh, place leftovers in an airtight container. This helps keep moisture in and prevents any strong smells from the fridge. Make sure to store the rice and toppings separately if possible. The rice stays fluffy this way, and toppings remain crisp. You can store leftovers for up to three days. When you’re ready to enjoy leftovers, heat the rice in the microwave or on the stovetop. If using the microwave, cover the bowl with a damp paper towel. This adds moisture and keeps the rice from drying out. Heat in 30-second intervals until warm. On the stovetop, add a splash of water and stir over low heat until heated through. If you want to keep your meal longer, you can freeze the rice. First, let it cool completely before packaging. Use a freezer-safe container or bag. Remove as much air as possible to prevent freezer burn. You can freeze the rice for up to three months. To use, thaw it in the fridge overnight, then reheat as mentioned above. Yes, you can use brown rice. It will need more water and a longer cooking time. Use a ratio of 2 1/2 cups of vegetable broth for 1 cup of brown rice. Cook it for about 40-45 minutes. The texture will be chewier, but still tasty. If you don’t like cilantro, try parsley or mint. Both herbs give a fresh taste. You can also use basil for a different flavor. Each option gives a unique twist to your rice bowl. This recipe is already gluten-free! Use vegetable broth labeled gluten-free. Always check the labels of beans and corn for added gluten. Enjoy your meal without worry. Absolutely! Grilled chicken, shrimp, or tofu work well here. Add cooked protein on top of your rice for a filling meal. You can also try adding cooked quinoa for extra protein. You can store leftovers in the fridge for up to 4 days. Keep them in airtight containers to maintain freshness. Reheat in the microwave or on the stove before serving again. Feel free to get creative with toppings! Chopped tomatoes, jalapeños, or a dollop of sour cream add great flavor. You can also sprinkle cheese on top for a creamy finish. Yes, this dish is vegan as is! Just ensure any additional toppings or protein are also plant-based. Enjoy a healthy, plant-powered meal with this recipe. Lime juice adds brightness to the rice. It enhances the flavors and makes the dish lively. The acidity from the lime balances the richness of other ingredients. Yes! Kids usually love the flavors and colors in this bowl. You can adjust the spice levels to suit their taste. Encourage them to help assemble their own bowls for fun. You can prep the rice and toppings separately. Store them in the fridge until you’re ready to serve. This makes meal time quick and easy, perfect for busy days. For the full recipe, check out the details above. In this blog post, I shared a simple recipe for cilantro lime rice. We reviewed the key ingredients that create a bright and tasty dish. I provided step-by-step instructions to make cooking easy. You learned some tips to improve flavor and avoid mistakes. Additionally, we explored variations and storage methods to enhance your experience. Cilantro lime rice is versatile and perfect for many meals. Enjoy trying these ideas in your kitchen!

Zesty Cilantro Lime Rice Bowls Flavorful and Easy Meal

Are you ready to spice up your meal plan? These Zesty Cilantro Lime Rice Bowls are quick, easy, and bursting

Older posts
Newer posts
← Previous Page1 … Page15 Page16 Page17 … Page85 Next →

dsad

© 2025 So Yum Recipes • Built with GeneratePress

Our Policies

  • Copyright Policy
  • Cookie Policy
  • GDPR Policy
  • Privacy Policy
  • Disclaimer
  • Terms Of Use

More Information

  • Home
  • About
  • Contact
  • Appetizers
  • Dessert
  • Dinner
  • Drinks
©2025, So Yum Recipes About Back To Top