Skip to content
DisclaimerTerms Of UseGDPR PolicyCookie Policy

So Yum Recipes

  • Home
  • Drinks
  • Appetizers
  • Dinner
  • Dessert
  • About
  • Contact
  • Privacy Policy
DisclaimerTerms Of UseGDPR PolicyCookie Policy

Chloe

- 1 lb boneless, skinless chicken breast, cut into bite-sized pieces - 2 tablespoons sesame oil - 3 tablespoons low-sodium soy sauce - 1 tablespoon honey or agave syrup - 1 tablespoon rice vinegar - 1 teaspoon fresh ginger, minced - 2 cloves garlic, minced - 1 cup broccoli florets - 1 bell pepper, sliced (any color) - 1 carrot, julienned - 1 tablespoon sesame seeds (for garnish) - 2 green onions, sliced (for garnish) - Cooked brown rice or quinoa (for serving) This Healthy Sesame Chicken dish is simple yet full of flavor. The chicken serves as the main protein, and you can choose any color bell pepper to add a pop of brightness. The marinade combines sesame oil, soy sauce, and honey, giving a sweet and savory touch. Fresh ginger and garlic boost the flavor and offer health benefits too. Broccoli, bell pepper, and carrots add texture and nutrients. Don't skip the sesame seeds and green onions for that final touch of freshness! Serve this over brown rice or quinoa for a wholesome meal. This recipe is not only quick but also packed with good ingredients. Enjoy cooking with these fresh, vibrant ingredients! {{ingredient_image_1}} To start, I make the marinade. In a medium bowl, I whisk together: - 2 tablespoons sesame oil - 3 tablespoons low-sodium soy sauce - 1 tablespoon honey or agave syrup - 1 tablespoon rice vinegar - 1 teaspoon minced fresh ginger - 2 cloves minced garlic This mix gives the chicken a rich flavor. Next, I add the bite-sized chicken pieces. I make sure every piece is well-coated. I let the chicken marinate for at least 20 minutes. For more flavor, I sometimes let it sit in the fridge for up to one hour. Once the chicken has marinated, I heat a non-stick skillet over medium-high heat. I add the marinated chicken pieces to the hot skillet. I cook the chicken for about 5 to 7 minutes. I stir it occasionally until the chicken is browned and fully cooked. After the chicken is cooked, it’s time to add veggies. I toss in: - 1 cup broccoli florets - 1 sliced bell pepper (any color) - 1 julienned carrot I stir everything together and cook for another 5 to 6 minutes. This timing helps the vegetables stay tender-crisp. I check the seasoning and add more soy sauce if needed. Once done, I remove it from heat. I love to sprinkle sesame seeds and sliced green onions on top before serving. To enhance flavors, you can add more ingredients. Try adding a sprinkle of red pepper flakes for heat or a splash of lime juice for brightness. These small changes make a big difference. I recommend marinating the chicken for at least 20 minutes. If you have more time, let it sit for up to an hour in the fridge. This longer time helps the chicken soak up all the tasty flavors. Use a non-stick skillet or a wok for high heat cooking. These tools help the chicken brown nicely without sticking. Heat the skillet before adding the chicken. This ensures a good sear. To keep the chicken juicy, avoid overcooking it. Cook the chicken for about 5-7 minutes until it's no longer pink inside. Stir occasionally to cook evenly. When serving, use a deep bowl for a great look. Place a scoop of brown rice or quinoa at the bottom. Top it with the chicken and veggies. For garnishing, sprinkle sesame seeds and sliced green onions on top. A wedge of lime on the side adds color and a zesty kick. This makes your dish not only tasty but also beautiful! Pro Tips Marinate for Maximum Flavor: Allowing the chicken to marinate for at least 1 hour will enhance the flavor. If time permits, marinate overnight for even better results. Veggie Variety: Feel free to add other vegetables like snow peas, zucchini, or snap peas for added nutrition and color. Cooking Method: For a crispier texture, consider stir-frying the chicken in batches instead of overcrowding the skillet. Garnish Generously: Don’t skimp on the sesame seeds and green onions; they add a delightful crunch and fresh flavor to the dish. {{image_2}} Options for gluten-free You can make this dish gluten-free by using tamari instead of soy sauce. Tamari is a great option because it has a similar taste but is safe for those with gluten issues. You can also check labels on your honey or agave to ensure they are gluten-free. Substitutes for vegetarian or vegan diets For a vegetarian or vegan twist, swap the chicken for tofu or tempeh. Both options absorb the marinade well. You can also use seitan for a meat-like texture. Just make sure to adjust cooking times based on what you choose. Different vegetables to use Feel free to get creative with the veggies! You can add snap peas, zucchini, or even mushrooms. Each vegetable brings its own flavor and texture. Use what you have on hand or what’s in season for a fresh taste. Low-calorie substitutes for the marinade If you want to cut calories, try using less honey or agave. You can also add more vinegar for tang without the calories. Another trick is to use a bit of vegetable broth instead of oil. This adds flavor without extra fat. To keep your Healthy Sesame Chicken fresh, use these simple tips: - Place leftovers in the fridge within two hours of cooking. - Use airtight containers to prevent moisture loss. - Store in glass or BPA-free plastic containers for safety. - Label containers with the date for easy tracking. When reheating, keep the chicken juicy and tasty. Here are some methods: - Use a microwave for quick reheating. Cover the dish to trap steam. - Reheat on the stovetop over low heat. Add a splash of water to keep it moist. - Avoid high heat to prevent drying out the chicken. Safe reheating tips include checking the internal temperature. Heat until it reaches 165°F (74°C). Enjoy your meal again! I recommend marinating the chicken for at least 20 minutes. This time allows the flavors to soak in. You can marinate it for up to 1 hour in the fridge for even better taste. If you’re in a hurry, 20 minutes will still give you nice flavor. Yes, you can use frozen chicken. But first, you need to thaw it completely. I suggest using the fridge for safe thawing overnight. Once thawed, cut it into bite-sized pieces and marinate as usual. Avoid cooking frozen chicken directly, as it may not cook evenly. For a balanced meal, serve Healthy Sesame Chicken with cooked brown rice or quinoa. Both add fiber and nutrients. You can also add a side of steamed vegetables, like green beans or snap peas, for extra color and crunch. A light salad can also pair nicely. Absolutely! Healthy Sesame Chicken is perfect for meal prep. Cook a large batch and store it in airtight containers. Keep it in the fridge for up to 4 days. You can also freeze portions for up to 3 months. Just reheat on the stove or in the microwave when you’re ready to eat. This blog post guides you to make Healthy Sesame Chicken. We explored key ingredients, marinating the chicken, and cooking techniques. I shared tips for flavor and presentation. You can adapt the recipe for special diets and store leftovers correctly. Cooking can be simple and fun. With these steps, you can create a dish everyone will enjoy. Try it out, and enjoy your tasty meal!

Healthy Sesame Chicken Easy and Flavorful Recipe

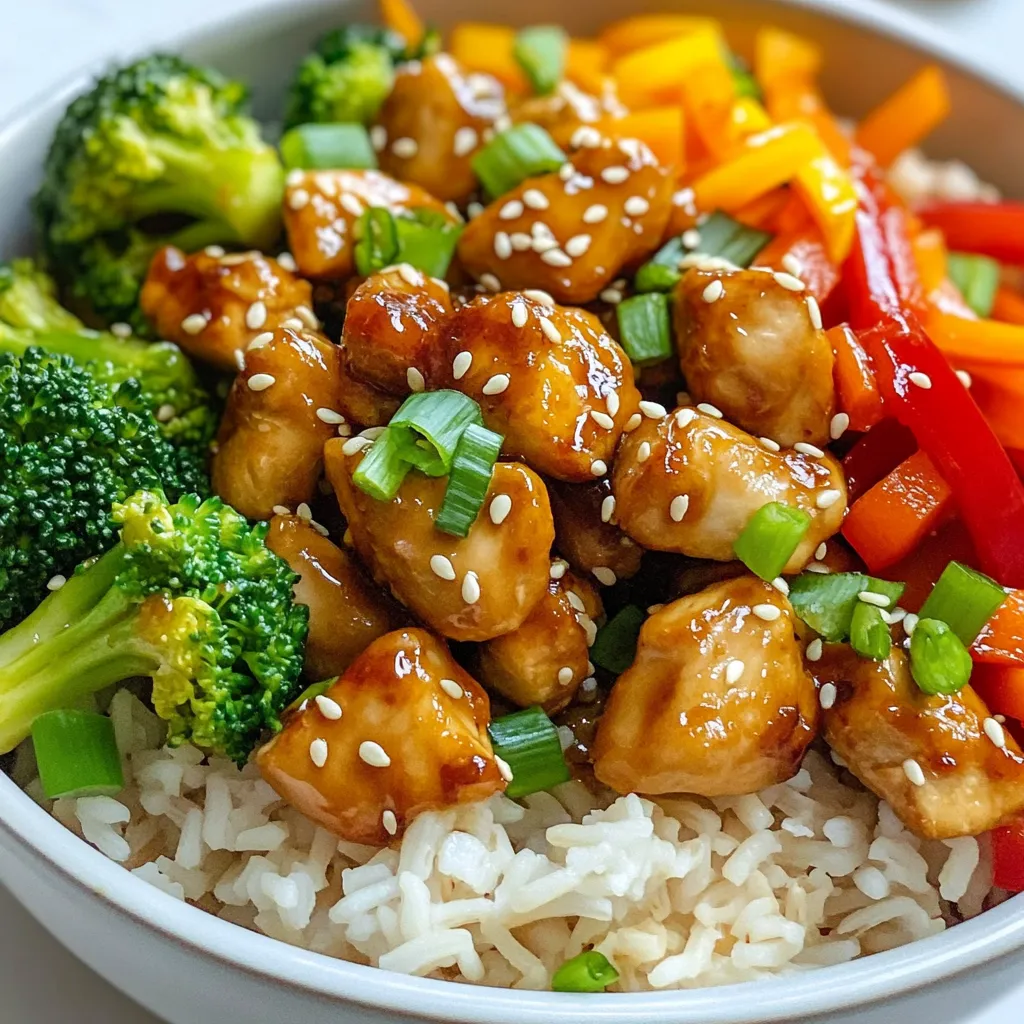
Are you craving a tasty yet healthy meal? Look no further than my Healthy Sesame Chicken! This easy and flavorful

To make a rich and creamy Garlic Butter Mushroom Risotto, you will need a few key ingredients. Here’s a list to guide you: - 1 cup Arborio rice - 4 cups chicken or vegetable broth (low sodium) - 2 tablespoons unsalted butter - 1 tablespoon olive oil - 1 medium onion, finely chopped - 3 cloves garlic, minced - 1 cup mushrooms, sliced (your choice: cremini, shiitake, or button) - 1/2 cup grated Parmesan cheese - 1/4 cup fresh parsley, chopped - Salt and freshly cracked black pepper to taste - Lemon zest (optional, for garnish) Each ingredient plays an important role. Arborio rice gives the dish its creamy texture. The broth adds flavor and moisture, while butter and olive oil create a rich base. The onions and garlic provide a fragrant aroma. Mushrooms add depth, and Parmesan cheese brings a savory finish. Fresh parsley brightens up the dish, and lemon zest can add a nice touch. Using low-sodium broth helps control salt levels, keeping the dish balanced. Feel free to choose the type of mushrooms you like best. Each brings its own taste and texture, making this risotto versatile. {{ingredient_image_1}} 1. Heating the broth: In a medium saucepan, pour in your broth. Heat it on low. Keep it warm but do not let it boil. This step ensures your risotto cooks evenly. 2. Sautéing the onions and garlic: Grab a large skillet. Add olive oil and one tablespoon of butter over medium heat. Toss in the chopped onion. Sauté it until it's soft, around 4-5 minutes. Then, add the minced garlic. Let it cook for one more minute. 3. Cooking the mushrooms: Now, add your sliced mushrooms to the pan. Stir them in well. Cook for about 5-7 minutes. You want them browned and soft. This adds a rich flavor to your risotto. 4. Toasting the Arborio rice: Next, stir in one cup of Arborio rice. Cook it for 1-2 minutes. This step helps the rice absorb all the lovely flavors from the pan. 1. Adding broth gradually: Start adding your warm broth to the rice. Use a ladle to scoop it in, one ladle at a time. Stir the mixture. Wait until most of the liquid is absorbed before adding more. 2. Achieving creamy consistency: Keep stirring and adding broth for about 18-20 minutes. You want the rice to be creamy and just tender, known as al dente. 3. Finishing touches with Parmesan and parsley: Once the rice is done, take the pan off the heat. Stir in the last tablespoon of butter and half a cup of grated Parmesan cheese. Mix until it melts and creates a creamy sauce. Finally, fold in the fresh parsley and season with salt and pepper to taste. Serve your Garlic Butter Mushroom Risotto right away and enjoy the warm, rich flavors! - Temperature control for broth: Always keep your broth warm. This helps the rice cook evenly. If the broth is cold, the rice will seize up and not absorb the flavors well. - Importance of stirring: Stir the rice often. This helps release the starch and makes the risotto creamy. Stirring also prevents the rice from sticking to the pan. - Signs of doneness: The risotto should be creamy and slightly firm in the center. Taste it towards the end of cooking. If it feels too hard, let it cook a bit longer. - Choosing fresh mushrooms: Always pick fresh mushrooms. They add great flavor and texture. Look for mushrooms that are firm and dry. Avoid any that feel slimy or have dark spots. - Selecting the right Parmesan cheese: Use high-quality Parmesan cheese. Freshly grated cheese melts better and adds a richer taste. Pre-grated cheese often lacks flavor and texture. - Benefits of low-sodium broth: Low-sodium broth allows you to control the salt. It helps highlight the flavors in the dish without being too salty. Plus, you can always add salt later if needed. Pro Tips Use Warm Broth: Keeping the broth warm helps the rice cook evenly and absorb liquid more efficiently, resulting in a creamier risotto. Stir Constantly: Stirring the risotto continuously helps release the starch from the rice, creating that classic creamy texture. Choose the Right Mushrooms: Varieties like shiitake or cremini add depth of flavor, while button mushrooms offer a milder taste. Finish with Butter and Cheese: Adding the remaining butter and Parmesan at the end enhances the creaminess and richness of the risotto. {{image_2}} You can make garlic butter mushroom risotto even better by adding herbs and spices. Fresh thyme or rosemary gives a nice touch. Just sprinkle some in while cooking. You can also add proteins like chicken or shrimp. Cook them in the pan before adding the rice. This adds richness and makes the dish heartier. If you're looking for different vegetables, try adding spinach or peas. These add color and nutrition. Just stir them in during the last few minutes of cooking. They will brighten the dish and give it a fresh taste. For gluten-free options, use gluten-free broth and check the rice label. Arborio rice is usually gluten-free, so you can enjoy this dish safely. If you want a vegan version, you can swap out the cheese and butter. Use plant-based butter and nutritional yeast for a cheesy flavor. This keeps the creamy texture while making it dairy-free. Enjoy experimenting with these variations to create your perfect risotto! To keep your garlic butter mushroom risotto fresh, cool it down first. Spread it out on a plate to help it cool quickly. Once cool, use airtight containers. Glass or plastic containers both work well. Make sure to seal them tightly to prevent air from getting in. Your risotto can last in the fridge for up to three days. When you want to enjoy your risotto again, you can reheat it easily. For the microwave method, place the risotto in a bowl. Add a splash of broth or water to help it steam. Cover the bowl and heat in short bursts, stirring in between. This keeps it from drying out. If you prefer the stovetop, add the risotto to a pan. Pour in a bit of broth or water, and heat over low. Stir often, so it warms evenly. This method helps keep the creamy texture intact. Enjoy your meal again! What is the difference between risotto and other rice dishes? Risotto uses a special rice called Arborio. This rice has a high starch content. This makes risotto creamy. Other rice dishes may not have this texture. They often cook in more water or broth all at once, while risotto needs gradual liquid addition. How can I make risotto in advance? You can prep the mushrooms and onion ahead. Cook them until soft, then store them. When ready, add the rice and broth to the warm mixture. This way, you save time and still get the creamy result. Can I use other types of rice for risotto? It is best to use Arborio rice for risotto. However, you can try Carnaroli or Vialone Nano. These types have similar starch levels and can give you a creamy dish. Other rice types, like basmati or jasmine, won’t work as well. How do I know when the risotto is done? Risotto should be creamy and the rice should be al dente. You can test the rice by tasting it. If it is firm but not hard, it is done. The grains should be separate, not mushy. What happens if I add too much broth? If you add too much broth, the risotto can become soupy. It will lose its creamy texture. If this happens, cook it a bit longer to help thicken. Stir it often to avoid burning. Can I freeze risotto for later? You can freeze risotto, but it may change in texture. To freeze, let it cool completely. Store in a tight container. When ready to eat, reheat it slowly. Add a little broth to help it regain creaminess. In this post, we explored making risotto with just a few key ingredients. We covered each step, from preparing your broth to achieving that creamy finish. I shared tips for perfecting your dish and discussed variations to suit your taste. Remember to choose fresh ingredients for the best flavor. With practice, you will master risotto and impress anyone you serve. Enjoy your cooking journey and happy eating!

Garlic Butter Mushroom Risotto Simple and Rich Recipe

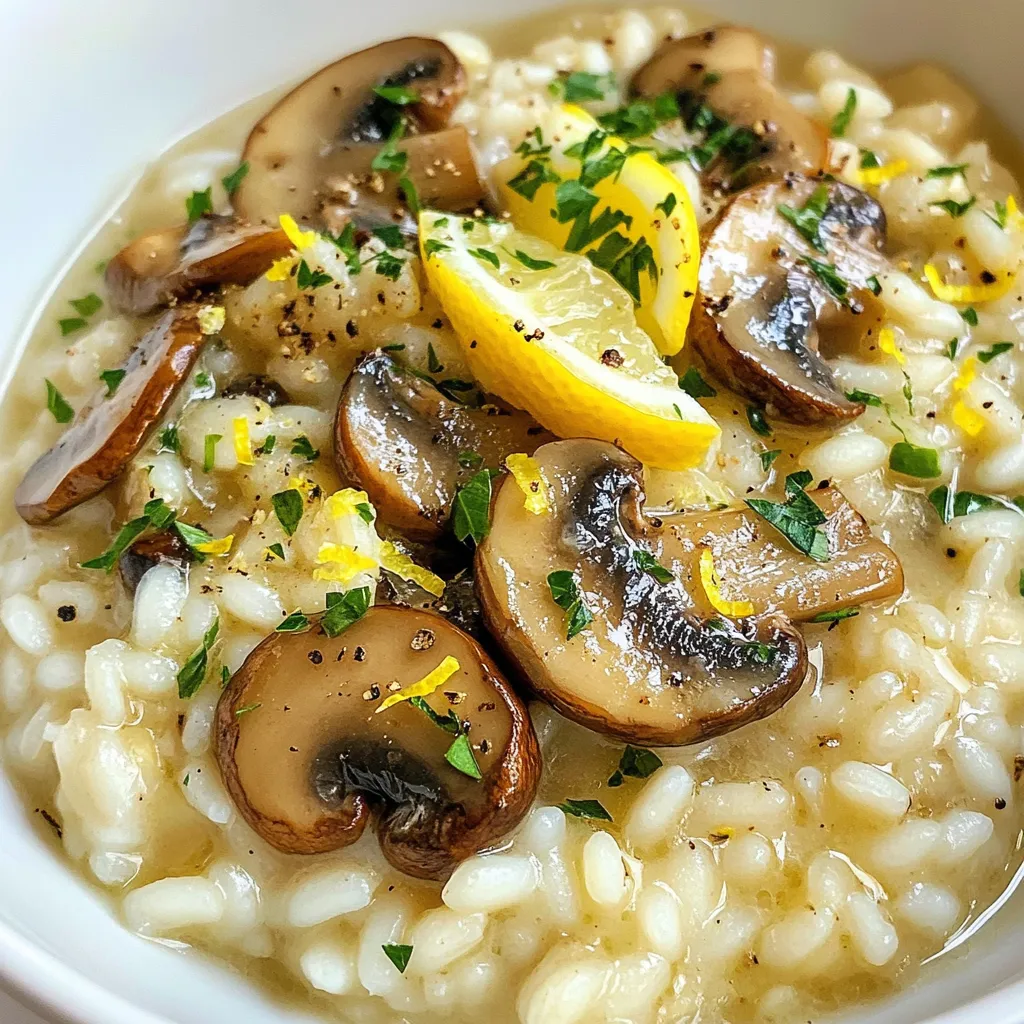
Looking for a dish that warms your soul? Garlic Butter Mushroom Risotto is simple, rich, and packed with flavor. No

- 1 lb boneless, skinless chicken breasts - 4 cups chicken broth - 1 can (15 oz) white beans - 1 medium onion, diced - Spices and seasonings: - 3 cloves garlic, minced - 1 can (4 oz) diced green chilies - 1 teaspoon ground cumin - 1 teaspoon chili powder - 1/2 teaspoon dried oregano - Salt and pepper to taste - 1 cup corn kernels (fresh or frozen) - 1 cup sour cream - 1/2 cup cream cheese, softened - Fresh cilantro - Lime wedges - Sour cream You can swap chicken for turkey or even tofu. This keeps it tasty and fun. If you want lower fat dishes, use low-fat sour cream or cream cheese. Full-fat options add more creaminess. Choose what fits your taste! {{ingredient_image_1}} 1. Sautéing onions and garlic: First, heat the olive oil in a large pot over medium heat. Add the diced onion and cook it until it turns clear, about 5 minutes. This step builds a great base flavor. Next, stir in the minced garlic and let it cook for 1 minute. You want to smell that delicious garlic aroma! 2. Seasoning chicken: Now, add the chicken breasts to the pot. Season them well with salt, pepper, cumin, and chili powder. Sauté the chicken for about 5-7 minutes until it turns white on the outside. This process adds depth to the dish and ensures the chicken is full of flavor. 1. Boiling and simmering: Pour in 4 cups of chicken broth and add the diced green chilies, white beans, and oregano. Bring this mix to a boil. Once it boils, reduce the heat to low, cover the pot, and let it simmer for 20-25 minutes. This slow cooking makes the chicken tender and allows all the flavors to meld. 2. Shredding chicken: After simmering, take the chicken out of the pot. Use two forks to shred the chicken into bite-sized pieces. This helps distribute the chicken evenly throughout the chili. Return the shredded chicken back to the pot. 1. Combining cream cheese and corn: Stir in the corn, sour cream, and softened cream cheese. Mix until everything is well combined and heated through. This creamy mix gives the chili a rich texture that's hard to resist. 2. Adjusting seasoning: Taste your chili and adjust the seasoning with more salt or pepper as needed. If the chili seems too thick, add more chicken broth until it reaches the texture you like. The final touch is key to making it perfect for your taste. For a slow cooker version, start by adding all your ingredients to the pot. This includes the chicken, onion, garlic, spices, and broth. Set your slow cooker to low and let it cook for 6-8 hours. Shred the chicken before serving. If you prefer an Instant Pot adaptation, sauté the onion and garlic first using the sauté function. Then, add the remaining ingredients and seal the lid. Cook on high pressure for 15 minutes, then do a quick release. Shred the chicken and mix well. Want some heat? Adding jalapeños for spice can elevate the flavor. Chop a few and add them in when you sauté the onion. Adjust the amount based on your spice tolerance. You can also incorporate additional vegetables. Consider adding diced bell peppers, zucchini, or even spinach. They add color and nutrition without changing the taste too much. For serving suggestions and bowl arrangement, ladle the chili into deep bowls. A dollop of sour cream on top creates a nice contrast. Sprinkle fresh cilantro over the chili for a fresh look. Don’t forget the garnishing with lime and cilantro. Place lime wedges on the side. This adds a zesty touch. It also gives your guests a chance to add more flavor as they like. Pro Tips Cooking Chicken: For extra flavor, consider marinating the chicken in lime juice and spices for a few hours before cooking. Thickening the Chili: If you prefer a thicker chili, you can add a tablespoon of cornstarch mixed with water during the simmering stage. Flavor Enhancements: Try adding diced jalapeños or a splash of hot sauce for an extra kick of heat. Garnishing: Experiment with different toppings such as avocado slices, shredded cheese, or crushed tortilla chips for added texture and flavor. {{image_2}} You can make white chicken chili vegetarian by using plant-based substitutes for chicken. Try using tofu, tempeh, or seitan. These options absorb flavors well and add protein. You can also use jackfruit for a textured bite. You can explore different beans in your chili. Navy beans and cannellini beans are great choices. Navy beans are small and creamy, while cannellini beans are larger and have a nutty taste. Both add a nice texture and flavor. If you love heat, add spicy green chilies or hot sauce. You can mix in diced jalapeños or serrano peppers for an extra kick. Adjust the amount to fit your spice level. This will make your white chicken chili exciting and bold. White chicken chili lasts in the fridge for about 4 to 5 days. To keep it fresh, store it in an airtight container. This helps to prevent any smell from other foods in the fridge from mixing in. If you want to save some for later, you can freeze the chili. First, let it cool completely. Then, pour it into a freezer-safe container or bag. Be sure to leave some space at the top, as it may expand when frozen. When you want to use it, thaw the chili in the fridge overnight or use the defrost setting on your microwave. To reheat your chili, warm it on the stove over low heat. Stir it often to make sure it heats evenly. You can add a splash of chicken broth if it seems too thick. If you want to keep the creaminess and flavor, avoid using high heat. This way, your chili stays smooth and tasty. Yes, you can use frozen chicken. Just make sure to cook it longer. When using frozen chicken, add it to the pot while it’s still frozen. Let it simmer for an extra 10-15 minutes. This ensures it is fully cooked and tender. Always check the center of the chicken to ensure it is no longer pink. To thicken your chili, you have several options. First, you can mash some of the white beans. This adds creaminess without extra steps. Another option is to use cornstarch. Mix cornstarch with cold water, then stir it into the chili. Let it cook a few minutes until it thickens. Lastly, you can simmer the chili longer. This helps reduce excess liquid. Yes, White Chicken Chili can be gluten-free. Most ingredients, like chicken and beans, are gluten-free. However, always check labels on canned goods. Sometimes, canned broth or spices may contain gluten. If you want to be safe, use gluten-free broth. This ensures your chili is safe for everyone. In this post, we explored how to make a delicious white chicken chili. We covered essential ingredients like chicken, beans, and spices. You learned preparation steps, cooking tips, and variations, plus how to store your chili properly. Remember, this dish is flexible. You can adjust it to fit your taste. Using different proteins or beans opens new doors. With these insights, you can create a tasty meal anytime. Enjoy experimenting with flavors and have fun cooking!

White Chicken Chili Simple and Flavorful Recipe

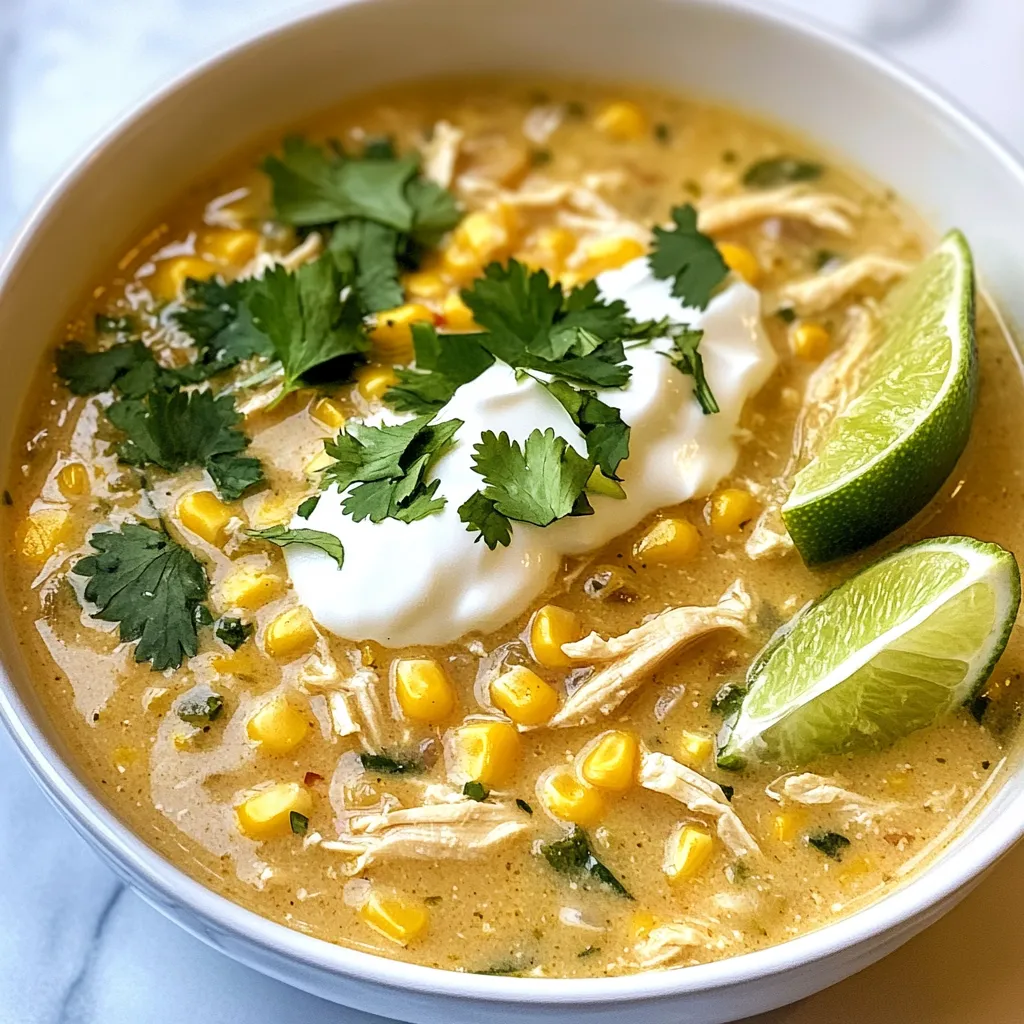
Looking for a warm, hearty dish that’s simple and bursting with flavor? You’ve found it! This White Chicken Chili recipe

- 1 cup plain Greek yogurt - 1 tablespoon mayonnaise - 1 teaspoon garlic powder - 1 teaspoon onion powder - 1 teaspoon dried dill - 1 teaspoon dried parsley - 1 teaspoon dried chives - 1 teaspoon lemon juice - Salt and pepper to taste The star of this dip is plain Greek yogurt. It gives the dip a rich and creamy base. The mayonnaise adds a bit of extra creaminess. You want to blend these two well to create a smooth texture. Next, I add garlic powder and onion powder. These spices give depth and flavor. Dried dill, parsley, and chives add a fresh taste and a bit of color. Each herb brings its own unique flavor. A little lemon juice brightens up the whole mix. It balances the creaminess with some tang. Do not forget the salt and pepper. They help to bring all the flavors together. Taste as you go. Adjust the seasoning to fit your liking. - Fresh vegetables for dipping - Carrot sticks - Cucumber slices - Bell pepper strips For dipping, fresh veggies are a must. I love using carrot sticks, cucumber slices, and bell pepper strips. These veggies pair perfectly with the dip. They add crunch and color to your plate. You can also use any other fresh vegetables you like. The more variety, the better! {{ingredient_image_1}} To start, grab a mixing bowl. In this bowl, combine 1 cup of plain Greek yogurt with 1 tablespoon of mayonnaise. Mix these two together until they are smooth and creamy. This base creates a rich texture for your dip. Next, add in the seasonings. This includes 1 teaspoon each of garlic powder, onion powder, dried dill, dried parsley, and dried chives. Stir everything until well mixed. These herbs and spices bring a lot of flavor to the dip. Now, take a fresh lemon. Squeeze in 1 teaspoon of lemon juice and mix again. This step brightens the flavor and gives it that zesty kick. After mixing, it’s time to season. Add salt and pepper to taste. Start with a little and adjust as needed. Once you are happy with the flavor, cover the bowl. Place it in the fridge for at least 30 minutes. This waiting time allows the flavors to meld beautifully. When you’re ready to serve, take the dip out of the fridge. It pairs perfectly with fresh vegetables. I suggest using carrot sticks, cucumber slices, and bell pepper strips. These veggies not only look great but also add crunch and freshness. You can also serve the dip with crackers or chips if desired. Enjoy your flavorful and fresh Greek yogurt ranch dip! To make your Greek yogurt ranch dip taste amazing, let it chill. Chilling helps the flavors blend well. I recommend at least 30 minutes in the fridge. This wait makes a big difference. You can also adjust seasonings to match your taste. If you love garlic, add more garlic powder. If you want it tangy, squeeze in more lemon juice. Taste as you go! Creativity makes your dip stand out. Arrange the fresh veggies in a rainbow pattern. Carrot sticks, cucumber slices, and bell pepper strips look great together. Use pretty serving bowls. A colorful bowl can make your dip pop. Add a sprinkle of fresh herbs on top for a nice touch. One mistake is not mixing thoroughly. Make sure all the ingredients blend well. This way, every bite is flavorful. Another mistake is skipping refrigeration. This step is key for flavor. If you serve it right away, the dip may taste flat. Always let it chill! Pro Tips Use Fresh Herbs: Fresh herbs can elevate the flavor of your ranch dip. If you have access to fresh dill, parsley, or chives, feel free to substitute them for the dried versions for a brighter taste. Adjust Creaminess: If you prefer a lighter dip, you can substitute some of the Greek yogurt with sour cream or even buttermilk to achieve your desired consistency. Flavor Boost: For an extra zing, try adding a pinch of cayenne pepper or a few drops of hot sauce to give your dip a spicy kick. Perfect Dipping Vegetables: Carrot sticks, cucumber slices, and bell pepper strips are classic choices, but don't hesitate to experiment with other crunchy vegetables like celery, radishes, or even broccoli florets for dipping. {{image_2}} If you want a lighter dip, try low-fat Greek yogurt. It gives the same creamy taste with fewer calories. You can also use dairy-free yogurt if you're avoiding dairy. This way, everyone can enjoy the dip. For a mayo swap, use more Greek yogurt instead. This keeps the flavor rich while cutting down on fat. You can also try using mashed avocado or hummus for a new twist. Want to spice things up? Add a few dashes of hot sauce. This will give your dip a nice kick. You can also mix in some cayenne pepper for more heat. To make the dip fresh, add chopped herbs like basil or cilantro. These add brightness and can change the whole flavor. Fresh dill gives a nice twist, too. Don’t be afraid to experiment with your favorite herbs. Let’s get creative! For a Southwest style, mix in some black beans or corn. A little cumin can give it that warm flavor. If you want Italian flair, add sun-dried tomatoes and a dash of oregano. This will make a flavorful dip that pairs well with breadsticks. The options are endless! To keep your Greek yogurt ranch dip fresh, store it in an airtight container. This helps prevent any odors from the fridge from mixing in. Make sure to seal the lid tightly after each use. Always place your dip in the refrigerator. Keeping it cold maintains its creamy texture and taste. This dip lasts about 3 to 5 days in the fridge. Check for any signs of spoilage before serving. If you see any mold or an off smell, discard it right away. Freshness is key for both flavor and safety. If you have leftover dip, get creative! Use it as a spread on sandwiches or wraps. It also works well as a topping on baked potatoes or grilled meats. You can even mix it into pasta salads for extra flavor. The options are endless! Greek yogurt ranch dip is made from simple ingredients. Here’s what you need: - 1 cup plain Greek yogurt - 1 tablespoon mayonnaise - 1 teaspoon garlic powder - 1 teaspoon onion powder - 1 teaspoon dried dill - 1 teaspoon dried parsley - 1 teaspoon dried chives - 1 teaspoon lemon juice - Salt and pepper to taste These ingredients combine to create a creamy and tasty dip that is light yet full of flavor. Yes, you can make this dip ahead of time! In fact, it's even better after resting. Here are the best practices: - Prepare the dip up to two days in advance. - Store it in an airtight container in the fridge. - Let it chill for at least 30 minutes before serving. This helps the flavors blend. Yes, this dip is gluten-free! All the ingredients used are naturally gluten-free. Just ensure that your mayonnaise is also gluten-free, as some brands may include gluten. You can easily add some heat to the dip. Here are a few suggestions: - Mix in a teaspoon of hot sauce for a kick. - Add diced jalapeños for fresh heat. - Use cayenne pepper to spice it up, adjusting to your taste. This dip pairs well with many fresh veggies. Here are some ideas: - Carrot sticks - Cucumber slices - Bell pepper strips - Celery sticks - Cherry tomatoes These add crunch and freshness, making each bite delightful. The prep time is short! It takes about 10 minutes to make the dip. With chilling time, the total is about 40 minutes. It’s quick, easy, and perfect for any gathering. This blog post showed you how to make a tasty Greek yogurt ranch dip. We covered the main ingredients, step-by-step instructions, and helpful tips. I shared easy ways to enhance the flavor and avoid common mistakes. You learned how to store leftovers and even add your own twist to the dip. Now, you can impress friends with this healthy dip. Enjoy your snacks and feel proud of your creation!

Greek Yogurt Ranch Dip Flavorful and Fresh Delight

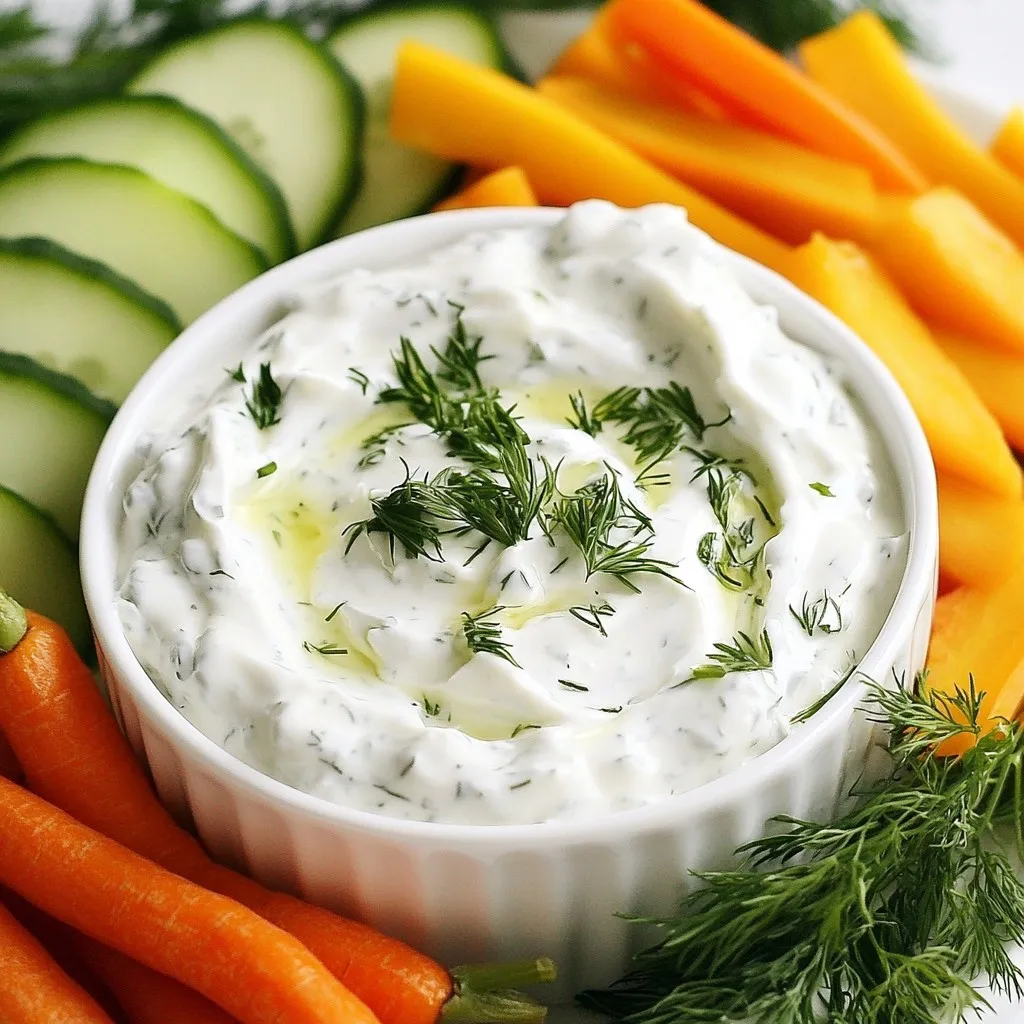
Looking for a fresh and tasty dip? My Greek Yogurt Ranch Dip is perfect for you! This creamy blend is

To make this creamy Tuscan salmon skillet, gather these items: - 4 salmon fillets (about 6 oz each) - 2 tablespoons olive oil - 3 cloves garlic, minced - 1 cup cherry tomatoes, halved - 1 cup baby spinach - 1 cup heavy cream (or coconut milk for a lighter version) - 1/2 cup grated Parmesan cheese - 1 teaspoon dried Italian herbs (oregano, basil, thyme) - Salt and pepper to taste - Fresh basil leaves for garnish For a lighter twist, you can swap heavy cream for coconut milk. This change lowers the fat while keeping the dish creamy. You can also use skinless salmon fillets to cut down on calories. If you want more veggies, try adding zucchini or bell peppers for extra flavor and nutrition. To make your dish pop, top it with fresh basil leaves. They add a nice color and fresh taste. You could also sprinkle more Parmesan cheese for a richer flavor. Pairing with garlic bread or serving over pasta makes a great meal too. Enjoy your beautiful meal! {{ingredient_image_1}} Start by heating two tablespoons of olive oil in a large skillet over medium-high heat. While the oil warms, season the four salmon fillets with salt and pepper. Once the oil shimmers, add the fillets skin-side down. Sear them for about four to five minutes until they turn golden brown. Flip the fillets and cook for another four to five minutes until fully cooked. Remove the salmon from the skillet and set it aside on a plate. In the same skillet, add three minced garlic cloves. Sauté the garlic for about 30 seconds until it smells great. Next, toss in one cup of halved cherry tomatoes. Cook the tomatoes for three to four minutes until they start to soften. Pour in one cup of heavy cream, stirring well. Bring the mix to a gentle simmer. Add in half a cup of grated Parmesan cheese and one teaspoon of dried Italian herbs. Stir until the cheese melts and the sauce becomes creamy. Now it's time to bring everything together. Add one cup of baby spinach to the skillet. Stir it in until it wilts, which takes about two minutes. Return the seared salmon fillets to the skillet, placing them on top of the sauce. Spoon some of the creamy sauce over each fillet. Cook for an additional two to three minutes to heat everything through. Taste and adjust seasoning with salt and pepper as needed. Enjoy your delicious creamy Tuscan salmon! To make the best salmon, choose fresh fillets. Look for bright colors and firm texture. Season your salmon with salt and pepper before cooking. This simple step adds flavor. Heat olive oil in the skillet. Place the salmon skin-side down. Sear each side for 4-5 minutes. This gives a nice golden crust. Remove the salmon and set it aside. This keeps it tender and juicy. Herbs can transform your dish. For this recipe, use dried Italian herbs. Oregano, basil, and thyme work well together. Add them when you pour in the cream. This lets the flavors mix nicely. Fresh basil leaves are great for garnish too. They add a pop of color and taste. Don’t be shy with herbs; they boost flavor without extra calories. Serve your creamy Tuscan salmon in shallow bowls. This makes for a lovely presentation. Add fresh basil on top for a nice touch. For a complete meal, pair it with garlic bread. You can also serve it over pasta or quinoa. Both options soak up the creamy sauce well. Enjoy this dish with family or friends for a cozy dinner! Pro Tips Perfectly Cooked Salmon: To ensure your salmon is cooked perfectly, aim for an internal temperature of 145°F (63°C). The fish should flake easily with a fork. Enhance the Flavor: Add a splash of white wine or lemon juice to the sauce for an extra layer of flavor. It brightens the dish and complements the creaminess. Use Fresh Ingredients: Whenever possible, opt for fresh spinach and tomatoes. They will provide a vibrant color and superior taste compared to their canned or frozen counterparts. Make it Your Own: Feel free to customize the recipe by adding other vegetables such as bell peppers or zucchini, or even spices like red pepper flakes for a kick! {{image_2}} You can swap salmon for other fish like tilapia or cod. Both cook quickly and stay moist. If you prefer meat, try chicken breasts. Just adjust cooking time to ensure they are fully cooked. For a heartier option, use shrimp. They need only a few minutes to cook in the sauce. To make this dish vegetarian, replace the salmon with hearty vegetables. Zucchini, eggplant, or even tofu work well. Cook the veggies until tender. They will soak up the creamy sauce just like the fish. This makes a rich, tasty meal without meat. For extra flavor, add sun-dried tomatoes. They bring a sweet, tangy kick to the dish. Just chop them up and stir them in with the tomatoes. Capers are another great choice. They add a briny taste that pairs well with the cream. Both options give a unique twist to the classic recipe. To keep your creamy Tuscan salmon fresh, store it in an airtight container. Let the dish cool down before sealing it. Place it in the fridge for up to three days. If you want to enjoy it later, keep the sauce and salmon together. This helps maintain flavor and moisture. When reheating, use a skillet over low heat. This helps the salmon warm evenly without drying out. You can add a splash of cream or water to keep it creamy. Heat for about 5 minutes, stirring gently, until warmed through. Avoid high heat to prevent overcooking. If you want to freeze the dish, it's best to freeze just the salmon and sauce together. Let it cool completely, then place it in a freezer-safe container. It can last up to three months in the freezer. To enjoy it later, thaw overnight in the fridge before reheating. Yes, you can use frozen salmon. Just thaw it first. Place it in the fridge overnight or use cold water. After thawing, pat it dry. This helps to get a nice sear. Cooking times may vary slightly, so check for doneness. You can use coconut milk for a lighter version. It adds a hint of sweetness. For a low-calorie option, try using Greek yogurt. It thickens the sauce and adds creaminess. Just stir it in at the end to avoid curdling. To make this dish dairy-free, swap heavy cream for coconut milk. Use nutritional yeast instead of Parmesan cheese. It gives a cheesy flavor without dairy. You can also add a splash of lemon juice for tanginess. Salmon is done when it flakes easily with a fork. It should be opaque and have a light pink center. Use a food thermometer if you want to be precise. The internal temperature should reach 145°F (63°C). Always let it rest for a few minutes before serving. This blog post covered tasty salmon recipes, from ingredients to storage tips. You learned about choosing fresh salmon and how to make a creamy sauce. I shared ways to enhance flavor with herbs and suggested different proteins for variety. In the end, cooking salmon can be easy and fun. Enjoy trying new flavors and variations. You can make meals that impress, while still being simple and quick!

Creamy Tuscan Salmon Skillet Flavorful and Simple Recipe

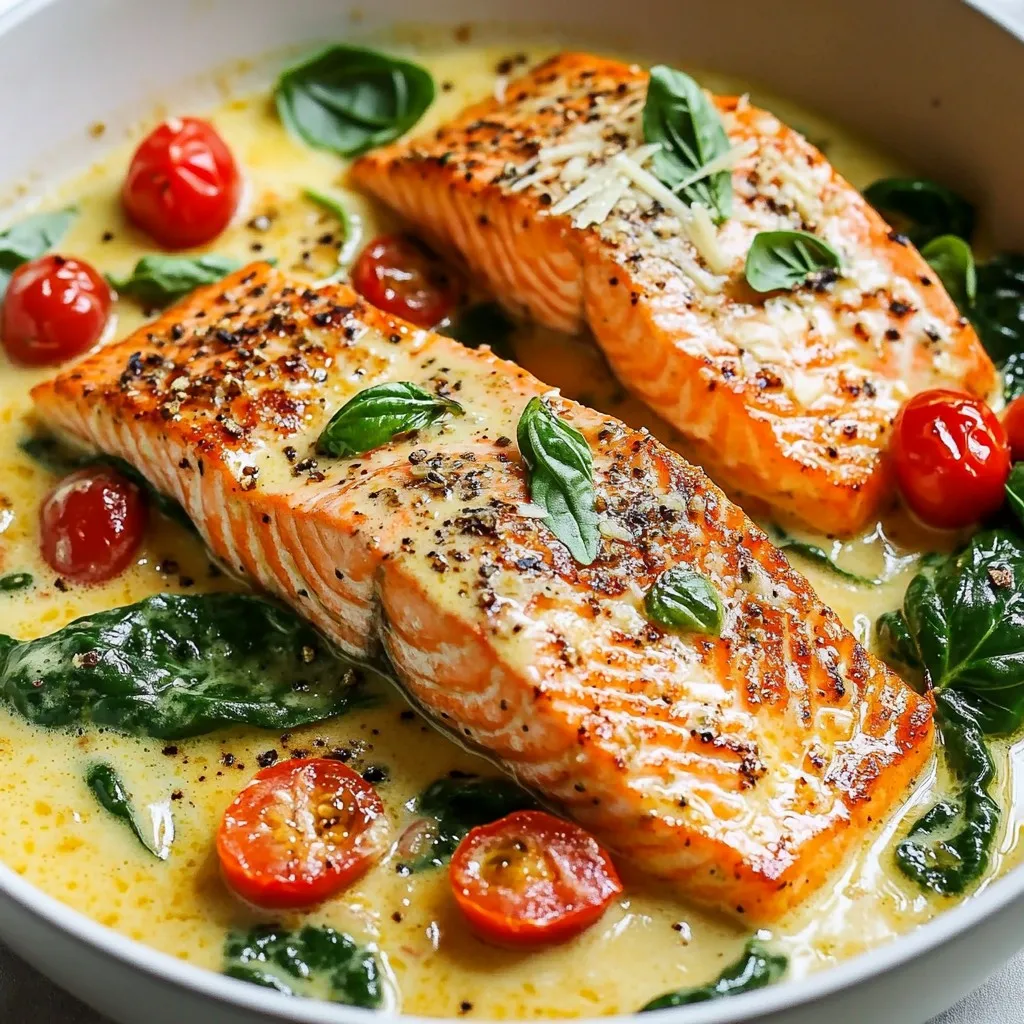
Craving a simple yet flavorful meal? Let me share my Creamy Tuscan Salmon Skillet recipe with you. This dish brings

- 1 lb lean ground turkey or chicken - 1 cup lentils (cooked) - 1 onion, diced - 2 cloves garlic, minced - 2 carrots, diced - 1 cup peas (fresh or frozen) - 2 cups cauliflower, mashed (for the topping) - 1 tablespoon olive oil - 1 tablespoon tomato paste - 1 teaspoon Worcestershire sauce (optional) - 1 teaspoon dried thyme - 1 teaspoon dried oregano - Salt and pepper to taste - ½ cup chicken or vegetable broth - 1 egg, beaten (for glazing topping) - Ground Turkey or Chicken: This lean meat offers high protein and low fat. It helps build muscle and keeps you full. - Lentils: Packed with fiber and protein, lentils support digestion and heart health. - Onion and Garlic: These add flavor and have antioxidants that boost your immune system. - Carrots: Rich in vitamins, carrots improve your eyesight and skin health. - Peas: These tiny green gems offer protein, fiber, and vitamins A, C, and K. - Cauliflower: A low-carb vegetable, cauliflower is high in vitamins and great for making a creamy topping. - Olive Oil: A healthy fat that supports heart health and adds flavor. - Tomato Paste: This adds rich flavor and contains vitamins like C and K. - Worcestershire Sauce: It enhances taste with a mix of savory and sweet notes. - Thyme and Oregano: These herbs provide flavor and antioxidants with anti-inflammatory properties. - Egg: It acts as a binder and gives a nice golden finish when baked. - Meat: Choose organic or free-range turkey or chicken for better flavor and nutrients. - Lentils: Opt for dry lentils over canned for more fiber and less sodium. - Vegetables: Fresh veggies are best, but frozen peas work well if fresh isn't available. - Cauliflower: Look for firm, white heads without spots or blemishes. - Herbs and Spices: Fresh herbs can elevate flavors. Check for vibrant colors and strong scents. - Broth: Use low-sodium broth to control salt levels in your dish. {{ingredient_image_1}} First, gather all your ingredients. You need lean ground turkey or chicken, lentils, onion, garlic, carrots, peas, and cauliflower. Chop the onion, garlic, and carrots into small pieces. This helps them cook evenly. Next, heat 1 tablespoon of olive oil in a large skillet over medium heat. Add the diced onion and minced garlic. Cook until the onion turns soft. This should take about 3-4 minutes. Then, add the diced carrots and cook for another 5 minutes. Now, add the ground turkey or chicken. Break it apart with a spatula as it cooks. Make sure it is browned all over. Once cooked, stir in the cooked lentils and peas. Add 1 tablespoon of tomato paste, Worcestershire sauce, dried thyme, and oregano. Season with salt and pepper to taste. Pour in ½ cup of chicken or vegetable broth. Let this simmer for 5 minutes. While the filling simmers, boil water in a pot. Add 2 cups of cauliflower florets and cook until they are very soft, about 10-15 minutes. Drain the cauliflower and mash it well. Season with salt and pepper to your liking. A smooth texture is key for a great topping. Grab a baking dish and spread the meat and vegetable mixture evenly at the bottom. Carefully layer the mashed cauliflower on top. Smooth it out with a spatula. Brush the top with the beaten egg for a nice golden color. Preheat your oven to 400°F (200°C). Place the dish in the oven and bake for 25-30 minutes. You want the top to be slightly golden and the edges bubbling. Let it cool for a few minutes before serving. Enjoy your healthy, protein-packed meal! To boost the protein in your Shepherd's Pie, swap lean turkey for lean beef. You can also add cooked quinoa or chickpeas to the filling. Lentils already pack a protein punch, so use them generously. For an even more protein-rich topping, mix in some Greek yogurt with the mashed cauliflower. Avoid using too much broth. It can make the filling soupy. Ensure your meat is browned well, which adds flavor. Don't rush the cauliflower mash. Overcooking the cauliflower can make it watery. A smooth, creamy mash should be the goal. Lastly, skip the egg wash if you prefer a lighter topping. For a creamy cauliflower mash, steam the cauliflower instead of boiling it. This keeps more flavor and nutrients. Add a touch of butter or olive oil for richness. Season well with salt and pepper. If you like garlic, mix in roasted garlic for added depth. Blend until smooth for the best texture. Pro Tips Use Fresh Herbs: Fresh herbs like parsley or thyme not only enhance the flavor but also add a pop of color to your Shepherd's Pie. Cook Lentils Ahead: Cooking lentils beforehand saves time and ensures they are tender, making the filling even more delicious. Experiment with Toppings: Feel free to mix in different vegetables or even incorporate cheese into the mashed cauliflower for added flavor. Rest Before Serving: Allowing the Shepherd's Pie to rest for a few minutes after baking helps the layers set, making it easier to serve. {{image_2}} You can easily change the protein in your Shepherd's Pie. If you prefer beef, use lean ground beef instead of turkey or chicken. For a pork option, ground pork adds a nice flavor. If you want a vegetarian dish, replace meat with more lentils or chickpeas. This makes it hearty and healthy. Each choice offers a new taste, so feel free to experiment. Herbs and spices can boost the flavor of your Shepherd's Pie. Try adding fresh rosemary or parsley for a bright note. You can mix in some smoked paprika for a smoky touch. Adding a pinch of cayenne pepper gives it a little heat. Always taste as you go! Adjust the spices based on your preference to make it truly yours. Looking for a low-carb option? You can swap the mashed cauliflower for mashed sweet potatoes. Sweet potatoes are nutritious and tasty. For a gluten-free version, ensure all your ingredients, like broth and sauces, are gluten-free. This way, everyone can enjoy this delicious dish without worry. To store your Protein Packed Shepherd's Pie, let it cool first. Use an airtight container. This keeps moisture in and prevents odors from mixing. You can store leftovers in the fridge for up to three days. If you want to keep it longer, freezing is a great option. When you're ready to enjoy leftovers, you can reheat them easily. Preheat your oven to 350°F (175°C). Place the Shepherd's Pie in a baking dish. Cover it with foil to keep moisture in. Heat for about 20-25 minutes. You can also use the microwave for faster reheating. Just cover it and heat for 2-3 minutes until hot. Freezing your Shepherd's Pie is simple. First, let it cool completely. Cut it into individual portions. Wrap each portion tightly in plastic wrap. Then, place them in a freezer-safe bag or container. Label it with the date. You can freeze it for up to three months. To reheat from frozen, bake at 350°F (175°C) for about 45-50 minutes. Enjoy your healthy meal later! Shepherd's Pie is a comforting dish from the UK. It has a base of meat and vegetables topped with mashed potatoes. The name comes from its use of lamb, as shepherds tend sheep. The dish dates back to the late 1700s. People made it to use leftover meat. Today, we see many variations, like using turkey or lentils for protein. Yes, you can make Shepherd's Pie ahead of time. Prepare the filling and topping, then assemble the dish. Cover it tightly with plastic wrap or foil. Store it in the fridge for up to two days. When ready to bake, heat your oven to 400°F (200°C) and cook until hot and bubbly. This saves time on busy nights! Customizing Shepherd's Pie is easy. For gluten-free, skip the broth with gluten. Use gluten-free broth instead. If you want a vegetarian option, replace meat with more lentils or mushrooms. You can use plant-based meat for a similar taste. Adjust veggies to fit your needs. Carrots, peas, and corn work well. Always check labels for hidden allergens. Shepherd's Pie is hearty, so lighter sides work best. Try a fresh green salad with a vinaigrette. Roasted vegetables also make a great choice. Steamed broccoli or green beans add color and crunch. For a fun twist, serve it with crusty bread for dipping. These sides balance the meal and keep it enjoyable. This shepherd's pie recipe is packed with protein and flavor. We covered the best ingredients, how to cook each part, and storage tips. I shared tricks to avoid mistakes and enhance protein. You can even customize it based on your diet. As you make this dish, remember it’s all about quality ingredients and creativity. Enjoy every bite and make it your own!

Protein Packed Shepherds Pie Healthy Dinner Option

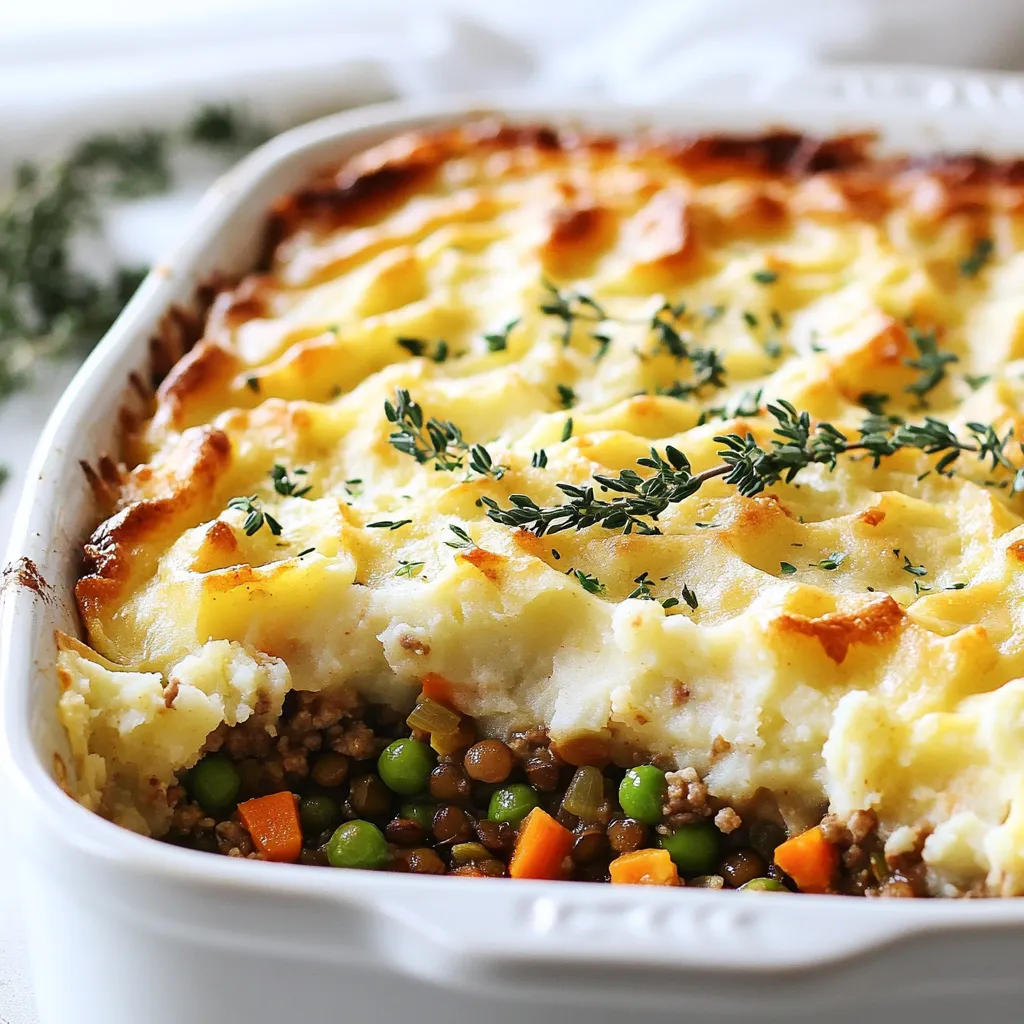
Looking for a healthy dinner that fills you up and tastes great? I’ve got the perfect solution: Protein Packed Shepherd’s

- 8 oz Italian sausage - 1 medium onion, diced - 2 cloves garlic, minced - 3 medium carrots, sliced - 2 celery stalks, sliced - 6 cups vegetable or chicken broth - 1 (12 oz) package of cheese tortellini - 1 cup kale or spinach, chopped - 1 (14.5 oz) can diced tomatoes - 1 teaspoon Italian seasoning - Salt and pepper to taste - 2 tablespoons olive oil - Fresh parsley and grated Parmesan cheese for garnish Gathering the right ingredients is key to making a great soup. I always choose fresh items for the best flavor. The star of this dish is the Italian sausage. You can use mild or spicy sausage based on your taste. For a rich base, I use onion, garlic, carrots, and celery. These veggies add depth and sweetness to the soup. Don't forget the tortellini! A 12 oz package of cheese-filled pasta makes it hearty. The greens, either kale or spinach, add color and nutrients. I love using diced tomatoes for a touch of acidity. Italian seasoning ties it all together. Lastly, salt and pepper enhance the flavors, while olive oil gives a nice finish. This soup is a warm hug in a bowl, perfect for autumn days. With fresh parsley and grated Parmesan on top, it looks and tastes amazing. Each ingredient plays a role in creating a comforting and delicious meal. {{ingredient_image_1}} 1. Heat olive oil and sauté onion: Start by heating 2 tablespoons of olive oil in a large pot over medium heat. Once the oil is hot, add the diced onion. Sauté the onion for about 3-4 minutes until it softens and turns translucent. This step builds a strong base for your soup. 2. Add garlic, carrots, and celery: Next, add 2 cloves of minced garlic, 3 sliced carrots, and 2 sliced celery stalks to the pot. Cook these vegetables together for about 5 minutes. Stir them often until they begin to soften. The aroma will make your kitchen feel warm and inviting. - Crumble and brown the Italian sausage: Now, it’s time to add 8 oz of Italian sausage. Crumble the sausage into the pot. Cook it for about 6-8 minutes, stirring occasionally. You want it browned and fully cooked. Breaking it up with your spoon helps it cook evenly and melds its flavors with the veggies. - Add broth, diced tomatoes, and seasoning: Once the sausage is cooked, pour in 6 cups of vegetable or chicken broth. Add 1 can of diced tomatoes with their juices and 1 teaspoon of Italian seasoning. Bring this mixture to a gentle boil. This is where the magic begins! The flavors will blend beautifully. - Add tortellini and kale, adjust seasoning: After boiling, toss in 1 (12 oz) package of cheese tortellini. Cook according to package instructions, usually about 3-5 minutes. When the tortellini floats to the top, it's ready! Stir in 1 cup of chopped kale and cook for another 2 minutes until it wilts. Finally, season with salt and pepper to taste. Adjust as needed to get the perfect flavor. Now, you have a hearty and warm meal ready to enjoy! - Ensure sausage is fully cooked: Cook the sausage until it is browned and crumbles easily. This usually takes about 6-8 minutes. You want it safe to eat and full of flavor. - How to properly sauté vegetables: Start with a hot pan and add olive oil. Sauté the onion for about 3-4 minutes. Then, add garlic, carrots, and celery. Cook them for another 5 minutes. This helps build a tasty base for your soup. - Tips for adjusting seasoning: After adding the broth and tomatoes, taste the soup. You can add more salt, pepper, or Italian seasoning to fit your taste. Small changes can really boost flavor. - Suggestions for adding heat or extra flavor: If you like spice, add red pepper flakes or a dash of hot sauce. For extra depth, try adding a splash of balsamic vinegar. It brightens the soup and adds a unique twist. - Pairing with crusty bread: Serve the soup with warm, crusty bread. It soaks up the broth and makes each bite comforting. A good loaf enhances the meal. - Best sides to serve with soup: A simple green salad with light dressing goes well with this soup. It balances the meal and adds freshness. You can also serve cheese sticks for a fun touch. Pro Tips Use Fresh Ingredients: whenever possible, opt for fresh vegetables and herbs to enhance the flavor of your soup. Adjust the Spiciness: If you prefer a milder soup, use mild Italian sausage, or add a pinch of red pepper flakes for a subtle kick. Make it a Meal: Serve the soup with crusty bread or a side salad for a complete meal that is perfect for autumn evenings. Store Leftovers Properly: If you have leftovers, store them in an airtight container in the fridge for up to 3 days. Reheat gently on the stove. {{image_2}} You can change up the sausage in your soup. Try chicken sausage for a lighter option. If you want more heat, use spicy Italian sausage. For a milder taste, go with sweet Italian sausage. You can also swap the greens. If you don’t have kale, use Swiss chard. Spinach is another great option. These greens add color and nutrition. If you need a gluten-free version, choose gluten-free tortellini. Many brands offer this option. You can also use rice or quinoa instead of tortellini. For a vegan soup, replace the sausage with plant-based sausage. There are many tasty products on the market. Use vegetable broth instead of chicken broth for a full flavor. Adding spices can change the flavor of your soup. Try red pepper flakes for some heat. You can also mix in fresh herbs like basil or thyme for a fresh taste. Experimenting with different broths is fun too. Use a rich mushroom broth for depth. You can also try adding a splash of white wine for complexity. These changes can make the soup your own. To store your Autumn Sausage Tortellini Soup, let it cool first. Then, scoop it into airtight containers. Make sure to leave some space at the top. This helps prevent spills when it expands in the fridge. Store the soup in the fridge for up to three days. If you want it to last longer, freezing is a great option. To freeze your soup, use freezer-safe containers. Portion the soup for easy meals later. Leave some space at the top, as it will expand. You can freeze it for up to three months. When you're ready to eat, transfer the soup to the fridge to thaw overnight. To reheat frozen soup, place it in a pot over low heat. Stir often until it's hot. You can also use the microwave. Heat in short intervals, stirring in between. This ensures even heating. Enjoy your warm, hearty meal any time! Can I make this soup in advance? Yes, you can make this soup ahead of time. It tastes even better the next day. Just store it in the fridge. When you're ready to eat, heat it gently on the stove. What can I serve with this soup? I love serving this soup with crusty bread. You can also pair it with a fresh salad. Both sides add a nice touch to the meal. Can I use another type of pasta? Absolutely! You can use any small pasta. Just adjust the cooking time based on the type you choose. What if I don’t have kale or spinach? If you have other greens, feel free to use them. Swiss chard or even arugula works well. Just chop them and stir them in at the end. How long can I keep leftovers? Leftovers can last about 3 to 4 days in the fridge. Make sure to store them in an airtight container. Can I freeze tortellini soup? Yes, you can freeze this soup! Just cool it first, then transfer it to a freezer-safe container. It will last about 3 months frozen. When ready to eat, thaw it overnight in the fridge and heat it up. In this post, we covered how to make a delicious autumn sausage tortellini soup. We discussed each ingredient and shared easy steps for cooking. I gave tips on enhancing flavors and serving ideas. Remember, you can swap ingredients to suit your tastes, and the soup stores well for later. Experimenting with this recipe can lead to new favorites. Enjoy making this warm, comforting dish!

Autumn Sausage Tortellini Soup Hearty and Warm Meal

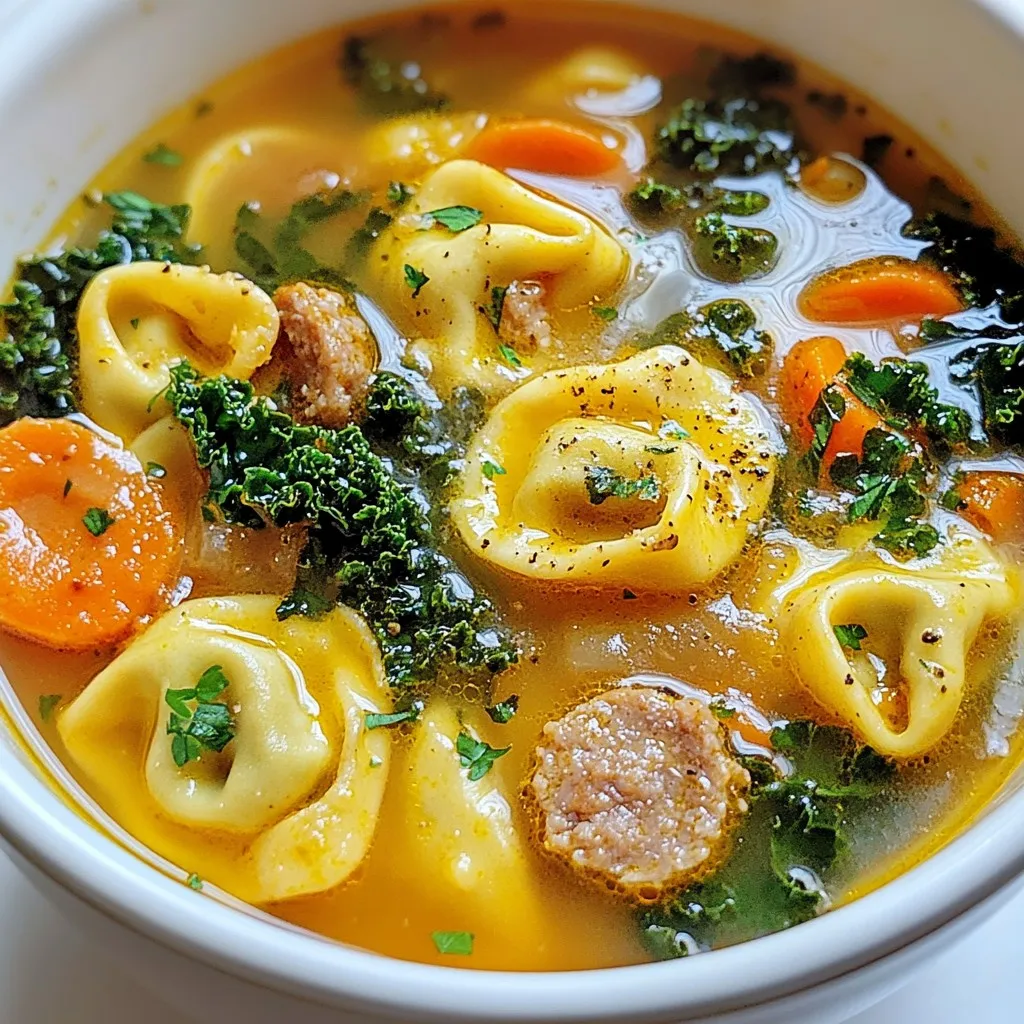
As the leaves turn and a chill fills the air, there’s nothing quite like a warm bowl of Autumn Sausage

To make One Pot Creamy Cajun Pasta, gather these key items: - 12 oz penne pasta - 1 tablespoon olive oil - 1 onion, finely chopped - 3 cloves garlic, minced - 1 bell pepper (red or yellow), diced - 1 teaspoon Cajun seasoning - 1/2 teaspoon smoked paprika - 1/4 teaspoon cayenne pepper (adjust to taste) - 4 cups vegetable broth - 1 cup heavy cream - 1 cup frozen peas - 1 cup grated Parmesan cheese - Salt and pepper to taste - Fresh parsley, chopped (for garnish) These ingredients create a rich and flavorful dish. Make sure to use fresh items for the best taste. You can boost the flavor with some extras: - 1 teaspoon lemon juice for brightness - 1/2 cup cooked and crumbled sausage for heartiness - A splash of hot sauce for a kick - Fresh herbs like thyme or basil for aroma These additions make your dish stand out even more. If you need to swap out ingredients, consider these options: - Use any pasta shape you like, such as fusilli or farfalle. - Swap heavy cream with coconut milk for a lighter dish. - If you lack vegetable broth, chicken broth works too. - For a cheese alternative, try nutritional yeast for a vegan option. These swaps help you adapt the recipe to what you have on hand. {{ingredient_image_1}} Start by heating one tablespoon of olive oil in a large pot over medium heat. Add one finely chopped onion. Cook this for about five minutes until it turns soft and clear. Next, add three minced garlic cloves and one diced bell pepper. Stir and cook for two to three minutes. The pepper should be tender. Now, it's time to add some flavor! Sprinkle in one teaspoon of Cajun seasoning, half a teaspoon of smoked paprika, and a quarter teaspoon of cayenne pepper. Mix well and let it cook for one more minute. Now, add twelve ounces of penne pasta to the pot. Pour in four cups of vegetable broth and give it a good stir. Bring the pot to a boil. Once it’s boiling, turn down the heat to medium-low. Cover the pot and let it simmer for about twelve to fifteen minutes. Stir occasionally. You want the pasta to be firm yet cooked, and most of the broth should be gone. Lower the heat to low. Pour in one cup of heavy cream, one cup of frozen peas, and one cup of grated Parmesan cheese. Stir everything together until it looks creamy and well combined. Taste your dish and add salt and pepper if needed. Cook for another two minutes to warm the peas. Finally, take it off the heat and let it sit for a minute. Don’t forget to sprinkle some chopped fresh parsley on top before serving! To make your pasta creamy, start with heavy cream. Use one cup in your recipe. This gives a rich texture. Stir it in at low heat after cooking the pasta. Add the grated Parmesan cheese next. This cheese melts well and helps create a smooth sauce. If you want extra creaminess, add more cheese. You can also try a little butter for added richness. When cooking pasta in one pot, use enough liquid. For this recipe, you need four cups of vegetable broth. Bring it to a boil first. This helps the pasta cook evenly. Stir the pasta often to prevent sticking. Cover the pot while it simmers. This keeps steam inside, cooking the pasta well. Always check for doneness a minute or two before the time ends. You want it al dente, not mushy. To control the spice in your dish, start with less cayenne pepper. This recipe calls for 1/4 teaspoon, but you can use less. Taste the dish as you cook. You can always add more spice later. If it gets too spicy, add a little extra cream or cheese to balance it out. Remember, Cajun seasoning packs flavor, so a little goes a long way! Pro Tips Use Fresh Ingredients: Fresh vegetables and high-quality pasta will enhance the overall flavor of your dish. Adjust the Spice Level: Feel free to modify the amount of cayenne pepper based on your heat preference. Let it Rest: Allowing the pasta to sit for a minute after cooking helps thicken the sauce and improves the texture. Experiment with Proteins: Add cooked chicken, shrimp, or sausage for a heartier dish that packs even more flavor. {{image_2}} You can easily add protein to your One Pot Creamy Cajun Pasta. Chicken, shrimp, or tofu all work well. For chicken, cut it into small pieces. Sauté it with the onion in step one. For shrimp, add it in the last few minutes of cooking. This way, they cook quickly without getting tough. If you prefer tofu, use firm tofu. Cut it into cubes and sauté it along with the vegetables. This adds flavor and texture. If you want a vegetarian or vegan dish, swap out the heavy cream. Use coconut milk or cashew cream instead. This keeps the dish creamy while being plant-based. For cheese, you can use a nutritional yeast blend or vegan cheese. These options add a cheesy flavor without dairy. Don’t forget to check your vegetable broth to ensure it’s vegan. This way, you can enjoy the robust flavors without any animal products. Feel free to get creative with vegetables in this recipe. Zucchini, spinach, or mushrooms add different tastes and textures. You can add them in step two with the bell pepper. Another great option is cherry tomatoes; they add sweetness. Just halve them and toss them in while the pasta cooks. This dish is all about personal taste, so use what you love. Mixing different veggies keeps the dish fresh and exciting! To store leftovers, let the pasta cool down first. Then, place it in an airtight container. You can keep it in the fridge for up to three days. This helps keep the pasta fresh and tasty. When you are ready to eat your leftovers, reheat gently. You can use a microwave or a pot on the stove. If using the stove, add a splash of vegetable broth or cream. This will help keep it creamy and moist. If you want to store the pasta longer, freezing is a great option. Place the cooled pasta in a freezer-safe container. Be sure to leave some space for expansion. You can freeze it for up to three months. To enjoy it later, thaw it in the fridge overnight before reheating. Yes, you can use other pasta shapes. Bowtie, fusilli, or spaghetti work well. Just keep the cooking time in mind. Thinner pasta may cook faster, while thicker pasta may need more time. Always check for doneness. To add more heat, increase the cayenne pepper. You can also use hot sauce. Another option is to add sliced jalapeños or chili flakes. Taste as you go to find your perfect spice level. This dish pairs well with a simple green salad. Garlic bread or crusty baguette also complements it nicely. For a heartier meal, serve it with grilled chicken or shrimp. Yes, you can make it gluten-free by using gluten-free pasta. Check the package for cooking times, as they may differ. Make sure the vegetable broth is also gluten-free to keep the dish safe. To sum up, this blog post covers everything you need for One Pot Creamy Cajun Pasta. We talked about key ingredients and options to make it tasty. I shared step-by-step instructions and expert tips to ensure a creamy texture. Plus, you learned how to add protein and variations to suit your taste. Remember, storing leftovers properly keeps your meal fresh. Now it's time to experiment and enjoy your delicious creation!

One Pot Creamy Cajun Pasta Simple and Tasty Meal

Are you craving a meal that’s quick, creamy, and full of flavor? This One Pot Creamy Cajun Pasta is your

To make One Pot Taco Pasta, gather these must-have items: - 1 pound ground turkey or beef - 1 onion, diced - 2 cloves garlic, minced - 1 bell pepper, diced (any color) - 1 tablespoon taco seasoning - 1 can (15 oz) black beans, drained and rinsed - 1 cup corn kernels (fresh or frozen) - 3 cups chicken broth - 12 oz penne pasta or fusilli - 1 cup diced tomatoes (canned or fresh) - 1 cup shredded cheddar cheese - 1 tablespoon olive oil - Fresh cilantro, for garnish - Salt and pepper to taste You can switch things up with these fun options: - Use ground chicken or tofu instead of turkey or beef. - Add jalapeños for extra heat. - Include zucchini or spinach for more veggies. - Swap cheddar for a different cheese like pepper jack or mozzarella. - Use different beans, like pinto or kidney beans. When picking your ingredients, I suggest: - Ground Meat: Look for brands like Perdue for turkey or grass-fed beef from local farms. - Taco Seasoning: McCormick offers a great blend with rich flavors. - Canned Tomatoes: Hunt's diced tomatoes are ripe and tasty. - Cheese: Tillamook's cheddar melts perfectly and adds great flavor. - Olive Oil: Extra virgin olive oil from California gives the best taste. With these ingredients, you will create a tasty and quick meal that everyone will love! {{ingredient_image_1}} To start, gather all your ingredients. This makes cooking easier. Here’s what you need: - 1 pound ground turkey or beef - 1 onion, diced - 2 cloves garlic, minced - 1 bell pepper, diced (any color) - 1 tablespoon taco seasoning - 1 can (15 oz) black beans, drained and rinsed - 1 cup corn kernels (fresh or frozen) - 3 cups chicken broth - 12 oz penne pasta or fusilli - 1 cup diced tomatoes (canned or fresh) - 1 cup shredded cheddar cheese - 1 tablespoon olive oil - Fresh cilantro, for garnish - Salt and pepper to taste Next, chop your onion and bell pepper. Mince the garlic. These steps help build flavor. Now, let’s cook! Heat the olive oil in a large pot over medium heat. Add the diced onion and bell pepper. Cook them for about 4-5 minutes, until they soften. Then, stir in the minced garlic. Cook for another minute until you smell that great garlic aroma. Now it's time to add the meat. Put in your ground turkey or beef. Break it apart with a spatula. Cook it for about 5-7 minutes, until it turns brown. Sprinkle in your taco seasoning. Mix it well with the meat and veggies. Next, pour in the chicken broth, diced tomatoes, black beans, corn, and uncooked pasta. Stir everything together. Bring the mixture to a boil. Then, reduce the heat to low. Cover the pot and let it simmer for 10-12 minutes. Stir occasionally to keep the pasta from sticking. Once the pasta is tender, take it off the heat. Stir in the shredded cheddar cheese until it melts and gets creamy. Season with salt and pepper to taste. Finally, serve hot and garnish with fresh cilantro for color and flavor. To make sure your pasta turns out great, follow these tips: - Use enough liquid. The pasta needs it to cook well. - Stir often during simmering. This helps prevent sticking. - Check for doneness. Pasta should be tender but not mushy. These simple steps will help you make the best One Pot Taco Pasta every time! Cooking in one pot saves time and energy. Start by prepping all your ingredients first. This way, you can add them in the right order. Use a large pot to give everything room to cook. Heat the olive oil well before adding your onion and pepper. This helps them soften quickly. Stir often to keep food from sticking to the bottom. If you see any bits stuck, give it a good scrape with your spatula. This adds extra flavor to your dish. Ensure you cover the pot after adding liquids. It traps heat and cooks the pasta evenly. To adjust the seasoning, taste as you cook. Start with the taco seasoning and add more if needed. If you want it spicier, add a pinch of cayenne pepper or chopped jalapeños. For a milder taste, reduce the seasoning or skip it. You can also add a dollop of sour cream or a splash of lime juice. These add flavor without heat. Remember, every ingredient has its own flavor. Black beans and corn add sweetness, while tomatoes add acidity. Balancing these flavors is key to a tasty dish. One common mistake is overcooking the pasta. Follow the cooking time closely. Stir often to prevent it from sticking. Another mistake is not seasoning enough. Taste as you go to find the right balance. Don’t forget to use enough liquid. If it looks dry, add a little more broth or water. Finally, avoid adding cheese too early. Stir it in after cooking for a creamy texture. These tips will help you make a perfect one pot taco pasta that everyone will love. Pro Tips Customize Your Protein: Feel free to swap out ground turkey or beef for ground chicken, pork, or even plant-based meat alternatives for a healthier or vegetarian version. Boost the Flavor: Adding a splash of lime juice or a few chopped jalapeños can enhance the flavor profile and add a delightful kick to the dish. Cheese Variations: Experiment with different types of cheese, such as pepper jack for a spicy twist or mozzarella for a milder flavor, to suit your taste preferences. One-Pot Cooking Tip: To prevent pasta from sticking, stir the mixture occasionally while it simmers, and ensure there's enough liquid for the pasta to absorb. {{image_2}} You can easily make this dish vegetarian or vegan. Instead of meat, use mushrooms or lentils. Both options add great texture and flavor. Use vegetable broth instead of chicken broth for a vegan base. You can also add more beans, like kidney beans or chickpeas, for extra protein. Swap out the cheese for a vegan alternative or skip it entirely for a lighter meal. If you want to cater to different diets, swap out a few ingredients. For gluten-free pasta, use rice or quinoa pasta. Instead of corn, use diced zucchini or chopped spinach for a veggie boost. If you're watching your sodium, choose low-sodium broth and canned tomatoes. You can also use fresh herbs like parsley instead of cilantro if you prefer a different flavor. Feel free to get creative with this recipe! Add some diced jalapeños for spice or mix in chopped olives for a briny kick. You can change the taco seasoning to other spices, like cumin or smoked paprika, for a different taste. Try topping with crushed tortilla chips for crunch or serve with avocado slices for creaminess. The options are endless, so experiment and find your favorite twist! To store your One Pot Taco Pasta, allow it to cool first. Then, transfer it to an airtight container. This helps keep the flavors fresh. Use a container that fits the amount you have left. You can store it in the fridge for up to three days. Make sure to label it with the date. You can freeze One Pot Taco Pasta too. First, cool it down completely. Then, divide it into portions. Place each portion in a freezer-safe bag or container. Remove as much air as you can. This will help prevent freezer burn. You can keep it in the freezer for up to three months. When you are ready to eat, just thaw it in the fridge overnight. When reheating, use a pot or microwave. If using the stove, add a splash of water or broth to keep it moist. Heat it slowly over low to medium heat, stirring often. If using a microwave, cover the dish and heat in short bursts. Stir in between to heat evenly. Enjoy your delicious One Pot Taco Pasta just like the first time! Yes, you can make One Pot Taco Pasta ahead of time. Just cook the dish as usual and let it cool. Store it in an airtight container in the fridge. It will stay fresh for up to three days. When you are ready to eat, simply reheat it on the stove or in the microwave until warm. The flavors will blend even more over time, making it taste great. You can serve One Pot Taco Pasta with many sides. A simple green salad adds freshness. You can also pair it with tortilla chips for a crunchy bite. If you like, add some guacamole or sour cream on the side for extra flavor. A cold drink, like lemonade or iced tea, fits well with this meal too. To make One Pot Taco Pasta less spicy, you can reduce the taco seasoning. Use only half of what the recipe calls for. You can also choose a mild taco seasoning mix. Adding more cheese will help cool the heat too. Throw in a dollop of sour cream or yogurt when serving. These options help balance the spice and keep the dish tasty. One Pot Taco Pasta is simple and fun to make. We explored the key ingredients, cooking steps, and various tips to enhance your dish. You can customize it to fit your tastes, whether you prefer it vegetarian or spicy. Remember to store leftovers correctly and reheat them gently to enjoy every bite later. With these insights, you'll whip up a tasty meal that pleases everyone at the table. Dive in and get cooking!

One Pot Taco Pasta Quick and Flavorful Dinner Dish

Looking for a quick dinner that’s bursting with flavor? One Pot Taco Pasta is your answer! In just one pot,

To make tasty steak tacos, gather these main items: - 1 lb flank steak - 1 tablespoon olive oil - 1 teaspoon garlic powder - 1 teaspoon ground cumin - Salt and pepper to taste - 8 small corn tortillas The flank steak provides rich flavor and tenderness. The olive oil helps with marinating, while garlic powder and cumin add depth. Salt and pepper are essential for taste. Corn tortillas are the perfect vessel for your steak. Chimichurri sauce is key to these tacos. You will need: - 1 cup fresh cilantro, chopped - 1/2 cup fresh parsley, chopped - 2 cloves garlic, minced - 1/4 cup red wine vinegar (or lime juice) - 1/2 teaspoon red pepper flakes - 1/2 cup olive oil Cilantro and parsley give the sauce a fresh taste. Garlic adds a nice kick, while red wine vinegar brings acidity. Red pepper flakes add a hint of spice. Olive oil binds everything together and enriches the flavor. Garnishes elevate your tacos. Consider these options: - 1 avocado, sliced - Lime wedges for serving Sliced avocado adds creaminess to each bite. Lime wedges bring a burst of freshness. You can mix and match these to suit your taste. Enjoy your steak tacos with chimichurri! {{ingredient_image_1}} To start, gather your ingredients. In a bowl, mix 1 tablespoon of olive oil, 1 teaspoon of garlic powder, 1 teaspoon of ground cumin, salt, and pepper. Rub this mixture all over 1 pound of flank steak. This step is key for flavor. Let the steak marinate for at least 30 minutes. If you have time, marinate it for up to 2 hours in the fridge. This will make the steak even tastier. Now, let's make the chimichurri. In a mixing bowl, combine 1 cup of chopped fresh cilantro, 1/2 cup of chopped fresh parsley, and 2 minced garlic cloves. Add 1/4 cup of red wine vinegar. If you prefer, you can use lime juice instead. Then, stir in 1/2 teaspoon of red pepper flakes and 1/2 cup of olive oil. Mix well. Add salt and pepper to taste. Let it sit for a bit. This lets the flavors blend nicely. Next, it's time to cook the steak. Preheat your grill or skillet over medium-high heat. Sear the marinated flank steak for 5-7 minutes on each side. For medium-rare, that is perfect. If you like it more cooked, keep it on longer. After cooking, remove the steak from heat and let it rest for 5 minutes. During this time, warm the 8 small corn tortillas on the grill or in a skillet for about 30 seconds on each side. This makes them soft and easy to fold. Now, we can assemble the tacos! First, slice the rested steak thinly against the grain. This helps keep it tender. Take each warmed tortilla and layer on slices of the grilled steak. Add a generous spoonful of chimichurri on top. Finish by adding a couple of slices of avocado. For a fresh kick, squeeze lime juice over the tacos before serving. Enjoy your savory steak tacos with chimichurri! Flank steak needs high heat to cook well. I love grilling or using a cast iron skillet. These methods give the steak a nice sear. Preheat your grill or skillet to medium-high heat. Sear the steak for 5-7 minutes on each side. This timing works well for medium-rare. If you prefer more doneness, cook it a bit longer. Always let the steak rest for at least 5 minutes before slicing. This helps keep it juicy. To make chimichurri pop, use fresh ingredients. Fresh cilantro and parsley are key. I like to chop them finely for better flavor. Add minced garlic for a nice kick. Red wine vinegar gives it a tangy taste. If you want a twist, try lime juice instead. Don’t forget red pepper flakes for heat. Mix everything well and let it sit for 10 minutes. This waiting time lets the flavors blend beautifully. When serving steak tacos, I suggest using warm corn tortillas. They add a nice texture. Top each taco with chimichurri and avocado slices. The creamy avocado balances the flavors. You can also serve lime wedges on the side. A squeeze of lime brightens the tacos. For drinks, I recommend a cold beer or a fresh margarita. These pair well with the flavors in the tacos. Enjoy your meal! Pro Tips Rest the Steak: Allow the cooked steak to rest for at least 5 minutes before slicing. This helps retain the juices and ensures a more tender bite. Use Fresh Herbs: For the chimichurri, using fresh herbs instead of dried will enhance the flavor and brightness of the sauce. Adjust the Spice: If you prefer a milder chimichurri, reduce or omit the red pepper flakes. Conversely, add more for an extra kick! Warm Tortillas: Warming the tortillas before filling them makes them more pliable and enhances their flavor, making for a better taco experience. {{image_2}} You can swap flank steak for other meats. Here are a few great options: - Chicken: Use grilled chicken thighs for a juicy bite. - Pork: Carnitas made from slow-cooked pork make great tacos. - Shrimp: Sauté shrimp with spices for a quick and tasty taco. - Tofu: Marinate firm tofu for a plant-based option. Each protein brings its own flavor and texture. Experiment to find your favorite! Chimichurri is versatile. You can try these variations: - Green Chimichurri: Use more parsley and add mint for a fresh taste. - Spicy Chimichurri: Add more red pepper flakes or fresh chili peppers. - Lemon Chimichurri: Substitute lime juice with lemon juice for a different zing. - Smoky Chimichurri: Add smoked paprika to give a unique flavor. Feel free to mix and match ingredients to create your perfect sauce! Tacos are fun to customize. Here are some tasty toppings you can add: - Sour Cream: A dollop adds creaminess. - Pico de Gallo: Fresh salsa adds crunch and brightness. - Pickled Red Onions: They add tang and color. - Cheese: Crumbled queso fresco or shredded cheese enhances flavor. - Jalapeños: For those who like a little heat, sliced jalapeños are perfect. Add your favorite toppings to make your steak tacos truly your own! If you have leftover steak tacos, store them properly. Place each taco in an airtight container. If you can, keep the chimichurri sauce separate. This helps keep the tortillas from getting soggy. Store the container in the fridge. Leftover tacos can last up to two days. Chimichurri sauce stores well too. Pour it into a clean jar or container. Make sure the lid seals tight. You can keep chimichurri in the fridge for up to one week. If you want to store it longer, freeze it. Just put it in ice cube trays. Once frozen, transfer the cubes to a zip-top bag. This way, you can use small amounts later. Reheating your tacos is simple. If you stored them in a container, take them out. You can warm them in a skillet over low heat. Cover it with a lid to keep them moist. For chimichurri, just give it a quick stir after thawing. If it needs more flavor, add a little salt or fresh herbs. Enjoy your delicious tacos again! Flank steak is my top choice for tacos. It cooks fast and has great flavor. It stays tender when you slice it against the grain. Other good options are skirt steak or sirloin. They also add rich taste to your tacos. Yes, you can make chimichurri ahead of time. It actually tastes better if you let it sit. Store it in the fridge for up to a week. Just remember to stir it before serving. The flavors blend well over time. To make gluten-free steak tacos, use corn tortillas. They are naturally gluten-free and perfect for tacos. Always check the label to ensure there are no hidden gluten ingredients. You can still enjoy the same great taste without the gluten. If you need a substitute for red wine vinegar, lime juice works well. It adds a nice tangy flavor. Apple cider vinegar is another good option. Both will keep your chimichurri fresh and zesty. In this article, we covered how to make delicious steak tacos. We discussed key ingredients like flank steak and chimichurri sauce. I provided step-by-step instructions to marinate and cook your steak perfectly. You learned tips for enhancing flavor and storing leftovers. Lastly, we explored tasty variations and addressed common questions. Making steak tacos is fun, and they can fit any taste. Enjoy your cooking adventure!

Savory Steak Tacos with Chimichurri Recipe

If you’re craving a bold and tasty dish, look no further than these savory steak tacos with chimichurri. This recipe

Older posts
Newer posts
← Previous Page1 … Page141 Page142 Page143 Page144 Next →

dsad

© 2025 So Yum Recipes • Built with GeneratePress

Our Policies

  • Copyright Policy
  • Cookie Policy
  • GDPR Policy
  • Privacy Policy
  • Disclaimer
  • Terms Of Use

More Information

  • Home
  • About
  • Contact
  • Appetizers
  • Dessert
  • Dinner
  • Drinks
©2025, So Yum Recipes About Back To Top