Skip to content
DisclaimerTerms Of UseGDPR PolicyCookie Policy

So Yum Recipes

  • Home
  • Drinks
  • Appetizers
  • Dinner
  • Dessert
  • About
  • Contact
  • Privacy Policy
DisclaimerTerms Of UseGDPR PolicyCookie Policy

Chloe

- 1 lb sirloin steak, cut into bite-sized pieces - 4 tablespoons unsalted butter - 4 cloves garlic, minced - 1 tablespoon fresh rosemary, chopped or 1 teaspoon dried - Salt and pepper to taste - 1 teaspoon smoked paprika - 1 tablespoon olive oil - Fresh parsley, chopped, for garnish When making garlic butter steak bites, you need high-quality ingredients. The sirloin steak shines as the main ingredient. Cut it into bite-sized pieces, and it cooks fast. Use unsalted butter for rich flavor and control over salt. Minced garlic adds a punch, while fresh rosemary brings a warm, earthy taste. For seasonings, salt and pepper are essential. Smoked paprika adds a nice depth, giving the dish a slight smokiness. Olive oil helps in searing the steak, so don’t skip it. Finally, fresh parsley brightens the dish and adds color. Gather these ingredients before starting. This way, you’ll have a smooth cooking experience. Enjoy the rich, buttery flavor, and savor each bite. {{ingredient_image_1}} To start, we need to season the steak. Take your 1 lb sirloin steak and cut it into bite-sized pieces. Sprinkle salt, pepper, and 1 teaspoon smoked paprika all over the steak. Make sure to coat every piece well. This step adds great flavor. Next, let the seasoned steak sit at room temperature for about 15 minutes. This helps the meat cook evenly. You want it to be at a good temp before it hits the hot pan. Now, let’s heat the skillet. In a large skillet, pour in 1 tablespoon of olive oil. Turn the heat to medium-high. Wait until the oil shimmers. This means it’s ready for the steak. Carefully add the seasoned steak bites to the skillet in a single layer. It’s important not to crowd the pan. If you add too many pieces at once, they will steam instead of sear. Let them cook for about 3-4 minutes without stirring. You want to see a nice brown crust form. Once that’s done, flip the steak bites over. Cook for another 2-3 minutes for medium-rare. If you like it more cooked, leave them a bit longer. Once done, remove the steak from the skillet and set it aside on a plate. Now for the best part: the garlic butter sauce. In the same skillet, lower the heat to medium. Add 4 tablespoons of unsalted butter. Let it melt slowly. When the butter is melted, add 4 minced garlic cloves and 1 tablespoon of chopped fresh rosemary. Sauté this mix for 1-2 minutes. You'll know it's ready when the garlic smells amazing. Just be careful not to burn it; burnt garlic is not tasty. Finally, return the steak bites to the skillet. Toss them in the garlic butter sauce until they are well coated. Cook for another minute to heat them through. Now, your garlic butter steak bites are ready to serve! To get that nice brown crust, start with a hot pan. Heat the olive oil until it shimmers. This helps the steak bites sear well. Do not overcrowd the pan. If you add too many pieces, they will steam instead of sear. Cook in batches if needed. This gives each bite the chance to get that perfect crust. Use a meat thermometer for the best results. Aim for 130°F for medium-rare. This keeps the steak juicy and tender. If you prefer well-done steak, cook it to 160°F. But be careful; it can dry out. I usually lean toward medium-rare for the best flavor and texture. You can play with extra seasonings. Try adding garlic powder or onion powder for more depth. Feel free to swap out herbs. Fresh thyme or oregano work well too. They add a unique twist to the garlic butter sauce. Pro Tips Let It Rest: After cooking, allow the steak bites to rest for a few minutes. This helps the juices redistribute, ensuring a more flavorful bite. Use High Heat: Searing the steak at a high temperature enhances the Maillard reaction, giving you a deliciously browned crust. Make sure your pan is hot enough before adding the meat. Fresh Herbs Matter: Opt for fresh rosemary if possible, as it provides a vibrant flavor that dried herbs cannot replicate. Add it towards the end of cooking to retain its aroma. Pair with Sides: These garlic butter steak bites pair wonderfully with sides like mashed potatoes or a fresh salad. Consider balancing the richness with a light dish. {{image_2}} You can use various cuts for steak bites. While sirloin is great, try ribeye for more fat and flavor. Tenderloin works too; it's lean and melts in your mouth. Just remember, cooking times will change based on the cut. - Ribeye: Sear for 3-4 minutes, then 2-3 minutes more. - Tenderloin: Cook for about 2-3 minutes each side for a nice medium-rare. Spice up your garlic butter steak bites with fun flavors. Adding mushrooms or bell peppers gives a nice texture and taste. Slice them thin and toss them in the pan after the steak bites. You can also mix in fresh herbs like thyme or parsley. They add a fresh touch that really brightens the dish. If you need gluten-free options, this recipe is already a winner! The ingredients do not contain gluten. For low-carb eaters, skip the butter or use ghee. You can serve it over veggies instead of rice or bread. Zucchini noodles or cauliflower rice work great! To store garlic butter steak bites, let them cool first. Place them in an airtight container. This keeps them fresh. The steak bites last in the fridge for 3 to 4 days. You can enjoy them later without losing flavor. You can freeze steak bites for longer storage. Place cooled bites in a freezer-safe bag. Remove as much air as you can. They last up to 3 months in the freezer. When you’re ready to eat, thaw them in the fridge overnight. For reheating, use a skillet over medium heat. Add a little butter or oil to keep them moist. Heat for about 5-7 minutes until warm. Garlic butter steak bites are versatile. You can use them in salads, tacos, or rice bowls. They add great flavor to any meal. Pair these bites with sides like roasted veggies or mashed potatoes. A fresh salad also works well. Enjoy a complete meal that is easy to make and delicious! Yes, you can use other cuts of steak for this recipe. Here are some great options: - Ribeye: Tender and rich in flavor. - Filet Mignon: Very tender and has a mild taste. - Flank Steak: Lean and flavorful, just slice it thin. - Skirt Steak: Great for a chewy texture and bold flavor. Each cut gives a different taste and texture, so feel free to experiment. To check if your steak bites are done, use these tips: - For medium-rare, the center should feel warm and soft. - A meat thermometer can help. Aim for 130°F (54°C). - If you prefer medium, aim for 140°F (60°C). Remember, cooking time varies, so check often to avoid overcooking. Garlic butter steak bites pair well with many sides. Here are some delicious options: - Mashed potatoes: Creamy and comforting. - Steamed broccoli: Adds a nice crunch. - Rice: Fluffy rice soaks up the sauce well. - Salad: A fresh salad brings balance to the meal. Feel free to mix and match these sides for a tasty dinner! This blog post covered how to make delicious garlic butter steak bites. You learned about the key ingredients, steps to cook them, and tips to enhance flavor. Remember, the right cuts and doneness are vital for great results. Feel free to explore variations and dietary options. With a few simple steps, you can create a tasty meal. Enjoy your cooking and impress your family with this easy dish. Your culinary skills are sure to grow with practice!

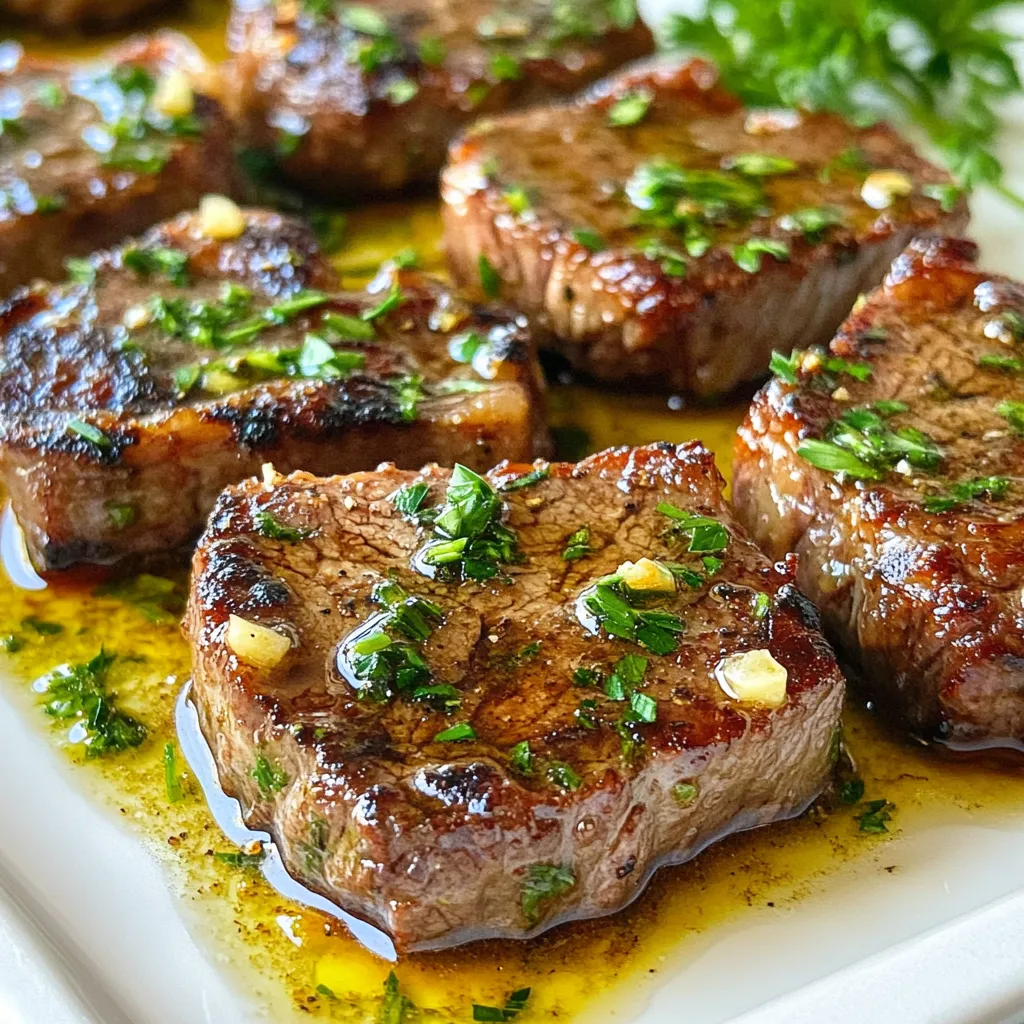
Garlic Butter Steak Bites Flavorful and Simple Recipe

If you crave a quick and tasty dinner, I’ve got just the dish for you: Garlic Butter Steak Bites. This

- 1 cup rolled oats - 1/2 cup creamy peanut butter - 1/2 cup unsweetened cocoa powder - 1/2 cup honey or maple syrup - 1/4 cup melted coconut oil - 1 teaspoon vanilla extract - 1/4 teaspoon salt - 1/2 cup dark chocolate chips - Optional: 1/4 cup shredded coconut To start, you need rolled oats. They give the cookies a nice texture. Then, creamy peanut butter adds a rich and nutty flavor. Unsweetened cocoa powder is key for that deep chocolate taste. Honey or maple syrup acts as a sweetener. You can choose either based on your taste. Next, melted coconut oil helps bind the cookies and adds healthy fats. You also need vanilla extract for a hint of warmth. A little salt balances the sweetness and enhances the other flavors. Dark chocolate chips add that extra chocolatey goodness. If you like, add shredded coconut for a fun texture. Gather these ingredients, and you’re ready to make a simple, tasty treat! {{ingredient_image_1}} First, grab a medium-sized bowl. Add 1 cup of rolled oats, 1/2 cup of unsweetened cocoa powder, and 1/4 teaspoon of salt. Stir them well. This helps spread the cocoa and salt evenly. Mix until you see no clumps. This step sets the base for your cookies. Next, take a separate microwave-safe bowl. Add 1/2 cup of creamy peanut butter, 1/2 cup of honey or maple syrup, and 1/4 cup of melted coconut oil. Heat this in the microwave for 30 seconds. Check it to see if it's warm. Stir it until everything blends together nicely. Then, add 1 teaspoon of vanilla extract to this mixture. Mix again until smooth. Now, pour your wet mix over the dry ingredients. Stir them together well. You want every oat to be coated. If you like chocolate, fold in 1/2 cup of dark chocolate chips and 1/4 cup of shredded coconut, if using. Grab a baking sheet and line it with parchment paper. Using a tablespoon or cookie scoop, drop spoonfuls of the mix onto the sheet. Press them down a bit to flatten. Finally, put your baking sheet in the fridge. Let the cookies chill for 30 minutes to an hour. This helps them firm up and become chewy. When they are set, take them out and enjoy your no-bake treats! To get the right texture, use rolled oats. They provide a nice chew. When mixing, ensure all oats are coated well. If you want a firmer cookie, add more cocoa powder. For a softer bite, use less cocoa. Chilling is key! Let the cookies rest in the fridge for at least 30 minutes. This helps them set and firm up nicely. You can adjust the recipe for different diets. If you need a nut-free option, use sunflower seed butter instead of peanut butter. To make it vegan, replace honey with maple syrup. For gluten-sensitive diets, rolled oats are usually safe. Always check labels to confirm they are gluten-free. If you want a lower-sugar treat, reduce the honey or syrup. You can also try sweetened cocoa powder for a twist. Presentation matters, even for no-bake cookies! Arrange the cookies on a fun plate. Add a sprinkle of dark chocolate chips or shredded coconut around them. This makes the dish look lively. You can stack them high for a more impressive display. Use colorful napkins to make the treats pop. Your friends and family will love how they look! Pro Tips Use Natural Sweeteners: Opt for honey or maple syrup depending on your preference; they add a unique flavor and moisture to the cookies. Chill for Better Texture: Allowing the cookies to chill in the refrigerator not only firms them up but also enhances the flavors as they meld together. Experiment with Mix-ins: Feel free to add nuts, seeds, or dried fruits to customize your cookies according to your taste and nutritional needs. Storage Tips: Store the cookies in an airtight container in the fridge for up to a week for optimal freshness. {{image_2}} You can add nuts or seeds for a crunchy twist. Try chopped almonds, walnuts, or pecans. Seeds like chia or flaxseed work well too. This boosts the nutrition and flavor. Simply mix in 1/4 cup of your choice when combining the dry ingredients. You can even toast the nuts for extra taste. Switching sweeteners can change your cookie's taste. Honey and maple syrup are great options. You can also try agave syrup or brown rice syrup. Each sweetener gives a different flavor. Just keep the amount the same as in the recipe. This way, your cookies stay sweet and tasty. Add unique flavors to make your cookies special. For a minty taste, mix in 1/2 teaspoon of mint extract. Almond extract is another fun choice. Just use 1/2 teaspoon for a nice almond flavor. You can also add a bit of espresso powder for a coffee kick. These twists make your no-bake cookies exciting and delicious! I love making no-bake chocolate oatmeal cookies. They are quick and easy. To keep them fresh, store them in an airtight container. This keeps moisture out and flavor in. You can stack the cookies with parchment paper between them. This way, they won't stick together. If you want to save some for later, freezing works great! Place the cookies in a single layer on a baking sheet. Freeze them for about an hour until firm. Then, move them to a freezer-safe bag or container. They can last up to three months in the freezer. To enjoy, just thaw them in the fridge overnight. To keep your no-bake cookies fresh, avoid heat and sunlight. Store them in a cool, dark place. If you live in a humid area, refrigeration helps. Just remember to use an airtight container. This ensures your cookies stay tasty and chewy for days. No-bake cookies can last about one week. Store them in an airtight container. Keep them in the fridge for best freshness. If they are left out, they may get too soft. Yes, you can use sun butter or soy nut butter. These are great nut-free options. They will give a similar taste and texture to the cookies. To make these cookies vegan, use maple syrup instead of honey. Replace creamy peanut butter with a vegan nut butter. Ensure your chocolate chips are dairy-free. Cookies can be too soft if the mixture is too wet. Make sure to measure the ingredients carefully. Chilling them longer can also help them firm up. This blog post covered how to make delicious no-bake cookies. I shared the key ingredients like oats, peanut butter, and cocoa powder. You learned step-by-step how to mix and chill the dough. Tips on texture and serving gave you extra tricks for success. I also shared variations and storage tips for you. Try these cookies for a sweet treat that fits your needs. Enjoy creating your own favorite flavors!

No-Bake Chocolate Oatmeal Cookies Simple Treat

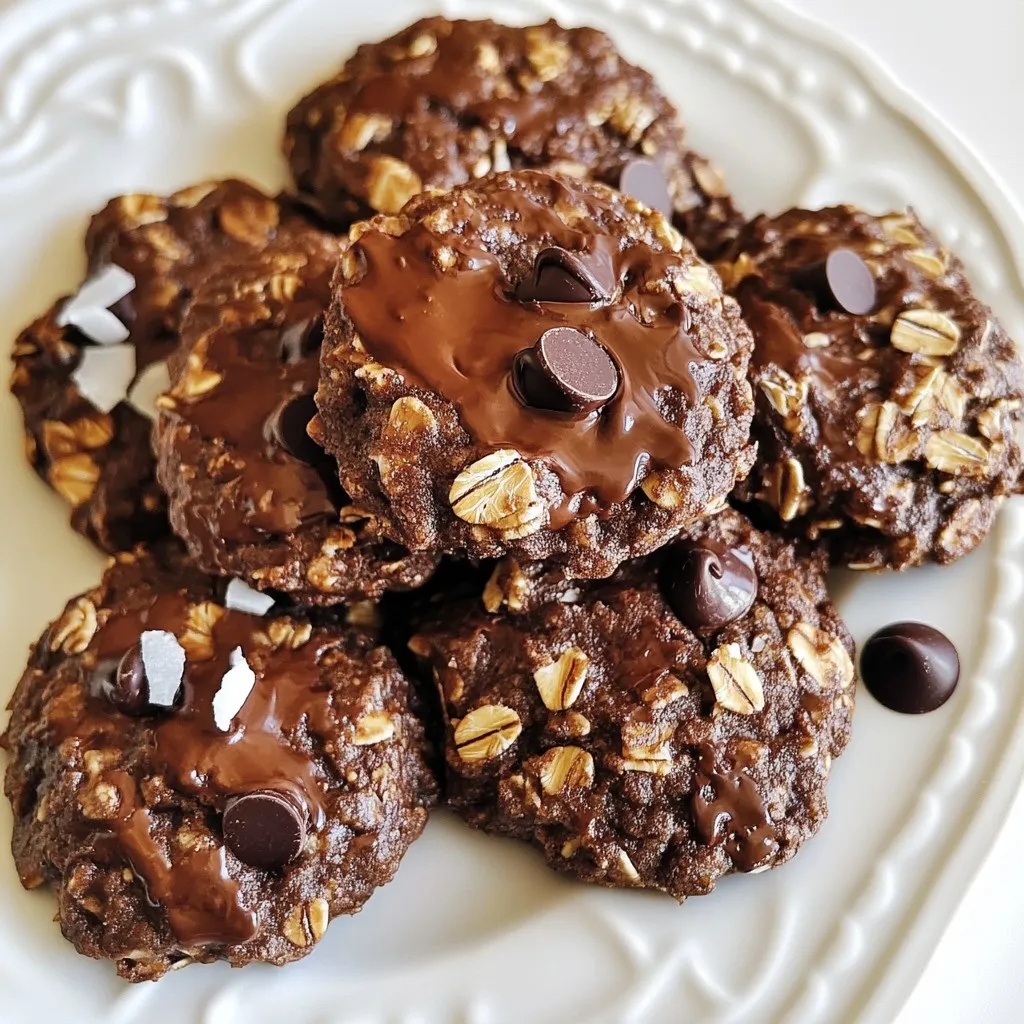
If you love cookies but hate the oven, you’re in the right place! No-Bake Chocolate Oatmeal Cookies are quick, easy,

To make Matcha White Chocolate Blondies, you need these simple ingredients: - 1 ½ cups all-purpose flour - 1 teaspoon baking powder - ½ teaspoon salt - ½ cup unsalted butter, melted - 1 cup brown sugar, packed - ¼ cup granulated sugar - 2 large eggs - 1 teaspoon vanilla extract - 2 tablespoons matcha powder - 1 cup white chocolate chips Each item plays a key role in the final taste and texture. All-purpose flour gives the blondies structure. You want this to be light and fluffy. Baking powder helps them rise for a soft bite. A little salt balances the sweetness and brings out the flavors. Unsalted butter adds richness. It makes the blondies moist and flavorful. Brown sugar gives a deep caramel taste, while granulated sugar adds sweetness. Together, they create a nice balance. The eggs give the blondies their rich texture and help bind everything. The vanilla extract adds depth to the flavor. The star of the show is the matcha powder, which gives a stunning green color and earthy taste. Lastly, white chocolate chips melt into gooey pockets of sweetness. Gather these ingredients before you start. With these elements, you’re on your way to creating a delicious batch of Matcha White Chocolate Blondies! {{ingredient_image_1}} 1. Preheat your oven to 350°F (175°C). Line an 8x8 inch baking dish with parchment paper. Leave some overhang for easy removal later. 2. In a medium bowl, whisk together the following dry ingredients: - 1 ½ cups all-purpose flour - 1 teaspoon baking powder - ½ teaspoon salt - 2 tablespoons matcha powder Make sure they blend well. Set this bowl aside. 3. In a large mixing bowl, combine these wet ingredients: - ½ cup unsalted butter, melted - 1 cup brown sugar, packed - ¼ cup granulated sugar Whisk them together until smooth and creamy. 4. Add in 2 large eggs, one at a time. Mix well after each egg. Then, add 1 teaspoon of vanilla extract. Keep whisking until the mixture looks glossy. 1. Gradually fold the dry mixture into the wet mixture. Use a spatula or wooden spoon. Mix until just combined. Be careful not to overmix. 2. Gently fold in 1 cup of white chocolate chips. Make sure they spread evenly in the batter. 3. Pour the batter into the prepared baking dish. Smooth the top with a spatula. 4. Bake in the oven for 25-30 minutes. Check for doneness by inserting a toothpick. It should come out clean or with a few moist crumbs, not wet batter. 5. Let the blondies cool in the pan for about 10 minutes. Lift them out using the parchment overhang. Transfer them to a wire rack to cool completely. 6. Once cooled, cut into squares and enjoy your matcha white chocolate blondies! To get the right texture in your Matcha White Chocolate Blondies, avoid overmixing. When you mix the dry and wet ingredients, do it gently. Stir until you see no dry flour. If you mix too much, your blondies may turn out dense and tough. When folding in the ingredients, use a spatula. This helps keep the batter light and airy. Start from the bottom and fold upwards. Do this until the white chocolate chips are evenly mixed. You can add fun flavors to your blondies. Consider mixing in nuts like walnuts or pecans for a crunchy twist. Dried fruit, such as cranberries, can also add a sweet bite. For serving, these blondies pair well with a scoop of vanilla ice cream. You can also serve them with fresh berries for a fruity touch. A light drizzle of chocolate sauce adds extra sweetness, too! Pro Tips Use Quality Matcha: Choose high-grade matcha for a vibrant color and richer flavor in your blondies. Don't Overmix: Mix the batter until just combined to ensure your blondies are soft and chewy, not dense. Check for Doneness: A toothpick should come out with a few moist crumbs for perfectly baked blondies. Let Cool Completely: Allowing the blondies to cool fully before cutting helps achieve cleaner edges and better texture. {{image_2}} You can switch up the chocolate in these blondies. Instead of white chocolate chips, try dark or milk chocolate. Each type brings its own taste. Dark chocolate adds a rich flavor, while milk chocolate makes it sweeter. If you need gluten-free options, use almond flour or coconut flour. These flours work well but change the taste a bit. Almond flour gives a nutty flavor, while coconut flour adds a hint of sweetness. Remember to adjust the amount of liquid in your recipe, as these flours absorb more moisture. Feel free to add nuts or fruits for extra flavor. Chopped walnuts or pecans can add a nice crunch. You can also use dried fruits like cranberries or cherries for a fruity twist. They pair well with matcha and add texture. If you want to try different sweeteners, replace granulated sugar with maple syrup or honey. These natural sweeteners can change the taste. Maple syrup adds a warm flavor, while honey gives a floral note. Adjust the amount of liquid in the recipe if you use these. Explore these variations to make matcha white chocolate blondies even more exciting! To keep your matcha white chocolate blondies fresh, use an airtight container. This helps prevent them from drying out. You can also wrap them in plastic wrap before placing them in the container. Store them at room temperature for up to three days. If you want them to last longer, keep them in the fridge for up to a week. Just remember, they may lose some of their soft texture in the fridge. If you want to save some blondies for later, freezing is a great option. Start by cutting the blondies into squares. Then, wrap each piece in plastic wrap tightly. Place the wrapped blondies in a freezer-safe bag or container. They can stay in the freezer for up to three months. When you're ready to enjoy them, remove a blondie from the freezer. Let it thaw in the fridge overnight for the best results. If you're in a hurry, you can also let it sit at room temperature for about an hour. Enjoy your sweet treat! Can I use different types of matcha? Yes, you can use various matcha types. Higher quality matcha gives a richer flavor. Ceremonial matcha works well, but culinary matcha is a good choice too. Both will give your blondies a nice color and taste. How do I know when the blondies are done baking? Check your blondies at 25 minutes. Insert a toothpick into the center. If it comes out clean or with a few moist crumbs, they are done! If it has wet batter, bake for a few more minutes. The edges should look set and slightly golden. What’s the best way to cut blondies? Wait until the blondies cool completely. Use a sharp knife for clean cuts. You can run the knife under hot water for easier slicing. Cut them into squares or rectangles based on your preference. Enjoy the perfect treats! You learned how to make tasty Matcha White Chocolate Blondies. First, gather all the ingredients and mix them well. Remember to fold gently and watch the baking time. Tips like adding nuts can boost flavor. Store or freeze your blondies to enjoy later. Keep these ideas in mind next time you bake. It's a fun treat that can fit your taste! Happy baking!

Matcha White Chocolate Blondies Irresistible Treat

Are you ready for a sweet treat that’s hard to resist? These Matcha White Chocolate Blondies combine rich flavors and

For the best Spaghetti Squash Au Gratin, gather these items: - 1 medium spaghetti squash - 1 cup heavy cream - 1 cup grated Gruyère cheese - 1/2 cup grated Parmesan cheese - 2 cloves garlic, minced - 1/2 teaspoon nutmeg - 1 tablespoon olive oil - Salt and pepper to taste - 1/2 cup breadcrumbs - Fresh parsley, chopped (for garnish) Using fresh and high-quality ingredients makes a big difference. Choose a firm spaghetti squash with a smooth skin. The cream should be rich and thick. I always prefer using Gruyère cheese for its great flavor. Freshly grated cheese melts better than pre-packaged options. Also, buy fresh garlic for a stronger taste. You can swap some ingredients if needed. For a lighter dish, use half-and-half instead of heavy cream. Any melty cheese works well. Try cheddar or mozzarella if you want a different flavor. If you need a dairy-free option, use coconut cream and a dairy-free cheese. You can skip the breadcrumbs for a lower-carb option. Just top with extra cheese instead. {{ingredient_image_1}} First, preheat your oven to 375°F (190°C). This step is key for even cooking. Next, take a medium spaghetti squash. Cut it in half lengthwise. Use a spoon to scoop out the seeds. Drizzle olive oil inside each half. Season with salt and pepper. Place the squash cut-side down on a baking sheet. Roast it in the oven for about 30-40 minutes. Check for tenderness; the flesh should pull into strands easily. While the squash roasts, grab a medium saucepan. Heat it on medium heat. Add minced garlic and sauté for about one minute until fragrant. Pour in one cup of heavy cream, stirring gently. Bring this mixture to a simmer. Add a pinch of nutmeg and season with salt and pepper. Reduce the heat and mix in one cup of grated Gruyère cheese. Stir until it melts. Then add half a cup of grated Parmesan cheese. Make sure everything blends well. Once the squash cools, use a fork to scrape the flesh into spaghetti-like strands. In a large mixing bowl, combine these strands with the creamy cheese mixture. Mix it all well. Transfer the combined mixture to a greased baking dish. Top with breadcrumbs and the rest of the Parmesan cheese. Bake in the oven for 20-25 minutes. Look for a golden, bubbling top. Once done, let it cool slightly. Garnish with chopped parsley before serving. Enjoy your scrumptious spaghetti squash au gratin! To roast spaghetti squash well, first, cut it in half. Use a sharp knife for safety. Scoop out the seeds with a spoon. Then, drizzle the inside with olive oil. Add salt and pepper for taste. Place the squash cut-side down on a baking sheet. Roast it at 375°F (190°C) for 30 to 40 minutes. You know it's done when you can easily pull the flesh into strands with a fork. You can change the flavor of your dish easily. Add more garlic for a stronger taste. A pinch of red pepper flakes gives a nice kick. Want a sweeter touch? Add a little maple syrup or honey. For a fresh taste, mix in some lemon juice. Always taste your mixture before baking. Adjust the seasonings to match your preference. To make this dish, you will need a few key tools. Here’s a list to help you prepare: - Sharp knife - Spoon for scooping seeds - Baking sheet - Medium saucepan - Mixing bowl - Fork for shredding squash - Greased baking dish These tools will help you create a delicious spaghetti squash au gratin with ease. Having the right equipment makes cooking more fun and less stressful. Pro Tips Choosing the Right Squash: Look for a spaghetti squash that feels heavy for its size with a firm skin, indicating freshness and good flavor. Enhancing Flavor: For an extra flavor kick, consider adding diced onion or a pinch of cayenne pepper to the cheese sauce. Breadcrumb Alternatives: If you prefer a gluten-free option, substitute regular breadcrumbs with crushed gluten-free crackers or almond flour. Serving Suggestions: This dish pairs beautifully with a simple green salad or roasted vegetables for a complete meal. {{image_2}} To make this dish vegetarian, simply keep the cheese. For a vegan version, swap the heavy cream with coconut cream or cashew cream. Use a plant-based cheese that melts well. Nutritional yeast can add a cheesy flavor too. You can also add in some cooked veggies like spinach or mushrooms for extra nutrients. These swaps keep the dish creamy and delicious. Cheese choices can change the taste of your dish. Instead of Gruyère, try cheddar or fontina for a sharper flavor. A mix of cream cheese and mozzarella gives a rich texture. If you want something tangy, goat cheese works great. Just remember to adjust the amount based on how strong you want the flavor. For a heartier meal, add protein to your au gratin. Cooked chicken or turkey can blend well. You can also use cooked sausage or bacon for a smoky flavor. If you prefer plant-based options, try adding lentils or chickpeas. They add protein without changing the creamy texture. Adjust your cooking time based on the protein you choose to ensure everything cooks through. To keep your Spaghetti Squash Au Gratin fresh, store it in an airtight container. I recommend letting it cool first. This helps avoid steam buildup. Place the leftovers in the fridge. Use them within three days for the best taste. When you’re ready to enjoy your leftovers, preheat your oven to 350°F (175°C). Transfer the dish to an oven-safe dish. Cover it with foil to keep moisture in. Heat for about 15-20 minutes. You can also use a microwave. Just heat in short bursts, checking often. If stored properly in the fridge, your Spaghetti Squash Au Gratin lasts up to three days. If you want to keep it longer, consider freezing it. In the freezer, it can last for about two months. Just make sure to label it with the date. Spaghetti Squash Au Gratin is a creamy, cheesy dish. It uses roasted spaghetti squash as a base. The squash gets mixed with heavy cream, Gruyère, and Parmesan cheese. Then, you top it with breadcrumbs for a crunchy finish. This dish is rich in flavor and texture. It's a great way to enjoy vegetables in a comforting style. Yes, you can make this dish ahead of time. Prepare the spaghetti squash and cheese mix. Then, store them in the fridge. When ready to bake, combine them and add breadcrumbs. Bake as you normally would. This method saves time on busy days. Just remember to adjust the baking time if the dish is cold from the fridge. You know the spaghetti squash is done when it is tender. When you poke it with a fork, it should feel soft. You can also pull the strands easily from the shell. This usually takes about 30-40 minutes in the oven at 375°F. If you see a little browning on the edges, that’s a good sign too! We covered how to make a delicious Spaghetti Squash Au Gratin. I shared the key ingredients, tips for quality, and substitution ideas. You learned step-by-step instructions for cooking and baking. I included useful tricks for perfect roasting and flavor adjustments. We also explored variations, storage, and reheating tips. This dish is easy to make and can fit many diets. Enjoy experimenting with flavors and alternatives to make it your own!

Irresistible Spaghetti Squash Au Gratin Recipe

Get ready to enjoy a twist on a classic with my Irresistible Spaghetti Squash Au Gratin recipe! This dish combines

- 1 pound ground turkey - 2 cups stale bread, cubed - 1 cup cranberries (fresh or dried) The main ingredients in cranberry turkey stuffing balls create a tasty base. Ground turkey gives them protein and a nice flavor. Stale bread adds texture and helps bind the mixture. Cranberries bring sweetness and a pop of color. You can use fresh or dried cranberries, depending on what you have. - 1/2 cup celery, finely chopped - 1/2 cup onion, finely chopped - 1/4 cup fresh parsley, chopped - 1 teaspoon dried thyme - 1 teaspoon sage - 1/2 tablespoon garlic powder Flavor enhancers make these stuffing balls exciting. Celery and onion bring a great aroma. Fresh parsley adds brightness. Thyme and sage give depth to the taste. Garlic powder adds a savory kick. Each ingredient works together to create a warm, inviting flavor profile. - 1 large egg, beaten - 1/4 cup chicken broth (or vegetable broth for a lighter flavor) - Salt and pepper to taste Binding agents hold the stuffing balls together. The egg helps bind everything while adding moisture. Chicken broth boosts flavor, but vegetable broth is a great choice for a lighter dish. Salt and pepper enhance all the tastes. Adjust these to suit your taste buds. {{ingredient_image_1}} 1. Preheat your oven to 375°F (190°C). Grab a baking sheet and line it with parchment paper. This helps keep the stuffing balls from sticking. 2. In a large skillet, add a splash of olive oil. Heat it over medium heat. Once hot, add the finely chopped onion and celery. Sauté them for about 5 minutes. You want them soft and clear, not brown. 1. In a big mixing bowl, combine the ground turkey with the sautéed onion and celery. 2. Next, add the cubed stale bread and cranberries. Toss in the chopped parsley, dried thyme, sage, garlic powder, salt, and pepper. 3. Pour in the beaten egg and chicken broth. Mix everything gently with your hands or a spatula. Be careful not to over-mix. You want a nice blend without a mushy mix. 1. With clean hands, form the mixture into small balls. Aim for about 1-2 inches in diameter. Place each ball on your prepared baking sheet. 2. Drizzle a bit of olive oil over the tops of the stuffing balls. This adds moisture and helps them crisp up while baking. 3. Bake in the preheated oven for 25-30 minutes. They should turn golden brown and be cooked through. 4. Once done, take them out and let them cool for a few minutes before serving. Enjoy these tasty bites! To make great stuffing balls, avoid over-mixing. Over-mixing can lead to tough balls. Mix just until everything is combined. The ideal size for stuffing balls is around 1-2 inches in diameter. This size helps them cook evenly and stay moist inside. You can add more flavor by using different herbs and spices. Consider adding rosemary or oregano for a fresh twist. You can also use different types of bread. Try sourdough or whole-grain bread for added texture and taste. For a beautiful presentation, serve the stuffing balls on a festive platter. Line the platter with fresh parsley for a pop of color. You can also pair them with homemade cranberry sauce. This adds a sweet and tart flavor that complements the stuffing perfectly. Pro Tips Use Fresh Ingredients: Opt for fresh cranberries if available, as they provide a brighter flavor compared to dried ones. Customize Your Herbs: Feel free to experiment with different herbs like rosemary or oregano to personalize the flavor profile. Keep Them Moist: If the mixture feels dry, add a bit more broth to ensure the stuffing balls stay moist during baking. Batch Cooking: Make a larger batch and freeze the uncooked balls. They can be baked directly from frozen, adding a few extra minutes to the cooking time. {{image_2}} You can easily change the main protein in this dish. Swap ground turkey for ground chicken. If you want a vegetarian option, use black beans or chickpeas. These swaps keep the flavor while adding variety. Also, feel free to use different dried fruits or nuts. Instead of cranberries, try raisins, apricots, or even chopped apples. For nuts, walnuts or pecans work great. These changes add new textures and tastes. Adding spices can kick up the flavor. Try cumin for a warm note or paprika for a smoky twist. These spices blend well with the other ingredients and make your stuffing balls unique. You can also experiment with different bread types. Use sourdough for a tangy flavor or whole grain for added health benefits. Each bread type brings its own character to the dish. If you need gluten-free options, use gluten-free bread. This keeps the recipe safe for those with gluten sensitivities. You can also find gluten-free breadcrumbs for a quick swap. For dairy-free modifications, skip the egg. You can use flaxseed meal mixed with water as a binder. This keeps the texture while making the dish dairy-free. Adjusting these ingredients ensures everyone can enjoy your cranberry turkey stuffing balls. To keep your cranberry turkey stuffing balls fresh, store them properly. Place the leftovers in an airtight container. This helps lock in flavors. You can chill them in the fridge for up to four days. Make sure they cool down before sealing. This prevents moisture build-up, which can cause sogginess. When it's time to enjoy leftovers, the best method is to use an oven. Preheat your oven to 350°F (175°C). Place the stuffing balls on a baking sheet. Heat them for about 10-15 minutes. This method helps maintain their crispy outside and soft inside. If you're in a hurry, you can use a microwave. Heat them in short bursts of 30 seconds, checking often to avoid drying out. Freezing cranberry turkey stuffing balls is easy. First, let them cool completely. Then, arrange them on a baking sheet. Freeze them for about an hour until firm. Once frozen, transfer them into a freezer bag or airtight container. They can stay good for up to three months. When you're ready to enjoy them, defrost in the fridge overnight. Reheat them in the oven to restore their texture. Yes, you can make these stuffing balls ahead of time! Here’s how: - Mix the ingredients: Follow the recipe up to the point of forming the balls. - Shape the balls: Form the mixture into balls, but do not bake them yet. - Storage: Place the uncooked balls on a baking sheet. Cover them with plastic wrap and store in the fridge for up to 24 hours. - Baking: When ready, bake them straight from the fridge. You might need to adjust the baking time slightly. These stuffing balls pair well with many sides: - Green beans: Lightly sautéed or steamed for a crisp texture. - Mashed potatoes: Creamy and buttery, they balance the savory stuffing. - Roasted vegetables: Carrots, Brussels sprouts, or squash add color and flavor. - Cranberry sauce: A sweet-tart sauce enhances the stuffing’s flavors. - Gravy: Pouring some gravy over the stuffing balls adds richness. Yes, you can use fresh herbs! Here are some pros and cons: - Pros: Fresh herbs add bright flavor and vibrant color. They may also have more aroma than dried herbs. - Cons: Fresh herbs have a shorter shelf life and may require more quantity. For example, use three times the amount of fresh herbs as dried. Overall, both options work well, so choose based on what you have on hand! In this article, we explored making tasty cranberry turkey stuffing balls. We covered ingredients like ground turkey, cranberries, and herbs for flavor. You learned step-by-step instructions for preparation, mixing, and baking. I shared tips to perfect the texture and flavor. Variations help you customize for dietary needs. Lastly, I provided storage tips to keep leftovers fresh. Now, you have the tools to create your own delicious stuffing. Enjoy experimenting with flavors and making this recipe your own.

Cranberry Turkey Stuffing Balls Tasty Holiday Treat

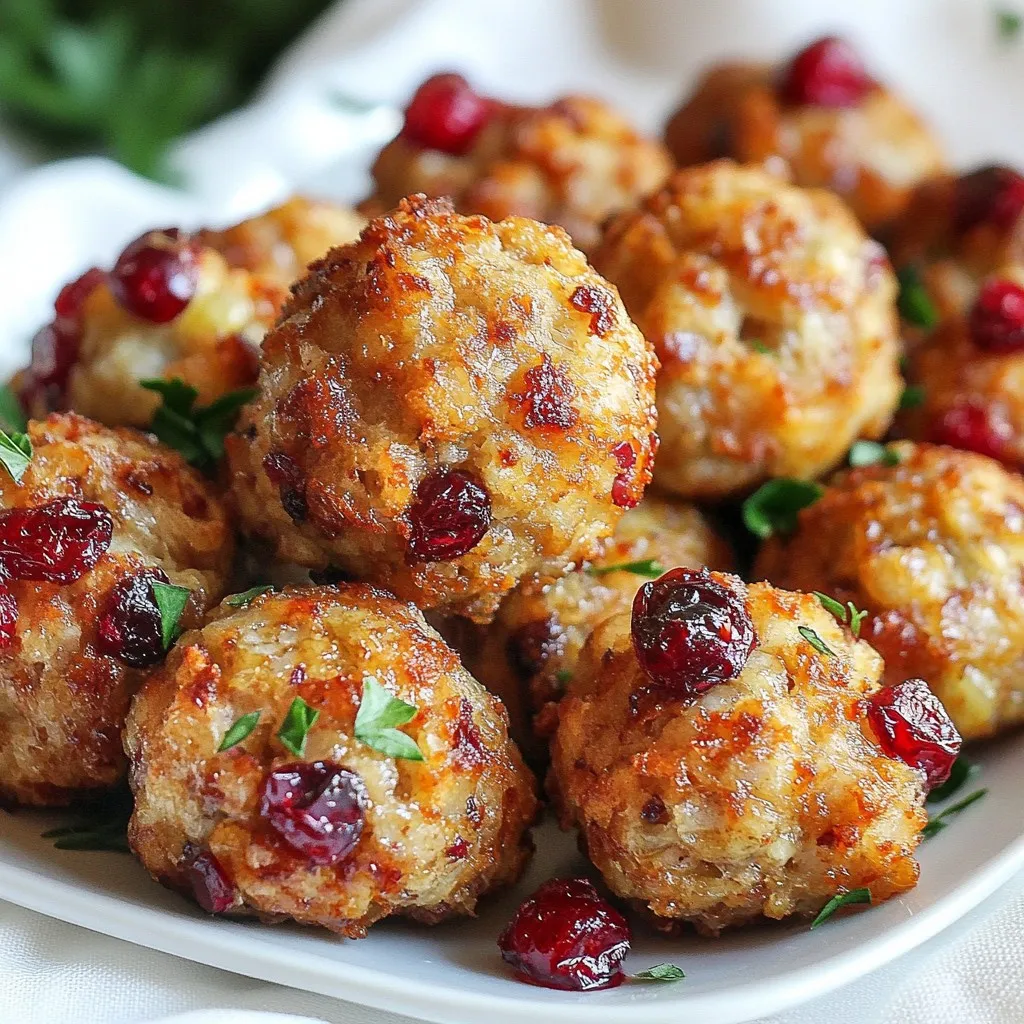
Get ready to elevate your holiday feast with my delicious Cranberry Turkey Stuffing Balls. These tasty treats combine ground turkey,

For the chicken, you need these items: - 1 lb chicken breast, thinly sliced - 2 tablespoons soy sauce - 1 tablespoon sesame oil Start by mixing the chicken with soy sauce and sesame oil. This marinade adds flavor and moisture. Let it sit for 15-20 minutes. This time lets the chicken soak up the sauce. For the fresh crunch, gather these veggies: - 1 cup shredded carrots - 1 cup red cabbage, finely shredded - 1/2 cucumber, julienned - 1/4 cup fresh cilantro, chopped These vegetables add color and texture. The carrots are sweet and crunchy. The cabbage gives a nice crunch. The cucumber adds freshness, while cilantro brings a burst of flavor. To make the peanut sauce, you need: - 1/2 cup crunchy peanut butter - 2 tablespoons honey - 2 tablespoons lime juice Whisk these ingredients together until smooth. If it’s too thick, add a bit of warm water. This sauce is creamy, sweet, and tangy. It’s the perfect topping for your wraps. {{ingredient_image_1}} Start by slicing the chicken breast thin. Place the chicken in a bowl. Add the soy sauce and sesame oil. Mix well so the chicken is fully coated. Let it marinate for 15 to 20 minutes. This step makes the chicken flavorful and juicy. While the chicken marinates, it’s time for the peanut sauce. In a separate bowl, combine the peanut butter, honey, and lime juice. Whisk until smooth. If it feels too thick, add a tablespoon of warm water. This will help achieve a nice, creamy texture. Heat a non-stick skillet over medium-high heat. Once hot, add the marinated chicken. Cook for 5 to 7 minutes. Stir occasionally. The chicken should turn golden brown and cook fully. Remove it from heat and set it aside. Now, it’s time to make the wraps. Lay out the large lettuce leaves on a clean surface. In the center of each leaf, add a portion of cooked chicken. Top it with shredded carrots, red cabbage, cucumber, and cilantro. Drizzle the peanut sauce generously over the fillings. Fold the sides of the lettuce leaves over the filling. Roll them up tightly. If needed, secure with toothpicks. Finally, garnish with chopped peanuts. Serve with extra peanut sauce and optional Sriracha on the side for some heat. To cook chicken perfectly, start with thin slices. This helps the chicken cook fast and even. Marinate it with soy sauce and sesame oil for flavor. Let it sit for 15-20 minutes. This time allows the chicken to soak up the flavors. Heat your skillet to medium-high. Cook the chicken for about 5-7 minutes. Stir it often to avoid burning. The chicken should be golden brown and fully cooked inside. Use a meat thermometer for safety. Ensure it reaches 165°F (75°C). Follow these steps for juicy and tasty chicken. To make your peanut sauce creamy, start with smooth peanut butter. If you use crunchy, it may not blend well. Mix the peanut butter with honey and lime juice. Whisk these together until smooth. If it’s too thick, add a spoon of warm water. This keeps the sauce pourable. Taste your sauce and adjust the lime juice or honey as needed. A dash of salt can enhance the flavor too. This creamy sauce will make your wraps shine. For wraps, I love using large lettuce leaves. Butter lettuce and romaine are my top choices. They are soft and easy to fold. You can also try collard greens or cabbage leaves. These greens add a nice crunch and flavor. Make sure to wash and dry the leaves well. This prevents sogginess. Choose leaves that are large enough to hold your fillings. These tips will help you enjoy your wraps to the fullest. Pro Tips Marinate for Flavor: Allow the chicken to marinate for at least 20 minutes to enhance its flavor. For even more depth, marinate it for a few hours in the refrigerator. Customize Your Veggies: Feel free to mix and match your favorite vegetables. Bell peppers, snap peas, or even avocado can add extra crunch and flavor. Peanut Sauce Consistency: If your peanut sauce is too thick, gradually add warm water to achieve your desired consistency. This will make it easier to drizzle over the wraps. Roll with Care: When rolling the wraps, be gentle but firm. Ensuring the fillings are snug will help prevent any spillage and make for easier eating. {{image_2}} You can swap chicken for other proteins. Try shrimp, tofu, or even pork. Each option brings a new taste. Shrimp cooks fast and adds a nice twist. Tofu is great for a vegetarian choice. It soaks up flavors well. Pork adds a rich, savory touch. Choose what you like best! Add seasonal vegetables for variety. Try bell peppers, snap peas, or radishes. Bell peppers add sweetness and crunch. Snap peas bring a fresh bite. Radishes add a peppery kick. You can mix and match veggies based on what’s fresh or in your fridge. This makes each wrap unique and colorful. Switch up the sauces for a new experience. Use hoisin sauce for a sweet touch. You can also try a spicy peanut sauce with extra sriracha. A sesame dressing adds a nice nutty flavor. Experiment with different sauces to find your favorite. The right sauce can change the whole wrap! I love making extra wraps for lunch later! To store your leftover wraps, first let them cool down. Then, wrap each one tightly in plastic wrap or place them in an airtight container. This keeps them fresh. Store the wraps in the fridge. They will last up to 2 days. If you notice the lettuce wilting, it’s best to eat them sooner. When you’re ready to eat your wraps, remove them from the fridge. If you want them warm, take off the plastic wrap. Microwave them for about 20-30 seconds. Check the middle to see if it's warm. If you like them crispy, you can heat them in a pan for a couple of minutes. Just be careful not to overheat, or the lettuce will get soggy. You can also freeze these wraps for later! First, follow the same steps to cool and wrap them. Use freezer-safe bags or containers, and make sure to remove as much air as possible. They will keep well for up to 3 months. When you’re ready to eat, thaw them in the fridge overnight. Then, you can reheat them as mentioned earlier. Enjoy your tasty meal anytime! Yes, you can easily make these wraps vegetarian. Instead of chicken, use tofu or tempeh. Both options absorb flavors well. Just marinate them like the chicken. Cook until golden and crispy. You can enjoy the same fresh veggies and peanut sauce with your vegetarian filling. To change the spice level, add or remove Sriracha sauce. If you want it milder, skip the Sriracha. You can also add less peanut sauce. For more heat, drizzle extra Sriracha on your wrap. Another option is to add red pepper flakes to the peanut sauce. If you are allergic to peanuts, try almond butter or sunflower seed butter. Both options work well in the sauce. Make sure to check labels for allergens. You can also skip the sauce and use a sesame dressing for flavor. Enjoy the wraps with fresh herbs for taste. Making flavorful chicken wraps is simple and fun. You learned about the key ingredients, like chicken, veggies, and creamy peanut sauce. I shared steps to marinate, cook, and assemble your wraps. With tips for perfect chicken and great greens, you'll impress anyone. Remember, you can mix proteins, swap veggies, or try new sauces. If you have leftovers, storing and reheating them is easy. Whatever your style, these wraps can fit your tastes and needs. Enjoy making them your own!

Asian Peanut Chicken Wraps Flavorful and Simple Meal

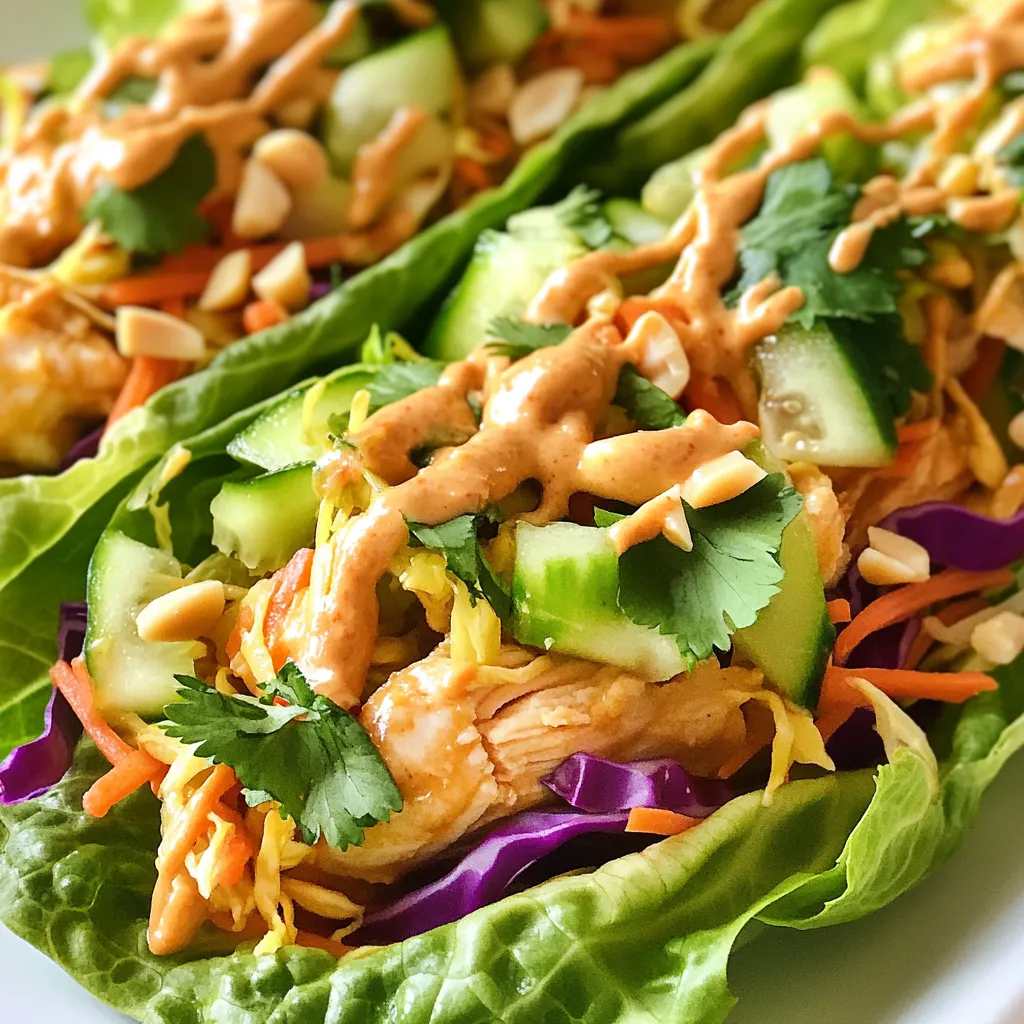
Craving a meal that’s both tasty and easy? You’re in the right place! My Asian Peanut Chicken Wraps are full

- 1 lb ground beef or ground turkey - 1 small onion, diced - 2 cloves garlic, minced - 1 packet taco seasoning (or 2 tablespoons homemade seasoning) - 1 cup diced tomatoes (canned or fresh) - 1 can (15 oz) black beans, rinsed and drained - 1 cup corn (fresh or frozen) The main ingredients form the base of our crustless taco pie. I love using ground beef for its rich flavor, but ground turkey works well too. Diced onion and garlic add depth and taste. Taco seasoning gives it that classic flavor we all love. Diced tomatoes, black beans, and corn provide texture and nutrition. This mix makes the filling hearty and satisfying. - 1 cup shredded cheddar cheese - 3 large eggs - 1 cup milk (or a non-dairy alternative) Dairy ingredients bring creaminess to the dish. Shredded cheddar cheese melts beautifully, adding a cheesy layer on top. The eggs and milk create a custard-like filling. This mixture binds everything together, making each slice easy to serve and full of flavor. - Fresh cilantro or parsley - Additional toppings (sour cream, avocado, etc.) Garnishes can elevate your crustless taco pie. Fresh herbs like cilantro or parsley add brightness. You can also add toppings like sour cream or avocado. These extra touches make each bite special and can cater to personal tastes. {{ingredient_image_1}} 1. Preheat your oven to 375°F (190°C). Grease a 9-inch pie pan with cooking spray or olive oil. This helps the pie come out easily. 2. In a large skillet, cook 1 pound of ground beef or turkey. Add 1 small diced onion. Cook over medium heat until the meat is browned and the onion is clear. This takes about 5-7 minutes. 3. Add 2 minced garlic cloves to the meat. Cook for another minute to bring out the garlic flavor. 1. Sprinkle 1 packet of taco seasoning over the meat mix. Add 1 cup diced tomatoes, 1 can of rinsed black beans, and 1 cup of corn. 2. Stir everything well and let it cook for about 5 minutes. Season with salt and pepper to taste. This step blends the flavors nicely. 3. In a separate bowl, whisk together 3 large eggs and 1 cup of milk. Make sure they mix well. Stir in half of the 1 cup of shredded cheddar cheese. 1. Spread the meat mix evenly at the bottom of the pie pan. Pour the egg and cheese mix over it. 2. Sprinkle the rest of the shredded cheese on top. 3. Bake for 30-35 minutes. Check if the egg is set and the top is golden brown. A knife in the center should come out clean. 4. Let the pie cool for a few minutes before slicing. Garnish with fresh cilantro or parsley for a tasty finish. To brown meat well, use a hot pan. This helps seal in juices and flavor. Break the meat into small pieces as you cook. Stir it only a few times to get a nice brown color. For the egg filling, whisk eggs and milk together until smooth. Make sure the eggs are well mixed. Adding half the cheese will help it stay moist. This makes every bite cheesy and rich. You can adjust seasoning to your taste. If you like spice, add cayenne or chili powder. For milder flavors, use less taco seasoning. Experiment with fresh herbs like cilantro for extra flavor. If you want to use different proteins, turkey or chicken work well. Ground chicken is leaner. You can also use plant-based meat for a veggie option. Just make sure to season it well to enhance the taste. This pie pairs well with a fresh salad or rice. A side of guacamole or salsa adds a nice touch. For a colorful plate, serve with sliced peppers or avocado. To make the pie look great, garnish with fresh cilantro or parsley. A sprinkle of cheese on top makes it look even tastier. Slice it into wedges for easy serving. Pro Tips Use Lean Meat: Opt for lean ground beef or turkey to keep the dish lighter and healthier while still being flavorful. Customize the Veggies: Feel free to add or substitute other vegetables like bell peppers or zucchini for extra nutrition and flavor. Cheese Variations: Experiment with different types of cheese such as pepper jack or feta for a unique twist on the flavor. Let it Rest: Allow the pie to cool for a few minutes before slicing to ensure clean cuts and better texture. {{image_2}} You can switch the ground beef or turkey for chicken. Shredded chicken works great. If you want a plant-based option, try lentils or crumbled tofu. These choices add different flavors and textures. They make the dish unique while keeping it hearty. If you need gluten-free options, use gluten-free taco seasoning. You can also choose gluten-free beans. For those avoiding dairy, there are many great cheese alternatives. Look for non-dairy cheese that melts well. Almond or oat milk can replace regular milk without losing taste. Want a kick? Add jalapeños or hot sauce for a spicy touch. If you prefer a Southwestern style, use chipotle seasoning. You can also make a vegetarian version. Add bell peppers, zucchini, or spinach for more veggies. These swaps keep the pie filling and tasty. To store your Crustless Taco Pie, let it cool down first. Use an airtight container or wrap it tightly in plastic wrap. This helps keep it fresh and tasty. In the fridge, your pie will last about 3 to 4 days. Always check for any signs of spoilage before eating. If you want to save some pie for later, freezing is a great option. Cut the pie into slices and wrap each slice in plastic wrap. Then, place the wrapped slices in a freezer-safe bag. This helps prevent freezer burn. Your pie can stay good in the freezer for up to 3 months. To enjoy, take a slice out and thaw it in the fridge overnight. When you’re ready to eat your leftovers, the best way to reheat them is in the oven. Preheat your oven to 350°F (175°C). Place the pie slice on a baking sheet and cover it with foil. Heat for about 15 to 20 minutes. This keeps the pie from getting soggy. You can also microwave individual slices for 1 to 2 minutes, but the oven gives a better texture. For serving, try adding fresh cilantro or a dollop of sour cream on top. This adds a nice touch and makes it look great! You can make your own seasoning at home. Mix these spices for a great flavor: - 1 tablespoon chili powder - 1 teaspoon cumin - 1 teaspoon paprika - ½ teaspoon garlic powder - ½ teaspoon onion powder - Salt and pepper to taste This blend gives your pie a fresh taste. You can adjust the amounts for your liking. Yes, you can prepare this pie in advance. Cook the meat and mix in the beans and corn. Place this mixture in your pie pan. Then, cover it and store it in the fridge. When you are ready to bake, pour the egg mixture on top. Bake it as per the recipe. This way, you save time on busy days. This dish is perfect for meal prep. Store leftovers in an airtight container in the fridge. They will stay fresh for 3 to 4 days. When you want to eat, reheat it in the oven or microwave. Make sure it is hot all the way through before serving. Enjoy your tasty meal! This blog post covered how to make a delicious crustless taco pie. We explored the key ingredients, including meat, veggies, and cheese, and shared helpful tips for cooking and flavoring. You learned step-by-step instructions for preparation, assembly, and baking. We also discussed variations, storage, and answers to common questions. Trying this recipe can add fun to your meal prep. Enjoy the tasty results and keep experimenting with flavors!

Crustless Taco Pie Flavorful and Hearty Recipe

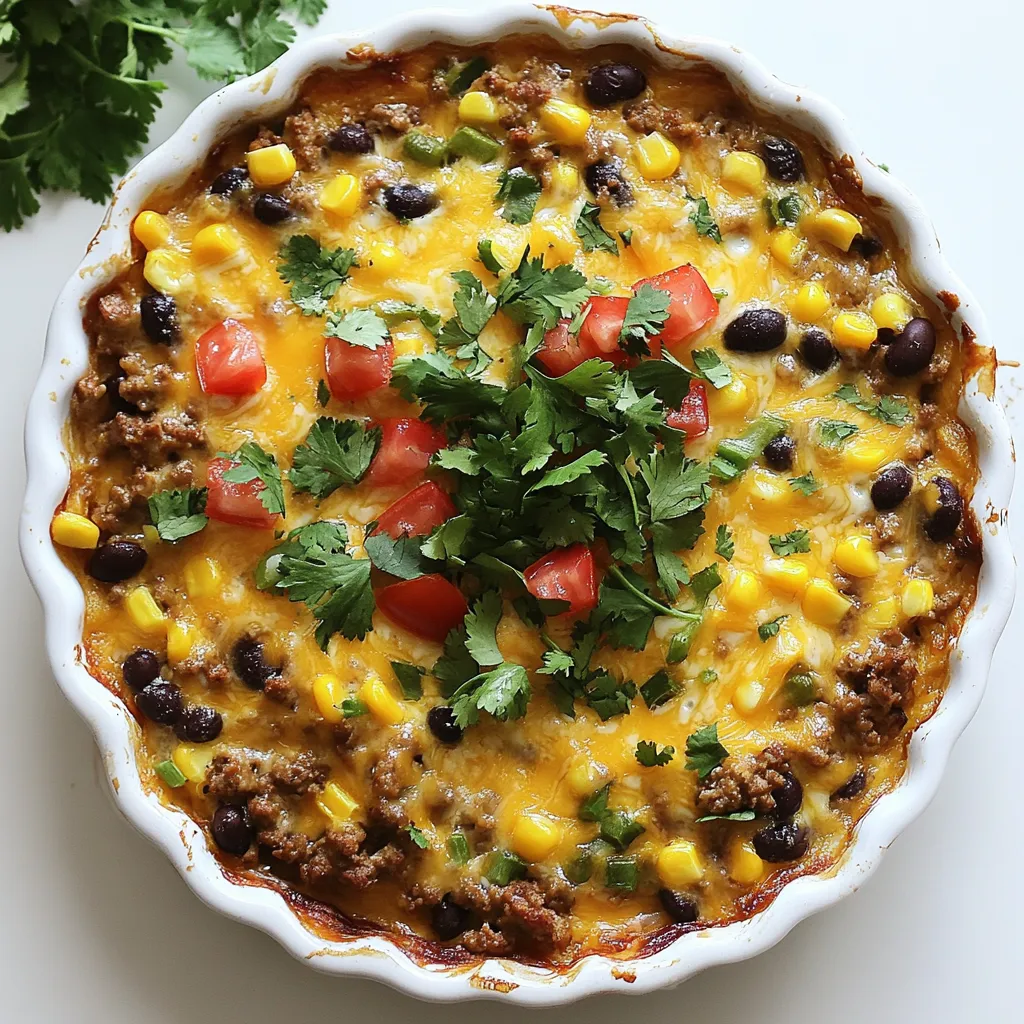
Are you craving a dish that brings all the tasty flavors of tacos without the mess of a crust? Look

- 2 cups cooked chicken, shredded - 4 cups fresh or frozen corn kernels - 1 medium onion, diced - 2 medium potatoes, diced - 2 cloves garlic, minced - 4 cups chicken broth - 1 cup heavy cream - 1 teaspoon smoked paprika - 1 teaspoon thyme - Salt and pepper, to taste - 2 tablespoons olive oil - Fresh parsley, chopped (for garnish) Using fresh ingredients makes a big difference. Fresh corn gives the chowder a sweet, bright taste. Choose firm, sweet corn if you use fresh. For frozen corn, look for high-quality brands with no added ingredients. Fresh herbs like parsley should be vibrant and fragrant. They add a nice touch to your dish. Use low-sodium chicken broth for better control of salt. This helps you adjust flavors to your liking. You can swap out shredded chicken for turkey or even cooked sausage. If you want a lighter chowder, use half-and-half instead of heavy cream. You may also replace potatoes with sweet potatoes for a twist. If you can’t find smoked paprika, regular paprika works too. For a vegetarian option, use vegetable broth and skip the meat altogether. Adjust the recipe to fit your taste and what you have at home. {{ingredient_image_1}} Start by gathering all your ingredients. You will need: - 2 cups cooked chicken, shredded - 4 cups fresh or frozen corn kernels - 1 medium onion, diced - 2 medium potatoes, diced - 2 cloves garlic, minced - 4 cups chicken broth - 1 cup heavy cream - 1 teaspoon smoked paprika - 1 teaspoon thyme - Salt and pepper, to taste - 2 tablespoons olive oil - Fresh parsley, chopped (for garnish) In a skillet, heat the olive oil over medium heat. Add the diced onion and minced garlic. Sauté until the onion turns soft and clear. This step builds rich flavor for your chowder. Next, transfer the onion and garlic to your crockpot. In the crockpot, add the shredded chicken, corn, and diced potatoes. Pour in the chicken broth and stir in the smoked paprika and thyme. Season with salt and pepper. Mix everything well. Cover the crockpot and cook on low for 6-8 hours or on high for 3-4 hours. The longer you cook, the better the flavors blend together. About 30 minutes before serving, stir in the heavy cream. This makes the chowder creamy and rich. Taste your chowder and adjust the salt and pepper if needed. When ready, ladle the chowder into bowls. Garnish each bowl with fresh parsley for a nice touch. For a great meal, serve with crusty bread on the side. To make your chowder taste even better, use fresh herbs. Fresh thyme adds a bright note. Adding a squeeze of lemon juice before serving brightens the dish. You can also try adding smoked paprika for a nice twist. This gives a rich and smoky flavor that makes every bite special. If you enjoy heat, add a pinch of cayenne pepper. This will warm your chowder right up! For the best taste, aim for longer cooking times. Cooking on low for 6-8 hours allows flavors to blend well. If you're short on time, the high setting works in 3-4 hours. Just keep an eye on the potatoes; they should be fork-tender. Adding heavy cream about 30 minutes before serving makes it creamy. This step is key to achieving that rich texture you crave. If your chowder is too thick, add more chicken broth. Stir it well until you reach your desired consistency. If it's too thin, let it cook a bit longer with the lid off. This helps it thicken naturally. If you find it bland, don’t hesitate to adjust the seasoning. A bit more salt and pepper can make a big difference. Always taste as you go. Pro Tips Use Rotisserie Chicken: For a quick and flavorful shortcut, use store-bought rotisserie chicken. This saves time and adds a delicious smoky flavor to the chowder. Customize with Vegetables: Feel free to add other vegetables like bell peppers or carrots for extra nutrition and color. Just make sure to adjust cooking times accordingly. Thickening the Chowder: If you prefer a thicker chowder, mash some of the potatoes against the side of the crockpot before adding the cream. This will create a heartier texture. Serving Suggestions: Pair the chowder with a fresh garden salad or some homemade cornbread for a complete and satisfying meal. {{image_2}} You can swap the chicken for other proteins. Try shredded turkey for a lighter dish. If you prefer beef, use shredded beef or ground beef. For a heartier taste, consider adding diced ham. Each protein adds its unique flavor to the chowder. To make this dish vegan, replace the chicken with chickpeas or lentils. Use vegetable broth instead of chicken broth. Swap heavy cream with coconut milk or cashew cream for a rich texture. This way, you keep the chowder creamy without dairy. Feel free to mix in seasonal veggies. In summer, add fresh zucchini or bell peppers. In fall, diced butternut squash gives a sweet touch. Winter root veggies like carrots or parsnips also work well. This keeps your chowder fresh and fun with each season! After enjoying Chicken Corn Chowder, store leftovers in an airtight container. Let it cool to room temperature first. Place the container in the fridge. It will stay fresh for up to three days. Make sure to label your container with the date. To reheat, pour the chowder into a pot over medium heat. Stir it often to heat evenly. You can also use the microwave. Place it in a microwave-safe bowl and cover it loosely. Heat in short bursts, stirring in between. Aim for warm, not hot. For long-term storage, freezing is a great option. Use freezer-safe containers or bags. Make sure to leave space for expansion. It will last up to three months in the freezer. When ready to eat, thaw it overnight in the fridge. Reheat it gently on the stove for best results. You can store Chicken Corn Chowder in the fridge for about three to four days. Make sure to use an airtight container. This keeps it fresh and safe to eat. If you want to keep it longer, consider freezing it. In the freezer, it can last for up to three months. Just remember to label your containers with the date. Yes, you can use fresh corn! Fresh corn adds a sweet and crisp taste. If you choose fresh corn, you will need about four cups. Simply cut the kernels off the cob and add them to the chowder. It is a great way to enjoy the seasonal flavor of corn. Chicken Corn Chowder pairs well with several sides. Here are some great options: - Crusty bread for dipping - A simple green salad for freshness - Cornbread for added sweetness - Crackers for some crunch These sides make your meal more filling and fun! In this article, we explored Chicken Corn Chowder. We discussed key ingredients, their quality, and substitutes. I provided clear steps for preparation, cooking, and finishing touches. You learned valuable tips for flavoring, timing, and fixing common issues. We also talked about protein variations, plant-based options, and seasonal veggie ideas. Lastly, I covered storage, reheating, and freezing methods. You now have the tools to make this dish your own. Enjoy creating this comforting chowder!

Chicken Corn Chowder Crockpot Flavorful Comfort Meal

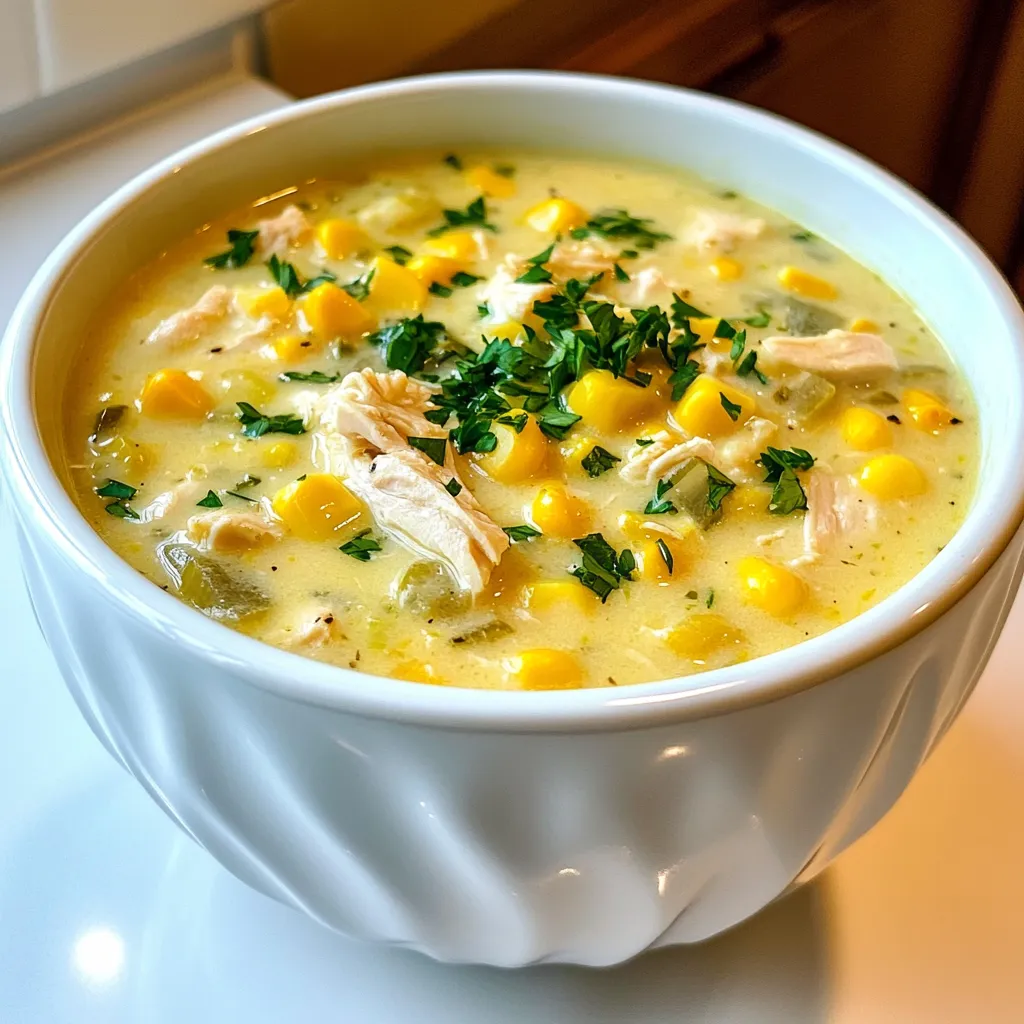
Looking for a cozy meal that warms your soul? My Chicken Corn Chowder Crockpot recipe is just what you need!

- 2 chicken breasts, diced into bite-sized pieces - 1 cup broccoli florets - 1 cup bell peppers (red and yellow), chopped - 1 cup cherry tomatoes, halved - 1 medium onion, diced - 3 cloves garlic, minced - 2 tablespoons olive oil - 1 teaspoon dried Italian herbs - 1 teaspoon smoked paprika - Salt and pepper to taste - 1 cup vegetable broth - 1 cup quinoa, rinsed - Fresh parsley, chopped (for garnish) The main ingredients for this dish are simple yet packed with flavor. Chicken breasts give this meal protein. The veggies add color, taste, and nutrition. Broccoli brings crunch, while bell peppers add sweetness. Cherry tomatoes offer freshness. Onion and garlic boost the flavor even more. Olive oil helps cook everything together, making it juicy and tasty. - Additional vegetables or spices - Protein substitutes You can swap in other vegetables if you like. Zucchini or carrots work well. You can also add spices like cayenne for heat. If you want a different protein, feel free to use turkey, tofu, or shrimp. These choices can change the dish and keep it exciting. - Large skillet - Cooking utensils You will need a large skillet for this recipe. A good skillet helps cook everything evenly. You will also need basic cooking utensils, like a spatula and a knife, to chop and stir. Having the right tools makes cooking easier and more fun. {{ingredient_image_1}} Start by cutting the chicken breasts into small, bite-sized pieces. This helps them cook evenly. In a large skillet, heat 2 tablespoons of olive oil over medium heat. When the oil is hot, add the chicken. Season it with salt, pepper, 1 teaspoon of smoked paprika, and 1 teaspoon of dried Italian herbs. Cook the chicken for about 5 to 7 minutes. It should be browned and cooked through. Once done, take the chicken out and set it aside. In the same skillet, add the diced onion and minced garlic. Sauté them for 2 to 3 minutes. You want them to get soft and fragrant. Next, add 1 cup of broccoli florets and 1 cup of chopped bell peppers. Keep cooking for another 3 to 4 minutes. The veggies should start to soften but still have a bit of crunch. Now it’s time to bring everything together. Stir in 1 cup of rinsed quinoa and 1 cup of halved cherry tomatoes. Pour in 1 cup of vegetable broth and mix well. Make sure all ingredients are combined. This step will infuse the quinoa with lots of flavor. Turn the heat down to low. Add the cooked chicken back into the skillet and cover it. Let it simmer for about 15 to 20 minutes. This will help the quinoa cook perfectly and soak up all the broth. Stir occasionally to make sure nothing sticks to the bottom. When the quinoa is fluffy and the veggies are tender, it’s time to serve! Taste the dish and add more salt or pepper if needed. Remove it from the heat and garnish with fresh chopped parsley. This adds a nice touch. Serve it warm, and enjoy your delicious one pot meal! To ensure your chicken is perfectly cooked, cut it into small, even pieces. This helps it cook faster and stay juicy. Sauté the chicken in a hot skillet with olive oil. Season it well with salt, pepper, smoked paprika, and Italian herbs. Cook it for about 5 to 7 minutes or until it is no longer pink inside. Use a meat thermometer to check for doneness; it should reach 165°F (75°C). This way, your chicken will be tender and full of flavor. For an extra kick, you can add more herbs and spices. Consider using fresh basil or thyme for a fresh taste. A pinch of red pepper flakes will add heat. You can also try adding lemon zest for brightness. These small changes can make your dish stand out and keep your taste buds excited. Pre-chopping your ingredients can save you a lot of time. Before you start cooking, chop the chicken, vegetables, and garlic. You can also rinse the quinoa in advance. Having everything ready to go means you can focus on cooking. It makes your One Pot Chicken Veggie Skillet quick and easy to prepare, even on busy nights. Pro Tips Use Fresh Ingredients: Fresh vegetables and high-quality chicken will enhance the flavor of your dish significantly. Customize the Veggies: Feel free to swap out the vegetables based on what you have on hand or your personal preference. One-Pot Cooking: This recipe is designed for easy cleanup; make sure to use a large enough skillet to accommodate all ingredients. Garnish for Flavor: Don't skip the fresh parsley; it adds a burst of color and freshness to the final dish. {{image_2}} You can switch chicken for turkey, tofu, or shrimp. Turkey is lean and tasty. It cooks similarly to chicken. Tofu offers a plant-based option. Just be sure to press it to remove extra water. Shrimp cooks quickly and adds a nice touch. Adjust cooking times based on your choice. Feel free to mix in seasonal veggies. Zucchini, carrots, or spinach work great. You can also use frozen veggies if fresh ones are not available. Frozen veggies save time and reduce waste. Just add them in when you add the quinoa and broth. They will cook well in the skillet. For gluten-free needs, use quinoa as your grain. Quinoa is naturally gluten-free. If you want a low-carb option, skip the quinoa. You can add more veggies instead. Cauliflower rice is a great substitute. It keeps the dish light while still being filling. Store your One Pot Chicken Veggie Skillet in an airtight container. Let it cool first, then place it in the fridge. It’s best if you use it within three days. This keeps the flavors fresh and the chicken safe to eat. To freeze, let the skillet cool completely. Divide it into portions and use freezer-safe bags or containers. Remove as much air as possible to prevent freezer burn. When you're ready to eat, thaw it overnight in the fridge. Heat it on the stove or microwave until hot. In the fridge, this dish lasts about three days. If frozen, it can stay good for up to three months. After that, you might notice a drop in quality. Always check for signs of spoilage before eating. Yes, you can make this dish ahead of time. Cook the One Pot Chicken Veggie Skillet and let it cool. Then, store it in an airtight container in the fridge. It lasts for up to three days. You can also prepare the ingredients in advance. Chop the chicken and veggies, and store them separately. This way, you save time and enjoy a quick meal later. This dish is a complete meal, but you can add sides for variety. Here are some great options: - A simple green salad with a light dressing. - Crusty bread to soak up the flavors. - Rice or another grain for extra carbs. - Steamed veggies for added nutrients. These sides enhance your meal while keeping it balanced. To scale the recipe, simply multiply each ingredient by the number of servings you want. For example, if you want to serve eight, double all ingredients. This works well for chicken, veggies, and broth. Keep in mind that cooking time might vary slightly. Check the quinoa for doneness and adjust as needed. This blog post guides you through making a delicious One Pot Chicken Veggie Skillet. We covered the main ingredients, cooking steps, and tips for perfect results. You learned about optional ingredients for extra flavor and how to adapt for dietary needs. By using this recipe, you can save time and enjoy a tasty meal. Cooking can be fun and simple with these easy tips and tricks. Now you have the skills to make this dish your own!

One Pot Chicken Veggie Skillet Quick and Simple Meal

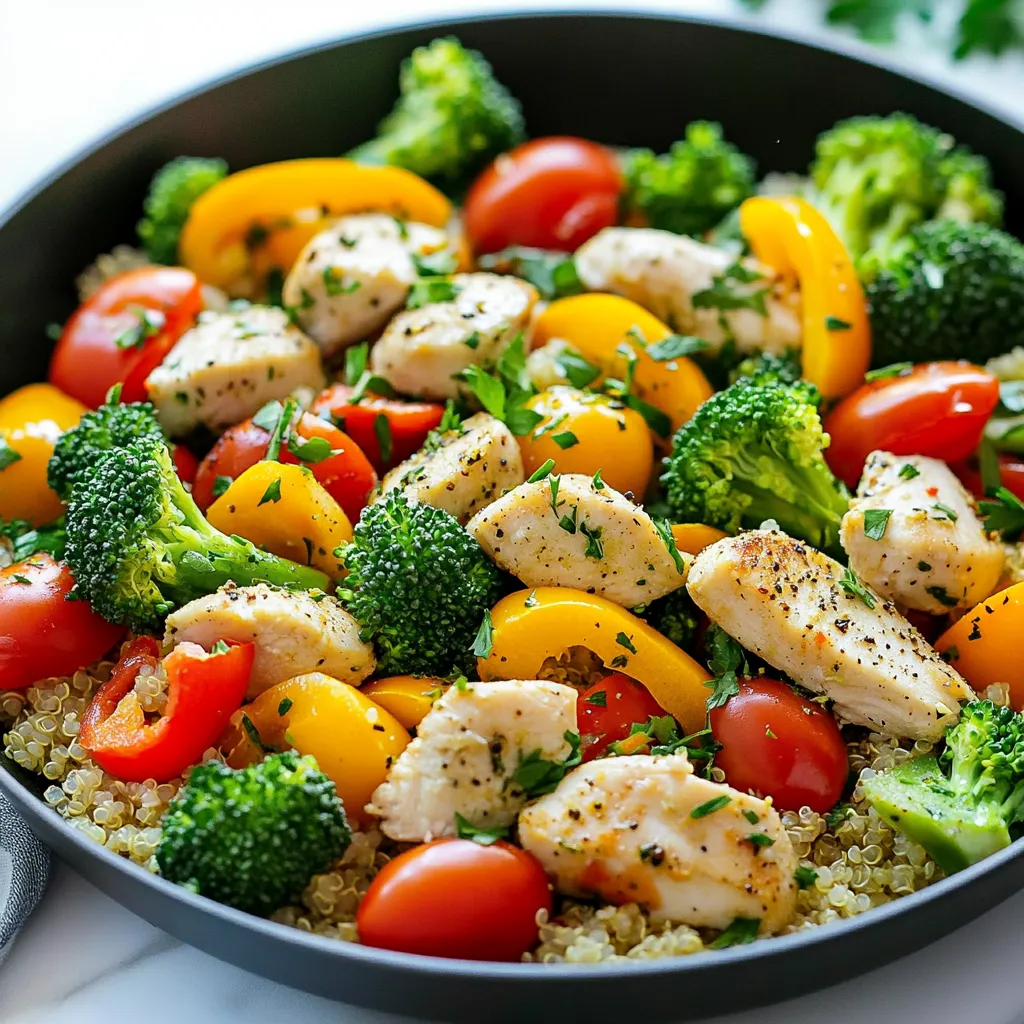
Looking for a quick and tasty meal? The One Pot Chicken Veggie Skillet is your answer! This dish packs protein

For this tasty dish, you need: - 500g chicken breast, thinly sliced - 2 tablespoons sweet chili sauce - 1 tablespoon soy sauce - 1 tablespoon sesame oil - 1 red bell pepper, sliced - 1 green bell pepper, sliced - 1 cup broccoli florets - 2 cloves garlic, minced - 1 tablespoon fresh ginger, minced - 2 green onions, chopped - 1 tablespoon cornstarch (mixed with 2 tablespoons water) - Salt and pepper to taste - Cooked jasmine rice for serving These ingredients give your stir fry a great blend of sweet and savory. The chicken serves as the base, while the sweet chili sauce adds a lovely kick. The bell peppers and broccoli provide color and crunch. You’ll want to have some basic tools handy: - A large bowl for marinating - A large pan or wok for cooking - A wooden spoon or spatula for stirring - A cutting board and knife for chopping These tools help you cook quickly and keep everything organized. A wok is great because it heats evenly and allows for easy tossing of your food. Feel free to get creative! You can add: - Pea pods for extra crunch - Carrots for sweetness - Mushrooms for umami flavor - Cashews for a nutty twist These add-ins can make your dish unique. Try different combinations to find what you love best. Mixing in seasonal veggies also helps reduce waste and keep your meals fresh. {{ingredient_image_1}} To start, grab a large bowl. Place the thinly sliced chicken breast inside. Add two tablespoons of sweet chili sauce and one tablespoon of soy sauce. Sprinkle in a pinch of salt and pepper. Mix it all well. Let the chicken marinate for about 15 minutes. This helps the flavors blend nicely. Now, heat two tablespoons of sesame oil in a large pan or wok. Make sure it’s hot before adding the marinated chicken. Stir-fry the chicken for about 5 to 7 minutes. You want it to be fully cooked and a bit caramelized. Once done, remove the chicken and set it aside. In the same pan, add two cloves of minced garlic and one tablespoon of minced ginger. Sauté for about 30 seconds until it smells great. Next, toss in one sliced red bell pepper, one sliced green bell pepper, and one cup of broccoli florets. Stir-fry these for about 3 to 4 minutes until they are tender but still crisp. Return the cooked chicken to the pan with the veggies. Mix one tablespoon of cornstarch with two tablespoons of water in a small bowl. Pour this mixture over the chicken and vegetables. Stir everything together well. Cook for an additional 2 to 3 minutes until the sauce thickens. Finally, toss in the chopped green onions just before serving. This adds a fresh crunch to your stir fry! Marinating chicken adds flavor and makes it tender. Use a large bowl for marinating. Combine the sliced chicken with sweet chili sauce, soy sauce, and a pinch of salt and pepper. Let it sit for 15 minutes. This short time helps the chicken soak up the flavors. If you have more time, you can marinate it for up to an hour for even more taste. The key to a great stir fry is high heat. Use a large pan or wok. Heat sesame oil until it shimmers. This shows it’s hot and ready. Add the marinated chicken and stir-fry it for 5-7 minutes. Cook until it is fully cooked and a bit caramelized. Remove the chicken, then add garlic and ginger to the same pan. This way, you keep the yummy flavors. Add your veggies and stir-fry them until they are tender but still crisp. How you serve your dish matters! Place the stir fry over fluffy jasmine rice. This rice soaks up the sauce well. For a nice touch, add extra chopped green onions on top. A drizzle of more sweet chili sauce gives it a pop of color and flavor. This makes your dish look and taste amazing! Pro Tips Marinate for Maximum Flavor: Allow the chicken to marinate for at least 15 minutes, but for best results, marinate for 1-2 hours in the refrigerator to enhance the flavor. Use High Heat: Stir-frying is best done at high heat. This helps to quickly cook the chicken and vegetables, locking in their flavors and textures. Veggie Variety: Feel free to add or substitute other vegetables like snap peas, carrots, or zucchini to add color and nutrition to your stir-fry. Thicken Your Sauce: If you prefer a thicker sauce, allow the stir-fry to simmer a bit longer after adding the cornstarch mixture until it reaches your desired consistency. {{image_2}} You can easily make this dish vegetarian or vegan. Simply swap the chicken for tofu or tempeh. Use the same marinade to soak the tofu or tempeh. Both options absorb flavors well. For a vegan sauce, check labels on sweet chili sauce and soy sauce. Some may have animal products. Don’t feel limited to chicken! You can use shrimp, beef, or pork instead. Just adjust cooking times. Shrimp cooks fast, while beef may need a bit longer. For beef, slice it thinly for even cooking. Feel free to get creative with your veggie mix! Carrots, snap peas, or zucchini work great. Just aim for vibrant colors and varied textures. This keeps every bite exciting. Add veggies at different times based on how long they take to cook. To keep your sweet chili chicken stir fry fresh, use an airtight container. Place it in the fridge. It stays good for about 3 to 4 days. Make sure it cools before you store it. This prevents the growth of bacteria. When you reheat, do it gently. Use a pan on medium heat. Add a splash of water or broth to keep it moist. Stir often to heat evenly. You can also use a microwave. Just cover it with a damp paper towel to keep it from drying out. You can freeze this dish for later! Use a freezer-safe bag or container. Remove as much air as you can to avoid freezer burn. It can last for up to 2 months in the freezer. To enjoy, thaw it in the fridge overnight before reheating. You can marinate chicken for about 15 to 30 minutes. This time allows the chicken to soak up the flavors. If you have more time, you can marinate it longer in the fridge for even better taste. Just remember to not go over 24 hours. Yes, you can use other sauces! Soy sauce adds a nice saltiness. Teriyaki sauce gives a sweet twist. If you like spice, try sriracha. Just balance the flavors to keep it tasty. The best vegetables for stir fry are bell peppers, broccoli, and snap peas. You can also add carrots, zucchini, or snow peas. Choose veggies you love. Cut them into bite-sized pieces for even cooking. Sweet chili chicken stir fry can be healthy! It has lean protein and lots of colorful veggies. Just watch the amount of sauce you use. You can also serve it with brown rice for more fiber and nutrients. Yes, you can make this dish in advance! Cook the stir fry and let it cool. Store it in the fridge for up to three days. Reheat it in a pan or microwave when you're ready to eat. Just add a splash of water to keep it moist. In summary, this post shared essential tips to make sweet chili chicken stir fry. You learned about the key ingredients, cooking steps, and helpful techniques. Don't forget the variations to fit your tastes, and how to store leftovers for later enjoyment. This dish is quick and flavorful, perfect for busy evenings. Enjoy making it your own and impressing your family or friends. Now, get cooking and savor every bite!

Savory Sweet Chili Chicken Stir Fry Easy Recipe

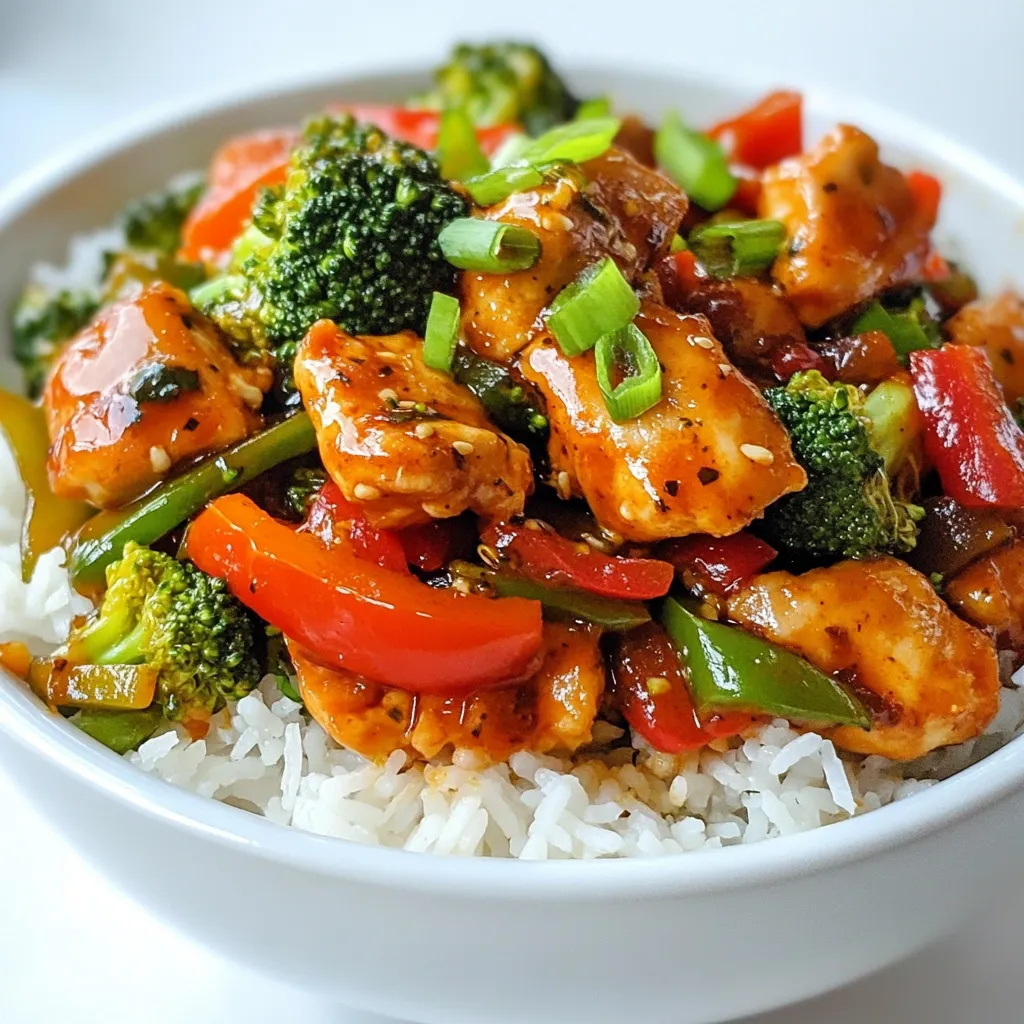
Are you ready to spice up your dinner routine? My Savory Sweet Chili Chicken Stir Fry is quick, easy, and

Older posts
Newer posts
← Previous Page1 … Page139 Page140 Page141 … Page144 Next →

dsad

© 2025 So Yum Recipes • Built with GeneratePress

Our Policies

  • Copyright Policy
  • Cookie Policy
  • GDPR Policy
  • Privacy Policy
  • Disclaimer
  • Terms Of Use

More Information

  • Home
  • About
  • Contact
  • Appetizers
  • Dessert
  • Dinner
  • Drinks
©2025, So Yum Recipes About Back To Top