Skip to content
DisclaimerTerms Of UseGDPR PolicyCookie Policy

So Yum Recipes

  • Home
  • Drinks
  • Appetizers
  • Dinner
  • Dessert
  • About
  • Contact
  • Privacy Policy
DisclaimerTerms Of UseGDPR PolicyCookie Policy

Chloe

To create these tasty bites, you need a few key ingredients. Each ingredient plays a vital role in the flavor and texture of the dish. - Puff pastry - Brie cheese - Cranberry sauce Puff pastry gives a light, flaky base. It puffs up beautifully in the oven, creating a perfect shell. Brie cheese melts nicely, offering a creamy texture. Cranberry sauce adds a sweet and tart kick, making it festive and fun. - Chopped pecans or walnuts - Fresh herbs for garnish Nuts add crunch and depth. You can use chopped pecans or walnuts based on your taste. Fresh herbs, like rosemary or thyme, brighten the dish and make it look nice. - Baking sheet - Parchment paper - Rolling pin A baking sheet holds your bites while they cook. Parchment paper keeps them from sticking. A rolling pin helps smooth out the puff pastry, making it easy to cut into squares. You can find the full recipe for these delightful bites by checking out the Full Recipe. Enjoy making these treats that are perfect for any gathering! First, you need to thaw the puff pastry. Leave it in the fridge overnight or on the counter for about 30 minutes. While it thaws, preheat your oven to 375°F (190°C). This temperature helps create a nice, golden crust. Now, let’s cut the pastry squares. On a lightly floured surface, roll out the thawed puff pastry. Cut each sheet into 3-inch squares. You should have about 20 squares. Place the squares on a lined baking sheet, leaving space between them. In the center of each square, add a small piece of brie cheese, about 1 teaspoon. Then, spoon a dollop of cranberry sauce on top, also about 1 teaspoon. If you want a crunchy twist, sprinkle some chopped pecans or walnuts over the cranberry sauce. Next, fold the corners of the pastry squares up. Pinch them in the center to form a pocket. This keeps the cheese and cranberry sauce inside while baking. To give them a nice shine, brush the tops of the pastry bites with the beaten egg. This will help them turn golden brown in the oven. Bake in your preheated oven for 15-20 minutes. Look for a puffed and golden appearance. When done, remove them and let them cool a bit. Garnish with fresh rosemary or thyme for an extra touch. Enjoy these bites warm with friends and family! For more detailed cooking steps, check the Full Recipe. To make the best cranberry brie bites, start with the right brie. I recommend using a creamy brie that melts well. Look for brie that has a soft texture and a rich flavor. Some popular brands include President and brie de Meaux. When it comes to cranberry sauce, you have two options: homemade or store-bought. Homemade sauce gives you control over sweetness and flavor. You can customize it by adding spice, like cinnamon or nutmeg. Store-bought sauce is quick and convenient. Either choice will work, but fresh sauce adds a nice touch. To tell if your bites are done, look for a golden brown color. The pastry should be puffed and crisp. If they are not golden after 15 minutes, give them a few more minutes in the oven. If you use larger pieces of brie or more sauce, you might need to adjust the baking time. Check them around the 15-minute mark. If they look golden and puffed, they are ready! You can pair cranberry brie bites with many sides. A fresh salad with greens and nuts works well. You might also serve them with a platter of meats and cheeses. These bites are perfect for special occasions. They shine at holiday parties, game days, or family gatherings. Their festive look and taste will impress your guests. Enjoy them warm for the best flavor! For the complete recipe, check out the Full Recipe for your next gathering. {{image_2}} You can add more fun to your cranberry brie bites by changing the flavor. Adding different fruit preserves can really change the vibe. Consider using apricot, raspberry, or even fig preserves. Each one brings a unique taste and pairs well with brie. You can also incorporate herbs into the filling. Chopped rosemary or thyme can make the bites more aromatic. Just mix in a little with your cranberry sauce for an extra kick. If you want to switch things up, try using goat cheese or cream cheese instead of brie. Goat cheese has a tangy flavor that will surprise you. Cream cheese offers a smooth texture that blends well with the fruit. For those who prefer vegan options, look for plant-based cheese substitutes. Many brands offer great flavor and texture that mimic traditional cheese. You won’t miss out on taste! You can serve these bites in different ways for fun. Mini tartlets are a great way to present them. Just use a tart shell instead of puff pastry for a sturdy base. Bite-sized pastry pinwheels are another fun choice. Roll the pastry with the filling, slice, and bake. These styles make your dish more appealing and great for parties. For more details on making these tasty bites, check out the Full Recipe. To keep your cranberry brie bites fresh, store them in an airtight container. Place a paper towel at the bottom to absorb any moisture. You can refrigerate them for up to three days. If you want to save them for longer, freeze the bites. Wrap each one in plastic wrap and then place them in a freezer bag. They can stay frozen for up to three months. To reheat your cranberry brie bites, the oven is the best choice. Preheat it to 350°F (175°C). Place the bites on a baking sheet and cover them lightly with foil. Heat for about 10 to 15 minutes. This method helps keep the pastry crisp and prevents sogginess. Avoid using the microwave, as it can make the pastry chewy. You can prepare cranberry brie bites in advance. Assemble them, then freeze before baking. Lay them on a baking sheet and freeze until solid. Once frozen, transfer them to a freezer bag. When you're ready to bake, no need to thaw. Just add a few extra minutes to the baking time for a delicious treat. Yes, you can prep these bites in advance! To do this, follow these steps: - Prepare the pastry squares and fill them with cheese and cranberry sauce. - Do not brush them with egg wash yet. - Place them on a baking sheet and cover with plastic wrap. - Store in the fridge for up to 24 hours before baking. When you’re ready to bake, brush with egg wash and bake as per the recipe. This method keeps the flavors fresh and saves time on busy days. Cranberry Brie Bites pair well with many dishes. Here are some ideas: - A simple green salad with vinaigrette. - Sliced fruits like apples or pears. - A cheese platter with nuts and dried fruits. - Sparkling wine or cider to enhance the flavors. These pairings create a beautiful and festive spread for any gathering. A soggy pastry can happen, but it’s easy to fix. Here are some tips: - Make sure to bake the bites until they are golden and puffed. - Avoid overloading the filling. Too much cranberry sauce can make the pastry soggy. - If you notice sogginess after baking, place the bites back in the oven for a few minutes. - Serve them warm right after baking for the best texture. By following these tips, you’ll keep your Cranberry Brie Bites crisp and delicious. Cranberry brie bites are a simple and tasty treat. You learned how to gather the right ingredients, prepare the bites, and perfect your baking. Plus, you found tips on storing and reheating leftovers to keep them fresh. You can even experiment with different flavors and ingredients. Enjoy making these bites for your next gathering. They will impress your guests and satisfy your taste buds! Keep exploring and enjoy your time in the kitchen.

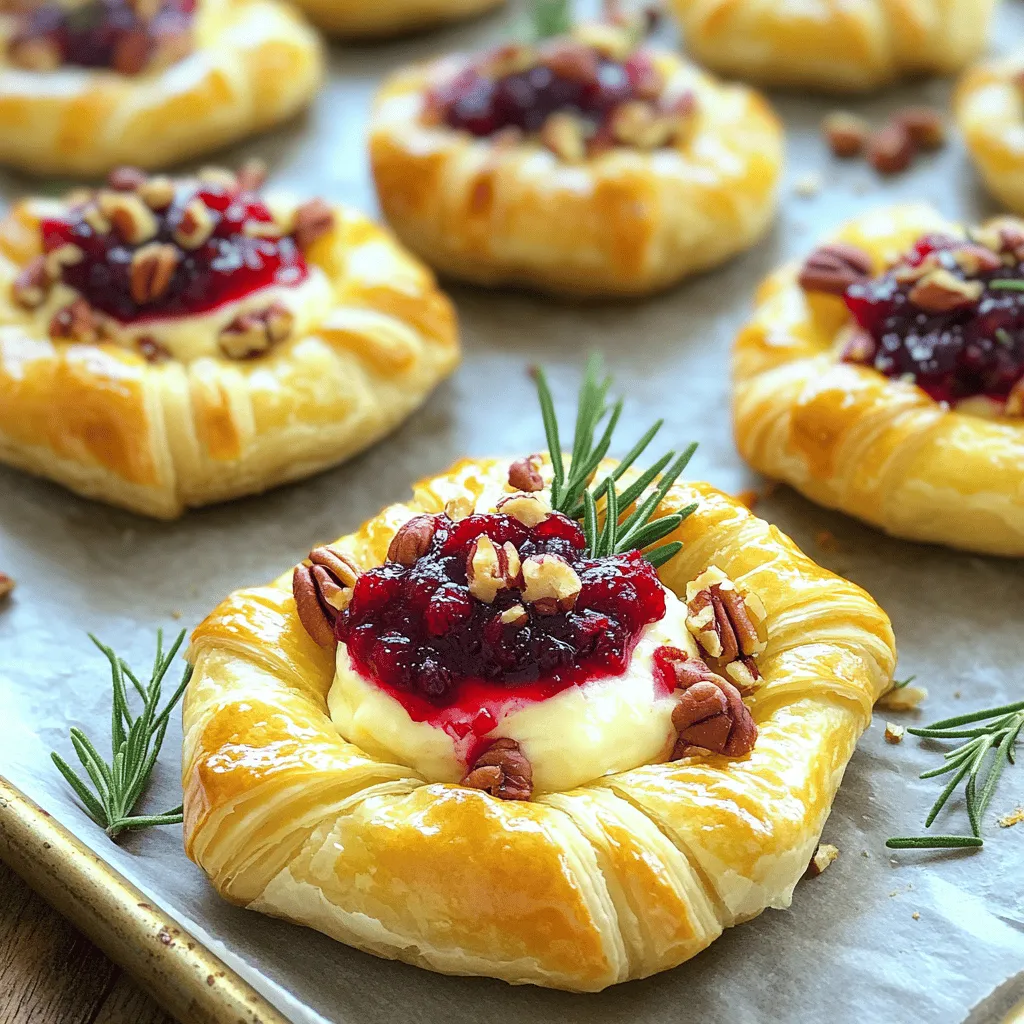
Cranberry Brie Bites Simple Festive Flavor Delight

If you’re looking for a tasty treat that shines at any gathering, you’ve found it! These Cranberry Brie Bites offer

- 2 cups cooked shredded chicken - 1/2 cup BBQ sauce (options for homemade or store-bought) - 4 flatbreads or naan - 1 cup shredded mozzarella cheese - 1/2 red onion, thinly sliced - 1/2 cup corn kernels (fresh or frozen) - 1/4 cup fresh cilantro, chopped - 1 tablespoon olive oil - Salt and pepper to taste These ingredients come together to create a dish that is both tasty and easy to make. The chicken brings protein, while the BBQ sauce adds rich flavor. I love using shredded chicken because it mixes well with the sauce, making each bite juicy and full of taste. Flatbreads or naan serve as a great base for this dish. They are soft and hold toppings well. I often choose naan for a little extra flavor, but any flatbread works nicely. The cheese melts beautifully, creating a creamy layer on top. Red onion adds a crisp texture and a sharp bite that balances the sweetness of the BBQ sauce. The corn brings a nice crunch and a hint of sweetness. Fresh cilantro brightens the dish, giving it a pop of color and flavor. To make this recipe even better, I brush the flatbreads with olive oil. This helps them crisp up nicely while baking. Salt and pepper round out the flavors, ensuring every bite tastes great. You can find the full recipe [here](#). This dish is perfect for a quick meal or a fun snack! - Preheat the oven to 400°F (200°C). - In a bowl, mix the shredded chicken with BBQ sauce. Stir well so the chicken is fully coated. - Brush both sides of the flatbreads with olive oil. This adds flavor and helps them crisp. - Spread the BBQ chicken mixture evenly over each flatbread. Make sure to reach the edges. - Top with shredded mozzarella cheese, sliced red onions, and corn kernels. - Bake the flatbreads for about 10-12 minutes. Watch for the cheese to melt and the edges to turn golden. - Once baked, let them cool for a few minutes. This makes slicing easier. - Before serving, add fresh cilantro on top for a nice touch. For the full recipe, refer to the complete guide provided earlier. To make the best BBQ chicken flatbread, choose the right flatbread. I like using naan or pita bread. These types hold up well and have a nice texture. You can also use pre-made flatbreads from the store if you’re short on time. For BBQ sauce, I recommend a sweet and tangy sauce. Look for one with a good balance of flavor. You can even try a smoky BBQ sauce for a deeper taste. Homemade BBQ sauce can take your flatbread to the next level. You can find plenty of easy recipes online. To avoid soggy flatbreads, brush them lightly with olive oil. This helps create a barrier. Bake the flatbreads before adding toppings for a few minutes. This keeps them crisp. You can customize the cheese and toppings to suit your taste. I love using mozzarella for its meltiness. However, you can try cheddar or pepper jack for extra flavor. Add your favorite veggies, like bell peppers or jalapeños, to mix it up. For side dishes, consider a fresh salad. A simple green salad pairs well with BBQ flavors. You can also serve coleslaw for a crunchy contrast. For garnishing, fresh cilantro adds a nice touch. You can also drizzle some extra BBQ sauce on top. This makes the dish look great and adds more flavor. Try out these tips to make your BBQ chicken flatbread perfect! For the full recipe, check out the section above. {{image_2}} You can switch up the protein in your BBQ chicken flatbread. Try using pulled pork for a richer flavor. Tofu is a great choice for a vegan option. It soaks up BBQ sauce well and gives a nice texture. For cheese, you can use vegan cheese if you want a dairy-free meal. There are many brands that melt nicely. Just check the label to ensure it fits your diet. Want to add some heat? Try adding jalapeños or a spicy BBQ sauce. This gives your flatbread a kick that many love. You can also mix in some chipotle peppers for a smoky flavor. If you prefer a sweet taste, think about adding pineapple pieces. They add a fun, fruity twist. You can also try a honey BBQ sauce for extra sweetness. This balance of flavors makes each bite exciting. Looking for a Mediterranean vibe? Use feta cheese and add olives. You can also include roasted red peppers for a colorful touch. This flatbread will transport you to sunny shores. For an Asian twist, try adding teriyaki sauce instead of BBQ sauce. Top it with green onions and sesame seeds. This gives your flatbread a unique flavor that surprises and delights. With so many variations, you can enjoy BBQ chicken flatbread in many ways. Just be sure to check the [Full Recipe] for the base you love! To keep your BBQ chicken flatbread fresh, place it in an airtight container. This helps prevent air from drying it out. If you have multiple pieces, stack them with parchment paper between each layer. It keeps the toppings from sticking together. Store the container in the fridge. Your flatbreads will last up to three days. To reheat without losing texture, use the oven. Preheat it to 350°F (175°C). Place the flatbreads on a baking sheet. Heat them for about 10 minutes. This method keeps the edges crispy. You can also use a skillet. Heat it on medium-low and place the flatbread in. Cover with a lid for a few minutes. This helps the cheese melt while keeping the crust crisp. Yes, you can freeze BBQ chicken flatbread! Wrap each piece tightly in plastic wrap. Then, place them in a freezer-safe bag. Remove as much air as possible before sealing. This method helps prevent freezer burn. To reheat, thaw in the fridge overnight. Then, use the oven or skillet methods to warm them up. Enjoy your easy meal anytime! How long does BBQ chicken flatbread last in the refrigerator? BBQ chicken flatbread can last about 3 to 4 days in the refrigerator. Make sure to store it in an airtight container. This helps keep it fresh and tasty. I recommend eating it sooner for the best flavor and texture. Can I use store-bought flatbreads? Yes, you can use store-bought flatbreads. They save time and are easy to find. Just choose a good quality flatbread or naan for the best taste. You can also make your own if you feel up for it! How to make BBQ chicken flatbread dairy-free? To make BBQ chicken flatbread dairy-free, simply swap out the mozzarella cheese for a dairy-free cheese option. You can also skip the cheese altogether. The BBQ sauce and toppings will still add lots of flavor. What are some gluten-free alternatives? For a gluten-free option, try using gluten-free flatbreads or tortillas. Many stores sell these now. You can also use lettuce wraps for a fresh twist. Just load them up with the BBQ chicken and toppings! How many servings does this recipe make? This recipe makes about 4 servings. Each flatbread can be a meal or a fun appetizer. You can easily adjust the number of flatbreads based on your needs. What is the estimated calorie count per serving? Each serving of BBQ chicken flatbread has around 350 calories. This can vary based on the toppings and how much BBQ sauce you use. Feel free to add fresh veggies for extra nutrition! This blog post covered the tasty BBQ chicken flatbread recipe. We explored ingredients, preparation steps, and helpful tips to make it just right. You learned about fun variations and how to store your leftovers effectively. These flatbreads are easy to customize and a great meal option. Enjoy trying new flavors and sharing them with friends and family. Happy cooking!

BBQ Chicken Flatbread Easy and Flavorful Recipe

Craving a quick and tasty meal? Let me introduce you to BBQ Chicken Flatbread! This easy recipe will bring big

To make this dish, you need the following items: - 6 bone-in, skin-on chicken thighs - 1/4 cup brown sugar - 4 cloves garlic, minced - 1/4 cup soy sauce (low sodium preferred) - 2 tablespoons apple cider vinegar - 1 tablespoon olive oil - 1 teaspoon ground ginger - Salt and black pepper to taste - 1 tablespoon sesame seeds (for garnish) - 2 green onions, sliced (for garnish) This list gives you all you need to create a flavorful meal. Each ingredient plays a role, making the chicken tender and tasty. If you don’t have brown sugar, you can use white sugar mixed with molasses. For soy sauce, coconut aminos work well too. If you need a vinegar swap, use rice vinegar in place of apple cider vinegar. If you want a different oil, avocado oil is a great choice. Ground ginger can be replaced with fresh ginger, just use less. For a richer taste, I suggest using specific brands. Look for organic brown sugar like Wholesome Sweeteners for a deep flavor. Kikkoman is a reliable choice for soy sauce. For apple cider vinegar, Bragg’s is often favored for its quality. When picking olive oil, go for California Olive Ranch for a robust taste. These brands help enhance the dish's overall flavor and quality. For the full recipe, check out the complete guide. First, gather your ingredients. You will need chicken thighs, brown sugar, garlic, soy sauce, apple cider vinegar, olive oil, ground ginger, salt, and pepper. In a bowl, mix the brown sugar, minced garlic, soy sauce, apple cider vinegar, olive oil, ground ginger, salt, and pepper. This mix will be your marinade. Place the chicken thighs in a resealable bag. Pour the marinade over the chicken. Seal the bag tightly and shake it gently. Make sure all the chicken gets covered. Let it marinate for at least 30 minutes in the fridge. This step builds flavor. Heat a large skillet on medium-high heat. Remove the chicken from the marinade. Let the extra marinade drip off. Place the chicken thighs skin-side down in the hot skillet. Sear them for about 4 to 5 minutes. You want the skin to be crispy and golden brown. This step adds a nice texture. After searing, carefully flip the chicken thighs over. Pour any remaining marinade over the chicken. This keeps the flavor locked in. Preheat your oven to 400°F (200°C). After flipping the chicken in the skillet, transfer the skillet to the oven. Bake the chicken for 25 to 30 minutes. You want the chicken to reach an internal temperature of 165°F (74°C). This ensures it is fully cooked. Once done, remove the skillet from the oven. Let the chicken rest for 5 minutes before serving. This resting time keeps the meat juicy. Finally, sprinkle sesame seeds and sliced green onions on top for garnish. Enjoy your Brown Sugar Garlic Chicken Thighs! For the full recipe, refer to the previous section. To get that crispy skin, start with dry chicken thighs. Pat them dry using paper towels. This helps to remove extra moisture. Make sure your oven is hot, around 400°F (200°C). Sear the chicken skin-side down in a hot skillet for 4-5 minutes. This locks in flavor and gives it a golden color. When you flip the chicken, let it cook in the oven. This method ensures the skin stays crispy and the meat stays juicy. Marinating is key for tasty chicken. Use the marinade from the recipe. Let the chicken sit in it for at least 30 minutes. For deeper flavor, marinate for up to 4 hours. The brown sugar and garlic work wonders together. You can even add herbs like thyme or rosemary to the mix. Make sure the chicken is fully coated. This step brings out the best taste in your dish. Oven types can change cooking times. If you have a convection oven, reduce the cooking time by about 5 minutes. Check the chicken’s internal temperature with a meat thermometer. It should reach 165°F (74°C). If your oven runs hot, keep an eye on the chicken to avoid overcooking. Each oven is unique, so adjust as needed. This will help you serve perfectly cooked chicken every time. For the full recipe, check the instructions above! {{image_2}} You can change the flavor of Brown Sugar Garlic Chicken Thighs by using different marinades. Try adding honey for sweetness or chili paste for heat. You can also swap soy sauce with teriyaki sauce for a unique twist. Each change brings new tastes to the dish, keeping it exciting for your family. If you prefer, you can use chicken breasts instead of thighs. Chicken breasts cook quicker and have less fat. Just be careful not to overcook them. Bake them for about 20 to 25 minutes. You want them juicy and tender. The marinade will still give them great flavor. You can make this dish a full meal by adding vegetables. Veggies like broccoli, carrots, or bell peppers roast well with the chicken. Toss them in the marinade and place them around the chicken in the skillet. They will soak up the flavors while cooking. This way, you get a tasty and nutritious meal in one dish. For the complete guide on this recipe, check out the Full Recipe. To keep your brown sugar garlic chicken thighs fresh, let them cool first. Place the chicken in an airtight container. Store it in the fridge for up to four days. If you want to keep it longer, consider freezing. Reheating needs care to keep the chicken tasty. Use an oven to reheat at 350°F (175°C). Place the chicken in a baking dish, cover it with foil, and heat for 20 minutes. This method keeps it moist. You can also use a microwave for quick reheating, but the oven is best for texture. If you want to freeze the chicken, wrap it tightly in plastic wrap and then foil. Make sure to label it with the date. Frozen chicken can last up to three months. When you are ready to eat, thaw it in the fridge overnight before reheating. This method helps keep the chicken juicy. For the full recipe, check out the detailed instructions. To make Brown Sugar Garlic Chicken Thighs in an air fryer, start by marinating the chicken as the recipe states. Once marinated, preheat your air fryer to 375°F (190°C). Place the chicken thighs in the basket, skin-side up. Cook for about 25 minutes. Check the internal temperature; it should be 165°F (74°C). The skin will be crispy and flavorful. This method saves time and gives you a great texture. Yes, you can use boneless chicken thighs. They cook faster than bone-in thighs. If you switch to boneless, reduce the baking time. Start checking for doneness around 20 minutes. The marinade will still work well. Just make sure to coat the chicken evenly. This choice makes it easier to eat and still very tasty. The best side dish pairs well with the sweet and savory flavor of the chicken. I recommend serving it with steamed rice or roasted veggies. Both options balance the meal. You could also add a fresh salad for crunch. These sides enhance the dish and make it feel complete. You can store the marinade in the fridge for up to one week. Make sure to keep it in an airtight container. If you want to store it longer, consider freezing it. Just thaw it before use. This way, you can save time when you're ready to cook again. The flavors will still be fresh and vibrant. For the full recipe, check the complete instructions provided earlier. In this blog post, we explored the recipe for Brown Sugar Garlic Chicken Thighs. We covered the ingredients, substitutions, and recommended brands. Next, I provided step-by-step instructions for preparation, searing, and baking. I shared tips to achieve crispy skin and enhance flavor. We also discussed variations and storage options. Finally, I answered common questions to help you cook this dish successfully. Cooking can be fun and easy. Enjoy your delicious meal, and get creative!

Brown Sugar Garlic Chicken Thighs Tasty and Simple Dish

If you’re craving a dish that’s both tasty and simple, look no further than Brown Sugar Garlic Chicken Thighs. This

To make the best whipped hot chocolate, you need: - 2 cups whole milk (or almond milk for a dairy-free option) - 2 tablespoons unsweetened cocoa powder - 1/4 cup sugar (adjust to taste) - 1 teaspoon vanilla extract - 1/4 cup heavy cream - 2 tablespoons powdered sugar - Whipped cream for topping - Chocolate shavings or sprinkles for garnish These ingredients create a rich, creamy drink that warms you up from the inside out. Whole milk gives a satisfying creaminess. Almond milk is a great choice if you want a dairy-free treat. Unsweetened cocoa powder adds deep chocolate flavor. The sugar balances the cocoa’s bitterness. Vanilla extract adds a lovely aroma and depth. Heavy cream and powdered sugar make the topping extra special. The whipped cream adds a fluffy texture. You can easily swap some ingredients to fit your needs. Here are some ideas: - Use oat milk or soy milk for a dairy-free option. - Replace sugar with maple syrup or honey for natural sweetness. These swaps keep the drink tasty while catering to different diets. To make the best whipped hot chocolate, choose high-quality ingredients. - Select whole milk or rich almond milk for a creamier drink. - Use pure cocoa powder for the best chocolate flavor. - Fresh heavy cream whips better and tastes richer. Using quality ingredients really makes a difference in flavor and texture. Enjoy every sip of this blissfully creamy delight! 1. Heating the milk: Start by pouring 2 cups of whole milk into a medium saucepan. Use medium heat and warm the milk until it steams. Be careful not to let it boil. 2. Mixing cocoa and sugar: Take 2 tablespoons of unsweetened cocoa powder and 1/4 cup of sugar. Whisk them into the warm milk. It should dissolve completely, creating a smooth mixture. 3. Achieving smoothness: Add 1 teaspoon of vanilla extract to the mixture. Stir well for a perfect blend. Remove the pan from heat once it’s smooth and ready. 1. Tips for beating heavy cream: In a clean bowl, pour in 1/4 cup of heavy cream. Add 2 tablespoons of powdered sugar. Use an electric mixer to beat the cream. 2. Achieving soft peaks: Beat the mixture for about 3-4 minutes. Stop when you see soft peaks forming. The cream should be fluffy but not too stiff. 1. Pouring hot chocolate into mugs: Grab your favorite mugs and fill them with the hot chocolate mixture. Aim to fill them about 3/4 full. 2. Adding whipped cream and garnishing: Top each mug with a generous dollop of whipped cream. For a fun touch, sprinkle chocolate shavings or sprinkles on top. Enjoy your whipped hot chocolate bliss! For the full recipe, you can refer to the earlier section. To make the best whipped hot chocolate, you need to focus on two key things: temperature and texture. - Ensuring the right temperature: Heat your milk gently. You want it warm enough to steam but not boiling. Boiling can change the flavor and texture of your drink. Use medium heat and keep an eye on it. - Whipping cream tips: Use cold heavy cream for the best results. Place your bowl and beaters in the fridge for a few minutes before whisking. This helps create nice, soft peaks. Whip until it is fluffy but not too stiff. How you serve your whipped hot chocolate can make it even more fun! - Creative serving suggestions: Pour your hot chocolate into clear mugs. This lets everyone see the beautiful layers of chocolate and cream. - Mug and topping choices: Use fun mugs that match the season. Top with whipped cream and sprinkle chocolate shavings or colorful sprinkles on top. This makes it look extra special. Even the best can make mistakes when making whipped hot chocolate. Here are a few to watch out for: - Overheating milk: If you let the milk boil, it can ruin the drink. You want it warm, not hot. - Overwhipping cream: If you whip the cream too much, it can become grainy. Stop once you reach soft peaks. This makes it light and fluffy. Making whipped hot chocolate is all about the details. Focus on the temperature and texture for a blissful treat. Whether it’s for a cozy night in or a special occasion, these tips will help you shine in the kitchen. For the complete recipe, check out the Full Recipe section. {{image_2}} You can take your whipped hot chocolate to the next level with fun flavors. Peppermint adds a refreshing kick. Just mix in a few drops of peppermint extract. Caramel brings a sweet and creamy twist. Drizzle some caramel sauce into your hot chocolate for a treat. You can also experiment with spices. A pinch of cinnamon gives warmth. Nutmeg adds a cozy, festive note. Mix these spices right into the hot chocolate for a delightful blend. Toppings can change the game for whipped hot chocolate. You can try flavored whipped creams for added flair. Use vanilla, chocolate, or even pumpkin spice whipped cream. If you want a lighter option, consider whipped coconut cream. It’s dairy-free and tasty! You can also get creative with garnishes. Try crushed candy canes for a holiday feel or sprinkle cocoa powder for a simple touch. Each option adds a new layer of flavor and fun. Whipped hot chocolate can fit any season. For the holidays, think about adding festive touches. A sprinkle of crushed peppermint or a dash of nutmeg can make it special. You can also make a cold version for summer. Blend the hot chocolate with ice for a refreshing treat. Top it with whipped cream and chocolate shavings for a delightful drink. This way, you can enjoy whipped hot chocolate no matter the weather! To keep leftover hot chocolate, pour it into a clean jar. Seal it tightly to keep it fresh. Place it in your fridge. Consume it within three days for the best taste. When reheating, use a saucepan over low heat. Stir it often to prevent burning. You can also microwave it in a safe mug. Heat for 30 seconds, then stir. Repeat until warm. Be careful not to overheat, or the texture will change. If you have leftover whipped cream, use it in other recipes. It’s great on pancakes or waffles. You can also add it to coffee or desserts. This way, nothing goes to waste, and you enjoy more treats. For the full recipe, check the section above! I often use whole milk for a rich flavor. It gives a creamy texture that feels great. If you want a lighter option, almond milk works well too. It adds a nice nutty taste. Other plant-based milks, like oat or soy, can also work. When you pick milk, think about the flavor and creaminess you enjoy most. Yes, you can make it ahead of time. Store the hot chocolate in the fridge. Just keep it in a sealed container. When you want to enjoy it, reheat it gently. Use a microwave or stovetop. Stir it well to mix any settled chocolate. The whipped cream can be made in advance too. Just keep it chilled until you are ready to serve. If you don't have powdered sugar, you can use granulated sugar. Just blend it in a blender for a few seconds. It will turn into a fine powder. You can also use honey or maple syrup for a different sweetness. These options will change the flavor, so taste as you go. No whisk? No problem! You can use a fork to beat the cream. It will take longer, but it works. A blender or food processor is another option. Just be careful not to overwhip. You want soft peaks, not butter. This way, your whipped hot chocolate will stay light and fluffy. In this post, we explored making whipped hot chocolate, from the essential ingredients to step-by-step instructions. We discussed ingredient substitutions, tips for greatness, and fun variations. Remember, quality ingredients lead to the best taste. Pay attention to temperature and mixing to avoid common mistakes. With these tips, you can enjoy a rich, creamy drink anytime. Embrace creativity with flavors and toppings to make it your own. Now, get ready to indulge in this cozy treat!

Whipped Hot Chocolate Blissfully Creamy Delight

Craving comfort on a chilly day? Whipped hot chocolate is your answer! This blissfully creamy delight combines rich cocoa with

To make delicious caramel pecan sticky buns, gather the following items: - 3 ½ cups all-purpose flour - 1 packet (2 ¼ teaspoons) active dry yeast - ½ cup milk, warmed - ⅓ cup granulated sugar - ¼ cup unsalted butter, melted - 2 large eggs - ½ teaspoon salt - 1 teaspoon ground cinnamon - 1 cup brown sugar, packed - ½ cup unsalted butter, softened - 1 cup chopped pecans - 1 cup caramel sauce (store-bought or homemade) You can swap some ingredients for others based on your needs. For the milk, use almond or oat milk if you're dairy-free. Instead of all-purpose flour, try whole wheat flour for a nutty taste. If you want a vegan option, use flax eggs instead of regular eggs. For the caramel sauce, homemade is best, but store-bought works great too. When shopping for ingredients, look for fresh options to ensure great flavor. Choose flour that is freshly milled for the best results. Check the expiration date on your yeast to make sure it’s active. For milk, buy organic if you can. Fresh, unsalted butter gives a rich taste that salted butter can’t match. Finally, choose pecans that are crunchy and fragrant. Fresh nuts keep your sticky buns tasty! To start, I warm the milk in a small bowl. Then, I mix in the sugar and sprinkle the yeast over the warm milk. I let it sit for about 5 to 10 minutes. You'll notice bubbles forming. This shows the yeast is alive. In a large bowl, I combine the flour, melted butter, eggs, salt, and cinnamon. Once the yeast is ready, I add this mixture to the bowl and stir until a dough forms. Next, I knead the dough on a floured surface for 5 to 7 minutes. The dough should feel smooth and elastic. I shape it into a ball, place it in a greased bowl, and cover it with a clean towel. I let it rise in a warm place for about 1 hour or until it doubles in size. While the dough rises, I prepare the filling. I mix the softened butter and brown sugar in a separate bowl. I blend it well and then stir in the chopped pecans. After the dough has risen, I roll it out into a rectangle, about 12 by 18 inches. Next, I spread the butter and sugar mixture evenly over the dough. I start rolling the dough from one long side, making a tight log. Once rolled, I cut the log into 12 equal pieces. Now, I am ready to place the cut rolls. In a 9x13 inch baking dish, I pour a layer of caramel sauce on the bottom. I sprinkle the pecan mixture over the sauce and then place the rolls on top. I make sure they fit snugly but are not squished. Finally, I cover the dish with a towel and let the rolls rest for 30 minutes to rise again. I preheat my oven to 350°F (175°C). Once the rolls have rested, I bake them in the preheated oven for 25 to 30 minutes. They should turn golden brown. After baking, I let them cool for about 5 minutes. Then, I flip the dish upside down onto a serving platter. This way, the sticky caramel side is on top. For an extra touch, I drizzle more caramel sauce and sprinkle additional chopped pecans over the warm buns. Enjoy this sweet and gooey treat! For the full recipe, check out the details above. To get soft and fluffy sticky buns, knead the dough well. Kneading helps develop gluten, which gives the buns structure. Make sure to let your dough rise in a warm spot. A warm kitchen works best! This allows the yeast to work its magic. If the dough doesn't rise enough, your buns may turn out dense. One common mistake is using cold milk. Always warm your milk before adding the yeast. Cold milk can stop the yeast from activating. Another mistake is not measuring flour correctly. Use a spoon to fluff the flour, then scoop it into your measuring cup. Too much flour can make the dough dry and hard. Using fresh ingredients makes a big difference in flavor. Always check the expiration date on your yeast and spices. For a richer taste, try using brown sugar in the dough. Adding a pinch of nutmeg with the cinnamon can also enhance the flavor. Don’t forget to drizzle extra caramel sauce before serving for added sweetness. For the full recipe, refer to the provided details. {{image_2}} You can make your caramel pecan sticky buns even more fun. Try adding chocolate chips for a sweet twist. Dark chocolate pairs well with caramel. You can also add dried fruits like cranberries or apricots for a fruity touch. These flavors blend perfectly with the sticky sweetness. Just sprinkle them on the dough before rolling it up. Want to enjoy these sticky buns without gluten? You can use a gluten-free flour blend instead of all-purpose flour. Look for blends that include xanthan gum, as this helps mimic the texture of regular dough. Follow the same recipe steps, and you’ll have gluten-free sticky buns that still taste amazing. Presentation matters when serving sticky buns. Drizzle extra caramel sauce over the warm buns for a beautiful finish. You can also sprinkle chopped pecans on top for added crunch. Try serving them with a scoop of vanilla ice cream for a decadent dessert. These treats shine at brunch or any special occasion. Just remember, they are best enjoyed warm! For a full recipe, check out the complete instructions for making these delightful buns. To keep your leftover sticky buns fresh, place them in an airtight container. Make sure to allow them to cool completely before storing. This helps prevent moisture build-up that can make them soggy. You can also wrap them tightly in plastic wrap for extra protection. Store them at room temperature for up to 2 days. If you need more time, refrigeration can help, but they might dry out a bit. Reheating your sticky buns is easy. Preheat your oven to 350°F (175°C). Place the buns in a baking dish and cover them with foil. Heat for about 10-15 minutes until warmed through. If you want to keep the sticky texture, drizzle a little caramel sauce over them before reheating. You can also use the microwave for a quick fix. Heat them for about 15-20 seconds, but don’t overdo it, or they can get tough. Freezing is a great way to enjoy sticky buns later. Once they cool, wrap each bun in plastic wrap and then place them in a freezer bag. Remove as much air as possible to avoid freezer burn. They can stay in the freezer for up to 3 months. When you want to eat them, thaw them in the fridge overnight. Then reheat as mentioned above. This method keeps them sweet and gooey, just like when they were fresh. For the full recipe, check out the details above! Yes, you can use instant yeast. The main difference is in how you mix it. You do not need to proof instant yeast in warm milk. Just mix it directly with your dry ingredients. This saves time and still gives you great sticky buns. If your dough has over-proofed, it may lose its rise. To fix it, gently punch it down to release the air. Then, knead it for a minute. Let it rise again for half the usual time before shaping it into rolls. This can help revive the dough. If you don’t have caramel sauce, you can make a quick version. Melt brown sugar and butter together on low heat. Stir until smooth. Use this mixture instead of store-bought caramel. You’ll still get that sweet and gooey taste in your sticky buns. For the full recipe, check out the details above. You learned about sticky buns, from key ingredients to step-by-step instructions. We covered delicious variations and smart storage tips. Remember to source fresh ingredients for the best taste. Avoid common mistakes to ensure perfect texture. Don’t hesitate to get creative with flavors. Whether you bake for yourself or share with others, these treats bring joy. Enjoy your sticky bun journey and impress everyone with your skills!

Caramel Pecan Sticky Buns Sweet and Gooey Treat

Are you ready to treat yourself to the ultimate indulgence? Caramel Pecan Sticky Buns are sweet, gooey, and packed with

- 1 loaf of brioche bread - 4 large eggs - 2 cups whole milk - 1 cup canned pumpkin puree - 1/2 cup brown sugar - 1 tablespoon vanilla extract - Spices: cinnamon, nutmeg, ginger, salt - 1/2 cup chopped pecans - Whipped cream for serving - Maple syrup for serving In this Pumpkin Spice French Toast Casserole, I use simple and tasty ingredients. The brioche bread works best for its soft texture. You can feel the warmth of the pumpkin puree mixed with eggs and milk. I love adding brown sugar for a sweet touch. The vanilla extract gives a nice depth of flavor. Don't forget the spices! Cinnamon, nutmeg, and ginger add that cozy fall taste. You can adjust these spices based on your taste. If you like nuts, try adding chopped pecans for crunch. Serve this casserole warm. Drizzle it with maple syrup and add whipped cream if you like. Enjoy the mix of flavors that come together so well! For the full recipe, check out the details on how to make this delicious dish. - Preheat your oven to 350°F (175°C). - Grease a 9x13-inch baking dish with butter or cooking spray. - In a large bowl, whisk together the eggs, milk, and pumpkin puree. - Add brown sugar, vanilla, cinnamon, nutmeg, ginger, and salt. Mix well. - Gently fold in the brioche bread cubes until they are soaked in the mixture. - Let the mixture sit for 10-15 minutes so the bread can absorb flavors. - Pour the mixture into the greased baking dish, spreading it evenly. - Cover the dish with foil and bake for 30 minutes. - Uncover and bake for an additional 15-20 minutes until the top is golden brown. Enjoy this easy and tasty Pumpkin Spice French Toast Casserole! You can find the [Full Recipe](#) for more details. To get the best texture in your casserole, use thick bread. Brioche works great here. It soaks up the pumpkin mixture well. Let the bread cubes sit in the mix for 10-15 minutes. This helps them absorb the flavors. If you skip this step, your casserole may turn out soggy. Avoiding a soggy casserole is key. Make sure not to add too much liquid. Stick to the recipe's amounts for eggs and milk. If your mixture seems too wet, add more bread. You want a nice balance. Adjusting spices can change the taste. You can add more cinnamon or nutmeg if you love these flavors. For a twist, try adding a pinch of cloves or allspice. These spices add warmth and depth. Consider toppings too. Chopped pecans add a crunchy texture. You can also mix in chocolate chips or dried fruit for extra sweetness. Drizzling maple syrup on top is a must! Pair your casserole with fresh fruit. Sliced bananas or berries work well. A side of crispy bacon adds a savory touch. For drinks, serve with coffee or spiced apple cider. The warm flavors blend nicely. When it comes to presentation, serve in a large dish. This makes it easy for guests to help themselves. Add a sprinkle of powdered sugar on top for a lovely finish. Try the Full Recipe for all the details. Enjoy your cooking! {{image_2}} If you want a gluten-free version, choose the right bread. Look for gluten-free bread made from rice or almond flour. These options work well in the casserole and still taste great. Be sure to check the ingredients to avoid hidden gluten. This makes it safe for those with gluten sensitivity. To make this dish vegan, swap out the eggs and milk. Use flaxseed meal mixed with water for eggs. A common ratio is one tablespoon of flaxseed meal and three tablespoons of water per egg. For milk, use almond or oat milk. These alternatives give you a creamy base without dairy. You can still enjoy the same warm and cozy flavors. For a fun twist, consider adding seasonal fruits. Diced apples or cranberries bring a nice tartness. They pair well with pumpkin spice. You can also sprinkle in some chopped pecans for extra crunch. Don’t be afraid to get creative with other fall flavors. Adding a touch of maple or even a hint of caramel can elevate your casserole. Explore flavors that remind you of autumn! To store leftovers of your Pumpkin Spice French Toast Casserole, let it cool first. Place it in an airtight container. This helps keep it fresh for up to three days in the fridge. When you want to eat it, you can just reheat it. Make sure to cover it to avoid drying out. If you want to freeze the casserole, cut it into portions first. Wrap each piece tightly in plastic wrap and then in foil. This keeps it fresh for up to three months. When you are ready to eat, thaw it in the fridge overnight. Reheat it in the oven at 350°F (175°C) for about 20-25 minutes. This method helps keep the texture nice. You can also microwave individual pieces for a quick meal. This Pumpkin Spice French Toast Casserole is easy to make and even easier to store! For the full recipe, check the earlier sections. You can prepare this casserole the night before. Just follow these steps: - Mix all ingredients as per the recipe. - Pour the mixture into your greased baking dish. - Cover with plastic wrap or foil. - Refrigerate overnight. In the morning, just bake it straight from the fridge. You may need to add a few extra minutes to the baking time. This makes breakfast easy and fun! Yes, you can switch up the bread! Here are some great options: - Challah: This bread holds moisture well. - Sourdough: It adds a nice tang. - Whole grain: For a healthier twist. Just make sure the bread is a bit stale or dry. This helps it soak up the egg mixture better. To reheat your casserole, follow these tips: - Preheat your oven to 350°F (175°C). - Place the casserole in an oven-safe dish. - Cover with foil to keep it moist. - Heat for about 15-20 minutes. This method keeps your casserole warm without drying it out. You can easily cut back on the sweetness. Here are some ideas: - Reduce the brown sugar to 1/4 cup. - Use a sugar substitute like stevia or monk fruit. - Add more spices like cinnamon or nutmeg for flavor. These changes will help you enjoy the dish without too much sugar! You can now create a delicious Pumpkin Spice French Toast Casserole with confidence. This dish uses brioche, eggs, milk, and pumpkin puree as the stars. Adding spices and sugar brings warmth and flavor. Remember to soak the bread well for the best texture. You can adapt the recipe for gluten-free or vegan diets too. Serve it up with whipped cream and maple syrup for a treat. Enjoy all the cozy flavors of fall with this easy recipe. Try it; you won't regret it!

Pumpkin Spice French Toast Casserole Easy and Tasty

Looking for a cozy fall breakfast that’s easy and delicious? You’ll love my Pumpkin Spice French Toast Casserole! This dish

- 2 cans chickpeas, drained and rinsed - 1 can coconut milk - 1 medium onion, diced - 3 cloves garlic, minced - 1 tablespoon ginger, grated - 1 tablespoon curry powder - 1 teaspoon turmeric powder - 1 teaspoon cumin powder - 1 can diced tomatoes - 2 tablespoons olive oil - Salt and pepper to taste Chickpeas stand out as the star of this dish. They add a hearty texture and protein. Coconut milk brings a rich creaminess and a hint of sweetness. The spices transform the dish into a flavor-packed delight. - Fresh cilantro - Lime wedges - Additional vegetables Fresh cilantro brightens the dish and adds a pop of color. Lime wedges give a zesty kick that balances the creaminess. You can also add vegetables like spinach or bell peppers for extra nutrition. For the full recipe, check out the detailed instructions. Preparing the Aromatics Start by gathering your ingredients. Dice one medium onion and set it aside. Mince three cloves of garlic. Grate one tablespoon of fresh ginger. These three ingredients create a flavorful base for your curry. Toasting the Spices Next, measure out one tablespoon of curry powder, one teaspoon of turmeric, and one teaspoon of cumin. Toasting these spices enhances their flavor. Heat two tablespoons of olive oil in a large pan over medium heat. Add the diced onion and sauté for about five minutes. Once the onion is soft, add garlic and ginger. Cook for one to two minutes, stirring frequently. Then, add the spices and stir for one minute. This toasts the spices and fills your kitchen with a warm aroma. Simmering the Base Now, it’s time to build your curry base. Pour in one can of diced tomatoes with their juices. Let the mixture simmer for five minutes. This allows the flavors to meld together beautifully. Combining Ingredients After simmering, add two cans of drained chickpeas and one can of coconut milk. Stir well to combine everything. Bring the mixture to a gentle simmer. Cover the pan and cook for 15 to 20 minutes. Stir occasionally so nothing sticks to the bottom. You’ll notice the curry thickening slightly as it cooks. Seasoning the Curry Once the cooking time is up, remove the pan from heat. Season your curry with salt and pepper to taste. If you want more spice, feel free to adjust the seasonings. Serving Suggestions When ready to serve, let the curry sit for a few minutes. This allows the flavors to settle. Use shallow bowls for serving. Top each bowl with fresh cilantro and serve with fluffy basmati rice or quinoa. For an extra pop of flavor, squeeze a lime wedge over the curry. Enjoy your creamy coconut chickpea curry! Check out the Full Recipe for more details. Achieving the Right Consistency To get the perfect creamy texture, you need to balance the liquids. Use one can of coconut milk for richness. If your curry is too thick, add a splash of vegetable broth or water. If it’s too thin, let it simmer longer. Stir often to prevent sticking. Adjusting Spice Levels If you like heat, add more curry powder or a pinch of cayenne. Start small, then taste as you go. For milder curry, cut back on spices. You can also add a dollop of yogurt at the end to cool it down if it gets too spicy. Best Accompaniments Serve your creamy coconut chickpea curry with fluffy basmati rice or quinoa. These grains soak up the sauce well. You can also add naan for a fun twist. A side salad with fresh veggies brightens the meal. Presentation Ideas Serve the curry in shallow bowls. Top with fresh cilantro for a pop of color. A squeeze of lime adds freshness and vibrancy. For added flair, place a few lime wedges on the side. This makes your meal look as good as it tastes! For the complete process, check the Full Recipe. {{image_2}} Chickpeas shine in this dish, but you can swap them. Try black beans, kidney beans, or lentils. Each bean brings a unique flavor and texture to your curry. If you use lentils, cook them for a shorter time. They may need less time than chickpeas. Adding vegetables makes this dish even better. You can mix in spinach, bell peppers, or carrots. Just chop them small and add them when you cook the onions. They will blend well and add more color and nutrition. Feel free to play with spices in this recipe. Instead of curry powder, try garam masala or chili powder. Each spice gives a different taste. You can also add fresh herbs like basil or mint for extra freshness. Coconut aminos can be a great addition. They add a savory, slightly sweet flavor. Use them if you want to make the dish more complex. Just add a tablespoon while cooking to enhance the taste. For the full recipe, check out the Creamy Coconut Chickpea Curry 🥥. After you make the creamy coconut chickpea curry, let it cool. Place the leftovers in a container. You can use a glass or plastic container with a tight lid. This keeps the food fresh. Store it in the fridge. Shelf Life in the Refrigerator The curry lasts about 3 to 5 days in the fridge. Always check for any signs of spoilage before eating. If it smells off or looks strange, throw it away. You can freeze the creamy coconut chickpea curry too! This is a great option for meal prep. Freezing Instructions Let the curry cool completely. Then, pour it into a freezer-safe container. Leave some space at the top for expansion. You can also use freezer bags. Just make sure to squeeze out the air before sealing. Thawing and Reheating Tips To thaw, move the curry from the freezer to the fridge. Let it sit overnight. You can also use the microwave for quick thawing. When reheating, make sure it heats evenly. Stir well to prevent hot spots. You may need to add a splash of coconut milk or water to bring back the creamy texture. Enjoy your meal again! For the full recipe, check out the details above. Is this recipe vegan and gluten-free? Yes, this recipe is both vegan and gluten-free. You use chickpeas, coconut milk, and spices that are all plant-based. Check the labels on your ingredients to be sure they meet your needs. Can I use dried chickpeas instead of canned? Yes, you can! Just soak the dried chickpeas overnight. Cook them until soft before adding them to the curry. This will add a fresh taste and texture. How can I make the curry spicier? To spice things up, add more curry powder or some chili flakes. You can also include fresh chopped chilies while cooking. Start small, taste, and adjust as needed. What should I serve with creamy coconut chickpea curry? I recommend serving it with fluffy basmati rice or quinoa. You could also add some naan bread for a nice touch. Fresh cilantro on top adds color and flavor. This blog post guides you through making a delicious creamy coconut chickpea curry. We covered key ingredients like chickpeas and coconut milk, cooking steps from prepping to serving, and tips for nice flavors. I shared variations, storage tips, and answered common questions. Making this curry can be fun and easy. You now have the tools to create your own tasty meal. Enjoy experimenting with new ingredients and flavors! Happy cooking!

Creamy Coconut Chickpea Curry Flavorful and Easy Meal

If you’re looking for a quick, satisfying meal that bursts with flavor, you’re in the right place! This Creamy Coconut

- 2 salmon fillets - 1 cup jasmine rice - 1/4 cup soy sauce (low sodium) - 2 tablespoons honey - 1 tablespoon rice vinegar - 1 tablespoon sesame oil - 2 garlic cloves, minced - 1 teaspoon fresh ginger, grated The salmon fillets are the star here. They provide rich flavor and healthy fats. Jasmine rice offers a light and fragrant base. The teriyaki sauce combines soy sauce, honey, rice vinegar, sesame oil, garlic, and ginger. These ingredients create a sweet and savory blend that perfectly complements the fish. - 1 cup broccoli florets - 1/2 red bell pepper, sliced Broccoli florets add crunch and color. They are full of vitamins. Sliced red bell pepper brings a sweet and vibrant touch to the dish. Both vegetables cook quickly and enhance the meal's overall nutrition and taste. - 1 green onion, chopped (for garnish) - Sesame seeds (for garnish) - Salt and pepper to taste Chopped green onion adds freshness and a pop of color. Sesame seeds provide a nutty flavor and a nice crunch. Salt and pepper enhance the dish, balancing the sweetness of the teriyaki sauce. These garnishes make the dish visually appealing and tasty. For the full recipe, check out the details above. To make fluffy jasmine rice, start by rinsing the rice. Place it in a fine-mesh strainer and run it under cold water. Keep rinsing until the water runs clear. This removes excess starch and helps prevent sticking. Next, in a medium saucepan, add 1 cup of rinsed rice and 2 cups of water. Bring it to a boil over medium heat. Then, reduce the heat to low. Cover the pot and let it simmer for about 15 minutes. The rice will absorb the water and cook perfectly. After 15 minutes, remove the pot from heat but keep it covered. Let it sit for another 5 minutes. This resting time makes the rice even fluffier. Now, let's make the teriyaki sauce. In a small saucepan, combine 1/4 cup of low-sodium soy sauce, 2 tablespoons of honey, 1 tablespoon of rice vinegar, and 1 tablespoon of sesame oil. Add 2 minced garlic cloves and 1 teaspoon of grated ginger. Whisk the ingredients together. Heat the mixture over medium heat. Bring it to a gentle simmer, stirring often. Let it cook for about 5 minutes until it thickens slightly. Remove it from heat and set it aside. This sauce is sweet and savory, enhancing the salmon's flavor. For the salmon, season both fillets with salt and pepper. Heat a skillet over medium-high heat. Once hot, place the salmon skin-side down in the pan. Cook it for about 4 to 5 minutes without moving it. Carefully flip the fillets. Brush some teriyaki sauce on top. Cook for an additional 3 to 4 minutes. The salmon should be cooked through but still tender. The skin will be crispy, adding great texture to the dish. Now, let’s prepare the vegetables. In the same skillet, add 1 cup of broccoli florets and 1/2 sliced red bell pepper. Sauté them for about 3 to 4 minutes. You want them to stay tender-crisp, so avoid overcooking. If they seem dry, add a splash of water. This helps steam them slightly. The bright colors and crunch will make your rice bowls pop. To serve, take a bowl and add a scoop of fluffy jasmine rice. Place the teriyaki salmon on top of the rice, along with the sautéed vegetables. Drizzle the remaining teriyaki sauce over everything. For a finishing touch, sprinkle chopped green onion and sesame seeds on top. This adds flavor and a nice look to your bowls. Enjoy your delicious teriyaki salmon rice bowls! For the complete recipe, check out the Full Recipe. To make your teriyaki salmon rice bowls even better, try adding spices like chili flakes or black pepper. You can also mix in a splash of orange juice for a citrus twist. Pair your dish with pickled ginger or a side of miso soup. This adds depth and makes the meal feel complete. If you want to switch things up, you can use chicken or tofu instead of salmon. Both options work well with teriyaki sauce. For rice, jasmine is great, but brown rice or quinoa can also be delicious. You can swap vegetables too! Try snap peas, carrots, or bok choy for a new flavor. To get that perfect pan-sear, heat your skillet well before adding salmon. Cook skin-side down for a crisp finish. If you prefer grilling, marinate the salmon first for extra flavor. Baking is another option; just place the salmon on a parchment-lined tray and bake at 400°F for about 12-15 minutes. Each method brings out unique flavors in the salmon. For the full recipe, check the previous section. {{image_2}} You can switch up the protein in this dish easily. If you want chicken, use boneless, skinless thighs. They will soak up the teriyaki sauce well. For a plant-based choice, go for tofu. Choose firm tofu, press it, and cut it into cubes. Cook it the same way as salmon. It will absorb the sauce and taste great. You can use different types of rice for these bowls. Brown rice adds a nutty flavor and is a bit chewy. Cauliflower rice is a low-carb option and cooks quickly. If you want a protein boost, try quinoa. It cooks fast and has a pleasant texture. All these options work well with the teriyaki flavor. Adding seasonal veggies makes your bowl fresh and colorful. In spring, use asparagus or snap peas. In summer, try zucchini or corn. Fall brings great choices like butternut squash. Winter is perfect for root veggies like carrots or sweet potatoes. Don't forget leafy greens like spinach or kale. They add nutrition and a nice crunch! To keep your teriyaki salmon rice bowls fresh, store leftovers in the fridge. Place the salmon and rice in separate containers. This helps maintain their textures. Use airtight containers to avoid air exposure. Consume leftovers within three days for the best taste. When reheating salmon, do it gently to keep it moist. You can use the microwave on low power. Cover the salmon with a damp paper towel to trap steam. For rice, add a splash of water before microwaving. This helps prevent it from drying out. Heat the rice for about one minute. Stir and check if it's warm enough. If you want to freeze portions, let the salmon and rice cool first. Place them in freezer-safe bags. Squeeze out as much air as you can. Label the bags with the date. For the best taste, eat frozen portions within three months. When you’re ready to eat, thaw overnight in the fridge. This keeps the food safe and tasty. Making Teriyaki Salmon Rice Bowls takes about 30 minutes. - Prep time is around 10 minutes. - Cooking time is about 20 minutes. Yes, you can use store-bought teriyaki sauce. However, homemade sauce gives better flavor. Homemade sauce uses fresh ingredients. This makes it taste bright and vibrant. Store-bought options may contain preservatives. Always check labels for quality. Salmon is packed with nutrients. It is rich in omega-3 fatty acids, which help your heart. - Salmon supports brain health and reduces inflammation. - It is a great source of protein and vitamins. Eating salmon can boost your mood and energy levels. Yes, you can make this recipe ahead. Cook the salmon and rice, then store them. - Keep them in airtight containers in the fridge. - You can prepare the teriyaki sauce in advance too. When ready to eat, just reheat everything together. Many sides pair well with Teriyaki Salmon Rice Bowls. Here are some great options: - Steamed edamame - Cucumber salad - Miso soup - Pickled vegetables These sides add flavor and texture to your meal. Try mixing and matching! In this post, we explored how to make tasty Teriyaki Salmon Rice Bowls. We covered key ingredients like salmon, jasmine rice, and fresh veggies. You learned how to cook rice, make flavorful teriyaki sauce, and perfectly sauté vegetables. I shared tips on storage and variations, ensuring you can customize your dish. These bowls are not only easy but also packed with nutrition. Now, enjoy creating memorable meals that your whole family will love. Happy cooking!

Teriyaki Salmon Rice Bowls Flavorful and Easy Recipe

If you’re searching for a quick and tasty meal, look no further! Teriyaki Salmon Rice Bowls are packed with flavor

- 1 lb sirloin steak, cut into bite-sized cubes - 4 tablespoons unsalted butter - 4 cloves garlic, minced - 1 teaspoon fresh rosemary, chopped (or ½ teaspoon dried) - 1 teaspoon fresh thyme, chopped (or ½ teaspoon dried) - Salt and pepper to taste - 1 tablespoon olive oil - Fresh parsley, chopped (for garnish) To make garlic butter steak bites, you need simple and fresh ingredients. The star is the sirloin steak. It’s tender and full of flavor. Cut the steak into bite-sized cubes. This helps with even cooking and makes it easy to eat. Next, gather your garlic and unsalted butter. Garlic adds aroma and flavor. Butter creates a rich sauce that makes the bites irresistible. Don't forget the herbs! Fresh rosemary and thyme brighten the dish. If you don't have fresh herbs, dried ones work too. Season the steak with salt and pepper. This step is key for taste. You will also need olive oil for cooking. It helps sear the steak for a nice crust. Finally, fresh parsley provides a pop of color and freshness. For detailed cooking steps, check out the Full Recipe. Happy cooking! Start by seasoning the steak cubes. Use salt and pepper. You want to coat every piece well. This step boosts the flavor. Next, prepare your cooking space. Clear your counter and gather all ingredients. This helps you cook smoothly. Now, let’s preheat the pan. Use a large skillet and heat olive oil over medium-high heat. Wait until it shimmers. This shows it's ready. Then, it's time to sear the steak bites. Add them to the pan in one layer. Cook for 2-3 minutes on each side. Check for your desired doneness. Medium-rare is best for tenderness. Avoid overcrowding the pan. If needed, cook in batches. Once the steak bites are done, transfer them to a plate. Keep them warm by covering them. In the same skillet, lower the heat to medium. Add butter and melt it down. Once melted, add the minced garlic, rosemary, and thyme. Sauté these for 1-2 minutes. You want the garlic to be fragrant, not burnt. Now, it's time to combine everything. Return the steak bites to the skillet. Toss them in the garlic butter sauce until coated. Heat them for one more minute. This warms them through. Finally, remove from heat and garnish with chopped parsley. Plate it beautifully and enjoy your dish. For the full recipe, refer to the earlier sections. For garlic butter steak bites, I love using sirloin. It's tender and full of flavor. You can also try ribeye for extra juiciness. When cutting the steak, slice it into cubes about one inch wide. This size cooks evenly and stays tender. Everyone likes their steak a bit different. For medium-rare, cook for 2-3 minutes on each side. If you prefer medium, add an extra minute. To get a great sear, make sure your pan is hot before adding the steak. This step locks in juices and gives a nice crust. Think about pairing these bites with fresh salad or roasted veggies. You can also serve them with toothpicks for easy snacking. For a nice touch, place the bites on a wooden board and drizzle with extra garlic butter. Garnish with fresh parsley for a pop of color. For the full recipe, check out the detailed steps to make this dish perfect every time. {{image_2}} To make garlic butter steak bites even better, try adding spices. A pinch of cayenne gives a nice kick. If you like herbs, add fresh basil or oregano. These extra flavors make each bite more exciting. For a low-carb option, skip the bread and serve with vegetables. You can use zucchini noodles or a fresh salad. If you need a gluten-free choice, check that your butter and seasonings are gluten-free. This way, everyone can enjoy the dish. You can grill the steak bites for a smoky flavor. Just skewer them on sticks and grill until cooked through. Another option is using an air fryer. This method cooks the bites fast and keeps them juicy. It's a healthier choice without losing taste. For a full recipe, refer to the earlier section. To keep your garlic butter steak bites fresh, store them in an airtight container. Place the container in the fridge. They stay tasty for up to three days. If you want to keep them longer, freezing is a good option. For freezing steak bites, let them cool first. Arrange them in a single layer on a baking sheet. Freeze them for one to two hours, then transfer to a freezer bag. This method helps keep them from sticking together. They can last up to three months in the freezer. When you're ready to eat, thaw them overnight in the fridge. When reheating, use a skillet on low heat. This method keeps the texture nice. You can also use the oven at a low temperature. Avoid using high heat, as it can overcook the steak. Just warm them until they are heated through, and you’ll enjoy their full flavor again. The best steak for Garlic Butter Steak Bites is sirloin. Sirloin is tender and flavorful. Other great choices include ribeye or filet mignon. These cuts cook well and stay juicy. They also absorb the garlic butter flavor nicely. Yes, you can use olive oil instead of butter. It adds a nice flavor and is healthier. You can also try ghee or avocado oil. These options will change the taste a bit but still work well. Cooking steak bites takes about 10 minutes. You will need 2-3 minutes per side for a nice sear. The total time depends on how you like your steak cooked. Make sure to check for doneness while cooking. You can prepare the garlic butter sauce ahead of time. Just store it in the fridge in an airtight container. When ready to use, reheat gently on low heat. This keeps the flavors fresh and tasty. Garlic Butter Steak Bites pair well with many sides. Consider serving them with a fresh salad or roasted vegetables. You can also enjoy them with rice or mashed potatoes. For a fun twist, serve them on skewers with toothpicks. For those seeking step-by-step guidance, check out the Full Recipe for Garlic Butter Steak Bites. To prepare Garlic Butter Steak Bites, you need simple, quality ingredients. Start with sirloin steak, butter, garlic, and fresh herbs. As discussed, seasoning and cooking your steak properly makes a big difference. Use tips for different cuts and cooking methods to enhance flavor. Keep experimenting with variations for your taste. Remember, these bites can be frozen or stored well for later. Easy reheating methods help you enjoy them again. Enjoy your cooking journey, and savor each delicious bite!

Garlic Butter Steak Bites Flavorful and Easy Dish

Are you ready to elevate your dinner game? Garlic Butter Steak Bites are both flavorful and easy to make. With

- 1 lb Brussels sprouts, trimmed and halved - 3 tablespoons olive oil - 2 tablespoons pure maple syrup - 1/2 cup pecans, roughly chopped - 1 tablespoon balsamic vinegar - Fresh thyme leaves for garnish - 1 teaspoon garlic powder - 1 teaspoon onion powder - Salt and pepper to taste The main ingredients are simple yet powerful. The Brussels sprouts bring a nice crunch. Olive oil helps with roasting, while maple syrup adds a sweet touch. The pecans give a nutty flavor and great texture. You can also use balsamic vinegar for a tangy kick. Fresh thyme leaves can brighten up the dish. Seasoning is key! Garlic powder and onion powder add depth. Don’t forget salt and pepper to taste. These ingredients work together to create magic. For the full recipe, check out the complete guide. Enjoy every bite of these flavorful bites! 1. Preheat the oven to 400°F (200°C). This is key for good roasting. 2. In a large bowl, combine the halved Brussels sprouts with olive oil, maple syrup, garlic powder, onion powder, salt, and pepper. Toss well to coat the sprouts evenly. 1. Spread the Brussels sprouts on a baking sheet cut side down. This helps them brown nicely. 2. Roast for 20 minutes before adding pecans. This step builds great flavor. 1. After 20 minutes, gently toss the sprouts and sprinkle the chopped pecans over them. 2. Roast for an additional 10-15 minutes. You want them tender and brown, stirring once halfway through. 3. Optionally, drizzle with balsamic vinegar before serving. Toss to combine for added taste. 4. Finally, remove from the oven and garnish with fresh thyme leaves. This adds a lovely touch. For the full recipe, check out the Maple-Pecan Roasted Brussels Sprouts. - Make sure to coat the sprouts well with oil and seasonings. This helps them cook evenly. - Use parchment paper on your baking sheet. It makes for easy cleanup after roasting. - If you like some spice, add a pinch of red pepper flakes. It gives a nice kick. - Try using different nuts, like walnuts or almonds, for added crunch and flavor. - Serve the roasted Brussels sprouts on a large platter. - Garnish with extra pecans and thyme for a beautiful look. This adds a touch of elegance to your dish. For the full recipe, check out the details above. {{image_2}} You can add seasonal veggies to your Brussels sprouts. Try carrots or sweet potatoes for color and taste. They roast well and add a nice texture. If you want extra flavor, try adding crispy bacon or pancetta. This gives a savory twist that many love. For a unique taste, make a maple mustard mix. Combine Dijon mustard with maple syrup. This brings a tangy sweetness that brightens the dish. You can also try a honey-lemon version. The citrus burst from the lemon adds freshness to the roasted sprouts. If you want a lighter option, use avocado oil instead of olive oil. It has a mild flavor and is great for cooking. For those who follow a vegan diet, pick pure maple syrup without additives. It keeps your dish both sweet and plant-based. For the full recipe, check the earlier section. To keep your Maple Roasted Brussels Sprouts fresh, let them cool completely. This step is key. Once cool, place them in an airtight container. Store the container in the fridge. The sprouts will stay good for about 3 to 4 days. For the best taste, reheat leftovers in the oven. Set the oven to 350°F (175°C) and warm them for about 10-15 minutes. This method helps to maintain their crispy texture. If you need a quick option, you can use the microwave. However, be aware that they may become a bit soggy. I do not recommend freezing these sprouts. Freezing can change their taste and texture. To enjoy the best flavor, eat them fresh or store leftovers in the fridge. If you have extra, consider sharing with friends instead of freezing! The best temperature for roasting Brussels sprouts is 400°F (200°C). This heat helps them caramelize nicely. You want that golden brown color. It also brings out their sweet flavor. You can use frozen Brussels sprouts if needed. However, fresh sprouts taste better and have a better texture. Frozen sprouts can be a quick fix, but they may not roast as well. Brussels sprouts are done when they are tender and caramelized. You do not want them mushy. Check for a nice brown color on the outside. This shows they are ready to eat. Maple roasted Brussels sprouts pair well with many dishes. You can serve them with roasted meats like chicken or beef. They also go great in grain bowls. They work well as a side for holiday meals too. Try them with your favorite proteins! For the full recipe, check out the details above. These maple roasted Brussels sprouts are easy to make and delicious. You learned the key ingredients, step-by-step instructions, and handy tips to enhance flavor. The variations and storage advice will help you enjoy them longer. Don't hesitate to try new flavors or veggies for a fun twist. These Brussels sprouts work well on any plate, from casual meals to special occasions. Enjoy your cooking adventure and the tasty results it brings!

Maple Roasted Brussels Sprouts Flavorful and Easy Recipe

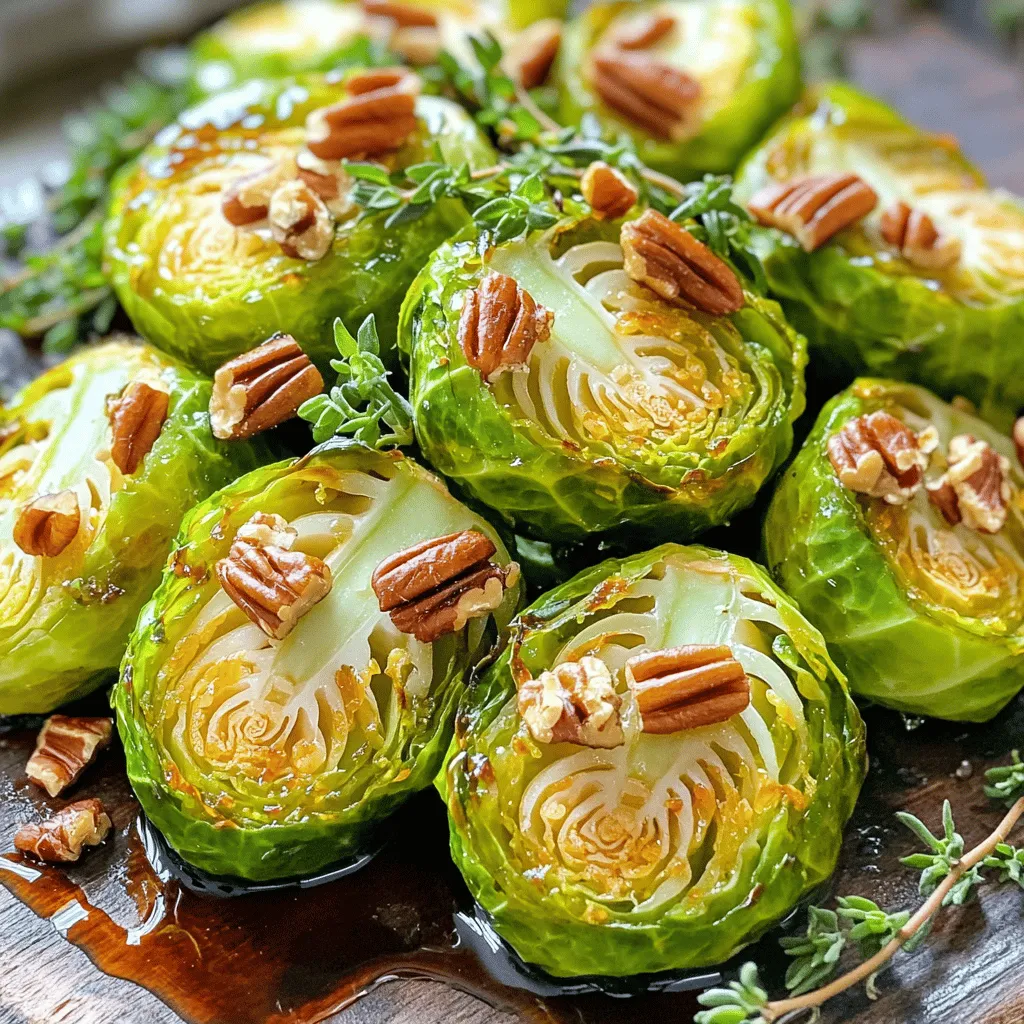
Are you looking for a quick and tasty side dish? Maple Roasted Brussels Sprouts might be your answer! This easy

Older posts
Newer posts
← Previous Page1 … Page13 Page14 Page15 … Page83 Next →

dsad

© 2025 So Yum Recipes • Built with GeneratePress

Our Policies

  • Copyright Policy
  • Cookie Policy
  • GDPR Policy
  • Privacy Policy
  • Disclaimer
  • Terms Of Use

More Information

  • Home
  • About
  • Contact
  • Appetizers
  • Dessert
  • Dinner
  • Drinks
©2025, So Yum Recipes About Back To Top