Skip to content
DisclaimerTerms Of UseGDPR PolicyCookie Policy

So Yum Recipes

  • Home
  • Drinks
  • Appetizers
  • Dinner
  • Dessert
  • About
  • Contact
  • Privacy Policy
DisclaimerTerms Of UseGDPR PolicyCookie Policy

Chloe

- 1 medium butternut squash, peeled and diced - 1 cup arborio rice - 4 cups vegetable broth Butternut squash gives this dish a sweet taste and creamy texture. The arborio rice is key for that signature risotto creaminess. Using vegetable broth enhances the flavor without overpowering the dish. - 2 tablespoons olive oil - 1/2 cup shredded Parmesan cheese (or a vegan alternative) - 6-8 fresh sage leaves, chopped Olive oil helps sauté the onion and garlic, adding depth to the dish. Parmesan cheese adds a rich, savory note, while fresh sage brings a lovely herbal aroma that pairs perfectly with the squash. - Pumpkin seeds for garnish - Vegan alternatives Pumpkin seeds add a nice crunch and visual appeal. If you want a vegan risotto, simply swap out the Parmesan for a plant-based cheese. This way, everyone can enjoy this creamy comfort dish! {{ingredient_image_1}} 1. First, grab a medium saucepan. Heat 4 cups of vegetable broth over low heat. 2. Keep the broth warm while you cook the risotto. This helps the rice cook evenly. 1. Now, take a large skillet. Add 2 tablespoons of olive oil and 1 tablespoon of butter. Heat over medium heat. 2. Once the oil is hot, add 1 small chopped onion. Sauté for 3-4 minutes until it turns clear. 3. Next, stir in 2 minced garlic cloves and cook for 1 minute. This gives great flavor. 4. Then, add 1 medium peeled and diced butternut squash. Cook for about 5 minutes. You want it to start softening. 1. Now it's time for the rice. Add 1 cup of arborio rice to the skillet. Stir well so each grain gets coated. 2. Toast the rice for around 2 minutes. This step adds a nice flavor. 3. Start adding the warm vegetable broth one ladle at a time. Stir often. 4. Wait until the broth is absorbed before adding more. Continue this for 18-20 minutes. The rice should be creamy and slightly firm. 1. Once the rice is ready, stir in 6-8 chopped fresh sage leaves and 1/2 cup of shredded Parmesan cheese. 2. Season with salt and pepper to taste. Mix until the cheese melts and everything is combined well. 3. Remove from heat and let it sit for a few minutes. This helps the flavors blend. Enjoy your creamy butternut squash sage risotto! To make your risotto creamy, stir often. Stirring helps release starch from the rice. This starch is key to that creamy texture. Use arborio rice for best results. Arborio rice has the right amount of starch. It absorbs liquid well and gets soft without losing shape. Adjusting seasonings can boost your dish. Taste your risotto while cooking. This way, you can add salt and pepper as needed. Fresh herbs, like chopped sage, add depth. They give a fragrant touch to the dish. You can also try adding garlic or onion powder for more flavor. For the best experience, serve with a side salad. A light green salad balances the meal. You can also add crusty bread for extra texture. For presentation, use bowls. Garnish with pumpkin seeds and whole sage leaves. This adds color and makes your risotto look gourmet. Pro Tips Use Fresh Sage: Fresh sage leaves provide a more vibrant flavor compared to dried ones. Add them at the end of cooking for the best aroma. Toast the Rice: Toasting the arborio rice before adding broth enhances its nutty flavor and helps achieve a creamy texture. Consistent Stirring: Stirring the risotto continuously while adding broth helps release the starches, creating a creamy consistency. Garnish for Presentation: Garnish with pumpkin seeds and whole sage leaves to add texture and a pop of color to your dish. {{image_2}} You can change grains for this risotto. Try using farro or quinoa instead of arborio rice. These grains cook differently but can add unique flavors and textures. When choosing seasonal vegetables, think about what’s fresh. You can add mushrooms, spinach, or even peas. They can provide extra taste and a pop of color. For vegan options, swap the Parmesan cheese for a vegan alternative. Nutritional yeast is a great choice. It gives a cheesy flavor without dairy. If you want a gluten-free risotto, make sure your broth is gluten-free. Arborio rice is naturally gluten-free, so you’re safe there. To add depth, consider spices like nutmeg or cinnamon. These warm spices can enhance the sweetness of the squash. You can also mix in proteins. Cooked chicken or shrimp can make this dish heartier. For a vegetarian protein, add chickpeas or lentils. These options can turn your risotto into a complete meal. To store leftovers, first let the risotto cool. Then, place it in an airtight container. It is best to refrigerate it within two hours of cooking. This way, you keep it fresh for later meals. For freezing, use a freezer-safe container. Make sure to leave space at the top for expansion. You can freeze risotto for up to three months. When you want to eat it, place the container in the fridge overnight to thaw. To reheat, warm it on the stove with a splash of broth. Stir often to get the creamy texture back. In the fridge, butternut squash sage risotto lasts about three to five days. Always check for signs of spoilage before enjoying leftovers. If it smells off or has changed color, it’s best to toss it. Enjoy your creamy comfort dish fresh for the best taste! Arborio rice is the best choice for risotto. Its short, round grains absorb liquid well. This rice releases starch when cooked, making the dish creamy. You want that smooth texture in every bite. Other rice types, like jasmine or basmati, won't give you the same result. Yes, you can make risotto without broth. You can use water, but it won't have as much flavor. Try using white wine or vegetable stock instead. You can also mix water with herbs to boost taste. This way, you can still enjoy a tasty risotto. To make risotto ahead, cook it until it's almost done. Leave out a little liquid, so it stays creamy. Cool it down quickly in a wide dish. Once cool, store it in an airtight container. When ready to eat, reheat it slowly, adding a splash of broth or water to revive the creaminess. This recipe combines butternut squash, arborio rice, and vegetable broth for a delicious dish. I shared step-by-step instructions to help you make creamy risotto, plus tips for flavor and presentation. You can customize it with seasonal veggies and dietary changes to fit your needs. Proper storage will keep leftovers fresh and tasty. Remember, with a little practice, you can create a comforting risotto that's perfect for any meal. Enjoy experimenting with flavors and ingredients to make it your own!

Butternut Squash Sage Risotto Creamy Comfort Dish

If you crave a cozy, creamy dish, look no further than Butternut Squash Sage Risotto. This dish blends sweet butternut

- 1 lb ground beef or turkey - 1/2 cup breadcrumbs - 1/4 cup grated Parmesan cheese - 1 large egg - 2 cloves garlic, minced - 1 tablespoon fresh ginger, grated - 1/4 cup honey - 2 tablespoons Sriracha sauce - 1 tablespoon rice vinegar - 1 tablespoon sesame oil - 1 teaspoon black pepper - 1/2 teaspoon salt - 1/4 teaspoon crushed red pepper flakes - Fresh cilantro for garnish When making Spicy Honey Sriracha Meatballs, the ingredients are key to the taste. The blend of ground beef or turkey, breadcrumbs, and cheese gives the meatballs a tasty base. I love using fresh garlic and ginger. They add a bright punch of flavor that pairs well with the meat. The sauce is a game changer. Honey and Sriracha create a sweet and spicy mix. This sauce coats the meatballs perfectly. Rice vinegar adds a nice tang, while sesame oil brings depth to the flavor. Seasoning is just as important. Black pepper and salt help enhance all the tastes. Crushed red pepper flakes add a little heat. Fresh cilantro not only looks great but also adds a fresh finish. Gather these simple ingredients, and get ready to whip up a dish that everyone will love! {{ingredient_image_1}} - Preheat the oven to 400°F (200°C). - Line your baking sheet with parchment paper. This helps with easy cleanup. - In a large bowl, combine the ground beef or turkey, breadcrumbs, and grated Parmesan. - Add the egg, minced garlic, grated ginger, soy sauce, black pepper, salt, and crushed red pepper flakes. - Mix well until the texture is even. Avoid overmixing; it can make the meatballs tough. - Scoop about 1.5 tablespoons of the mixture with your hands. - Roll it into a ball and place it on the prepared baking sheet. - Keep the meatballs spaced out. Bake for 15-20 minutes. They should be golden and cooked through. Check for an internal temperature of 165°F (75°C). - While the meatballs bake, combine honey, Sriracha, rice vinegar, and sesame oil in a small saucepan. - Stir well over medium heat and bring to a simmer. Cook for 3-5 minutes until the sauce thickens. - Once the meatballs are done, remove them from the oven. - Carefully transfer them to a large bowl. Pour the spicy honey Sriracha sauce over the meatballs. - Gently toss to coat each meatball evenly in the sauce. - Transfer the coated meatballs to a serving dish. - Garnish with freshly chopped cilantro for a pop of color and flavor. Enjoy! To make Spicy Honey Sriracha Meatballs pop, use fresh ingredients. Fresh garlic and ginger add a bright taste. They bring out the best flavor in your dish. Balance the sweetness of honey with the heat of Sriracha. This mix makes each bite exciting. Adjust the sweetness or spice to fit your taste buds. You can choose to bake or fry your meatballs. Baking is simpler and less messy. It also makes the meatballs crisp without much oil. Frying gives a nice brown crust but takes more care. Always check if the meatballs are done. They should reach an internal temperature of 165°F (75°C). Use a meat thermometer for the best results. One common mistake is overmixing the meatball mixture. This can make the meatballs tough. Mix just until combined for a tender bite. Another mistake is crowding the meatballs on the baking sheet. Leave space between them to cook evenly. This allows hot air to circulate and helps them brown nicely. Pro Tips Use Lean Meat: Opt for lean ground turkey or beef for a healthier version of these meatballs without sacrificing flavor. Adjust Spice Level: Modify the amount of Sriracha and crushed red pepper based on your spice tolerance; start with less and add more to taste. Let Them Rest: Allow the meatballs to rest for a few minutes after baking before coating them in sauce to enhance their flavor and texture. Experiment with Garnishes: Try garnishing with sesame seeds or green onions for added texture and a burst of flavor. {{image_2}} You can switch up the meat to change the flavor. Try ground chicken or pork instead. Each meat adds a unique taste. If you want a lighter option, turkey works well too. For dairy-free meals, skip the Parmesan cheese. Use nutritional yeast for a cheesy flavor. You can also try almond flour instead of breadcrumbs for a gluten-free option. Get creative by adding veggies to the meatball mix. Chopped bell peppers or shredded carrots bring color and nutrition. You can even mix in some chopped spinach for extra health benefits. For a twist on the sauce, try adding hoisin sauce. This adds a sweet touch. You could also use chili garlic sauce for a different heat level. These meatballs make a great appetizer. Just serve them with toothpicks for easy eating. You can also place them on a platter with your favorite dipping sauce. If you want to make it a meal, serve the meatballs over rice or noodles. They pair well with steamed broccoli or a fresh salad. This adds balance and makes the meal more filling. After you enjoy your spicy honey Sriracha meatballs, store any leftovers in the fridge. Use an airtight container to keep them fresh. Glass or BPA-free plastic containers work best. Make sure to cool the meatballs before sealing them to avoid moisture buildup. If you want to save some for later, freezing is a great option. First, let the meatballs cool completely. Then, place them in a single layer on a baking sheet. Freeze them for about an hour. After that, transfer the meatballs to a freezer bag. Remove as much air as possible before sealing. For reheating, you can bake them at 350°F (175°C) until warmed through or microwave them for a quick meal. In the fridge, your meatballs can last up to four days. Always check for signs of spoilage. If they smell sour or change color, it’s best to toss them. When stored properly, frozen meatballs can last up to three months. Yes, you can use lean meat. Ground turkey or lean beef works great. Lean meat keeps the meatballs lighter. However, it may result in drier meatballs. To prevent this, add a bit more fat, like olive oil or an extra egg. To tone down the heat, reduce the Sriracha. You can start with one tablespoon instead of two. Adding more honey also helps. Honey balances the spice with sweetness. You can mix in a little ketchup for extra flavor. These meatballs pair well with rice or noodles. You can also serve them with a fresh salad. Try them in a sub with fresh veggies. For a fun twist, serve them as sliders with mini buns. Absolutely! You can make the meatball mixture a day before. Store it in the fridge covered. This helps flavors blend well. Just form and bake them when ready to cook. Reheat leftover meatballs in the oven or microwave. For the oven, set it to 350°F. Place meatballs on a baking sheet for about 10 minutes. In the microwave, heat them for 1-2 minutes. Make sure they are hot all the way through. You learned how to make spicy honey sriracha meatballs. We covered ingredients, step-by-step instructions, and tips for great flavor. Remember to balance spice and sweetness for the best taste. Using fresh ingredients helps the dish shine. Whether serving as a snack or main meal, these meatballs will impress. Don't forget to store any leftovers properly. Enjoy making this tasty dish!

Spicy Honey Sriracha Meatballs Irresistible Flavor Boost

Looking to spice up your meal? These Spicy Honey Sriracha Meatballs pack a punch of flavor that will leave your

- 1 lb flank steak - 1/4 cup fresh cilantro, chopped - 3 tablespoons lime juice - 2 cloves garlic, minced For this recipe, the base flavors come from the flank steak, fresh cilantro, lime juice, and garlic. The flank steak gives a rich, meaty taste. Fresh cilantro adds a bright, herby kick. Lime juice brings in a zesty tang. Garlic adds depth and warmth. Together, these ingredients create a lively flavor that makes your taste buds dance. - 1 cup brown rice (cooked) - 1 cup black beans (canned, rinsed and drained) - 1 avocado, sliced - 1 cup cherry tomatoes, halved - 1/2 cup corn (fresh, frozen, or canned) These ingredients work together to build a hearty meal. Brown rice serves as a filling base. Black beans add protein and fiber. Sliced avocado brings creaminess and healthy fats. Cherry tomatoes add sweetness and color. Corn gives a nice crunch and sweetness. Each bite is a mix of flavors and textures. - Sliced jalapeños - Sour cream - Additional cilantro Toppings can elevate your steak bowl. Sliced jalapeños add heat for those who like spice. Sour cream provides a cool contrast to the flavors. Extra cilantro can boost the herb taste. You can customize each bowl to suit your taste. Enjoy mixing and matching! {{ingredient_image_1}} To start, combine the following in a bowl: - 1/4 cup fresh cilantro, chopped - 3 tablespoons lime juice - 2 cloves garlic, minced - 1 teaspoon ground cumin - 1 teaspoon chili powder - Salt and pepper to taste Mix these ingredients well. This marinade adds a fresh taste to the steak. Next, place 1 lb of flank steak in a resealable plastic bag or a dish. Pour the marinade over the steak, ensuring it covers all sides. Seal the bag or cover the dish. Refrigerate for at least 30 minutes. For a stronger flavor, let it marinate for up to 2 hours. Now, preheat your grill or skillet over medium-high heat. Remove the steak from the marinade, shaking off the excess. Grill the steak for about 5-7 minutes on each side. Cook until it reaches your desired doneness. For medium-rare, aim for 130°F. After cooking, remove the steak from heat. Let it rest for 5 minutes. This helps keep the juices inside. While the steak is resting, prepare your bowls. Start with a base layer of 1 cup of cooked brown rice. Add 1 cup of black beans, rinsed and drained. Next, layer fresh corn and halved cherry tomatoes. Finally, slice an avocado and place it on top. Once the steak has rested, slice it thinly against the grain. Arrange the sliced steak over your rice and bean mixture. Drizzle extra lime juice over the bowls. You can also add optional toppings like sliced jalapeños, sour cream, and extra cilantro for more flavor and flair. Enjoy your delicious, colorful cilantro lime steak bowls! To enhance flavors in your cilantro lime steak bowls, use a simple marinade. Combine chopped cilantro, lime juice, minced garlic, ground cumin, chili powder, salt, and pepper in a bowl. This mixture adds a bright taste to the steak. For best results, marinate the steak for at least 30 minutes. If you have time, let it sit for up to 2 hours. The longer it marinates, the more flavor it will soak up. You can choose to grill or use a skillet for cooking the steak. Grilling gives a nice char and smoky flavor. If you pick a skillet, use medium-high heat. Cook the steak for about 5-7 minutes on each side. The ideal doneness temperature for medium-rare is 130°F. Remember to let the steak rest for 5 minutes after cooking. This resting time keeps the juices inside. To make your bowls look appealing, garnish them well. Slice the avocado and arrange it neatly on top. Scatter halved cherry tomatoes and corn around the bowl. For a pop of color, add some sliced jalapeños or sprinkle extra cilantro on top. A drizzle of lime juice at the end adds a fresh touch. Presenting your dish this way makes it more inviting and fun to eat. Pro Tips Marinate for Maximum Flavor: Allow the steak to marinate for at least 2 hours for deeper flavor penetration, or overnight if time permits. Rest the Steak: Always let the steak rest for at least 5 minutes after cooking. This helps retain juices, making for a more tender bite. Customize Your Bowls: Add seasonal vegetables or your favorite toppings like grilled peppers or shredded cheese to make the bowls your own. Use Fresh Ingredients: Whenever possible, opt for fresh ingredients, especially herbs and vegetables, to enhance the overall flavor and presentation of your dish. {{image_2}} You don’t have to stick with flank steak. Chicken is a great choice if you want something lighter. Simply use chicken breasts or thighs. Tofu is a fantastic option for a vegetarian meal. Just press and marinate it like steak. This way, you keep the great flavor while catering to your preferences. Brown rice is a lovely base, but there are more options. Quinoa offers a nutty taste and a protein boost. Cauliflower rice is another great choice for a low-carb meal. It adds a fresh crunch to your bowls. You can even try farro or barley for a different texture. Each grain brings its unique flavor and feel. Want to kick up the flavor? Consider adding spices like paprika or coriander. You could also toss in bell peppers or zucchini for more color and taste. Adding fresh jalapeños gives a nice kick if you love heat. Don’t forget about black olives or corn for extra texture and flavor. Each add-in can transform your bowl into something new and exciting. To keep your steak bowls fresh, use airtight containers. Glass or plastic containers work well. Store them in the fridge for up to three days. This way, you can enjoy your meal later without losing flavor. For the best taste, reheat your steak bowls in the microwave. Place the bowl in the microwave and cover it with a damp paper towel. Heat for about 1-2 minutes until warm. This keeps the rice moist and helps the flavors blend. You can also reheat in a skillet over low heat, stirring often. This method warms the food evenly and keeps it tasty. If you want to save your steak bowls for longer, freezing is an option. Place the components in separate bags. Freeze the steak, rice, and veggies separately. This helps maintain texture and taste. When you're ready to eat, thaw them overnight in the fridge. Reheat as mentioned above for the best results. To make cilantro lime sauce, start with these steps: - In a bowl, mix 1/4 cup chopped fresh cilantro. - Add 3 tablespoons of lime juice. - Include 2 minced garlic cloves. - Stir in 1 teaspoon of ground cumin and 1 teaspoon of chili powder. - Season with salt and pepper to taste. This sauce is fresh and bright. It enhances the steak's flavor and adds zing to your bowls. Yes, you can prepare this dish ahead of time. Here are some tips: - Marinate the flank steak up to 2 hours prior to cooking. - Cook the steak and let it cool before storing. - Assemble the bowls with cooked rice, beans, and veggies. Store each component separately. - This way, you can quickly reheat and enjoy a tasty meal later. Meal prep saves time and helps you eat well during busy days. If you don’t have lime juice, here are some alternatives: - Use lemon juice for a similar tang. - Try orange juice for a sweeter flavor. - Consider vinegar, like apple cider or rice vinegar, for a different twist. These substitutes keep your dish tasty and bright, even without lime. Cilantro lime steak bowls are simple and tasty. You learned about key ingredients like flank steak, fresh cilantro, and lime juice. I shared step-by-step instructions for marinating and cooking. Plus, I offered tips for great flavor and helpful variations to try. Now, get creative with your own bowls. Enjoy experimenting with different proteins, grains, and toppings. With these ideas, you’ll make delicious meals your family will love. Cook, share, and savor every bite!

Cilantro Lime Steak Bowls Flavorful and Easy Meal

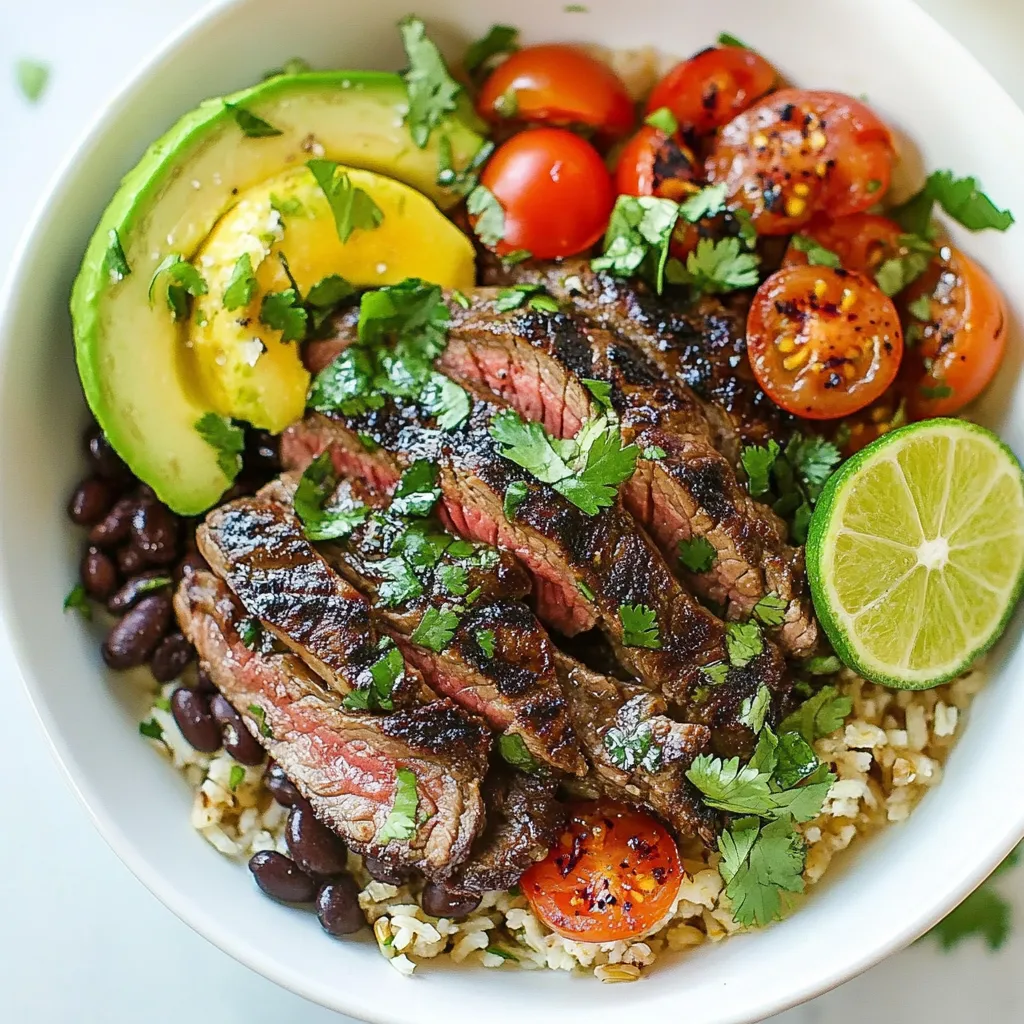
Are you looking for a tasty and easy meal to spice up your dinner? Look no further! These Cilantro Lime

- 8 oz elbow macaroni - 1 lb chicken breast, diced - 1/2 cup honey - 1/4 cup soy sauce (low sodium) - 2 cups shredded cheddar cheese - 1/2 cup cream cheese, softened - 1/2 cup milk To make this dish, start with elbow macaroni. This pasta holds cheese well. Next, we need chicken breast. Diced chicken cooks quickly and adds protein. Honey and soy sauce form a sweet and salty sauce for flavor. Cheddar cheese gives that classic mac and cheese taste. Cream cheese makes it extra creamy. Milk helps the cheese melt smoothly. - 1 teaspoon garlic powder - 1/2 teaspoon smoked paprika - Fresh parsley, chopped (for garnish) Garlic powder enhances the chicken's flavor. Smoked paprika adds warmth and depth. Fresh parsley brightens the dish and makes it pretty. - Additional cheese for topping - Other protein substitutions For a cheesier bite, add more cheese on top. You can swap chicken for shrimp or tofu. These options keep the meal tasty and fun. {{ingredient_image_1}} To start, boil the elbow macaroni. Fill a large pot with salted water and bring it to a boil. Once boiling, add the macaroni. Cook it based on the package instructions until it is al dente. This means it should be firm, but not hard. After that, drain the pasta and set it aside. Next, we need to prepare the chicken. Heat two tablespoons of olive oil in a large skillet over medium heat. While the oil heats, season the diced chicken with salt, pepper, and garlic powder. Once the oil is hot, add the chicken to the skillet. Cook it for about 5-7 minutes. You want it to be browned and fully cooked through. This ensures a juicy and tasty chicken. Now, let’s make the honey garlic sauce. In a small bowl, mix together half a cup of honey, a quarter cup of low-sodium soy sauce, and two cloves of minced garlic. Once the chicken is cooked, pour this sauce into the skillet. Stir well to coat the chicken evenly. Let the sauce simmer for about 2-3 minutes. This helps it thicken up nicely. Now, it’s time to combine everything. In a large mixing bowl, add the cooked macaroni, the chicken with sauce, two cups of shredded cheddar cheese, half a cup of cream cheese, half a cup of milk, and half a teaspoon of smoked paprika. Stir everything together until well mixed. Make sure the pasta and chicken get evenly coated with cheese and sauce. Preheat your oven to 350°F (175°C). Transfer the mac and cheese mixture into a greased baking dish. If you like, you can top it with some extra cheese. Bake it for 20-25 minutes. You want it to be bubbly and golden on top. Keep an eye on it to avoid overcooking. After baking, remove the dish from the oven. Let it cool for a few minutes before serving. This helps avoid burns. Before serving, garnish with some chopped fresh parsley for a pop of color. Enjoy your savory honey garlic chicken mac and cheese! To get the right flavor, you can adjust the sweetness or saltiness. If the sauce tastes too sweet, add a bit more soy sauce. For extra sweetness, add more honey. To thicken the sauce, let it simmer longer. This helps it stick to the chicken and pasta better. To cook pasta just right, look for al dente texture. This means it should be firm but not hard. Stir the pasta while it cooks to prevent sticking. Once cooked, drain it well and avoid rinsing. Rinsing washes away the starch that helps sauce stick. For a creamy mac and cheese, use a blend of cheeses. Cheddar is great, but mix it with cream cheese for richness. When melting cheese, stir it in slowly over low heat. This keeps the cheese smooth and prevents clumping. Make sure to use freshly shredded cheese, as it melts better than pre-shredded. Pro Tips Perfectly Cooked Pasta: Make sure to cook the elbow macaroni al dente. This will help it maintain its texture when mixed with the cheese sauce and baked. Marinate the Chicken: For added flavor, consider marinating the diced chicken in the honey garlic sauce for 30 minutes before cooking. This will enhance the taste. Cheese Variations: Feel free to mix different types of cheese, such as mozzarella or pepper jack, for a unique flavor profile in your mac and cheese. Garnish for Presentation: Adding freshly chopped parsley not only enhances the visual appeal but also adds a fresh flavor that complements the dish beautifully. {{image_2}} You can change up the protein in this dish. Instead of chicken, try shrimp or tofu. Shrimp cooks quickly and adds a nice flavor. Just sauté it until it turns pink. Tofu is a great vegetarian option. Press it to remove water, then cube and sauté. Add some color and nutrition by including veggies like spinach or bell peppers. Spinach wilts nicely and blends well with the cheese. Bell peppers add a sweet crunch. You can also explore different spices for extra flavor. Try adding chili powder or cumin. Mixing cheeses can take your mac and cheese to the next level. Use a blend of cheddar and Monterey Jack for a creamy texture. You can even incorporate flavored cheeses, like smoked gouda or pepper jack, to add depth. Experimenting with cheeses makes each batch unique and exciting! To store leftovers, place the mac and cheese in an airtight container. It’s best to do this when it has cooled down. Keep it in the refrigerator for up to three days. For freshness, cover the dish tightly. You can also use plastic wrap or foil to seal it. If you want to save it for longer, freezing is a great option. Let the dish cool completely before you freeze it. Use a freezer-safe container or a heavy-duty freezer bag. It can last up to three months in the freezer. When you're ready to eat, thaw it in the fridge overnight. To reheat in the oven, preheat it to 350°F (175°C). Place the mac and cheese in a baking dish and cover it with foil. Heat for about 20-25 minutes or until warm. Stir halfway through for even heating. For microwave reheating, scoop a portion into a microwave-safe bowl. Add a splash of milk to keep it creamy. Heat for 1-2 minutes on high, stirring halfway. Check to see if it’s hot enough before serving. You can serve this dish with a simple salad. A side of steamed broccoli works well too. Garlic bread adds a nice touch. For a refreshing drink, try iced tea or lemonade. Yes, you can prepare the dish in advance. Cook the mac and cheese, then store it in the fridge. Just reheat it in the oven before serving. It stays tasty for about three days. To spice up the sauce, add red pepper flakes. You can also mix in some hot sauce. Adjust the amount based on your heat preference for the best flavor. Absolutely! Kids love the creamy cheese and sweet honey flavor. The chicken adds protein, making it a balanced meal. You can even let kids help with the cooking for more fun. Yes, you can use regular soy sauce. It will make the dish saltier, so watch the salt you add. You could also use tamari for a gluten-free option. This blog post covered how to make Honey Garlic Chicken Mac and Cheese. You learned about key ingredients like chicken, pasta, and sauces. I shared step-by-step instructions to ensure success. Tips on cooking and storage can help keep your dish fresh. Explore variations to make this recipe your own. Don’t be afraid to add different flavors and proteins. Enjoy experimenting with this tasty meal that everyone loves!

Savory Honey Garlic Chicken Mac and Cheese Recipe

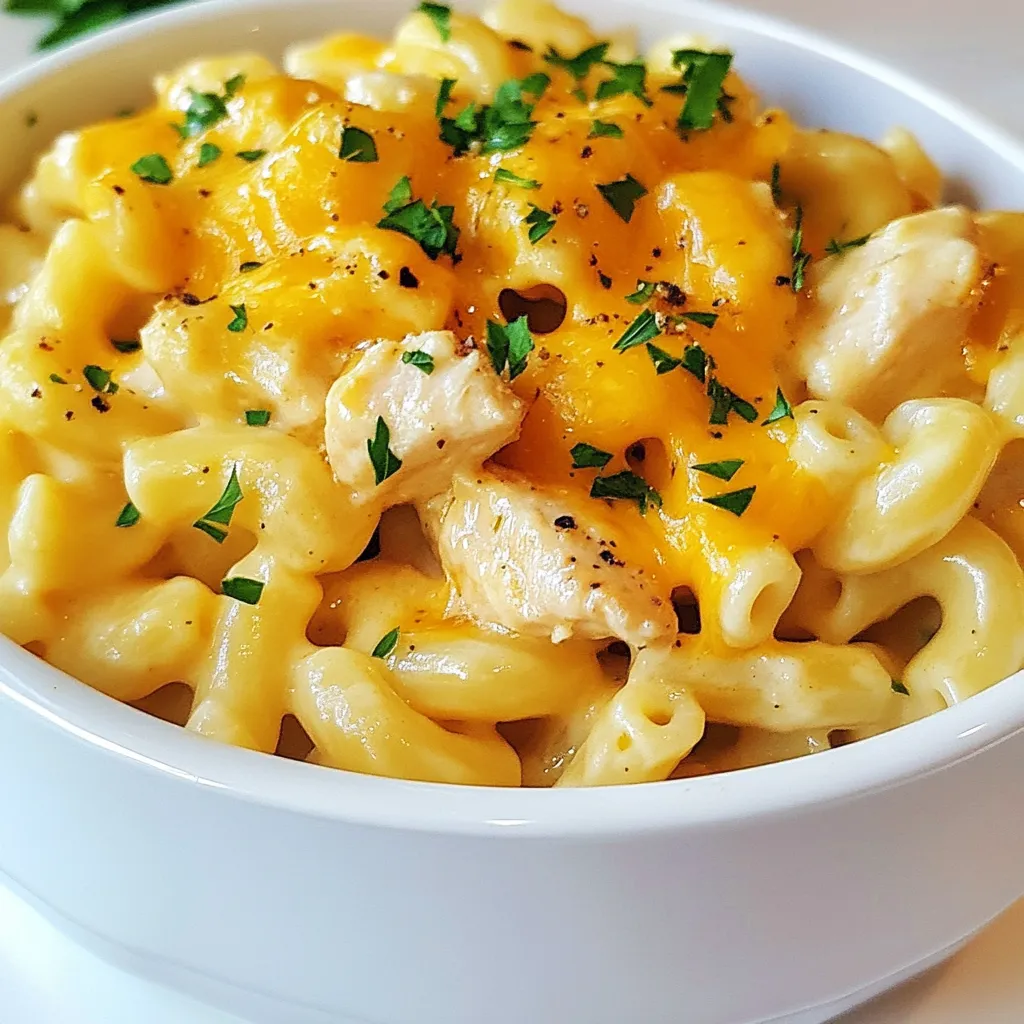
Ready to excite your taste buds? This Savory Honey Garlic Chicken Mac and Cheese recipe combines tender chicken, creamy cheese,

- 12 oz cheese tortellini (fresh or frozen) - 1 tablespoon olive oil - 4 cloves garlic, minced - 1 cup heavy cream - 1 cup diced tomatoes (canned or fresh) - 1/2 teaspoon red pepper flakes (adjust to taste) - 1 teaspoon Italian seasoning - Salt and pepper to taste - 1 cup fresh spinach, roughly chopped - 1/2 cup grated Parmesan cheese - Fresh basil leaves for garnish - Additional vegetables (e.g., bell peppers, mushrooms) - Protein options (e.g., chicken, shrimp) - Flavor boosters (e.g., lemon zest, sundried tomatoes) I love how this dish combines simple ingredients to create something amazing. You can use fresh or frozen cheese tortellini. I often choose fresh because it cooks quickly. Olive oil gives a nice base, while garlic adds a fragrant kick. Heavy cream makes the sauce rich and creamy. Diced tomatoes add color and flavor, balancing the cream. Red pepper flakes give a gentle heat. You can adjust this based on your taste. Italian seasoning adds depth, while salt and pepper enhance all the flavors. Fresh spinach brings in a pop of color and nutrition. Finally, grated Parmesan cheese melts into the sauce, making it even tastier. If you want to personalize the dish, consider some add-ins. Bell peppers and mushrooms can add more veggies. Chicken or shrimp can turn this into a heartier meal. For a bright twist, add lemon zest or sundried tomatoes for extra flavor. This dish is all about making it your own! {{ingredient_image_1}} To boil tortellini, fill a large pot with salted water. Bring it to a rolling boil. Add the cheese tortellini and cook as directed on the package. It usually takes about 3-5 minutes. Check for al dente texture; it should be firm yet tender. After cooking, drain the tortellini well and set aside. For the garlic, heat olive oil in a large skillet over medium heat. Add minced garlic and sauté for about 1 minute. Watch closely to prevent burning. You want the garlic fragrant, not brown. Timing is key here; it enhances the flavor of the whole dish. To make the cream sauce, pour the heavy cream into the skillet with the garlic. Bring it to a gentle simmer. Next, add diced tomatoes, red pepper flakes, and Italian seasoning. Stir well to mix. Season with salt and pepper. This sauce needs to be creamy but not too thick. Now, stir in the chopped spinach and let it wilt for about 2-3 minutes. Make sure to stir occasionally. Once the spinach is wilted, add the cooked tortellini to the skillet. Toss gently to coat the tortellini in the creamy sauce. Sprinkle in the grated Parmesan cheese and mix until it melts. This step is crucial for a rich flavor. To make Marry Me Tortellini just right, you can adjust the spiciness. A pinch of red pepper flakes can add a nice kick. Start with half a teaspoon. Taste it, then add more if you like. This lets you control the heat to match your taste. Adding more vegetables can balance the richness of the cream. Try bell peppers or mushrooms for extra flavor and texture. This makes the dish healthier and more colorful too. When plating Marry Me Tortellini, shallow bowls work best. This lets you show off the creamy sauce. Sprinkle extra Parmesan cheese on top for a cheesy touch. Fresh basil leaves add a pop of color and flavor. A light drizzle of olive oil can finish the dish beautifully. For the best results, use a large pot for boiling the tortellini. A non-stick skillet is great for making the sauce. It helps prevent sticking and burning. Essential kitchen tools include a sharp knife for chopping and a wooden spoon for stirring. These tools make the cooking process smooth and easy. Pro Tips Cook Tortellini Al Dente: Ensure the tortellini is cooked al dente for the best texture. It will continue to cook slightly when mixed with the sauce. Customize the Heat: Adjust the amount of red pepper flakes according to your spice preference. You can always add more, but it’s hard to take it out! Use Fresh Ingredients: Whenever possible, opt for fresh tomatoes and spinach to enhance the flavor and nutritional value of the dish. Perfect Presentation: For an elegant touch, serve in shallow bowls and add a swirl of olive oil on top before garnishing with basil and extra Parmesan. {{image_2}} You can easily make Marry Me Tortellini vegetarian. Just swap the cheese tortellini for a plant-based version. Many brands now offer great flavors. You can also add more veggies. Think bell peppers, zucchini, or mushrooms. This boosts nutrients and flavor. Try to use fresh spinach, too. It adds color and a nice texture. For those who need gluten-free options, there are plenty of choices. Look for gluten-free tortellini brands. They taste good and work well in this dish. When making the sauce, check the labels on your cream and seasonings. Make sure they are gluten-free. This keeps everyone at the table happy. Want to switch things up? Change the seasonings! You can try pesto for a fresh twist. A little lemon-garlic can also brighten the dish. Feeling adventurous? Add artichokes or olives for a fun flavor kick. These simple changes make the dish unique and exciting. To keep your Marry Me Tortellini fresh, store it in an airtight container. Place it in the fridge right away. This dish lasts about three to four days in the refrigerator. If you want to save it longer, consider freezing it. In the freezer, it can keep for up to three months. Just make sure to separate portions. This way, you can pull out only what you need. When reheating, I recommend using the stovetop. It helps keep the creamy texture. Add a splash of cream or water to help the sauce stay smooth. Heat it on low, stirring gently. If you prefer the microwave, use a microwave-safe dish. Cover it with a paper towel to prevent splatters. Heat in short bursts, stirring in between. This method works well but may not keep the sauce as creamy as the stovetop. The name "Marry Me" Tortellini comes from its rich flavor. Many say it tastes so good that it can inspire love. The creamy sauce, fresh spinach, and cheesy tortellini create a dish that feels special. It's perfect for a date night or special occasion. Yes, you can prepare this dish in advance. Cook the tortellini and sauce separately. Store them in the fridge for up to 2 days. When ready to serve, combine them and heat gently. This way, you save time on busy days. Serve Marry Me Tortellini in shallow bowls. Pair it with a side salad or garlic bread. A light white wine, like Pinot Grigio, complements the flavors well. Fresh basil on top adds a lovely touch. Absolutely! This dish is great for meal prep. You can scale the recipe up for batch cooking. Store portions in airtight containers. Reheat them for a quick, delicious meal during the week. This blog post explored the delicious Marry Me Tortellini. We covered key ingredients and options for add-ins. I shared step-by-step instructions for cooking and making the sauce. Tips helped you perfect this dish’s flavor and presentation. In final thoughts, the dish is versatile and easy to customize. Enjoy experimenting with different flavors and ingredients. Perfect for any meal, it is sure to impress!

Marry Me Tortellini Simple and Flavorful Delight

Are you ready to impress your loved ones with a pasta dish that could spark romance? Marry Me Tortellini is

- 2 cans (15 oz each) chickpeas, drained and rinsed - 1 tablespoon coconut oil - 1 medium onion, chopped - 3 cloves garlic, minced - 1 tablespoon fresh ginger, grated - 1 can (14 oz) coconut milk - 2 teaspoons curry powder - 1 teaspoon turmeric powder - 1 teaspoon cumin powder - 1 tablespoon tomato paste - 1 cup spinach leaves, fresh - Salt and pepper, to taste - Fresh cilantro, for garnish - Lemon wedges, for serving This recipe serves four. Each serving has about: - Calories: 360 - Protein: 12g - Carbohydrates: 50g - Fat: 14g - Fiber: 10g Chickpeas are a great source of protein and fiber. Coconut milk adds healthy fats. This dish is both filling and nutritious. I love using spices to add flavor. Here are some great options: - Curry powder: This gives the dish its warm taste. - Turmeric: It adds color and health benefits. - Cumin: This brings an earthy taste that pairs well with chickpeas. Feel free to experiment with spices. Try adding paprika for heat or coriander for a citrusy flavor. Enjoy your cooking adventure! {{ingredient_image_1}} To make Minute Chickpea Curry, start by gathering your ingredients. You will need two cans of chickpeas, one tablespoon of coconut oil, one chopped onion, three minced garlic cloves, and one tablespoon of grated ginger. You will also use one can of coconut milk, two teaspoons of curry powder, one teaspoon of turmeric powder, one teaspoon of cumin powder, and one tablespoon of tomato paste. Lastly, grab one cup of fresh spinach, salt, pepper, cilantro for garnish, and lemon wedges for serving. 1. Heat the coconut oil in a large skillet over medium heat until melted. 2. Add the chopped onion. Sauté for about five minutes until it turns translucent. 3. Stir in the minced garlic and grated ginger. Cook for two more minutes until you smell the nice aroma. 4. Add the spices. Mix in the curry powder, turmeric, and cumin. Toast the spices for one minute. 5. Incorporate the chickpeas and tomato paste. Mix everything well with the onion and spices. 6. Pour in the coconut milk. Stir until all ingredients blend together. Bring it to a gentle simmer. 7. Let the curry simmer for about ten minutes. Stir occasionally until it thickens a bit. 8. Add the spinach. Stir it in and let it wilt for two minutes just before serving. 9. Season with salt and pepper. Taste and adjust if needed. 10. Garnish with cilantro and serve with lemon wedges on the side. Keep your kitchen tidy while you cook. Gather all your ingredients before you start. This saves time and makes cooking easier. Use a cutting board and knife for chopping quickly. A non-stick skillet helps prevent sticking and makes cleanup easier. - Prep Time: 10 minutes. This includes chopping and measuring your ingredients. - Cook Time: 15 minutes. This is the time needed to cook the curry and let it simmer. - Total Time: 25 minutes. You will have a delicious meal ready in no time! To boost the flavor of your chickpea curry, use fresh herbs. Fresh cilantro adds a bright taste. A splash of lemon juice brightens the dish. You can also try adding a dash of soy sauce for depth. If you want heat, add chopped chili peppers or a pinch of cayenne. Toasted nuts, like cashews, add a nice crunch and flavor. One common mistake is overcooking the spinach. You want it to wilt, not turn mushy. Another mistake is using old spices. Fresh spices give the best flavor. Don’t skip the salt; it enhances all the flavors. Lastly, avoid rushing the simmering time. Letting the curry simmer thickens it and melds the flavors. A large skillet works best for this dish. A non-stick skillet helps with easy stirring and cleaning. A wooden spoon is great for mixing the ingredients without scratching your pan. For measuring, use a set of measuring spoons and cups for accuracy. A sharp knife makes chopping the onion and garlic quick and safe. Pro Tips Use Fresh Spices: Freshly ground spices will enhance the flavor of your curry significantly. Consider grinding whole spices yourself for a more aromatic experience. Adjust the Heat: If you prefer a spicier curry, add diced green chilies or a pinch of cayenne pepper to the mixture. Adjust according to your heat preference. Enhance the Creaminess: For an even creamier curry, you can add a tablespoon of nut butter, such as almond or cashew, to the coconut milk when simmering. Serve with Accompaniments: Pair your Chickpea Delight Curry with basmati rice or warm naan for a complete meal. A side of yogurt can also help balance the spices. {{image_2}} This chickpea curry is a great dish for both vegetarians and vegans. It uses coconut milk, making it dairy-free. You can enjoy it without any animal products. Want to add more veggies? Toss in bell peppers, carrots, or zucchini. They cook well and add a nice crunch. You can also top it with avocado for extra creaminess. Feel free to get creative with your chickpea curry. Here are a few ideas: - Sweet Potatoes: Dice them up and add them in. They make the dish sweeter and more filling. - Peas or Corn: These add a pop of color and sweetness. - Chopped Tomatoes: Fresh or canned will work. They add extra moisture and flavor. - Nuts: Cashews or peanuts can add crunch and richness. They pair well with the spices. If you like some heat, adjust the spice level to your taste. For mild curry, stick to the recipe as is. If you want more spice, add red pepper flakes or fresh chili. Start with a small amount, then taste and add more if needed. You can also use a spicy curry powder for a fiery kick. Just remember, balance is key to a great flavor! To keep your chickpea curry fresh, let it cool first. Once cool, transfer it to an airtight container. Store it in the fridge for up to four days. Make sure to label the container with the date. This way, you will know how long it has been stored. You can freeze leftover chickpea curry for longer storage. Use a freezer-safe container or heavy-duty freezer bags. Leave some space for expansion. Frozen curry can last for up to three months. When ready to eat, thaw it in the fridge overnight before reheating. To reheat the curry, place it in a pot over low heat. Stir occasionally to prevent sticking. You can also microwave it. Pour the curry into a microwave-safe bowl. Heat it in short bursts, stirring in between. Ensure it is warm throughout before serving. Add a splash of coconut milk if it looks too thick. You can use almond milk or soy milk. These options work well in most recipes. If you want creaminess, try cashew cream. It adds a nice texture and flavor. Yes, you can use dried chickpeas. First, soak them overnight. Then, cook them until soft. This method takes more time, but it adds a fresh taste. This recipe is already gluten-free. All the ingredients are safe for gluten-free diets. Just double-check the curry powder and tomato paste for any hidden gluten. Serve it with rice or quinoa for a filling meal. You can also try naan bread or pita for dipping. A simple salad or yogurt can add freshness to the plate. This blog post covered how to make chickpea curry. We discussed ingredients, cooking steps, and helpful tips. You learned about adjusting flavors, avoiding common mistakes, and using the right tools. We also explored variations, like vegetarian options and spice levels. Finally, I provided storage tips so nothing goes to waste. Chickpea curry is easy to prepare and enjoy. With practice, you'll make it your own.

Minute Chickpea Curry Quick and Flavorful Recipe

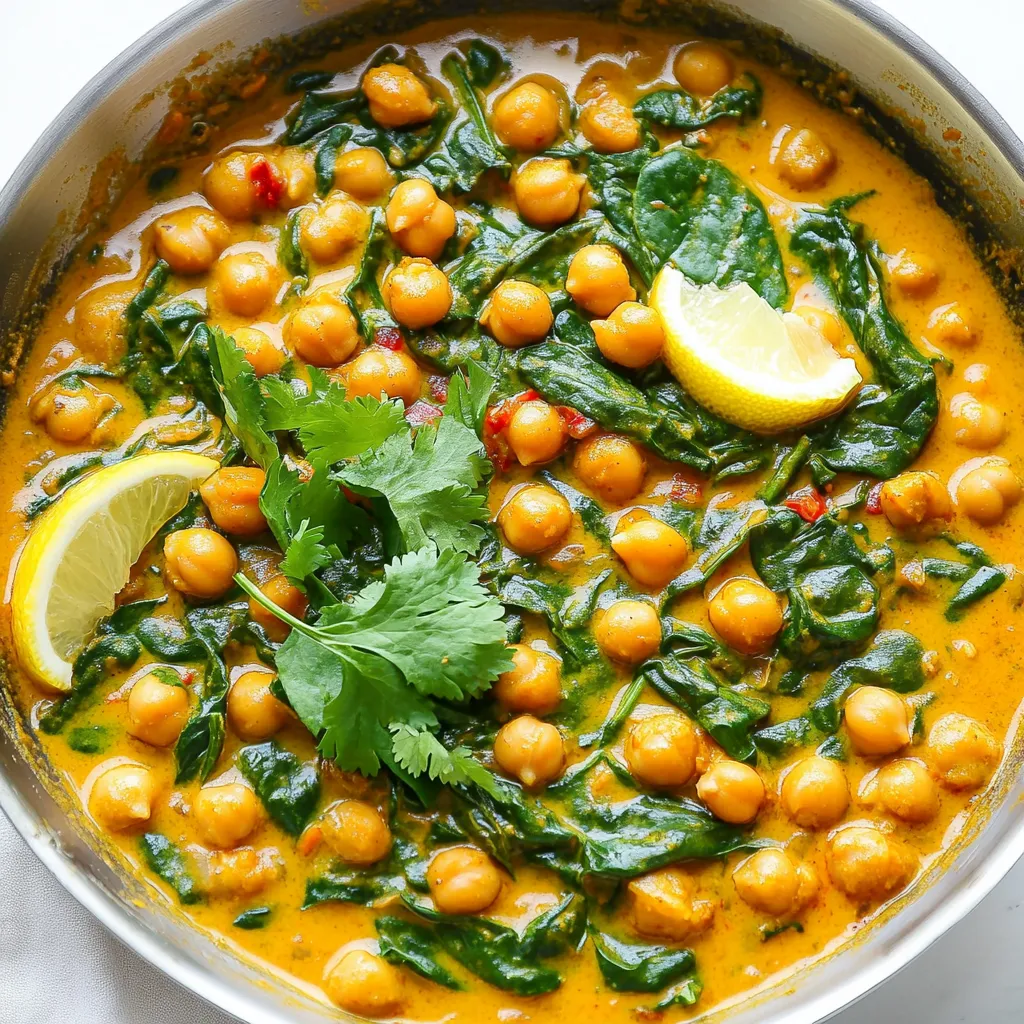
If you’re in a rush but crave a tasty meal, you need this Minute Chickpea Curry recipe. It’s quick, easy,

Here’s what you need to make these tasty muffins. Gather these items before you start cooking: - 3 ripe bananas, mashed - 1/3 cup melted coconut oil (or vegetable oil) - 1/2 cup brown sugar - 1 large egg, beaten - 1 teaspoon vanilla extract - 1 teaspoon baking soda - Pinch of salt - 1 teaspoon ground cinnamon - 1 1/2 cups all-purpose flour - 1/2 cup chocolate chips (semi-sweet or dark) - Optional: 1/4 cup chopped walnuts or pecans Ripe bananas are key. They should have brown spots. They add natural sweetness and moisture. You can use coconut oil or vegetable oil; both work well. The brown sugar adds a rich flavor. The egg helps bind everything, while vanilla adds warmth. Baking soda makes the muffins rise. Salt balances the sweetness, and cinnamon brings a warm spice. Use all-purpose flour for the best texture. Chocolate chips are a must; they melt and create gooey pockets. If you like nuts, add walnuts or pecans for crunch. Once you have all the ingredients, you're ready to bake. This recipe is simple and fun. Enjoy the process! {{ingredient_image_1}} Preheating the oven is key. It helps the muffins rise and bake evenly. Set your oven to 350°F (175°C). Start by mashing your bananas in a large bowl. Add 1/3 cup of melted coconut oil. Mix them well until smooth. Then, add 1/2 cup of brown sugar, 1 beaten egg, and 1 teaspoon of vanilla extract. Whisk it all together until combined. Next, sprinkle in 1 teaspoon of baking soda and a pinch of salt. Add 1 teaspoon of ground cinnamon for flavor. Slowly fold in 1 1/2 cups of all-purpose flour until just mixed. Do not overmix! Now, gently fold in 1/2 cup of chocolate chips. If you want, add 1/4 cup of chopped walnuts or pecans for a crunchy twist. Spoon the batter into your muffin tin, filling each cup about 2/3 full. Bake for 18 to 20 minutes. To check if they are done, insert a toothpick into the center. If it comes out clean, they are ready! Do not overmix the batter. When you mix too much, the muffins can turn out tough. Just stir until the flour is combined. Check your oven's baking time. Each oven is different. Start checking on your muffins at 18 minutes. Use a toothpick to see if they are done. If it comes out clean, your muffins are ready! Spices can boost flavor. Try adding a pinch of nutmeg or cloves. These spices work well with bananas. You can also change the chocolate chips. Semi-sweet chips are great, but dark chocolate adds a rich taste. You can even mix in white chocolate or peanut butter chips for fun flavors. Make your muffins look great! Arrange them on a wooden board. Dust with powdered sugar for a sweet touch. You can add banana slices or a few chocolate chips on top. This adds color and makes them look fancy. Enjoy your delicious, easy-to-make muffins! Pro Tips Use Overripe Bananas: The riper the bananas, the sweeter and more flavorful your muffins will be. Look for bananas with plenty of brown spots for the best results. Don’t Overmix the Batter: When combining the flour, mix until just combined. Overmixing can lead to dense muffins instead of light and fluffy ones. Experiment with Mix-ins: Feel free to customize your muffins by adding different mix-ins such as dried fruits, coconut flakes, or various nuts to enhance texture and flavor. Check for Doneness: Since oven temperatures can vary, start checking your muffins a couple of minutes before the suggested baking time to avoid overbaking. {{image_2}} You can make small swaps for a healthier muffin. First, replace the coconut oil with applesauce. This change cuts fat but keeps moisture. Second, try using whole wheat flour instead of all-purpose flour. Whole wheat adds fiber and nutrients. The muffins will taste great and feel lighter. Get creative with mix-ins! You can add seasonal fruits like blueberries or diced apples. These fruits bring fresh flavor and extra moisture. For chocolate lovers, try different chocolate options. White chocolate, milk chocolate, or dark chocolate chips add unique tastes. Mix and match to find your favorite! If you need a gluten-free option, use gluten-free flour. Choices like almond flour or oat flour work well. You may need to adjust the liquid in the batter. Gluten-free flours absorb more moisture. Start with slightly less flour and add more if needed. The muffins will still be soft and tasty. To keep your muffins fresh, store them in an airtight container. This prevents air from drying them out. You can also use a zip-top bag. Place a paper towel inside to absorb moisture. This helps keep them soft. Store at room temperature for up to three days. Freezing muffins is easy. First, let the muffins cool completely. Wrap each muffin in plastic wrap. Then, place them in a freezer-safe bag. Make sure to label the bag with the date. You can freeze them for up to three months. To reheat, take a muffin out and let it thaw at room temperature. You can heat it in the microwave for about 15-20 seconds. For a crispy top, pop it in the oven at 350°F for about 5-10 minutes. To keep your muffins moist, use ripe bananas. They add natural sweetness and moisture. Avoid overmixing the batter; this makes muffins tough. If you notice them getting stale, try adding a slice of bread in the container. The bread will absorb the air and keep the muffins fresh longer. Store them away from direct sunlight and heat. Yes, you can use frozen bananas. First, thaw the bananas in the fridge or at room temperature. Once thawed, drain any excess liquid. Mash the bananas well before adding them to the mix. This helps keep the muffins moist and adds great banana flavor. To check if the muffins are done, insert a toothpick into the center. If it comes out clean or with a few crumbs, they are ready. You can also look for a golden color on top and a slight spring when you touch them. Absolutely! To make mini muffins, fill each mini cup about halfway. Bake them for about 10-12 minutes. Always check with a toothpick to ensure they are cooked through. To make these muffins vegan, replace the egg with a flax egg. Mix one tablespoon of flaxseed meal with three tablespoons of water, then let it sit for a few minutes. You can also swap the coconut oil for applesauce or a plant-based oil. You learned how to make delicious banana muffins using simple ingredients and easy steps. We discussed tips for perfecting your muffins, variations to suit your taste, and ways to store them. Remember, baking is about creativity and enjoyment. Feel free to experiment with flavors and ingredients. With these guidelines, you can bake muffins that everyone will love. Enjoy the tasty results!

Chocolate Chip Banana Bread Muffins Delightfully Easy

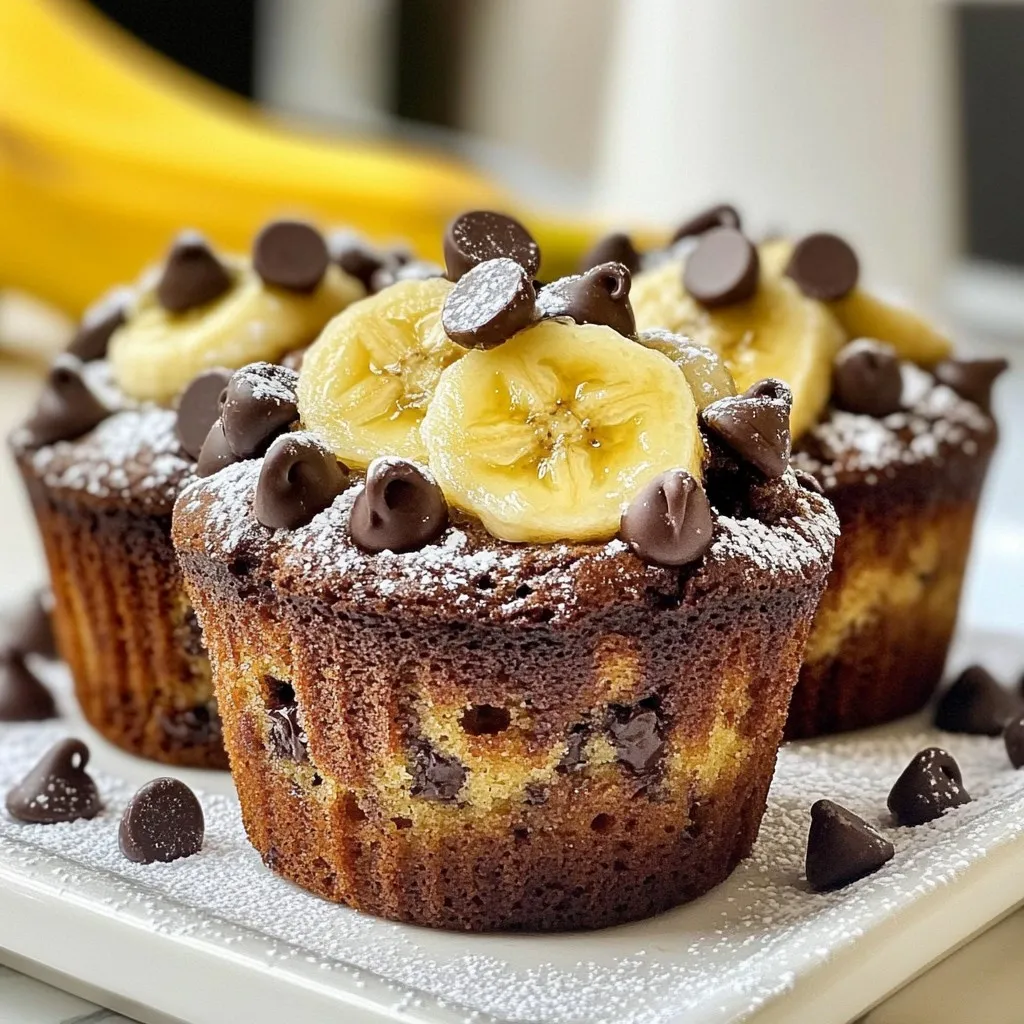
Who doesn’t love warm, fresh muffins? Chocolate Chip Banana Bread Muffins are the perfect blend of sweet and comforting. They’re

- 8 oz whole wheat pasta - 1 lb lean ground beef - 1 cup low-sodium beef broth - 1 cup cherry tomatoes, halved - 1 cup fresh spinach - 1 medium onion, diced - 3 cloves garlic, minced - 1 teaspoon dried oregano - 1 teaspoon dried basil - Salt and pepper to taste - 1 tablespoon olive oil - Grated Parmesan cheese for serving I love using whole wheat pasta. It adds fiber and keeps you full longer. Lean ground beef gives the dish a hearty protein boost. The low-sodium beef broth keeps the flavors rich without too much salt. Cherry tomatoes add a sweet burst, while fresh spinach brings a pop of color and nutrients. Diced onion and minced garlic form a solid base for the sauce. Dried oregano and basil add depth with their warm, earthy notes. Remember to season with salt and pepper to taste; this step makes all the difference. Olive oil helps cook the onions and garlic, lending richness to the dish. Finally, a sprinkle of grated Parmesan cheese gives a creamy finish that ties everything together. Each ingredient plays a role in creating a tasty and filling meal. {{ingredient_image_1}} First, boil water in a large pot. Add a pinch of salt for flavor. Once the water boils, add 8 oz of whole wheat pasta. Cook it according to the package directions until it is al dente. This usually takes about 8-10 minutes. After cooking, drain the pasta and set it aside. Next, grab a large skillet and heat 1 tablespoon of olive oil over medium heat. Add 1 medium diced onion to the skillet. Cook it for about 3-5 minutes until it is soft and clear. Then, add 3 cloves of minced garlic and 1 lb of lean ground beef. Use a spatula to break up the beef as it cooks. Cook it until the beef is brown and well done. Now, it’s time to mix in the herbs and tomatoes. Add 1 teaspoon of dried oregano and 1 teaspoon of dried basil to the beef mixture. Stir well. Then, add 1 cup of halved cherry tomatoes and 1 cup of low-sodium beef broth. Bring this mixture to a simmer. Let it cook for about 5 minutes. Once it simmers, add 1 cup of fresh spinach. Cook for another 2-3 minutes until the spinach wilts. Lastly, season the mixture with salt and pepper to taste. - Final Steps Add the drained pasta to the skillet. Toss everything together until the pasta is coated with the sauce. Make sure it heats through. Then, serve hot and top with grated Parmesan cheese. Enjoy your high protein beef pasta! To make the best beef pasta, cook the pasta until it is al dente. This means it should be firm but not hard. Drain it well, but save some pasta water. The starchy water helps the sauce stick better. When you sauté the onion, wait until it becomes soft. This brings out its sweet flavor. Add garlic right after so it cooks without burning. Always break apart the ground beef as it cooks. This ensures even cooking and flavor throughout the dish. To boost protein, use lean ground beef. It has less fat and more protein. You can also add other protein sources. Try mixing in cooked lentils or chickpeas. They blend well and add texture. Another great option is to top your dish with a generous amount of grated Parmesan cheese. It not only adds flavor but also packs in extra protein. Preparation can speed up your cooking. Chop the onion and garlic ahead of time. You can also use pre-washed spinach. This saves you a few minutes. When cooking, multitask! While the pasta cooks, prepare the beef mixture. This way, you maximize your time. Finally, clean as you go. It makes the kitchen less messy and the cooking process more enjoyable. Pro Tips Use Lean Beef: Opt for lean ground beef (90% lean or higher) to keep the dish healthy while maximizing protein content. Cook Pasta Al Dente: Ensure the pasta is cooked al dente for the perfect texture and better absorption of the flavors in the sauce. Add Extra Veggies: Feel free to add more vegetables such as bell peppers or zucchini for added nutrition and flavor. Garnish for Flavor: Don’t skip the grated Parmesan cheese; it adds a rich flavor that enhances the overall dish. {{image_2}} You can switch things up with different proteins. Try ground turkey or chicken for a lighter taste. If you want more flavor, use Italian sausage. You can also add veggies like bell peppers or zucchini. They will boost the nutrition and add color to your plate. If you need a gluten-free meal, use gluten-free pasta. There are many types, such as rice or quinoa pasta. Just cook it according to the package. The rest of the recipe stays the same. This way, you can still enjoy a hearty dish without gluten. Want a vegetarian meal? Replace beef with lentils or chickpeas. They are rich in protein and will fill you up. Use vegetable broth instead of beef broth for the sauce. You can still enjoy the same great flavors while keeping it meat-free. After you enjoy your meal, let it cool down. Place the pasta in an airtight container. This keeps the flavors fresh. You can store it in the fridge for up to three days. Keep it away from strong-smelling foods, as pasta can absorb odors. When you are ready to eat again, take the pasta out of the fridge. You can reheat it in a skillet over medium heat. Add a splash of beef broth or water to help it warm up. Stir until it’s hot. You can also use a microwave. Place it in a bowl, cover it, and heat for one to two minutes. If you want to save some for later, freezing is great. Use a freezer-safe container or resealable bag. Make sure to remove as much air as possible. Label it with the date. You can freeze it for up to three months. When you want to eat it, thaw it in the fridge overnight before reheating. This keeps the taste and texture just right. Whole wheat pasta is great for high protein meals. It has more fiber and protein than regular pasta. Other options include chickpea or lentil pasta. These types pack extra protein, making them perfect for this dish. Yes, you can make this dish ahead of time. Cook the pasta and beef mixture separately. Store them in airtight containers in the fridge. When you're ready to eat, just heat them up together. To boost the protein, try adding more lean beef or using ground turkey. You can mix in beans or lentils for extra protein. If you like cheese, sprinkle more Parmesan on top for added protein too. Several side dishes go well with this pasta. A simple green salad with lemon dressing adds freshness. Roasted vegetables can bring more flavor and color to your meal. Garlic bread is also a favorite, perfect for soaking up sauce. In this blog post, we explored the ingredients and steps for a delicious high-protein beef pasta. We covered cooking tips, storage info, and variations to suit your needs. Remember, using fresh ingredients and lean protein makes all the difference. Feel free to customize the recipe with your favorite veggies or proteins. This dish is not only tasty but also offers great nutrition. Now, get cooking and enjoy a healthy meal you can share!

High Protein Beef Pasta Flavorful and Filling Meal

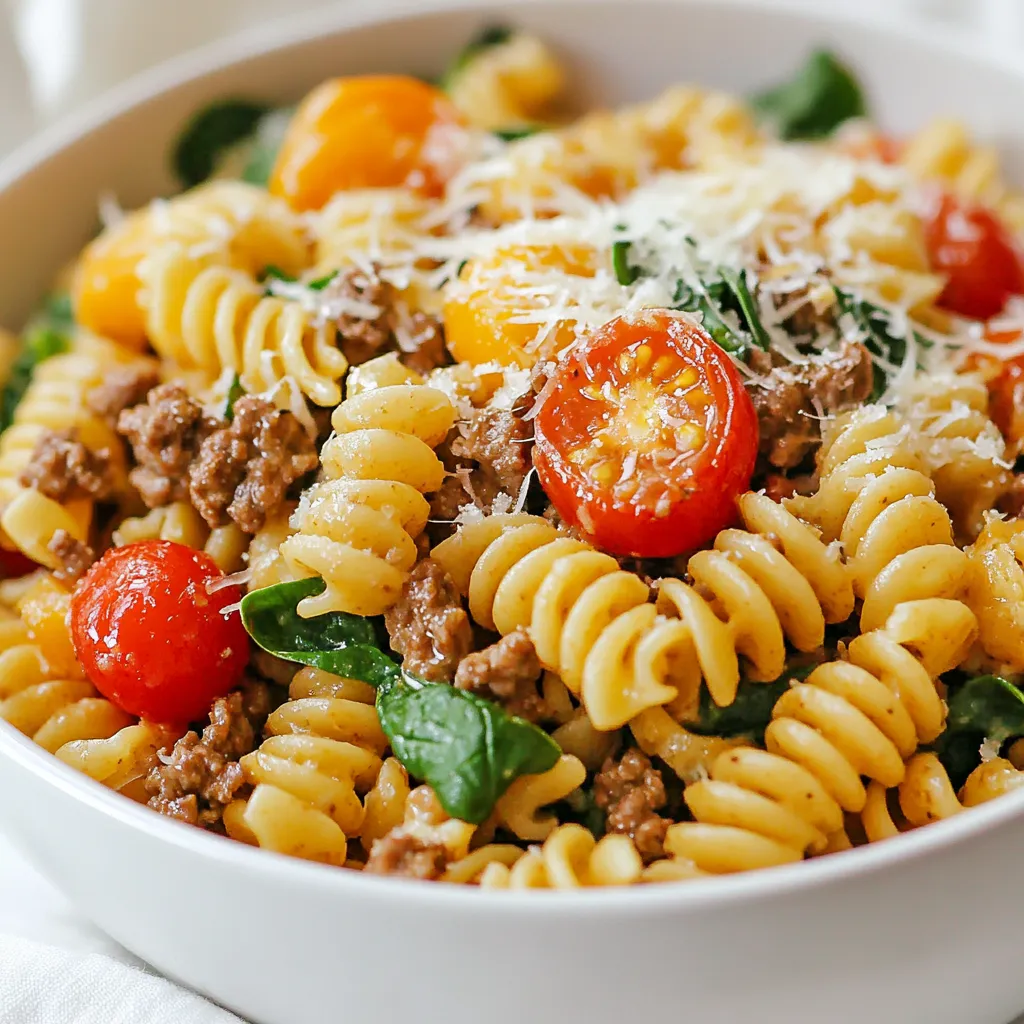
Are you ready for a meal that’s both tasty and packed with protein? My High Protein Beef Pasta is your

- 1 lb sirloin steak, cut into bite-sized pieces - 1 medium head cauliflower, cut into florets - 1 tablespoon olive oil - 1 small onion, finely chopped - 2 cloves garlic, minced - 1 cup heavy cream - 1 cup shredded cheddar cheese - 1 teaspoon paprika - Salt and pepper, to taste - Fresh parsley, chopped for garnish The main ingredients for Creamy Steak Bites Cauliflower Skillet create a great base. The sirloin steak adds rich flavor and protein. I love using cauliflower because it soaks up the creaminess well. Olive oil helps sauté the onions and adds a nice touch. For the additional ingredients, I use a small onion and garlic for a savory kick. Heavy cream brings that luscious texture. These ingredients blend to create a creamy sauce that hugs every bite. Seasoning is key. Paprika adds warmth and color. Salt and pepper enhance all the flavors. Lastly, fresh parsley gives a pop of color and freshness. The combination of these ingredients makes every bite a delight. {{ingredient_image_1}} - Preparing the Steak and Cauliflower: Start by cutting the sirloin steak into bite-sized pieces. This helps it cook evenly. Next, wash the cauliflower and cut it into small florets. This makes them easier to cook. - Setting Up the Skillet: Grab a large skillet and place it on the stove. Pour in one tablespoon of olive oil and set the heat to medium-high. This oil will help prevent sticking and add flavor. - Sautéing the Onion and Garlic: When the oil is hot, add the finely chopped onion. Sauté it for about three to four minutes. Wait until it looks soft and translucent. Then, add the minced garlic and stir for one more minute. This will make your kitchen smell amazing! - Browning the Steak: Now, season the steak pieces with salt, pepper, and paprika for extra flavor. Add them to the skillet. Cook until they are nicely browned, which takes about five to seven minutes. Make sure to stir occasionally so they cook evenly. - Cooking the Cauliflower: After removing the steak, add the cauliflower florets to the same skillet. Stir them well to mix with the leftover juices. Cook for about five minutes until they start to soften. - Adding Cream and Cheese: Pour one cup of heavy cream over the cauliflower. Stir it well and let it simmer for five minutes. This will help the sauce thicken a bit. Then, add one cup of shredded cheddar cheese, mixing it in until it melts and becomes creamy. - Combining Ingredients: Now, return the browned steak bites to the skillet. Gently fold them into the creamy cauliflower mixture. Let everything cook together for an extra two to three minutes. This allows all the flavors to blend nicely. - Adjusting Seasoning: Finally, taste your dish and add more salt and pepper if needed. This step ensures that each bite is full of flavor. Garnish with chopped fresh parsley before serving. Enjoy your creamy steak bites cauliflower skillet! Choosing the Right Cut of Steak For this recipe, I recommend using sirloin steak. It is tender and flavorful. Cut it into bite-sized pieces. This helps it cook quickly and evenly. You can also use ribeye if you want a richer taste. Both cuts give great results in the creamy sauce. Ensuring Proper Vegetable Texture Cauliflower can cook differently based on size. Cut the florets into similar sizes. This helps them cook evenly. You want them to be tender but not mushy. Cooking them for about 5 minutes in the skillet does the trick. Stir them often to avoid burning and ensure they soften just right. Presentation Ideas Serve the creamy steak bites in the skillet for a cozy feel. It looks great and keeps the dish warm. You can also plate individual servings. Drizzle some extra cheese on top for a fancy touch. Add a sprinkle of parsley for color and freshness. Pairing with Side Dishes This dish pairs well with simple sides. Try serving it with a fresh salad or steamed green beans. You can also enjoy it with some crusty bread. This helps soak up the creamy sauce and adds to your meal's enjoyment. Recommended Skillet Types Use a large, heavy skillet for this recipe. A cast-iron or stainless-steel skillet works best. These materials heat evenly and help brown the steak well. Non-stick pans can also work but may not give the same flavor depth. Helpful Cooking Utensils A good spatula is key for stirring and flipping the steak. Use a wooden spoon to mix the cauliflower and sauce gently. Tongs are handy for handling the steak pieces. Having these tools makes cooking easier and more fun! Pro Tips Use a Hot Skillet: Ensure your skillet is hot enough before adding the steak. This helps achieve a nice sear and locks in the juices. Season Generously: Don’t skimp on the salt and pepper; seasoning the steak properly enhances its flavor significantly. Cook Cauliflower Al Dente: Aim to cook the cauliflower until just tender. This will keep a nice bite and prevent it from becoming mushy in the creamy sauce. Experiment with Cheeses: While cheddar is classic, feel free to mix in other cheeses like Gruyere or Monterey Jack for added flavor complexity. {{image_2}} Using Different Vegetables You can swap out cauliflower for other veggies. Try broccoli for a similar crunch. Zucchini works well too, adding a light texture. For a twist, use bell peppers for a sweet flavor. Each choice gives a new taste and texture to the dish. Alternative Cheeses If you don’t have cheddar, try mozzarella for a gooey feel. Gouda adds a rich flavor that melts nicely. For a sharper taste, consider using Parmesan or blue cheese. Each cheese changes the dish’s character while keeping it creamy. Low-Carb Options To make this dish low-carb, skip the heavy cream. Use coconut cream as a great substitute. It adds creaminess without the carbs. You can also add more veggies like spinach or mushrooms to fill your plate. Dairy-Free Alternatives For a dairy-free version, replace heavy cream with cashew cream. Blend soaked cashews with water until smooth. Nutritional yeast can add a cheesy taste without dairy. These swaps keep the dish creamy and delicious for everyone. Adding Spices and Herbs Mix in some Italian herbs like oregano or thyme for a fresh taste. A pinch of red pepper flakes can add heat if you like spice. Fresh herbs like basil or chives can brighten up the dish, making it more vibrant. Sauce Enhancements You can boost the sauce by adding a splash of Worcestershire sauce. This adds depth and umami flavor. A squeeze of lemon juice can also brighten the dish and cut through the creaminess. Try these tweaks to make the sauce even more exciting. - Container Recommendations: Use an airtight container to keep your dish fresh. Glass or plastic containers work well. - Refrigeration Guidelines: Store leftovers in the fridge within two hours. They last for up to three days. - Best Methods for Reheating: Use the microwave for quick reheating. You can also reheat on the stove over low heat. - Maintaining Creamy Consistency: Add a splash of cream while reheating. This keeps the sauce rich and creamy. - Freezing Tips: Allow the dish to cool completely before freezing. Use a freezer-safe container. - Thawing and Reheating Guidelines: Thaw overnight in the fridge. Reheat gently on the stove, adding cream to revive the texture. How do I make the cauliflower less crunchy? To make the cauliflower less crunchy, cook it longer. After adding the florets to the skillet, let them simmer for about 10 minutes. This will soften them nicely. You can also add a bit more cream to help soften them further. Can I use a different type of meat? Yes, you can use other meats. Chicken or pork works well. Just adjust the cooking time based on the meat you choose. What can I serve with Creamy Steak Bites Cauliflower Skillet? This dish pairs well with a fresh salad or crusty bread. You can also serve it over rice or quinoa for a heartier meal. How long will the dish keep in the refrigerator? You can store it in the fridge for about 3 to 4 days. Just make sure to keep it in an airtight container. Is this recipe high in protein? Yes, this recipe is high in protein. The sirloin steak and cheddar cheese contribute a good amount of protein per serving. What are the calorie counts per serving? Each serving contains around 450 to 500 calories. This can vary based on the exact amounts of cream and cheese you use. This blog post covers a tasty recipe for Creamy Steak Bites Cauliflower Skillet. You’ve learned about the main and additional ingredients, step-by-step cooking instructions, and tips to make your dish shine. Whether you want to swap ingredients or store leftovers, you now have all the details. Remember, this dish is flexible. You can customize it to fit your taste or diet. Enjoy creating your version for a savory meal!

Creamy Steak Bites Cauliflower Skillet Delight

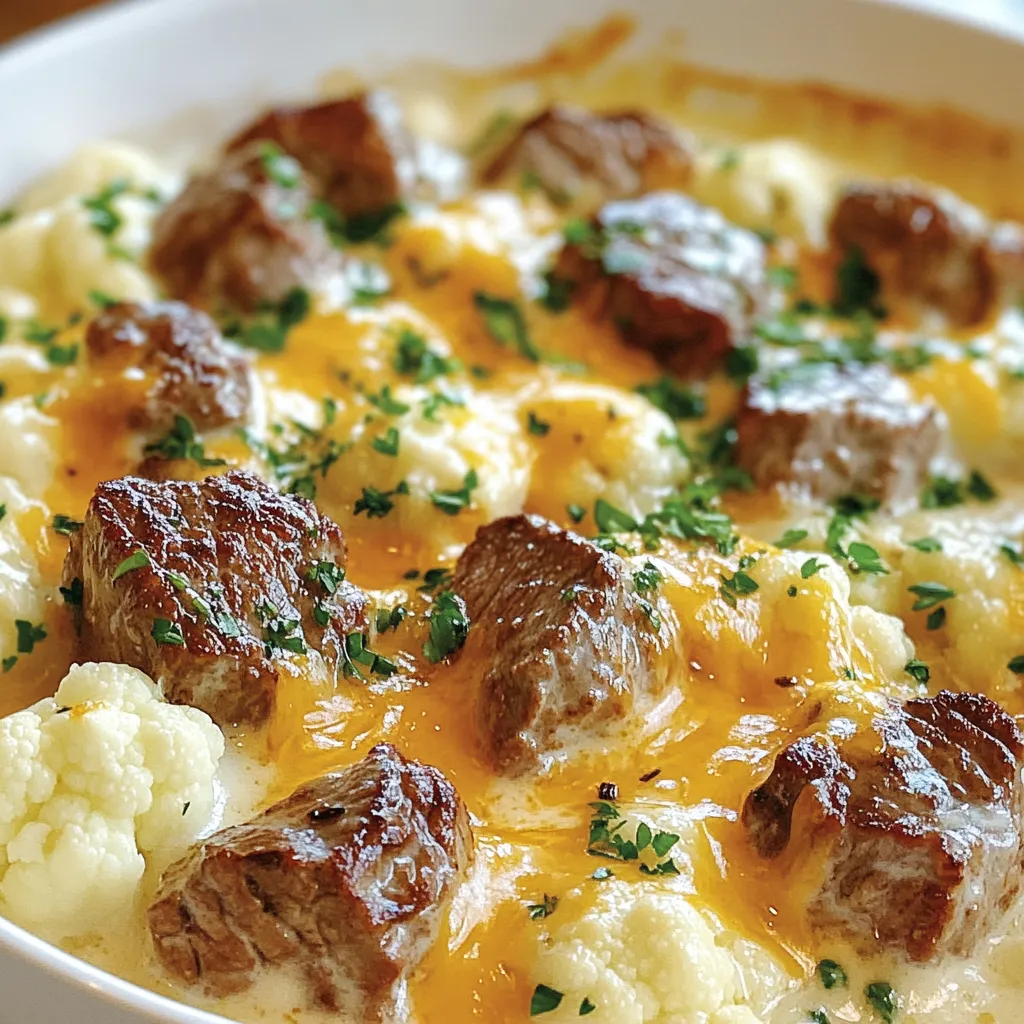
Looking for a delicious dish that combines tender steak bites and creamy cauliflower? You’re in the right place! In this

- 4 boneless, skinless chicken thighs - 2 cups cherry tomatoes, halved - 1 red onion, sliced into wedges - 1 bell pepper (red or yellow), sliced - 1 zucchini, sliced - 1/4 cup extra virgin olive oil - 1 tablespoon fresh lemon juice - 3 cloves garlic, minced - 1 tablespoon dried oregano - Feta cheese, crumbled (for garnish) - Salt and pepper to taste - 1/4 cup Kalamata olives, pitted and halved - Fresh parsley, chopped (for garnish) - 1 cucumber, diced (for garnish) These ingredients come together to create a bright and flavorful dish. The chicken thighs are juicy and tender. The veggies bring color and texture. The marinade adds zing and depth. With feta and olives, this meal screams Mediterranean flair. Make sure to use fresh ingredients for the best taste. The cherry tomatoes burst with sweetness. The bell peppers add crunch. Each bite offers a balance of flavors. This dish is not just easy; it’s also fun to make. Enjoy the process of arranging the ingredients on the sheet pan—it's like art! {{ingredient_image_1}} First, preheat your oven to 400°F (200°C). This temperature is key for cooking the chicken and veggies just right. Next, grab a large sheet pan and line it with parchment paper. This will help with cleanup later. Now, let’s make the marinade. In a small bowl, mix together 1/4 cup of olive oil, 1 tablespoon of lemon juice, and 3 minced garlic cloves. Add 1 tablespoon of dried oregano, along with salt and pepper to taste. Whisk until everything blends well. This mix adds great flavor to the chicken and veggies. Place 4 boneless, skinless chicken thighs on the parchment-lined pan. Pour half of your marinade over the chicken. Make sure each piece gets coated well. Next, add 2 cups of halved cherry tomatoes, 1 sliced red onion, and a sliced bell pepper around the chicken. Toss in 1 sliced zucchini too. Drizzle the rest of the marinade over the vegetables and toss them gently to coat. Lastly, scatter 1/4 cup of halved Kalamata olives evenly across the pan. Slide the pan into your preheated oven. Bake for 25 to 30 minutes. Check that the chicken reaches an internal temperature of 165°F (75°C). The juices should run clear, and the vegetables must be tender. This will ensure everything is cooked perfectly. Once out of the oven, let the dish rest for a few minutes. Crumble feta cheese over the top and garnish with fresh parsley and diced cucumber. You can serve it straight from the sheet pan for a fun look or transfer it to a platter for a nice presentation. Enjoy your flavorful meal! To ensure even cooking, spread the chicken and veggies evenly on the pan. This allows hot air to circulate. Avoid crowding the pan, which can trap steam and prevent browning. For marinating, use a zip-top bag. This helps the chicken absorb flavors well. Let it marinate for at least 30 minutes. For best results, marinate overnight in the fridge. Want extra flavor? Try adding smoked paprika or cumin. These spices bring warmth and depth. You can also experiment with red pepper flakes for a bit of heat. Fresh herbs are key to a bright taste. Use fresh oregano or thyme if you can. They add a pop of flavor that dried herbs can't match. For plating, serve the chicken straight from the sheet pan. This rustic look is fun and inviting. You can also transfer everything to a large platter for a fancier touch. Garnish with crumbled feta and chopped parsley for color. Add diced cucumber on the side for crunch. This makes the dish more appealing and fresh. Pro Tips Marinate for Maximum Flavor: Allow the chicken to marinate for at least 30 minutes, or even overnight, to enhance the flavors of the dish. Veggie Variations: Feel free to add other vegetables like eggplant or asparagus based on what you have on hand or your personal preference. Check for Doneness: Always use a meat thermometer to ensure the chicken has reached 165°F (75°C) for safe consumption. Garnish for Freshness: Fresh herbs like basil or dill make excellent garnishes that can add a burst of flavor and color to your dish. {{image_2}} You can swap chicken thighs for chicken breasts or drumsticks. Chicken breasts cook faster but may dry out if overcooked. Drumsticks offer juicy meat and flavor. If you prefer other proteins, consider turkey thighs or fish. These options bring different tastes and textures to the dish. Seasonal veggies can add color and taste. Try using asparagus or green beans in spring. In summer, zucchini and bell peppers shine. For autumn, root veggies like sweet potatoes add sweetness. You can mix and match to find your favorite combos. Just make sure to cut them to similar sizes for even cooking. To make this dish gluten-free, simply ensure your marinade ingredients are gluten-free. Most olive oils and spices are safe. For a keto-friendly version, skip the potatoes and use more non-starchy veggies. You can add cauliflower or broccoli for a low-carb boost. This way, you still enjoy a tasty meal while sticking to your diet. To keep your Sheet Pan Greek Chicken fresh, store it in the fridge. Use airtight containers. This helps keep flavors intact and prevents spoilage. Make sure to let the dish cool before sealing. You can safely store it for up to three days. If you want to keep it longer, consider freezing. When reheating, you have two great options: the oven or the microwave. For the oven, preheat to 350°F (175°C). Place the chicken and veggies on a baking sheet. Heat for about 15-20 minutes, until warm. The microwave is quicker. Use a microwave-safe plate. Heat in short bursts, about 1-2 minutes at a time, checking often. This prevents overcooking. Freezing leftovers is easy. Portion the chicken and veggies into freezer-safe bags or containers. Remove as much air as possible. This helps avoid freezer burn. You can freeze it for up to two months. When you're ready to eat, thaw it in the fridge overnight. For reheating, follow the oven or microwave instructions mentioned above. You should bake the Sheet Pan Greek Chicken for 25 to 30 minutes at 400°F (200°C). This time is enough to cook the chicken fully. The chicken should reach an internal temperature of 165°F (75°C). You can check this with a meat thermometer. When it’s done, the juices will run clear, and the veggies will be tender. Yes, you can prep this recipe ahead of time! I suggest marinating the chicken overnight. This helps the flavors soak in well. To prep, just mix the marinade and coat the chicken. Then, cover it and store it in the fridge. You can also chop the veggies a day before cooking. Just keep them in a sealed container in the fridge. You can serve many tasty sides with this dish. Some great options include: - Rice or quinoa for a filling base - Pita bread to soak up the juices - A fresh Greek salad for a crunchy contrast - Roasted potatoes for a hearty side These sides will complement the flavors in the chicken and veggies perfectly! This blog post covered the tasty Sheet Pan Greek Chicken. We explored key ingredients like chicken thighs, cherry tomatoes, and zucchini. You learned how to prepare a simple marinade and arrange everything on the pan. I shared tips for cooking and presentation, plus variations to suit dietary needs. Remember, this dish is flexible and easy to adapt. Whether you're cooking for a crowd or meal prepping for the week, it's a winner. Enjoy making this healthy and flavorful meal for you and your loved ones.

Sheet Pan Greek Chicken Flavorful and Easy Recipe

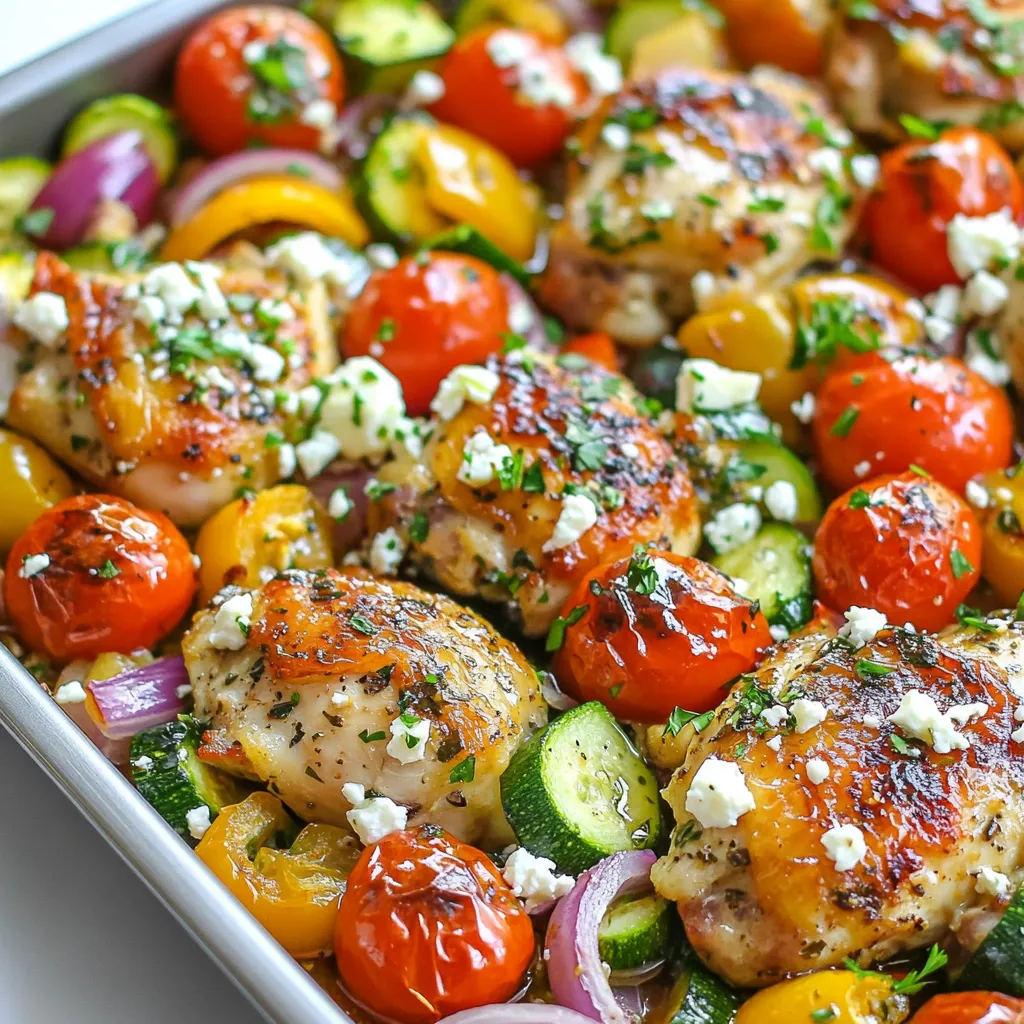
Are you ready to bring the vibrant flavors of Greece to your kitchen? My Sheet Pan Greek Chicken recipe simplifies

Older posts
Newer posts
← Previous Page1 … Page137 Page138 Page139 … Page144 Next →

dsad

© 2025 So Yum Recipes • Built with GeneratePress

Our Policies

  • Copyright Policy
  • Cookie Policy
  • GDPR Policy
  • Privacy Policy
  • Disclaimer
  • Terms Of Use

More Information

  • Home
  • About
  • Contact
  • Appetizers
  • Dessert
  • Dinner
  • Drinks
©2025, So Yum Recipes About Back To Top