Skip to content
DisclaimerTerms Of UseGDPR PolicyCookie Policy

So Yum Recipes

  • Home
  • Drinks
  • Appetizers
  • Dinner
  • Dessert
  • About
  • Contact
  • Privacy Policy
DisclaimerTerms Of UseGDPR PolicyCookie Policy

Chloe

- 1 lb flank steak - 1/4 cup fresh lime juice (about 2 limes) - 1/4 cup olive oil - 1/4 cup fresh cilantro, chopped The main ingredients form the base of the bowl. Flank steak offers rich flavor and tenderness when cooked right. Fresh lime juice adds a bright, zesty kick. Olive oil brings richness and helps the flavors blend. Fresh cilantro ties it all together with its unique taste. - 2 cloves garlic, minced - 1 teaspoon ground cumin - 1 teaspoon chili powder - 1 cup cooked quinoa - 1 cup cherry tomatoes, halved - 1 avocado, sliced - 1 cup corn (fresh, canned, or frozen) - 1/2 red onion, thinly sliced - Crumbled feta cheese for topping (optional) These ingredients enhance the dish. Garlic gives depth, while cumin and chili powder add warmth. Quinoa is a great base that’s filling and healthy. Cherry tomatoes and avocado add freshness, while corn brings sweetness. Red onion provides a nice crunch, and feta cheese adds creaminess, if you choose to use it. - Extra cilantro - Alternative toppings Garnishes elevate the bowl. Extra cilantro adds a fresh pop. You can use alternative toppings like jalapeños for heat or lime wedges for extra zest. Get creative with what you like! {{ingredient_image_1}} To start, gather your marinade ingredients. You need fresh lime juice, olive oil, chopped cilantro, minced garlic, ground cumin, chili powder, salt, and pepper. 1. In a bowl, whisk together: - 1/4 cup fresh lime juice - 1/4 cup olive oil - 1/4 cup chopped cilantro - 2 cloves minced garlic - 1 teaspoon ground cumin - 1 teaspoon chili powder - Salt and pepper to taste This mix will create a zesty flavor. 2. Next, coat the flank steak in the marinade. Make sure every part is covered. Cover the bowl and let it sit in the fridge. Aim for at least 30 minutes, but if you can, let it marinate for up to 4 hours. This will deepen the flavors. While the steak marinates, it’s time to cook the quinoa. 1. Rinse 1/2 cup of dry quinoa under cold water. This step helps remove any bitterness. 2. In a saucepan, add the rinsed quinoa and 1 cup of water. Bring this to a boil. Then, reduce the heat to a simmer. 3. Cover the pot and let it cook for about 15 minutes. The quinoa is ready when the water is absorbed. Fluff it with a fork and set it aside. Now, let’s grill the steak to perfection. 1. Preheat your grill or skillet over medium-high heat. This is key for a good sear. 2. Remove the steak from the marinade. Grill it for about 5-7 minutes on each side. This timing depends on how you like your steak. For medium-rare, aim for the lower end. 3. After grilling, let the steak rest for 5 minutes. This helps keep it juicy. Once rested, slice it against the grain for the best texture. These steps will give you a flavorful and tender steak for your bowls. For the best flavor, marinate your flank steak for at least 30 minutes. If you have more time, let it marinate for up to 4 hours. The longer you marinate, the more the steak will soak up the citrus and spice flavors. To make marinating easier, use a food-safe plastic bag. This way, you can coat the steak evenly and save space in your fridge. You can cook the steak in different ways. If you don’t have a grill, try broiling or pan-searing. Both methods will give you a nice sear and flavor. To achieve your perfect steak doneness, use a meat thermometer. Aim for 130°F for medium-rare and 140°F for medium. Once cooked, let the steak rest for 5 minutes. This helps keep the juices inside when you slice it. When assembling your bowls, start with a base of fluffy quinoa. Layer the sliced grilled steak on top, then add halved cherry tomatoes, avocado slices, corn, and thin red onion. To enhance the dish, drizzle the reserved marinade on top. For an extra touch, sprinkle crumbled feta cheese and garnish with more cilantro. This makes your dish look fresh and inviting. Pro Tips Marinate for Maximum Flavor: For the best flavor, marinate the steak for at least 2 hours, or even overnight. This allows the flavors to penetrate the meat more deeply. Let the Steak Rest: After grilling, let your steak rest for about 5 minutes before slicing. This helps the juices redistribute, making for a more tender and juicy bite. Use Fresh Ingredients: Opt for fresh lime juice and herbs to elevate the flavor profile. Fresh ingredients make a significant difference in the overall taste of the dish. Customize Your Bowls: Feel free to add or substitute any of your favorite toppings, like black beans or bell peppers, to make the bowls your own! {{image_2}} You can switch the flank steak for chicken or shrimp. Grilled chicken breast works well. Marinate it the same way. If you prefer shrimp, use large shrimp and grill them for just a few minutes. For a vegetarian option, use grilled vegetables like bell peppers and zucchini. Tofu is also a great choice. Just press it to remove water, then marinate and grill or sauté it. While quinoa is a great base, you can try different grains. White or brown rice works nicely. You can even use farro or barley for a chewy texture. If you want a low-carb meal, go for cauliflower rice. It cooks quickly and adds a nice crunch to your bowl. To add some heat, consider jalapeños or hot sauce. These will spice things up nicely. You can also play with dressings. An avocado dressing adds creaminess and richness. Try mixing mashed avocado with lime juice and a bit of garlic for a fresh twist. To keep your cilantro lime steak bowls fresh, place leftovers in a sealed container. Glass or BPA-free plastic containers work best. Store them in the fridge right away. This helps prevent spoilage and keeps the flavors intact. Try to eat the leftovers within three days for the best taste. You can freeze the individual parts of your steak bowls. First, cool the steak and quinoa completely. Place them in freezer-safe bags or containers. Avoid freezing the fresh veggies like tomatoes and avocado since they do not thaw well. When you are ready to eat, thaw the steak and quinoa overnight in the fridge. Reheat the quinoa in the microwave or on the stove with a splash of water. For steak, warm it gently in a pan on low heat. In the fridge, cooked quinoa can last about five days. The grilled steak stays good for three to four days. Keep an eye on your ingredients. If they smell off or look slimy, it’s best to toss them. Always check for signs of spoilage to stay safe. To make flank steak more tender, start by using a meat mallet. Gently pound the steak to break down fibers. Next, marinate it for at least 30 minutes. Acidic ingredients like lime juice help soften the meat. The longer you marinate, the more tender it gets. I suggest marinating for up to 4 hours for the best flavor and texture. Yes, you can use dry herbs if fresh cilantro is not available. Dried parsley or oregano can work as good substitutes. Use about one-third of the amount when using dried herbs. They are more concentrated than fresh herbs. While the flavor may change a bit, you will still enjoy a tasty meal. Many sides complement cilantro lime steak bowls nicely. Here are some great options: - Black beans - Grilled vegetables - Mixed green salad - Roasted sweet potatoes - Corn salsa These sides add color and texture. They also balance the flavors in your meal. You can mix and match based on your taste! Cilantro lime steak bowls are a tasty and easy dish to make. We covered the key ingredients, marination, and cooking steps for a great meal. Remember to use fresh ingredients and try different proteins or grains based on your needs. Storing leftovers correctly helps keep the dish fresh. You can enjoy customizing flavors and garnishes to suit your taste. Dive into this recipe and satisfy your cravings with a bowl full of flavor!

Cilantro Lime Steak Bowls Flavorful and Easy Meal

Looking for a quick, tasty meal? Cilantro Lime Steak Bowls are the perfect choice! This dish pairs zesty flank steak

- 2 boneless, skinless chicken breasts, cut into bite-sized pieces - 2 medium zucchinis, sliced into half-moons - 1 bell pepper (any color), diced - 1 small red onion, chopped - 2 cloves garlic, minced - 1 teaspoon dried oregano - 1 teaspoon smoked paprika - Salt and pepper to taste - 3 tablespoons olive oil - Fresh basil or parsley for garnish When I cook Chicken Zucchini Skillet, I focus on fresh ingredients. The chicken gives protein and flavor. I like using boneless, skinless chicken breasts. They cook fast and stay juicy. Zucchini is my favorite vegetable in this dish. It adds a nice crunch and bright color. I slice the zucchini into half-moons. This shape lets them cook evenly. I also add bell pepper and red onion. They bring more color and taste to the skillet. The bell pepper can be any color. I usually choose red or yellow for sweetness. Garlic is a must in my kitchen. It adds a warm aroma and depth to the dish. I always mince it so the flavor spreads well. For seasonings, I use dried oregano and smoked paprika. Oregano gives a classic taste, while smoked paprika adds warmth. I season with salt and pepper for balance. Finally, I drizzle olive oil in the skillet. It helps cook the chicken and veggies just right. When everything is done, I love to garnish with fresh basil or parsley. It makes the dish look beautiful and adds freshness. {{ingredient_image_1}} - Heating the Oil: Start by taking a large skillet. Add 2 tablespoons of olive oil. Heat it over medium heat. - Cooking the Chicken: Now, add the chicken pieces to the skillet. Season with salt, pepper, oregano, and smoked paprika. Cook for about 5-7 minutes. Stir occasionally until the chicken turns brown and is fully cooked. - Sautéing the Vegetables: After the chicken is done, move it to a plate. Keep it warm by covering it. In the same skillet, add 1 more tablespoon of olive oil. Toss in the chopped onion. Sauté for 2-3 minutes until the onion is see-through. - Incorporating Garlic: Next, add the sliced zucchini and diced bell pepper to the skillet. Cook for 5-6 minutes. You want the veggies to be soft but still crunchy. Then, stir in the minced garlic. Cook for one more minute, just until you smell the garlic. - Combining Ingredients: Return the cooked chicken to the skillet. Mix everything well. Cook for another 2-3 minutes so the flavors blend nicely. Check if you need more seasoning. - Serving Suggestions: Once heated through, take the skillet off the heat. Garnish your dish with fresh basil or parsley for a lovely touch. Enjoy your meal! Selecting Quality Chicken Choose fresh, high-quality chicken. Look for meat that is pink and firm. Avoid any chicken with a strange smell. Organic options often taste better and are more healthy. Avoiding Overcooking Cook the chicken until it’s no longer pink inside. Use a meat thermometer if you have one. The internal temperature should be 165°F. Overcooking makes chicken dry and tough. Stir it often to cook evenly. Maintaining Vegetable Crispness Don’t overcook your veggies. Cook them until they are tender but still bright. This gives your dish a nice crunch. Add them to the pan after the chicken is done. Flavor Enhancements Use fresh herbs like basil or parsley for a pop of flavor. You can also add a splash of lemon juice. This brightens up the dish and makes it taste fresh. Don't forget to season with salt and pepper to enhance all the flavors. Pro Tips Use Fresh Ingredients: Opt for fresh chicken and seasonal vegetables for the best flavor and texture in your dish. Don’t Overcrowd the Pan: Cook the chicken and vegetables in batches if necessary to ensure they sear properly instead of steaming. Customize Your Seasonings: Feel free to adjust the spices according to your taste preferences; adding a pinch of cayenne can give it a nice kick! Serve Immediately: This dish is best enjoyed fresh off the stove while the chicken is juicy and the vegetables are crisp. {{image_2}} You can easily swap chicken for other proteins. Try diced turkey or shrimp. Both options cook quickly and add great taste. For a vegetarian choice, use firm tofu or chickpeas. Just sauté them until they are golden brown. Adjust cook times as needed for each protein type. Feel free to change the veggies in this dish. Broccoli, asparagus, or spinach work well. You can also add carrots for a sweet crunch. Mix and match to suit your taste. Just keep the cooking times in mind. Cook harder veggies longer, while softer ones need less time. This dish is naturally gluten-free with the right ingredients. Make sure your seasonings and oils are free from gluten. Most spices are safe, but check labels if unsure. Enjoy this meal without worry, even if you avoid gluten. To make this dish lower in carbs, simply skip or reduce the amount of bell pepper. Zucchini is a great low-carb veggie, so keep it in. You can also add more leafy greens like spinach or kale for extra nutrients. This keeps your meal filling without the extra carbs. To keep your chicken zucchini skillet fresh, let it cool first. Place the dish in an airtight container. This helps retain moisture and flavor. Store it in the fridge for up to three days. If you want to keep it longer, freeze it. Use freezer-safe bags or containers. It can last up to three months in the freezer. When you store leftovers, separate the chicken and veggies if you can. This keeps them at their best. When ready to eat, you can reheat your skillet meal. The best way is on the stove. Place it in a skillet over medium heat. Stir it often to warm evenly. This usually takes about 5 to 7 minutes. You can also use a microwave if you're short on time. Place it in a microwave-safe bowl. Heat for 1 to 2 minutes, stirring halfway through. Check that it's hot all the way through before serving. How long does it take to cook chicken in a skillet? It takes about 5 to 7 minutes to cook chicken in a skillet. Start with medium heat. The chicken should be browned and cooked through before you remove it. Always check that the inside is no longer pink. Can I make this dish ahead of time? Yes, you can make this dish ahead of time. Cook the chicken and veggies, then store them in the fridge. Reheat when you are ready to eat. This makes it easy for busy days. What other vegetables can I use in this recipe? You can use many other veggies in this recipe. Consider adding bell peppers, mushrooms, or spinach. Each will add its own flavor and color. Be sure to keep the cooking time in mind. Some veggies cook faster than others. You now understand how to make a tasty chicken zucchini skillet. We covered the main ingredients, preparation steps, and cooking tips. You learned how to add flavor with seasonings and variations for different diets. Storing and reheating tips help keep your dish fresh. Cooking doesn't have to be hard. With these steps, you can make a great meal. Enjoy creating and sharing this dish with friends and family!

Chicken Zucchini Skillet Flavorful and Simple Meal

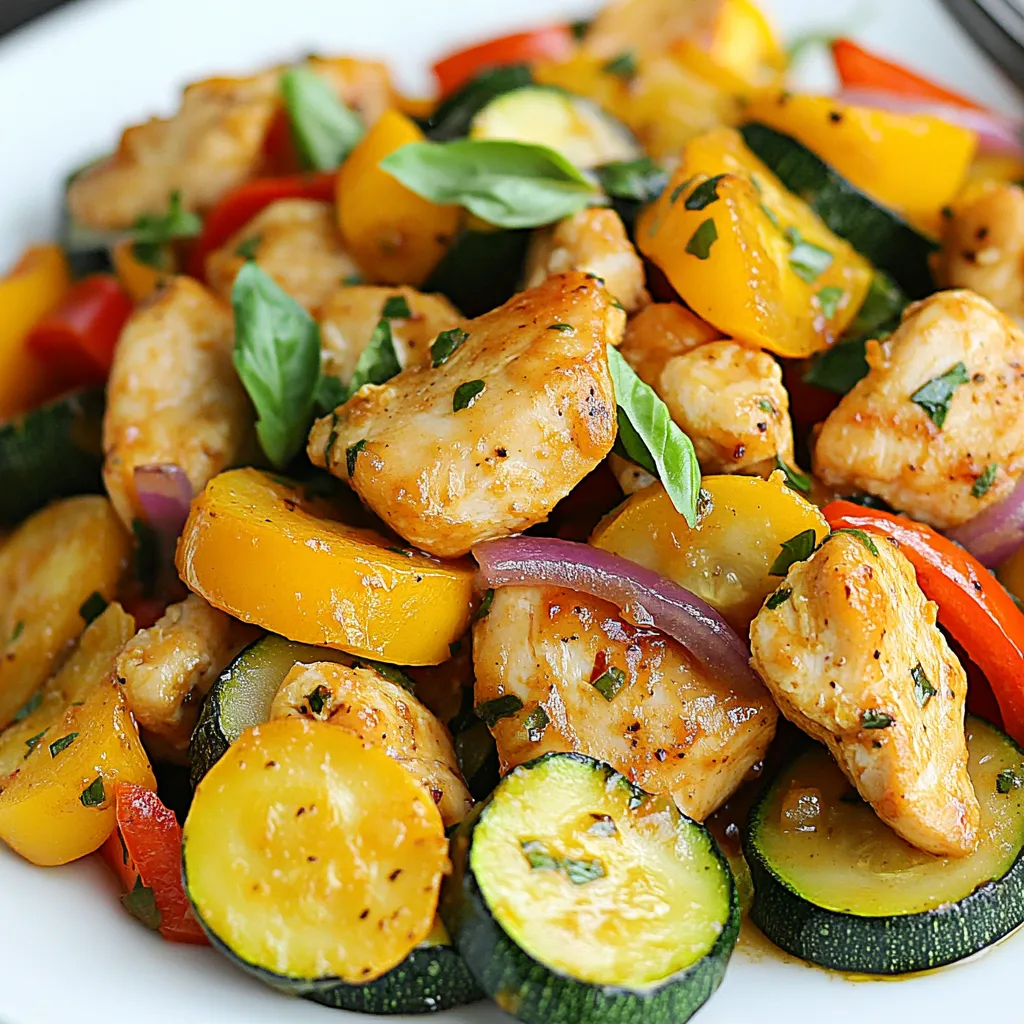
Looking for a quick and tasty dinner idea? This Chicken Zucchini Skillet is simple, flavorful, and packed with good ingredients.

To make chocolate dipped shortbread hearts, gather these items: - 2 cups all-purpose flour - 1 cup unsalted butter, softened - ¾ cup powdered sugar - 1 teaspoon vanilla extract - ¼ teaspoon salt - 1 cup semi-sweet chocolate chips - 1 tablespoon coconut oil (optional for smoother chocolate) - Heart-shaped cookie cutters - Sprinkles or chopped nuts for garnish (optional) You can swap some ingredients if needed: - Use salted butter instead of unsalted, but skip the salt. - Swap all-purpose flour for gluten-free flour for a gluten-free option. - Use dark chocolate chips for a richer flavor. - Replace coconut oil with vegetable oil if you don’t have it. Make sure you have these tools ready: - A large mixing bowl - A whisk or electric mixer - Parchment paper for baking sheets - A rolling pin for dough - A wire rack for cooling cookies - A microwave-safe bowl for melting chocolate - A spatula for dipping cookies By gathering these ingredients and tools, you’re all set to create delightful chocolate dipped shortbread hearts! {{ingredient_image_1}} Start by creaming together the softened butter and powdered sugar in a large bowl. Mix until it looks light and fluffy. This step is key for a soft cookie. Next, add the vanilla extract and salt. Stir well to combine all the flavors. Gradually add the all-purpose flour into the butter mix. Keep stirring until a dough forms. It might seem crumbly at first, but it will come together. Once the dough is ready, divide it in half. Shape each half into a disc and wrap them in plastic wrap. Chill in the fridge for at least 30 minutes. This helps the dough hold its shape when you bake. Preheat your oven to 350°F (175°C). Take one disc of dough from the fridge. On a lightly floured surface, roll it out to about ¼ inch thick. Use heart-shaped cookie cutters to cut out your shapes. Place them on a baking sheet lined with parchment paper. Make sure to leave some space between each cookie. Bake them for 12-15 minutes. You want the edges to turn lightly golden. Once they are done, take them out and let them cool completely on a wire rack. Cooling them is important for the next step. Now it’s time to melt the chocolate. In a microwave-safe bowl, mix the chocolate chips with coconut oil if you want smoother chocolate. Microwave the bowl in 30-second intervals. Stir in between until the chocolate is fully melted and smooth. Once melted, dip half of each cooled shortbread heart into the chocolate. Allow any excess chocolate to drip off before placing them back on the parchment-lined sheet. If you like, sprinkle some toppings like sprinkles or chopped nuts while the chocolate is still wet. Let the chocolate set at room temperature or pop the cookies in the fridge for a quicker set. To get the best texture for your shortbread hearts, start with softened butter. It should feel like a cool pillow when you touch it. Cream the butter and powdered sugar until it looks fluffy and light. This step adds air and makes your cookies tender. When you mix in the flour, do it slowly. Overmixing can make your cookies tough, and we want them to melt in your mouth. Melting chocolate can be tricky, but it’s easy if you know how. Use a microwave-safe bowl to melt the chocolate chips. Add coconut oil for a lovely sheen. Heat the chocolate in short bursts of 30 seconds. Stir it well in between each round. This helps prevent burning. When the chocolate is glossy and smooth, it’s ready for dipping! Decorating your cookies can be fun and creative! After dipping each heart in chocolate, add sprinkles or chopped nuts while the chocolate is still wet. This way, they stick well. You could also drizzle more chocolate on top for a fancy touch. Arrange your cookies on a nice plate or in a gift box. A little parchment paper can make the display look extra special. Pro Tips Chill the Dough: For cleaner shapes when cutting out cookies, ensure the dough is well-chilled. This helps maintain the heart shape during baking. Quality Chocolate: Use high-quality chocolate for dipping to enhance the flavor of your shortbread hearts. Dark chocolate can also add a rich contrast. Experiment with Flavors: Add a pinch of cinnamon or almond extract to the dough for an extra layer of flavor that complements the chocolate. Presentation Matters: For a special touch, arrange your cookies in a decorative box or on a cake stand, and consider adding a ribbon for gifting. {{image_2}} You can bring new tastes to your shortbread. Try adding a teaspoon of almond extract. It gives a nice nutty flavor. You can also mix in lemon zest for a fresh, bright touch. For a spiced twist, add a pinch of cinnamon or nutmeg. These small changes can make a big impact on taste. You have many chocolate choices for dipping. Semi-sweet chocolate is a classic option. It balances sweetness and richness well. Dark chocolate offers a bold flavor for those who love a deeper taste. Milk chocolate is sweeter and creamier, perfect for kids. White chocolate gives a unique twist and a lovely contrast to the cookie. You can also mix different chocolates for a fun marbled effect. You can change the look and feel of these cookies for holidays. For Valentine’s Day, use pink or red sprinkles. For Easter, top with pastel-colored decorations. In the fall, try a pumpkin spice flavor and add fall-themed sprinkles. Winter can bring peppermint extract mixed into the dough or crushed candy canes on top. These ideas make your treats fun for any occasion! To keep your chocolate dipped shortbread hearts fresh, store them in an airtight container. This helps keep them soft and prevents them from getting stale. Place a sheet of parchment paper between layers to avoid sticking. Keep the container in a cool, dry place away from direct sunlight. Avoid storing them in the fridge, as this can alter their texture. These cookies stay fresh for about one week when stored properly. If you notice any changes in smell or texture, it's best to toss them. If you want to keep them longer, consider freezing them. The rich butter flavor and chocolate will still taste great even after freezing. To freeze chocolate dipped shortbread hearts, first, let them cool completely. Place them in a single layer on a baking sheet. Freeze for about one hour until firm. Then, transfer the cookies to an airtight container or a freezer bag. You can store them this way for up to three months. When you're ready to enjoy, let them thaw at room temperature for a few minutes. To stop chocolate from cracking, make sure to melt it gently. Use a microwave in short bursts. Stir between each burst to keep the heat even. Adding a little coconut oil helps too. This gives the chocolate a smoother finish. Once dipped, let the cookies cool slowly. Rapid temperature changes can make chocolate crack. Yes, you can use gluten-free flour to make these cookies. Look for a blend that works well for baking. Brands with xanthan gum often give the best results. The texture may change slightly, but the taste will still be tasty. Make sure to follow the same steps in the recipe. You can make these cookies ahead of time. Prepare the dough and chill it, as the recipe suggests. You can freeze the dough for up to three months. Just thaw it in the fridge before rolling and cutting. Bake the cookies when you are ready to dip them in chocolate. This way, you can enjoy fresh cookies any time! We covered all key steps to make delicious chocolate dipped cookies. From the right ingredients to handy tips, this guide has you set for success. Remember to try different flavors and decorations for fun twists. Store your treats properly to keep them fresh. Whether you’re a beginner or a pro, these cookies will impress. Dive into baking and enjoy making these treats!

Chocolate Dipped Shortbread Hearts Irresistible Treat

Indulging in a sweet treat is always a delight, especially when it’s a Chocolate Dipped Shortbread Heart! In this guide,

- 1.5 lbs flank steak, sliced into thin strips - 2 bell peppers (red and green), sliced - 1 large onion, sliced - 3 cloves garlic, minced - 1 cup beef broth - 1 tablespoon soy sauce - 1 tablespoon oyster sauce - 1 tablespoon Worcestershire sauce (optional) - 1 tablespoon cornstarch mixed with 2 tablespoons water (for thickening) - 2 tablespoons olive oil - Salt and pepper to taste - Cooked rice or noodles for serving Gathering the right ingredients is key to making great crockpot pepper steak. Start with flank steak, as it cooks well in a slow cooker. Slice it thinly for better texture. Fresh bell peppers, both red and green, add color and crunch. A large onion and minced garlic enhance the dish's flavor. For the sauce, beef broth is a must. It keeps the meat juicy and tender. Soy sauce offers a savory touch, while oyster sauce deepens the taste. A dash of Worcestershire sauce adds a rich layer, but it’s optional. Lastly, cornstarch thickens the sauce at the end. Olive oil helps in searing the steak, giving it a nice crust. Don’t forget salt and pepper to taste. Serve the pepper steak over fluffy rice or noodles for a hearty meal. {{ingredient_image_1}} First, slice the flank steak into thin strips. This cuts down cooking time and makes it tender. Next, heat olive oil in a large skillet over medium-high heat. Season the steak strips with salt and pepper. Sear the steak in batches for about 2-3 minutes on each side until browned. Once done, transfer the steak to your crockpot. In the same skillet, add sliced bell peppers, onion, and minced garlic. Sauté them for 2-3 minutes until they soften a bit. This step boosts their flavor. After sautéing, add the vegetables to the crockpot with the seared steak. Now, it’s time to mix the sauces. In a bowl, combine beef broth, soy sauce, oyster sauce, and Worcestershire sauce, if you like. Pour this mixture over the steak and veggies in the crockpot. Make sure everything is coated well. Cover the crockpot and set it to low heat. Let it cook for 6-8 hours, or on high heat for 3-4 hours. About 30 minutes before serving, stir in the cornstarch mixed with water. This thickens the sauce nicely. Adjust the cooking time as needed to ensure the sauce reaches your desired thickness. Taste it and adjust seasoning if necessary before serving. Searing the steak adds deep flavor. It helps lock in juices. Use a hot skillet to get a nice brown crust. This step makes your dish rich and tasty. Always cook the steak in batches. If you crowd the pan, it won't brown well. Each piece needs space to cook evenly. Before serving, taste your dish. This lets you know if it needs more salt or pepper. You can also add more soy sauce for a stronger flavor. If you want it spicy, sprinkle some red pepper flakes. Feel free to customize to your taste. Each cook can make this dish their own. Pepper steak pairs well with rice or noodles. They soak up the sauce nicely. For a pretty plate, garnish with sliced green onions or sesame seeds. This adds color and crunch. You can also serve it with a side of steamed veggies. They balance the meal and add freshness. Pro Tips Choose the Right Cut: Flank steak is ideal for slow cooking as it becomes tender and flavorful. However, you can also use skirt steak or sirloin if you prefer. Don't Skip the Searing: Searing the steak before adding it to the crockpot enhances the flavor through caramelization, giving your dish a rich depth. Customize Your Veggies: Feel free to add other vegetables like mushrooms or broccoli. Just make sure to cut them into uniform sizes for even cooking. Adjust the Seasoning: Always taste your dish before serving. You can add more soy sauce or a pinch of sugar to balance the flavors if needed. {{image_2}} You can switch the flank steak for boneless chicken breast. Just slice it thin. Chicken cooks well in the crockpot and absorbs the flavors nicely. Tofu is a great choice for a vegetarian option. Use firm tofu and cube it before adding it to the pot. This gives a nice texture and flavor. Feel free to get creative with vegetables. Adding mushrooms or broccoli can make the dish more colorful and nutritious. You can also use different bell pepper colors, like yellow or orange. This not only adds flavor but also makes the dish visually appealing. If you want a healthier version, try low-sodium alternatives for sauces. This keeps the taste without too much salt. You can also make this dish without oyster sauce. Just add a bit more soy sauce for flavor. This allows you to enjoy pepper steak while meeting your dietary needs. To keep your leftover pepper steak fresh, cool it first. Place it in the fridge within two hours. Use airtight containers to store it. This helps prevent spoilage. I recommend using glass or BPA-free plastic containers. They keep the flavors well and are easy to clean. When reheating, always make sure the food is hot. The best method is using the microwave. Heat in short intervals to avoid overcooking. Stir the dish between intervals for even heating. If you're using the stove, warm it on low heat. This keeps the meat tender. Ensure the internal temperature reaches 165°F for safety. You can freeze pepper steak for up to three months. Use freezer-safe containers or bags. Make sure to remove as much air as possible. To thaw, place it in the fridge overnight. If you're in a hurry, use the microwave on defrost setting. Avoid refreezing once it has thawed. This keeps the texture and taste just right. Yes, you can cook this on high heat! If you choose high heat, adjust the time to 3-4 hours. This will still give you tender steak and tasty veggies. Just remember, low heat is best for rich flavor. So, if you have the time, go for low! If you don't have flank steak, don't worry! You can use sirloin or skirt steak. Both options work well and stay juicy. For a different twist, try using boneless chicken breast or even tofu for a vegetarian meal. Pepper steak stays good in the fridge for 3-4 days. Store it in an airtight container to keep it fresh. If you want to keep it longer, consider freezing it. Just be sure to thaw it safely before enjoying it again! To make pepper steak, gather flank steak, bell peppers, and onion. Use flavor-packed sauces like soy and Worcestershire. Follow the steps for perfect cooking. Remember to sear the steak well for flavor and adjust spices to your taste. You can even switch proteins or veggies for a twist. Ultimately, this dish is versatile and easy to store. Enjoy your delicious meal!

Crockpot Pepper Steak Flavorful and Easy Dinner Recipe

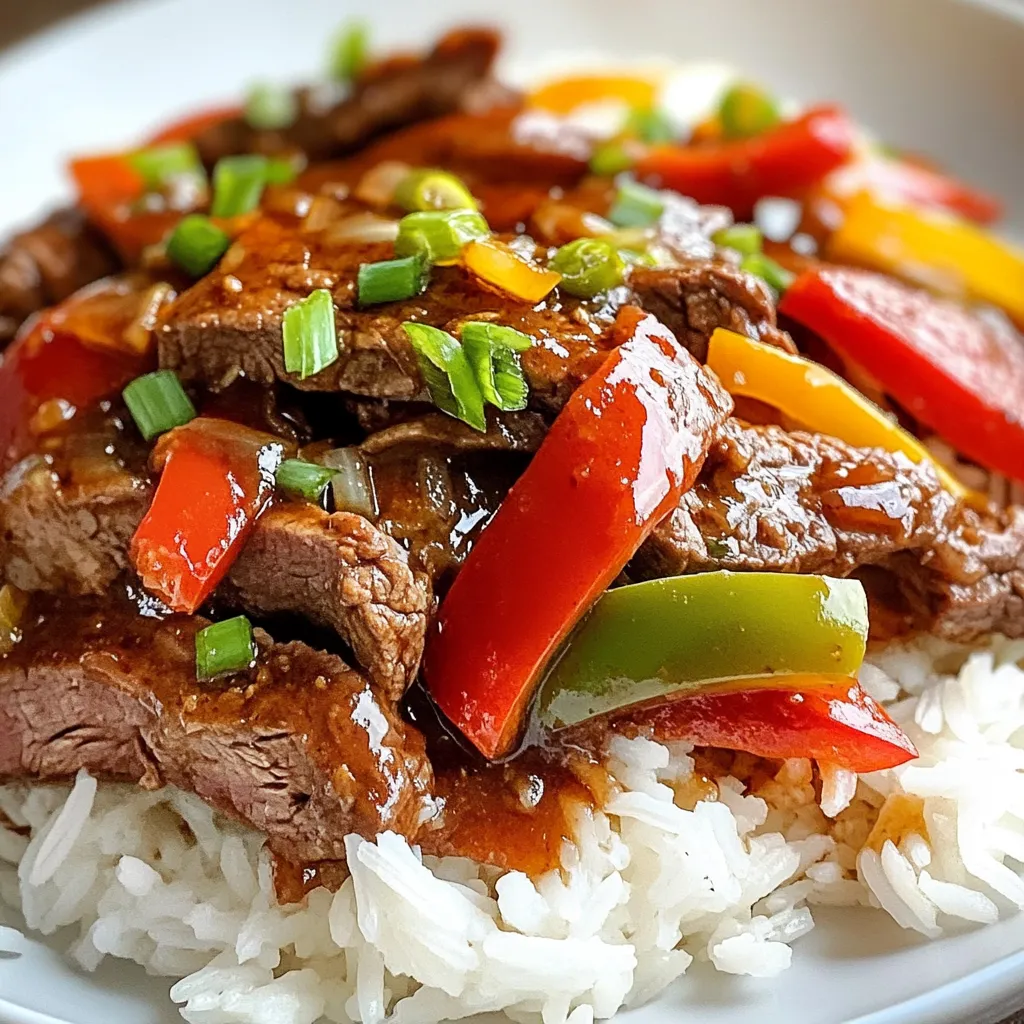
Are you looking for a simple yet flavorful dinner dish? Look no further than my Crockpot Pepper Steak recipe! With

To make Chocolate Chip Cheesecake Cookies, you will need the following ingredients: - 1 cup cream cheese, softened - 1/2 cup unsalted butter, softened - 3/4 cup brown sugar, packed - 1/4 cup granulated sugar - 1 large egg - 1 teaspoon vanilla extract - 1 1/2 cups all-purpose flour - 1/2 teaspoon baking soda - 1/4 teaspoon salt - 1 cup semi-sweet chocolate chips - 1/2 cup crushed graham crackers Each ingredient plays a key role in creating the perfect cookie. The cream cheese gives it that rich, cheesecake flavor. Butter adds moisture and helps the cookies spread. Brown sugar makes them chewy and sweet. The egg binds everything and adds fluffiness. The flour forms the base of the dough, while baking soda helps them rise. Salt enhances the flavors. Chocolate chips add sweetness and richness, and graham crackers bring that classic cheesecake taste. Gather these items before you start. This will make your baking process smooth and enjoyable. Happy baking! {{ingredient_image_1}} 1. Preheat your oven to 350°F (175°C). Prepare a baking sheet by lining it with parchment paper. This helps the cookies not stick. 2. In a large mixing bowl, combine 1 cup of softened cream cheese and 1/2 cup of softened unsalted butter. Use an electric mixer to blend these until they are smooth and fluffy. This step is key for a creamy texture. 3. Next, add 3/4 cup of packed brown sugar and 1/4 cup of granulated sugar to the cream mixture. Beat until everything is well mixed. The sugars add sweetness and help the cookies rise. 4. Incorporate 1 large egg and 1 teaspoon of vanilla extract. Mix well until the batter is smooth. The egg binds the ingredients, while the vanilla adds flavor. 5. In a separate bowl, whisk together 1 1/2 cups of all-purpose flour, 1/2 teaspoon of baking soda, and 1/4 teaspoon of salt. Gradually add this dry mix to the wet ingredients, stirring just until combined. Avoid over-mixing to keep the cookies soft. 6. Now, fold in 1 cup of semi-sweet chocolate chips and 1/2 cup of crushed graham crackers. Mix gently to ensure they are evenly distributed. The graham crackers give that delicious cheesecake flavor. 7. Using a cookie scoop or tablespoon, drop rounded balls of dough onto the prepared baking sheet. Make sure to space them about 2 inches apart for even baking. 8. Bake in the preheated oven for 10 to 12 minutes. Look for lightly golden edges with soft centers. This ensures a chewy texture. 9. After baking, remove the cookies from the oven. Let them cool on the baking sheet for about 5 minutes. Then, transfer them to a wire rack to cool completely. Enjoy the sweet aroma as they cool! - How to achieve the perfect cookie texture To get soft and chewy cookies, do not overmix your dough. Mix just until you see no dry flour. Bake until the edges are light brown, but the center looks soft. This helps keep the inside moist and chewy. - Recommended tools for baking cookies Use a good electric mixer to cream butter and cream cheese. A cookie scoop helps you make even-sized cookies. Parchment paper on your baking sheet makes cleanup easy and helps cookies bake evenly. - Cooling and serving tips Allow the cookies to cool on the sheet for about 5 minutes. Then, move them to a wire rack. This keeps them from getting soggy. Serve warm for a melty chocolate experience, or let them cool for a firmer texture. - Adding spices or extracts For a twist, try adding a pinch of cinnamon or nutmeg. A bit of almond extract can also enhance the cheesecake flavor. Just a small amount can make a big difference in taste. - Alternative chocolate types If you want to mix it up, use milk chocolate or dark chocolate chips. You can also try white chocolate for a sweeter cookie. Each type gives a unique flavor to these delicious cheesecake cookies. Pro Tips Chill the Dough: For even thicker cookies, chill the dough for 30 minutes before baking. This helps prevent spreading and gives you a chewier texture. Use Room Temperature Ingredients: Ensure your cream cheese and butter are at room temperature for easier mixing and a smoother batter. Customize Your Mix-Ins: Feel free to swap out semi-sweet chocolate chips for dark chocolate or even white chocolate for a different twist on flavor! Store Properly: Keep leftover cookies in an airtight container at room temperature for up to a week to maintain freshness. {{image_2}} If you want to make these cookies fit your diet, consider using gluten-free options. You can swap regular flour for a gluten-free blend. Just make sure the blend has xanthan gum for the right texture. For a vegan twist, replace cream cheese with a vegan cream cheese. Use coconut oil instead of butter. You can also use flax eggs or applesauce in place of the egg. Both work well to keep the cookie moist. Feeling adventurous? Try different chip flavors. Dark chocolate or white chocolate chips add a unique taste. You can even mix in peanut butter chips for extra flavor. Adjusting sweetness can change the cookie's vibe. If you prefer a less sweet cookie, cut back on the brown sugar. You can also add a touch of sea salt to balance the sweetness. This adds a nice contrast to the chocolate and cream cheese. To keep your chocolate chip cheesecake cookies fresh, store them at room temperature. Use an airtight container to prevent drying out. Place parchment paper between layers to avoid sticking. If you want to keep them longer, refrigerate them. They will stay fresh for about one week in the fridge. Just remember to seal them well to keep them moist. To freeze cookies properly, first let them cool completely. Then, place them in a single layer on a baking sheet. Freeze until firm, about one hour. After that, transfer them to a freezer bag. Remove as much air as possible to avoid freezer burn. They can last up to three months in the freezer. When you want to enjoy a cookie, take it out and let it thaw at room temperature. You can also reheat it in the oven for a few minutes. This will bring back that fresh-baked taste. How do I prevent my cookies from spreading? To stop cookies from spreading, chill the dough for at least 30 minutes. This helps firm the fat. Use a cookie scoop to keep the shape. Also, make sure to measure your flour correctly. Too little flour can cause spreading. Can I make these cookies in advance? Yes, you can make the cookie dough ahead of time. Just wrap it well and store it in the fridge for up to 3 days. You can also freeze the dough. It lasts for about three months in the freezer. When ready, let it thaw in the fridge before baking. What can I use instead of cream cheese? You can use mascarpone or ricotta cheese as a substitute. Both will give a similar creamy texture. Another option is Greek yogurt, but it may change the flavor a bit. Each choice will still taste great in the cookies. How long do these cookies last? These cookies stay fresh for about a week when stored in an airtight container. If you want them to last longer, freeze them. They can keep for up to three months in the freezer. Just make sure to wrap them well! Now you know how to make delicious cookies with cream cheese and chocolate chips. We covered the key ingredients, steps to prepare, and tips for great results. Remember to store and freeze your cookies correctly to keep them fresh. You can also try different flavors and variations to make this recipe your own. Baking can be fun and rewarding. Enjoy your homemade treats!

Chocolate Chip Cheesecake Cookies Tasty Delight Recipe

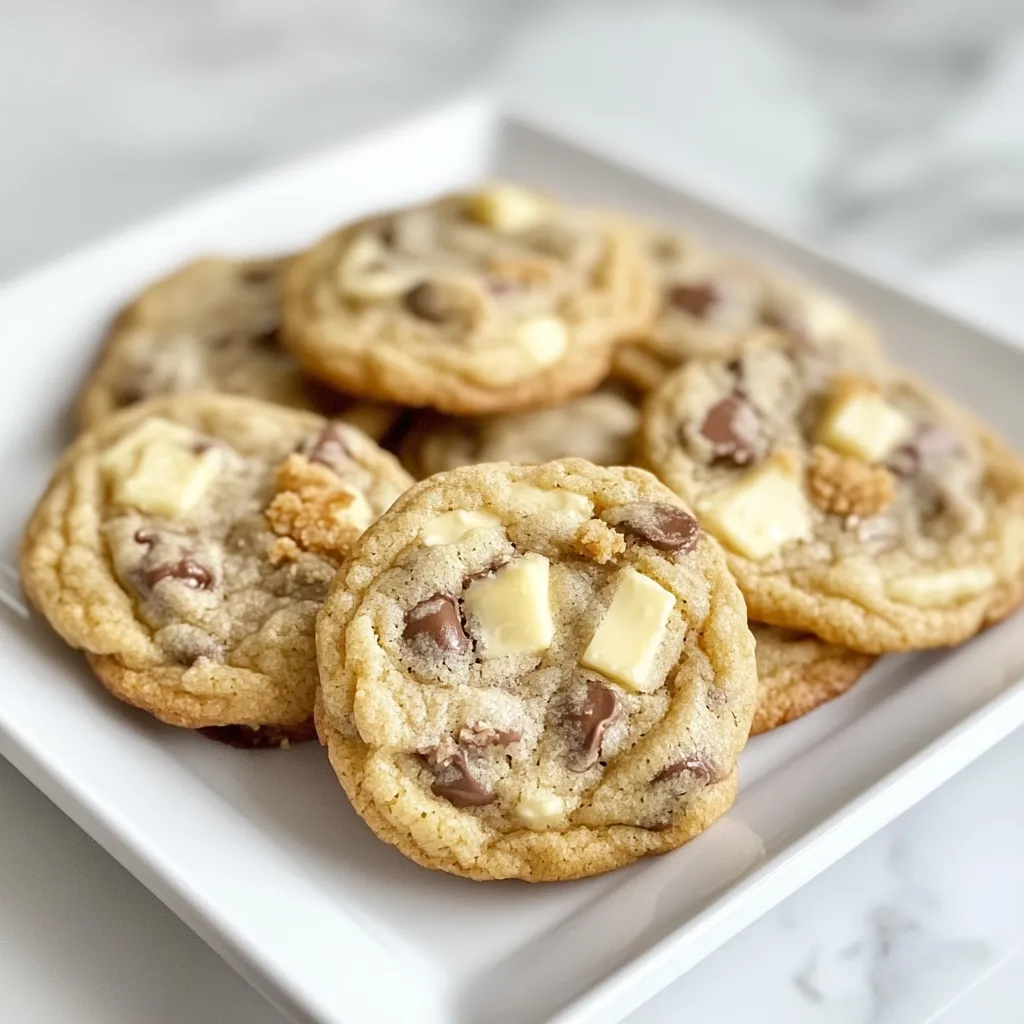
Get ready for a treat that combines two favorites—cheesecake and cookies! In this post, I will show you how to

- 1 pound ground beef - 1/2 pound ground pork - 1 cup breadcrumbs - 1 large onion, finely chopped - 3 cloves garlic, minced - 1/4 cup beef broth - 1 large egg - 1 tablespoon soy sauce - 2 tablespoons Worcestershire sauce (non-alcoholic) - 1 teaspoon dried thyme - 1 teaspoon black pepper - 1 teaspoon salt - 1 cup shredded Gruyère cheese - 2 tablespoons fresh parsley, chopped, for garnish Use fresh, high-quality meat for the best flavor. Ground beef should be lean. Ground pork adds moisture and richness. Fresh breadcrumbs provide better texture than dried ones. A good Gruyère cheese is key for that rich, melty topping. Choose a fresh onion that feels heavy, with a firm skin. Fresh herbs enhance flavor and add freshness. If you want a lighter option, use ground turkey instead of beef and pork. For a gluten-free dish, swap breadcrumbs for crushed gluten-free crackers. You can also use vegetable broth to replace beef broth for a lighter taste. If Gruyère is not available, you can try Swiss cheese or mozzarella for a similar meltiness. {{ingredient_image_1}} First, you need to preheat your oven. Set it to 400°F (200°C). This helps the meatballs cook well. Next, take a baking sheet and line it with parchment paper. The paper keeps the meatballs from sticking. This makes cleanup easy. In a large skillet, pour in one tablespoon of olive oil. Heat it over medium heat. Add the finely chopped onion. Cook the onion until it becomes soft and golden. This should take about 15-20 minutes. Stir it often to stop it from burning. After 15 minutes, add the minced garlic. Cook for two more minutes. Then, take the skillet off the heat and let the mixture cool. Grab a large bowl. In it, combine the ground beef and ground pork. Next, add the breadcrumbs, egg, and beef broth. Pour in the soy sauce and Worcestershire sauce, too. Then, add the dried thyme, black pepper, and salt. Finally, mix in the cooled onion and garlic. Use your hands to combine everything well. This mixture is key to your meatballs. Now it’s time to form the meatballs. Take a handful of the mixture and shape it into a ball about 1.5 inches wide. Place each meatball on the baking sheet as you go. Make sure there is space between them. Bake the meatballs in your preheated oven for 20-25 minutes. They should be cooked through and browned. Once the meatballs are done, take them out of the oven. Sprinkle shredded Gruyère cheese on top of each meatball. This cheese adds a rich, creamy flavor. Return the meatballs to the oven for an extra 5 minutes. This melts the cheese and makes it bubbly. After that, let the meatballs rest for a couple of minutes. Finally, garnish with fresh parsley before serving. Enjoy your flavorful creation! To get sweet, golden onions, start with a good amount of olive oil. Heat it over medium heat in a large skillet. Add your chopped onion and let it cook slowly. Stir the onions often to prevent burning. You want them to take their time. This process takes about 15-20 minutes. When the onions turn soft and brown, add minced garlic for the last 2 minutes. This adds great flavor. Once done, let the mix cool before adding it to the meatball mix. When forming meatballs, keep your hands slightly wet. This helps prevent sticking. Grab about a handful of the meat mixture and roll it into a ball, about the size of a golf ball. Make sure the meatballs are even in size. This helps them cook at the same rate. Place them on your baking sheet, leaving space between each one. This space allows hot air to circulate and cook them evenly. To ensure your meatballs cook evenly, bake them on a lined baking sheet. The parchment paper helps with easy cleanup, too. You’ll want to check the meatballs halfway through cooking. If one side is browning faster, you can turn them to get a nice, even color. Bake until they are fully cooked and reach a safe internal temperature. Adding Gruyère cheese at the end gives them that extra touch of flavor. Let them rest a couple of minutes before serving. This helps keep them juicy and delicious. Pro Tips Use Fresh Herbs: Fresh thyme can elevate the flavor profile of your meatballs. Consider adding a teaspoon of fresh thyme instead of dried for a more vibrant taste. Perfectly Caramelized Onions: To achieve the best caramelization, cook your onions on low heat and stir them frequently. This will bring out their natural sweetness and enhance the overall flavor of the dish. Cheese Variation: While Gruyère adds a delightful nutty flavor, feel free to experiment with other cheeses like mozzarella or cheddar for different flavor profiles in your meatballs. Make Ahead: Prepare the meatballs in advance and refrigerate them. You can bake them just before serving, which makes this dish perfect for entertaining. {{image_2}} You can switch up the meat in these meatballs for a new twist. Ground turkey or chicken works well. They are leaner but still tasty. If you want more flavor, try adding some Italian sausage. It gives a nice spice to the dish. Mixing different meats can make each bite exciting. If you prefer a meat-free option, you can make veggie meatballs. Use lentils or black beans as the base. They add protein and can be very filling. Combine them with breadcrumbs and your favorite spices. Add some grated vegetables like carrots or zucchini for extra nutrition. You can still use the same onion and garlic for great flavor. Spice up your meatballs with fun flavors. Add some chopped mushrooms for an earthy taste. You can mix in fresh herbs like basil or parsley for brightness. A splash of balsamic vinegar can add depth. For a kick, try adding crushed red pepper flakes. Experimenting with cheese is also a great idea. Mozzarella or feta can bring a different taste and texture. To store your leftover meatballs, let them cool first. Place them in an airtight container. If you have a lot, use a few small containers to save space. Store the container in the fridge. These meatballs will stay fresh for about three to four days. Reheating your meatballs is simple. You can use the oven or microwave. If you choose the oven, preheat it to 350°F (175°C). Place the meatballs on a baking sheet. Heat them for about 10-15 minutes. If using a microwave, place the meatballs in a microwave-safe bowl. Heat them for 1-2 minutes, checking to see if they are hot. Add a splash of beef broth to keep them moist. You can freeze your meatballs for longer storage. First, let them cool completely. Arrange them in a single layer on a baking sheet. Freeze them for 1-2 hours until firm. Then, transfer them to a freezer bag or container. Be sure to remove as much air as possible. Label the bag with the date. Your meatballs can last for up to three months in the freezer. When you're ready to eat, thaw them in the fridge overnight before reheating. Yes, you can use ground turkey or chicken. These meats are leaner than beef and pork. They will make your meatballs lighter. Just remember, the flavor will change a bit. You may want to add more seasoning to enhance the taste. These meatballs pair well with many sides. Here are some great options: - Mashed potatoes - Rice - Pasta - Crusty bread - Side salad Each option will soak up the delicious flavors. You can mix and match based on what you like. Cooked meatballs can last in the fridge for about three to four days. Make sure to store them in an airtight container. This keeps them fresh and safe to eat later. If you notice any off smells, it’s best to toss them. Absolutely! You can prepare the meatballs and bake them ahead of time. After baking, let them cool completely. Then, store them in the fridge or freezer. When ready to eat, just reheat and enjoy. This makes meal prep easy and fast! This post shared key steps to make delicious French Onion Meatballs. We covered all ingredients, cooking tips, and variations to suit your taste. Remember, quality ingredients make a big difference. Try fun alternatives and store leftovers for another meal. With these tips, you can impress family and friends. Enjoy creating this tasty dish and make it part of your recipe collection. Happy cooking!

French Onion Meatballs Bursting with Flavor

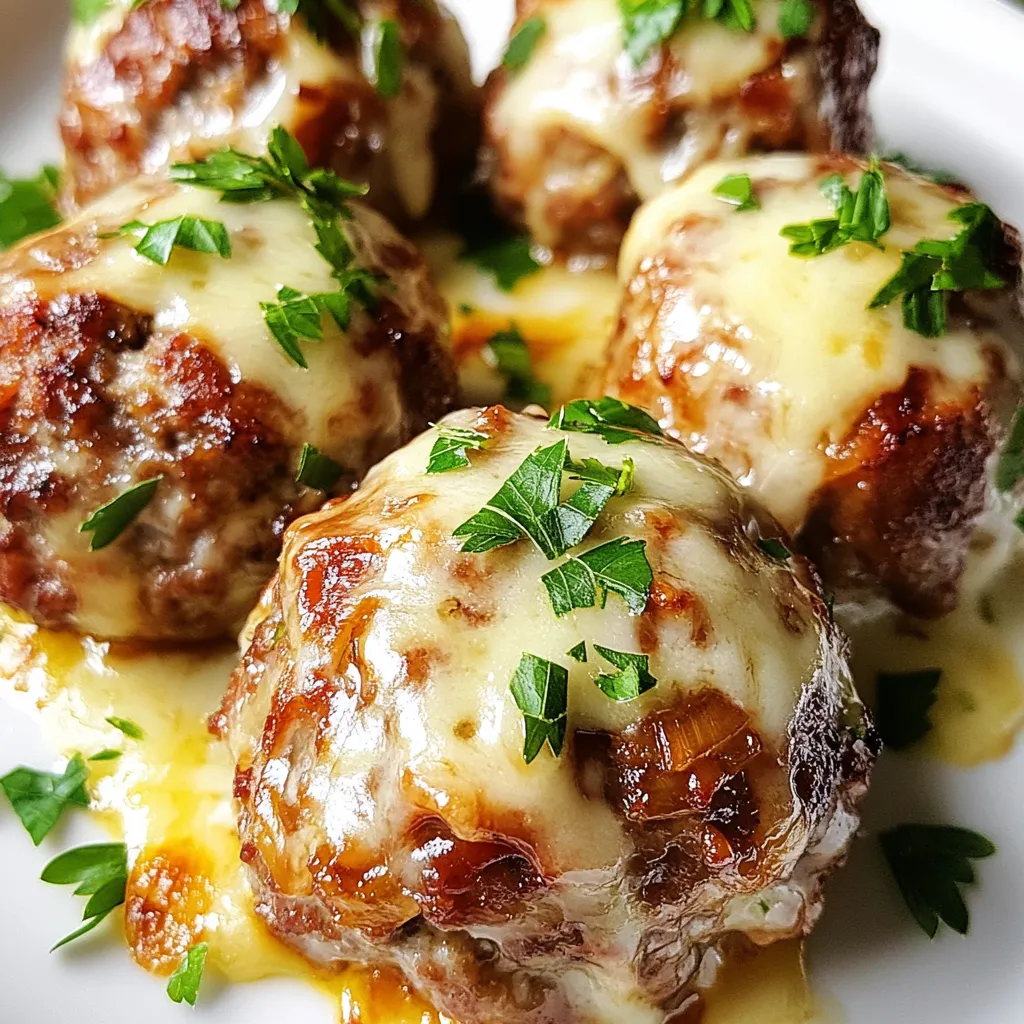
Are you ready to wow your taste buds? French Onion Meatballs Bursting with Flavor offer a delicious twist on a

You need a whole chicken weighing about 4 to 5 pounds. This size cooks evenly and stays juicy. For the marinade, gather 1/4 cup of olive oil, the zest and juice from 1 lemon, and 8 cloves of minced garlic. Fresh herbs make a big difference. Use 2 tablespoons each of chopped rosemary and thyme, along with 1 tablespoon of chopped parsley. Don't forget salt and pepper to taste. Add 1 teaspoon of paprika for a hint of warmth. Aromatics add depth to your dish. Start with 1 onion, quartered, which gives flavor as it roasts. You also need 2 carrots, chopped into large pieces. These not only enhance taste but also serve as a bed for the chicken. The carrots soak up the juices, making them sweet and tender. For seasoning, salt and pepper are key. They bring out the natural flavors of the chicken. The paprika adds some color and a mild kick. This mix of ingredients creates a balanced flavor profile that makes every bite delightful. The combination of lemon, garlic, and herbs is classic and a must-try. {{ingredient_image_1}} Start by preheating your oven to 425°F (220°C). This step is key for a crispy skin. Next, pat your whole chicken dry with paper towels. Drying the chicken helps the skin crisp up nicely. Carefully loosen the skin over the breast and thighs. Use your fingers, but be gentle to avoid tearing. This allows the marinade to soak in better. In a small bowl, mix together the olive oil, lemon zest, and lemon juice. Add the minced garlic, chopped rosemary, thyme, parsley, salt, pepper, and paprika. Whisk it all together until smooth. This marinade adds a burst of flavor to the chicken. Rub this mixture all over the chicken. Don’t forget to get it under the skin and inside the cavity. This ensures every bite is packed with taste. Place quartered onion and some carrot pieces inside the chicken's cavity. This adds aroma and flavor. In a roasting pan, put remaining carrots and pour the chicken broth over them. Position the chicken, breast-side up, on the carrots. Roast in the oven for about 1 hour and 15 minutes. Check the chicken’s internal temperature; it should reach 165°F (74°C). Halfway through, baste the chicken with its own juices. This keeps it moist and flavorful. After roasting, let the chicken rest for 10-15 minutes before carving. This helps the juices spread evenly. Enjoy your juicy, flavorful garlic herb roasted chicken! To get that crispy skin, start with a dry chicken. Pat it dry with paper towels. This helps the skin crisp up nicely. Next, loosen the skin over the breast and thighs. This allows the marinade to get under the skin. Rub the marinade all over the chicken, focusing on those areas. When you roast it, use high heat. This helps the skin turn golden brown. You want juicy meat, right? First, use a whole chicken with good fat. This helps keep it moist. When you rub the marinade inside the cavity, it adds flavor. Basting the chicken halfway through cooking is key. Use its own juices to keep it moist. Let it rest after cooking. This helps the juices stay inside when you carve it. You need a few basic tools for this recipe. A roasting pan is a must. It helps catch the juices and keeps the chicken elevated. Use a meat thermometer. This ensures you cook the chicken to the right temperature. A sharp knife is important for carving. Finally, have some paper towels handy for drying the chicken. These tools will help you create a perfect garlic herb roasted chicken. Pro Tips Marinate Overnight: For even deeper flavor, consider marinating the chicken overnight in the refrigerator. This allows the herbs and spices to penetrate the meat thoroughly. Use a Meat Thermometer: A reliable meat thermometer will ensure your chicken is perfectly cooked. Insert it into the thickest part of the thigh without touching the bone to check for doneness. Resting Time is Key: Allow the chicken to rest after roasting. This helps the juices redistribute throughout the meat, making it more succulent and flavorful. Add Vegetables: Feel free to add other vegetables like potatoes or bell peppers to the roasting pan. They will absorb the delicious drippings and become a tasty side dish. {{image_2}} You can switch herbs to change the taste of your chicken. Instead of rosemary, try sage for a warm flavor. Basil works well too, giving a sweet and fresh note. If you want a spicy kick, use oregano. Each herb brings a unique taste, so feel free to experiment. Mix and match until you find your favorite combo! You can roast chicken in an oven or use a slow cooker. The oven gives you a crispy skin. Set it to 425°F and roast for about 1 hour and 15 minutes. The slow cooker cooks at a low temperature for hours. It keeps the meat juicy but won’t give you that crispy finish. Both methods work great, so choose what fits your day. After roasting, pair your chicken with delicious sides. Roasted carrots and a fresh salad complement the chicken well. You can also serve it with mashed potatoes for comfort. If you like grains, try quinoa or rice. These sides soak up the chicken's juices and enhance your meal. Enjoy your flavorful feast! After enjoying your garlic herb roasted chicken, store leftovers right away. Let the chicken cool down to room temperature. Then, place it in an airtight container. This keeps the chicken fresh and tasty for later. You can also wrap the chicken tightly in plastic wrap. Make sure to keep it in the fridge. Use leftovers within three to four days for the best flavor. When you're ready to eat the leftovers, reheat the chicken safely. The best way is to use an oven. Preheat it to 350°F (175°C). Place the chicken in a baking dish and cover it with foil. This keeps it moist as it heats. Heat for about 20-30 minutes until it's hot all the way through. You can use a meat thermometer to check if it reaches 165°F (74°C). If you want to save chicken for longer, freezing is a great option. Cut the chicken into pieces for easier storage. Place the pieces in freezer bags. Press out as much air as you can before sealing. You can also use airtight containers. Label the bags or containers with the date. Frozen chicken can last up to three months. When you’re ready to eat, thaw it in the fridge overnight before reheating. Roast a whole chicken at 425°F for about 1 hour and 15 minutes. Use a meat thermometer to check. The chicken is done when the inside reaches 165°F. Juices should run clear when you cut into it. Roasting at this high heat makes the skin crispy. It also seals in the juices. This method gives you a flavorful bird that is tender and moist. Yes, you can use boneless chicken thighs. They cook faster than a whole chicken. Adjust the cooking time to about 30-40 minutes. Make sure they reach 165°F inside. The marinade works well with thighs too. You’ll get a tasty dish with nice flavors. If the chicken is dry, there are a few fixes. First, make sure to baste it with its own juices during cooking. This adds moisture and flavor. You can also serve it with sauce or broth. For leftovers, try shredding the chicken. Mix it with a little broth before serving. This keeps it juicy and tasty. We covered how to make a tasty roasted chicken. Start with quality ingredients like a whole chicken, fresh herbs, and flavorful marinades. Prepping and basting ensure juicy results while using the right tools helps achieve that crispy skin. You learned variations to mix it up and smart ways to store leftovers. Remember, cooking is fun, and with these tips, your chicken will shine at every meal. Enjoy your delicious creations and keep exploring new flavors!

Garlic Herb Roasted Chicken Juicy and Flavorful Dish

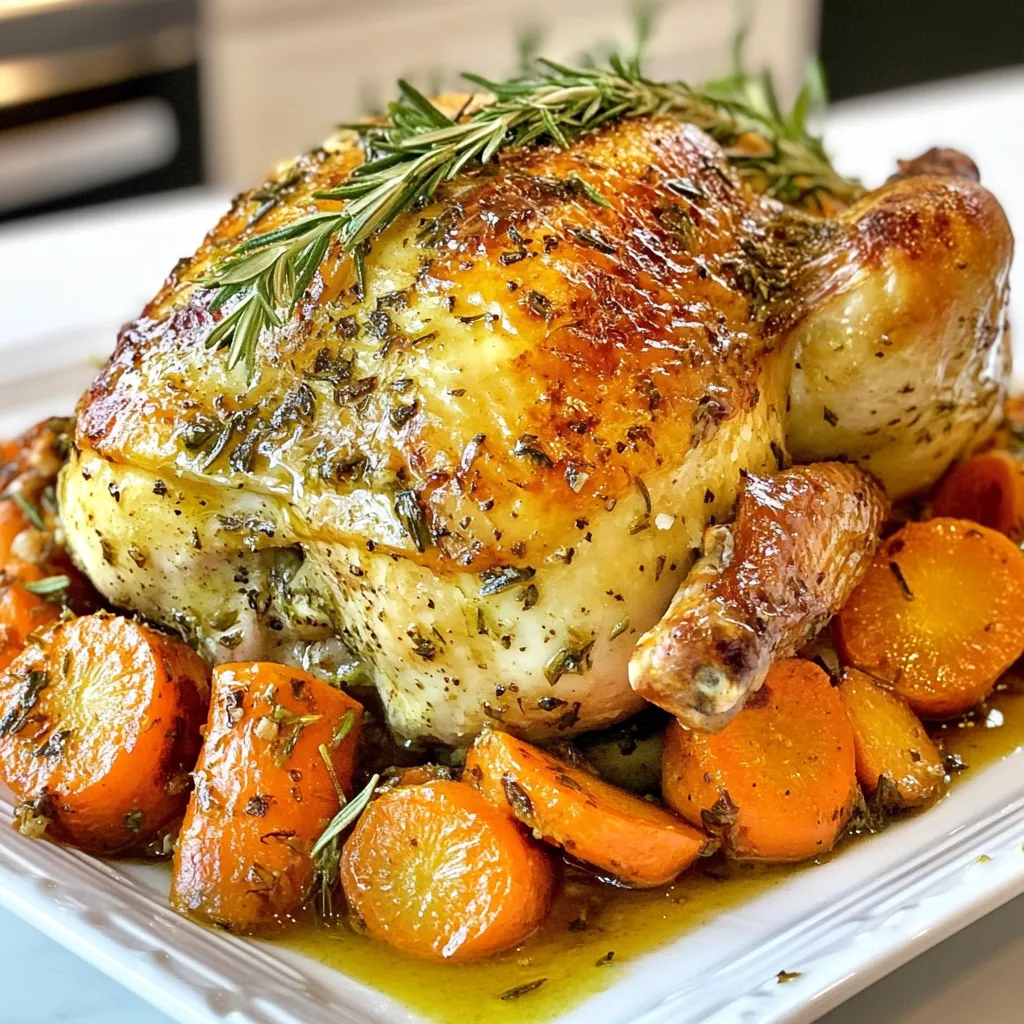
Welcome to the ultimate guide on making Garlic Herb Roasted Chicken! If you crave a juicy, flavorful dish, you’re in

- 1 frozen banana - 1 cup unsweetened almond milk (or any milk of choice) - 2 tablespoons natural peanut butter - 2 tablespoons cocoa powder - 1 tablespoon honey or maple syrup (adjust to taste) - 1/2 teaspoon vanilla extract The main ingredients for this Chocolate Peanut Butter Smoothie Bowl are simple yet delicious. The frozen banana gives a creamy base. It also makes the smoothie cold and thick. Almond milk adds a nice creaminess without being heavy. You can use any milk you prefer, though. Natural peanut butter brings that rich, nutty flavor. It pairs perfectly with cocoa powder, which gives the bowl a chocolatey taste. Honey or maple syrup adds a touch of sweetness. You can adjust this to fit your taste. A little vanilla extract enhances all the flavors and makes it even better. - Sliced bananas - Granola - Chia seeds - Drizzle of peanut butter Toppings make this smoothie bowl fun and more filling. Sliced bananas add fresh flavor and a nice texture. Granola gives a nice crunch, which contrasts well with the smooth base. Chia seeds not only look great but also add extra nutrition. A drizzle of peanut butter on top is an extra treat you won’t want to skip. Feel free to mix and match your toppings. They can change the flavor and texture each time you make it. Enjoy creating your own perfect blend! {{ingredient_image_1}} To start, gather your blender. I like to use a high-speed blender for the best results. Next, add the following ingredients into the blender: - 1 frozen banana - 1 cup unsweetened almond milk - 2 tablespoons natural peanut butter - 2 tablespoons cocoa powder - 1 tablespoon honey or maple syrup - 1/2 teaspoon vanilla extract Once everything is in, secure the lid tightly. This step is key to avoid any spills. Now, blend the mixture on high speed. Blend until it is smooth and creamy. If the mix is too thick, add a little more almond milk. This helps you reach your desired consistency. If needed, stop the blender and scrape down the sides. This ensures all ingredients mix well. Once you have a smooth blend, pour it into a bowl. The bowl should show off its rich color. For the best look, add your toppings. I like to use: - Sliced bananas - A sprinkle of granola - A few chia seeds - A drizzle of peanut butter These toppings not only add flavor but also make the bowl look amazing. Enjoy this delicious treat right away! To get the right thickness, adjust the almond milk. If your smoothie is too thick, add a splash more. Blend on high speed. Stop to scrape down the sides if needed. This helps mix everything well. Smooth and creamy is the goal! You can boost the flavor with spices. A pinch of cinnamon or a dash of nutmeg adds warmth. Want it sweeter? Adjust the honey or maple syrup to your taste. Start with a little and taste as you go. This smoothie bowl pairs well with breakfast or snacks. Enjoy it for a quick meal or dessert. It's perfect for warm days or a cozy morning. Serve it at brunch with friends or on a lazy weekend. Your guests will love it! Pro Tips Use Frozen Bananas: For a creamier texture, always use frozen bananas instead of fresh ones. They blend smoothly and provide a thick, ice-cream-like consistency. Adjust Sweetness to Taste: Depending on the ripeness of your banana and your preference, you may want to adjust the amount of honey or maple syrup. Start with less and add more if needed. Experiment with Toppings: Get creative with toppings! Try adding berries, nuts, or yogurt for added flavor and texture. Each topping can enhance your smoothie bowl experience. Choosing the Right Milk: While almond milk is a great choice, feel free to use any milk you prefer, such as oat milk or coconut milk, to change the flavor profile of your smoothie bowl. {{image_2}} If you need dairy-free options, almond milk works great. You can also try oat or coconut milk. These milks add creaminess without dairy. For nut-free substitutions, consider sun butter or soy nut butter. They give a similar taste and texture without nuts. You can mix in fruits like berries or mango for a fresh taste. Other nut butters like almond or cashew add a fun twist. For toppings, think beyond bananas. Try berries, coconut flakes, or even dark chocolate chips for extra flavor. Using seasonal fruits makes this bowl even more special. In summer, add fresh peaches or strawberries. In autumn, consider spices like cinnamon with apples. For holidays, top with festive sprinkles or crushed peppermint. This makes your smoothie bowl fun and festive! To store any leftover smoothie, put it in an airtight container. This helps keep it fresh. You can also use a mason jar. Make sure to seal it tight. If you want to freeze your smoothie, pour it into ice cube trays. Once frozen, place the cubes in a bag. This way, you can blend them later for another smoothie. The stored smoothie lasts about one day in the fridge. After that, it may start to spoil. Look for changes in smell or color. If it smells sour, it's time to toss it. When freezing, your smoothie can last up to three months. Just check for signs of freezer burn before using. Always trust your senses. If it looks or smells off, don’t eat it. This smoothie bowl is rich in nutrients. Bananas provide potassium and fiber, which help with digestion. Peanut butter adds protein and healthy fats, keeping you full. Cocoa powder is full of antioxidants, good for your heart. Almond milk is low in calories and has no dairy. This bowl gives you energy without a sugar crash. Yes, you can prepare this smoothie bowl in advance. Blend the base and store it in the fridge. It stays fresh for up to one day. Give it a quick stir before serving. However, toppings are best added right before you eat. This keeps them crunchy and fresh. You can use many milk alternatives. Some great choices include soy milk, oat milk, or coconut milk. Each option adds a unique flavor. If you need a nut-free option, try rice milk. Choose what you like best for the taste and texture. To make this recipe vegan, simply replace honey with maple syrup or agave nectar. Both options are plant-based and provide sweetness. Ensure your peanut butter is vegan-friendly. Most brands do not use animal products. With these swaps, you can enjoy a tasty vegan chocolate peanut butter smoothie bowl. This smoothie bowl is easy to make and full of flavor. We discussed the key ingredients, how to blend them, and tips for perfect texture. Remember to explore variations and toppings to make it your own. Enjoy this healthy treat whenever you want a quick snack or breakfast. With a little creativity, you can add seasonal fruits or different nut butters. Store any leftovers properly to keep them fresh. This recipe is sure to delight your taste buds and boost your day.

Chocolate Peanut Butter Smoothie Bowl Deliciously Rich

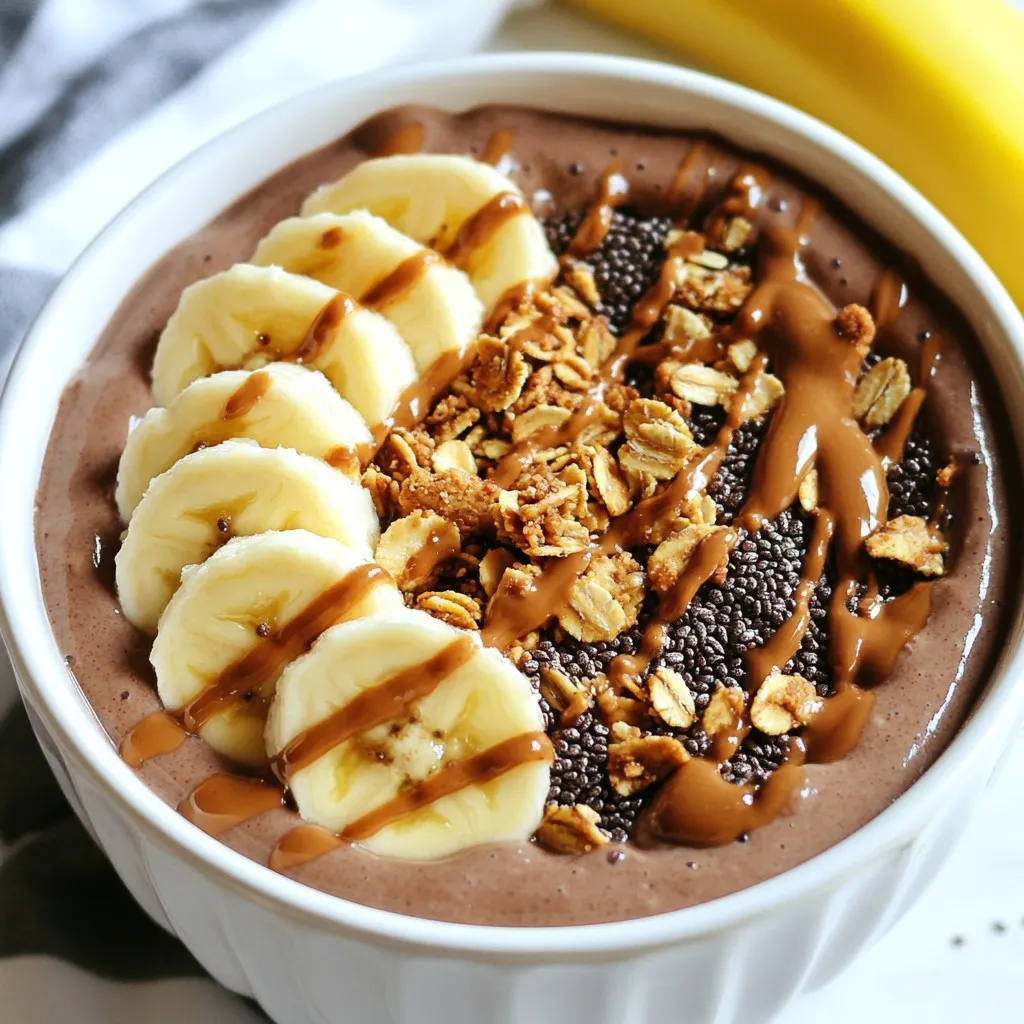
Craving a sweet and healthy treat? Look no further! This Chocolate Peanut Butter Smoothie Bowl combines rich flavors with simple

To make these salted caramel cheesecake cookies, you need a few key ingredients: - 1 cup cream cheese, softened - 1/2 cup unsalted butter, softened - 1 cup granulated sugar - 1/2 cup brown sugar, packed - 1 large egg - 1 teaspoon vanilla extract - 2 cups all-purpose flour - 1/2 teaspoon baking soda - 1/4 teaspoon salt - 1/2 cup caramel sauce (store-bought or homemade) - 1/2 teaspoon sea salt flakes (for topping) These ingredients create a rich, creamy, and sweet cookie that will impress anyone. You will need some basic tools to make your cookies: - Mixing bowls - Electric mixer - Measuring cups and spoons - Baking sheet - Parchment paper - Cookie scoop or tablespoon - Wire rack These supplies help you mix, bake, and cool your cookies with ease. Adding special touches can enhance your cookies. Consider these options: - Extra caramel sauce for drizzling - Chopped nuts, like pecans or walnuts - Chocolate chips for a sweet twist - A sprinkle of cocoa powder for a bold flavor These toppings can add flavor and visual appeal to your delicious cookies. {{ingredient_image_1}} Start by preheating your oven to 350°F (175°C). While it heats up, line a baking sheet with parchment paper. This step keeps your cookies from sticking. It also makes cleanup easy later. Make sure to use a large enough baking sheet. You will bake many cookies at once. In a large mixing bowl, combine the softened cream cheese and unsalted butter. Use a mixer to blend until the mix is smooth and fluffy. Next, add the granulated sugar and brown sugar. Beat this mixture until well combined. Then, crack in one large egg and pour in the vanilla extract. Mix again until everything is fully combined. In another bowl, whisk together the all-purpose flour, baking soda, and salt. Gradually add this dry mix to your wet ingredients. Stir until a dough forms. Finally, stir in 1/3 cup of caramel sauce. This adds flavor and sweetness to the dough. Now it's time to bake. Use a cookie scoop or a tablespoon to drop rounded balls of dough onto your prepared baking sheet. Leave enough space between each cookie. Drizzle the remaining caramel sauce over the top of each cookie. Finish with a sprinkle of sea salt flakes. Bake the cookies in your preheated oven for 10-12 minutes. Watch for the edges to turn lightly golden. Once baked, let the cookies cool on the baking sheet for 5 minutes. After that, transfer them to a wire rack to cool completely. Enjoy the sweet smell filling your kitchen! Making Salted Caramel Cheesecake Cookies can be fun, but some mistakes can ruin them. Here are key mistakes to watch for: - Overmixing the dough: This can make cookies tough. Mix just until combined. - Not measuring flour correctly: Too much flour can lead to dry cookies. Use the spoon-and-level method. - Skipping the cooling time: Don’t rush to move cookies before they cool. They need time to set and firm up. - Using cold ingredients: Make sure your cream cheese and butter are softened. Cold ingredients won’t mix well. Want your cookies to be soft and chewy? Follow these tips: - Use room temperature ingredients: This helps create a smooth dough. - Chill the dough: If you have time, chill the dough for 30 minutes. This keeps cookies from spreading too much. - Watch the baking time: Take them out when the edges are golden. They will harden as they cool. - Don’t skip the caramel drizzle: It adds flavor and moisture, making cookies extra tasty. Serve your cookies in style with these ideas: - Garnish with extra caramel sauce: Drizzle it on a plate for a beautiful look. - Add a sprinkle of sea salt: It enhances the flavor and looks great. - Pair with ice cream: Vanilla or salted caramel ice cream makes a perfect match. - Consider themed serving: Use seasonal plates or napkins for fun occasions. Pro Tips Chill the Dough: For thicker, chewier cookies, refrigerate the dough for at least 30 minutes before baking. This allows the flavors to meld and improves the cookie's structure. Caramel Sauce Quality: Use high-quality caramel sauce for the best flavor. If using store-bought, opt for a brand that uses real ingredients for a richer taste. Even Baking: Make sure to rotate the baking sheet halfway through the baking time to ensure even baking, especially if your oven has hot spots. Storage Tips: Store cookies in an airtight container at room temperature for up to a week. For longer freshness, consider freezing them, and then thaw before serving. {{image_2}} You can change the flavor of these cookies easily. Try adding chocolate chips for a sweet twist. You can also use white chocolate for a creamy taste. For a fruity kick, mix in dried cranberries or cherries. Nuts like pecans or walnuts can add a nice crunch. If you want a spiced flavor, add a pinch of cinnamon or nutmeg. Making these cookies gluten-free is simple. Just swap the all-purpose flour for gluten-free flour. Many brands work well for baking. Make sure to check the label to avoid any hidden gluten. The taste and texture will still be great. You can enjoy the same salted caramel goodness without worry. You can make these cookies fit any season. For fall, add pumpkin spice to the dough. In winter, use peppermint extract for a holiday touch. You can even shape the cookies into festive designs. Use colored sugar or sprinkles for fun decorations. These cookies can become a family favorite for every holiday! To keep your cookies fresh, place them in an airtight container. Use parchment paper between layers to avoid sticking. Store them at room temperature for up to five days. If you want them to last longer, consider refrigeration. Just remember to bring them back to room temp before eating. Freezing cookies is easy! First, let them cool completely. Then, place them in a single layer on a baking sheet. Freeze for about an hour until firm. After that, transfer them to a freezer-safe bag or container. You can freeze the cookies for up to three months. This way, you always have a sweet treat ready! To enjoy your cookies warm, preheat your oven to 350°F (175°C). Place the cookies on a baking sheet for about five minutes. This warms them up nicely and softens the caramel. You can also use the microwave. Heat each cookie for about 10-15 seconds. Enjoy them fresh and gooey! To make these cookies chewier, you can add an extra egg yolk. The yolk brings moisture. This small change gives the cookies a lovely soft texture. You can also reduce the baking time by a minute or two. Less time in the oven keeps the centers soft. Yes, you can use different types of caramel! You might try dulce de leche or homemade caramel sauce. Just make sure it is thick enough to hold its shape. Thin caramel may spread too much while baking. If you need a substitute for cream cheese, use mascarpone cheese. It has a similar texture and taste. You can also try Greek yogurt for a lighter option. Just keep in mind that this may change the flavor slightly. These cookies last about a week when stored correctly. Keep them in an airtight container. They stay fresh and tasty for several days. If you want to keep them longer, you can freeze them. Just layer them with parchment paper and freeze in a sealed bag. In this post, we explored how to make salted caramel cheesecake cookies. We looked at key ingredients, baking supplies, and tasty toppings. You learned step-by-step instructions for mixing and baking cookies. I shared tips to avoid common mistakes and achieve the best texture. Variations included gluten-free options and seasonal flavors. Finally, I provided storage tips and answered your frequently asked questions. With all this, you can bake cookies that impress! Enjoy making and sharing these treats with friends and family.

Salted Caramel Cheesecake Cookies Easy and Tasty Treat

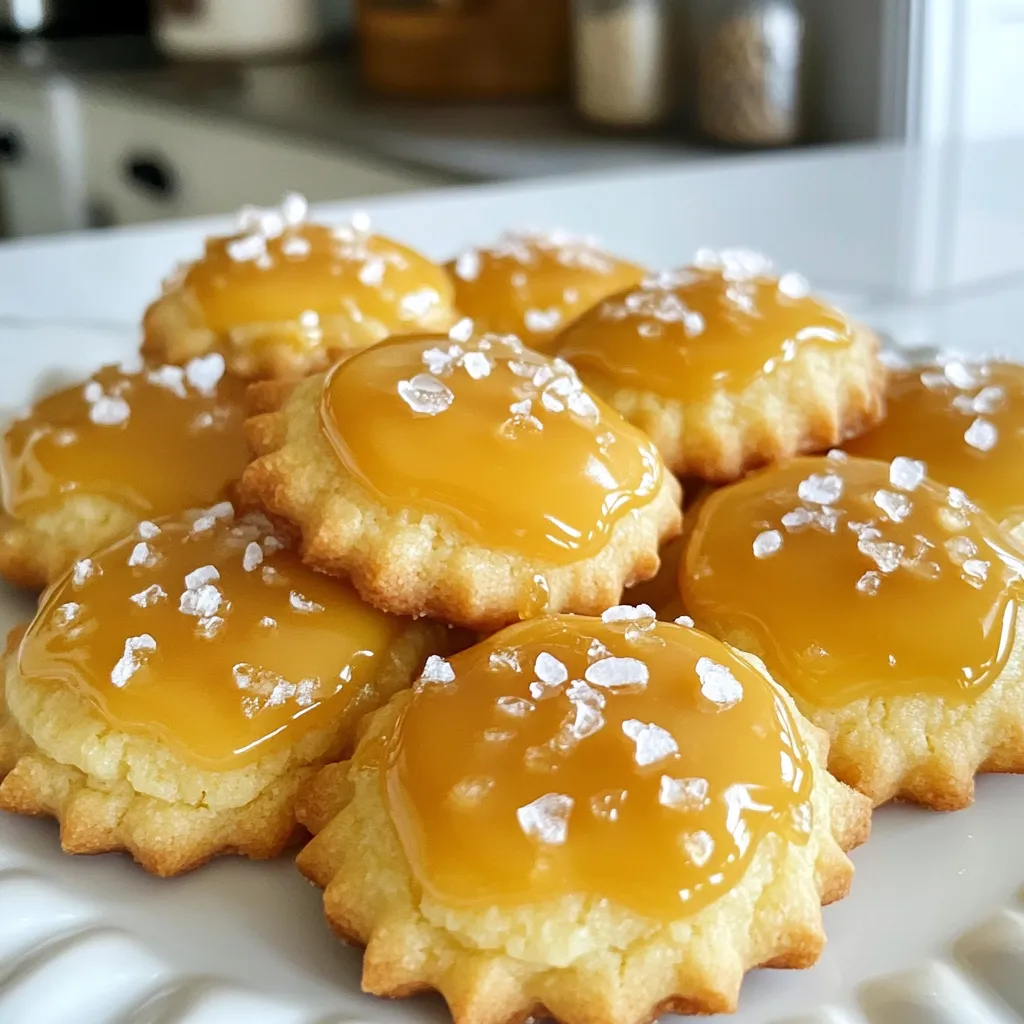
If your sweet tooth craves something special, you need to try salted caramel cheesecake cookies. These treats blend rich cream

For a rich and creamy peanut butter chocolate fudge, you need these simple ingredients: - 1 cup creamy peanut butter - 1 cup semi-sweet chocolate chips - 1/2 cup sweetened condensed milk - 1/4 teaspoon sea salt - 1 teaspoon vanilla extract - 1/4 cup chopped nuts (walnuts or almonds, optional) - 1/4 cup mini marshmallows (optional, for extra texture) Each ingredient plays a key role in creating that perfect fudge. The creamy peanut butter gives a nutty flavor and smooth texture. Semi-sweet chocolate chips bring sweetness and depth. Sweetened condensed milk adds creaminess and helps everything stick together. The sea salt balances the sweetness, while vanilla extract enhances the flavor. Nuts and marshmallows add fun textures. You can mix things up with these optional ingredients: - Chopped nuts (walnuts or almonds) - Mini marshmallows Adding nuts gives a nice crunch. Mini marshmallows add a soft, chewy bite. You can also try different toppings like extra chocolate chips or a sprinkle of sea salt on top for flair. If you don’t have some ingredients, don’t worry! Here are some substitutes you can use: - Natural peanut butter instead of creamy peanut butter - Dark chocolate chips instead of semi-sweet chocolate chips - Coconut milk can replace sweetened condensed milk These swaps can change the taste a bit but will still lead to a tasty fudge. Just keep in mind that the texture might differ slightly. {{ingredient_image_1}} To start, grab an 8x8-inch baking dish. Line it with parchment paper. Make sure to leave some overhang. This will help you lift the fudge out later. The paper keeps the fudge from sticking. It’s an easy way to ensure a clean finish. Next, take a medium saucepan. Combine the creamy peanut butter, semi-sweet chocolate chips, sweetened condensed milk, and sea salt. Heat this mix over medium-low heat. Stir constantly until everything melts together. The goal is a smooth and creamy texture. This step is key to getting a rich taste. Once your mixture is smooth, take it off the heat. Stir in the vanilla extract for added flavor. If you want to add chopped nuts or mini marshmallows, now is the time. Fold them in gently. This adds fun textures to your fudge. After mixing, pour the fudge into your prepared dish. Use a spatula to spread it evenly. Avoid these common mistakes for the best results with your fudge: - Not stirring enough: Stirring keeps the fudge smooth. - Using too high heat: Medium-low heat is key for melting. - Skipping the sea salt: Salt enhances the flavors. Don’t skip it! To get the right texture, follow these tips: - Use creamy peanut butter: Creamy gives a smooth finish. - Melt slowly: Slow melting keeps it creamy. - Cool slowly: Let it cool at room temp before chilling. Here are the tools I find most helpful: - Medium saucepan: For melting your mixture. - Spatula: Great for spreading the fudge evenly. - 8x8-inch baking dish: Perfect size for this recipe. - Parchment paper: Helps with easy removal. Using the right tools will make your fudge-making easier and more fun! Pro Tips Use Quality Ingredients: The better the quality of your chocolate and peanut butter, the richer and more decadent your fudge will taste. Don’t Overheat: When melting the mixture, keep the heat low and stir constantly to avoid burning the chocolate and creating a gritty texture. Storage Secrets: For the best texture, store the fudge in an airtight container in the refrigerator, where it will stay fresh for up to a week. Customize Your Fudge: Feel free to experiment with different mix-ins like dried fruits or flavored extracts to create unique variations of this fudge. {{image_2}} You can change the flavor of your fudge easily. Adding mint extract gives a fresh twist. Just use a half teaspoon. For a salty kick, sprinkle sea salt on top. It pairs well with the sweet chocolate. You can make this fudge vegan by using dairy-free chocolate chips. Swap sweetened condensed milk for coconut cream. This keeps it creamy and rich. For gluten-free fudge, check the labels on your ingredients. Most chocolate chips are gluten-free, but always verify. Dried fruits add a chewy texture. Try raisins, cranberries, or chopped apricots. Different nuts can change the taste too. Walnuts and almonds are great, but pecans or cashews also work well. You can mix and match to find your favorite combo! To keep your peanut butter chocolate fudge fresh, store it in an airtight container. Make sure the fudge is completely cool before placing it in the container. If you want to keep it extra safe, you can layer parchment paper between the fudge squares. This method helps prevent sticking. When stored correctly, your fudge can last up to two weeks at room temperature. If you keep it in the fridge, it can last for about three weeks. Just remember to check for any signs of spoilage, like odd smells or changes in texture. You can freeze the fudge for longer storage. Wrap each piece in plastic wrap and then place them in a freezer-safe bag. This way, they stay fresh and tasty. Frozen fudge can last up to three months. When you're ready to eat it, let it thaw in the fridge overnight. Enjoy your sweet treat whenever you like! Yes, you can use natural peanut butter. It may change the fudge's texture. Natural peanut butter has less sugar and oil. This can make your fudge less sweet and a bit crumbly. If you prefer a smoother fudge, stick with creamy peanut butter. If your fudge is too soft, chill it longer. Place it in the fridge for an extra hour or two. You can also try adding more chocolate chips to thicken it. Melt them in and mix well. This helps create a firmer texture. To cut fudge into perfect squares, use a sharp knife. First, let the fudge set completely. Then, lift it out of the dish using parchment paper. Place it on a cutting board. Wipe the knife with a damp cloth between cuts for clean edges. Yes, you can make fudge without sweetened condensed milk. Try using coconut cream or a mix of butter and sugar instead. These alternatives still create a creamy fudge. Adjust the amount of chocolate to balance sweetness. In this blog post, we explored the key ingredients for fudge, how to prepare it, and tips for success. We looked at tasty variations and proper storage methods too. Fudge is fun and easy to make, and you can get creative with flavors. Remember to follow the steps and use the right tools for the best results. Enjoy your fudge, and don’t be afraid to try new ideas!

Ingredient Peanut Butter Chocolate Fudge Delightful Treat

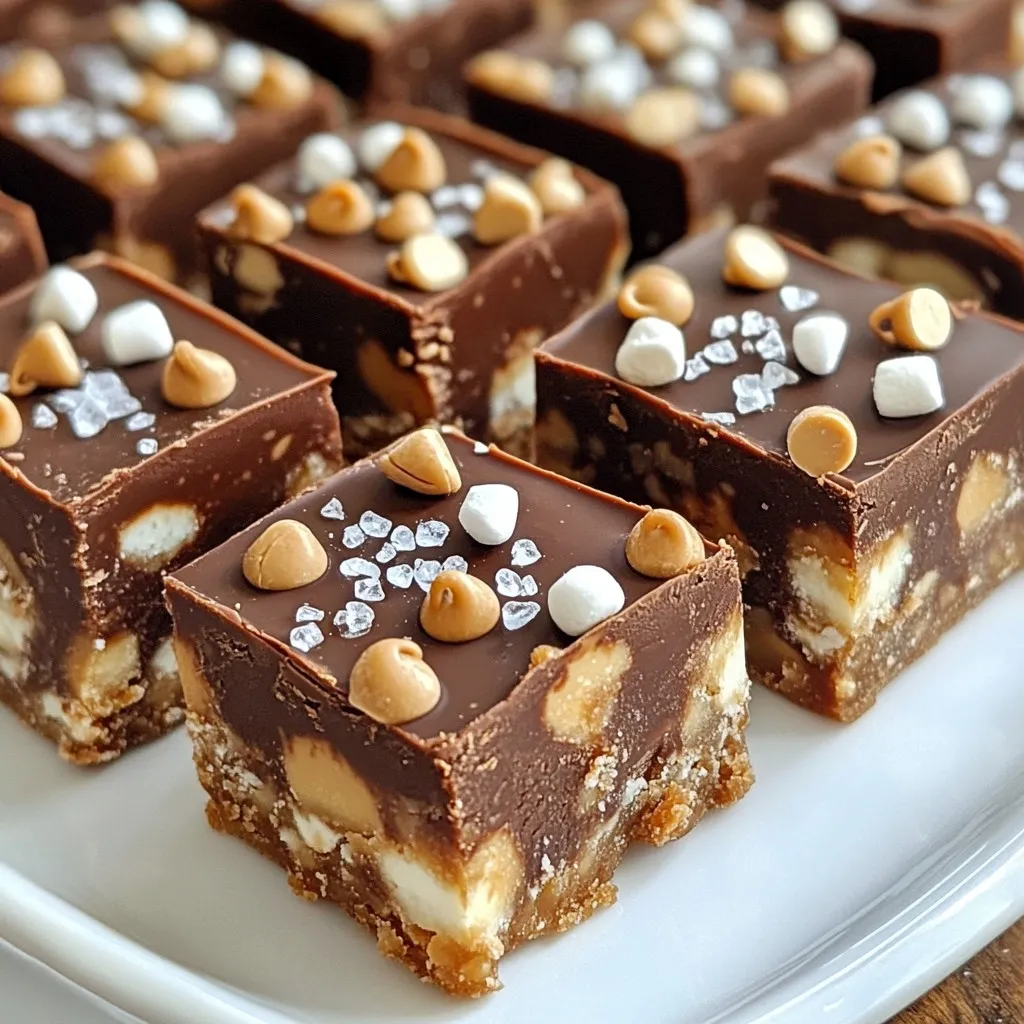
If you love chocolate and peanut butter, you’re in for a treat! This peanut butter chocolate fudge is simple to

Older posts
Newer posts
← Previous Page1 … Page136 Page137 Page138 … Page144 Next →

dsad

© 2025 So Yum Recipes • Built with GeneratePress

Our Policies

  • Copyright Policy
  • Cookie Policy
  • GDPR Policy
  • Privacy Policy
  • Disclaimer
  • Terms Of Use

More Information

  • Home
  • About
  • Contact
  • Appetizers
  • Dessert
  • Dinner
  • Drinks
©2025, So Yum Recipes About Back To Top