Skip to content
DisclaimerTerms Of UseGDPR PolicyCookie Policy

So Yum Recipes

  • Home
  • Drinks
  • Appetizers
  • Dinner
  • Dessert
  • About
  • Contact
  • Privacy Policy
DisclaimerTerms Of UseGDPR PolicyCookie Policy

Chloe

- 1 lb beef steak (sirloin or ribeye), thinly sliced - 1 medium onion, sliced - 1 bell pepper (green or red), sliced - 2 cups shredded provolone cheese - 4 large flour tortillas - 1 teaspoon garlic powder - 1 teaspoon Worcestershire sauce - Salt and pepper to taste - 2 tablespoons olive oil When I make Philly cheesesteak quesadillas, I always start with the main ingredients. Thinly sliced beef steak is key. You can use sirloin or ribeye, depending on your taste. Both cuts give great flavor and texture. The onions and bell peppers add sweetness and crunch. I love using provolone cheese because it melts perfectly. It makes the quesadilla creamy and rich. Flour tortillas hold everything together well, making them easy to fold. For a little extra flavor, I often add garlic powder and Worcestershire sauce. These ingredients can take your quesadillas to the next level. Don't forget about seasoning! A sprinkle of salt and pepper is all you need. Use olive oil for cooking. It helps everything cook evenly and adds a nice flavor. With these ingredients, you have a solid base for delicious Philly cheesesteak quesadillas. {{ingredient_image_1}} To start, heat a skillet over medium-high heat. Add 1 tablespoon of olive oil. When the oil is hot, add 1 pound of thinly sliced beef steak. You can use sirloin or ribeye. Season the beef with salt, pepper, and 1 teaspoon of garlic powder. Cook for 3 to 4 minutes. The beef should be browned but still tender. Once cooked, take the beef out of the skillet and set it aside. In the same skillet, add another tablespoon of olive oil. Then, add 1 sliced onion and 1 sliced bell pepper. Sauté the veggies for about 5 minutes. They should become soft and sweet. For extra flavor, drizzle 1 teaspoon of Worcestershire sauce over the veggies as they cook. This adds a nice depth to the taste. Now, it's time to put it all together. Lay a large flour tortilla flat on a clean surface. Sprinkle half of it with shredded provolone cheese. Next, add a generous amount of the beef and veggie mix on top. Sprinkle a bit more cheese on the filling. Fold the tortilla in half. Repeat this with the remaining tortillas and fillings. To cook, wipe the skillet clean and return it to medium heat. Place the quesadilla in the skillet. Cook for about 3 to 4 minutes on each side. You want the tortilla to turn golden and the cheese to melt. If needed, add more oil to prevent sticking. Once cooked, let the quesadilla sit for a minute. Then slice it into wedges and enjoy! For Philly cheesesteak quesadillas, I recommend using sirloin or ribeye. These cuts have great flavor and tenderness. Thinly slice the beef to help it cook quickly. This will ensure your quesadillas are juicy and full of taste. To get the best cheese melt, use provolone cheese. It melts nicely and adds a rich flavor. Place a generous amount of cheese on both sides of the tortilla. Cook on medium heat to let the cheese melt fully without burning the tortilla. If you want extra gooeyness, add a bit of cream cheese too. To keep your quesadillas from sticking, oil the skillet well. Use olive oil and make sure to cover the entire surface. This helps the quesadillas brown nicely and slide out easily. If you find them sticking, add a little more oil as you cook. Pro Tips Choose the Right Cut: For the best flavor and tenderness, opt for ribeye or sirloin steak, which are ideal for quick cooking and provide excellent taste. Preheat the Skillet: Ensuring your skillet is hot before adding the quesadilla will help achieve that perfect crispy exterior while keeping the cheese melty inside. Don’t Overstuff: While it might be tempting to add lots of filling, overstuffing can make flipping the quesadilla difficult and lead to spillage during cooking. Let it Rest: Allowing the quesadilla to sit for a minute after cooking will help the cheese set slightly, making it easier to slice and serve without falling apart. {{image_2}} You can swap beef for chicken, shrimp, or even veggies. Chicken works great when thinly sliced and seasoned well. Shrimp adds a sweet touch, while mushrooms or zucchini can make a tasty veggie option. Simply follow the same cooking steps for each protein. This gives you a new flavor and keeps things fun. While provolone is classic, other cheeses work well too. Try cheddar for a sharper taste or mozzarella for a creamy melt. Pepper jack adds a spicy kick. Mixing different cheeses can also create a unique flavor blend. Experiment with your favorites to find what you love most. Want to up the flavor? Add spices like cumin or smoked paprika. A dash of hot sauce can give it a kick. You can also drizzle some ranch or barbecue sauce inside the quesadilla for extra taste. Fresh herbs like cilantro or parsley can brighten up each bite. These small tweaks make a big difference! To store leftovers, let the quesadillas cool first. Wrap each one in plastic wrap or foil. Place them in an airtight container. They will stay fresh in the fridge for up to three days. Make sure to label the container with the date. This helps you keep track of how long they've been stored. To reheat quesadillas, use a skillet or a toaster oven. Heat the skillet over medium heat. Add a bit of oil to prevent sticking. Place the quesadilla in the skillet and cook for about 2-3 minutes on each side. This method helps keep the tortilla crispy and the cheese melty. You can also use the microwave, but this may make the quesadilla soggy. For the best taste, stick to the skillet. If you want to freeze quesadillas, follow these steps. First, let them cool completely. Wrap each quesadilla tightly in plastic wrap. Then, place them in a freezer-safe bag or container. Remove as much air as possible before sealing. They can last up to three months in the freezer. When you're ready to eat, thaw them in the fridge overnight before reheating. A Philly cheesesteak quesadilla is a fun twist on the classic sandwich. It combines thin slices of beef steak, sautéed onions, and bell peppers with melted provolone cheese, all wrapped in a flour tortilla. This dish gives you the rich flavors of a Philly cheesesteak in a crispy, cheesy quesadilla form. Yes, you can make these quesadillas ahead of time. Prepare the beef and veggies in advance. Then, store them in the fridge. When you're ready to eat, just assemble and cook the quesadillas. You can also freeze them before cooking. Just remember to wrap them well to avoid freezer burn. You can serve various sides with these quesadillas. Here are some ideas: - A fresh salad with greens and tomatoes - Crispy potato fries or sweet potato fries - A side of salsa for dipping - Sour cream or guacamole for added creaminess These sides enhance the meal and add more flavors to enjoy. Philly cheesesteak quesadillas are a delicious blend of beef, veggies, and cheese. We covered key ingredients like sirloin, onions, and provolone. You learned how to cook the meat, sauté veggies, and assemble the perfect quesadilla. You also discovered tips for choosing the right meat and cheese, plus storage methods. These quesadillas offer endless variation for your taste. Try different proteins and flavor boosts. They’re easy to make, and leftovers are just as tasty. Enjoy making them for family or friends!

Philly Cheesesteak Quesadillas Tasty and Simple Recipe

If you’re craving a meal that mixes classic flavors with a modern twist, you’re in the right place! Today, we’ll

- 4 boneless, skinless chicken thighs - 2 cups broccoli florets - 1 cup bell peppers, sliced (any colors) - 1 cup snow peas - 1 carrot, sliced thinly - 1/4 cup teriyaki sauce (preferably low sodium) - 2 tablespoons honey - 1 tablespoon sesame oil - 2 teaspoons garlic, minced - 1 teaspoon ginger, grated - Salt and pepper, to taste - Sesame seeds - Green onions, sliced The main ingredients include chicken thighs and fresh vegetables. Chicken thighs give a great flavor. Broccoli, bell peppers, snow peas, and carrots add color and crunch. Each veggie offers a unique taste and texture. Next, we prepare the marinade. It combines teriyaki sauce, honey, sesame oil, garlic, and ginger. This mix creates a sweet and savory flavor. Salt and pepper add a touch of seasoning. Marinating the chicken in this sauce helps it absorb all those yummy flavors. To finish, we add garnish. Sesame seeds and sliced green onions make the dish pop. They add a nice crunch and fresh taste. This recipe is not only easy but also full of vibrant colors. Enjoy every bite! {{ingredient_image_1}} - Preheat oven to 400°F (200°C). - Line a baking sheet with parchment paper. - Combine teriyaki sauce, honey, sesame oil, garlic, ginger, salt, and pepper. This mixture gives your chicken a sweet and savory flavor. Mix it well so all the flavors blend nicely. - Marinate chicken for 15 minutes to 2 hours. The longer you marinate, the more flavor the chicken gains. If you have time, go for the full two hours! - Wash and cut vegetables into bite-sized pieces. This helps them cook evenly and makes them easy to eat. You can use any veggies you like! - Place chicken at the center and vegetables around. This layout ensures the chicken cooks well and the veggies get nice and tender. - Bake for 25-30 minutes. Check that the chicken reaches 165°F (75°C) inside. - Broil for an additional 2-3 minutes. This step adds a nice caramelized finish to the dish. Enjoy the wonderful aroma filling your kitchen! - Marinate the chicken for 15 minutes to 2 hours. Longer marinating gives more flavor. - Use a plastic bag to marinate. It helps coat the chicken better. - Check the chicken’s internal temperature. It should reach 165°F (75°C). - Adjust the cooking time based on the size of the chicken. Thicker pieces take longer to cook. - Serve directly from the sheet pan. This gives a rustic and inviting look. - Garnish with sesame seeds and sliced green onions for color and texture. Pro Tips Marinate for Maximum Flavor: Allow the chicken to marinate for at least 2 hours, or even overnight, to enhance the flavors and tenderness. Vegetable Variations: Feel free to add or substitute your favorite vegetables like zucchini, asparagus, or snap peas for a personalized touch. Perfectly Cooked Chicken: Use a meat thermometer to check that the internal temperature of the chicken reaches 165°F (75°C) for safe eating. Leftover Storage: Store any leftovers in an airtight container in the fridge for up to 3 days, making it a great meal prep option! {{image_2}} You can change the veggies to fit your taste. - Adding zucchini or asparagus: Zucchini adds a nice crunch. Asparagus gives a fresh flavor. Both work well with teriyaki sauce. - Using different colored bell peppers: Bell peppers come in red, yellow, and green. Each color brings a unique taste and look. Mix them for a vibrant dish. Want to switch up the protein? You have options! - Replacing chicken with tofu or shrimp: Tofu is great for a plant-based meal. Shrimp cooks quickly and adds a nice seafood flavor. - Using chicken breast instead of thighs: Chicken breast is leaner. It cooks faster, so adjust your baking time. Not a fan of store-bought teriyaki sauce? Try this. - Exploring homemade teriyaki sauce recipes: Making your own sauce gives you control over flavors. Use soy sauce, brown sugar, and garlic for a simple mix. - Utilizing store-bought sauces with different flavors: Many brands offer unique teriyaki sauces. Look for ones with added spices or flavors for a twist. Feel free to experiment! Each change can make this dish your own. Store any leftovers in airtight containers. This keeps the chicken and veggies fresh. I recommend using glass containers. They don’t absorb odors and clean easily. Always let the food cool before sealing. When you reheat, add a splash of water to keep it moist. Heat it in the microwave or on the stove until it’s hot all the way through. You can freeze cooked chicken and veggies, too. Let them cool completely before packing. Use freezer-safe bags or containers. Remove as much air as you can. This helps prevent freezer burn. Keep the meals in the freezer for about three months for the best flavor. Label them with the date, so you know when to use them. Check for signs of spoilage before eating. If the chicken smells off or looks strange, throw it out. Veggies should be bright and crisp. If they feel slimy or wilted, it’s time to toss them. Always wash your hands before handling food. Keep raw chicken separate from other foods to avoid cross-contamination. This keeps your meals safe and tasty. Yes, you can use frozen vegetables. They make cooking easy and fast. However, frozen veggies may release more water while cooking. This can change the texture slightly. If you use them, adjust your baking time. You may need to bake a bit longer to ensure everything cooks well. To check if chicken is done, use a meat thermometer. The inside of the chicken should reach 165°F (75°C). This ensures it is safe to eat. If you don’t have a thermometer, cut into the chicken. The meat should be white, not pink. You can serve this dish with rice or quinoa for a complete meal. Noodles also pair well with teriyaki flavors. A fresh green salad adds a nice crunch too. Feel free to mix and match different sides to suit your taste. Yes, you can prep this dish ahead of time. Marinate the chicken and chop the veggies the night before. Store them in the fridge until you're ready to cook. When reheating, make sure the chicken reaches the same safe temperature again. This way, you save time and enjoy a quick meal. This blog post covered a tasty sheet pan teriyaki chicken dish. We explored main ingredients like chicken, vibrant veggies, and a flavorful marinade. I shared a step-by-step guide to make cooking easy. You learned tips for marinating and presenting the dish. Plus, we discussed variations and storage practices to keep your meals fresh. Now, you can create a delicious meal with confidence. Enjoy experimenting with flavors and sharing your new dish!

Sheet Pan Teriyaki Chicken & Veggies Savory Delight

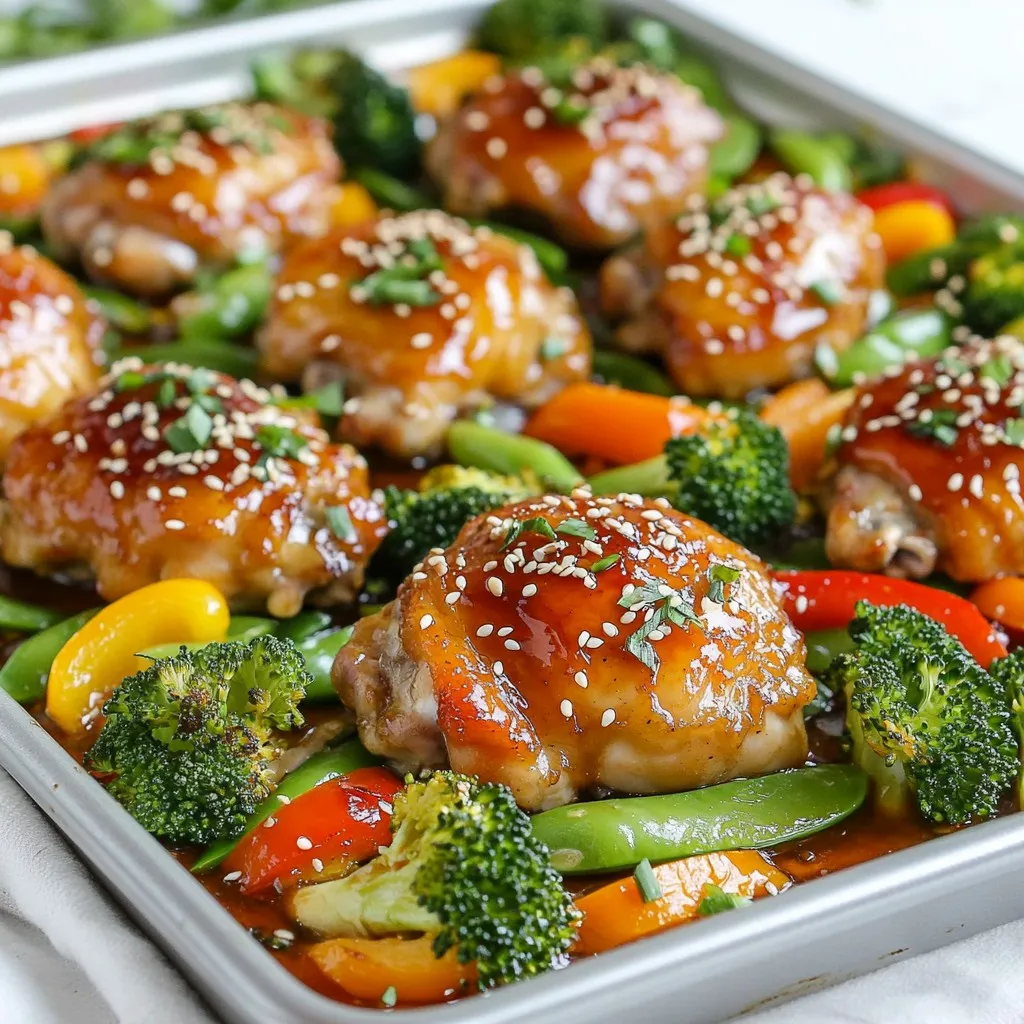
If you’re craving a simple yet delicious dinner, look no further! Our Sheet Pan Teriyaki Chicken & Veggies is a

- 4 boneless, skinless chicken breasts - 1 cup honey - ½ cup BBQ sauce (your favorite) - 1 tablespoon soy sauce - 1 teaspoon garlic powder - 1 teaspoon onion powder - Salt and pepper to taste - 2 cups long-grain white rice - 4 cups chicken broth - 1 cup bell peppers (diced, any color) - 1 cup corn (fresh or frozen) - 2 green onions (sliced, for garnish) - Sesame seeds (for garnish) For this Honey BBQ Chicken and Rice dish, start with boneless, skinless chicken breasts. They cook evenly and stay juicy. Use a cup of honey to add sweetness. Mix it with half a cup of your favorite BBQ sauce for that smoky kick. Add a tablespoon of soy sauce for depth, and sprinkle in a teaspoon each of garlic powder and onion powder. This mix gives the chicken a nice flavor boost. Don’t forget salt and pepper to taste. For the rice, use long-grain white rice. Two cups of rice paired with four cups of chicken broth make it rich and tasty. Add color and crunch with one cup of diced bell peppers and a cup of corn, either fresh or frozen. Finally, garnish with sliced green onions and sesame seeds for a pop of flavor and fun. This combo of ingredients makes a perfect meal for family or friends. It’s easy to prepare, and everyone will love it! {{ingredient_image_1}} To start, you need to prepare the honey BBQ mixture. In a small bowl, whisk together the honey, BBQ sauce, soy sauce, garlic powder, onion powder, salt, and pepper. Mix until everything is well combined. This mixture gives the chicken its sweet and smoky flavor. Now, it’s time to marinate the chicken. Place your boneless, skinless chicken breasts in a large resealable bag or a glass dish. Pour half of your honey BBQ mixture over the chicken. Make sure all the pieces are coated. Seal the bag or cover the dish. Marinate in the fridge for at least 30 minutes. For deeper flavor, let it sit for up to 4 hours. While the chicken marinates, rinse the rice under cold water. Keep rinsing until the water runs clear. This step helps remove excess starch and makes the rice fluffier. In a medium saucepan, add the rinsed rice and 4 cups of chicken broth. Bring this to a boil over medium-high heat. Once it boils, reduce to low heat and cover. Let it simmer for about 18 to 20 minutes, or until the rice absorbs all the liquid. Next, cook the chicken. Heat a large skillet over medium heat. Take the marinated chicken out of the bag, discarding any leftover marinade. Cook the chicken for about 6 to 7 minutes on each side. You want it to have a nice glaze from the BBQ sauce. To check for doneness, use a meat thermometer. The internal temperature should reach 165°F (75°C). Once done, remove the chicken from the skillet and let it rest for a few minutes. In the same skillet, add your diced bell peppers and corn. Choose any color of bell pepper you like for a pop of color. Sauté these for about 2 to 3 minutes until they are slightly tender. This step adds extra flavor and texture to your dish. Now, it’s time to combine everything. Fluff the cooked rice with a fork, then stir in the sautéed bell peppers and corn. Mix well to combine. Slice the rested chicken and place it over the rice mix. If you like, drizzle some of the remaining honey BBQ sauce on top. For a beautiful presentation, garnish with sliced green onions and a sprinkle of sesame seeds. Enjoy your meal! How long to marinate for maximum flavor? Marinating chicken for at least 30 minutes gives you good flavor. For the best taste, aim for 4 hours. This time lets the honey and BBQ sauce soak in. Using alternative marinades You can change the flavor by using different marinades. Try teriyaki sauce or a sweet chili sauce. Both add a tasty twist to your chicken. Ensuring juicy chicken To get juicy chicken, avoid overcooking. Cook until the internal temperature hits 165°F. Use a meat thermometer to check this easily. Adjusting cook times for different chicken cuts If you use thighs or drumsticks, cook longer than breasts. Thighs may need an extra few minutes. Always check for doneness. Flavoring rice with herbs and spices Make your rice pop by adding herbs. A pinch of thyme or a bay leaf can enhance the taste. You can even toss in garlic powder while it cooks. Cooking rice in advance Cook rice ahead of time to save effort. You can store it in the fridge for up to four days. Just reheat it before serving. Pro Tips Marinate for Maximum Flavor: The longer you marinate the chicken, the more flavorful it will be. Aim for at least 1 hour, but if you can, let it sit for 4 hours or overnight for the best results. Use a Meat Thermometer: To ensure your chicken is perfectly cooked, use a meat thermometer to check that the internal temperature reaches 165°F (75°C). Customize Your Rice: Feel free to add other vegetables to the rice, like peas or carrots, to enhance the dish's color and nutrition. You can also use brown rice for a healthier option. Leftover Sauce Usage: If you have leftover honey BBQ sauce, use it as a dip for veggies or as a glaze for grilled meats. It's a versatile condiment that can elevate many dishes. {{image_2}} You can switch up the flavor with different sauces. Try teriyaki sauce for a sweet twist. Sweet chili sauce adds a spicy kick. If you're not a fan of chicken, use tofu or beef instead. Tofu absorbs flavors well, making it a great choice. Thinly sliced beef cooks quickly and pairs nicely with the honey BBQ sauce. To make this dish gluten-free, use gluten-free soy sauce. Most BBQ sauces are gluten-free, but check labels. For vegetarian and vegan options, replace chicken with marinated, grilled tofu. You can also use plant-based meat alternatives for a similar texture. This way, everyone can enjoy this meal. Pair Honey BBQ Chicken and Rice with simple side dishes. Steamed broccoli or a fresh salad works well. For fun and color, serve with roasted sweet potatoes. When hosting, use a large platter for a beautiful presentation. Arrange the chicken and rice in the center. Scatter diced bell peppers and corn around for color. Finish with green onions and sesame seeds on top. This makes for a stunning display at any gathering. To keep your Honey BBQ Chicken and Rice fresh, store leftovers right away. Place the chicken and rice in an airtight container. Make sure to let the food cool before sealing. This helps prevent moisture build-up, which can make your meal soggy. You can keep it in the fridge for up to three days. When you are ready to eat your leftovers, reheating is key. Use the microwave for quick warmth. Heat in short bursts, stirring in between. This ensures even heating. If you prefer, you can also reheat on the stove. Just add a splash of chicken broth to keep the rice moist. You can freeze Honey BBQ Chicken and Rice for longer storage. For the best taste, freeze the chicken and rice separately. This helps each part maintain its texture. Use freezer-safe bags or containers. Label them with the date to keep track. To thaw, place the chicken in the fridge overnight. For rice, you can place it in warm water for quicker results. Once thawed, reheat on the stove or in the microwave until hot. Avoid using high heat; it can change the texture. Enjoy your meal just as delicious as the first time! You can use turkey or tofu instead of chicken. Both options work well with the honey BBQ flavors. If you prefer seafood, try shrimp or salmon. Just adjust the cooking times to ensure proper doneness. Yes, you can! Place the marinated chicken in the slow cooker with rice and broth. Cook on low for 4-6 hours or high for 2-3 hours. The chicken will be tender, and the rice will soak up all the flavors. Cooked Honey BBQ Chicken lasts about three to four days in the fridge. Store it in an airtight container to keep it fresh. Always check for any off smells or changes in texture before eating. Marinating the chicken enhances its flavor and tenderness. While not mandatory, marinating for at least 30 minutes is best. If you are short on time, you can skip it, but the dish will be less flavorful. Yes, you can use brown rice! Just remember that brown rice takes longer to cook. Use about 40-45 minutes of cooking time instead of 18-20 minutes. Adjust the liquid amount as needed for best results. This blog post offers a complete guide to making Honey BBQ Chicken and Rice. You learned about the right ingredients, detailed cooking steps, and tips for maximum flavor. I shared ways to make this dish fit different diets and some easy serving ideas too. With the right cooking skills, you can impress anyone with your meal. Enjoy experimenting with flavors and make this dish your own. Following these steps ensures a tasty outcome every time. Happy cooking!

Honey BBQ Chicken and Rice Flavorful Family Meal

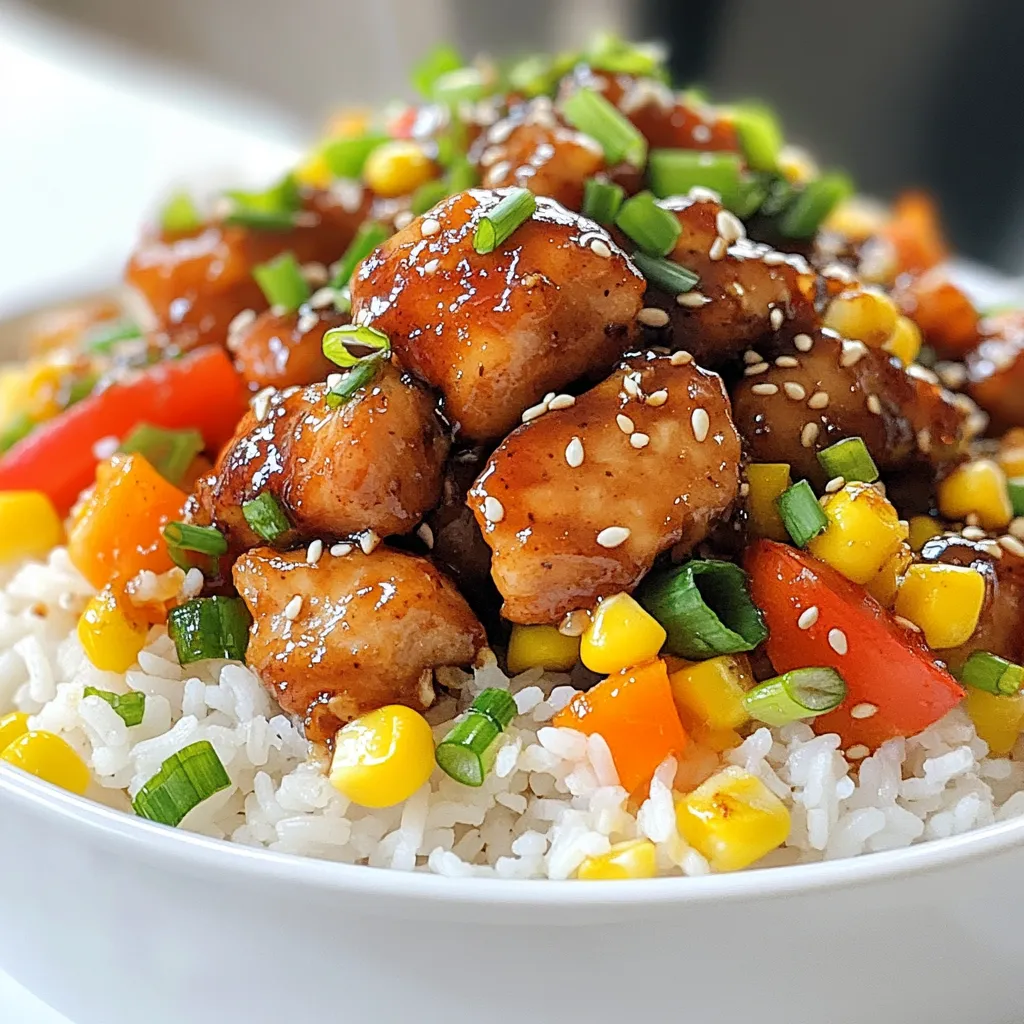
Looking for a tasty family meal that’s easy to make? Honey BBQ Chicken and Rice is your answer! This dish

- Chicken - 1 lb boneless, skinless chicken thighs, cut into bite-sized pieces - Coating ingredients - 1 cup cornstarch - 2 large eggs, beaten - 1/2 cup all-purpose flour - 1 teaspoon baking powder - Salt and pepper to taste - Oil for frying (vegetable or canola) - Sauce ingredients - 1/2 cup honey - 2 tablespoons soy sauce (low sodium recommended) - 1 tablespoon sesame oil - 2 cloves garlic, minced - 1 teaspoon ginger, grated - 2 tablespoons sesame seeds - 3 green onions, sliced (for garnish) The chicken is the star here. I use thighs because they stay juicy. The coating gives it that crunchy texture. Cornstarch, eggs, and flour work great together. The sauce blends sweet and savory. Honey adds sweetness, while soy sauce brings depth. Sesame oil and garlic give it a kick. Don't forget the green onions for a fresh touch. Each part of the dish plays a key role in flavor and texture. {{ingredient_image_1}} First, we need to bread the chicken. Start by mixing cornstarch with salt and pepper in one bowl. In another bowl, beat the eggs. In a third bowl, mix flour, baking powder, salt, and pepper. Next, take each piece of chicken. Dip it in the cornstarch first. Then, coat it in the egg. Finally, roll it in the flour mix. Make sure every piece is well-covered. This helps create a crispy crust. Now, let’s fry the chicken. Heat oil in a deep pan over medium-high heat. Once the oil is hot, add the chicken in batches. Don’t overcrowd the pan. Fry until golden brown, about 4-5 minutes. Remove the chicken and place it on paper towels to drain. Now, let’s make the sauce. In a saucepan, mix together honey, soy sauce, sesame oil, minced garlic, and grated ginger. Heat this mixture over medium heat. Bring it to a gentle boil. Stir often to prevent sticking. Let it simmer for 2-3 minutes. This thickens the sauce and blends the flavors. After the sauce thickens, it’s time to coat the chicken. Add the fried chicken pieces to the saucepan. Gently fold the chicken into the sauce. Make sure every piece is coated well. For presentation, transfer the chicken to a serving dish. Sprinkle sesame seeds on top. Finish by garnishing with sliced green onions. This adds color and freshness to your dish. To get the best crispiness, you need the right cooking temperature. Heat your oil to 350°F (175°C). Use a thermometer to check this. If the oil is too cool, the chicken will soak up oil and become soggy. If it's too hot, the outside will burn before the inside cooks. Frying technique matters too. Fry the chicken in small batches. This keeps the oil temperature steady. Do not overcrowd the pan. Each piece needs space to fry evenly. Fry for about 4-5 minutes until golden brown. Drain on paper towels to remove excess oil. To make your dish pop, try adding spices. A pinch of red pepper flakes adds heat. You can also mix in garlic powder for more flavor. If you lack some ingredients, you can make substitutions. Use chicken breast instead of thighs for a leaner option. You can swap honey with maple syrup for a different sweetness. Low-sodium soy sauce helps keep the dish lighter without losing taste. Adjust according to your preferences! Pro Tips Choose the Right Chicken: Opt for boneless, skinless chicken thighs for the juiciest and most flavorful results. They stay tender and absorb the sauce beautifully. Double-Dip for Extra Crispiness: For an extra crispy coating, consider double-dipping the chicken. After the initial coating, dip it back in the egg and then back into the flour mixture. Temperature Matters: Ensure the oil is hot enough before frying. If it's not hot enough, the chicken will absorb more oil and become greasy instead of crispy. Make it Your Own: Feel free to add vegetables like bell peppers or broccoli to the frying pan for a colorful and nutritious twist on this dish. {{image_2}} You can make Crispy Honey Sesame Chicken healthier. Try baking instead of frying. Preheat your oven to 400°F. Coat the chicken pieces as before. Place them on a baking sheet lined with parchment paper. Bake for about 20 minutes, flipping halfway through to get golden edges. This method cuts down on oil and calories. You can also use low-sugar sauce options. Many brands offer honey or soy sauce with less sugar. Look for these when shopping. You can mix honey with a bit of water and lemon juice. This creates a lighter sauce that still tastes great. If you need gluten-free options, switch the coating ingredients. Use gluten-free flour and cornstarch. These will help keep the crunch without gluten. Always check the labels to ensure they are certified gluten-free. You can also try chicken alternatives. For a twist, use tofu or tempeh. Cut them into bite-sized pieces and follow the same breading steps. They soak up the sauce well, and you still get that crispy texture. This can be a fun option for vegetarians or anyone trying to eat less meat. To keep your crispy honey sesame chicken fresh, store it in the fridge. Place it in an airtight container. This way, it stays tasty for up to three days. If you want to save it longer, you can freeze it. Use a freezer bag and press out the air. It can last up to three months in the freezer. When you’re ready to enjoy leftovers, the best way to reheat is in the oven. Preheat your oven to 350°F. Place the chicken on a baking sheet and cover it with foil. Heat for about 10-15 minutes. This keeps the chicken crispy. You can also use an air fryer for quick reheating. Set it to 350°F and heat for about 5-7 minutes. This method keeps the crunch and flavor intact. Avoid microwaving, as it can make the chicken soggy. You can make chicken crispy without frying by baking or air frying. To bake, coat the chicken pieces in cornstarch and seasonings. Place them on a baking sheet and spray lightly with oil. Bake at 425°F for about 20-25 minutes. Flip halfway for even crispness. An air fryer also works well. Cook at 400°F for 15-20 minutes, shaking the basket halfway. Both methods give you a crispy texture without all the oil. Yes, you can use other meats like pork or tofu. For pork, choose boneless cuts like tenderloin. Cut them into bite-sized pieces and follow the same breading process. For tofu, use firm or extra-firm tofu. Press it to remove excess moisture, then cut it into cubes. Coat and cook just like chicken. Both options absorb flavors well and give a delicious result. You can serve this dish with rice or noodles. Steamed white rice or fried rice pairs nicely. You might also enjoy it with stir-fried vegetables like broccoli, bell peppers, or snap peas. A fresh side salad adds a nice crunch too. For a complete meal, consider serving dumplings or spring rolls on the side. We explored how to make Crispy Honey Sesame Chicken using simple steps. First, we covered the key ingredients, including chicken, coating, and sauce. Next, I walked you through preparation, cooking methods, and assembly for a tasty dish. I shared tips for crispiness and flavor boosts, plus variations for health and diet needs. Lastly, we discussed storage tips and reheating methods. This dish is delightful and versatile. You can easily adjust it to fit your taste. Enjoy your cooking journey!

Crispy Honey Sesame Chicken Simple and Tasty Recipe

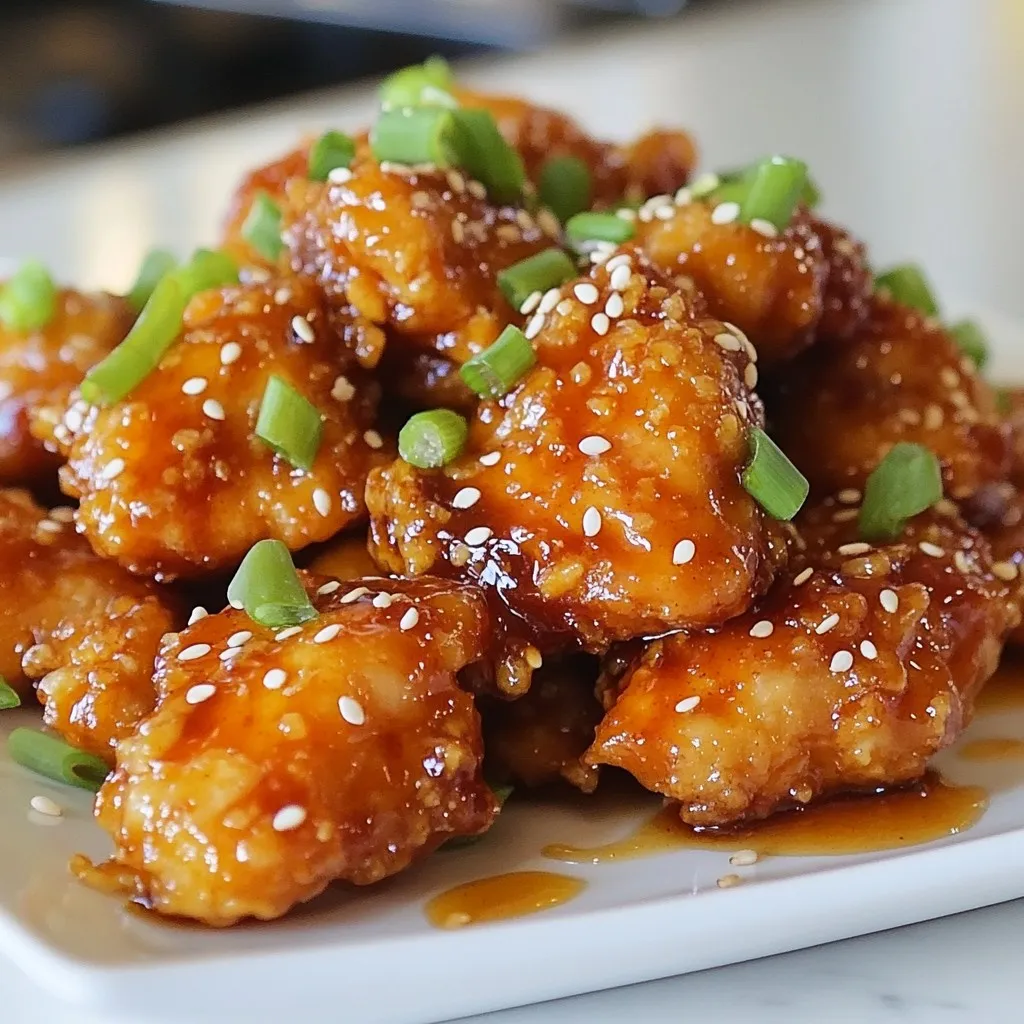
Looking for a delicious meal that packs a crunch? You’re in the right place! My Crispy Honey Sesame Chicken recipe

For this dish, you will need: - 4 large bell peppers (red, yellow, or orange) - 1 cup ricotta cheese - 2 cups fresh spinach, chopped - 1 cup cooked quinoa - 1/2 cup grated Parmesan cheese - 1 teaspoon garlic powder - 1 teaspoon onion powder - Salt and pepper to taste - 1/4 teaspoon red pepper flakes (optional for a kick) - 1 tablespoon olive oil - Fresh basil leaves for garnish - Bell Peppers: Rich in vitamin C and antioxidants. They help boost your immune system. - Ricotta Cheese: A great source of protein and calcium. It adds creaminess to the dish. - Spinach: Packed with iron, vitamins A and K. It supports your overall health. - Quinoa: High in protein and fiber. It makes this meal filling and nutritious. - Parmesan Cheese: Adds flavor and calcium but use in moderation due to sodium. If you want to make changes, here are some ideas: - Dairy-Free: Use tofu or a cashew-based cheese instead of ricotta. - Gluten-Free: Quinoa is already gluten-free. No need for changes. - Vegan: Replace ricotta with a plant-based cheese and skip the Parmesan. - Spicy: Add diced jalapeños or hot sauce for extra heat. Feel free to mix and match to fit your taste and dietary needs! {{ingredient_image_1}} Start by preheating your oven to 375°F (190°C). This ensures even cooking. Next, take your large bell peppers and cut off the tops. Remove the seeds and membranes inside. Set them aside on a plate. In a large bowl, mix ricotta cheese, chopped spinach, cooked quinoa, and grated Parmesan cheese. Add garlic powder, onion powder, salt, and pepper. If you want a bit of heat, toss in red pepper flakes. Combine all the ingredients well. Drizzle olive oil over the insides of the peppers. This adds flavor and helps them cook better. Fill each pepper with the spinach and ricotta mixture. Make sure to pack it in tightly. Place the stuffed peppers upright in a baking dish. If they wobble, slice a small piece off the bottom. This gives them a flat base. Cover the dish with aluminum foil. Bake in the oven for 25 minutes. After 25 minutes, take off the foil. Bake for another 15 minutes. You want the peppers to be tender and the cheese lightly golden. Always wash your hands before cooking. Use a cutting board for chopping and mixing. When handling hot dishes, use oven mitts to protect your hands. Be careful when removing the foil; steam can cause burns. Let the peppers cool for a few minutes before serving. Enjoy your healthy and tasty meal! When choosing bell peppers, look for ones that are firm. They should feel heavy for their size. Bright colors mean freshness. Avoid any that have soft spots or wrinkles. Red, yellow, and orange peppers are sweeter than green ones, so pick your favorite! To make the filling creamier, add a bit more ricotta cheese. You can also mix in a splash of milk or cream. For a richer taste, blend in some cream cheese. This change makes the filling smooth and dreamy, perfect for your peppers. If your oven runs hot, check the peppers early. You may need to reduce the time. For convection ovens, lower the temperature by about 25°F. If using a toaster oven, watch closely, as they can cook faster. Always ensure your peppers are tender and the cheese is golden. Pro Tips Choose Colorful Peppers: Use a mix of red, yellow, and orange bell peppers for a vibrant presentation and a range of flavors. Make Ahead: You can prepare the filling and stuff the peppers a day in advance. Just cover and refrigerate, then bake when ready to serve. Don’t Overcook: Keep an eye on your peppers while baking to ensure they remain tender but not mushy. A slight crunch adds great texture! Experiment with Cheese: Feel free to substitute or mix in other cheeses like mozzarella or feta for a different flavor profile. {{image_2}} You can add protein to the spinach ricotta mix. Chicken or tofu works well. If you choose chicken, use cooked and shredded chicken breast. For tofu, use firm tofu. Press it to remove extra water, then crumble it. Mix your choice into the filling for added flavor and nutrition. Spices and herbs can make your dish pop. Try adding a pinch of nutmeg for warmth. Fresh herbs like parsley or thyme can brighten the taste. You can also add Italian seasoning for a classic touch. Adjust the spices based on your taste. A little tweak can change the whole dish! If you're watching carbs, make some easy swaps. Instead of quinoa, use cauliflower rice. It has fewer carbs and adds a nice texture. You can also skip the cheese or use a low-fat version. These changes keep the flavor but lower the carbs. Enjoy the stuffed peppers without worry! To store leftover stuffed peppers, let them cool first. Place them in an airtight container. They will stay fresh in the fridge for up to three days. Label the container with the date for easy tracking. This way, you know when to use them. If you want to freeze stuffed peppers, prepare them as usual but do not bake them yet. Wrap each pepper in plastic wrap, then place them in a freezer-safe bag. They can stay in the freezer for up to three months. When you're ready to eat, just thaw them in the fridge overnight. To reheat stuffed peppers, preheat your oven to 350°F (175°C). Place the peppers on a baking sheet and cover them with foil. Bake for about 20 minutes, or until heated through. If you want a crispy top, remove the foil for the last five minutes. Enjoy the warm, cheesy goodness! Yes, you can use frozen spinach. Just thaw it first. Squeeze out any extra water. This way, your filling stays creamy and not soggy. The stuffed peppers last about three to four days. Store them in an airtight container. This keeps them fresh and tasty for your next meal. I love to serve these peppers with a side salad. A light vinaigrette pairs well. You can also add some crusty bread or a grain like quinoa for a full meal. Absolutely! Grilling adds a nice smoky flavor. Just wrap them in foil and place them on the grill. Cook for about 20 minutes, or until they're tender. Enjoy the outdoor twist! Spinach ricotta stuffed peppers combine ripe bell peppers, creamy filling, and key nutrients. I shared steps to prepare, bake, and store this dish. Tips on selecting peppers and making your filling even richer were included. Variations let you customize it with proteins or spices. In the end, these stuffed peppers are tasty, fun, and easy to make. Whether for a weeknight meal or a gathering, they will impress. Enjoy putting your spin on this recipe!

Spinach Ricotta Stuffed Peppers Flavorful and Healthy

Are you ready to elevate your dinner game? Spinach ricotta stuffed peppers are not just tasty; they’re packed with nutrients,

Cowboy pasta is simple and fun to make. Here’s what you need: - Pasta: 12 oz of penne or rotini works best. - Meat: Use 1 lb of ground beef for great flavor. - Vegetables: Chop 1 small onion and mince 2 cloves of garlic. Add 1 cup of corn, frozen or canned. - Canned Ingredients: You need 1 can (15 oz) of black beans and 1 can (15 oz) of diced tomatoes with green chilies. - Seasonings: Gather 2 teaspoons of chili powder, 1 teaspoon of cumin, and 1 teaspoon of paprika. - Dairy: Have 1 cup of shredded cheddar cheese and fresh cilantro for garnish. - Other: Use 1 cup of beef broth, plus salt and pepper to taste. These ingredients blend well to create a hearty meal for your family. Each item adds flavor, color, and nutrition. Enjoy the cooking process, and get ready for a tasty dish! {{ingredient_image_1}} - Boiling Water and Cooking Time Start by filling a large pot with water. Add a pinch of salt. Bring the water to a boil over high heat. Once it boils, add 12 ounces of your chosen pasta. I like penne or rotini. Cook the pasta until it is al dente. This usually takes about 8 to 10 minutes. - Draining and Setting Aside After the pasta is cooked, carefully pour it into a colander to drain. Make sure to shake off any excess water. Set the pasta aside for later. - Browning Tips and Techniques In a large skillet, heat over medium heat. Add 1 pound of ground beef. Use a wooden spoon to break it up as it cooks. Brown the beef for about 5 to 7 minutes. - Draining Excess Fat Once the beef is browned, check for any excess fat. If there is too much, drain it off. This keeps your dish from being greasy. - Timing for Onion and Garlic Next, add 1 chopped small onion and 2 minced garlic cloves to the skillet. Sauté these for about 3 to 4 minutes. - Importance of Translucent Onion You want the onion to become translucent. This means it should look clear and soft. This step adds great flavor to your dish. - Stirring and Mixing Instructions Now it’s time to add the fun stuff. Stir in 1 can of black beans, 1 can of diced tomatoes (with green chilies), and 1 cup of corn. - Importance of Simmering for Flavor Pour in 1 cup of beef broth and add 2 teaspoons of chili powder, 1 teaspoon of cumin, and 1 teaspoon of paprika. Season with salt and pepper to taste. Mix everything well and let it simmer for about 10 minutes. This helps all the flavors blend together. - Techniques for Folding Pasta into Mixture Gently fold the cooked pasta into the meat and vegetable mixture. Use a spatula to combine everything. Make sure the pasta is well coated with the sauce. - Melting Cheese: Tips for Perfect Texture Sprinkle 1 cup of shredded cheddar cheese on top. Cover the skillet and reduce the heat to low. Cook for about 5 minutes, or until the cheese is melted and bubbly. - Garnishing for Presentation Once the cheese has melted, remove the skillet from heat. Garnish with fresh chopped cilantro for a pop of color and flavor. Serve hot and enjoy your Cowboy Pasta! To cook pasta al dente means it should be firm to the bite. This texture keeps your pasta from becoming mushy. Follow the package instructions for the best results. Salting the water is key. It enhances the pasta's natural flavor. Use about one tablespoon of salt per gallon of water. This step makes a big difference in taste. You can boost flavors with different spices. Try adding garlic powder, onion powder, or even smoked paprika. These spices can add depth and warmth to your dish. Fresh ingredients like bell peppers or zucchini can brighten the dish. Consider adding them for extra nutrition and color. Fresh cilantro adds a punch of flavor when used as a garnish. Managing pots and pans can be easy. Clean as you cook to keep your space tidy. Rinse pots right after use to prevent sticking. Store leftover ingredients promptly. Place them in airtight containers. This keeps them fresh for future meals. Pro Tips Cook Pasta Al Dente: Make sure to cook the pasta just until it is al dente, as it will continue to cook when mixed with the meat and sauce. Flavor Boost: For an extra kick, add a dash of hot sauce or some diced jalapeños when combining the ingredients. Cheese Variations: Experiment with different types of cheese, such as pepper jack or Monterey jack, for a unique flavor profile. Make it Ahead: This dish can be made ahead of time and reheated; just add a splash of broth when reheating to keep it moist. {{image_2}} You can easily swap the ground beef with plant-based proteins. Try using lentils or mushrooms. Both options add great texture and taste. For more veggies, add bell peppers, zucchini, or spinach. These additions boost nutrition and flavor. Want some heat? Add spices like cayenne or red pepper flakes. These spices can warm up your dish. You can also toss in sliced jalapeños or a splash of hot sauce. Both bring that extra kick to the table. If you need a gluten-free option, choose pasta made from rice or quinoa. These types cook well and taste great. Be sure to check other ingredients too. Some canned goods might use gluten. Always read the labels to stay safe! To keep your Cowboy Pasta fresh, use airtight containers. Divide the pasta into smaller portions. This helps with quick meals later. Let the pasta cool down first. Place it in the fridge for up to four days. For freezing, use freezer-safe bags. Squeeze out the air before sealing. This helps prevent freezer burn. You can store it for up to three months. You can reheat Cowboy Pasta in two ways: microwave or stovetop. For the microwave, place the pasta in a bowl. Cover it with a damp paper towel. Heat on medium power for about two minutes. Stir and check if it’s warm. For the stovetop, use a skillet over low heat. Add a splash of water or broth. Stir often until it’s hot. This keeps the pasta from drying out. Cowboy Pasta lasts about four days in the fridge. If you freeze it, it stays good for three months. Always check for signs of spoilage before eating. If it smells off or has a strange texture, throw it away. Enjoy your meals safely! You can serve many tasty sides with Cowboy Pasta. Here are some great options: - Garlic Bread: It adds a nice crunch and flavor. - Green Salad: A fresh salad balances the meal well. - Steamed Vegetables: Broccoli or green beans work great. - Cornbread: This adds a sweet touch to your meal. - Drinks: Try iced tea or lemonade to refresh your palate. Yes, you can make Cowboy Pasta ahead. Here are some tips: - Cook and Cool: Cook the pasta and meat mixture fully. Let it cool completely. - Store in Fridge: Place it in an airtight container. It can stay fresh for three days. - Reheat: When ready, reheat on the stove. Add a splash of beef broth to keep it moist. Cowboy Pasta can be a healthy choice. Here’s the breakdown: - Protein: Ground beef gives you protein for energy. - Beans and Corn: These add fiber and nutrients. - Vegetables: Tomatoes and onions offer vitamins. To make it healthier, you can use lean beef or add more veggies. You can easily add your own twist to Cowboy Pasta. Here are some ideas: - Different Meats: Swap ground beef for turkey or chicken. - Extra Veggies: Add bell peppers or zucchini for more color and flavor. - Spice It Up: Add jalapeños for heat or extra chili powder. - Cheese Choices: Use pepper jack cheese for a spicy kick. In this post, we covered everything you need for making Cowboy Pasta. We discussed the ingredients, step-by-step instructions, and helpful tips to ensure success. You learned how to cook pasta perfectly and enhance flavors with spices. Plus, we explored fun variations and storage tips to keep your dish fresh. With this knowledge, you can create your own delicious Cowboy Pasta tailored to your taste. Enjoy cooking and share your creations with friends and family!

Cowboy Pasta Delightful and Easy Family Meal

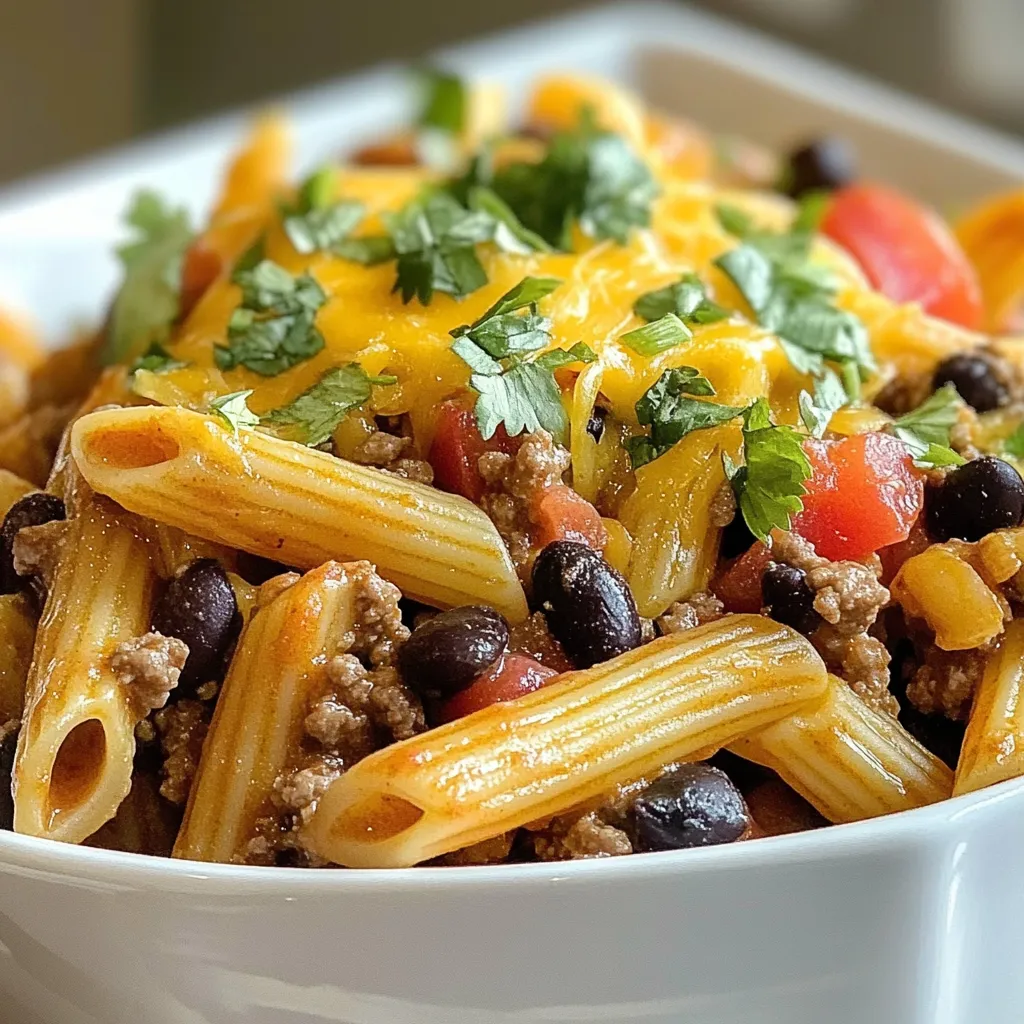
Are you looking for a fun and easy family meal? Look no further than Cowboy Pasta! This hearty dish is

- 1 lb (450g) boneless chicken thighs, cut into bite-sized pieces - 1/2 cup cornstarch - 1/2 teaspoon salt - 1/2 teaspoon black pepper - 1 cup vegetable oil (for frying) The base of this dish is the boneless chicken thighs. They stay juicy and tender when cooked. The cornstarch gives the chicken a perfect crunch. The salt and pepper bring out the natural flavors of the chicken. - 1/4 cup gochujang (Korean chili paste) - 2 tablespoons honey - 2 tablespoons soy sauce - 1 tablespoon sesame oil - 2 cloves garlic, minced - 1 teaspoon ginger, minced - 1 tablespoon rice vinegar This sauce adds a kick to the chicken bites. Gochujang is a thick, spicy paste that gives a deep flavor. Honey adds a bit of sweetness to balance the heat. Soy sauce and sesame oil add umami and richness, while garlic and ginger bring freshness. Rice vinegar adds a little tang to round out the flavor. - Sesame seeds - Chopped green onions - Cucumber slices and pickled radish Garnishes make your dish more appealing. Sesame seeds add a nice crunch. Chopped green onions give a fresh taste. Cucumber slices and pickled radish add a cool, crisp contrast. These optional items can elevate your meal and make it look beautiful. {{ingredient_image_1}} To start, you need to coat the chicken. Use 1/2 cup of cornstarch. This makes the chicken crispy. Mix the cornstarch with 1/2 teaspoon of salt and 1/2 teaspoon of black pepper in a large bowl. Then, add your 1 lb of boneless chicken thighs. Toss until each piece is fully coated. This coating is key. It traps moisture and gives that crunch you want. Next, heat the oil. Use a deep skillet or wok. Pour in 1 cup of vegetable oil. Set the heat to medium-high. The oil needs to reach about 350°F or 175°C. You can test it by dropping a small piece of chicken in. If it sizzles, it’s ready! Now, fry the chicken. Add the coated pieces in small batches. Avoid overcrowding the pan. Fry for about 5-7 minutes. Look for a golden brown color. This shows they are cooked through. Use a slotted spoon to lift them out. Place the chicken on a paper towel-lined plate. This helps drain excess oil. Now, let’s make the spicy sauce. In a separate bowl, add 1/4 cup of gochujang. Then, pour in 2 tablespoons of honey, 2 tablespoons of soy sauce, and 1 tablespoon of sesame oil. Next, add 2 minced garlic cloves, 1 minced ginger piece, and 1 tablespoon of rice vinegar. Mix until all ingredients blend smoothly. Balance the flavors to your liking. If you want it sweeter, add more honey. For more heat, add more gochujang. This sauce gives your chicken its kick! To get the best chicken bites, avoid overcrowding the pan. If you add too many pieces at once, the chicken will steam instead of fry. This will lead to a soggy texture. Instead, cook in small batches. Aim for a golden brown color, which shows they are done. The chicken should be crispy outside and juicy inside. If you want to change the heat of your sauce, add less gochujang. You can start with a tablespoon and taste. Add more if you like it spicier. If you can't find gochujang, use sriracha or chili paste. These can give you a nice kick, while still keeping the flavor. For a great presentation, serve your chicken bites on a large platter. Sprinkle more green onions and sesame seeds on top for color. You can also add cucumber slices and pickled radish for crunch. These sides cool the heat and add freshness. Pair your bites with a cold drink like iced tea or beer for a perfect meal. Pro Tips Ensure Even Coating: Make sure each piece of chicken is evenly coated with cornstarch to achieve a crispy texture when frying. Maintain Oil Temperature: Use a kitchen thermometer to keep the oil at the right temperature (350°F or 175°C) for optimal frying results. Customize the Spice Level: Adjust the amount of gochujang in the sauce to suit your heat preference; add more for extra spice or reduce for milder flavors. Garnish for Presentation: Don’t skip the sesame seeds and green onions; they add not just flavor but also a beautiful finish to your dish. {{image_2}} You can make Spicy Korean Chicken Bites a bit healthier. Here are two easy ways: - Baking instead of frying: If you want less oil, bake the chicken. Coat the chicken pieces with cornstarch and seasonings. Arrange them on a baking sheet. Bake at 400°F (200°C) for about 20-25 minutes. This method gives you a crispy texture without deep frying. - Using chicken breast instead of thighs: Chicken breast is leaner. Swap out chicken thighs for chicken breast in this recipe. Just remember, chicken breast cooks faster. Adjust the cooking time to prevent dryness. You can play with the flavors in this dish. Here are some fun ideas: - Adding additional spices or sauces: Want more heat? Add cayenne pepper or red pepper flakes to the sauce. For a smoky flavor, mix in some smoked paprika. You can also try adding a splash of lime juice for a tangy kick. - Creating a sweet variation with fruit: Add fruit like pineapple or mango to your sauce. This will give a sweet twist. Chop the fruit and stir it into the sauce. It adds a great texture and taste. Let’s get global with these ideas: - Fusion with other cuisines: Try blending flavors from different cultures. Add some Thai sweet chili sauce for a sweet and spicy taste. You could also use a bit of barbecue sauce for a Southern twist. - Using different proteins like tofu or shrimp: For a vegetarian version, swap chicken with tofu. Press the tofu to remove water, then cut it into bite-sized pieces. For seafood lovers, use shrimp instead. Just adjust the cooking time for shrimp, as it cooks quickly. To keep your Spicy Korean Chicken Bites fresh, use airtight containers. Glass containers work great for this. You can also use plastic containers with good seals. Store the chicken in the fridge for up to three days. Make sure it cools down before sealing to avoid moisture. To reheat while keeping the chicken crispy, use the oven. Preheat to 375°F (190°C). Spread the chicken on a baking sheet and heat for about 10 minutes. For the sauce, warm it gently in a small pot on low heat. Stir often to keep it from burning. You can freeze cooked chicken bites. Place them in a single layer on a baking sheet until frozen. Then, transfer to a freezer-safe bag or container. They can last for up to three months in the freezer. For the sauce, store it in a separate container. Freeze it in small portions for easy use later. To keep your chicken bites crispy, coat them well. Use cornstarch mixed with salt and pepper. This mix helps create a nice crust. When frying, heat the oil to about 350°F (175°C). This ensures the chicken cooks fast, sealing in the moisture. Fry in small batches to avoid crowding. Too much chicken at once lowers the oil's heat. Drain the fried chicken on paper towels to remove excess oil. Yes, you can use other meats! Try using pork, shrimp, or even tofu. Pork works well with the spicy sauce. Shrimp cooks quickly and has a nice texture. If you choose tofu, use firm or extra-firm tofu for a better bite. Just remember to adjust cooking times based on the meat used. The spice level comes from gochujang, a Korean chili paste. Gochujang has a deep, rich flavor with heat. It’s not overpowering but adds a nice kick. If you prefer less heat, use less gochujang in the sauce. You can also mix in some honey to balance the spice. This way, you get a flavor that fits your taste! You now have everything to make Spicy Korean Chicken Bites at home. We covered key ingredients, from chicken to spices. The cooking steps ensure perfectly crispy bites, and the sauce brings the heat. Use tips to adjust flavor and add garnishes for a stunning dish. Consider healthier options or international twists for variety. Lastly, proper storage and reheating will keep your leftovers tasty. Enjoy sharing these bites with family and friends. They will love the crunch and flavor you created!

Spicy Korean Chicken Bites Flavorful Easy Recipe

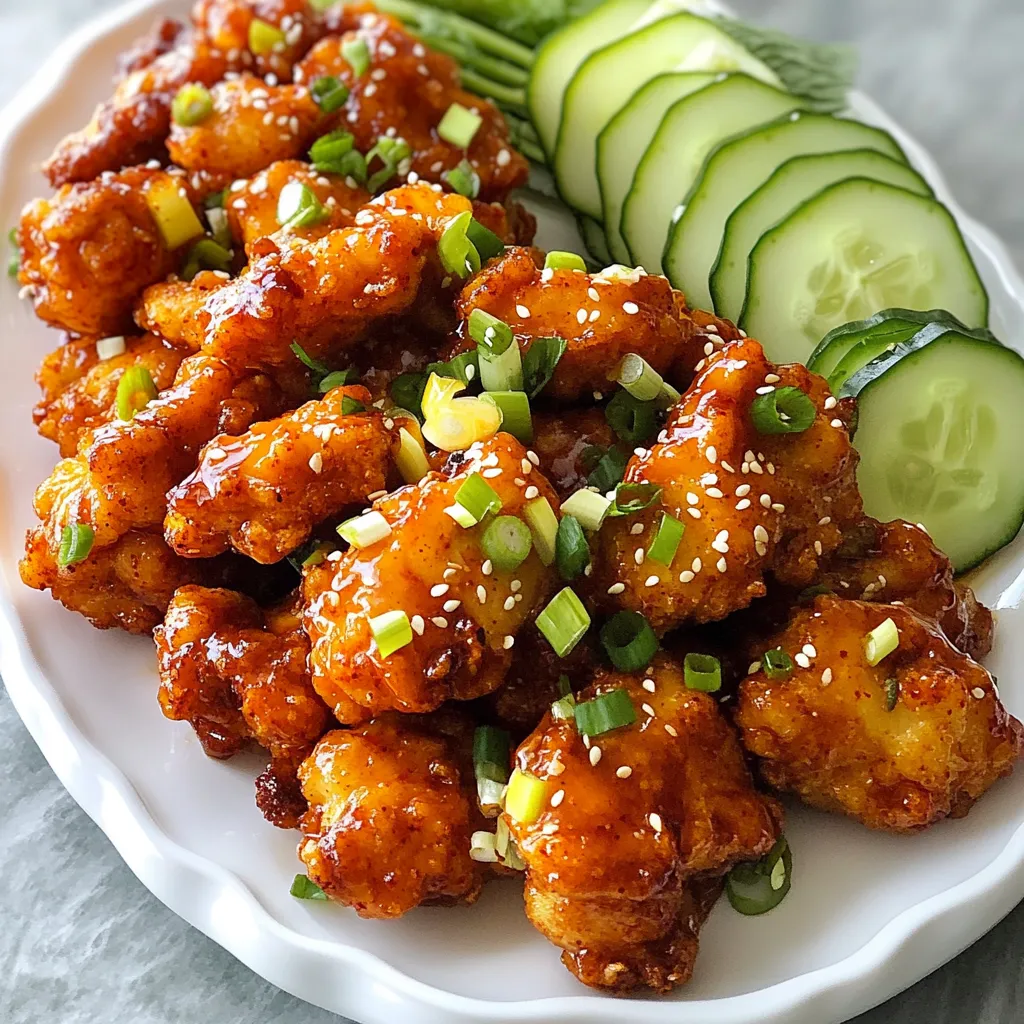
Get ready for a flavor explosion with my easy Spicy Korean Chicken Bites! This recipe transforms juicy chicken thighs into

- 2 lbs beef chuck - 4 cups beef broth - 3 medium carrots - 3 medium potatoes - 1 large onion - 3 garlic cloves - 2 tablespoons tomato paste - 1 teaspoon dried thyme - 1 teaspoon dried rosemary - 2 bay leaves - 1 tablespoon Worcestershire sauce - Salt and pepper - 3 tablespoons olive oil - 1 cup frozen peas - Fresh parsley for garnish Gathering the right ingredients is key to making a great beef stew. The beef chuck is your star. It gives the stew its rich flavor. Cut it into 1-inch cubes. This size helps the meat cook evenly. Next, collect your veggies. You will need carrots, potatoes, onion, and garlic. The carrots add sweetness. The potatoes create a hearty base. The onion and garlic build layers of flavor. Don't forget tomato paste! It adds depth and richness. Seasonings are vital. Dried thyme and rosemary work well with beef. They add an earthy taste. Bay leaves enhance the stew's aroma. Worcestershire sauce brings a savory kick. Salt and pepper will elevate everything. You can add frozen peas for color and sweetness. Fresh parsley makes a lovely garnish. It adds a pop of green and freshness. With these ingredients, you're ready to create a comforting and flavorful beef stew. Enjoy the process and the delicious results! {{ingredient_image_1}} To start, heat 3 tablespoons of olive oil in a large pot over medium-high heat. Add the beef cubes in batches. Sear each side until they turn a nice brown. This should take about 5 to 6 minutes for each batch. Once browned, remove the beef from the pot and set it aside. This step locks in the flavor and gives a rich taste. Next, in the same pot, toss in the chopped onion and minced garlic. Sauté them for about 3 minutes. You want the onion to be soft and clear. Then, add 2 tablespoons of tomato paste. This adds a deep flavor. Stir for another minute to mix it well. Now, return the browned beef to the pot. Pour in 4 cups of beef broth. This will help create a rich base. Then, add 3 sliced carrots and 3 cubed potatoes. For seasoning, add 1 teaspoon of dried thyme, 1 teaspoon of dried rosemary, 2 bay leaves, and 1 tablespoon of Worcestershire sauce. Don’t forget salt and pepper to taste! Bring everything to a boil. Once it boils, reduce the heat to low. Cover the pot and let it simmer. This stage takes about 1.5 to 2 hours. Stir it occasionally. The goal is for the beef and veggies to become tender and flavorful. About 10 minutes before serving, stir in 1 cup of frozen peas. This keeps their bright color and crunch. Taste the stew and adjust the seasoning if needed. A little extra salt or pepper can make a big difference! To make your beef stew even better, try adding red wine. It adds depth and richness. You can also mix in additional herbs. Fresh thyme or parsley can brighten the dish. Using homemade beef broth is a great choice. It gives a fuller taste than store-bought. You can easily make beef broth from leftover bones and scraps. When cooking beef stew, the right pot matters. A Dutch oven works best. It holds heat well and cooks evenly. This helps your beef become tender. To avoid tough meat, choose the right cut. Beef chuck is ideal because it becomes soft during cooking. Always brown your beef well before simmering. This step adds flavor. Presentation matters as much as taste. Ladle your stew into deep bowls. This makes it look warm and inviting. Garnish with fresh parsley for color and freshness. It adds a nice touch. Serve your stew with crusty bread on the side. This way, you can dip into the rich sauce. Pro Tips Brown the Meat Properly: Ensure the beef is well-browned to develop rich flavors. Avoid overcrowding the pan to achieve a good sear. Use Fresh Herbs: Fresh thyme and rosemary can elevate the dish. If using dried herbs, reduce the quantity as they are more potent. Let it Rest: After cooking, allow the stew to sit for 10-15 minutes before serving. This helps the flavors meld together. Thicken the Stew: For a heartier stew, mash a few pieces of the potato against the side of the pot and stir them back in. {{image_2}} You can change the cut of beef in this stew. Try using brisket or round. These cuts can give a different texture and flavor. If you want a leaner option, use sirloin. Each cut has its own charm. You can also swap out vegetables based on what you have. Instead of carrots, try parsnips. They add a nice sweetness. You can use sweet potatoes instead of regular potatoes for a twist. Green beans can replace peas if you prefer. If you need gluten-free options, check your beef broth. Some brands add gluten. Use a gluten-free broth to keep the stew safe. Also, avoid Worcestershire sauce, as it can contain gluten. For low-sodium alternatives, choose low-sodium beef broth. You can skip salt until serving. Taste as you go, and add salt later if needed. This way, you control the flavor without too much sodium. You can make this stew in a slow cooker. After browning the beef, add all the ingredients to the slow cooker. Cook on low for 6-8 hours. This method makes the beef very tender and juicy. If you have an Instant Pot, use it for a quicker method. Add all the ingredients to the pot. Seal the lid and cook on high pressure for about 35 minutes. Let the pressure release naturally for best results. These variations can help you enjoy beef stew your way. To store leftovers, let the beef stew cool first. Place it in airtight containers. I recommend using glass containers for easy reheating. You can also use plastic, but make sure they are safe for heat. Label the containers with the date. This helps you remember when you made it. To freeze beef stew, let it cool completely. Transfer it to freezer-safe bags or containers. Remove as much air as possible to prevent freezer burn. When you want to eat it, thaw the stew in the fridge overnight. You can also use the microwave for quick thawing. To reheat, warm it on the stove or in the microwave until it's hot throughout. Beef stew lasts about 3 to 4 days in the fridge. After that, it may spoil. Signs of spoilage include a sour smell or changes in color. If you see any mold, throw it away immediately. For the best taste, enjoy your stew within this time frame. Always trust your senses when it comes to food safety. To thicken your beef stew, you can use cornstarch or flour. Mix one tablespoon of cornstarch with two tablespoons of cold water. Stir this into the stew near the end of cooking. For flour, dust the beef with it before browning. This helps create a thicker stew. Both methods work well and give a nice texture. Yes, making beef stew a day ahead has many benefits. It allows the flavors to meld together. The next day, you will find the stew tastes even better. Just let it cool and store it in the fridge. Reheat gently before serving. You can serve beef stew with many sides. Here are some great options: - Crusty bread for dipping - Mashed potatoes for extra comfort - A fresh green salad for balance - Buttered noodles for a cozy touch These sides complement the stew and make a hearty meal. Yes, adding wine can enhance the flavor of your beef stew. Red wine works best for this dish. Use a dry red wine like Cabernet Sauvignon or Merlot. Add it after browning the beef. Let it cook down for a few minutes before adding broth. This will deepen the taste and make your stew richer. You now have all the tools to create a delicious beef stew. We explored key ingredients like beef chuck, broth, and veggies. I shared tips for better flavor, cooking techniques, and variations if you want something different. Plus, I provided storage advice so you keep leftovers fresh. With this knowledge, you can enjoy a warm, hearty meal anytime. Cooking beef stew isn't just about food; it's about comfort and home. So grab your ingredients and start simmering!

Homemade Beef Stew Comforting and Hearty Recipe

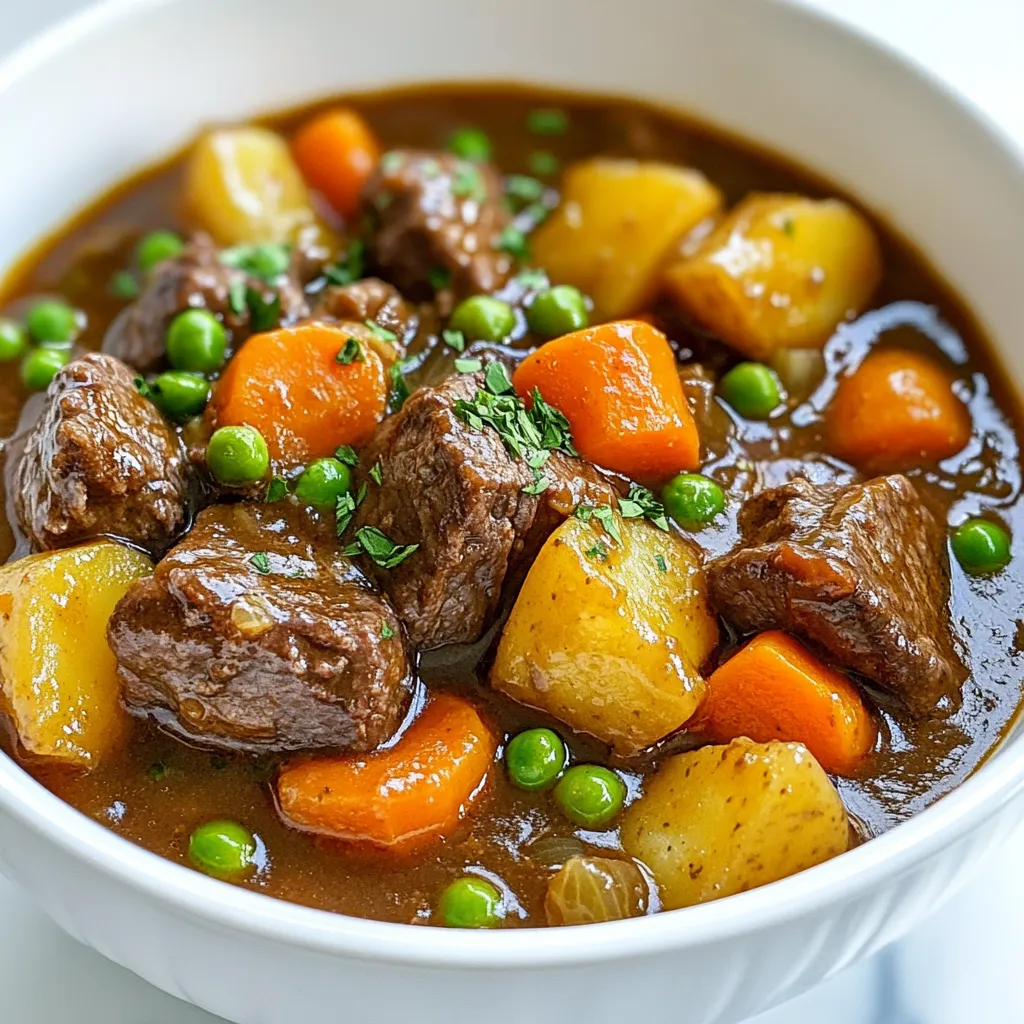
There’s nothing like a warm bowl of homemade beef stew to make you feel cozy inside. In this recipe, I’m

- 1 cup unsalted butter, melted - 1 cup brown sugar, packed - 1/2 cup granulated sugar - 2 large eggs - 2 teaspoons vanilla extract - 2 cups all-purpose flour - 1 teaspoon baking powder - 1/2 teaspoon baking soda - 1/4 teaspoon salt - 1 cup dried cranberries - 1 cup white chocolate chips - 1/2 cup chopped walnuts (optional) These ingredients make a rich and sweet treat. The butter gives a nice base. Brown sugar adds depth. Granulated sugar brings a perfect sweetness. Eggs help bind everything together. Vanilla extract adds a warm flavor. For the dry mix, flour is key. It gives structure to your blondies. Baking powder and baking soda help them rise. A touch of salt balances the sweetness. Now, let’s talk about the stars of the show: dried cranberries and white chocolate chips. The cranberries add tartness and chewiness. White chocolate brings creaminess and sweetness. If you love nuts, add walnuts for crunch. They give a nice texture contrast. Gather these ingredients before you start. You’ll find cooking much easier. Each item plays a role in creating a balanced, tasty treat. Enjoy the process of baking! {{ingredient_image_1}} 1. Preheat your oven to 350°F (175°C). Grease a 9x13 inch baking dish or line it with parchment paper. 2. In a large bowl, whisk together the melted butter, brown sugar, and granulated sugar. Make sure it is smooth and well mixed. 3. Add the eggs one at a time. Whisk well after each egg. Then, mix in the vanilla extract until the mixture is smooth. 4. In another bowl, sift the flour, baking powder, baking soda, and salt together. 1. Gradually mix the dry ingredients into the wet mixture. Stir until just combined. Don’t overmix! 2. Now, fold in the dried cranberries, white chocolate chips, and walnuts if you choose to use them. Make sure they are evenly spread in the batter. 1. Pour the batter into the prepared baking dish. Spread it out evenly with a spatula. 2. Bake for 25-30 minutes. Check for doneness by inserting a toothpick in the center. It should come out with a few moist crumbs, not wet batter. To make great blondies, start with even mixing. Mix the wet and dry ingredients separately first. This helps the batter blend well. When you combine them, stir gently. This keeps the blondies soft and chewy. Next, avoid over-baking. Check the blondies at 25 minutes. Insert a toothpick into the center. If it comes out with a few moist crumbs, they are done. If it is wet, bake for a few more minutes. Over-baking dries them out. Store leftovers in an airtight container. They stay fresh for about four days at room temperature. For longer storage, place them in the fridge. They can last up to a week this way. For serving, use a decorative platter. Dust the blondies lightly with powdered sugar. This adds a nice touch. You can also garnish with extra cranberries and white chocolate chunks on top. It makes the dish look fancy and inviting. Pro Tips Use Room Temperature Ingredients: Allow your eggs and butter to come to room temperature before mixing. This helps create a smoother batter and ensures even baking. Don’t Overmix the Batter: Once you combine the wet and dry ingredients, mix just until combined. Overmixing can lead to dense blondies. Check for Doneness: To prevent overbaking, check your blondies a few minutes before the recommended baking time. They should be golden around the edges and slightly soft in the center. Cool Completely Before Cutting: Allow the blondies to cool completely in the pan before cutting. This helps them set up and makes for cleaner squares. {{image_2}} You can change the nuts in this recipe if you want. Instead of walnuts, use pecans or almonds. Both add a nice crunch. If you prefer no nuts, just leave them out. Your blondies will still taste great! You can also switch up the chocolate. If you love dark chocolate, use dark chocolate chips instead of white. This adds a rich flavor. You can even mix chocolates. Try half white and half dark for a fun twist! Adding spices or extracts can boost the flavor. A dash of cinnamon gives warmth. You can add a bit of orange zest for a fresh taste. Vanilla extract is great, but almond extract can add a nice touch too. Want extra texture? Mix in some shredded coconut or oats. These add chewiness. You can even fold in mini marshmallows for a fun surprise! Don't be afraid to get creative with these blondies. To keep your cranberry white chocolate blondies fresh, store them at room temperature in an airtight container. This method works well for up to three days. If you want to store them longer, refrigeration is an option. Just make sure to wrap them tightly in plastic wrap or foil. This keeps them moist and tasty. You can also freeze blondies for up to three months. Cut them into squares first, then wrap each one in plastic wrap. Place the wrapped squares in a freezer bag. When you're ready to enjoy them, thaw at room temperature. You can also warm them in the microwave for a few seconds. For best taste, eat your blondies within a week. They taste great fresh but can last longer if stored well. Keep an eye on freshness by checking for changes in texture or smell. Signs of spoilage include a dry surface or an off smell. If you notice mold or a strange color, toss them out. Trust your senses; if they don’t taste right, it's best to let them go. Enjoy your blondies while they're at their best! To make your blondies fudgier, use less flour. You can also add an extra egg yolk. This adds moisture and richness. Brown sugar gives a chewy texture too. Try to mix gently so you do not add too much air. Bake just until the center is set. A toothpick should have moist crumbs, not dry ones. Yes, you can! Use a gluten-free flour blend that works for baking. Look for blends with a mix of rice flour, almond flour, and tapioca flour. You can find these in most grocery stores. Just make sure it is a 1:1 substitute for regular flour. These blondies pair well with a scoop of vanilla ice cream. A drizzle of caramel sauce adds extra sweetness. You can also serve them with a warm cup of tea or coffee. For a festive touch, try serving with cranberry juice. To summarize, we covered the key ingredients for delicious Cranberry White Chocolate Blondies. The recipe is easy to follow, with clear steps for preparation and baking. I shared tips on mixing, storage, and variations to enhance your blondies. Baking is about creativity. Adjust the recipe to suit your taste. With practice, you’ll master this treat and impress your friends. Enjoy every bite of your tasty creation!

Cranberry White Chocolate Blondies Easy Sweet Treat

Are you ready for a treat that combines sweet and tart flavors? These Cranberry White Chocolate Blondies are a deliciously

- 1 pound ground turkey or chicken - 1/2 cup breadcrumbs (preferably whole wheat) - 1/4 cup grated Parmesan cheese The base of these meatballs starts with ground turkey or chicken. Both options keep the dish light and tasty. Breadcrumbs help the meatballs hold together while giving them a nice texture. Parmesan cheese adds a savory kick that enhances the flavor. - 1 cup cranberry sauce (homemade or low sugar) - 1/4 cup pure maple syrup - 1 tablespoon soy sauce (or tamari for gluten-free) Cranberry sauce is a must for this recipe. You can make it from scratch or use store-bought. Pure maple syrup brings sweetness, balancing the tartness of the cranberries. Soy sauce adds depth. If you need a gluten-free option, tamari works perfectly. - Fresh parsley - Side dishes to pair with meatballs Fresh parsley makes a lovely garnish. It adds color and a fresh taste. You can serve these meatballs with rice, mashed potatoes, or a simple salad. These sides complete the meal while keeping it light and enjoyable. {{ingredient_image_1}} 1. First, preheat your oven to 400°F (200°C). This heat will help cook the meatballs evenly. 2. Next, prepare your baking sheet. Line it with parchment paper. This step keeps the meatballs from sticking. 1. In a large bowl, mix together key ingredients. Combine ground turkey or chicken, breadcrumbs, and Parmesan cheese. 2. Add a beaten egg, chopped onion, minced garlic, thyme, salt, and pepper to the bowl. Mix everything well until it’s smooth. 3. Now, form the mixture into small meatballs. Aim for about 1 inch in diameter. Place them on the baking sheet you prepped earlier. 1. Bake the meatballs in your preheated oven for 18-20 minutes. They should turn golden brown and be fully cooked. 2. While your meatballs bake, prepare the maple cranberry glaze. In a small saucepan, combine cranberry sauce, maple syrup, and soy sauce. Heat over medium-low. Stir often until the glaze warms and thickens a bit. 3. When the meatballs are ready, take them out of the oven. Drizzle the maple cranberry sauce over them right away. Toss gently to coat each meatball evenly. - Ensuring meatballs stay moist: Use ground turkey or chicken with some fat. This keeps meatballs juicy after baking. Adding chopped onion and garlic helps with moisture too. - Perfecting the glaze consistency: When you make the maple cranberry glaze, stir it slowly over medium-low heat. This helps it thicken nicely. If it gets too thick, add a splash of water to loosen it up. - Best serving styles: Serve meatballs warm, drizzled with the glaze. They make a great appetizer or main dish. Pair them with rice or mashed potatoes for a full meal. - Creative plating ideas: Use a large white plate for contrast. Place meatballs in a circle and drizzle sauce over them. Add fresh parsley for color. This makes the dish look elegant and fun. - Alternatives for ground meat: If you want to switch up the meat, try ground beef or pork. You can even use plant-based meat for a vegetarian option. - Gluten-free options for breadcrumbs: Use gluten-free breadcrumbs or crushed cornflakes. You can also grind oats into a fine powder for a good substitute. These tips can help you make the best maple cranberry meatballs. Enjoy the process and get creative in the kitchen! Pro Tips Use Fresh Herbs: Fresh thyme can elevate the flavor profile of your meatballs, making them more aromatic and flavorful. Customize the Glaze: Feel free to add a pinch of cinnamon or a dash of orange juice to the maple cranberry glaze for a unique twist. Check Doneness: Use a meat thermometer to ensure the internal temperature of the meatballs reaches 165°F (74°C) for safe consumption. Meal Prep Friendly: These meatballs freeze wonderfully, making them a great option for meal prep. Just reheat in the oven or microwave when ready to serve. {{image_2}} You can change the taste of your maple cranberry meatballs easily. Adding spices or herbs can create a new flavor. For example, try adding a pinch of cayenne pepper for heat. You can also mix in some fresh basil or rosemary. These will add a nice twist to the usual taste. Incorporating vegetables is another great way to enhance these meatballs. Finely chopped bell peppers or spinach can boost the nutrition. You can also try grated carrots. They add sweetness and color without changing the flavor much. If you're looking for a low-carb option, use ground chicken or turkey. You can swap breadcrumbs for almond flour. This keeps the meatballs soft and tasty. Use a sugar-free cranberry sauce to cut down on carbs. For a vegan adaptation, substitute the meat with lentils or mushrooms. You can also use flaxseed meal mixed with water as a binding agent instead of an egg. Use maple syrup and tamari for the glaze, and you'll have a delicious vegan version. You can give your meatballs an Asian-inspired flavor. Add ginger and sesame oil to the meat mixture. For the glaze, use hoisin sauce instead of cranberry sauce. This will create a sweet and savory taste. For a Mediterranean influence, add oregano and feta cheese to the meatball mix. Use a yogurt-based sauce instead of maple glaze. This gives a fresh and tangy flavor that pairs well with the meatballs. To store leftover meatballs, let them cool first. Place them in an airtight container. A glass or plastic container with a tight lid works well. I recommend using small containers for easy servings. These meatballs will stay fresh in the fridge for up to three days. To freeze meatballs, arrange them in a single layer on a baking sheet. Make sure they do not touch each other. Freeze them for about two hours until solid. Then, transfer them to a freezer bag. Remove as much air as possible before sealing. To reheat frozen meatballs, bake them in a 350°F oven for 20-25 minutes. You can also heat them in the microwave for about 2-3 minutes. For maximum freshness, store meatballs properly. Keep them in airtight containers in the fridge or freezer. Signs of spoilage include a strange smell or a change in color. If you notice these signs, it’s best to throw them away. Can I use a different type of meat? Yes, you can use ground beef or pork instead of turkey or chicken. Each meat adds a unique flavor. If you choose beef, expect a richer taste. Pork gives a slightly sweeter note. How do I make the sauce thicker? To thicken the sauce, simmer it longer over low heat. You can also add a cornstarch slurry. Mix one tablespoon of cornstarch with two tablespoons of water. Stir this mix into the sauce and cook until thickened. How long to bake if using larger meatballs? If you make larger meatballs, bake them for 25 to 30 minutes. Ensure they are fully cooked. Use a meat thermometer; the center should reach 165°F (74°C). Can I make this recipe ahead of time? Absolutely! You can prepare the meatballs and sauce in advance. Store the meatballs uncooked in the fridge for up to one day. You can also freeze them for later use. Just thaw before baking. Caloric content per serving Each serving contains about 300 calories. This count includes the meatballs and sauce. Protein and carb breakdown Each serving has about 25 grams of protein. It also contains roughly 30 grams of carbohydrates. This balance makes it a hearty meal option. Making maple cranberry meatballs is simple and fun. We covered key ingredients, like ground turkey and breadcrumbs, along with optional flavor boosts like cranberry sauce and maple syrup. The step-by-step guide shows how to prepare and bake your meatballs perfectly. Remember, you can adjust the recipe to fit your taste and dietary needs. In the end, these meatballs are versatile, tasty, and easy to store. Enjoy creating and sharing them with family and friends!

Maple Cranberry Meatballs Flavorful and Easy Recipe

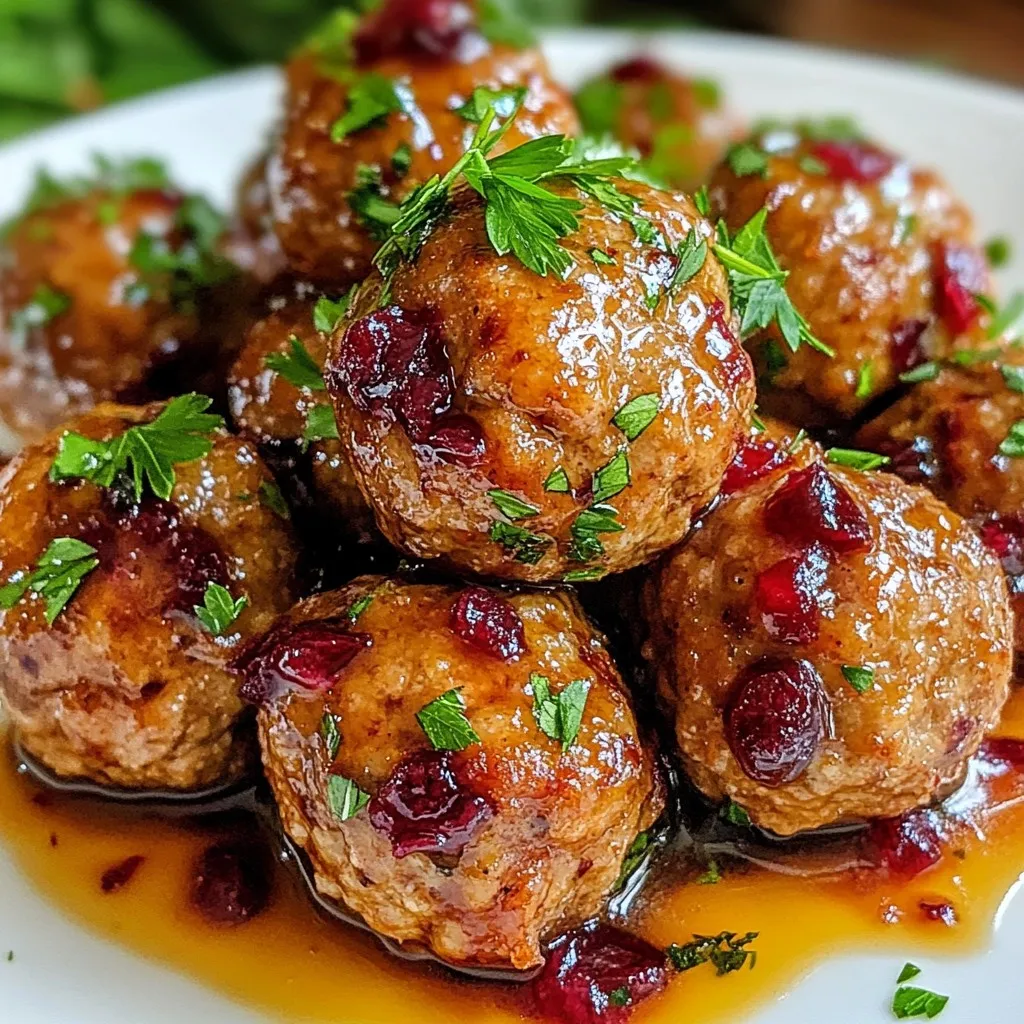
Looking for a unique and tasty dish? Try my Maple Cranberry Meatballs! These meatballs are easy to make and packed

Older posts
Newer posts
← Previous Page1 … Page135 Page136 Page137 … Page144 Next →

dsad

© 2025 So Yum Recipes • Built with GeneratePress

Our Policies

  • Copyright Policy
  • Cookie Policy
  • GDPR Policy
  • Privacy Policy
  • Disclaimer
  • Terms Of Use

More Information

  • Home
  • About
  • Contact
  • Appetizers
  • Dessert
  • Dinner
  • Drinks
©2025, So Yum Recipes About Back To Top