Skip to content
DisclaimerTerms Of UseGDPR PolicyCookie Policy

So Yum Recipes

  • Home
  • Drinks
  • Appetizers
  • Dinner
  • Dessert
  • About
  • Contact
  • Privacy Policy
DisclaimerTerms Of UseGDPR PolicyCookie Policy

Chloe

- 2 boneless, skinless chicken breasts, diced - 2 tablespoons olive oil - 3 cloves garlic, minced - 3 cups chicken broth - 12 oz fettuccine pasta - 1 cup heavy cream - 1 cup grated Parmesan cheese - 1 teaspoon Italian seasoning - Salt and pepper to taste - Chopped parsley for garnish When cooking, it's key to use the right measurements. Here are the units for this recipe: - Chicken: 2 breasts - Oil: 2 tablespoons - Garlic: 3 cloves - Broth: 3 cups - Pasta: 12 ounces - Cream: 1 cup - Cheese: 1 cup - Seasoning: 1 teaspoon - Salt and pepper: to taste To make your dish shine, choose good ingredients. Here are some tips: - Chicken: Look for fresh, organic chicken breasts. This adds flavor and quality. - Olive Oil: Use extra virgin olive oil for the best taste. - Garlic: Choose firm, aromatic garlic cloves. Fresh garlic makes a big difference. - Broth: Select low-sodium chicken broth for better control over salt. - Pasta: Opt for high-quality fettuccine. It holds sauce well. - Cream and Cheese: Use fresh heavy cream and real Parmesan for rich flavor. - Italian Seasoning: Check for freshness; it should smell strong and fragrant. Using quality ingredients makes your Instant Pot Chicken Alfredo Pasta not just good, but great! {{ingredient_image_1}} Follow these steps to make your Instant Pot Chicken Alfredo Pasta. You will love how easy it is! 1. Set your Instant Pot to the sauté mode. 2. Add 2 tablespoons of olive oil and let it heat. 3. Dice the 2 chicken breasts into small pieces. 4. Add the chicken to the pot. Cook for 5-7 minutes. 5. Stir until the chicken is brown and cooked through. 6. Season with salt and pepper. Then, take the chicken out and set it aside. 7. In the same pot, add 3 cloves of minced garlic. 8. Sauté the garlic for 1 minute. Stir to stop it from burning. 1. Pour in 3 cups of chicken broth. Scrape the bottom of the pot. 2. Add 12 oz of fettuccine pasta. Make sure it is covered with broth. 3. Close the Instant Pot lid and set the valve to sealing. 4. Cook on high pressure for 6 minutes. 5. Once done, quick-release the pressure. 6. Open the lid carefully. 7. Stir in 1 cup of heavy cream, 1 cup of grated Parmesan cheese, and the cooked chicken. 8. Add 1 teaspoon of Italian seasoning. Stir until the cheese melts. 9. Taste and adjust salt and pepper as needed. 10. Serve in bowls and garnish with chopped parsley. Enjoy your creamy and delicious meal! Using your Instant Pot can be fun and fast. Here are some tips to keep it simple: - Always check the sealing ring. Make sure it is clean and in place. - Use the sauté function to brown chicken first. It adds great flavor. - Don’t overfill the pot. Follow the maximum fill line for safety. - Always deglaze the pot after sautéing. Scrape up any bits stuck to the bottom. To make a creamy Alfredo sauce, follow these steps: - Use heavy cream for richness. It gives the sauce a smooth texture. - Stir in grated Parmesan cheese slowly. This helps it melt evenly. - Mix well after adding cream and cheese. This ensures a silky sauce. - Taste and adjust seasoning. Add salt and pepper to your liking. Here are some common mistakes that can ruin your dish: - Don’t skip the sautéing step. It builds flavor in your dish. - Avoid using low-quality cheese. This can lead to a grainy sauce. - Don’t rush the pressure release. Wait for it to finish naturally when you can. - Forgetting to adjust seasoning is a mistake. Always taste your dish before serving. Pro Tips Use Fresh Ingredients: Freshly grated Parmesan cheese melts better and enhances the flavor of your Alfredo sauce. Adjust Consistency: If the sauce is too thick, add a splash of chicken broth or extra cream to reach your desired creaminess. Cook Pasta Al Dente: Cooking the fettuccine al dente ensures it will not become mushy when mixed with the sauce. Garnish with Fresh Herbs: A sprinkle of fresh parsley or basil not only adds color but also brightens up the dish with added flavor. {{image_2}} You can enhance your chicken Alfredo pasta by adding fresh vegetables. Try using spinach, broccoli, or bell peppers. These add color and nutrients. To include them, sauté the vegetables with the garlic. This helps keep their flavor bright and fresh. You can also toss in peas or mushrooms during the pressure cooking. They cook quickly and blend well with the creamy sauce. If you want to change up the protein, you have options. Shrimp, turkey, or tofu work nicely. For shrimp, add them in at the end. They cook fast and stay tender. If you use turkey, diced turkey breast is a good choice. For tofu, choose firm tofu and sauté it until golden. Each option gives a new twist to this classic dish. While fettuccine is a favorite, you can use other pasta shapes. Penne, rigatoni, or even whole wheat pasta are great choices. Just keep the cooking time similar. Thin pasta like angel hair may need less time. Always check the package instructions for precise cooking times. Each pasta type offers a unique texture and flavor, making your meal even more interesting. You can store leftover Chicken Alfredo Pasta in an airtight container. Make sure it cools down before placing it in the fridge. The pasta stays fresh for up to three days. If you want to keep it longer, consider freezing it. To reheat, place the pasta in a pot over medium heat. Add a splash of milk or cream to keep it creamy. Stir often until heated through. You can also use the microwave. Heat in short bursts, stirring in between, for even warming. To freeze, use a freezer-safe container. Portion the pasta for easy meals later. It can last for about two months in the freezer. When ready to eat, thaw overnight in the fridge. Reheat on the stove or in the microwave, adding a bit of cream if needed. To make this dish vegetarian, skip the chicken. You can add mushrooms or tofu instead. Both options will add flavor and protein. Use vegetable broth in place of chicken broth. This keeps the dish rich and tasty. Yes, you can use low-fat cream. It will make the sauce lighter. However, the sauce may not be as rich. To boost flavor, add more Parmesan cheese or seasonings. The pasta takes about 6 minutes to cook in the Instant Pot. You need to set it to high pressure. Make sure to quick-release the pressure when cooking is done. This keeps the pasta from getting too soft. If you don’t have Parmesan cheese, use Pecorino Romano. It has a similar taste. Nutritional yeast is a great dairy-free option, too. It adds a cheesy flavor without dairy. This blog post covered all you need for making Instant Pot Chicken Alfredo Pasta. We explored the ingredients, their measurements, and how to choose quality items. You learned step-by-step cooking instructions and tips to perfect your dish. I also shared ideas for variations, storage, and answers to common questions. Cooking can be fun and simple when you follow these tips. Dive in, enjoy the process, and savor the results!

Instant Pot Chicken Alfredo Pasta Quick and Easy Recipe

Craving a creamy, dreamy meal in minutes? You’re in the right place! This Instant Pot Chicken Alfredo Pasta recipe is

To make loaded veggie quesadillas, gather these key items: - 4 large flour tortillas - 1 cup black beans, drained and rinsed - 1 cup corn kernels (fresh, frozen, or canned) - 1 bell pepper, diced (any color) - 1 medium zucchini, diced - 1 cup spinach leaves, roughly chopped - 1 teaspoon ground cumin - 1 teaspoon smoked paprika - 1 cup shredded cheese (cheddar, Monterey Jack, or a blend) - 2 tablespoons olive oil - Salt and pepper to taste These ingredients create a tasty mix of flavors and textures. The black beans add protein, while the veggies bring color and crunch. Feel free to add your favorite extras to make these quesadillas your own. Here are some fun options: - Avocado slices - Jalapeños for heat - Fresh herbs like parsley or basil - Different cheese types like feta or goat cheese - Sliced olives Mix and match to find your perfect combo. This flexibility makes the recipe fun and personal. To elevate your loaded veggie quesadillas, consider these garnishes: - Fresh cilantro for a burst of flavor - Lime wedges to squeeze on top - Sour cream or Greek yogurt for creaminess - Salsa or pico de gallo for a fresh kick These garnishes add freshness and depth. They also make your dish look more appealing for sharing. Enjoy! {{ingredient_image_1}} To make the veggie filling, first, heat 1 tablespoon of olive oil in a large skillet. Add the diced bell pepper and zucchini. Cook them over medium heat for about 5 minutes. You want them soft but not mushy. Next, stir in the black beans and corn. Add the chopped spinach, ground cumin, smoked paprika, salt, and pepper. Cook this mixture for another 3-4 minutes. You will see the spinach wilt. Once done, remove the skillet from heat and let it cool a bit. Now, let’s assemble the quesadilla. Heat the remaining tablespoon of olive oil in a non-stick skillet over medium heat. Place one tortilla in the skillet. On one half of the tortilla, add ¼ cup of shredded cheese. Next, scoop a generous amount of the veggie mixture on top of the cheese. Then, add another ¼ cup of cheese over the veggies. Fold the tortilla in half, covering the filling. For crispy quesadillas, cook them for 3-4 minutes on one side. You want it to turn golden brown. Then, carefully flip the quesadilla and cook the other side for another 3-4 minutes. If you like them extra crispy, you can cook them a bit longer. Repeat this with the remaining tortillas and filling. When they are done, cut them into wedges. Serve them warm with fresh cilantro and lime wedges on the side for added flavor. When picking tortillas, go for large flour tortillas. They are soft and easy to fold. Corn tortillas also work well for a gluten-free option. Make sure they are fresh for the best taste. Look for those without added preservatives to keep it healthy. To change the spice level, you can add or cut out spices. If you like it spicy, add diced jalapeños or a pinch of cayenne pepper. For milder quesadillas, stick with just the cumin and smoked paprika. Taste the filling before you assemble. This lets you adjust to your liking. Choosing cheese can make or break your quesadilla. I love using a mix of cheddar and Monterey Jack. This mix melts well and adds rich flavor. You can also try pepper jack for a kick. If you want a different taste, consider crumbled queso fresco or mozzarella. The choice is yours! Pro Tips Use Fresh Ingredients: Fresh vegetables not only enhance the flavor but also provide a vibrant texture and color to your quesadillas. Experiment with Cheese: Try different types of cheese like pepper jack for a spicy kick or goat cheese for a creamy twist. Don’t Overfill: While it’s tempting to load up your quesadilla, overfilling can make them difficult to flip and can lead to spills. Keep the Heat Moderate: Cooking at medium heat ensures that the tortillas become crisp without burning while allowing the cheese to melt perfectly. {{image_2}} To make vegan loaded veggie quesadillas, skip the cheese. Use nutritional yeast for a cheesy taste. It adds flavor and is dairy-free. You can also replace the cheese with vegan cheese options available in stores. They melt well and taste great. If you need a gluten-free option, use gluten-free tortillas. Many brands offer tasty choices. Make sure to check the labels to avoid any hidden gluten. This small change lets everyone enjoy these quesadillas without worry. You can add proteins to these quesadillas for an extra boost. Cooked chicken, turkey, or tofu work well. Simply mix them with the veggie filling. For more vegetables, try adding mushrooms, carrots, or kale. This makes your quesadillas even more colorful and tasty. Get creative and adjust to your taste! You can store leftover quesadillas in the fridge. Place them in an airtight container. They stay fresh for 3 to 4 days. Make sure they cool down before sealing. I recommend placing parchment paper between layers to avoid sticking. To freeze your quesadillas, wrap each one in plastic wrap. Then place them in a freezer bag or container. They last for up to 2 months in the freezer. Label the bag with the date. This way, you’ll know exactly when you made them. To reheat, use a skillet over medium heat. Cook each side for about 3 to 4 minutes. This keeps them crispy. You can also microwave them for 1 to 2 minutes if you’re in a hurry. However, this may make them a bit soft. Enjoy your quesadillas warm! To make loaded veggie quesadillas in the oven, preheat your oven to 400°F. Line a baking sheet with parchment paper. Prepare your filling as described in the recipe. Place your tortillas flat on the sheet. Add cheese and the veggie mix to one half of each tortilla. Fold them over. Brush the tops with olive oil. Bake for 15-20 minutes until golden and crispy. Yes, you can use other vegetables. Try mushrooms, onions, or broccoli. You can even add kale or sweet potatoes for different flavors. Feel free to mix and match until you find your favorite combo. Some great sides are salsa, guacamole, or sour cream. You can also serve with a fresh salad or Mexican rice. These pairs add more flavor and make the meal complete. Cooked quesadillas last in the fridge for about 3-4 days. Store them in an airtight container. Reheat them in a skillet or microwave before eating. This keeps them tasty and warm. In this post, we covered how to make loaded veggie quesadillas, from choosing ingredients to cooking tips. I shared ideas for customizing flavors and suggested options for different diets. You learned how to store and reheat these tasty treats. Now, you can enjoy delicious quesadillas any time. Be creative with your fillings and spices. Cooking should be fun, so experiment and make them your own!

Loaded Veggie Quesadillas Flavorful and Easy Meal

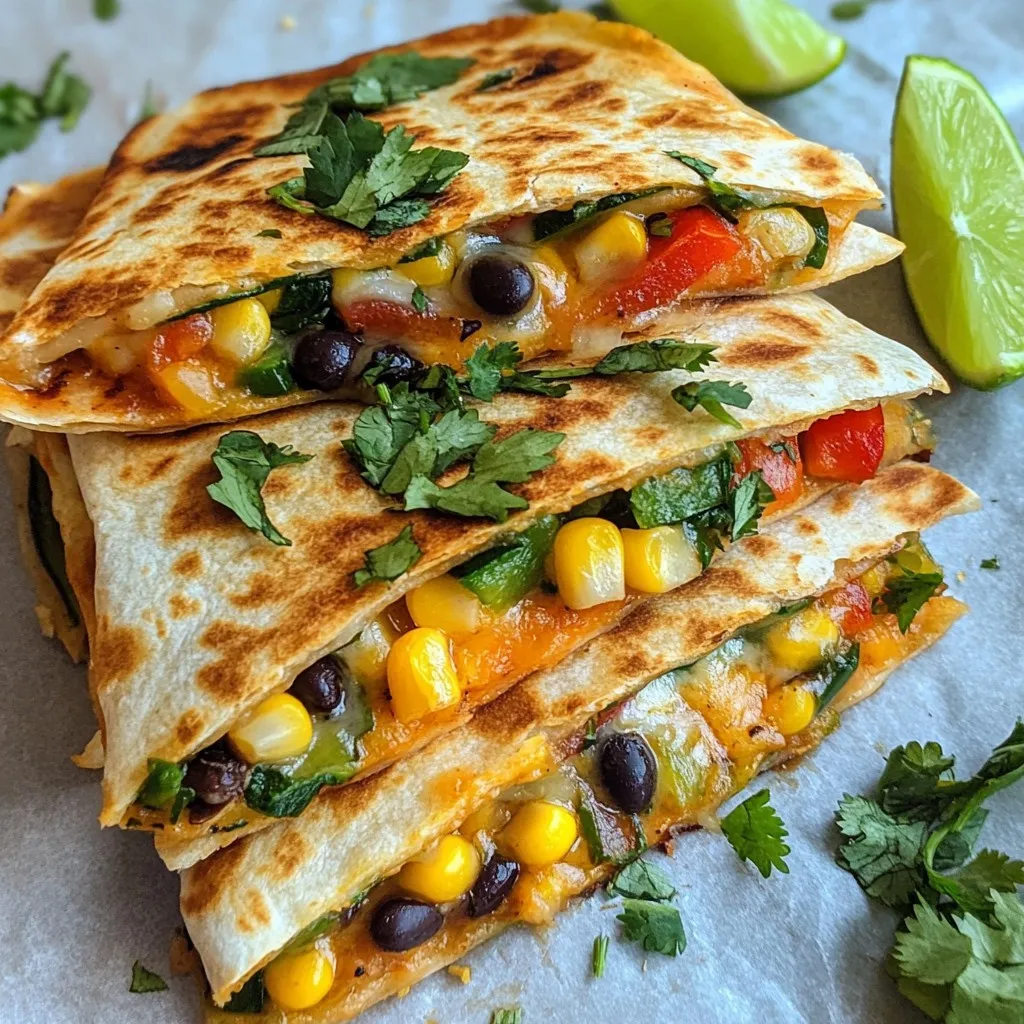
Looking for a quick and tasty meal? Loaded veggie quesadillas have you covered! With fresh veggies, cheesy goodness, and easy

- 200g spaghetti or your choice of pasta - 4 tablespoons unsalted butter - 4 cloves garlic, minced - 1/4 teaspoon red pepper flakes - Salt, to taste - Freshly cracked black pepper, to taste - 1/4 cup grated Parmesan cheese (optional) - Fresh parsley, chopped, for garnish To make a great Minute Garlic Butter Pasta, gather these simple ingredients. Spaghetti is my go-to, but you can use any pasta you like. The unsalted butter gives a rich base. I love using fresh garlic for its strong flavor. A hint of red pepper flakes adds just the right amount of heat. Next, let’s talk about seasonings. Salt is key to enhance the dish. Freshly cracked black pepper gives a nice kick. If you want to go the extra mile, adding Parmesan cheese makes it creamy and delicious. Lastly, chopped parsley brightens the dish and adds color. This recipe is easy, quick, and packed with flavor. You’ll enjoy each bite of this garlic butter delight! {{ingredient_image_1}} To start, fill a large pot with water and add a good amount of salt. Bring the water to a rolling boil. This step is key for flavor. Once boiling, add 200g of your choice of pasta. I love using spaghetti, but you can pick any pasta you want. Cook it for about 8-10 minutes. You want it to be al dente, which means it should still have a little bite to it. When done, remember to save a cup of pasta water before draining the pasta. Next, let’s make the sauce. Grab a large skillet and place it over medium heat. Add 4 tablespoons of unsalted butter to the pan. Watch it melt and start to froth. This is when you add 4 cloves of minced garlic. Sauté it for about 1-2 minutes. You want it to smell amazing and turn lightly golden, so don’t let it burn! After that, sprinkle in 1/4 teaspoon of red pepper flakes for a nice kick. Stir it for about 30 seconds to release the flavors. Now comes the fun part! Add the drained pasta into the skillet. Toss it well to coat the spaghetti in the garlic butter sauce. If it feels dry, slowly add some of that reserved pasta water. This will help make it nice and saucy. Season with salt and freshly cracked black pepper to taste. Toss again for good measure. If you want, sprinkle in 1/4 cup of grated Parmesan cheese. Toss until it melts into the pasta. This adds a nice creamy touch. Using fresh ingredients makes a big difference. Fresh garlic adds a bold taste. Butter should be unsalted for control over saltiness. Always use quality pasta, as it holds sauce well. Pasta water is your secret weapon. It has starch that gives the sauce a nice texture. When you add a little to your pasta, it coats well and makes it creamy. If your dish feels dry, just use a splash of that saved water. Make your dish look inviting. Serve the pasta in deep bowls. This helps the colors pop and keeps it warm. Sprinkle some extra Parmesan on top for flair. A drizzle of melted butter gives it a shiny look. Garnish with fresh parsley. It adds a nice green color and fresh taste. You can also use crushed red pepper for a bit of heat and visual contrast. Your meal will not just taste good; it will also look great! Pro Tips Use Fresh Garlic: Freshly minced garlic gives a stronger flavor compared to pre-minced or jarred options, enhancing the overall taste of your pasta. Adjust Heat Level: Modify the amount of red pepper flakes according to your spice preference. For a milder dish, reduce the amount or omit it altogether. Reserve Pasta Water: Always save some pasta water before draining. It’s starchy and helps to create a silky sauce that clings beautifully to the pasta. Experiment with Herbs: Feel free to add other fresh herbs like basil or oregano for an additional layer of flavor and freshness in your dish. {{image_2}} You can change your pasta to fit your needs. Whole wheat pasta is a great choice. It adds fiber and a nutty taste. Gluten-free pasta is also an option. Many brands make tasty gluten-free pasta that cooks well. You can also try different shapes. Fusilli, penne, or even farfalle work well. Each shape holds the sauce differently, giving a new twist to your dish. To make this dish more exciting, add vegetables. Spinach, cherry tomatoes, or broccoli can brighten the meal. You can also add proteins like chicken, shrimp, or tofu for extra heartiness. Fresh herbs make a big difference too. Basil, thyme, or oregano can add fresh notes. If you like spice, try different peppers. You can use jalapeños for a bolder kick or even a bit of sriracha. Adjust the red pepper flakes to suit your taste. Just remember, start small and taste as you go. This way, you can find the perfect heat level for you. To store leftovers of Minute Garlic Butter Pasta, let it cool first. Place the pasta in an airtight container. This keeps out air and moisture. You can store it in the fridge for up to three days. For storage containers, use glass or plastic containers with tight seals. These prevent spills and keep the pasta fresh. Make sure they are clean and dry before adding the pasta. The best way to reheat pasta is on the stove. Heat a skillet over medium heat. Add a splash of water or a little butter to keep it moist. Stir gently until heated through. You can also use the microwave. Place the pasta in a microwave-safe bowl. Add a bit of water, cover it, and heat in short bursts. This helps maintain the texture and flavor. Avoid overheating, as it can make the pasta dry. Enjoy your meal again! Preparing Minute Garlic Butter Pasta takes just 5 minutes for prep and 10 minutes for cooking. You can have a delicious meal in only 15 minutes. This quick time makes it perfect for busy days. Yes, you can make this pasta ahead of time. Store leftovers in an airtight container in the fridge for up to three days. When you want to eat it, just reheat in a pan over low heat. Add a bit of butter or water to keep it moist. If you don't have Parmesan cheese, there are great alternatives. You can try Pecorino Romano for a sharper taste. Nutritional yeast works well for a dairy-free option. Crumbled feta or goat cheese can also add nice flavors. In this article, we covered how to make Minute Garlic Butter Pasta with simple ingredients and easy steps. I shared tips to enhance the flavor and offered variations to suit your taste. Remember, fresh ingredients make a big difference. Store leftovers properly and reheat wisely to enjoy each bite. With these techniques, your pasta will always impress. Enjoy the journey of cooking and exploring new flavors!

Minute Garlic Butter Pasta Simple and Quick Meal

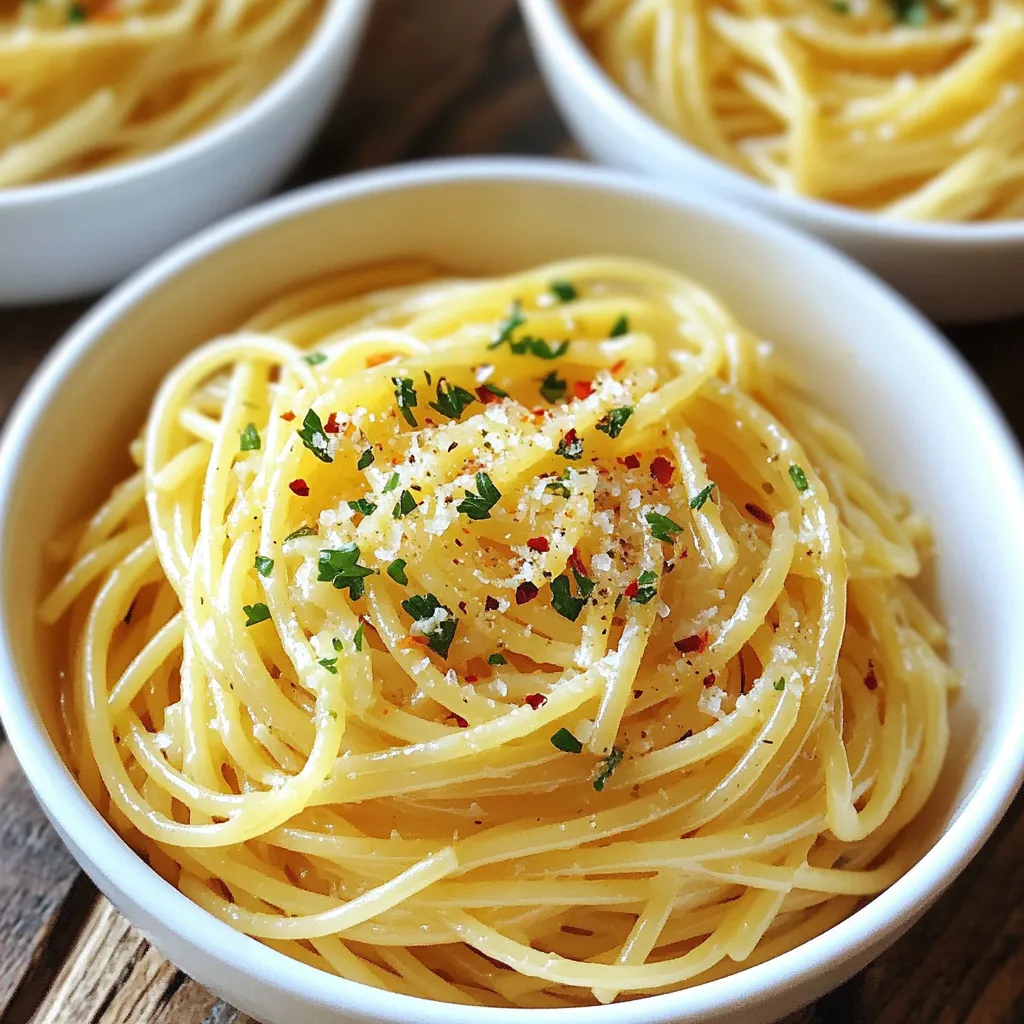
Craving a meal that’s quick, simple, and packed with flavor? Minute Garlic Butter Pasta is your answer! With just a

Here’s what you need to make creamy tomato garlic pasta: - 12 oz fettuccine pasta - 2 tablespoons olive oil - 4 cloves garlic, minced - 1 can (14 oz) crushed tomatoes - 1 teaspoon dried oregano - ½ teaspoon red pepper flakes (optional) - 1 cup heavy cream - 1 cup fresh spinach, roughly chopped - ½ cup grated Parmesan cheese - Salt and pepper to taste - Fresh basil leaves for garnish These ingredients come together to create a rich and tasty dish. Fettuccine adds a nice texture. Olive oil gives flavor and helps cook the garlic. Garlic is the star here, adding a strong and savory taste. Crushed tomatoes provide a sweet base for the sauce. Dried oregano brings in a hint of earthiness. If you like heat, add red pepper flakes. Heavy cream makes the sauce rich and creamy. Fresh spinach adds color and nutrition. Parmesan cheese brings a salty depth. Don't forget salt and pepper to enhance all these flavors. Finally, fresh basil leaves add a pop of freshness on top. When you gather these ingredients, you set yourself up for success. The blend of flavors makes every bite delightful. With these items, you're ready to create a dish that shines on your table. {{ingredient_image_1}} First, you need to boil some water. Fill a large pot with water and add a pinch of salt. Bring it to a rolling boil. Once the water bubbles, add 12 oz of fettuccine pasta. Cook the pasta according to the package instructions until it is al dente. This usually takes about 8-10 minutes. After the pasta is cooked, carefully drain it in a colander. Do not forget to reserve about ½ cup of the pasta water. This water is starchy and will help the sauce stick later. Now, let’s move on to the garlic. In a large skillet, pour in 2 tablespoons of olive oil. Heat the oil over medium heat. When the oil is warm, add 4 cloves of minced garlic. Sauté the garlic for about 1 minute. You want it to smell great but not burn. Next, it’s time for the tomatoes. Add a 14 oz can of crushed tomatoes to the skillet. Stir in 1 teaspoon of dried oregano and ½ teaspoon of red pepper flakes if you like some heat. Let this mixture simmer for about 5-7 minutes. The sauce should thicken slightly during this time. Now, lower the heat and pour in 1 cup of heavy cream. Stir everything together until it is well mixed. Allow the sauce to simmer for another 3-5 minutes. This helps the flavors blend nicely. To finish the sauce, add 1 cup of roughly chopped fresh spinach and ½ cup of grated Parmesan cheese. Stir until the spinach wilts and the cheese melts into the sauce. If the sauce feels too thick, you can add a bit of the reserved pasta water to reach your desired consistency. Finally, add the cooked fettuccine to the sauce. Toss everything together until the pasta is well coated. Season with salt and pepper to taste. Now your creamy tomato garlic pasta is ready to serve! To get that perfect creamy sauce, you can use pasta water. After cooking the fettuccine, save about ½ cup of the starchy water. If your sauce is too thick, slowly add some water. This will help loosen it up while keeping it creamy. Simmering the sauce is also key. When you let it simmer, the flavors mix well. The longer you simmer, the richer the taste becomes. Aim for about 5-7 minutes after adding the tomatoes. Adding spices and herbs can brighten your dish. Dried oregano and red pepper flakes give warmth and depth. You might try fresh basil or parsley for a fresh kick. For toppings, think about extra cheese or toasted pine nuts. A sprinkle of grated Parmesan on top is always a hit. These little touches make your dish special. Using fresh ingredients makes a big difference. Fresh tomatoes have better flavor than canned ones. If you pick fresh tomatoes, look for ones that are firm and smell sweet. When choosing canned tomatoes, go for high-quality brands. San Marzano tomatoes are a great choice. They are sweeter and less acidic, perfect for a creamy sauce. Fresh spinach also adds vibrant color and nutrition to your meal. Pro Tips Fresh Ingredients: Use fresh garlic and ripe tomatoes for the best flavor. Dried herbs can work in a pinch, but fresh ones elevate the dish significantly. Adjusting Creaminess: If you prefer a lighter sauce, you can substitute half of the heavy cream with chicken or vegetable broth without losing too much creaminess. Perfect Pasta: Always cook your pasta al dente, as it will continue to cook slightly when mixed with the hot sauce, preventing it from becoming mushy. Garnishing: Finish with a drizzle of high-quality olive oil and additional grated Parmesan for an extra touch of flavor and presentation. {{image_2}} You can easily add protein to your creamy tomato garlic pasta. Chicken works great! Just grill or sauté diced chicken breast until cooked. Shrimp is another tasty option. Sauté shrimp until pink and tender. For a plant-based choice, use tofu. Press and cube firm tofu, then sauté until golden. Each choice adds flavor and makes the dish more filling. If you follow a vegetarian diet, this recipe is already perfect for you. For a vegan option, swap heavy cream for coconut milk or cashew cream. You can use nutritional yeast instead of Parmesan for a cheesy taste. If gluten is a concern, choose gluten-free pasta. Many brands offer tasty alternatives that cook up nicely. Make this pasta shine with seasonal vegetables. In spring, add asparagus or peas for freshness. Summer is perfect for ripe tomatoes or zucchini. In fall, think about adding roasted butternut squash or mushrooms. Fresh herbs like basil or parsley can brighten the dish. These changes keep the recipe exciting and flavorful all year long! To store your creamy tomato garlic pasta, let it cool first. Place it in an airtight container. This helps keep it fresh. Make sure to eat it within three to four days for the best taste. You can freeze creamy tomato garlic pasta for even longer storage. First, cool the pasta completely. Then, put it in a freezer-safe container or bag. Squeeze out as much air as you can. It will last for about three months in the freezer. To reheat, thaw it overnight in the fridge. Then, warm it on low heat. Add a splash of cream or pasta water to bring back the creaminess. In the refrigerator, your creamy pasta stays fresh for about three to four days. In the freezer, it can last for up to three months. Always check for any signs of spoilage, like off smells or changes in texture. Enjoy your delicious dish while it’s at its best! You can swap some ingredients to make this dish lighter. Here are a few ideas: - Use whole wheat fettuccine for more fiber. - Replace heavy cream with Greek yogurt or cashew cream. - Add extra veggies like zucchini or bell peppers for more nutrients. - Use less cheese or choose a low-fat version. These swaps keep the flavor while reducing calories. Yes, you can! Here are some great alternatives: - Penne: Its shape holds sauce well. - Spaghetti: A classic choice that works perfectly. - Gluten-free pasta: If you need a gluten-free option, look for brown rice or chickpea pasta. - Whole grain: This adds flavor and fiber. Feel free to get creative with your choice! To reheat without losing creaminess, follow these tips: - Use a skillet over low heat. Add a splash of pasta water. - Stir often to heat evenly and keep it creamy. - If using a microwave, heat in short bursts. Stir in between to avoid hot spots. This keeps your pasta delicious and smooth! This blog post covered the essential ingredients and easy steps for creamy tomato garlic pasta. I shared tips to ensure great texture and flavor, including adding fresh ingredients. You can also explore variations with proteins and dietary options. Remember to store leftovers properly for later enjoyment. This dish is quick, tasty, and perfect for everyone. Give it a try, and you’ll have a simple yet delicious meal ready in no time. Enjoy cooking!

Creamy Tomato Garlic Pasta Easy and Flavorful Recipe

If you’re craving a dish that’s both creamy and packed with flavor, you’re in the right place! This Creamy Tomato

To make a Strawberry Spinach Pasta Salad, you need a few simple ingredients. Each one adds flavor and nutrition. Here’s what you’ll need: - 8 oz rotini pasta - 4 cups fresh spinach, washed and dried - 1 cup strawberries, sliced - ½ cup feta cheese, crumbled - ¼ cup walnuts, roughly chopped - 3 tablespoons olive oil - 2 tablespoons balsamic vinegar - 1 tablespoon honey - Salt and pepper to taste - Fresh basil leaves for garnish Each ingredient plays a key role. The rotini pasta gives a nice bite. Fresh spinach adds a crisp green touch. Strawberries bring a sweet burst of flavor. Feta cheese adds a creamy, salty taste that balances the salad. Walnuts provide crunch and healthy fats. The dressing brings it all together. Olive oil and balsamic vinegar create a tangy mix. Honey adds a hint of sweetness, while salt and pepper enhance the flavors. Basil leaves are a fresh finish that makes the salad pop. Using fresh ingredients makes this dish shine. You can easily find them at your local market. Feel free to adjust any ingredient to suit your taste. Add more strawberries for sweetness or extra walnuts for crunch. This recipe is all about enjoying fresh, vibrant flavors! {{ingredient_image_1}} - Boiling Salted Water: Start by filling a large pot with water. Add a good amount of salt. This helps flavor the pasta as it cooks. Bring the water to a rolling boil. - Cooking Time for Rotini: Add the rotini pasta to the boiling water. Check the package for the recommended cooking time. Usually, it takes about 8 to 10 minutes for al dente. Stir occasionally to prevent sticking. - Rinsing Pasta: Once cooked, drain the pasta in a colander. Rinse it under cold water. This stops the cooking process and cools the pasta for your salad. - Ingredients for Dressing: Gather your dressing items. You need olive oil, balsamic vinegar, honey, salt, and pepper. - Whisking Instructions: In a small bowl, combine the olive oil, balsamic vinegar, honey, and a pinch of salt and pepper. Use a whisk to mix until smooth and well blended. - Mixing the Salad Components: In a large mixing bowl, add the cooled rotini pasta. Then, toss in the fresh spinach, sliced strawberries, crumbled feta cheese, and chopped walnuts. - Dressing Application: Pour the dressing over the salad mixture. Make sure to coat everything evenly for the best flavor. - Tossing the Salad: Gently toss the salad to mix all the ingredients well. Taste and adjust the seasoning with more salt and pepper if needed. Best Refrigeration Practices Store your strawberry spinach pasta salad in an airtight container. This keeps it fresh longer. You can enjoy it for up to three days. How to Keep Fresh Ingredients Crisp To keep spinach crisp, add it just before serving. This prevents it from wilting. Also, avoid mixing in the dressing until you're ready to eat. Ideal Serving Dishes A large, shallow bowl works best for your salad. This allows the bright colors to shine. You can also use a platter for a more festive look. Complementary Dishes This salad pairs well with grilled chicken or fish. You can also serve it alongside crusty bread for a complete meal. Balancing Sweetness and Tang If you want more sweetness, add a bit more honey. For extra tang, try a splash of lemon juice. Taste as you go to find the perfect mix. Customizing with Extra Ingredients You can add other fruits like blueberries or peaches. Try different nuts like pecans for a new crunch. Get creative and make it your own! Pro Tips Perfect Pasta: Make sure to cook the rotini pasta al dente for the best texture. It will hold up better in the salad and not become mushy. Fresh Ingredients: Use the freshest spinach and strawberries you can find to enhance the flavor and nutritional value of your salad. Customize Your Nuts: Feel free to substitute walnuts with your favorite nuts, like pecans or almonds, for a different flavor profile. Flavor Boost: For an extra kick, add a pinch of red pepper flakes to the dressing or toss in some sliced red onions for added crunch and flavor. {{image_2}} - Alternative Pasta Choices You can swap rotini for other pasta types. Try bowtie, penne, or even whole wheat pasta. Each will give a new twist to your salad. - Different Cheeses Feta cheese adds a salty kick, but you can use goat cheese or mozzarella instead. Both bring unique flavors that blend well with the other ingredients. - Other Nut Options If walnuts are not your favorite, try pecans or almonds. They provide a nice crunch and add different tastes to your salad. - Vegan Options To make this salad vegan, skip the cheese. You can add avocado for creaminess and maybe some nutritional yeast for a cheesy flavor. - Gluten-Free Alternatives Use gluten-free pasta if you need a gluten-free dish. Many brands offer great options that taste just as good. - Seasonal Fruits In summer, use peaches or blueberries instead of strawberries. In fall, consider adding apples or pears to keep the salad fresh and exciting. - Herb Variations Fresh herbs like mint or cilantro can elevate your salad. They add brightness and a fresh taste that complements the strawberries and spinach. - Total Calories: This salad has about 300 calories per serving. - Fats: It contains around 18 grams of fat, mostly from walnuts and olive oil. - Proteins: You get about 8 grams of protein mainly from feta cheese and walnuts. - Carbs: The salad has around 30 grams of carbs, thanks to the pasta and fruits. - Spinach: Spinach is rich in vitamins A, C, and K. It helps with eye health and boosts your immune system. - Strawberries: These berries are full of antioxidants. They help fight inflammation and support heart health. - Walnuts: Walnuts provide healthy fats and protein. They also support brain health and can lower cholesterol. This combination of ingredients makes the Strawberry Spinach Pasta Salad not only tasty but also nutritious. Enjoying this salad gives you a healthy dose of vitamins while satisfying your taste buds. Yes, you can use frozen strawberries. However, fresh strawberries taste better. Frozen berries release more juice. This can make the salad watery. If you use frozen ones, let them thaw first. Drain any excess juice before adding them to your salad. The salad lasts for about 3 days in the fridge. Keep it in a sealed container. Over time, the spinach may wilt. The strawberries might lose their texture too. For best taste, eat it within the first two days. You can make the salad ahead of time. Just keep the dressing separate. Mix it in just before serving. This way, the salad stays fresh and crisp. It’s perfect for meal prep or gatherings. The dressing in this recipe is perfect. It uses olive oil, balsamic vinegar, and honey. This mix gives a nice sweet and tangy flavor. You can also try a light vinaigrette or a yogurt-based dressing for a twist. Yes, this salad is great for meal prep. It holds up well in the fridge. Just keep the dressing separate until you are ready to eat. This keeps everything fresh and tasty. This blog post covered a delightful salad made from rotini pasta, fresh spinach, strawberries, and other tasty ingredients. You learned how to cook the pasta, make the dressing, and combine it all into a refreshing dish. We explored tips for storage, serving, and adjusting flavors to fit your taste. Variations and substitutions make this recipe adaptable for many diets. Enjoy this salad for its flavor and health benefits! It’s simple, fresh, and perfect for any meal. Try it and make it your own!

Strawberry Spinach Pasta Salad Fresh and Flavorful Treat

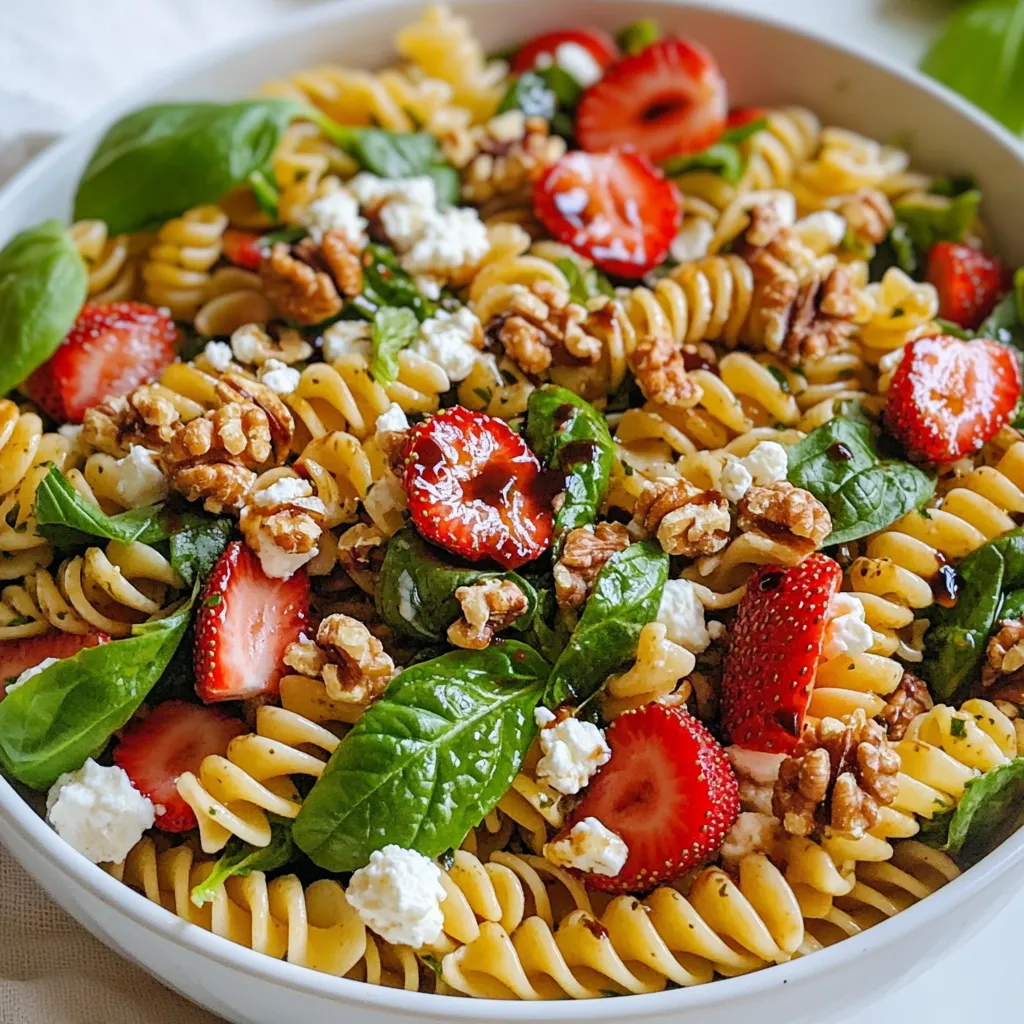
Looking to brighten up your meal with something fresh and tasty? My Strawberry Spinach Pasta Salad is the perfect choice!

- 4 chicken thighs (bone-in, skin-on) - 1/4 cup soy sauce - 1/4 cup brown sugar - 2 tablespoons apple cider vinegar - 2 tablespoons fresh ginger, grated - 3 cloves garlic, minced - 1 tablespoon sesame oil - 1 teaspoon ground black pepper - 1/2 teaspoon red pepper flakes (optional, for heat) - 1/4 cup pineapple juice - 2 green onions, chopped (for garnish) - 1 pineapple, sliced (for grilling and serving) These ingredients bring the flavors of Huli Huli Chicken to life. The chicken thighs are juicy and perfect for grilling. The skin keeps the meat moist while adding crunch. Soy sauce adds saltiness. Brown sugar gives a touch of sweetness. Apple cider vinegar balances the flavors. Fresh ginger and garlic add zest. Sesame oil brings nutty notes. Black pepper adds warmth. Red pepper flakes are for those who like heat. Pineapple juice adds a sweet twist. For serving, I like to garnish with green onions. They add a fresh touch. Grilled pineapple slices taste great alongside the chicken. This mix of ingredients creates a savory, sweet, and smoky flavor that you will love. {{ingredient_image_1}} To start, gather your ingredients. In a large mixing bowl, add: - 1/4 cup soy sauce - 1/4 cup brown sugar - 2 tablespoons apple cider vinegar - 2 tablespoons fresh ginger, grated - 3 cloves garlic, minced - 1 tablespoon sesame oil - 1 teaspoon ground black pepper - 1/2 teaspoon red pepper flakes (optional) - 1/4 cup pineapple juice Whisk these together until the sugar dissolves. The mix should smell sweet and tangy. Now it's time to marinate the chicken. Add the chicken thighs to the marinade, ensuring they get well coated. Cover the bowl and refrigerate. I recommend letting it sit for at least two hours, or even better, overnight. This wait allows all those flavors to soak in. First, preheat your grill to medium-high heat. This step is key for great results. Once the grill is hot, take the chicken out of the marinade. Let any extra marinade drip off. Keep the marinade for basting later. Now place the chicken thighs on the grill, skin side down. Grill them for about 6 to 7 minutes. You want the skin crispy and golden brown. After that, flip the chicken over. Brush the top with the reserved marinade. Grill for another 6 to 8 minutes. Check the internal temperature; it should reach 165°F (75°C) for safe eating. While the chicken grills, slice the pineapple. Place the slices on the grill too. Grill them for about 2 to 3 minutes on each side. This will give them a lovely caramelized look and sweet taste. When the chicken is done, take it off the grill and let it rest for a few minutes. This helps keep it juicy. Serve the chicken with the grilled pineapple on the side. Don't forget to garnish with chopped green onions for a fresh touch. Enjoy your flavorful meal! Marinating chicken is key for great taste. I suggest marinating for at least two hours. For the best flavor, let it sit overnight. The longer it soaks up those flavors, the better it gets. Basting adds another layer of flavor. Use the reserved marinade while grilling. Brush it on during the last few minutes of cooking. This helps keep the chicken juicy and enhances the taste. The right grill temperature matters. Preheat your grill to medium-high heat. This helps the chicken cook evenly and get a nice sear. Checking the doneness is simple. Use a meat thermometer. The chicken should reach 165°F (75°C) inside. This ensures it’s safe to eat and still juicy. Pro Tips Marinate Longer for Flavor: Allow the chicken to marinate overnight for the most flavorful results. This helps the chicken absorb all the delicious flavors from the marinade. Use a Meat Thermometer: To ensure perfectly cooked chicken, use a meat thermometer to check that the internal temperature reaches 165°F (75°C). Grill with Indirect Heat: If your grill has hot spots, consider using indirect heat by placing the chicken on the cooler side of the grill after searing to finish cooking without burning. Fresh Pineapple for Sweetness: For the best flavor, use fresh pineapple instead of canned. Grilling fresh pineapple enhances its sweetness and adds a delicious caramelized flavor. {{image_2}} You can customize Huli Huli chicken in many fun ways. First, try different marinades. Teriyaki gives a sweet twist, while citrus adds a bright zing. You can mix and match flavors to find your perfect taste. If you want to switch proteins, use pork or tofu instead of chicken. Each option brings its own unique flavor. You can also cook Huli Huli chicken in different ways. For oven-baked chicken, preheat your oven to 400°F (200°C). Place the marinated chicken on a baking sheet. Bake for about 30-35 minutes until the chicken is golden and reaches 165°F (75°C) inside. If you prefer a slow cooker, this method works too! Place the marinated chicken in the slow cooker. Cook on low for 6-8 hours or on high for 3-4 hours. The chicken will be tender and full of flavor. Both methods are simple and give tasty results. To keep your Huli Huli Chicken fresh, follow these steps: - Cool the chicken completely. Let it sit at room temperature for 30 minutes. - Use an airtight container. Place the chicken in a sturdy container. - Refrigerate. Store in the fridge for up to 3 days. If you want to save it longer: - Freeze the chicken. Wrap it tightly in plastic wrap or foil. - Use freezer bags. Place the wrapped chicken in a freezer bag to prevent freezer burn. - Label and date. Write the date on the bag. You can freeze it for up to 3 months. When you're ready to enjoy your leftovers, here are the best ways to reheat: - Oven method. Preheat to 350°F (175°C). Place chicken on a baking sheet. Heat for about 15-20 minutes. - Grill method. Preheat the grill. Warm the chicken for 5-10 minutes, turning it gently. - Microwave method. Place chicken on a microwave-safe plate. Heat in short bursts of 30 seconds. Check often to avoid drying out. These methods help keep your chicken juicy and tasty! What is Huli Huli Chicken? Huli Huli Chicken is a Hawaiian dish. It features grilled chicken marinated in a tasty blend. The marinade includes soy sauce, brown sugar, ginger, and garlic. This mix gives the chicken a sweet and savory flavor. The name "Huli" means "turn" in Hawaiian, and it refers to grilling the chicken by flipping it. How can I make Huli Huli Chicken spicier? To add spice, include more red pepper flakes in the marinade. You can also use spicy sauce or fresh chili peppers. Adjust the amount based on your heat preference. Start with a little and add more if needed. This way, you can find the perfect balance for your taste. What to serve with Huli Huli Chicken? Huli Huli Chicken pairs well with many sides. Consider serving it with rice or quinoa. Grilled vegetables also make a great choice. You can add a fresh salad for a light touch. Don’t forget to grill pineapple slices! They add sweetness and color to your plate. Can Huli Huli Chicken be made ahead of time? Yes, you can prepare Huli Huli Chicken ahead of time. Marinate the chicken the night before for the best flavor. Cook it fresh just before serving. If you have leftovers, store them in the fridge. Reheat them gently to keep the chicken juicy and tasty. In this article, we explored the recipe for Huli Huli Chicken. We discussed the key ingredients, the steps for marinating and grilling, and offered useful tips for flavor and grilling. I shared variations to suit your taste and explained how to store leftovers effectively. Enjoy this flavorful dish, whether for a quick dinner or a special occasion. With the right techniques, you can create a crowd-pleaser that everyone loves. Dive in and try making it your own!

Authentic Huli Huli Chicken Flavorful Grilled Delight

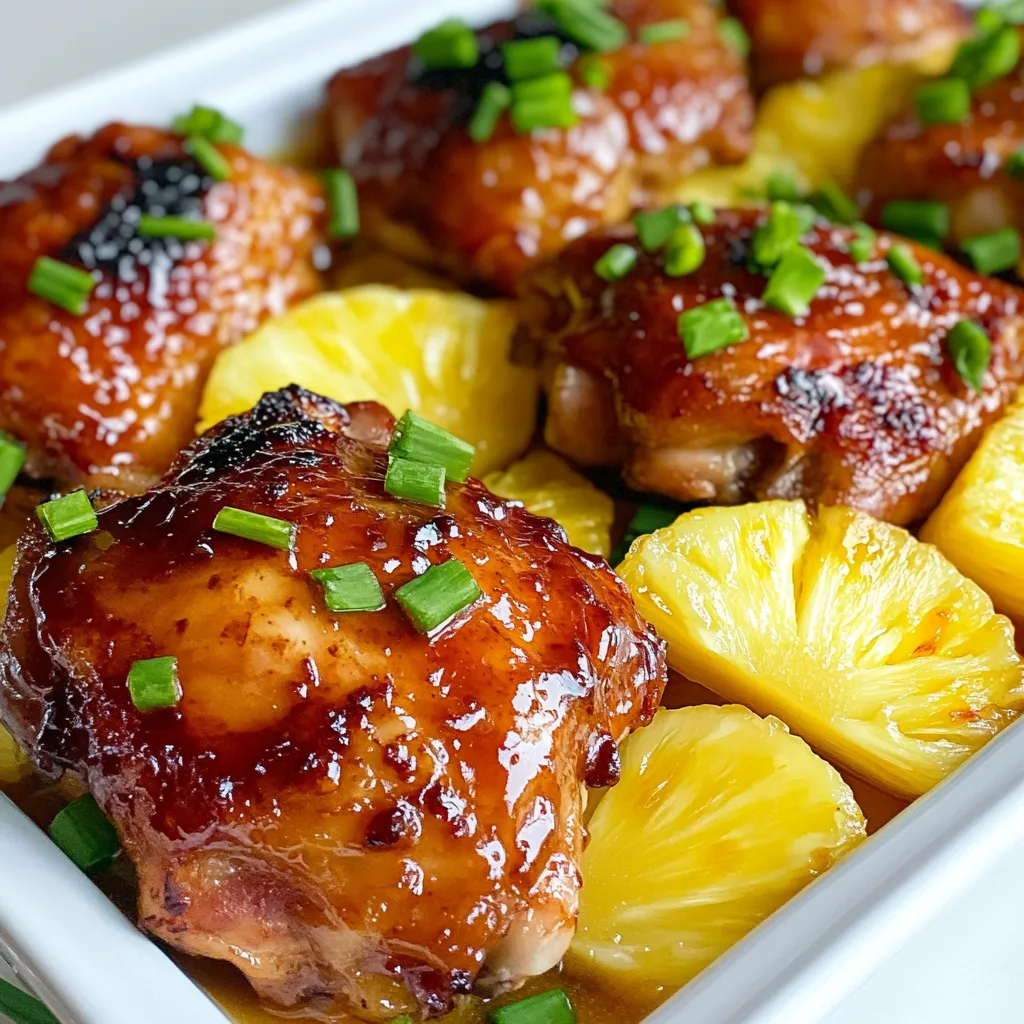
Huli Huli Chicken is a tasty dish with roots in Hawaii. Its sweet and savory marinade gives it a unique

- All-purpose flour: 4 tablespoons - Granulated sugar: 4 tablespoons - Cocoa powder: 2 tablespoons - Baking powder: 1/8 teaspoon - Milk: 3 tablespoons - Vegetable oil: 2 tablespoons - Vanilla extract: 1/4 teaspoon - Chocolate chips: 1 tablespoon (semi-sweet or dark) - Salt: A pinch To make a chocolate lava mug cake, you need simple ingredients. Each item plays a role in creating a moist, gooey treat. - All-purpose flour gives the cake structure. It holds everything together. - Granulated sugar adds sweetness and helps the cake rise. - Cocoa powder brings rich chocolate flavor. It’s key for that deep taste. - Baking powder helps the cake rise in the microwave. A tiny bit goes a long way. - Milk adds moisture, making the cake soft. - Vegetable oil keeps the cake tender and adds richness. - Vanilla extract gives a warm, sweet aroma. It enhances the chocolate flavor. - Chocolate chips create the ooey-gooey center. Use semi-sweet or dark for a chocolatey punch. - Salt balances the sweetness and enhances all flavors. Gather these items, and you're ready to create a delicious treat in just minutes! {{ingredient_image_1}} Start by grabbing a microwave-safe mug. You need to mix the dry stuff first. Add 4 tablespoons of all-purpose flour, 4 tablespoons of granulated sugar, 2 tablespoons of cocoa powder, 1/8 teaspoon of baking powder, and a pinch of salt. Use a small spoon to stir. Make sure everything is mixed well. This step is key for a smooth cake. Now, it’s time for the wet ingredients. Pour 3 tablespoons of milk into the mug. Then, add 2 tablespoons of vegetable oil and 1/4 teaspoon of vanilla extract. Stir until you see no dry flour. This mix should be thick, but not too thick. Next, fold in 1 tablespoon of chocolate chips. You can use semi-sweet or dark chocolate. Make sure they are spread throughout the batter. Now, it’s time for the fun part! Microwave your mug on high for 40-60 seconds. The cake should be set at the edges but still soft in the middle. Keep an eye on it! Let it cool for about a minute. This gives your lava cake a nice gooey center. Microwave timing is key to a great chocolate lava mug cake. You want it to cook enough to set the edges but stay gooey in the center. Start by microwaving for 40 seconds. Check it closely. If the center looks wet but edges are firm, it’s just right. If your microwave is strong, you may need only 40 seconds. For weaker microwaves, go up to 60 seconds. To avoid overflowing, use a large mug. Fill it only halfway with batter. This gives the cake room to rise. Keep an eye on it as it cooks. Letting the cake cool for one minute is very important. This short wait helps the gooey center develop. If you skip this step, the lava may be too hot and messy. A minute is all you need for the perfect balance of warmth and gooeyness. For presentation, you can serve the mug cake right in the mug. If you want to impress, invert it onto a plate. Add a scoop of vanilla ice cream or a dollop of whipped cream on top. For extra flair, sprinkle cocoa powder or chocolate shavings over it. This makes your dessert look gourmet and taste even better! Pro Tips Choose the Right Mug: Opt for a microwave-safe mug that holds at least 8 ounces to ensure your batter has enough space to rise without overflowing. Perfecting the Microwave Time: Microwaves vary in power, so start with 40 seconds and check. If the center is still too gooey, add 10-second increments until it's just right. Customize Your Chocolate: Experiment with different types of chocolate chips, such as white chocolate or peanut butter chips, for a unique twist on the flavor. Let It Rest: Allowing the mug cake to sit for a minute before digging in helps the lava center become more pronounced and enhances the overall texture. {{image_2}} You can change up the flavor of your chocolate lava mug cake easily. Try adding a swirl of peanut butter or Nutella before you microwave it. Just drop a spoonful in the center of the batter and give it a gentle stir. This will add a rich, creamy taste. You can also experiment with different types of chocolate chips. Use milk chocolate, dark chocolate, or even white chocolate for a fun twist. Each type brings a unique flavor that can change your dessert game. If you're looking for gluten-free options, almond or coconut flour works well. Replace the all-purpose flour with an equal amount of almond flour. It will give your cake a nutty flavor. For coconut flour, use half the amount since it absorbs more liquid. Adjust the milk slightly to ensure the cake remains moist. These alternatives keep the dessert tasty while meeting special dietary needs. Toppings can elevate your chocolate lava mug cake. Fresh fruits like strawberries or raspberries add a nice tartness. Nuts like walnuts or almonds give a great crunch. For a creamy finish, try flavored whipped cream. Whip cream with vanilla or hazelnut extract to add extra flavor. You can also sprinkle cocoa powder or chocolate shavings on top for a nice touch. Each topping transforms your mug cake into a delightful treat! If you have leftover chocolate lava mug cake, store it in the fridge. It will stay fresh for up to two days. Make sure to cover the mug with plastic wrap or a lid. This keeps it moist and tasty. To reheat your mug cake, use the microwave. Heat it for about 10-15 seconds. Check if it’s warm enough. If you want that gooey center back, you can add a splash of milk before reheating. This keeps the cake soft and helps restore its original texture. Enjoy that rich chocolate goodness again! Yes, you can make this cake without eggs. For an egg-free version, use 1 tablespoon of unsweetened applesauce. This will help bind the ingredients and keep your cake moist. You can also try using 1 tablespoon of yogurt or mashed banana as an alternative. Both options work well for a soft, rich cake. Microwave settings can change how your cake cooks. Most microwaves have different wattages. If your microwave is 700 watts, cook the cake for 60-70 seconds. For 900 watts, 40-50 seconds will work. If it's 1,100 watts or more, start with 40 seconds. Always watch the cake closely to prevent it from overflowing. Check your mug cake by looking at the edges. They should be set while the center is still soft. If the cake springs back when you gently press it, it’s done. You want that gooey lava center! If it looks too wet, microwave it for an extra 10 seconds. Let it cool for a minute to develop the lava texture. This blog covered how to make a delicious Chocolate Lava Mug Cake. You learned the right ingredients, how to mix them, and the perfect microwave time for a gooey center. We discussed tips to enhance your cake, variations to try, and how to store any leftovers. In the end, microwave desserts like this one are fun and quick. Enjoy making this treat and share it with friends or family. You'll impress everyone with your new skills and tasty creation!

Chocolate Lava Mug Cake Easy and Quick Fix

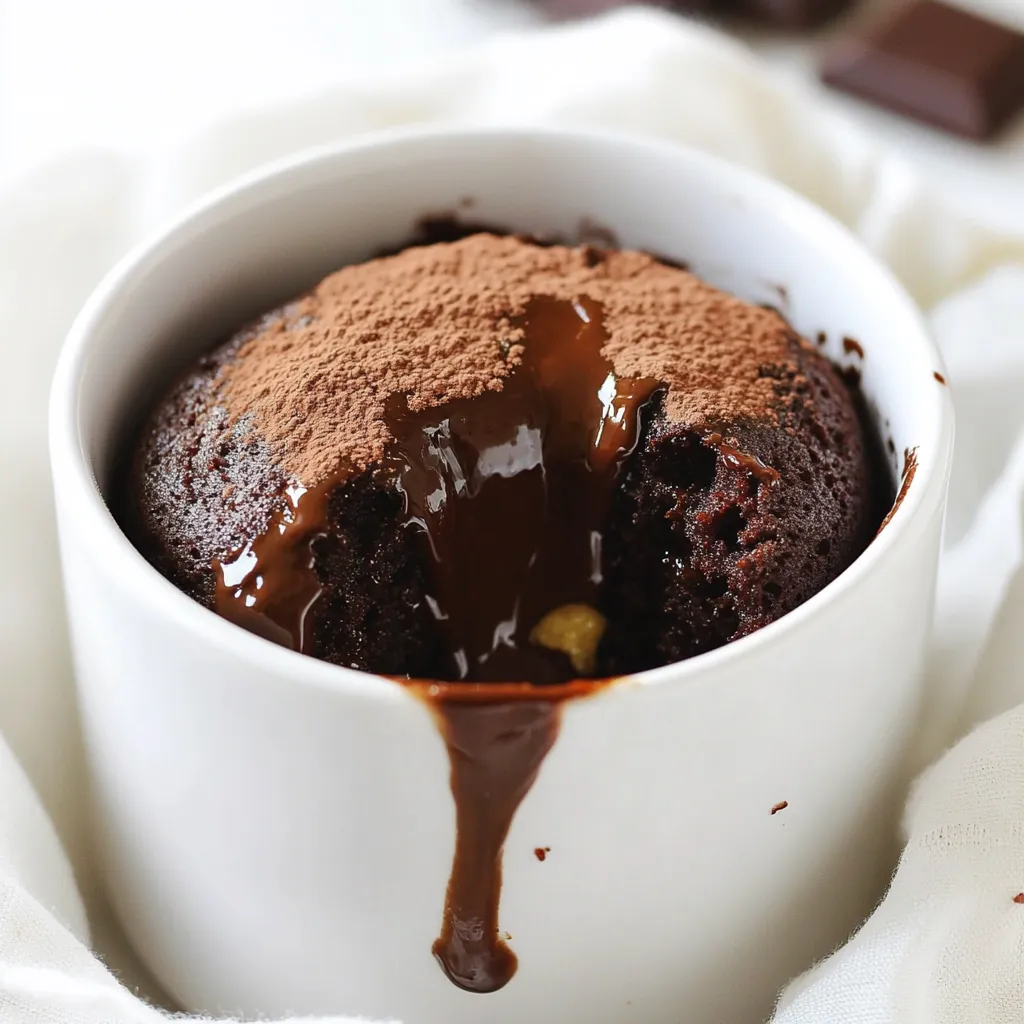
Are you craving something sweet but short on time? You’ll love this easy Chocolate Lava Mug Cake, ready in just

- 1 lb ground beef - 1 cup onion, diced - 2 cloves garlic, minced - 1 can (15 oz) kidney beans, rinsed and drained - 1 can (15 oz) diced tomatoes with green chilies - 1 cup corn kernels (fresh or frozen) - 1 cup uncooked elbow macaroni - 2 cups beef broth - 1 tablespoon chili powder - 1 teaspoon cumin - Salt and pepper to taste - 1 cup shredded cheddar cheese - Fresh cilantro or parsley for garnish For this recipe, accuracy matters. Each ingredient has a specific role. - I use 1 pound of ground beef for a rich taste. - One cup of diced onion adds sweetness. - Two cloves of minced garlic give a nice kick. - The kidney beans add protein and fiber. - The diced tomatoes with chilies bring heat and moisture. - Fresh or frozen corn adds sweetness and texture. - One cup of uncooked macaroni makes it hearty. - Two cups of beef broth keep it moist. - Chili powder and cumin add depth. - Salt and pepper balance the flavors. - Finally, one cup of shredded cheddar cheese tops it off perfectly. You can boost the dish with some extras. Here are a few ideas: - Add one chopped bell pepper for more color and crunch. - A teaspoon of smoked paprika gives a nice smoky touch. - Toss in some fresh jalapeños for heat. - For a touch of sweetness, mix in a tablespoon of brown sugar. - You can swap the cheddar for Monterey Jack for a creamier finish. These options let you make the dish your own. Enjoy creating your perfect hobo beef casserole! {{ingredient_image_1}} First, preheat your oven to 350°F (175°C). This step is key for even cooking. Grab a large skillet and put it on medium-high heat. You’ll want to cook the ground beef in this skillet. Add 1 pound of ground beef to the skillet. Cook it for about 5 to 7 minutes. Stir it often until it is nicely browned. Drain any fat that gathers in the pan. Next, add 1 cup of diced onion and 2 cloves of minced garlic. Sauté these for 3 to 4 minutes. You want the onion to turn soft and clear. Now, mix in 1 can of rinsed kidney beans, 1 can of diced tomatoes with green chilies, and 1 cup of corn. Add 1 cup of uncooked elbow macaroni and 2 cups of beef broth. Sprinkle in 1 tablespoon of chili powder, 1 teaspoon of cumin, and some salt and pepper. Stir everything well and bring the mixture to a simmer. Let it cook for about 5 minutes. This helps all the flavors blend together. Now it's time to put everything together. Pour the beef and macaroni mix into a greased 9x13-inch baking dish. Cover it tightly with aluminum foil. Bake it in the preheated oven for 25 minutes. After that, take off the foil and sprinkle 1 cup of shredded cheddar cheese on top. Return it to the oven and bake for another 10 to 15 minutes. You want the cheese to melt and bubble up. Once it is done, let the dish cool for a few minutes. You can then garnish it with fresh cilantro or parsley before serving. Enjoy your hearty hobo beef casserole! When cooking ground beef, always start with a hot pan. This helps brown the meat evenly. Break the beef apart as it cooks. Use a wooden spoon for this task. Drain excess fat after browning. This keeps your dish from being greasy. Season with salt and pepper while cooking. This builds flavor right from the start. To get that gooey, melted cheese topping, use shredded cheese. Shredded cheese melts better than slices. Add the cheese towards the end of baking. This keeps it from burning. Bake uncovered for about 10-15 minutes. Watch for the cheese to bubble and turn golden. Let it rest for a few minutes after baking. This makes serving easier and ensures it holds its shape. To boost the flavors in your casserole, try adding herbs. Fresh cilantro or parsley adds a bright touch. You can also mix in spices like smoked paprika for a smoky flavor. If you like heat, add some diced jalapeños. Consider using different beans for variety, like black beans or pinto beans. A splash of lime juice just before serving gives it a fresh kick. All these tips can make your Hobo Beef Casserole even more delicious! Pro Tips Use Lean Ground Beef: Opting for lean ground beef will reduce the amount of grease in your casserole, making it healthier and allowing the other flavors to shine. Mix in Extra Veggies: Feel free to add more vegetables like bell peppers, zucchini, or even spinach to increase the nutritional value and add more texture. Customize the Spices: Adjust the chili powder and cumin according to your spice preference. You can also add a pinch of cayenne for extra heat! Rest Before Serving: Allow the casserole to rest for about 5-10 minutes after baking. This will help it set and make it easier to serve. {{image_2}} You can easily make a vegetarian version. Replace the ground beef with lentils or mushrooms. Use vegetable broth instead of beef broth. This swap keeps the dish hearty and filling. You can also add extra beans or chickpeas for protein. Do you have food allergies? You can make simple swaps to fit your needs. For a dairy-free option, use vegan cheese. If you need gluten-free, swap elbow macaroni for gluten-free pasta. Ensure to check labels for safe ingredients. This way, everyone at the table can enjoy the meal. Want some heat? Add diced jalapeños or a pinch of cayenne pepper. For a mild version, skip the chili powder. You can also use sweet bell peppers instead. Adjust spices based on what your family likes best. Make it fun to explore flavors! After enjoying your Hobo Beef Casserole, let it cool down first. Store leftovers in an airtight container. This keeps it fresh and tasty. You can keep it in the fridge for up to three days. Make sure to label the date on the container. This way, you know when to eat it. To reheat, take a serving from the fridge. Place it in a microwave-safe dish. Cover it with a lid or microwave-safe wrap. Heat it on medium power for about 2-3 minutes. Stir halfway to heat evenly. If you prefer the oven, set it to 350°F (175°C). Bake for about 15-20 minutes. Check that it’s hot all the way through. If you want to keep it longer, freezing is a great option. Portion the casserole into smaller containers. This makes it easy to thaw only what you need. Wrap each container tightly with plastic wrap and aluminum foil. This prevents freezer burn. Label each container with the date. You can freeze it for up to three months. When ready to eat, thaw it overnight in the fridge before reheating. You can serve a salad or garlic bread with Hobo Beef Casserole. A fresh green salad adds crunch and color. You can also pair it with cornbread for a sweet touch. If you want something light, try steamed veggies. They balance the rich casserole well. Yes, you can make Hobo Beef Casserole ahead of time. Prepare the casserole, but do not bake it. Cover it and store it in the fridge for up to two days. When ready, just pop it in the oven. This saves time on busy nights. To make Hobo Beef Casserole gluten-free, swap the elbow macaroni for gluten-free pasta. You can find many brands that taste great. Check the beef broth to ensure it is gluten-free as well. With these changes, you can enjoy this dish safely. This blog post covered everything you need for a great Hobo Beef Casserole. You learned about the key ingredients and easy steps to make it. We also explored helpful tips to cook beef and get that cheese just right. You can try different versions, like vegetarian or spicy. Finally, I shared how to store and reheat leftovers. Making this dish can be fun and simple. Don’t be afraid to get creative with flavors. Enjoy your cooking adventure!

Hobo Beef Casserole Hearty and Simple Family Meal

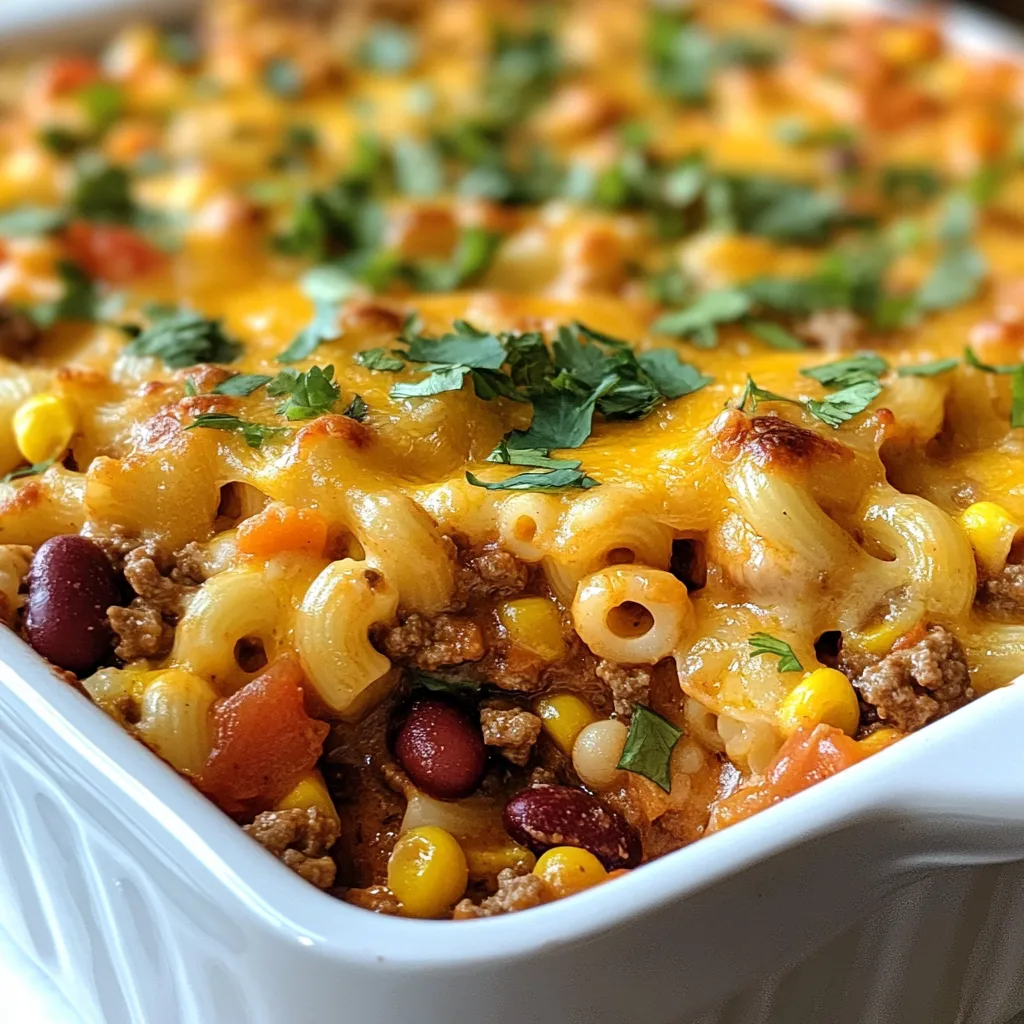
Looking for a hearty meal that your family will love? Hobo Beef Casserole is the perfect dish! It’s simple to

- 2 chicken thighs, boneless and skinless - 4 cups chicken broth - 2 packs of ramen noodles - 1 tablespoon sesame oil - 2 cloves garlic, minced - 1 small piece ginger, grated - 2 tablespoons soy sauce - 1 tablespoon chili paste (adjust to taste) - 1 teaspoon sugar - 1 cup baby spinach - 1 green onion, sliced For Fiery Chicken Ramen, you need fresh and bold flavors. The chicken thighs add rich taste. The chicken broth forms a warm base that brings it all together. Ramen noodles provide that fun, chewy texture. Sesame oil adds a nutty flavor that elevates the dish. Garlic and ginger give a tasty punch to the broth. Soy sauce adds depth, while chili paste kicks up the heat. Sugar balances the spice. Finally, baby spinach brings a splash of color and nutrients. - Soft-boiled eggs, for topping - Sriracha sauce, for drizzling - Toasted sesame seeds, for garnish Toppings can make your ramen special. Soft-boiled eggs add creaminess and protein. A drizzle of Sriracha gives extra heat and flavor. Toasted sesame seeds add crunch and a nutty finish. Feel free to mix and match toppings based on your taste! To make your ramen even spicier, consider these seasonings: - Red pepper flakes - Gochujang (Korean chili paste) - Chili oil - Hot sauce These spices can change your ramen game. Red pepper flakes bring heat without overpowering. Gochujang adds sweetness with a kick. Chili oil gives a bold flavor and a spicy aroma. Hot sauce is great for those who love heat! Adjust the amount to fit your spice level. Enjoy experimenting with flavors! {{ingredient_image_1}} First, heat the sesame oil in a large pot. Use medium heat. While the oil heats, season the chicken thighs with salt and pepper. Once the oil is hot, add the chicken to the pot. Cook each side for about 5-7 minutes. You want it fully cooked. Remove the chicken from the pot and slice it into bite-sized pieces. Set it aside for later. In the same pot, add the minced garlic and grated ginger. Sauté for about 30 seconds. This step builds great flavor. Then, pour in the chicken broth. Add the soy sauce, chili paste, and sugar. Bring the mixture to a simmer. Let it cook for 5 minutes. This time lets the flavors meld together. Now it’s time for the ramen noodles. Add them to the pot with the broth. Cook according to the package instructions. This usually takes about 3-4 minutes. Stir occasionally for even cooking. In the last minute, stir in the baby spinach. It will wilt quickly and add freshness. Finally, divide the cooked noodles and broth into bowls. Top with the sliced chicken, soft-boiled eggs, and green onion. Drizzle Sriracha on top for extra heat. Sprinkle with toasted sesame seeds for crunch. Enjoy your fiery chicken ramen! For soft-boiled eggs, start with fresh eggs. Bring a pot of water to a gentle boil. Carefully add the eggs, cooking them for exactly six minutes. Once done, place the eggs in ice water for a few minutes. This stops the cooking process. Peel the eggs and slice them in half. They should have a creamy yolk, perfect for your ramen. To control the heat in your ramen, start with one tablespoon of chili paste. Taste the broth and decide if you want more spice. You can add more chili paste a little at a time. If it gets too hot, add a touch of sugar or more broth to balance it. Always remember, you can add spice, but you cannot take it away. For a rich and tasty broth, use high-quality chicken broth. Sauté garlic and ginger until they smell amazing before adding the broth. The soy sauce adds depth, while the sugar balances the flavors. Let the broth simmer for at least five minutes. This helps all the flavors blend well. Don’t rush this step; it makes a big difference. Pro Tips Use Fresh Ingredients: Fresh garlic and ginger will give your broth a vibrant flavor that enhances the overall dish. Control the Heat: Adjust the amount of chili paste to your preferred spice level, ensuring it complements rather than overwhelms the other flavors. Perfect the Soft-Boiled Egg: For the best texture, boil eggs for 6-7 minutes and then plunge them into ice water to stop the cooking process. Garnish for Flavor: Adding toasted sesame seeds and fresh green onions at the end not only enhances presentation but also adds extra layers of flavor. {{image_2}} You can make this ramen vegetarian or vegan easily. Swap the chicken for tofu or tempeh. Use vegetable broth instead of chicken broth. Add more veggies like mushrooms, carrots, and bell peppers. These will add flavor and texture. If you want to change the protein, try shrimp or beef. Thinly sliced pork also works well. You can even use cooked chicken from a rotisserie for quick prep. Each protein gives a different taste, so explore what you like best. Toppings can really change your ramen game! Try adding corn, bamboo shoots, or seaweed. You can also use spicy pickled vegetables for extra heat. For crunch, add fried shallots or crushed peanuts. The options are endless, so have fun with your bowl! To keep your Fiery Chicken Ramen fresh, store it in an airtight container. Make sure it cools down first. Place it in the fridge if you plan to eat it within three days. If you want it to last longer, consider freezing it. When you want to enjoy your ramen again, heat it gently. Pour the ramen into a pot and add a splash of water or broth. Heat on medium-low, stirring often. This helps keep the noodles from becoming mushy. To freeze your ramen, first, separate the broth from the noodles. Place both in separate containers. You can freeze the broth for up to three months. The noodles can also freeze, but they may lose some texture. When ready to eat, thaw both and reheat as mentioned above. Fiery Chicken Ramen is a spicy noodle soup. It features tender chicken, rich broth, and ramen noodles. You can customize it with toppings like soft-boiled eggs and green onions. This dish blends flavors from Japan with a kick of heat. The spiciness comes from chili paste and Sriracha. You can adjust these ingredients to fit your taste. Start with less chili paste if you prefer mild flavors. You can always add more heat later. Yes, you can prepare the broth and chicken ahead of time. Store them in the fridge for up to three days. Cook the ramen noodles fresh when you're ready to eat. This keeps the noodles from getting soggy. Some great sides include steamed dumplings or a simple salad. You can also try pickled vegetables for a tangy crunch. These sides balance the heat and add variety to your meal. Look for ramen shops that focus on spicy dishes. Many Japanese restaurants offer specialty ramen. You can also check online reviews for local favorites. Fiery Chicken Ramen is a tasty dish with bold flavors. We discussed main ingredients, like chicken and seasonings, and optional toppings to enhance your bowl. I shared step-by-step instructions to prepare the chicken, the broth, and the ramen noodles. You learned tips for perfect soft-boiled eggs and how to store leftovers. Now, you can create your own spicy ramen at home. Enjoy trying different options and making it uniquely yours. Cooking can be fun, so dive in and savor every bite!

Fiery Chicken Ramen Spicy and Flavorful Bowl Delight

Are you ready to spice up your dinner routine? This Fiery Chicken Ramen is a bowl of bold flavors and

- Chicken Thighs - 4 boneless, skinless chicken thighs - Sauce Ingredients - 1/2 cup honey - 1/4 cup soy sauce (or tamari for gluten-free) - 4 cloves garlic, minced - 1 tablespoon fresh ginger, grated - 1 teaspoon sesame oil - 1/2 teaspoon red pepper flakes (adjust for spice level) - 1/2 cup chicken broth - Vegetables and Garnishes - 1 cup green beans, trimmed - 1 tablespoon cornstarch mixed with 1 tablespoon cold water (for thickening) - Sesame seeds and sliced green onions for garnish In this recipe, chicken thighs are the star. They stay juicy and tender during cooking. Honey adds a nice sweetness. Soy sauce gives it a savory touch. Garlic and ginger bring a punch of flavor. The sesame oil adds a subtle nutty taste. Red pepper flakes can spice things up. Chicken broth keeps everything moist. For veggies, green beans are a great choice. They add color and crunch. The cornstarch thickens the sauce, making it rich and sticky. Lastly, sesame seeds and green onions brighten up your dish for serving. {{ingredient_image_1}} Preparing the Chicken Start with four boneless, skinless chicken thighs. Place these thighs in the bottom of your slow cooker. Make sure they fit snugly. This helps them cook evenly. Mixing the Sauce In a bowl, mix together half a cup of honey, a quarter cup of soy sauce, four minced garlic cloves, one tablespoon of grated ginger, one teaspoon of sesame oil, and half a teaspoon of red pepper flakes. Stir this mixture well. The sauce will be sweet and savory. Combining Ingredients in the Slow Cooker Pour the honey garlic sauce over the chicken thighs. Then, add half a cup of chicken broth to the slow cooker. Make sure the chicken is fully coated in the sauce. This will keep it juicy and flavorful. Cooking Times and Temperatures Cover the slow cooker. Cook the chicken on low for six to seven hours. If you're short on time, you can cook it on high for three to four hours. The chicken will be ready when it's tender and easy to shred. Adding Vegetables In the last thirty minutes of cooking, add one cup of trimmed green beans to the slow cooker. Stir the beans into the sauce. They will cook quickly and add a nice crunch. Thicken the Sauce Once the cooking time is up, take out the chicken thighs and set them aside. Stir one tablespoon of cornstarch mixed with one tablespoon of cold water into the sauce. Turn the heat to high. Let it thicken for about ten to fifteen minutes. Stir occasionally to avoid lumps. Shredding the Chicken While the sauce thickens, shred the chicken with two forks. It should pull apart easily. This will help it soak up more sauce. Plating the Dish Serve the honey garlic chicken warm over a bed of rice or quinoa. Place the shredded chicken on top, and make sure to drizzle some thickened sauce over it. Garnishing Ideas Finish your dish with a sprinkle of sesame seeds and sliced green onions. This adds a nice touch and a pop of color. Enjoy your tasty meal! - Ensuring Chicken Tenderness: Use boneless, skinless chicken thighs. They stay moist and tender. Cook on low for 6-7 hours for best results. This slow cooking method helps the chicken soak up all that tasty sauce. - Adjusting Spice Levels: If you want more heat, add extra red pepper flakes. Start small and taste as you go. You can always add more, but it's hard to take it out! - Best Sides to Serve: Steamed rice or quinoa pairs perfectly with this dish. They soak up the sauce well. You can also serve with a fresh salad for some crunch. - Presentation Hacks: For a pretty plate, use shallow bowls. Place the chicken on top of the rice, then arrange green beans beside it. Drizzle sauce over the top and sprinkle with sesame seeds and green onions for color. - Using Different Types of Slow Cookers: Most slow cookers work well for this recipe. If you have a newer model, check the manual for cooking times. They may cook a bit faster. - Alternative Cooking Times: If you are short on time, cook on high for 3-4 hours. The chicken will still be tender but check it early to avoid overcooking. Pro Tips Use Fresh Ingredients: Fresh garlic and ginger can significantly enhance the flavor profile of your dish, making it more aromatic and delicious. Adjust the Spice Level: Feel free to modify the amount of red pepper flakes according to your spice tolerance. For a milder dish, reduce the flakes or omit them entirely. Thicken to Taste: If you prefer a thicker sauce, add more cornstarch mixed with water as needed. Just remember to let it simmer a bit longer for the best results. Meal Prep Friendly: This dish is great for meal prep! Store leftovers in airtight containers for up to 4 days in the refrigerator, or freeze for longer storage. {{image_2}} Using Different Cuts of Chicken You can use chicken breasts instead of thighs. Breasts cook faster, so check them after 3 hours on high. You can also try chicken drumsticks for a juicy option. They add more flavor but may need longer cooking time. Gluten-Free Options To make this dish gluten-free, use tamari instead of soy sauce. This swap keeps the same great taste. Always check labels on honey and broth for hidden gluten. Adding Vegetables You can easily add more veggies for fun. Try bell peppers, carrots, or snap peas. Add them in the last hour of cooking to keep them crisp. They boost nutrition and color for a beautiful plate. Using Different Sauces Mix it up with different sauces! Try using teriyaki sauce for a sweet twist. You could also add a splash of orange juice for a citrus kick. Experimenting with flavors keeps the dish fresh and exciting. Instant Pot Version If you own an Instant Pot, this recipe can be done in just 30 minutes. Use the sauté function for the sauce, then add the chicken and broth. Seal the lid and cook on high pressure for 10 minutes. Quick and tasty! Stovetop Adaptation You can also make this on the stovetop. Start by browning the chicken in a pan. Add the sauce and broth, then cover and simmer for about 30 minutes. This method gives you a nice sear and rich flavor. After you enjoy your slow cooker honey garlic chicken, you can store the leftovers. Place the chicken in a container and cover it well. Refrigerate the chicken within two hours of cooking. This keeps it fresh and safe. For the best results, use airtight containers. Glass or plastic containers work great. They help keep the chicken moist and tasty. If you want to save the honey garlic chicken for later, freezing is a good option. Allow the chicken to cool completely before freezing. This helps prevent ice crystals from forming. Use freezer-safe bags or containers to store the chicken. Remove as much air as possible to avoid freezer burn. The chicken can last in the freezer for up to three months. When it's time to enjoy your leftover chicken, reheating it properly is key. You can use the microwave, stovetop, or oven. For the microwave, place the chicken in a bowl and cover it. Heat it in short bursts, stirring in between. This helps heat it evenly. If you use the stovetop, put the chicken in a pan over low heat. Add a splash of chicken broth to keep it moist. Stir it often until warmed through. For the oven, preheat it to 350°F (175°C). Place the chicken in an oven-safe dish, cover it with foil, and heat for about 20 minutes. To keep the chicken moist, adding a bit of broth or sauce while reheating helps. This prevents the chicken from drying out. Enjoy your meal again! Can I use chicken breasts instead of thighs? Yes, you can use chicken breasts. They will cook faster. Keep an eye on the time. Breasts may dry out if cooked too long. How do I make this recipe spicier? To add heat, increase the red pepper flakes. You can also add sliced fresh chili peppers. This will boost the flavor and heat. What is the best way to thicken the sauce? Mix cornstarch with cold water. Add this to the sauce and cook on high. Stir until the sauce thickens to your liking. Calories and Macronutrients This dish has about 350 calories per serving. It contains protein, carbs, and healthy fats. Chicken provides lean protein while honey adds natural sugars. Dietary Considerations This recipe is great for many diets. Use tamari for gluten-free. Adjust honey for lower sugar options if needed. How many servings does this recipe make? This recipe makes four servings. It’s perfect for family meals or meal prep. Can I scale the recipe up or down? Yes, you can adjust the amounts. Just keep the same ratios for the sauce. This way, the flavors stay balanced. This article covers everything you need for a delicious slow-cooker dish. We discussed key ingredients, step-by-step cooking instructions, and helpful tips for great results. You can adjust spices and try new flavor combos, too. Storing leftovers properly ensures you enjoy every bite later. With these ideas, you can create a tasty meal for any occasion. Keep experimenting with variations to find your favorite. Cooking should be fun and rewarding, so enjoy the process and share your success!

Slow Cooker Honey Garlic Chicken Easy and Tasty Meal

Are you ready to impress your family with a simple and delicious meal? My Slow Cooker Honey Garlic Chicken is

Older posts
Newer posts
← Previous Page1 … Page133 Page134 Page135 … Page144 Next →

dsad

© 2025 So Yum Recipes • Built with GeneratePress

Our Policies

  • Copyright Policy
  • Cookie Policy
  • GDPR Policy
  • Privacy Policy
  • Disclaimer
  • Terms Of Use

More Information

  • Home
  • About
  • Contact
  • Appetizers
  • Dessert
  • Dinner
  • Drinks
©2025, So Yum Recipes About Back To Top