Skip to content
DisclaimerTerms Of UseGDPR PolicyCookie Policy

So Yum Recipes

  • Home
  • Drinks
  • Appetizers
  • Dinner
  • Dessert
  • About
  • Contact
  • Privacy Policy
DisclaimerTerms Of UseGDPR PolicyCookie Policy

Chloe

For the Low Carb Philly Cheesesteak Casserole, you will need: - 1 lb. thinly sliced beef (like flank steak or sirloin) - 1 medium onion, thinly sliced - 1 green bell pepper, thinly sliced - 1 tablespoon olive oil - 2 cloves garlic, minced - 1 cup heavy cream - 1 ½ cups shredded provolone cheese - 1 cup shredded mozzarella cheese - 1 teaspoon paprika - 1 teaspoon Italian seasoning - Salt and pepper to taste - Fresh parsley, chopped (for garnish) This casserole is low in carbs, making it great for those on keto or low-carb diets. It is also gluten-free since it does not use bread. The heavy cream and cheese provide a good source of fat, which many low-carb diets favor. However, if you have dairy allergies, you may want to substitute cream and cheese with lactose-free options. To make your casserole even tastier, consider adding: - Sliced mushrooms for a rich, earthy flavor. - Jalapeños for a spicy kick. - Worcestershire sauce for added umami depth. - Fresh herbs like thyme or oregano for more aroma. - A splash of beef broth to enhance the beef flavor. These additions can elevate your dish and make it your very own. Enjoy experimenting with these flavor boosters! {{ingredient_image_1}} First, set your oven to 350°F (175°C). This step is key for even cooking. Preheating helps the casserole cook right. Next, take a large skillet and add a tablespoon of olive oil. Heat it over medium. Slice one medium onion and one green bell pepper thinly. Add them to the skillet. Cook until soft, about 5-7 minutes. Then, add two minced garlic cloves. Stir for one more minute. This brings out all the great flavors. Once done, remove the veggies and set them aside. Now, use the same skillet for the beef. Add one pound of thinly sliced beef. Season with salt, pepper, one teaspoon of paprika, and one teaspoon of Italian seasoning. Cook for 5-8 minutes. Stir often to break apart the meat. You want it browned and cooked through. In a mixing bowl, combine one cup of heavy cream and the cooked vegetables. Add ¾ cup of shredded provolone cheese to the mix. Then, stir in the cooked beef until everything is mixed well. This step makes each bite full of flavor. Transfer the beef and veggie mix into a greased 9x13 inch baking dish. Spread it out so it’s even. Next, top it off with the remaining provolone cheese and one cup of shredded mozzarella cheese. This will give you a nice cheesy topping. Now, place the baking dish in the oven. Bake for 25-30 minutes. Look for bubbly and golden cheese on top. This is when the casserole is ready to come out. Once baked, take it out of the oven. Let it cool for a few minutes. This helps with serving. Garnish with chopped fresh parsley for a pop of color. Now, it’s time to enjoy your low-carb Philly cheesesteak casserole! To get that gooey cheese topping, use a mix of provolone and mozzarella. This blend gives great flavor and nice texture. Add the provolone to the beef mix and save the mozzarella for the top layer. Bake until the cheese bubbles and turns golden. This gives a nice crust that everyone will love. For tender beef, slice it thin. Use flank steak or sirloin for the best results. Make sure to season it well while cooking. This adds flavor and helps keep it juicy. Cook it just until it's browned, about 5-8 minutes. Overcooking can make it tough, so keep an eye on it. To save time, you can prep some ingredients ahead. Slice the onions and peppers the night before. This way, they are ready to go when you start cooking. You can also use pre-sliced beef if it’s available. This cuts down your prep time and makes the dish easier to put together. Pro Tips Tip for Beef Selection: Choose high-quality cuts like flank steak or sirloin for a tender and flavorful casserole. Tip for Creaminess: For an extra creamy texture, consider adding a little cream cheese to the heavy cream mixture. Tip for Vegetables: Feel free to mix in other vegetables like mushrooms or spinach for added nutrition and flavor. Tip for Cheese: Experiment with different cheese blends, such as cheddar or gouda, for unique flavor twists. {{image_2}} You can swap the beef for other meats. Try thinly sliced chicken or turkey. These options work well and keep the dish tasty. You can also use ground beef or turkey for a different texture. For a fun twist, try pork. Each protein brings its own flavor, making your casserole unique. To make this dish vegetarian, replace the beef with mushrooms or tempeh. Both options add a hearty feel. Use vegetable broth in place of heavy cream for a vegan version. Nutritional yeast adds a cheesy flavor without dairy. You can also load up on veggies like zucchini or eggplant to add more depth. If you like heat, add red pepper flakes or jalapeños to your meat mix. These spices will give your casserole a kick. For a milder taste, leave out any hot ingredients. You can also add sweet bell peppers for a nice balance. Adjusting spice levels helps you create your perfect casserole. To keep your Low Carb Philly Cheesesteak Casserole fresh, let it cool first. Place it in an airtight container. This will keep out moisture and odors. Store it in the fridge for up to three days. If you need to store it longer, freezing is a great option. When you're ready to enjoy the casserole again, take it out of the fridge. Preheat your oven to 350°F (175°C). Cover the casserole with foil. This will prevent it from drying out. Heat for about 20-25 minutes. Make sure it's hot all the way through. You can also reheat individual portions in the microwave for about 1-2 minutes. To freeze your casserole, first let it cool completely. Cut it into portions, if you want. Wrap each piece tightly in plastic wrap. Then place them in a freezer-safe bag or container. Label it with the date. The casserole can be frozen for up to three months. When you are ready to eat, thaw it in the fridge overnight before reheating. Yes, you can prepare this casserole ahead of time. Cook the beef and veggies, then mix them with the cream and cheese. Store everything in the fridge. When you're ready, just layer it in the dish and bake. This saves time on busy nights. Many low-carb sides work great with this casserole. Here are a few ideas: - Cauliflower rice - Zucchini noodles - Steamed broccoli - Salad with low-carb dressing These sides complement the rich flavors of the casserole while keeping your meal low in carbs. You can easily change this recipe. Try using different meats like chicken or turkey. Add more veggies like mushrooms or spinach for extra nutrition. You can also swap the cheeses. Use cheddar or gouda for a different flavor. Make it your own! Absolutely! This casserole is perfect for meal prep. You can divide it into portions and store them in containers. It reheats well, making it a great choice for quick lunches or dinners. This low-carb casserole is packed with protein from the beef and cheese. It also has healthy fats from the heavy cream and olive oil. The veggies add fiber and vitamins. Overall, it’s a balanced dish that supports a low-carb lifestyle. This blog post covered the main parts of making a great casserole. We looked at key ingredients, cooking steps, and ways to enhance flavor. I shared tips for perfect cheese and tender beef. You can customize the dish for your taste, too. In the end, casseroles are a great way to explore flavors and make meals easy. Now, you’re ready to create a delicious dish that everyone will love. Enjoy your cooking!

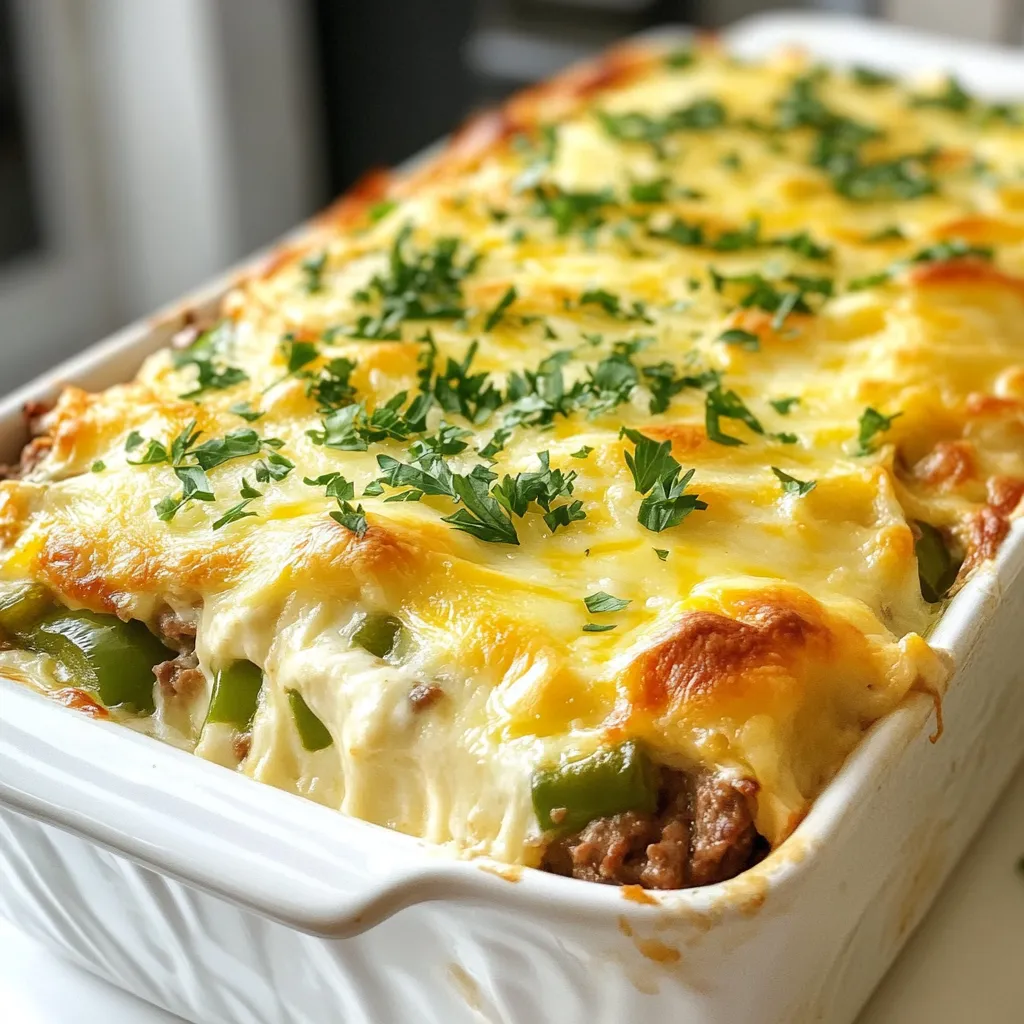
Low Carb Philly Cheesesteak Casserole Delight

Craving a hearty meal that fits your low-carb lifestyle? You’ve found it! This Low Carb Philly Cheesesteak Casserole packs all

- 4 salmon fillets - 2 tablespoons olive oil - 2 lemons (1 sliced into rounds, 1 juiced) - 3 cloves garlic, minced - 1 teaspoon dried oregano - 1 teaspoon dried thyme - Salt and pepper to taste - 1 cup cherry tomatoes, halved - 1 cup asparagus, trimmed - Fresh parsley, for garnish The ingredients for this dish are simple yet full of flavor. The salmon fillets form the base of the meal. Fresh lemons add a bright and zesty taste. I love using two lemons—one for juice and one for slices. The garlic gives a nice kick that pairs well with the herbs. For seasoning, I opt for dried oregano and thyme. They add depth without overwhelming the dish. Salt and pepper are key to enhancing all the flavors. For the veggies, I choose cherry tomatoes and asparagus. They roast well and balance the meal. Plus, their colors make the dish look beautiful. Finally, fresh parsley adds a pop of green. It makes each plate look fresh and inviting. These ingredients come together to create a meal that is both easy and delicious. {{ingredient_image_1}} 1. First, preheat your oven to 400°F (200°C). This heat makes the salmon cook just right. 2. Line a baking sheet with parchment paper. This helps with easy cleanup later. 3. In a small bowl, whisk together the olive oil, lemon juice, minced garlic, dried oregano, dried thyme, salt, and pepper. Mix until combined. This will be your tasty marinade. 1. Place the salmon fillets on the prepared baking sheet, skin side down. This helps keep the fish moist. 2. Brush the salmon fillets with the lemon herb mixture. Make sure to cover them well. 3. Arrange lemon slices on top of the salmon. They add flavor and look nice. 4. In another area on the baking sheet, add the halved cherry tomatoes and trimmed asparagus. Drizzle them with a bit more olive oil and season with salt and pepper, just like the salmon. 1. Bake everything in the preheated oven for about 12 to 15 minutes. You want the salmon to flake easily with a fork. The veggies should be tender. 2. Once done, take the baking sheet out of the oven and let it rest for a minute. This helps the flavors settle. 3. Garnish the dish with fresh parsley before serving. It adds a burst of color and flavor. To ensure your salmon stays moist, I recommend brushing it with the lemon herb mixture. This adds flavor and keeps the fish juicy. Don't skip the lemon slices on top. They not only taste great but also add moisture as the salmon bakes. For herbs, I love using oregano and thyme. These herbs bring a nice earthy flavor to the dish. You can also try dill or rosemary if you want to mix it up. Just remember to chop them fresh for the best taste. Timing is key for perfectly roasted asparagus and tomatoes. Asparagus cooks fast, so add it to the baking sheet five minutes after the salmon goes in. The tomatoes can roast for the same time as the salmon, so place them all on the sheet from the start. If you don’t have asparagus or cherry tomatoes, try broccoli or bell peppers instead. Both roast well and add a lovely color to the dish. For side dishes, a light salad pairs nicely with the salmon. A simple green salad with lemon vinaigrette works great. You can also serve it with rice or quinoa for a filling meal. When plating your salmon, place the fillet in the center of the plate. Arrange the roasted veggies around it. A sprinkle of fresh parsley on top adds a pop of color and freshness. Serve with lemon wedges for an extra zing! Pro Tips Use Fresh Herbs: Fresh herbs enhance the flavor of your salmon. If you have access to fresh oregano and thyme, consider using them instead of dried for a more vibrant taste. Perfect Salmon Cooking Time: Keep an eye on the salmon while it bakes. Depending on the thickness of the fillets, cooking time may vary slightly, so check for doneness at the 10-minute mark. Customize Your Veggies: Feel free to swap in your favorite vegetables. Zucchini, bell peppers, or even broccoli work beautifully in this dish and can be seasoned similarly. Rest Your Salmon: Letting the salmon rest for a minute after baking allows the juices to redistribute, resulting in a moister and more flavorful fillet. {{image_2}} You can swap salmon for other proteins. Chicken works well here. Tofu is a great choice for plant-based diets. When using chicken, cut it into thin pieces. This helps it cook quickly. For chicken, bake for 20-25 minutes. Tofu needs about 15-20 minutes to cook. You can change the flavors to keep it exciting. Try using fresh herbs instead of dried ones. Basil or dill adds fresh tastes. You can also mix in spices like paprika or cumin. For a citrus twist, use lime or orange juice instead of lemon. This gives a new flavor profile that surprises your taste buds. You don’t have to bake this dish; grilling is another option. Grilling gives a smoky flavor that’s delicious. If you need a faster method, try a skillet. Heat some oil in a pan. Cook the salmon and veggies for about 10 minutes. This method is quick and easy for busy nights. To keep your sheet pan lemon herb salmon fresh, store it in the fridge. Place the salmon and veggies in an airtight container. They will stay good for up to three days. Make sure to let the dish cool before sealing. If you want to save it for later, freezing is an option. Wrap each salmon fillet in plastic wrap, then place in a freezer-safe bag. It can last for up to three months in the freezer. When it’s time to eat your leftovers, you can choose to microwave or use the oven. For the microwave, place the salmon on a plate and cover it with a damp paper towel. Heat in 30-second bursts until warm. For the oven, preheat to 350°F. Place the salmon on a baking sheet and cover it with foil. Heat for about 10 minutes. This helps keep the salmon moist. Always check that it’s warm all the way through. If you have a busy week ahead, meal prep is a great choice. You can make this dish ahead of time. Cook the salmon and veggies, then divide them into single servings. Store each serving in a container. This way, you can grab a healthy meal on the go. If you want more variety, prepare extra veggies or add a side salad. This makes meals fun and easy! How long to bake salmon at 400°F? You should bake salmon for about 12-15 minutes at 400°F. It will be done when it flakes easily with a fork. Keep an eye on it, so it doesn't dry out. Can I use frozen salmon for this recipe? Yes, you can use frozen salmon! Just make sure to thaw it first. You can thaw it overnight in the fridge or quickly in cold water. This helps the salmon cook evenly. Gluten-free options available? This recipe is naturally gluten-free. All the ingredients are safe for those with gluten issues. You can enjoy this dish without worry! Dairy considerations for the recipe This recipe does not use any dairy. It's perfect if you're lactose intolerant or just want a dairy-free meal. Feel free to enjoy it guilt-free! What is the best way to tell if salmon is done? The best way is to check for flakiness. Use a fork to gently pull apart the salmon. If it flakes easily, it's done. You can also check the color; it should be opaque. How to make the dish spicier or more flavorful? To add spice, try adding a pinch of red pepper flakes to the marinade. You can also add some hot sauce or chili powder. For extra flavor, mix in fresh herbs or citrus zest! This blog post covered a simple and tasty salmon recipe. We explored the main ingredients, steps for baking, and helpful tips for perfecting your dish. You saw how to vary the recipe and store leftovers for later. Remember, cooking is about creativity and enjoying the process. Try different proteins and flavors to find what you love. Embrace your cooking journey. Each meal is a chance to learn and share with others. I hope you enjoy making this delicious dish as much as I do!

Sheet Pan Lemon Herb Salmon Flavorful and Easy Dish

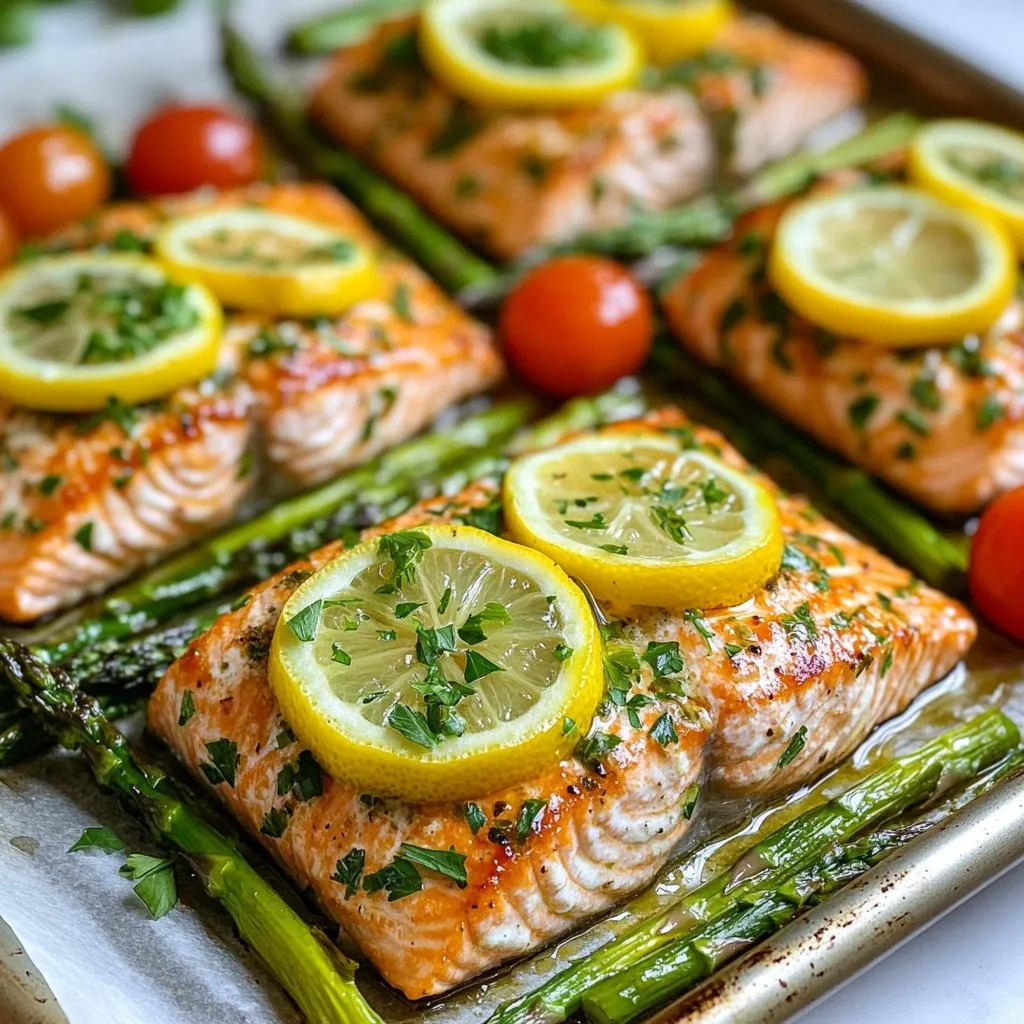
Looking for a simple and tasty meal? Try my Sheet Pan Lemon Herb Salmon! This easy dish combines juicy salmon,

To make creamy lasagna soup, you will need the following ingredients: - 1 tablespoon olive oil - 1 onion, chopped - 2 cloves garlic, minced - 1 pound ground beef or turkey - 1 teaspoon Italian seasoning - 1 can (15 ounces) tomato sauce - 4 cups chicken or vegetable broth - 8 ounces lasagna noodles, broken into pieces - 1 can (14.5 ounces) diced tomatoes, undrained - Salt and pepper to taste - 1 cup ricotta cheese - 1 cup shredded mozzarella cheese - 1/2 cup grated Parmesan cheese - Fresh basil leaves for garnish Each ingredient plays a vital role in this dish. The olive oil and onion kick things off, adding a nice base of flavor. Garlic brings in depth, while the ground meat adds heartiness. Italian seasoning gives it that classic Italian taste. Tomato sauce and diced tomatoes add richness and sweetness, and the broth makes the soup base. Lasagna noodles are crucial for that classic texture, while the cheeses provide creaminess and a rich finish. Finally, fresh basil adds a pop of color and flavor. Gather these ingredients, and you're ready to create a delicious, hearty meal! {{ingredient_image_1}} - Sautéing the onion and garlic Start by heating 1 tablespoon of olive oil in a large pot over medium heat. Add 1 chopped onion and cook until it looks clear, about 5 minutes. Then, stir in 2 minced garlic cloves and cook for 1 more minute until it smells good. - Browning the meat Next, add 1 pound of ground beef or turkey. Use a spoon to break the meat apart. Cook it for about 6 to 8 minutes until it turns brown. Don't forget to drain any fat before moving on. - Combining ingredients Now, sprinkle in 1 teaspoon of Italian seasoning, 1 can (15 ounces) of tomato sauce, and 4 cups of chicken or vegetable broth. Mix it all together well. - Boiling and simmering the soup Bring the mixture to a boil. Once it boils, turn the heat down and add 8 ounces of broken lasagna noodles and 1 can (14.5 ounces) of diced tomatoes, with juice. Let it simmer for about 15 to 20 minutes or until the noodles are soft. - Adding noodles and seasoning Taste the soup and add salt and pepper as you like. It should be flavorful and tasty. - Adding the cheese mixture In a separate bowl, mix together 1 cup of ricotta cheese, 1 cup of shredded mozzarella cheese, and 1/2 cup of grated Parmesan cheese. When ready to serve, ladle the hot soup into bowls and add a big spoonful of this cheese mix on top. Stir it gently. - Garnishing with basil Finally, add fresh basil leaves on top for a nice touch. It adds color and flavor to your creamy lasagna soup. Enjoy! Choosing the right meat makes a big difference. Ground beef gives a rich taste. If you prefer a lighter option, use ground turkey. It’s leaner, but still tasty. Adjusting seasonings can enhance your soup. Start with the Italian seasoning. Add salt and pepper as needed. Taste while cooking to find the right balance. You can even add a pinch of red pepper flakes for heat. Ensuring noodles are cooked perfectly is key. Break the lasagna noodles into smaller pieces. This helps them cook evenly and blend well in the soup. Stir often to avoid sticking. The best way to incorporate cheese is to mix it in a bowl first. Combine ricotta, mozzarella, and Parmesan. This makes it easier to spoon into your soup. When you add it to the hot soup, it melts beautifully. Pro Tips Use Fresh Herbs: Adding fresh basil or oregano just before serving enhances the flavor and adds a pop of color. Customize Your Protein: Feel free to substitute ground beef with Italian sausage or a plant-based protein for a different taste profile. Layer the Cheese: For an extra cheesy experience, save some mozzarella to sprinkle on top just before serving, allowing it to melt into the hot soup. Make it Ahead: This soup can be made ahead of time and stored in the refrigerator. Just reheat gently and add fresh cheese before serving. {{image_2}} You can switch up the meat in this recipe. Ground turkey works well if you want a leaner option. You could even use chicken for a lighter touch. If you want a meatless dish, try using mushrooms or lentils. Both add great flavor and texture. Want to kick up the taste? Add more vegetables! Spinach, zucchini, or bell peppers can make this soup more colorful and healthy. You can also try different cheeses. Swap mozzarella for Gouda or cheddar for a unique flavor. Mixing in some feta can give it a nice twist, too. To keep your creamy lasagna soup fresh, place it in an airtight container. Make sure to cool the soup before sealing. Store it in the fridge for up to five days. If you need more time, consider freezing it. When reheating your soup, you have a few good options. You can use the stove or microwave. For the stove, heat it gently in a pot over low heat. Stir often to avoid sticking. If using the microwave, place the soup in a safe bowl. Heat it in short bursts, stirring in between. This helps keep the flavor and texture. Freezing your lasagna soup is easy. First, portion it into freezer-safe bags or containers. Leave some space at the top, as it can expand. Label each bag with the date to track freshness. Your soup can last up to three months in the freezer. When ready to eat, thaw it overnight in the fridge before reheating. Can I use gluten-free noodles? Yes, you can use gluten-free noodles. Look for brands that work well in soups. They should hold up in the broth without getting mushy. Just cook them as directed on the package. How do I make it spicier? To add spice, consider using crushed red pepper flakes or hot sauce. You can also add diced jalapeños for a fresh kick. Start with a little and taste as you go. Adjust until it meets your heat preference. Is it suitable for meal prep? Absolutely! This soup is great for meal prep. You can make a big batch and store it in the fridge. Just keep the cheese mixture separate until you are ready to eat. It will taste fresh all week. Caloric content per serving Each serving of this creamy lasagna soup has about 400-500 calories. This can vary based on the meat and cheese you use. Keep this in mind if you are watching your calorie intake. Healthier ingredient options You can swap ground beef for ground turkey or chicken for a leaner meal. Low-fat cheese options are available too. You can also add more veggies like spinach or zucchini for extra nutrients. This blog post covered everything you need to make a hearty lasagna soup. We looked at key ingredients, simple steps, and tips for perfect flavor and texture. I shared ideas for variations and storage methods, plus answers to frequently asked questions. Now, you have the tools to create a dish that warms the heart. Enjoy experimenting with flavors and share this recipe with others. Happy cooking!

Creamy Lasagna Soup Hearty and Flavorful Recipe

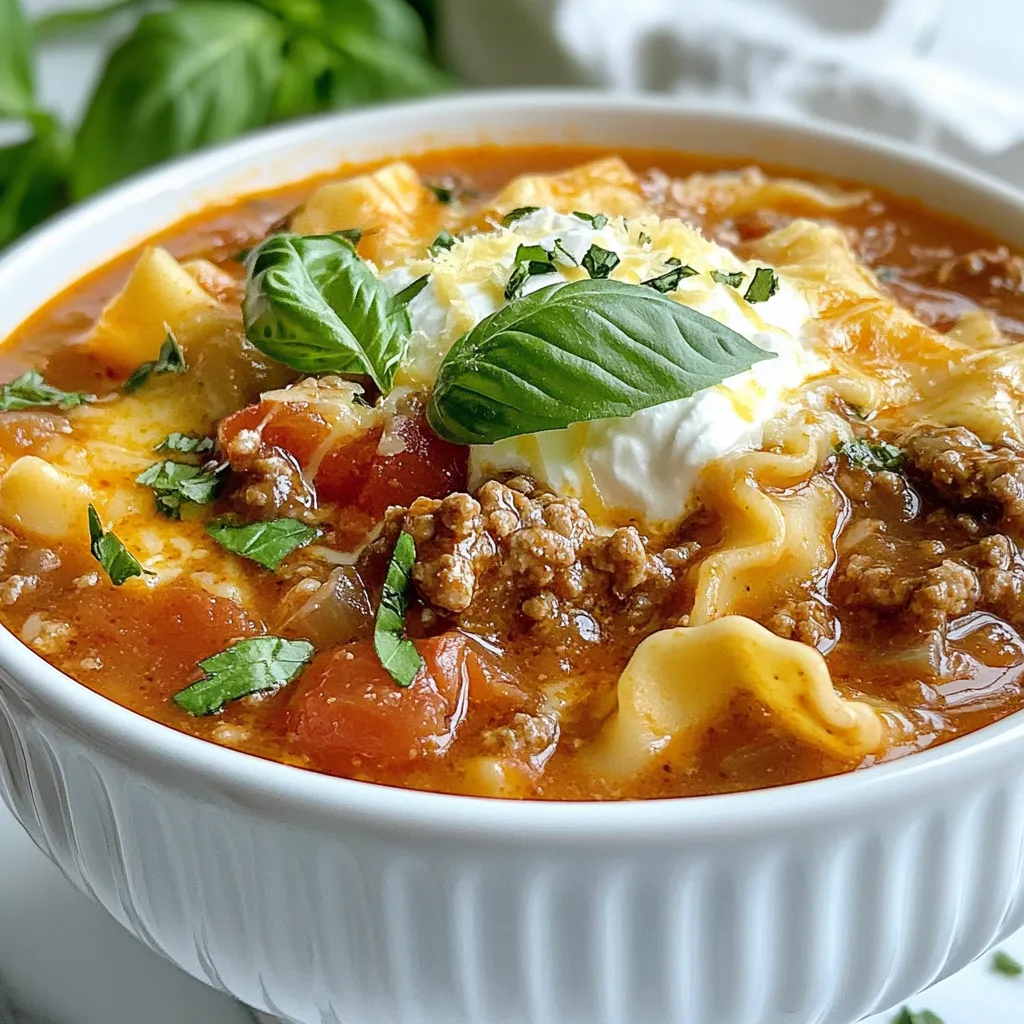
Craving a warm and hearty meal? This Creamy Lasagna Soup is the perfect choice. Packed with flavor and comfort, it

To make tasty white cheddar spinach chicken burgers, you will need: - 1 lb ground chicken - 1 cup fresh spinach, chopped - 1/2 cup white cheddar cheese, shredded - 1/4 cup breadcrumbs - 1 large egg - 2 cloves garlic, minced - 1 teaspoon onion powder - 1 teaspoon salt - 1/2 teaspoon black pepper - 1 tablespoon olive oil - 4 burger buns These ingredients blend well together. The ground chicken provides protein. The spinach adds color and nutrients. White cheddar gives a creamy, rich flavor. Breadcrumbs help bind the mix and add texture. You can make your burgers even better with these optional toppings: - Avocado slices - Sliced tomatoes - Lettuce - Additional white cheddar cheese These toppings add freshness and crunch. Use what you like or what you have on hand. Pair your burgers with these sides for a complete meal: - Sweet potato fries - Fresh salad Sweet potato fries add a nice sweetness. A salad keeps it light and healthy. You can also try different sides based on what you enjoy. {{ingredient_image_1}} In a large bowl, start with 1 pound of ground chicken. Add 1 cup of chopped spinach and 1/2 cup of shredded white cheddar cheese. Next, mix in 1/4 cup of breadcrumbs, 1 large egg, and 2 minced garlic cloves. Sprinkle 1 teaspoon of onion powder, 1 teaspoon of salt, and 1/2 teaspoon of black pepper into the mix. Use your hands to combine everything well until it forms a sticky mixture. This step ensures that all flavors blend together nicely. Once you mix the burger ingredients, divide the mixture into four equal parts. Shape each part into a patty that is about 3/4 inch thick. Make sure they are even in size for even cooking. Press your thumb lightly in the center of each patty. This helps them keep their shape while they cook. Set them aside on a plate while you heat up your skillet. Heat 1 tablespoon of olive oil in a non-stick skillet over medium heat. When the oil is hot, carefully place the patties in the skillet. Cook the burgers for 5 to 6 minutes without flipping. Look for a nice golden-brown color. After that, flip each burger and cook for another 5 to 6 minutes. Check the internal temperature. It should reach 165°F (75°C) and be no longer pink inside. For a melty finish, add extra white cheddar cheese on top during the last minute of cooking. Once done, take the burgers out and let them rest for a minute. If you like, toast the burger buns in the same skillet. This step adds extra flavor and crunch. Now, your burgers are ready to be assembled with your favorite toppings! To keep your chicken burgers juicy, start with fresh ground chicken. Fresh chicken has more fat, which helps with moisture. Add chopped spinach and cheese to the mix. These ingredients also add moisture and flavor. When you shape the patties, don’t overwork the meat. This keeps them light and tender. For even cooking, make sure the patties are the same thickness. I like to make them about 3/4 inch thick. This helps them cook evenly. Use medium heat on your skillet. Cooking too fast can burn the outside while keeping the inside raw. Flip the burgers only once, letting them cook well on each side. To perfectly melt the cheese, add it during the last minute of cooking. Place the shredded white cheddar on top of the patties. Cover the skillet with a lid to trap heat. This helps the cheese melt quickly and evenly. When the cheese is gooey, your burgers are ready to serve! Pro Tips Use Fresh Spinach: Opt for fresh spinach instead of frozen to ensure the best flavor and texture in your burgers. Don’t Overmix: Mix the ingredients just until combined to keep the burgers tender and not dense. Check Internal Temperature: Always use a meat thermometer to ensure the burgers reach an internal temperature of 165°F (75°C) for safety. Toast the Buns: Lightly toasting the buns in the skillet adds extra flavor and helps prevent them from getting soggy. {{image_2}} To add some heat, mix in 1-2 teaspoons of your favorite hot sauce. You can also add chopped jalapeños for a fresh kick. The spicy flavor works well with the white cheddar. Serve these spicy burgers with cooling toppings like avocado or sour cream. For a tasty vegetarian twist, swap the ground chicken for mashed chickpeas. Use the same spices and mix in chopped spinach and shredded white cheddar. Form the mixture into patties and cook as you would the chicken burgers. This option is hearty and packed with protein. While white cheddar shines in this recipe, feel free to experiment with other cheeses. Try pepper jack for a spicy flavor or feta for a tangy touch. You can also use mozzarella for a gooey melt. Each cheese brings its own unique taste, making the burger exciting every time. After cooking, let your burgers cool down to room temp. Place them in an airtight container. They will stay fresh in the fridge for up to three days. If you want them longer, consider freezing. To freeze your burgers, wrap each one tightly in plastic wrap. Then, place them in a freezer-safe bag or container. They can last up to three months in the freezer. Just remember to label the bag with the date! When you're ready to eat, you can reheat your burgers. Use the oven at 350°F. Place the burgers on a baking sheet and heat for about 10-15 minutes. You can also use a microwave. Just cover them with a damp paper towel to keep them moist. Heat for about 1-2 minutes, checking until warm. Enjoy your tasty burgers! Yes, you can use ground turkey in this recipe. Ground turkey is a lean meat option. It has a mild flavor, similar to chicken. Just keep in mind that turkey has less fat. This may affect the burger's juiciness. Adding a bit more cheese or olive oil can help keep it moist. If you want to skip breadcrumbs, there are many options. You can use crushed crackers or oats. Both will help bind the burger mix. If you need a gluten-free option, try almond flour or cornmeal. Each substitute will change the texture a bit, so experiment to find what you like best. To check if the burgers are done, use a meat thermometer. The internal temperature should reach 165°F (75°C). This ensures harmful bacteria are gone. If you don’t have a thermometer, cut a burger in half. The meat should be white, with no pink inside. When cooked, the burgers will be firm to the touch. We covered everything you need for delicious white cheddar spinach chicken burgers. You learned about the best ingredients, how to cook them just right, and tips to keep them juicy. We also shared fun variations and important storage info. These burgers are simple, tasty, and sure to impress. Experiment with toppings and sides to match your taste. Enjoy creating a meal that you and your loved ones will savor.

White Cheddar Spinach Chicken Burgers Recipe Delight

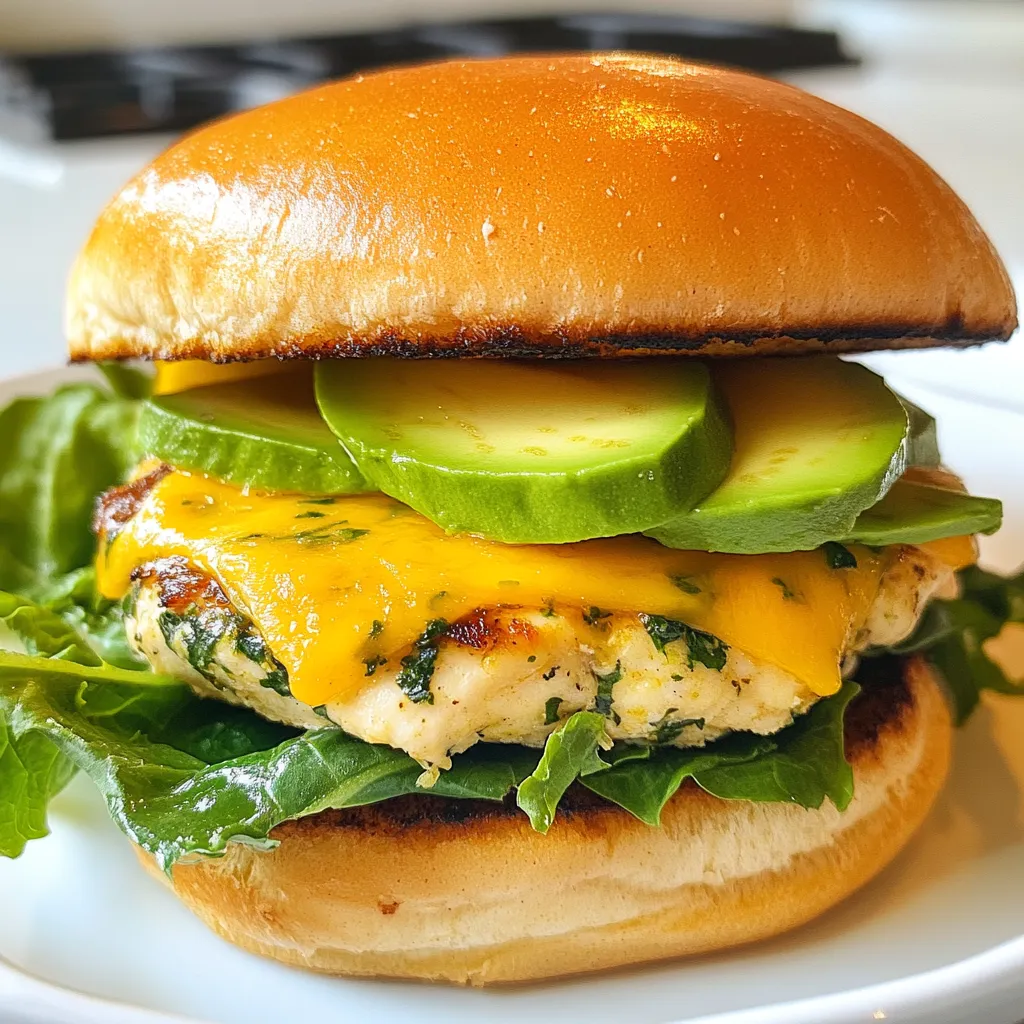
Are you ready to spice up your dinner routine? My White Cheddar Spinach Chicken Burgers are not just delicious; they

To make Keto Everything Bagel Bites, you will need: - 1 ½ cups shredded mozzarella cheese - 2 oz cream cheese, softened - 1 large egg - 1 cup almond flour - 1 teaspoon baking powder - 1 tablespoon everything bagel seasoning - ½ teaspoon garlic powder - ½ teaspoon onion powder - Salt, to taste Using the right brands can make a difference. Here are my top picks: - Mozzarella Cheese: Galbani or Sargento for great melt and taste. - Cream Cheese: Philadelphia for its creamy texture. - Almond Flour: Bob's Red Mill has a fine grind and great flavor. - Everything Bagel Seasoning: Trader Joe's has a fantastic blend. Knowing the nutrition can help you enjoy these bites guilt-free. Here’s what to expect per serving: - Calories: 120 - Fat: 9g - Protein: 7g - Carbohydrates: 3g - Fiber: 1g - Net Carbs: 2g These bites are not only delicious but also fit perfectly into your keto lifestyle! {{ingredient_image_1}} Start by preheating your oven to 375°F (190°C). This step is key for a nice crunch. While the oven heats, grab a baking sheet and line it with parchment paper. This will make cleanup easy. Next, you’ll make the dough. In a microwave-safe bowl, add 1 ½ cups of shredded mozzarella cheese and 2 oz of softened cream cheese. Microwave this mix in 30-second bursts. Stir between each round until the cheeses melt together. They should form a smooth blend. In another bowl, mix 1 large egg, 1 cup of almond flour, 1 teaspoon of baking powder, and seasonings like 1 tablespoon of everything bagel seasoning, ½ teaspoon of garlic powder, and ½ teaspoon of onion powder. Add a pinch of salt for taste. Now, pour the melted cheese into the dry mix. Use a spatula or your hands to combine everything. The dough will be sticky but should hold together. Divide this dough into 12 equal pieces. Roll each piece into a small ball. Place the dough balls on the lined baking sheet. Make sure to space them out evenly. For an extra burst of flavor, sprinkle more everything bagel seasoning on top of each ball. Bake them in your preheated oven for 12-15 minutes. Watch for them to turn golden brown and puff up nicely. Once baked, take them out and let the bagel bites cool for a few minutes before enjoying! To get that perfect crunch, use fresh ingredients. The cheese must be freshly shredded. Block cheese melts better than pre-shredded. Keep your dough moist but not sticky. This helps create a nice texture. When mixing, don’t overwork the dough. Mix until just combined for a light bite. Roll the dough into uniform balls for even cooking. Each bagel bite should be the same size. This helps them cook evenly and stay crunchy. One mistake is not preheating the oven. This step is key to achieving a nice rise. Another common error is using too much almond flour. Measure carefully to avoid dryness. If your dough feels dry, add a tiny bit of cream cheese. Do not skip the extra seasoning on top. It adds flavor and crunch. Avoid overcrowding the baking sheet. Space your bagel bites apart for proper air flow. This helps them crisp up nicely. Serve your bagel bites warm for the best taste. Pair them with low-carb dips for added flavor. Cream cheese or guacamole works great. For a fun twist, try adding herbs on top. These bites are perfect for parties or snacks. Store extras in an airtight container. Reheat them in the oven for a few minutes. This keeps their crunch intact. Enjoy your tasty, keto-friendly snack! Pro Tips Use Fresh Ingredients: Ensure your cream cheese and mozzarella are fresh for the best flavor and texture. Adjust Seasoning: Feel free to customize the everything bagel seasoning to your taste by adding more garlic or onion powder. Experiment with Add-ins: Try adding chopped herbs or cheese to the dough for a unique twist on flavor. Storage Tips: Store any leftovers in an airtight container in the fridge for up to 3 days; reheat in the oven for best results. {{image_2}} You can spice up your Keto Everything Bagel Bites with different seasonings. Try adding smoked paprika for a smoky flavor. You might also enjoy a pinch of chili powder for some heat. Mix in some dried herbs like oregano or basil for a touch of freshness. If you love cheese, consider adding grated Parmesan or cheddar to the dough. This change will give your bites a unique twist. Dipping sauces can take your bagel bites to the next level. A simple ranch dressing pairs well with the bites. You can easily make it at home with sour cream, garlic powder, and a bit of dill. A creamy cheese dip also works great. Just melt some cream cheese with spices for a rich dip. If you're feeling adventurous, try a low-carb marinara sauce. This adds a fun Italian vibe to your snack. While mozzarella is the classic choice, you can experiment with other cheeses. Cream cheese adds richness, while sharp cheddar gives a nice bite. If you want a stronger flavor, go for a blue cheese or feta. These cheeses will change the taste but keep it low-carb. Just remember, the texture may vary based on the cheese you use. You can store leftover Keto Everything Bagel Bites in an airtight container. Keep them in the fridge for up to three days. Make sure they cool completely before sealing. This helps avoid sogginess and keeps them crunchy. To freeze, place the bagel bites in a single layer on a baking sheet. Freeze them for about an hour. Once frozen, transfer them to a freezer-safe bag. They will last for up to three months. Label the bag with the date to track freshness. For the best taste, reheat in the oven. Preheat it to 350°F (175°C). Place the bagel bites on a baking sheet and heat for about 10 minutes. This keeps them crispy. You can also use an air fryer. Set it to 350°F (175°C) and heat for about 5 minutes. Enjoy your crunchy snack! Yes, you can make Keto Everything Bagel Bites ahead. Prepare the dough and shape the bites. Then, place them on a baking sheet. Cover them and store in the fridge for up to 24 hours. When you're ready, bake them fresh. This way, you enjoy a warm snack anytime. Absolutely! These bagel bites work well for meal prep. You can make a big batch and store them. Keep them in an airtight container in the fridge. They last about a week. You can grab them for breakfast or a quick snack. You'll know they are done when they turn golden brown. The bites should feel light and puffy. A toothpick inserted in the center should come out clean. If they look golden and feel firm, they're ready to enjoy. In this post, we explored making delicious Keto Everything Bagel Bites. We covered key ingredients, their brands, and nutritional values. The step-by-step guide showed you how to prepare, bake, and serve these tasty snacks. I shared tips to help you avoid common mistakes and achieve the perfect texture. You learned about variations and how to store leftovers for another day. In the end, these bagel bites are easy, fun, and great for everyone. Enjoying them will make your treat time special!

Keto Everything Bagel Bites Perfectly Crunchy Snack

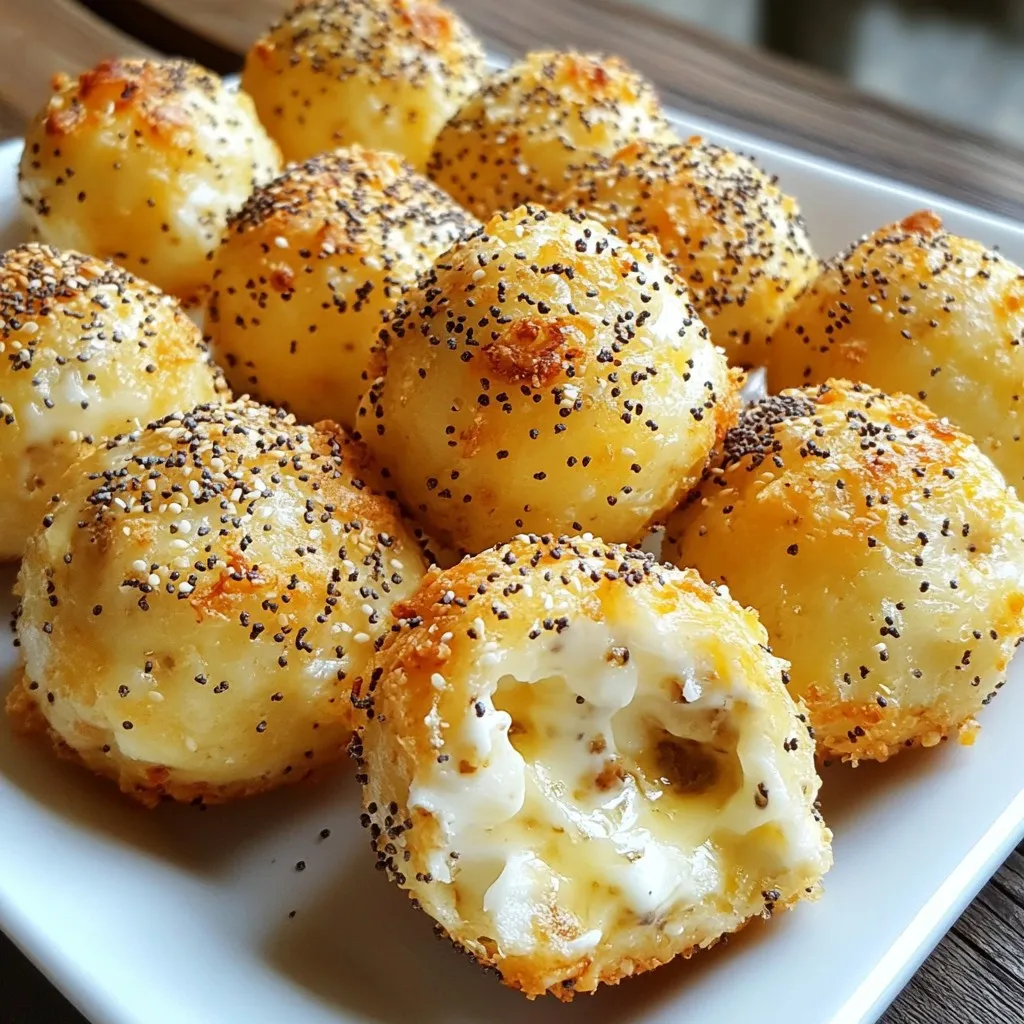
Looking for a crunchy, low-carb snack that satisfies your bagel cravings? Try my Keto Everything Bagel Bites! They’re easy to

For the perfect Salmon Spinach Pasta, gather these fresh ingredients: - 200g fettuccine pasta - 2 skinless salmon fillets - 2 cups fresh spinach - 1 clove garlic, minced - 1 tablespoon olive oil - 1 cup heavy cream - 1/2 cup grated Parmesan cheese - Zest of 1 lemon - Salt and pepper to taste - Fresh dill for garnish Let’s talk about measurements and substitutions. You can use any pasta you like. If you prefer whole wheat, go ahead! For the salmon, fresh is best, but frozen works too. Just make sure it's thawed. If you're low on heavy cream, use half-and-half for a lighter sauce. You can swap in nutritional yeast for the Parmesan if you want a vegan option. Freshness matters in this dish. Always choose bright green spinach. Look for firm salmon fillets with no fishy smell. For the garlic, use fresh cloves for the best flavor. When possible, buy ingredients from local markets. This choice supports farmers and gives you the freshest items. Store leftovers in an airtight container in the fridge for up to three days. Enjoy your cooking adventure! {{ingredient_image_1}} Bring a large pot of salted water to a boil. Add the fettuccine and cook it according to the package instructions. You want it al dente, or firm to the bite. This usually takes about 8-10 minutes. Drain the pasta and set it aside, but save a cup of pasta water. This water helps later to adjust the sauce. While your pasta cooks, get your salmon ready. Season the skinless salmon fillets with salt and pepper. Heat a tablespoon of olive oil in a large skillet over medium heat. Add the salmon fillets to the skillet and cook them for about 4-5 minutes on each side. You want them to be fully cooked but not dry. Once done, remove them from the skillet and use a fork to flake the salmon into bite-sized chunks. In the same skillet, add the minced garlic. Sauté it for about 30 seconds until it becomes fragrant. Then, add the fresh spinach. Cook it for about 2 minutes until it wilts down. This adds a nice flavor and color to your dish. Now, lower the heat and pour in the heavy cream. Stir it in to combine it with the garlic and spinach. Next, add the grated Parmesan cheese and lemon zest. Mix it well until the cheese melts and the sauce is creamy. If it seems too thick, add a bit of the reserved pasta water until you reach the right consistency. Gently toss the cooked fettuccine and flaked salmon into the creamy sauce. Stir everything together until the pasta and salmon are well-coated. Heat everything through. Taste and adjust the seasoning with more salt and pepper if needed. Plate the pasta in serving bowls. For an aromatic touch, garnish with freshly chopped dill. This adds a lovely color and flavor to your meal. Enjoy your Salmon Spinach Pasta straight away for the best taste! To cook salmon just right, use skinless fillets. Season them with salt and pepper. Heat olive oil in your skillet over medium heat. Cook the salmon for about 4-5 minutes on each side. You want it to flake easily. If it’s tough, you cooked it too long. Keep an eye on it to get that perfect texture. Start with a large pot of boiling salted water. Add the fettuccine and cook until al dente. This means it should have a little bite to it. Drain the pasta but save a cup of the water. This water can help thin your sauce later if it’s too thick. Mixing the pasta while it's hot helps it soak up flavors. For extra flavor, try adding fresh herbs like basil or parsley. You can also toss in some cherry tomatoes for a pop of color and taste. A squeeze of lemon juice brightens the dish. For a bit of heat, add red pepper flakes. These small changes can elevate your meal to a new level. Pro Tips Use Fresh Ingredients: Fresh salmon and spinach will elevate the dish's flavor and nutritional value, making your pasta truly delightful. Perfect Pasta Cooking: Make sure to cook the fettuccine until al dente for the best texture; it will continue to cook slightly when mixed with the sauce. Customize the Sauce: Feel free to add herbs like basil or a pinch of red pepper flakes for an extra kick of flavor in the creamy sauce. Garnish for Presentation: A sprinkle of freshly chopped dill not only adds a pop of color but also enhances the dish's aroma. {{image_2}} If you want to switch things up, try using chicken or shrimp instead of salmon. For chicken, use boneless, skinless thighs or breasts. Season them with salt and pepper. Cook in the skillet until golden brown. Shrimp cooks quickly, so add them last. Just sauté until they turn pink and opaque. While I love fettuccine, you can use other pasta shapes too. Penne or fusilli work well with the creamy sauce. They hold the sauce nicely. You can even try whole wheat or gluten-free pasta for a healthier option. Just follow package instructions for cooking times. To make this dish dairy-free, swap the heavy cream with coconut milk or cashew cream. Both will keep the creaminess. For the cheese, use nutritional yeast or a dairy-free cheese substitute. This way, you can enjoy the same great flavors without dairy. To store Salmon Spinach Pasta, let it cool first. Place it in an airtight container. This keeps it fresh for up to three days in the fridge. Make sure to seal it well to avoid drying out. If you add more cream while storing, it will stay creamy longer. Reheat the pasta gently. You can use the microwave or a skillet. If using the microwave, cover the dish and heat in short bursts. Stir between each burst to ensure even heat. If using a skillet, add a splash of water or cream. This helps to bring back the creamy texture. Heat over low heat, stirring often. You can freeze Salmon Spinach Pasta for up to two months. Divide it into portions before freezing. Use freezer-safe bags or containers. Remove as much air as possible to prevent freezer burn. When you are ready to eat, thaw it overnight in the fridge. Then, reheat it as described above. This keeps the flavors fresh and delicious. You can use milk or half-and-half instead of heavy cream. They will give a lighter sauce. For a dairy-free option, try coconut cream or cashew cream. These options keep the dish rich and tasty. Store leftover Salmon Spinach Pasta in the fridge for up to three days. Place it in an airtight container to keep it fresh. Reheat it gently on the stove or in the microwave. Yes, you can prepare parts of this dish ahead. Cook the pasta and salmon earlier in the day. Store them separately in the fridge. Add the spinach and sauce just before serving for the best flavor. A fresh salad or garlic bread goes well with this dish. You can also serve it with roasted vegetables. These sides complement the creamy pasta and add more texture to your meal. Absolutely! Salmon Spinach Pasta is great for meal prep. Cook it in advance and divide it into portions. You can enjoy it throughout the week for lunch or dinner. Just store it in the fridge and reheat as needed. This blog post covers the key steps to make Salmon Spinach Pasta. We went over ingredients, including measurements and freshness tips. The step-by-step guide showed how to cook pasta, prepare salmon, and create the sauce. I shared tips for the best results and variations for different diets. Finally, we discussed storage and answered common questions. With this knowledge, you can cook a delicious and satisfying meal. Enjoy impressing your family and friends with this tasty dish!

Salmon Spinach Pasta Flavorful and Easy to Make

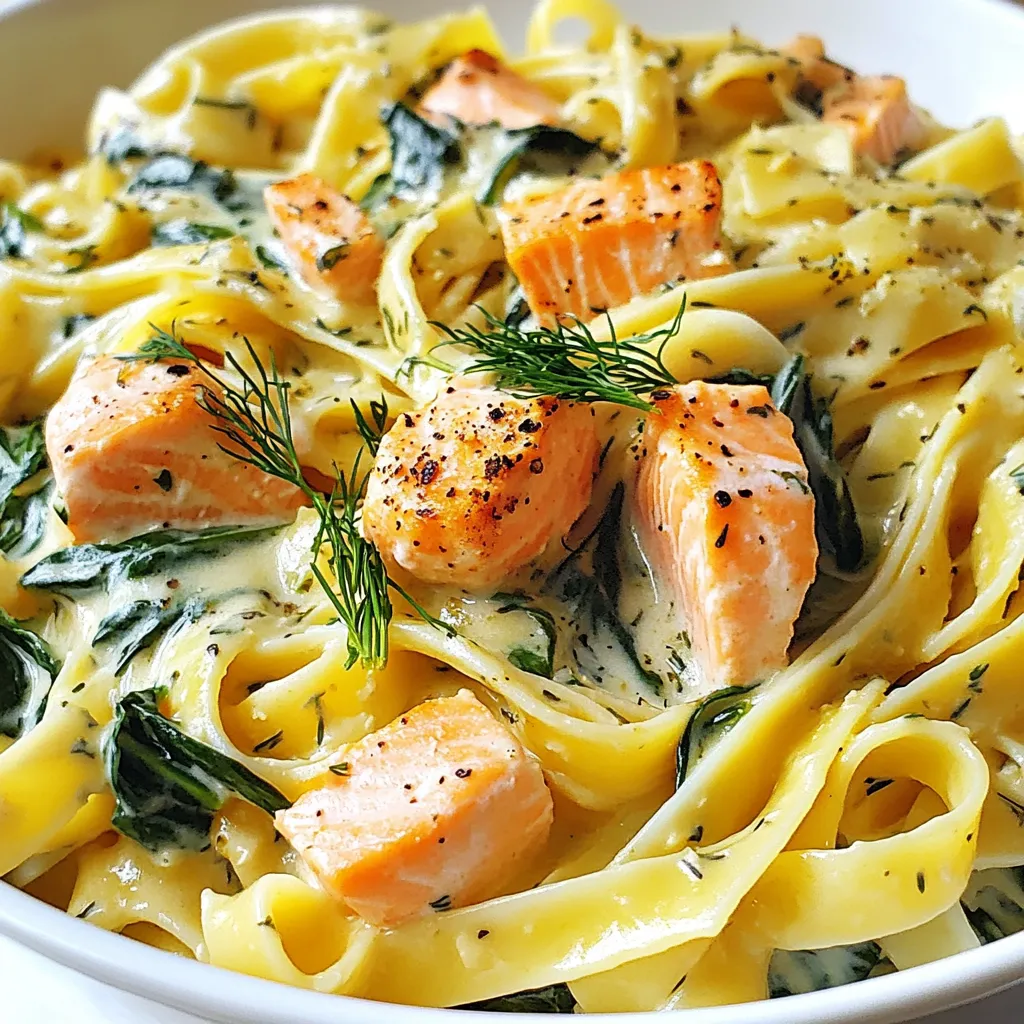
Looking for a quick, tasty meal? My Salmon Spinach Pasta is a perfect choice! This dish is not only flavorful,

- 1 pound shrimp, peeled and deveined - 2 ripe avocados, diced - 1 cup cherry tomatoes, halved - 1 small red onion, finely chopped - 1/4 cup fresh cilantro, chopped - Juice of 2 limes - 3 tablespoons olive oil - 1 teaspoon chili powder - Salt and pepper to taste - Mixed greens for serving When I make Lime Shrimp Avocado Salad, I love the fresh taste of each ingredient. The shrimp brings a nice, mild flavor. I always use shrimp that is peeled and deveined for ease. Diced avocados add creaminess and richness. They balance well with the crisp cherry tomatoes. I prefer using ripe avocados that are soft but not brown inside. Next, I chop a small red onion. It adds a nice crunch and a bit of sharpness. Fresh cilantro gives the salad a bright, herbal note. If you don’t like cilantro, you can skip it or use parsley instead. Now, let’s talk about the seasoning. The juice of two limes adds a zesty kick. I love the way lime juice makes the flavors pop. I mix it with olive oil for a rich dressing. Chili powder brings warmth without too much heat. Don’t forget to add salt and pepper for balance. If you want to serve this salad on a bed of mixed greens, it adds a nice touch. The greens give extra color and texture. This salad is light but filling, perfect for lunch or dinner. {{ingredient_image_1}} First, I take my shrimp and place them in a bowl. I add lime juice, chili powder, salt, and pepper. I toss everything to coat the shrimp well. Marinating the shrimp helps the flavors blend. I let it sit for about 15 to 20 minutes. This step makes the shrimp taste fresh and zesty. Next, I heat a skillet over medium heat. I add a tablespoon of olive oil and wait until it’s hot. Then, I place the marinated shrimp in the skillet. I cook the shrimp for about 2 to 3 minutes on each side. I know they are done when they turn pink and opaque. Once cooked, I remove them from the heat and let them cool slightly. In a large bowl, I add diced avocados, halved cherry tomatoes, finely chopped red onion, and cilantro. I mix these ingredients gently to keep the avocados intact. This makes a colorful and tasty base for the salad. To make the dressing, I whisk together the remaining olive oil, lime juice, and a pinch of salt and pepper in a small bowl. I drizzle this dressing over the salad mixture. This step adds a bright flavor to the dish. Once the shrimp has cooled, I add it to the salad. I toss everything together gently to combine the shrimp with the other ingredients. Then, I taste the salad and adjust the seasoning. If it needs more lime, salt, or pepper, I add it now. To serve, I can use mixed greens. I layer them on individual plates and top with the shrimp avocado salad. For a nice touch, I arrange the salad neatly and add a lime wedge on the side. This makes the dish look appealing and fresh. To avoid overcooking shrimp, watch the color change. Cook them until they turn pink and opaque. This usually takes about 2-3 minutes per side. If you cook them too long, they can become rubbery and tough. When choosing shrimp, fresh shrimp is often best for taste. If fresh shrimp isn’t available, frozen shrimp is a great option. Just make sure to thaw it in the fridge overnight for the best texture. To choose ripe avocados, look for ones that are slightly soft when you press them. If they feel hard, they need more time to ripen. If you want to speed up ripening, place them in a paper bag with a banana. For salads, select avocados that hold their shape. Avoid ones with dark spots or bruises. Diced avocados should be firm yet creamy, adding a nice texture to your dish. To boost the flavor of your salad, think about adding spices like garlic powder or cumin. These can add depth to your dish. If you prefer your salad spicier, add more chili powder or a splash of hot sauce. For a milder salad, reduce the chili powder or skip it altogether. Adjust the seasoning to suit your taste buds! Pro Tips Fresh Shrimp: Always use the freshest shrimp available for the best flavor and texture. If buying frozen, make sure to thaw them properly before marinating. Perfectly Ripe Avocados: Select avocados that are slightly soft to the touch but not overly mushy. This ensures they are creamy and flavorful without being too ripe. Customize the Heat: If you prefer a spicier kick, consider adding diced jalapeños or a dash of hot sauce to the salad for extra flavor. Chill Before Serving: For an even more refreshing salad, chill the mixed salad ingredients in the refrigerator for about 30 minutes before serving. {{image_2}} You can switch up the main protein in this salad. If you prefer chicken, use grilled or roasted pieces. For a plant-based option, try tofu. Just make sure to cut it into small cubes and marinate it similarly. You can also add more veggies to the mix. Try diced bell peppers, cucumber, or even corn for extra crunch. These simple changes keep the dish exciting and fresh. While the lime dressing is zesty, you can explore other flavors. A light balsamic vinaigrette adds sweetness. For a spicy kick, try a chipotle dressing. You can mix in fresh herbs too, like dill or basil, to make the taste more unique. Adding spices can elevate the flavor. Cumin or smoked paprika can give the salad a warm twist. Don't be afraid to experiment with different dressings until you find your favorite. Serving this salad as a wrap is a fun twist. Use large lettuce leaves or tortillas to wrap the salad tightly. You can also serve it in tacos for a festive touch. Just pile the salad into soft shells for a tasty meal. For gatherings, consider creative plating. Layer the salad in clear cups to show off the colors. Garnish with lime wedges and cilantro for an appealing look. This makes the dish stand out and invites everyone to dig in! To store your Lime Shrimp Avocado Salad, place it in an airtight container. This keeps flavors fresh. Refrigerate it right away after serving. The salad will stay good for up to two days. The shrimp will lose some texture, but it will still taste great. You should not reheat shrimp salad. Reheating can make shrimp tough and rubbery. Instead, enjoy it cold. If you want warmth, serve the shrimp separately. You can add warm shrimp to the salad just before eating. This salad does not freeze well. The avocados and shrimp will change texture. If you want to freeze ingredients, do it separately. Freeze shrimp after cooking, and store avocados fresh. Use shrimp within three months for best flavor. Yes, you can prep this salad ahead. For best results, keep the shrimp and dressing separate until serving. This way, the shrimp stays fresh, and the avocados won't brown. You can cook the shrimp and mix the other ingredients in advance. Just store them in the fridge. If shrimp isn’t your thing, try chicken or tofu. Both options work well with the lime and avocado flavors. You could also use canned beans for a vegetarian twist. These alternatives keep the salad tasty and fun. To keep avocados fresh, store them with lime juice. The acid slows down browning. You can also leave the pit in the unused half to help it last longer. Wrap it tightly in plastic wrap to block air. Yes, this salad is gluten-free. All ingredients, like shrimp, avocados, and vegetables, are naturally gluten-free. This makes it a great choice for those with gluten sensitivities. This salad pairs well with tortilla chips or crusty bread. For drinks, try a light white wine or sparkling water. These sides enhance the fresh flavors of the salad and make a lovely meal. This lime shrimp avocado salad is fresh, tasty, and easy to make. We covered the ingredients, seasoning, cooking the shrimp, and how to dress your salad. I shared tips for choosing the best avocados and cooking shrimp just right. Remember, you can easily alter this recipe with different proteins or dressings to fit your tastes. Whether you serve it as a salad or in a wrap, it promises a delightful meal. Try it out and enjoy a burst of flavors!

Lime Shrimp Avocado Salad Fresh and Flavorful Dish

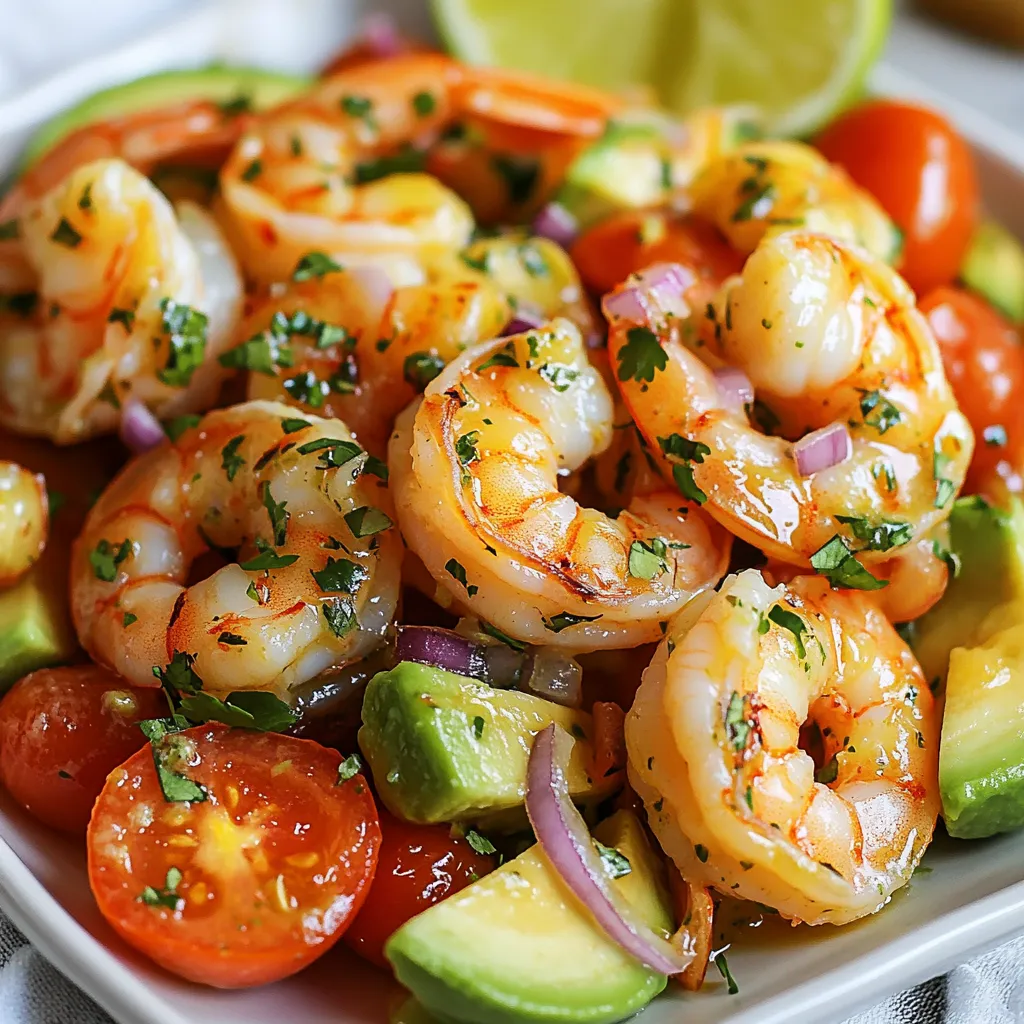
Looking for a fresh and tasty dish to impress your guests? This Lime Shrimp Avocado Salad is just what you

For tasty savory pancake tacos, gather these key items: - 1 cup all-purpose flour - 1 cup buttermilk (or milk with 1 tablespoon vinegar added) - 1 large egg - 1 teaspoon baking powder - 1/2 teaspoon baking soda - 1/2 teaspoon salt - 1/2 cup shredded cheese (cheddar or Mexican blend) - 1 small jalapeño, finely chopped (optional) These main ingredients create a fluffy and flavorful pancake base. The buttermilk adds a nice tang and moisture. The cheese gives your pancakes a cheesy flavor that makes them special. You can add more fun to your savory pancake tacos with these toppings: - 1 avocado, sliced - 1 cup cooked black beans - 1 cup pico de gallo - Fresh cilantro for garnish - Sour cream for topping These toppings bring freshness and creaminess to your tacos. The black beans add protein, while pico de gallo gives a burst of flavor. If you need to swap out ingredients, here are some ideas: - Use whole wheat flour for a healthier option. - Try almond milk if you want a dairy-free version. - Replace cheese with nutritional yeast for a vegan twist. - Skip the jalapeño if you prefer no spice. These substitutions still keep your savory pancake tacos delicious. You can customize them to fit your diet or taste. {{ingredient_image_1}} To begin, gather your ingredients. You will need: - 1 cup all-purpose flour - 1 teaspoon baking powder - 1/2 teaspoon baking soda - 1/2 teaspoon salt - 1 cup buttermilk (or milk with 1 tablespoon vinegar) - 1 large egg - 1/2 cup shredded cheese - 1 small jalapeño, finely chopped (optional) In a large bowl, mix the flour, baking powder, baking soda, and salt. Stir until blended. In another bowl, whisk together the buttermilk and egg. Combine the wet and dry mixes gently. Don’t overmix! Fold in the shredded cheese and jalapeño if you like some heat. Next, heat a non-stick skillet over medium heat. Lightly grease it with cooking oil. Pour a ladleful of batter into the skillet, making a round shape about 6 inches wide. Cook until bubbles form on the surface, which takes around 2 to 3 minutes. Flip the pancake and cook for another 2 minutes until golden brown. Repeat this until you have about 6 to 8 pancakes. Now it's time to bring it all together. Warm your black beans in a small saucepan. To assemble, take one pancake and add a spoonful of black beans, a few slices of avocado, and a good amount of pico de gallo. Fold the pancake like a taco. Repeat this for the rest of the pancakes. Serve warm, topped with fresh cilantro and a dollop of sour cream. Enjoy your tasty savory pancake tacos! To get the best pancake texture, mix your batter gently. Overmixing causes tough pancakes. The batter should look slightly lumpy; it's okay! Let it rest for a few minutes. This helps the pancakes rise better when cooked. Use a non-stick skillet for even cooking. Medium heat is key; too hot will burn the pancakes. You can amp up the flavor of your pancakes easily. Add spices like cumin or smoked paprika to the batter. Fresh herbs, like chopped cilantro or green onions, can also brighten the taste. If you like heat, include more jalapeños or even a pinch of crushed red pepper. Topping with sour cream adds creaminess and balances the flavors. One common mistake is not prepping the skillet right. Make sure it’s hot and lightly greased before pouring the batter. If you flip too soon, the pancake may fall apart. Also, don’t skip the cheese! It adds great flavor and helps hold the taco together. Lastly, avoid stacking hot pancakes without parchment paper; they may stick together. Pro Tips Use Room Temperature Ingredients: Make sure your egg and buttermilk are at room temperature for a smoother batter and fluffier pancakes. Customize Your Fillings: Feel free to add other toppings like grilled chicken, sautéed vegetables, or different cheeses to create your perfect taco pancake. Keep Pancakes Warm: If you're making a large batch, keep the cooked pancakes warm in a low oven (around 200°F) until you're ready to serve. Experiment with Spices: Add spices like cumin or smoked paprika to the pancake batter for an extra layer of flavor that complements the toppings. {{image_2}} You can easily adapt savory pancake tacos for vegetarians and vegans. For vegetarian tacos, use cheese made from plants. For vegans, swap the egg with flaxseed meal. Mix one tablespoon of flaxseed meal with three tablespoons of water. Let it sit for a few minutes until it thickens. Also, use almond or soy milk instead of buttermilk. This way, you keep the flavor while being plant-based. Adjust the spice level to suit your taste. If you like heat, add more jalapeños to the batter. You can also include diced green chilies for extra kick. For a milder option, skip the jalapeños and use sweet bell peppers instead. This helps keep the pancakes flavorful without the heat. Your savory pancake tacos can be as creative as you want! Instead of black beans, try refried beans or lentils. For extra crunch, add some corn or diced bell peppers. You can even use pulled pork or seasoned chicken for a heartier meal. Top with fresh salsa, guacamole, or even a drizzle of hot sauce. Each twist makes a new flavor adventure every time you serve these tacos. To store leftover pancake tacos, let them cool first. Place them in an airtight container. You can keep them in the fridge for up to three days. If you plan to eat them later, keep the toppings separate. This keeps the pancakes fresh and prevents sogginess. To reheat, you can use a skillet or microwave. For the skillet, warm it on medium heat. Add a little oil and heat each taco for about one minute on each side. This makes them crispy again. For the microwave, place the taco on a plate. Heat for about 30 seconds. Check if it’s warm enough. If not, heat in 10-second bursts until hot. You can freeze savory pancakes too! Let them cool completely. Then, stack them with parchment paper in between. Place them in a freezer bag or airtight container. They will last up to three months. When you’re ready to eat, thaw them overnight in the fridge. Reheat as mentioned above. Enjoy your tasty taco anytime! Savory pancake tacos are a fun twist on traditional pancakes. They are made from a savory batter that includes flour, buttermilk, and cheese. You cook these pancakes until they are golden brown and then fill them like tacos. Fillings can include black beans, avocado, and pico de gallo. The result is a tasty meal that combines breakfast and lunch. You can enjoy them for any meal of the day. Yes, you can easily make these pancakes gluten-free. Simply replace all-purpose flour with a gluten-free flour blend. Ensure the blend you use has a good structure to hold the pancake together. You may also need to adjust the liquid slightly. Always check that other ingredients, like baking powder, are gluten-free too. This way, everyone can enjoy savory pancake tacos. You can customize the fillings to match your taste. Start with cooked black beans, which add protein and fiber. Then, add sliced avocado for creaminess. You can also include salsa or pico de gallo for a fresh bite. For extra flavor, try adding cooked chicken, ground beef, or grilled veggies. Don't forget toppings like sour cream or fresh cilantro to enhance the dish. The options are endless! Savory pancake tacos offer a fun twist on a favorite dish. We explored key ingredients and how to prepare them. Remember, you can customize toppings and fillings to your taste. Use my tips to avoid common mistakes and achieve the best texture. Plus, the variations, from vegetarian to spicy, keep things exciting. You can store leftovers and enjoy them later. Dive into this easy recipe, and make it your own! Enjoy your tasty pancake tacos any time.

Savory Pancake Tacos Flavorful and Easy Recipe

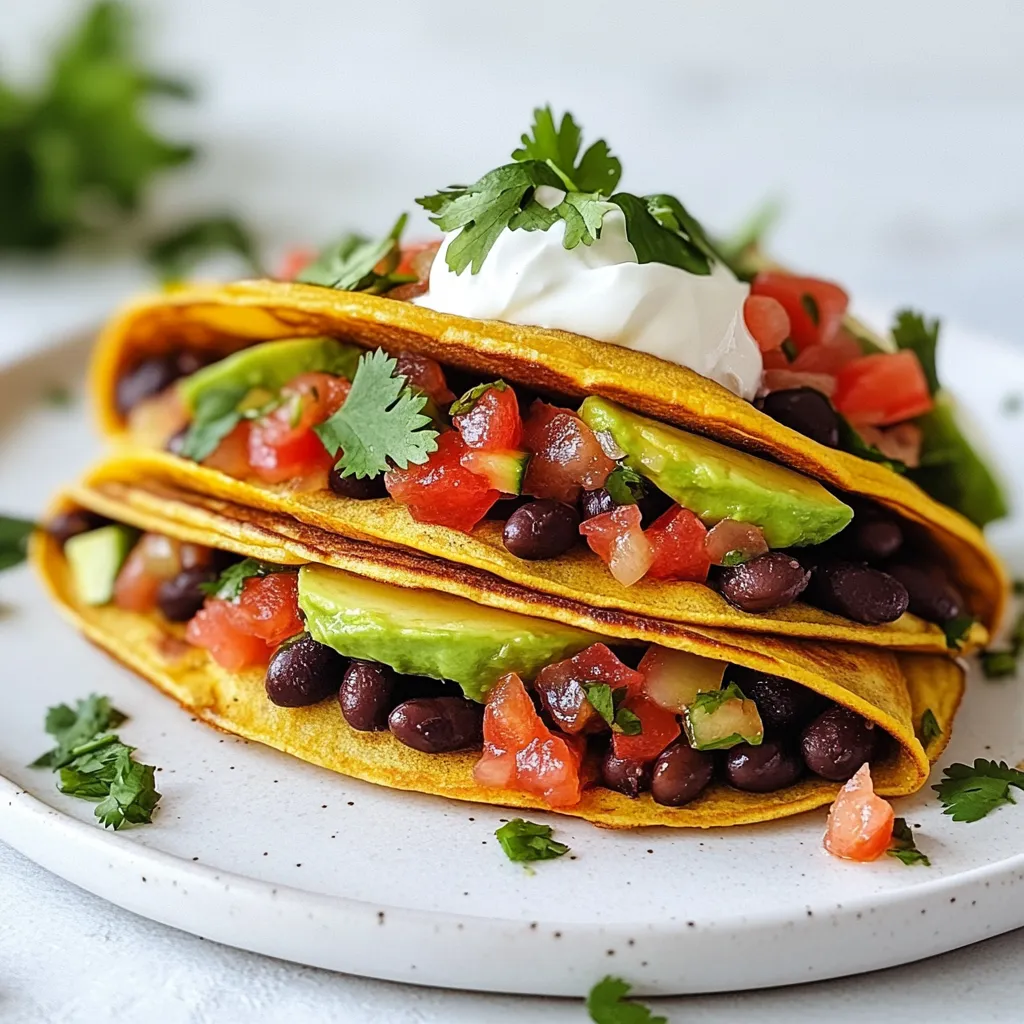
Welcome to the world of savory pancake tacos! These easy tacos pack a punch of flavor and fun. I’ll show

1. Chicken Use 1 pound of boneless, skinless chicken breasts. This is the main protein. It cooks well and stays tender. 2. Vegetables - 1 can (15 oz) black beans, rinsed and drained - 1 can (15 oz) diced tomatoes with green chilies - 1 medium onion, chopped - 2 cloves garlic, minced - 1 bell pepper (any color), chopped - 1 cup corn (frozen or fresh) These vegetables add color and flavor to the soup. They also provide nutrients. 3. Spices and Broth - 4 cups chicken broth - 2 tsp ground cumin - 1 tsp chili powder - 1 tsp smoked paprika - Salt and pepper to taste These spices create a warm and rich taste. The broth gives the soup its base. - Tortilla strips These add crunch and texture. You can buy them or make your own. - Fresh herbs Chopped cilantro is a great choice. It adds freshness and color. - Creamy toppings - Avocado slices - Sour cream (optional) These toppings add creaminess and balance the flavors. They elevate the dish and make it special. This soup is not only easy to make but also full of flavor. Each ingredient plays a role in creating that perfect bowl of comfort. {{ingredient_image_1}} Start by washing your hands. Then chop the onion and bell pepper into small pieces. Next, mince the garlic cloves. The goal is to make all the pieces small so they mix well in the soup. Now, grab your slow cooker. Place the chicken breasts at the bottom. This helps keep the chicken moist as it cooks. Layer the black beans, diced tomatoes (with their juice), chopped onion, minced garlic, chopped bell pepper, and corn on top of the chicken. This order matters. The chicken cooks better when it sits at the bottom. Next, pour the chicken broth over all the ingredients. This adds flavor and helps everything cook evenly. Sprinkle in the ground cumin, chili powder, smoked paprika, salt, and pepper. Use a spoon to stir gently. This mixes the spices with the other ingredients. Now it's time to set your slow cooker. Cover it with the lid. If you want the soup ready faster, set it to high. This will take about 3-4 hours. If you prefer to cook it slowly, set it to low. This option takes 6-8 hours. The longer cooking time makes the flavors richer. You can start the soup in the morning and have it ready for dinner. About 30 minutes before you plan to serve, shred the chicken. Use two forks to pull apart the chicken in the slow cooker. Stir it well into the soup to mix it thoroughly. This adds a nice texture. Right before serving, add the juice of one lime. This gives the soup a fresh taste. Now you're ready to serve your delicious soup! Enjoy it hot with tortilla strips, chopped cilantro, and avocado slices on top. If you like, add a dollop of sour cream for extra creaminess. For tender chicken, boneless, skinless chicken breasts work best. They stay juicy in the slow cooker. You can also use thighs for extra flavor. Adjust cooking times based on your cooker. For a richer taste, cook on low for 8 hours. If you're short on time, the high setting works well in 4 hours. Pair the soup with simple side dishes. Cornbread or a fresh salad complements the flavors nicely. You can serve the soup in bowls or cups. For a fun twist, use small tortillas as edible bowls. This adds a playful touch to your meal. Want to boost the flavor? Add more spices like cayenne or oregano. A pinch of cinnamon can give it a warm note, too. For toppings, consider fresh jalapeños, cheese, or radishes. These add crunch and taste, making your soup even better. Pro Tips Use Fresh Ingredients: Fresh herbs and vegetables elevate the flavor of the soup. Opt for fresh cilantro and ripe avocados when garnishing. Adjust Spice Level: If you prefer a spicier soup, feel free to add diced jalapeños or additional chili powder to suit your taste. Make it Ahead: This soup freezes well! Make a large batch and store in airtight containers for quick meals later on. Customize Toppings: Get creative with your toppings! Consider adding shredded cheese, diced onions, or even a sprinkle of hot sauce for extra flavor. {{image_2}} You can change the main protein in this soup. Instead of chicken, try turkey or beans. Both work well and taste great. Using beans makes the soup vegetarian friendly too. You can mix and match your veggies too. Try zucchini, carrots, or even spinach for added nutrients. Do you want your soup mild? Just cut back on the chili powder. For extra spice, add fresh jalapeños or more chili powder. You can also toss in some crushed red pepper flakes for a kick. Adjust the heat to match your taste. If you need a gluten-free option, make sure your broth is gluten-free. This soup is naturally gluten-free when made with the right ingredients. For a vegan option, skip the chicken and use vegetable broth instead. Add more beans or tofu for protein. These changes keep the soup tasty and satisfying. To keep your soup fresh, store leftovers in an airtight container. Let the soup cool first. Place it in the fridge for up to three days. Always label the container with the date. This way, you know when to eat it. For longer storage, freeze the soup. Use a freezer-safe container or bag. Leave some space at the top for expansion. The soup can last up to three months in the freezer. Thaw it in the fridge before reheating for best results. Reheat soup on the stove for even heat. Use medium heat and stir often. You can also use a microwave. Heat it in short bursts, stirring in between. Always check the soup’s temperature to ensure it’s hot throughout. Enjoy it warm with your favorite toppings! Yes, you can use frozen chicken in your slow cooker. However, it is important to ensure food safety. Cooking frozen chicken takes longer. Make sure the chicken reaches 165°F to be safe to eat. Check your slow cooker’s manual for cooking times. I recommend adding about an hour to the cooking time if the chicken is frozen. This helps ensure it cooks evenly and thoroughly. To thicken your soup, there are a few easy methods. You can add more beans or corn. These will break down and create a heartier texture. Another option is to mix in a slurry of cornstarch and water. Stir this into your soup about 30 minutes before it finishes cooking. You can also mash some of the cooked beans right in the pot. This adds thickness while keeping the flavors intact. You can serve many great sides with this soup. Consider adding a fresh salad for a light touch. Cornbread or crusty bread pairs nicely too. Tortilla chips make a fun side and add crunch. For a complete meal, try serving with rice. Each option enhances the soup and adds variety to your table. This post covered how to make Slow Cooker Chicken Tortilla Soup. You learned about key ingredients like chicken, veggies, and spices. I shared step-by-step instructions, cooking tips, and serving ideas. You can get creative with flavors, swap ingredients, or modify for diets. Finally, I included storage tips for leftovers. Slow Cooker Chicken Tortilla Soup is easy and fun. Enjoy experimenting with it!

Slow Cooker Chicken Tortilla Soup Flavorful and Easy

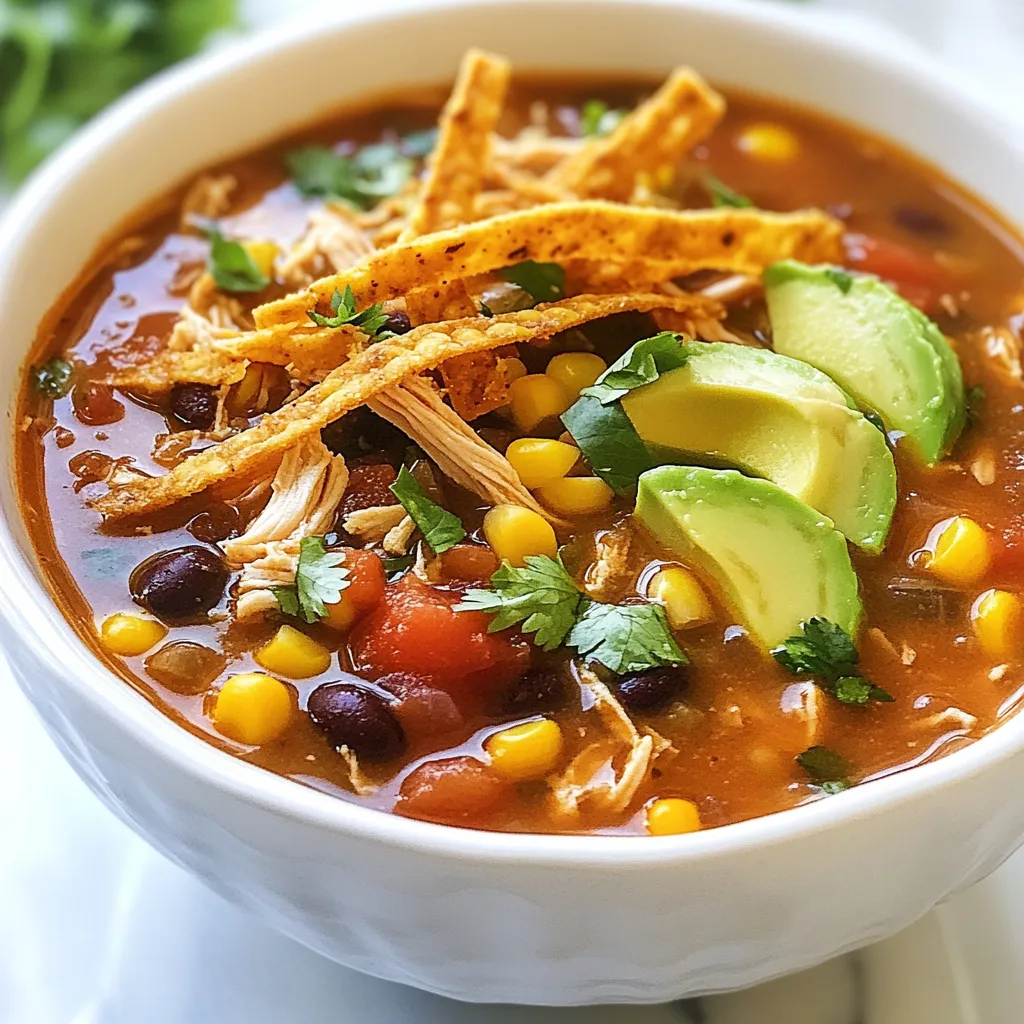
If you want a dish that warms your heart and fills your stomach, you’ve found it! My Slow Cooker Chicken

- 1 pound salmon fillet, skin removed and cut into bite-sized cubes - 1/2 cup all-purpose flour - 1/2 cup panko breadcrumbs - 1 egg, beaten - 1 teaspoon garlic powder - 1 teaspoon paprika - 1/2 teaspoon salt - 1/2 tablespoon black pepper - Vegetable oil for frying The salmon is the star of this dish. Use fresh salmon for the best flavor. Cut the salmon into cubes that are easy to eat. The flour mixture helps the coating stick well. - 1/2 cup mayonnaise - 2 tablespoons sweet chili sauce - 1 tablespoon sriracha (adjust to taste) The bang bang sauce adds a nice kick. Mix the mayonnaise, sweet chili sauce, and sriracha together. You can change the amount of sriracha for more or less heat. - 1 green onion, finely chopped Chop green onions to sprinkle on top. This adds color and freshness to the dish. It also gives a nice crunch when you bite in. {{ingredient_image_1}} To start, gather your ingredients. You need one pound of salmon fillet. Cut it into small cubes. This makes them easy to fry and eat. Next, grab three bowls. In the first bowl, mix together: - 1/2 cup all-purpose flour - 1 teaspoon garlic powder - 1 teaspoon paprika - 1/2 teaspoon salt - 1/2 tablespoon black pepper In your second bowl, beat one egg. This will help the crust stick. In the third bowl, add 1/2 cup of panko breadcrumbs. These will give the bites a crispy texture. Now, take each salmon cube. Dip it in the flour mix first. Then, coat it in the beaten egg. Finally, roll it in the panko breadcrumbs. Make sure each piece is well covered for that extra crunch. Now it's time to fry! Heat about 1/4 inch of vegetable oil in a large skillet. Set the heat to medium-high. Once the oil is hot, add the salmon bites in batches. Do not overcrowd the pan; this helps them cook evenly. Fry each side for about 3 to 4 minutes. Look for a golden brown color. This means they are cooked through. When done, take them out and place them on a paper towel-lined plate. This will soak up any extra oil. While the bites cool, let's make the bang bang sauce. In a small bowl, mix together: - 1/2 cup mayonnaise - 2 tablespoons sweet chili sauce - 1 tablespoon sriracha (adjust to taste) Stir well until it’s creamy and smooth. You can add more sriracha if you like it spicier. This sauce is key for that bang bang flavor! To serve, place the salmon bites on a platter. Drizzle the sauce over them or use it as a dip. Don’t forget to sprinkle some finely chopped green onions on top for a fresh touch. To get your salmon bites extra crispy, coat them well. First, use the flour mix. Then dip into the egg. Finally, roll in the panko breadcrumbs. Make sure every side is covered. This adds a nice crunch when you fry them. Fry in hot oil and don’t crowd the pan. This lets them cook evenly. The bang bang sauce can be spicy or mild. Start with one tablespoon of sriracha. If you like more heat, add more sriracha little by little. Mix the sauce well after each addition. Taste it as you go. This way, you get a sauce that suits your taste. One common mistake is not heating the oil enough. If the oil is not hot, the bites absorb too much oil. This makes them soggy. Another mistake is overcrowding the pan. Fry in batches to keep them crispy. Lastly, don’t skip the paper towel. It helps remove excess oil after frying. Pro Tips Use Fresh Salmon: For the best flavor and texture, choose fresh salmon over frozen. It will enhance the overall taste of your bites. Adjust the Spice: Feel free to modify the amount of sriracha in the bang bang sauce to match your spice preference. Start with less if you are unsure! Double Fry for Extra Crunch: For an even crunchier texture, consider frying the salmon bites a second time for 1-2 minutes after they have cooled slightly. Garnish Wisely: Adding chopped herbs like cilantro or parsley can elevate the presentation and add a fresh flavor contrast to the dish. {{image_2}} You can swap salmon with other proteins for Bang Bang bites. Try shrimp for a seafood twist. Chicken breast works well, too. Cut the chicken into bite-sized pieces. Both options cook quickly and stay juicy. Tofu is a great choice for a plant-based version. Just ensure it firms up well before frying. While the classic bang bang sauce is popular, you can mix it up. Try a honey mustard sauce for a sweet touch. A spicy garlic sauce adds heat and flavor. For a creamy twist, blend Greek yogurt with your favorite spices. Each sauce gives a unique flavor to the bites. Feel free to experiment and find your favorite! Serve Bang Bang salmon bites with fresh veggies. A crunchy cucumber salad pairs nicely. You can also add rice or quinoa for a filling meal. Consider a light dipping sauce like soy sauce or ponzu. These options balance the richness of the bites. They also add color and texture to your plate. Enjoy mixing and matching to create a full meal! Store leftover salmon bites in an airtight container. Place a paper towel in the container to absorb moisture. This keeps the bites crispy. Consume the leftovers within two days for the best taste. To reheat, use an oven or air fryer. Preheat the oven to 350°F. Place the salmon bites on a baking sheet. Bake for about 10 minutes, or until hot. If using an air fryer, heat at 350°F for 5-7 minutes. This helps restore their crispiness. You can freeze salmon bites for later use. First, let them cool completely. Then, place them in a single layer on a baking sheet. Freeze for about an hour. After that, transfer them to a freezer bag. They can stay frozen for up to three months. When ready to eat, thaw overnight in the fridge before reheating. Bang Bang sauce is a creamy, spicy sauce. It mixes mayonnaise, sweet chili sauce, and sriracha. You can adjust the heat by adding more or less sriracha. This sauce adds a zesty kick to any dish. It pairs perfectly with our salmon bites. Yes, you can prepare the salmon bites ahead. Coat the salmon cubes and keep them in the fridge for a few hours. Fry them just before serving for the best crunch. You can also make the sauce in advance. Just store it in the fridge until you're ready to use it. Bang Bang Salmon Bites go well with many sides. Try serving them with a fresh salad. You can also pair them with rice or quinoa. For a fun twist, serve them in tacos with slaw. The options are endless! To make them healthier, you can bake the salmon bites instead of frying. Use a light spray of oil for crispiness. You can also use whole wheat flour and panko for added fiber. Adding more veggies to the dish is another great option. Absolutely! Baking is a great choice for a healthier option. Preheat your oven to 400°F. Place the coated salmon bites on a baking sheet. Lightly spray them with oil. Bake for about 15-20 minutes until golden and cooked through. Flip halfway for even cooking. Bang Bang Salmon Bites are easy and tasty. We covered key ingredients, steps to make them, and tips for success. You learned how to introduce different proteins and sauces for fun twists. Storing and reheating bits are simple, too. If you follow these tips, you'll impress everyone with your cooking skills. Enjoy your delicious Bang Bang Salmon Bites and make them a regular part of your meals!

Bang Bang Salmon Bites Flavorful and Easy Recipe

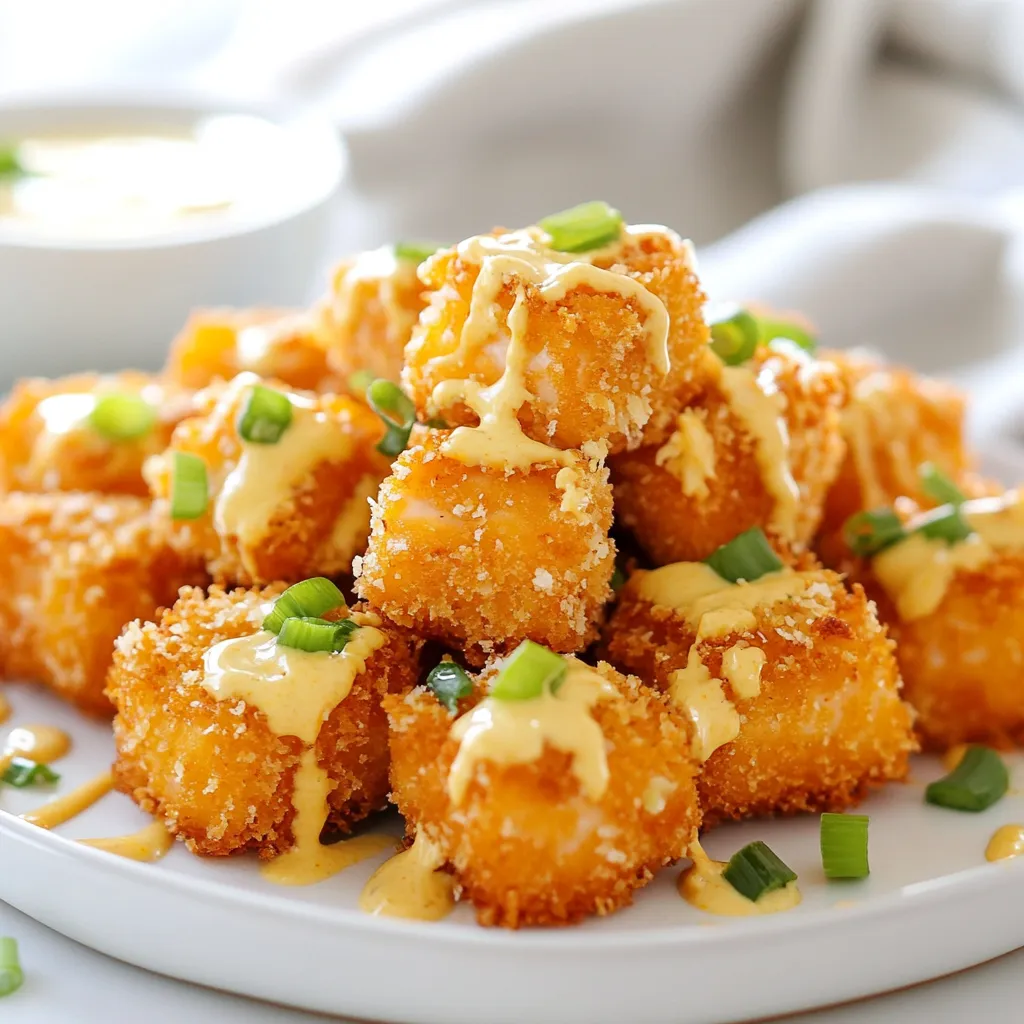
Are you ready to impress your taste buds with a fun and tasty dish? Bang Bang Salmon Bites are a

Older posts
Newer posts
← Previous Page1 … Page132 Page133 Page134 … Page144 Next →

dsad

© 2025 So Yum Recipes • Built with GeneratePress

Our Policies

  • Copyright Policy
  • Cookie Policy
  • GDPR Policy
  • Privacy Policy
  • Disclaimer
  • Terms Of Use

More Information

  • Home
  • About
  • Contact
  • Appetizers
  • Dessert
  • Dinner
  • Drinks
©2025, So Yum Recipes About Back To Top