Skip to content
DisclaimerTerms Of UseGDPR PolicyCookie Policy

So Yum Recipes

  • Home
  • Drinks
  • Appetizers
  • Dinner
  • Dessert
  • About
  • Contact
  • Privacy Policy
DisclaimerTerms Of UseGDPR PolicyCookie Policy

Chloe

- 1 lb ground beef (or ground turkey) - 1/2 cup breadcrumbs - 1/4 cup grated Parmesan cheese - 1 large egg - 3 cloves garlic, minced - 1 tbsp fresh ginger, grated - 1 tsp salt - 1/2 tsp black pepper - 1/2 tsp red pepper flakes (adjust for heat preference) - 1/4 cup honey - 1/4 cup soy sauce (low sodium) - 1 tbsp apple cider vinegar - 1 tsp sesame oil - 2 green onions, chopped (for garnish) - Sesame seeds (for garnish) - Additional spices (cumin, paprika) - Fresh herbs (cilantro, parsley) To make Spicy Honey Garlic Meatballs, gather all the ingredients listed above. The ground beef or turkey serves as the base. I love using fresh ginger and garlic for a punch of flavor. Feel free to adjust the red pepper flakes based on your heat preference. If you want to add more depth, consider the optional spices and fresh herbs. You can find the complete recipe in the [Full Recipe]. This will help you create the perfect meatballs. Each ingredient plays a role in building layers of taste. Enjoy the process and get ready for a delicious meal! - Preheat oven to 400°F (200°C). - In a large bowl, combine: - 1 lb ground beef (or ground turkey) - 1/2 cup breadcrumbs - 1/4 cup grated Parmesan cheese - 1 large egg - 3 cloves garlic, minced - 1 tbsp fresh ginger, grated - 1 tsp salt - 1/2 tsp black pepper - 1/2 tsp red pepper flakes Mix these ingredients until just combined. Do not overmix. This keeps the meatballs tender. - Shape the mixture into meatballs, about 1 inch wide. - Place the meatballs on a baking sheet lined with parchment paper. - Bake for 20-25 minutes. The meatballs should be cooked through and golden brown. - While the meatballs bake, make the sauce. - In a saucepan, combine: - 1/4 cup honey - 1/4 cup soy sauce (low sodium) - 1 tbsp apple cider vinegar - 1 tsp sesame oil - Heat the mixture over medium heat. Stir until well blended and slightly thickened, about 5 minutes. This sauce adds a sweet and spicy kick to your meatballs. Once your meatballs are done, coat them in the sauce. They will be sticky and delicious. You can find the Full Recipe for more details. To make great meatballs, mix the ingredients well but don't overwork the meat. This keeps them tender. I like to use an ice cream scoop. It helps form even-sized meatballs that cook at the same rate. You can adjust the red pepper flakes. This lets you control how spicy your meatballs are. Adding fresh herbs, like parsley or cilantro, brightens the flavor and adds freshness. Serve these meatballs over rice or noodles. This makes a complete and satisfying meal. You can also pair them with a side of vegetables or a salad for balance. For the full recipe, check out the details above. {{image_2}} You can use ground chicken or pork instead of beef. This change offers a lighter flavor. Ground chicken gives a mild taste that blends well with the honey garlic sauce. Pork adds richness and a juicy texture. Both options are great for those looking to switch things up. Feel free to explore different sauces. Teriyaki adds a sweet and savory twist. Barbecue sauce gives a smoky flavor. You can even mix sauces for more depth. The key is to find what you enjoy most. The sweet honey in the recipe blends well with various sauces, enhancing the meatballs. Want a meatless option? Use plant-based meat substitutes or lentils. These choices can mimic the texture of meat. Lentils are packed with protein and fiber. They also absorb flavors well, making them tasty. Try adding herbs or spices to boost the flavor even more. You can follow the same steps in the Full Recipe to keep it simple. To keep your meatballs fresh, place them in an airtight container. This helps prevent moisture loss and keeps them tasty. Store them in the fridge right after they cool down. They will stay good for about three to four days. If you want to save meatballs for later, freezing is a great option. First, let the meatballs cool completely. Then, place them in a single layer on a baking sheet. Freeze them for about one hour. Once frozen, transfer them to a freezer bag. Make sure to squeeze out the air. For reheating, you can bake them at 350°F (175°C) until warm, or heat them in the microwave. In the fridge, meatballs last about three to four days. In the freezer, they can keep well for up to three months. Just remember to label your bags with the date, so you know how long they have been stored. Enjoy your spicy honey garlic meatballs anytime! For the full recipe, check the section above. You can use crushed crackers or oats instead of breadcrumbs. Both options work well. Crushed crackers add a nice crunch. Oats can make the meatballs heartier. You might even mix them for fun! Yes, you can make these meatballs ahead of time. Prepare the meatballs and bake them as usual. Let them cool, then store in the fridge. You can reheat them in the oven or microwave when you are ready to serve. They taste great even after a day or two! Serve these meatballs warm with rice or noodles. You can also place them on a platter with toothpicks. Top with sesame seeds and green onions for a pretty look. They are great for parties or family meals! Check the internal temperature with a meat thermometer. It should reach 160°F (70°C) for beef or turkey. You can also cut one open to check. The meat should be brown inside, and the juices should run clear. Make sure to avoid any pink! These spicy honey garlic meatballs are easy and flavorful. You learned what ingredients you need and how to make them step by step. I shared tips for making perfect meatballs and keeping them fresh. You can even try different meats and sauces. Experimenting adds fun and taste. Enjoying these meatballs with rice or veggies makes a great meal. No matter how you make them, they will be a hit at your table. Happy cooking!

Spicy Honey Garlic Meatballs Tasty and Easy Recipe

Are you ready to savor a dish that boasts a sweet and spicy kick? I’m excited to share my Spicy

- 1 cup orzo pasta - 2 tablespoons olive oil - 1 small onion, finely chopped - 3 cloves garlic, minced - 8 ounces cremini mushrooms, sliced - 1 cup vegetable broth - 1 cup heavy cream (or coconut cream for dairy-free) - 1 teaspoon dried thyme - Salt and pepper to taste - ¼ cup grated Parmesan cheese (optional) - Fresh parsley, chopped for garnish Gathering the right ingredients is key to making a great creamy mushroom orzo. You want to start with orzo pasta, which is small and rice-like. It cooks quickly and soaks up flavors well. Next, olive oil is a must for sautéing. It adds rich taste to your dish. A small onion, chopped finely, gives a sweet base flavor. Garlic, when minced, adds a fragrant kick that makes the dish pop. Cremini mushrooms bring earthiness. They are great for adding depth. You will also need vegetable broth, which forms the base of your sauce. This adds moisture and flavor. For creaminess, use heavy cream or coconut cream. The coconut cream is perfect if you want a dairy-free option. Dried thyme brings herby notes, while salt and pepper enhance all the flavors. Finally, I like to add grated Parmesan cheese for extra richness. Parsley, chopped fresh, makes a lovely garnish. It adds color and a fresh taste. This creamy mushroom orzo is not just comfort food; it's a flavor-packed bowl of joy. For the full recipe, check out the details above. Happy cooking! - Bring salted water to a boil. - Cook orzo according to package instructions. - Drain and set aside. Cooking orzo is easy and quick. Start by bringing a pot of salted water to a boil. The salt helps flavor the pasta as it cooks. Once boiling, add the orzo and follow the package guide for cooking time. You want it to be al dente, which means it should be firm yet cooked through. After cooking, drain it well and set it aside. This will become the base of your creamy mushroom orzo. - Sauté onion until translucent. - Add garlic and mushrooms, cooking until tender. - Incorporate vegetable broth and simmer. Next, let’s make the mushroom mixture. In the same pot, heat olive oil over medium heat. Add your finely chopped onion. Sauté it until it becomes translucent, which should take about three to four minutes. This step builds a great flavor base. After that, stir in minced garlic and sliced mushrooms. Cook these until the mushrooms get tender and browned, about five to seven minutes. Finally, pour in the vegetable broth and bring the mix to a gentle simmer. This step adds moisture and depth to the dish. - Stir in heavy cream and dried thyme. - Add cooked orzo and mix until coated. - Season with salt, pepper, and optional Parmesan cheese. Now, let’s combine everything for a creamy delight. Reduce the heat to low and stir in heavy cream and dried thyme. This will give your dish a rich and smooth texture. Allow it to simmer for two to three minutes to thicken slightly. Then, add the cooked orzo to the creamy mushroom mixture. Stir well until the orzo is fully coated. Season with salt and pepper to taste. If you like, mix in some grated Parmesan cheese for extra creaminess. The cheese will melt into the dish, making it even more delicious. For the complete recipe, check out the Full Recipe section. Enjoy your cooking! To make your creamy mushroom orzo shine, consider these tips: - Use fresh herbs. They add a burst of flavor. Try thyme or parsley for freshness. - Substitute coconut cream for a lighter option. It gives a nice, creamy texture without dairy. Getting the right texture is key to a great dish: - Avoid overcooking the orzo. Cook it until it is just al dente. This keeps it firm and prevents mushiness. - Adjust creaminess by varying the quantity of cream. Add less for a lighter dish or more for a rich, creamy bowl. These tips will help you create a creamy mushroom orzo that is both flavorful and comforting. For more details, check the Full Recipe. {{image_2}} You can make creamy mushroom orzo even tastier with some easy changes. Add fresh spinach or kale to boost the nutrients. Just toss them in near the end of cooking. They will wilt quickly and add color. You can also switch up the mushrooms. Try shiitake or portobello for deeper flavors. Mixing different mushrooms gives you a great taste and texture. If you want more protein, add cooked chicken or shrimp. They both work well with the creamy sauce. Just mix them in when you add the orzo. For a plant-based option, consider chickpeas. They are hearty and fill you up. They also blend well with the creamy sauce. This way, you can customize your bowl to fit your taste! For the full recipe, check out the details above. To keep your creamy mushroom orzo fresh, store leftovers in an airtight container. Allow it to cool to room temperature first. Then, seal the container and place it in the fridge. This method helps keep the flavors intact. When you want to reheat, use the stove for best results. Add a splash of vegetable broth or water to the pot. This keeps the orzo creamy and prevents it from drying out. Heat it gently over low to medium heat, stirring often. In the fridge, your creamy mushroom orzo lasts about three to four days. If you won’t eat it in that time, consider freezing it. To freeze, place it in a freezer-safe container. Leave some space for the orzo to expand. It can stay in the freezer for up to three months. When ready to enjoy, thaw it overnight in the fridge. Reheat it on the stove, adding a little broth or water as needed. This way, you maintain the dish's rich, creamy texture. For the full recipe, check the earlier section. To make creamy mushroom orzo vegan, swap heavy cream for coconut cream. It gives a rich taste without dairy. For cheese, try nutritional yeast or a vegan cheese blend. These options add flavor and keep the dish creamy. You can also use vegetable broth and add more mushrooms for depth. Creamy mushroom orzo pairs well with many sides. A fresh green salad with light dressing brightens your meal. Roasted vegetables add texture and flavor. Grilled asparagus or steamed broccoli work great too. If you like bread, serve it with garlic bread or a crusty baguette. Yes, you can use regular pasta instead of orzo. Choose small shapes like shells or fusilli. Adjust cooking time as needed. Follow package instructions for al dente texture. The sauce will still coat the pasta nicely, giving you that creamy comfort in every bite. Check the [Full Recipe] for more details. This dish combines orzo pasta, mushrooms, and cream for a rich meal. You learned how to prepare and cook orzo, sauté onions, and mix in flavors. I also shared tips for enhancing taste and texture. You can vary ingredients for more options. Store leftovers well to keep them fresh. Enjoy creating this tasty, creamy mushroom orzo that suits your style!

Creamy Mushroom Orzo Flavorful Comfort Bowl

Welcome to your next favorite comfort food: Creamy Mushroom Orzo! This dish blends tender orzo pasta with savory mushrooms and

- 1 cup unsweetened almond milk (or any preferred milk) - 1/2 cup canned pumpkin puree - 1 scoop vanilla protein powder - 1/2 teaspoon pumpkin pie spice - 1 tablespoon maple syrup (or honey for sweetness) - 1/4 teaspoon vanilla extract - 1/2 banana (frozen for a creamier texture) - Ice cubes (optional for desired thickness) What is the protein content per serving? Each serving of this shake has about 20 grams of protein. This comes from the protein powder and the almond milk. What is the caloric breakdown? The shake has around 300 calories. This will vary based on your milk choice and if you add sweetener. What are the dietary benefits of the ingredients? - Pumpkin puree is high in fiber and vitamins A and C. - Almond milk is low in calories and often enriched with vitamins. - Bananas add potassium and natural sweetness without refined sugars. - Protein powder helps build and repair muscles, making it great after workouts. This shake is not only a great treat but also a fantastic way to fuel your day. For the full recipe, check out the Pumpkin Spice Protein Shake section. 1. Combine the main ingredients in the blender Start by adding 1 cup of unsweetened almond milk, 1/2 cup of canned pumpkin puree, and 1/2 frozen banana to your blender. These ingredients give a great base and creamy texture. 2. Incorporate flavor enhancers Next, add 1 scoop of vanilla protein powder, 1/2 teaspoon of pumpkin pie spice, 1 tablespoon of maple syrup, and 1/4 teaspoon of vanilla extract. This mix brings out that warm, fall flavor. 3. Blend to desired consistency Blend all the ingredients on high until smooth and creamy. If you want it thicker, toss in some ice cubes and blend again. - Using frozen bananas for creaminess Frozen bananas make your shake extra creamy. They also help keep your drink cold without watering it down. - Adjusting sweetness to taste Try your shake before serving. If you want it sweeter, add more maple syrup or honey. Adjust it to your liking! Check out the Full Recipe for more details and tips to perfect your Pumpkin Spice Protein Shake. To create the best pumpkin spice protein shake, blending time matters. Blend on high for at least 30 seconds. This lets the ingredients mix well and gives you a smooth texture. If you want it extra creamy, blend longer. Correct measurements also help your shake taste great. Use a measuring cup for liquids and a scale for powders. This keeps your flavors balanced. I recommend using a scale for the protein powder. Too much can change the shake's texture and taste. For a nice presentation, use a tall glass or a mason jar. This lets you show off the lovely orange color. You can also add a sprinkle of pumpkin pie spice on top for a finishing touch. Pair your shake with light snacks or meals. It goes well with whole-grain toast or oatmeal. For a sweet treat, enjoy it with a slice of apple. This adds a nice crunch and complements the shake's flavor. You can find the full recipe above to guide you. {{image_2}} You can easily switch up the flavor of your pumpkin spice protein shake. Try different types of milk. Oat milk adds a creamy texture. Coconut milk gives a light, sweet flavor. Almond milk keeps it nutty and mild. You can also add other spices. A dash of cinnamon enhances the cozy taste. Nutmeg or ginger can bring a fun twist. Experiment with flavors to find your favorite mix. If you need a non-dairy option, look for plant-based protein powders. Pea protein or rice protein works well. These options keep your shake creamy and delicious. For a vegan version, ensure your protein powder has no animal products. Many brands offer vegan-friendly options. You can also skip protein powder altogether. Just add more pumpkin or nut butter for extra nutrition. For the full recipe, check out the Pumpkin Spice Protein Shake. To keep your pumpkin spice protein shake fresh, start by refrigerating any leftovers. Pour the shake into a clean, airtight container. This helps prevent the shake from absorbing other smells in your fridge. It stays good for up to 24 hours. If you need to store it longer, consider freezing it. Pour the shake into ice cube trays or freezer-safe containers. This way, you can enjoy it later as a quick snack or meal. When stored in the fridge, your shake is best within one day. After that, it may lose flavor and texture. Check for signs that it has gone bad. If you notice an off smell, or if it separates and looks curdled, it's time to toss it. Always trust your senses. Fresh ingredients like pumpkin puree and banana have a short shelf life, so use them wisely. For the best taste and nutrition, enjoy your shake soon after making it. Can I make this shake without protein powder? Yes, you can skip the protein powder. The shake will still taste great! You can add more pumpkin or a scoop of Greek yogurt for creaminess. This keeps it filling. Is it suitable for meal replacement? Absolutely! This shake has protein, fiber, and healthy fats. It can stand in for a meal. Just make sure you feel full after drinking it. You can also add oats for more energy. How to make it less sweet for dietary restrictions? To cut down on sweetness, reduce or skip the maple syrup. Using unsweetened almond milk helps too. Adding more pumpkin or spices can balance flavors without added sugar. You can find the full recipe above to create your own tasty shake! This blog post walks you through making a delicious pumpkin protein shake. We covered key ingredients, step-by-step instructions, and tips for the best results. You learned about nutritional benefits and how to store your shake. Remember, you can customize flavors and protein powders to fit your taste. Enjoy your shake as a snack or meal replacement. With the right ingredients and tips, you can craft a tasty and healthy treat that fits your needs. Make it your own and savor every sip!

Pumpkin Spice Protein Shake Nutritional Power Boost

Are you craving a delicious way to boost your nutrition? Look no further than this Pumpkin Spice Protein Shake! Packed

For this Coconut Curry Butternut Soup, you need fresh and tasty ingredients. Here’s what you will use: - 1 medium butternut squash, peeled and cubed - 1 can (400ml) coconut milk - 1 medium onion, chopped - 2 cloves garlic, minced - 1 tablespoon fresh ginger, grated - 2 tablespoons red curry paste - 4 cups vegetable broth - 1 tablespoon olive oil - 1 teaspoon turmeric powder - 1 teaspoon cumin powder - Salt and pepper to taste - Fresh cilantro for garnish - Lime wedges for serving Each ingredient brings its own flavor. The butternut squash adds sweetness, while the coconut milk makes it creamy. The red curry paste gives it a nice kick. Fresh ginger and garlic add warmth and depth. Don’t forget to check the [Full Recipe] for more details on how to prepare this delicious soup. First, let’s prep the butternut squash. Start by peeling it with a sharp peeler. Cut the squash in half, scoop out the seeds, and then cube it into bite-sized pieces. This helps the squash cook evenly. Next, chop the onion. Dice it finely so it blends well into the soup. Then, take two cloves of garlic and mince them. This adds a nice flavor to the dish. Also, grab one tablespoon of fresh ginger and grate it. This will give the soup a warm, spicy kick. Now, heat one tablespoon of olive oil in a large pot over medium heat. Add the chopped onion first. Sauté it for about five minutes until it turns translucent. This step creates a tasty base for your soup. After the onion is ready, stir in the minced garlic and grated ginger. Cook them for another minute. This will fill your kitchen with great smells! Next, add two tablespoons of red curry paste, one teaspoon of turmeric powder, and one teaspoon of cumin powder. Mix well and let the spices cook for one to two minutes. You want the spices to be aromatic. Now it’s time to add the cubed butternut squash to the pot. Stir everything together. Pour in four cups of vegetable broth and bring the mixture to a boil. Once it boils, reduce the heat to low. Let it simmer for about 20 minutes, or until the squash is tender. Once the squash is cooked, take the pot off the heat. Use an immersion blender to puree the soup until smooth. If you don’t have one, carefully transfer the soup in batches to a blender. Blend until it’s silky. Be very careful with hot liquid! Return the pureed soup to the pot. Stir in one can of coconut milk and season with salt and pepper to taste. Gently reheat the soup until warmed through. This is when the magic happens! The coconut milk makes the soup creamy and rich. Serve the soup hot, garnished with fresh cilantro and a squeeze of lime juice. This adds brightness and freshness to every bowl. For the complete recipe, check [Full Recipe]. Enjoy your coconut curry butternut soup! To get the best texture in your soup, use an immersion blender. This tool makes blending easy and quick. If you don’t have one, a regular blender works too. Just be careful with the hot soup. Blend in small batches. If you want a thicker soup, add less broth. For a creamier soup, mix in more coconut milk. Adjusting the liquid helps you find your perfect texture. To boost the flavor, consider adding spices like coriander or cardamom. These spices add warmth and depth to the soup. You can also try a dash of chili powder for some heat. For garnishes, use fresh herbs like basil or mint. These add bright colors and fresh flavors. A sprinkle of toasted nuts can give a nice crunch too. The size of your butternut squash matters. If your pieces are big, you may need to cook longer. A smaller squash cooks faster, so keep an eye on it. Simmer for about 20 minutes, but check for tenderness. You want the squash to be soft enough to blend easily. Adjust your simmer time based on your taste. For more details, check the Full Recipe. {{image_2}} You can make this soup heartier by adding protein. Chickpeas work well. They add great texture and nutrition. Just stir in a can of drained chickpeas when you add the broth. You can also use shredded chicken. Cook the chicken in the soup or add pre-cooked chicken for convenience. If you're a fan of tofu, try using firm or extra-firm tofu. Cut it into cubes and pan-fry until golden. Add it right before serving for a tasty boost. Shrimp is another option. Add shrimp during the last few minutes of cooking. They will cook quickly and keep their nice texture. You can change the spice level to fit your taste. If you prefer a milder soup, reduce the red curry paste. Start with one tablespoon and taste as you go. You can always add more if you want more heat. For a spicier kick, try adding chili flakes or a different curry paste. Green curry paste has a different flavor and can make the soup zestier. Feel free to mix in other vegetables. Different squashes, like acorn or pumpkin, add a nice twist. You can also try root vegetables like carrots or sweet potatoes. These will give the soup a sweet depth. Fresh greens like spinach or kale can brighten the soup. Stir them in just before serving. They only need a minute to wilt and add color. For the full recipe, check out the complete instructions above. After making Coconut Curry Butternut Soup, let it cool down first. This helps keep it fresh. Store the soup in airtight containers. Glass jars or plastic containers work well. Make sure to fill them only halfway. This leaves room for expansion when it freezes. To freeze the soup, let it cool completely. Then, pour it into freezer-safe bags or containers. Squeeze out excess air before sealing. This prevents freezer burn. When you are ready to eat, thaw the soup in the fridge overnight. Reheat it on the stove over low heat. Stir gently to keep it smooth. The soup lasts in the fridge for about five days. Always check for signs of spoilage. If you see mold or an off smell, it’s best to throw it away. Keeping track of how long it has been in the fridge helps you avoid this. Yes, you can use fresh ginger. Fresh ginger gives a bright flavor. Use about one tablespoon of fresh ginger, grated. This will enhance the soup's taste and aroma. Ground ginger works, too, but fresh is best. To make the soup vegan, use vegetable broth and coconut milk. This recipe is already vegan-friendly. Just skip any non-vegan toppings. You can add more veggies or tofu for extra protein. You can serve this soup with crusty bread or rice. A simple green salad pairs well, too. For a twist, try it with some spicy roasted chickpeas. They add crunch and flavor. Yes, you can make the soup ahead of time. Just store it in the fridge for up to three days. Reheat it on the stove before serving. The flavors will deepen and taste even better! Yes, you can use other squashes. Pumpkin or acorn squash works well. Just ensure they are tender when cooked. Each squash adds a unique taste to the soup. This blog post covered a rich and flavorful coconut curry butternut soup. You learned about the key ingredients, step-by-step instructions, and helpful tips for delicious results. We explored fun variations, storage tips, and answered common questions. Enjoying this soup brings warmth and nutrition into your life. Don't hesitate to try it with different proteins or veggies. Simple changes can lead to new favorites. Embrace the creativity in your kitchen and enjoy every bite!

Coconut Curry Butternut Soup Flavorful and Easy Recipe

Looking for a simple, delicious soup to warm your soul? This Coconut Curry Butternut Soup checks all the boxes! Packed

- 1 pound baby carrots (or 4 large carrots, cut into sticks) - 3 tablespoons pure maple syrup - 2 tablespoons unsalted butter - 1 teaspoon cinnamon - Salt and pepper to taste - 1 tablespoon fresh thyme leaves (or 1 teaspoon dried thyme) - 1 tablespoon lemon juice For this recipe, I use 1 pound of baby carrots. If you prefer, you can cut 4 large carrots into sticks. The sweetness comes from 3 tablespoons of pure maple syrup. I add 2 tablespoons of unsalted butter for richness. One teaspoon of cinnamon adds warmth. I season with salt and pepper to taste. Fresh thyme gives a nice herbal note, and I use 1 tablespoon of it, or 1 teaspoon if dried. Finally, I add 1 tablespoon of lemon juice for brightness. When picking carrots, look for ones that are bright orange. They should feel firm and not soft. If you choose baby carrots, check that they are smooth and not shriveled. Avoid any carrots with dark spots or cracks. Fresh carrots taste better and will make your dish shine. Start by choosing your carrots. You can use baby carrots or large ones. If you pick large carrots, peel them and cut them into sticks. Rinse them well to remove dirt. Clean baby carrots under cold water. This step ensures your dish tastes fresh. Next, heat a large skillet over medium heat. Add two tablespoons of unsalted butter. Let it melt until it starts to bubble. Once the butter is ready, toss in the carrots. Sauté them for about five minutes. Stir them often to help them soften. After that, pour in three tablespoons of pure maple syrup. Add one teaspoon of cinnamon, and sprinkle salt and pepper to taste. Mix everything well to coat the carrots fully with the syrup and spices. Continue cooking on medium-low heat for another 10 to 15 minutes. Stir occasionally until the carrots become tender and the glaze thickens. You want them to shine from the syrup. When the carrots are tender, it’s time for final touches. Stir in one tablespoon of fresh thyme leaves or one teaspoon of dried thyme. This addition brightens the dish. Also, squeeze in one tablespoon of lemon juice. It adds a nice zing. Taste the carrots and adjust seasoning if needed. Add more salt or pepper to suit your taste. Follow these steps, and you’ll enjoy a delicious side dish. For the complete method, check the Full Recipe. To get the perfect glaze, control the heat. Start with medium heat when cooking the carrots. This helps them soften without burning. Once you add the maple syrup, lower the heat. This allows the glaze to thicken nicely. Stir often to prevent sticking. If your glaze is too thin, cook it longer. If it's too thick, add a splash of water. You can boost the flavor with simple add-ins. Consider adding orange zest for a citrus punch. A pinch of nutmeg can also add warmth. For a spicy kick, try a dash of cayenne pepper. Fresh herbs like rosemary or parsley can give a fresh touch. Feel free to mix and match these options to find your favorite flavor profile. One common mistake is overcooking the carrots. This can make them mushy. Keep an eye on them while cooking. Another mistake is not seasoning enough. Taste your dish and adjust the salt and pepper. Lastly, don’t skip the lemon juice. It brightens the flavor and balances the sweetness of the glaze. Follow these tips for a perfect side dish every time! {{image_2}} You can change the taste by adding other veggies. Try using parsnips, sweet potatoes, or turnips. These veggies add different flavors and textures. Cut them to match the size of your carrots. Cook them the same way. This makes a colorful side dish. Mixing vegetables keeps things fresh and fun. If you don’t have maple syrup, you can use honey or agave. Both sweeteners bring their own unique taste. Honey adds a floral note, while agave is milder. You can also use brown sugar for a deeper flavor. Just dissolve it in the butter before adding the carrots. Each option gives you a new twist on the classic recipe. Spices and herbs can change the entire dish. If you want a spicy kick, add a pinch of cayenne pepper. For a warm flavor, use nutmeg instead of cinnamon. Fresh herbs like parsley or dill can brighten the dish. Try adding a splash of balsamic vinegar for tang. Each spice or herb you add creates a new flavor experience. Explore what you like best! To keep your maple glazed carrots fresh, store them in an airtight container. This helps prevent moisture loss and keeps the flavor intact. Place the container in the fridge. Use the leftovers within three to five days for the best taste. Reheating is simple and quick. Place the carrots in a skillet over low heat. Stir them occasionally to ensure even heating. You can also microwave them in a bowl covered with a damp paper towel. Heat for about one to two minutes, checking every 30 seconds. You can freeze maple glazed carrots if you want to save them for later. Start by letting the carrots cool completely. Then, pack them into freezer bags, removing as much air as possible. Label the bags with the date. They will maintain good quality for up to three months. When ready to eat, thaw in the fridge overnight and reheat as mentioned above. Yes, you can use frozen carrots. They work well in this dish. Just remember to thaw them first. This helps them cook evenly. Frozen carrots may need less cooking time. Keep an eye on them to avoid mushiness. I recommend using pure maple syrup. It has a richer flavor than imitation syrup. Look for Grade A or Grade B syrup. Grade A is lighter and milder. Grade B has a stronger taste, which pairs well with carrots. Either choice will make your dish taste great. Making this dish vegan is easy. Simply replace the butter with a plant-based alternative. Olive oil or coconut oil works well. You can also use vegan margarine. The rest of the recipe stays the same. Enjoy your maple glazed carrots without any animal products! Check out the Full Recipe for more details. In this blog post, we explored how to make maple glazed carrots. We covered the ingredients, measurements, and tips for picking fresh carrots. You learned step-by-step how to prepare and cook them. I shared tips for perfecting the glaze, adding flavors, and avoiding common mistakes. You also discovered variations to include other veggies and sweeteners. Lastly, we discussed storing leftovers and reheating options. With these insights, you can create a delicious dish that shines on your table. Enjoy your cooking adventure!

Maple Glazed Carrots Flavorful Side Dish Recipe

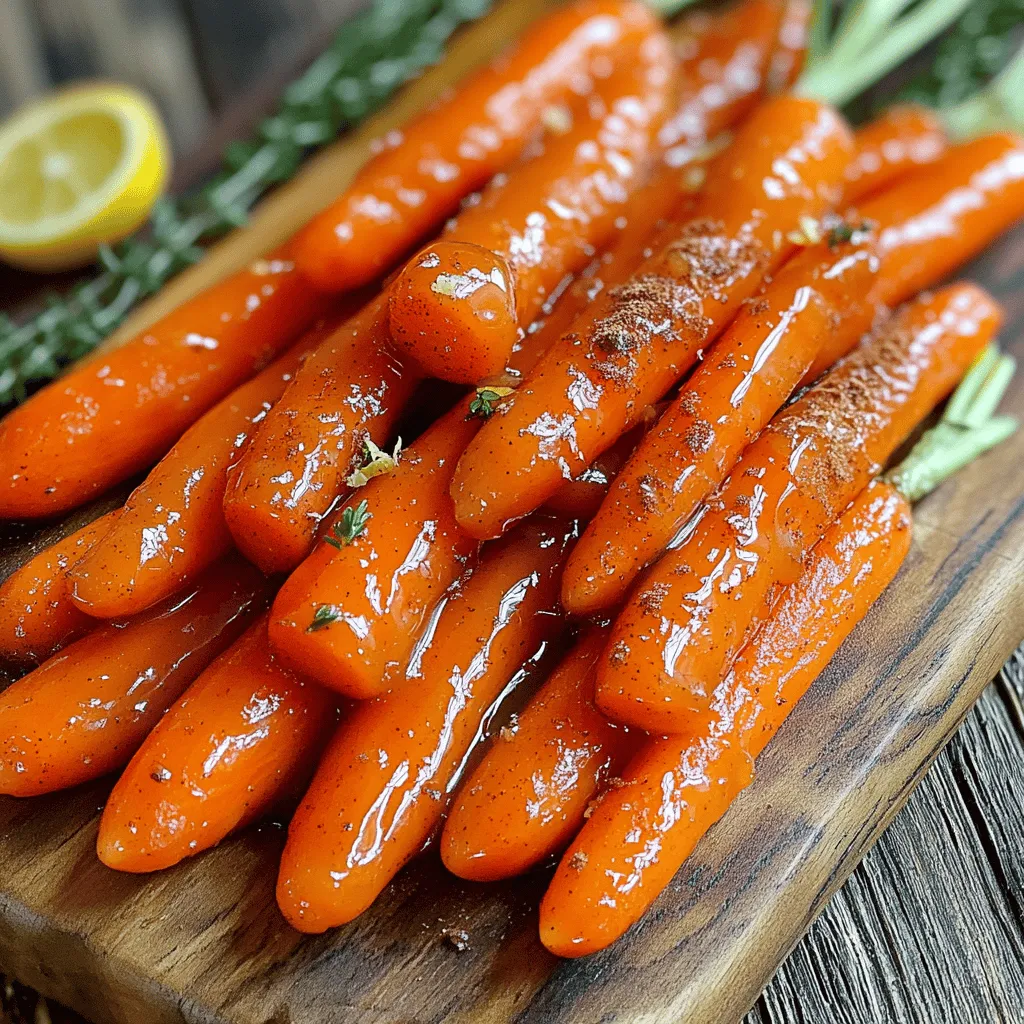
Looking for a side dish that wows? Maple glazed carrots are colorful, tasty, and super easy to make. This simple

- 1 medium head of cauliflower - 1 cup all-purpose flour - 1 cup almond milk (or any non-dairy milk) - 1 cup buffalo sauce To start, you need a medium head of cauliflower. Cut it into bite-sized florets for easy cooking. The batter requires one cup of all-purpose flour mixed with one cup of almond milk, or any non-dairy milk you prefer. This mix helps the cauliflower stick to the sauce. Don't forget the star of the show: one cup of buffalo sauce for that spicy kick! - 8 small corn tortillas - 1 ripe avocado, sliced - 1 cup shredded cabbage - ½ cup diced tomatoes - Fresh cilantro, for garnish - Lime wedges, for serving Next, let’s talk toppings. You’ll need eight small corn tortillas as the base. A ripe avocado adds creaminess, while one cup of shredded cabbage gives a nice crunch. Diced tomatoes, about half a cup, add freshness. Top it all off with fresh cilantro and lime wedges for that zesty finish. - Gluten-free flour options - Alternative toppings ideas You can switch the all-purpose flour with gluten-free flour if you need. For the toppings, feel free to get creative! Try different sauces, like ranch or even a chipotle sauce. You can also use other veggies like radishes or pickles. Experiment with what you love to make this dish your own! For the full recipe, check out the link to create these tasty Buffalo Cauliflower Tacos. - Preheat your oven to 450°F (232°C). - Line a baking sheet with parchment paper. - In a mixing bowl, combine 1 cup of flour, 1 teaspoon garlic powder, 1 teaspoon onion powder, 1 teaspoon paprika, ½ teaspoon salt, and ½ teaspoon black pepper. - Whisk in 1 cup of almond milk until the mixture is smooth. - Take each cauliflower floret and dip it into the batter. - Let the excess batter drip off and place the florets on the baking sheet. - Bake for 20-25 minutes, flipping halfway, until the florets are golden brown and crispy. - Once done, drizzle or toss the cauliflower with 1 cup of buffalo sauce. - Bake for an additional 10 minutes to let the sauce soak in. - While the cauliflower cooks, heat 8 small corn tortillas on a skillet over medium heat. - You can also warm them over a gas flame for a few seconds on each side. - Assemble the tacos by placing a generous amount of the buffalo cauliflower on each tortilla. - Top with slices of avocado, shredded cabbage, and diced tomatoes. - Finish with fresh cilantro and lime wedges on the side for extra flavor. For the full recipe, check out the detailed instructions above. To get your cauliflower crispy, baking is the best option. Frying can add extra calories and may not be as healthy. When baking, preheat your oven to 450°F (232°C) for the best results. Bake the cauliflower for 20-25 minutes, flipping halfway through. This helps both sides get golden brown. If you want it even crispier, bake for an extra 10 minutes after tossing in the buffalo sauce. You can boost the flavor with more spices. Try adding cumin or smoked paprika for depth. If you like it spicy, mix in cayenne pepper. You can also adjust the buffalo sauce level. For milder tacos, use less sauce. For more heat, add more sauce or choose a hotter brand. Serving these tacos with sides can make the meal special. Consider a fresh salad or some guacamole. For drinks, a cold beer pairs well. You could also enjoy a refreshing lemonade. These flavors go great together and make your meal even better! {{image_2}} For those who follow a vegan diet, buffalo cauliflower tacos shine as a perfect option. You can use almond milk or any non-dairy milk in the batter. This makes the recipe both tasty and plant-based. If you need a gluten-free option, swap the all-purpose flour with a gluten-free flour blend. This allows everyone to enjoy these tacos without worry. To switch things up, try using different sauces. You can experiment with barbecue sauce or a spicy sriracha. Each sauce adds its own unique flavor profile. For toppings, think beyond the basics. Add pickled onions, crumbled feta, or even mango salsa. These toppings can elevate your taco experience and add fresh flavors. Want to add local flair? Use spices common in your area. For example, add some Cajun seasoning for a Southern twist. If you crave heat, mix in jalapeños or chili flakes. This spicy twist will satisfy heat lovers and make your tacos unforgettable. For the full recipe, check out the [Full Recipe]. To store your buffalo cauliflower tacos, place them in an airtight container. This keeps them fresh and tasty. You can also wrap them tightly in foil or plastic wrap. If stored properly, these tacos will last in the fridge for about 3 days. Always let them cool down before sealing to avoid moisture build-up. When reheating, you have two main choices: the microwave or the oven. The microwave is quick but may make the tacos soft. If you want to keep them crispy, use the oven. Preheat it to 350°F (175°C) and bake the tacos for about 10 minutes. This helps regain their crunchiness for a better taste experience. You can freeze leftover buffalo cauliflower tacos if you need to save them for later. Wrap each taco in plastic wrap, then place them in a freezer-safe bag. This prevents freezer burn. When you are ready to eat, let the tacos thaw in the fridge overnight. Avoid using the microwave to thaw; it can change their texture. To make the best buffalo cauliflower tacos, follow these steps: 1. Prep the oven and baking sheet. Preheat your oven to 450°F (232°C) and line a baking sheet with parchment paper. This helps the cauliflower crisp up nicely. 2. Mix the batter. In a bowl, whisk together flour, garlic powder, onion powder, paprika, salt, and pepper. Add almond milk to create a smooth batter. 3. Coat the cauliflower. Dip each cauliflower floret in the batter. Let any extra batter drip off before placing them on the baking sheet. 4. Bake for crispiness. Bake the florets for 20-25 minutes. Flip them halfway through for even cooking. 5. Add buffalo sauce. Once golden and crispy, toss the cauliflower in buffalo sauce and bake for an additional 10 minutes. This adds that spicy kick. 6. Warm the tortillas. Heat corn tortillas in a skillet or over a gas flame until warm. This makes them easy to fold. 7. Assemble the tacos. Add the buffalo cauliflower to each tortilla. Top with avocado, cabbage, and tomatoes. 8. Garnish. Finish with fresh cilantro and lime wedges for extra flavor. Yes, you can prepare buffalo cauliflower tacos ahead of time. Here are some tips for meal prep: - Prep the cauliflower. You can cut and batter the cauliflower florets a day in advance. Store them in the fridge in an airtight container. - Bake just before serving. Bake the coated cauliflower shortly before you plan to eat. This keeps them crispy and fresh. - Make the toppings ahead. You can slice the avocado, chop the cabbage, and dice the tomatoes ahead of time. Store them separately in the fridge. - Reheat leftovers. If you have leftovers, you can reheat the tacos in the oven to restore their crispiness. Buffalo cauliflower tacos can be quite nutritious. Here are some benefits and considerations: - High in fiber. Cauliflower is rich in fiber, which aids in digestion and keeps you feeling full. - Low in calories. These tacos are lower in calories than traditional meat tacos, making them a great choice for lighter meals. - Packed with vitamins. Cauliflower contains vitamins C and K, along with folate and potassium, which support overall health. - Consider your toppings. Be mindful of how much buffalo sauce you use, as it can add sodium. Avocado and fresh veggies boost nutrients without extra calories. You can find the full recipe for buffalo cauliflower tacos [here](#). Buffalo cauliflower tacos combine flavor, texture, and ease. You start with simple ingredients like cauliflower, almond milk, and buffalo sauce. After baking, they become crispy and delicious. Add corn tortillas and fresh toppings for a feast. You can customize with gluten-free options or different sauces. Remember, these tacos are not just tasty but also nutritious. Enjoy them fresh, or store leftovers properly for later. With these tips, you can make tasty tacos that everyone will love. Now, get cooking and enjoy your new favorite dish!

Buffalo Cauliflower Tacos Flavorful and Easy Recipe

Are you ready to spice up your taco night? These Buffalo Cauliflower Tacos are not only flavorful but also super

To create these tasty bites, you need a few key ingredients. Each ingredient plays a vital role in the flavor and texture of the dish. - Puff pastry - Brie cheese - Cranberry sauce Puff pastry gives a light, flaky base. It puffs up beautifully in the oven, creating a perfect shell. Brie cheese melts nicely, offering a creamy texture. Cranberry sauce adds a sweet and tart kick, making it festive and fun. - Chopped pecans or walnuts - Fresh herbs for garnish Nuts add crunch and depth. You can use chopped pecans or walnuts based on your taste. Fresh herbs, like rosemary or thyme, brighten the dish and make it look nice. - Baking sheet - Parchment paper - Rolling pin A baking sheet holds your bites while they cook. Parchment paper keeps them from sticking. A rolling pin helps smooth out the puff pastry, making it easy to cut into squares. You can find the full recipe for these delightful bites by checking out the Full Recipe. Enjoy making these treats that are perfect for any gathering! First, you need to thaw the puff pastry. Leave it in the fridge overnight or on the counter for about 30 minutes. While it thaws, preheat your oven to 375°F (190°C). This temperature helps create a nice, golden crust. Now, let’s cut the pastry squares. On a lightly floured surface, roll out the thawed puff pastry. Cut each sheet into 3-inch squares. You should have about 20 squares. Place the squares on a lined baking sheet, leaving space between them. In the center of each square, add a small piece of brie cheese, about 1 teaspoon. Then, spoon a dollop of cranberry sauce on top, also about 1 teaspoon. If you want a crunchy twist, sprinkle some chopped pecans or walnuts over the cranberry sauce. Next, fold the corners of the pastry squares up. Pinch them in the center to form a pocket. This keeps the cheese and cranberry sauce inside while baking. To give them a nice shine, brush the tops of the pastry bites with the beaten egg. This will help them turn golden brown in the oven. Bake in your preheated oven for 15-20 minutes. Look for a puffed and golden appearance. When done, remove them and let them cool a bit. Garnish with fresh rosemary or thyme for an extra touch. Enjoy these bites warm with friends and family! For more detailed cooking steps, check the Full Recipe. To make the best cranberry brie bites, start with the right brie. I recommend using a creamy brie that melts well. Look for brie that has a soft texture and a rich flavor. Some popular brands include President and brie de Meaux. When it comes to cranberry sauce, you have two options: homemade or store-bought. Homemade sauce gives you control over sweetness and flavor. You can customize it by adding spice, like cinnamon or nutmeg. Store-bought sauce is quick and convenient. Either choice will work, but fresh sauce adds a nice touch. To tell if your bites are done, look for a golden brown color. The pastry should be puffed and crisp. If they are not golden after 15 minutes, give them a few more minutes in the oven. If you use larger pieces of brie or more sauce, you might need to adjust the baking time. Check them around the 15-minute mark. If they look golden and puffed, they are ready! You can pair cranberry brie bites with many sides. A fresh salad with greens and nuts works well. You might also serve them with a platter of meats and cheeses. These bites are perfect for special occasions. They shine at holiday parties, game days, or family gatherings. Their festive look and taste will impress your guests. Enjoy them warm for the best flavor! For the complete recipe, check out the Full Recipe for your next gathering. {{image_2}} You can add more fun to your cranberry brie bites by changing the flavor. Adding different fruit preserves can really change the vibe. Consider using apricot, raspberry, or even fig preserves. Each one brings a unique taste and pairs well with brie. You can also incorporate herbs into the filling. Chopped rosemary or thyme can make the bites more aromatic. Just mix in a little with your cranberry sauce for an extra kick. If you want to switch things up, try using goat cheese or cream cheese instead of brie. Goat cheese has a tangy flavor that will surprise you. Cream cheese offers a smooth texture that blends well with the fruit. For those who prefer vegan options, look for plant-based cheese substitutes. Many brands offer great flavor and texture that mimic traditional cheese. You won’t miss out on taste! You can serve these bites in different ways for fun. Mini tartlets are a great way to present them. Just use a tart shell instead of puff pastry for a sturdy base. Bite-sized pastry pinwheels are another fun choice. Roll the pastry with the filling, slice, and bake. These styles make your dish more appealing and great for parties. For more details on making these tasty bites, check out the Full Recipe. To keep your cranberry brie bites fresh, store them in an airtight container. Place a paper towel at the bottom to absorb any moisture. You can refrigerate them for up to three days. If you want to save them for longer, freeze the bites. Wrap each one in plastic wrap and then place them in a freezer bag. They can stay frozen for up to three months. To reheat your cranberry brie bites, the oven is the best choice. Preheat it to 350°F (175°C). Place the bites on a baking sheet and cover them lightly with foil. Heat for about 10 to 15 minutes. This method helps keep the pastry crisp and prevents sogginess. Avoid using the microwave, as it can make the pastry chewy. You can prepare cranberry brie bites in advance. Assemble them, then freeze before baking. Lay them on a baking sheet and freeze until solid. Once frozen, transfer them to a freezer bag. When you're ready to bake, no need to thaw. Just add a few extra minutes to the baking time for a delicious treat. Yes, you can prep these bites in advance! To do this, follow these steps: - Prepare the pastry squares and fill them with cheese and cranberry sauce. - Do not brush them with egg wash yet. - Place them on a baking sheet and cover with plastic wrap. - Store in the fridge for up to 24 hours before baking. When you’re ready to bake, brush with egg wash and bake as per the recipe. This method keeps the flavors fresh and saves time on busy days. Cranberry Brie Bites pair well with many dishes. Here are some ideas: - A simple green salad with vinaigrette. - Sliced fruits like apples or pears. - A cheese platter with nuts and dried fruits. - Sparkling wine or cider to enhance the flavors. These pairings create a beautiful and festive spread for any gathering. A soggy pastry can happen, but it’s easy to fix. Here are some tips: - Make sure to bake the bites until they are golden and puffed. - Avoid overloading the filling. Too much cranberry sauce can make the pastry soggy. - If you notice sogginess after baking, place the bites back in the oven for a few minutes. - Serve them warm right after baking for the best texture. By following these tips, you’ll keep your Cranberry Brie Bites crisp and delicious. Cranberry brie bites are a simple and tasty treat. You learned how to gather the right ingredients, prepare the bites, and perfect your baking. Plus, you found tips on storing and reheating leftovers to keep them fresh. You can even experiment with different flavors and ingredients. Enjoy making these bites for your next gathering. They will impress your guests and satisfy your taste buds! Keep exploring and enjoy your time in the kitchen.

Cranberry Brie Bites Simple Festive Flavor Delight

If you’re looking for a tasty treat that shines at any gathering, you’ve found it! These Cranberry Brie Bites offer

- 2 cups cooked shredded chicken - 1/2 cup BBQ sauce (options for homemade or store-bought) - 4 flatbreads or naan - 1 cup shredded mozzarella cheese - 1/2 red onion, thinly sliced - 1/2 cup corn kernels (fresh or frozen) - 1/4 cup fresh cilantro, chopped - 1 tablespoon olive oil - Salt and pepper to taste These ingredients come together to create a dish that is both tasty and easy to make. The chicken brings protein, while the BBQ sauce adds rich flavor. I love using shredded chicken because it mixes well with the sauce, making each bite juicy and full of taste. Flatbreads or naan serve as a great base for this dish. They are soft and hold toppings well. I often choose naan for a little extra flavor, but any flatbread works nicely. The cheese melts beautifully, creating a creamy layer on top. Red onion adds a crisp texture and a sharp bite that balances the sweetness of the BBQ sauce. The corn brings a nice crunch and a hint of sweetness. Fresh cilantro brightens the dish, giving it a pop of color and flavor. To make this recipe even better, I brush the flatbreads with olive oil. This helps them crisp up nicely while baking. Salt and pepper round out the flavors, ensuring every bite tastes great. You can find the full recipe [here](#). This dish is perfect for a quick meal or a fun snack! - Preheat the oven to 400°F (200°C). - In a bowl, mix the shredded chicken with BBQ sauce. Stir well so the chicken is fully coated. - Brush both sides of the flatbreads with olive oil. This adds flavor and helps them crisp. - Spread the BBQ chicken mixture evenly over each flatbread. Make sure to reach the edges. - Top with shredded mozzarella cheese, sliced red onions, and corn kernels. - Bake the flatbreads for about 10-12 minutes. Watch for the cheese to melt and the edges to turn golden. - Once baked, let them cool for a few minutes. This makes slicing easier. - Before serving, add fresh cilantro on top for a nice touch. For the full recipe, refer to the complete guide provided earlier. To make the best BBQ chicken flatbread, choose the right flatbread. I like using naan or pita bread. These types hold up well and have a nice texture. You can also use pre-made flatbreads from the store if you’re short on time. For BBQ sauce, I recommend a sweet and tangy sauce. Look for one with a good balance of flavor. You can even try a smoky BBQ sauce for a deeper taste. Homemade BBQ sauce can take your flatbread to the next level. You can find plenty of easy recipes online. To avoid soggy flatbreads, brush them lightly with olive oil. This helps create a barrier. Bake the flatbreads before adding toppings for a few minutes. This keeps them crisp. You can customize the cheese and toppings to suit your taste. I love using mozzarella for its meltiness. However, you can try cheddar or pepper jack for extra flavor. Add your favorite veggies, like bell peppers or jalapeños, to mix it up. For side dishes, consider a fresh salad. A simple green salad pairs well with BBQ flavors. You can also serve coleslaw for a crunchy contrast. For garnishing, fresh cilantro adds a nice touch. You can also drizzle some extra BBQ sauce on top. This makes the dish look great and adds more flavor. Try out these tips to make your BBQ chicken flatbread perfect! For the full recipe, check out the section above. {{image_2}} You can switch up the protein in your BBQ chicken flatbread. Try using pulled pork for a richer flavor. Tofu is a great choice for a vegan option. It soaks up BBQ sauce well and gives a nice texture. For cheese, you can use vegan cheese if you want a dairy-free meal. There are many brands that melt nicely. Just check the label to ensure it fits your diet. Want to add some heat? Try adding jalapeños or a spicy BBQ sauce. This gives your flatbread a kick that many love. You can also mix in some chipotle peppers for a smoky flavor. If you prefer a sweet taste, think about adding pineapple pieces. They add a fun, fruity twist. You can also try a honey BBQ sauce for extra sweetness. This balance of flavors makes each bite exciting. Looking for a Mediterranean vibe? Use feta cheese and add olives. You can also include roasted red peppers for a colorful touch. This flatbread will transport you to sunny shores. For an Asian twist, try adding teriyaki sauce instead of BBQ sauce. Top it with green onions and sesame seeds. This gives your flatbread a unique flavor that surprises and delights. With so many variations, you can enjoy BBQ chicken flatbread in many ways. Just be sure to check the [Full Recipe] for the base you love! To keep your BBQ chicken flatbread fresh, place it in an airtight container. This helps prevent air from drying it out. If you have multiple pieces, stack them with parchment paper between each layer. It keeps the toppings from sticking together. Store the container in the fridge. Your flatbreads will last up to three days. To reheat without losing texture, use the oven. Preheat it to 350°F (175°C). Place the flatbreads on a baking sheet. Heat them for about 10 minutes. This method keeps the edges crispy. You can also use a skillet. Heat it on medium-low and place the flatbread in. Cover with a lid for a few minutes. This helps the cheese melt while keeping the crust crisp. Yes, you can freeze BBQ chicken flatbread! Wrap each piece tightly in plastic wrap. Then, place them in a freezer-safe bag. Remove as much air as possible before sealing. This method helps prevent freezer burn. To reheat, thaw in the fridge overnight. Then, use the oven or skillet methods to warm them up. Enjoy your easy meal anytime! How long does BBQ chicken flatbread last in the refrigerator? BBQ chicken flatbread can last about 3 to 4 days in the refrigerator. Make sure to store it in an airtight container. This helps keep it fresh and tasty. I recommend eating it sooner for the best flavor and texture. Can I use store-bought flatbreads? Yes, you can use store-bought flatbreads. They save time and are easy to find. Just choose a good quality flatbread or naan for the best taste. You can also make your own if you feel up for it! How to make BBQ chicken flatbread dairy-free? To make BBQ chicken flatbread dairy-free, simply swap out the mozzarella cheese for a dairy-free cheese option. You can also skip the cheese altogether. The BBQ sauce and toppings will still add lots of flavor. What are some gluten-free alternatives? For a gluten-free option, try using gluten-free flatbreads or tortillas. Many stores sell these now. You can also use lettuce wraps for a fresh twist. Just load them up with the BBQ chicken and toppings! How many servings does this recipe make? This recipe makes about 4 servings. Each flatbread can be a meal or a fun appetizer. You can easily adjust the number of flatbreads based on your needs. What is the estimated calorie count per serving? Each serving of BBQ chicken flatbread has around 350 calories. This can vary based on the toppings and how much BBQ sauce you use. Feel free to add fresh veggies for extra nutrition! This blog post covered the tasty BBQ chicken flatbread recipe. We explored ingredients, preparation steps, and helpful tips to make it just right. You learned about fun variations and how to store your leftovers effectively. These flatbreads are easy to customize and a great meal option. Enjoy trying new flavors and sharing them with friends and family. Happy cooking!

BBQ Chicken Flatbread Easy and Flavorful Recipe

Craving a quick and tasty meal? Let me introduce you to BBQ Chicken Flatbread! This easy recipe will bring big

To make this dish, you need the following items: - 6 bone-in, skin-on chicken thighs - 1/4 cup brown sugar - 4 cloves garlic, minced - 1/4 cup soy sauce (low sodium preferred) - 2 tablespoons apple cider vinegar - 1 tablespoon olive oil - 1 teaspoon ground ginger - Salt and black pepper to taste - 1 tablespoon sesame seeds (for garnish) - 2 green onions, sliced (for garnish) This list gives you all you need to create a flavorful meal. Each ingredient plays a role, making the chicken tender and tasty. If you don’t have brown sugar, you can use white sugar mixed with molasses. For soy sauce, coconut aminos work well too. If you need a vinegar swap, use rice vinegar in place of apple cider vinegar. If you want a different oil, avocado oil is a great choice. Ground ginger can be replaced with fresh ginger, just use less. For a richer taste, I suggest using specific brands. Look for organic brown sugar like Wholesome Sweeteners for a deep flavor. Kikkoman is a reliable choice for soy sauce. For apple cider vinegar, Bragg’s is often favored for its quality. When picking olive oil, go for California Olive Ranch for a robust taste. These brands help enhance the dish's overall flavor and quality. For the full recipe, check out the complete guide. First, gather your ingredients. You will need chicken thighs, brown sugar, garlic, soy sauce, apple cider vinegar, olive oil, ground ginger, salt, and pepper. In a bowl, mix the brown sugar, minced garlic, soy sauce, apple cider vinegar, olive oil, ground ginger, salt, and pepper. This mix will be your marinade. Place the chicken thighs in a resealable bag. Pour the marinade over the chicken. Seal the bag tightly and shake it gently. Make sure all the chicken gets covered. Let it marinate for at least 30 minutes in the fridge. This step builds flavor. Heat a large skillet on medium-high heat. Remove the chicken from the marinade. Let the extra marinade drip off. Place the chicken thighs skin-side down in the hot skillet. Sear them for about 4 to 5 minutes. You want the skin to be crispy and golden brown. This step adds a nice texture. After searing, carefully flip the chicken thighs over. Pour any remaining marinade over the chicken. This keeps the flavor locked in. Preheat your oven to 400°F (200°C). After flipping the chicken in the skillet, transfer the skillet to the oven. Bake the chicken for 25 to 30 minutes. You want the chicken to reach an internal temperature of 165°F (74°C). This ensures it is fully cooked. Once done, remove the skillet from the oven. Let the chicken rest for 5 minutes before serving. This resting time keeps the meat juicy. Finally, sprinkle sesame seeds and sliced green onions on top for garnish. Enjoy your Brown Sugar Garlic Chicken Thighs! For the full recipe, refer to the previous section. To get that crispy skin, start with dry chicken thighs. Pat them dry using paper towels. This helps to remove extra moisture. Make sure your oven is hot, around 400°F (200°C). Sear the chicken skin-side down in a hot skillet for 4-5 minutes. This locks in flavor and gives it a golden color. When you flip the chicken, let it cook in the oven. This method ensures the skin stays crispy and the meat stays juicy. Marinating is key for tasty chicken. Use the marinade from the recipe. Let the chicken sit in it for at least 30 minutes. For deeper flavor, marinate for up to 4 hours. The brown sugar and garlic work wonders together. You can even add herbs like thyme or rosemary to the mix. Make sure the chicken is fully coated. This step brings out the best taste in your dish. Oven types can change cooking times. If you have a convection oven, reduce the cooking time by about 5 minutes. Check the chicken’s internal temperature with a meat thermometer. It should reach 165°F (74°C). If your oven runs hot, keep an eye on the chicken to avoid overcooking. Each oven is unique, so adjust as needed. This will help you serve perfectly cooked chicken every time. For the full recipe, check the instructions above! {{image_2}} You can change the flavor of Brown Sugar Garlic Chicken Thighs by using different marinades. Try adding honey for sweetness or chili paste for heat. You can also swap soy sauce with teriyaki sauce for a unique twist. Each change brings new tastes to the dish, keeping it exciting for your family. If you prefer, you can use chicken breasts instead of thighs. Chicken breasts cook quicker and have less fat. Just be careful not to overcook them. Bake them for about 20 to 25 minutes. You want them juicy and tender. The marinade will still give them great flavor. You can make this dish a full meal by adding vegetables. Veggies like broccoli, carrots, or bell peppers roast well with the chicken. Toss them in the marinade and place them around the chicken in the skillet. They will soak up the flavors while cooking. This way, you get a tasty and nutritious meal in one dish. For the complete guide on this recipe, check out the Full Recipe. To keep your brown sugar garlic chicken thighs fresh, let them cool first. Place the chicken in an airtight container. Store it in the fridge for up to four days. If you want to keep it longer, consider freezing. Reheating needs care to keep the chicken tasty. Use an oven to reheat at 350°F (175°C). Place the chicken in a baking dish, cover it with foil, and heat for 20 minutes. This method keeps it moist. You can also use a microwave for quick reheating, but the oven is best for texture. If you want to freeze the chicken, wrap it tightly in plastic wrap and then foil. Make sure to label it with the date. Frozen chicken can last up to three months. When you are ready to eat, thaw it in the fridge overnight before reheating. This method helps keep the chicken juicy. For the full recipe, check out the detailed instructions. To make Brown Sugar Garlic Chicken Thighs in an air fryer, start by marinating the chicken as the recipe states. Once marinated, preheat your air fryer to 375°F (190°C). Place the chicken thighs in the basket, skin-side up. Cook for about 25 minutes. Check the internal temperature; it should be 165°F (74°C). The skin will be crispy and flavorful. This method saves time and gives you a great texture. Yes, you can use boneless chicken thighs. They cook faster than bone-in thighs. If you switch to boneless, reduce the baking time. Start checking for doneness around 20 minutes. The marinade will still work well. Just make sure to coat the chicken evenly. This choice makes it easier to eat and still very tasty. The best side dish pairs well with the sweet and savory flavor of the chicken. I recommend serving it with steamed rice or roasted veggies. Both options balance the meal. You could also add a fresh salad for crunch. These sides enhance the dish and make it feel complete. You can store the marinade in the fridge for up to one week. Make sure to keep it in an airtight container. If you want to store it longer, consider freezing it. Just thaw it before use. This way, you can save time when you're ready to cook again. The flavors will still be fresh and vibrant. For the full recipe, check the complete instructions provided earlier. In this blog post, we explored the recipe for Brown Sugar Garlic Chicken Thighs. We covered the ingredients, substitutions, and recommended brands. Next, I provided step-by-step instructions for preparation, searing, and baking. I shared tips to achieve crispy skin and enhance flavor. We also discussed variations and storage options. Finally, I answered common questions to help you cook this dish successfully. Cooking can be fun and easy. Enjoy your delicious meal, and get creative!

Brown Sugar Garlic Chicken Thighs Tasty and Simple Dish

If you’re craving a dish that’s both tasty and simple, look no further than Brown Sugar Garlic Chicken Thighs. This

To make the best whipped hot chocolate, you need: - 2 cups whole milk (or almond milk for a dairy-free option) - 2 tablespoons unsweetened cocoa powder - 1/4 cup sugar (adjust to taste) - 1 teaspoon vanilla extract - 1/4 cup heavy cream - 2 tablespoons powdered sugar - Whipped cream for topping - Chocolate shavings or sprinkles for garnish These ingredients create a rich, creamy drink that warms you up from the inside out. Whole milk gives a satisfying creaminess. Almond milk is a great choice if you want a dairy-free treat. Unsweetened cocoa powder adds deep chocolate flavor. The sugar balances the cocoa’s bitterness. Vanilla extract adds a lovely aroma and depth. Heavy cream and powdered sugar make the topping extra special. The whipped cream adds a fluffy texture. You can easily swap some ingredients to fit your needs. Here are some ideas: - Use oat milk or soy milk for a dairy-free option. - Replace sugar with maple syrup or honey for natural sweetness. These swaps keep the drink tasty while catering to different diets. To make the best whipped hot chocolate, choose high-quality ingredients. - Select whole milk or rich almond milk for a creamier drink. - Use pure cocoa powder for the best chocolate flavor. - Fresh heavy cream whips better and tastes richer. Using quality ingredients really makes a difference in flavor and texture. Enjoy every sip of this blissfully creamy delight! 1. Heating the milk: Start by pouring 2 cups of whole milk into a medium saucepan. Use medium heat and warm the milk until it steams. Be careful not to let it boil. 2. Mixing cocoa and sugar: Take 2 tablespoons of unsweetened cocoa powder and 1/4 cup of sugar. Whisk them into the warm milk. It should dissolve completely, creating a smooth mixture. 3. Achieving smoothness: Add 1 teaspoon of vanilla extract to the mixture. Stir well for a perfect blend. Remove the pan from heat once it’s smooth and ready. 1. Tips for beating heavy cream: In a clean bowl, pour in 1/4 cup of heavy cream. Add 2 tablespoons of powdered sugar. Use an electric mixer to beat the cream. 2. Achieving soft peaks: Beat the mixture for about 3-4 minutes. Stop when you see soft peaks forming. The cream should be fluffy but not too stiff. 1. Pouring hot chocolate into mugs: Grab your favorite mugs and fill them with the hot chocolate mixture. Aim to fill them about 3/4 full. 2. Adding whipped cream and garnishing: Top each mug with a generous dollop of whipped cream. For a fun touch, sprinkle chocolate shavings or sprinkles on top. Enjoy your whipped hot chocolate bliss! For the full recipe, you can refer to the earlier section. To make the best whipped hot chocolate, you need to focus on two key things: temperature and texture. - Ensuring the right temperature: Heat your milk gently. You want it warm enough to steam but not boiling. Boiling can change the flavor and texture of your drink. Use medium heat and keep an eye on it. - Whipping cream tips: Use cold heavy cream for the best results. Place your bowl and beaters in the fridge for a few minutes before whisking. This helps create nice, soft peaks. Whip until it is fluffy but not too stiff. How you serve your whipped hot chocolate can make it even more fun! - Creative serving suggestions: Pour your hot chocolate into clear mugs. This lets everyone see the beautiful layers of chocolate and cream. - Mug and topping choices: Use fun mugs that match the season. Top with whipped cream and sprinkle chocolate shavings or colorful sprinkles on top. This makes it look extra special. Even the best can make mistakes when making whipped hot chocolate. Here are a few to watch out for: - Overheating milk: If you let the milk boil, it can ruin the drink. You want it warm, not hot. - Overwhipping cream: If you whip the cream too much, it can become grainy. Stop once you reach soft peaks. This makes it light and fluffy. Making whipped hot chocolate is all about the details. Focus on the temperature and texture for a blissful treat. Whether it’s for a cozy night in or a special occasion, these tips will help you shine in the kitchen. For the complete recipe, check out the Full Recipe section. {{image_2}} You can take your whipped hot chocolate to the next level with fun flavors. Peppermint adds a refreshing kick. Just mix in a few drops of peppermint extract. Caramel brings a sweet and creamy twist. Drizzle some caramel sauce into your hot chocolate for a treat. You can also experiment with spices. A pinch of cinnamon gives warmth. Nutmeg adds a cozy, festive note. Mix these spices right into the hot chocolate for a delightful blend. Toppings can change the game for whipped hot chocolate. You can try flavored whipped creams for added flair. Use vanilla, chocolate, or even pumpkin spice whipped cream. If you want a lighter option, consider whipped coconut cream. It’s dairy-free and tasty! You can also get creative with garnishes. Try crushed candy canes for a holiday feel or sprinkle cocoa powder for a simple touch. Each option adds a new layer of flavor and fun. Whipped hot chocolate can fit any season. For the holidays, think about adding festive touches. A sprinkle of crushed peppermint or a dash of nutmeg can make it special. You can also make a cold version for summer. Blend the hot chocolate with ice for a refreshing treat. Top it with whipped cream and chocolate shavings for a delightful drink. This way, you can enjoy whipped hot chocolate no matter the weather! To keep leftover hot chocolate, pour it into a clean jar. Seal it tightly to keep it fresh. Place it in your fridge. Consume it within three days for the best taste. When reheating, use a saucepan over low heat. Stir it often to prevent burning. You can also microwave it in a safe mug. Heat for 30 seconds, then stir. Repeat until warm. Be careful not to overheat, or the texture will change. If you have leftover whipped cream, use it in other recipes. It’s great on pancakes or waffles. You can also add it to coffee or desserts. This way, nothing goes to waste, and you enjoy more treats. For the full recipe, check the section above! I often use whole milk for a rich flavor. It gives a creamy texture that feels great. If you want a lighter option, almond milk works well too. It adds a nice nutty taste. Other plant-based milks, like oat or soy, can also work. When you pick milk, think about the flavor and creaminess you enjoy most. Yes, you can make it ahead of time. Store the hot chocolate in the fridge. Just keep it in a sealed container. When you want to enjoy it, reheat it gently. Use a microwave or stovetop. Stir it well to mix any settled chocolate. The whipped cream can be made in advance too. Just keep it chilled until you are ready to serve. If you don't have powdered sugar, you can use granulated sugar. Just blend it in a blender for a few seconds. It will turn into a fine powder. You can also use honey or maple syrup for a different sweetness. These options will change the flavor, so taste as you go. No whisk? No problem! You can use a fork to beat the cream. It will take longer, but it works. A blender or food processor is another option. Just be careful not to overwhip. You want soft peaks, not butter. This way, your whipped hot chocolate will stay light and fluffy. In this post, we explored making whipped hot chocolate, from the essential ingredients to step-by-step instructions. We discussed ingredient substitutions, tips for greatness, and fun variations. Remember, quality ingredients lead to the best taste. Pay attention to temperature and mixing to avoid common mistakes. With these tips, you can enjoy a rich, creamy drink anytime. Embrace creativity with flavors and toppings to make it your own. Now, get ready to indulge in this cozy treat!

Whipped Hot Chocolate Blissfully Creamy Delight

Craving comfort on a chilly day? Whipped hot chocolate is your answer! This blissfully creamy delight combines rich cocoa with

Older posts
Newer posts
← Previous Page1 … Page12 Page13 Page14 … Page83 Next →

dsad

© 2025 So Yum Recipes • Built with GeneratePress

Our Policies

  • Copyright Policy
  • Cookie Policy
  • GDPR Policy
  • Privacy Policy
  • Disclaimer
  • Terms Of Use

More Information

  • Home
  • About
  • Contact
  • Appetizers
  • Dessert
  • Dinner
  • Drinks
©2025, So Yum Recipes About Back To Top