Skip to content
DisclaimerTerms Of UseGDPR PolicyCookie Policy

So Yum Recipes

  • Home
  • Drinks
  • Appetizers
  • Dinner
  • Dessert
  • About
  • Contact
  • Privacy Policy
DisclaimerTerms Of UseGDPR PolicyCookie Policy

Chloe

To make Peanut Butter Cottage Cheese Pudding, gather these simple ingredients: - Cottage cheese - Creamy peanut butter - Honey or maple syrup - Vanilla extract - Almond milk - Cocoa powder - Salt - Optional toppings: chopped nuts, dark chocolate chips, or banana slices Each ingredient plays an important role in creating a delicious pudding. Cottage cheese gives it a creamy base. Creamy peanut butter adds rich flavor and protein. Honey or maple syrup sweetens the mix. Vanilla extract brings warmth and depth. Almond milk keeps it light and smooth. Cocoa powder gives it that chocolatey goodness. A pinch of salt enhances all the flavors. You can also add toppings to make it extra special! Feel free to get creative with your choices. Each ingredient combines to create a delightful treat that feels indulgent but is also nutritious. Enjoy making this easy and tasty pudding! 1. Combine ingredients in a blender: Start by adding 1 cup of cottage cheese, 1/2 cup of creamy peanut butter, 2 tablespoons of honey or maple syrup, 1 teaspoon of vanilla extract, 1/2 cup of almond milk, 1/4 cup of cocoa powder, and a pinch of salt to your blender. This mix creates a rich base for our pudding. 2. Blend until smooth: Blend the mixture on high until it becomes creamy and smooth. You may need to stop and scrape down the sides of the blender. This ensures everything mixes well. 3. Adjust sweetness if needed: After blending, taste the pudding. If you want it sweeter, add more honey or maple syrup. Blend again until fully combined. 4. Pour into serving bowls: Once you reach your desired taste and texture, pour the pudding into bowls or cups. - Duration for chilling: Place the bowls in the fridge and chill for at least 30 minutes. This helps the pudding thicken and the flavors to blend. - Importance of chilling: Chilling is key. It not only improves the texture but also makes every bite taste better. You’ll enjoy a cold, refreshing treat after the wait! To get the right thickness for your pudding, start with the base. If your mix is too thick, add more milk. You can use almond milk, cow's milk, or any milk you like. A little splash goes a long way. Blend again until you reach a smooth texture. You want it to feel soft and creamy, just like a pudding. For smoothness, make sure to blend all the ingredients well. Scrape down the sides of your blender. This step helps mix everything evenly. No lumps should remain. A good blend makes all the difference. Taste your pudding before serving. You might want to adjust the sweetness. If it needs more sweetness, add a little honey or maple syrup. Blend again to mix it well. Start with a small amount and taste after each addition. You can also use natural sweeteners like agave syrup or stevia. These options can give your pudding a different flavor. Choose what you like best, and enjoy your perfect treat! {{image_2}} You can mix things up with this pudding. Adding different extracts can change the taste. Try almond extract for a nutty twist. Chocolate extract will make it richer and sweeter. You can also add fruits. Bananas blend smoothly and add natural sweetness. Berries like strawberries or blueberries add a fresh pop. Just toss them in the blender with the other ingredients. Want to make it dairy-free? You can easily make it vegan. Swap cottage cheese with silken tofu. Use maple syrup instead of honey for sweetness. This keeps it creamy and rich. If you need a nut-free option, try sunflower seed butter. It has a similar taste and texture. You can also use soy nut butter. These swaps keep the flavor while avoiding nuts. To store your Peanut Butter Cottage Cheese Pudding, first, let it cool. Once it reaches room temperature, transfer it to a clean container. Make sure to use an airtight container. This helps keep it fresh and tasty. I recommend glass or BPA-free plastic containers. These are sturdy and won’t absorb any odors. In the fridge, your pudding lasts for about 3 to 5 days. Keep an eye on its smell or look for any changes. If you want to save it for longer, you can freeze it. However, freezing can change the texture. It might not be as creamy after thawing. To freeze, pour it into a container, leaving some space at the top. This allows for expansion. When you want to enjoy it again, thaw it in the fridge overnight. Can I use a different type of cheese? Yes, you can use other soft cheeses. Ricotta or cream cheese works well. Just keep in mind the taste will change. Ricotta adds a light flavor, while cream cheese is richer. Is it safe to eat after a few days in the fridge? Yes, it stays good for about three to four days. Make sure to store it in an airtight container. Always check for any off smells before eating it again. Can I substitute the peanut butter with another nut butter? Absolutely! Almond butter or cashew butter can replace peanut butter. Each nut butter gives a unique taste. Experiment with different types for fun flavors! This blog showed you how to make a tasty peanut butter cottage cheese pudding. You learned about the key ingredients, steps for preparation, chilling tips, and ways to adjust sweetness. I also covered variations for flavors and dietary needs. Lastly, I shared best storage practices to keep it fresh. This dish is easy and fun to make, so get creative with it. Enjoy your delicious treat and share it with friends!

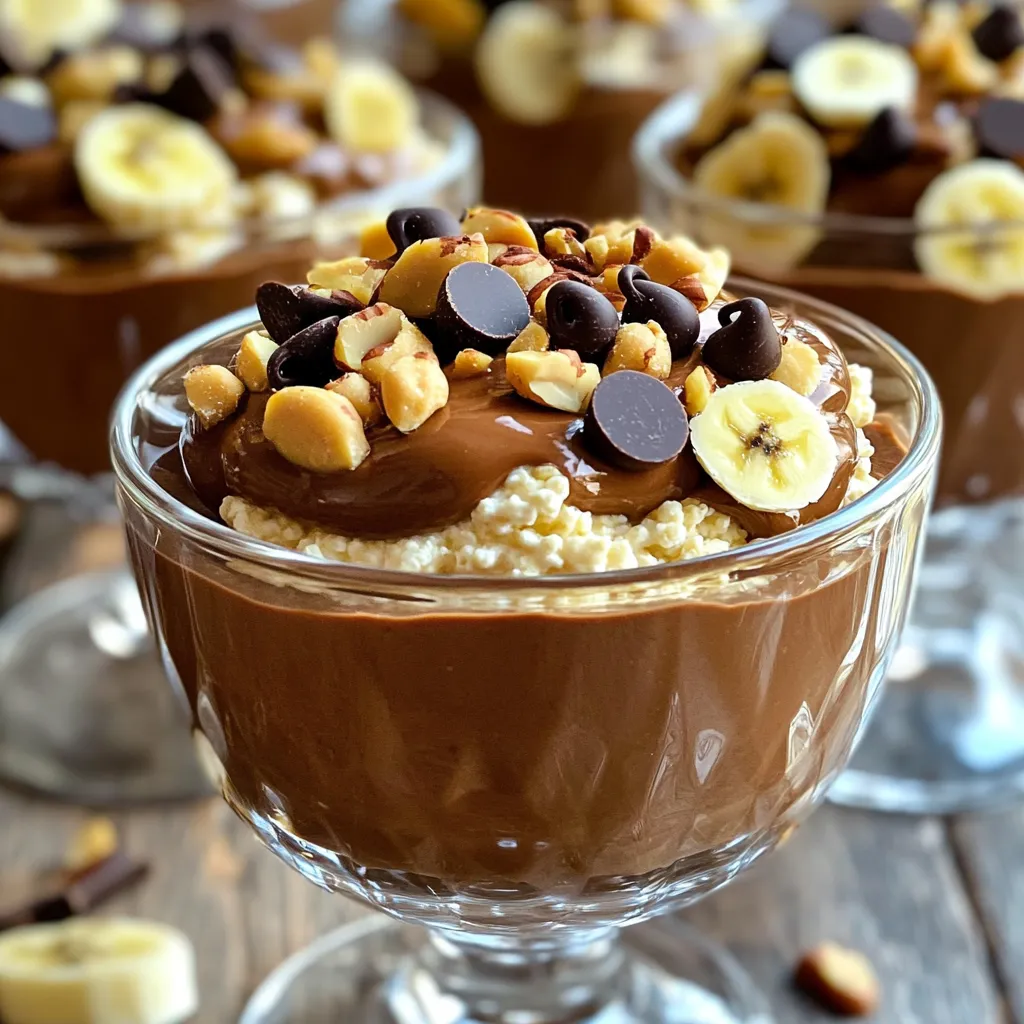
Peanut Butter Cottage Cheese Pudding Delightful Treat

Are you ready to discover a tasty treat that’s both smooth and creamy? Peanut Butter Cottage Cheese Pudding is an

To make these tasty muffins, you will need: - 1 cup canned pumpkin puree - 1/2 cup vegetable oil - 1 cup brown sugar, packed - 1/2 cup granulated sugar - 2 large eggs - 1 teaspoon vanilla extract - 1 1/2 cups all-purpose flour - 1 teaspoon baking soda - 1 teaspoon baking powder - 1 teaspoon ground cinnamon - 1/2 teaspoon ground nutmeg - 1/4 teaspoon ground ginger - 1/4 teaspoon salt - 1 cup semi-sweet chocolate chips - Optional: 1/2 cup chopped walnuts or pecans For the best results, I suggest using well-known brands. Look for: - Libby's for pumpkin puree - Crisco for vegetable oil - Domino for brown and granulated sugar - Ghirardelli for chocolate chips These brands offer quality and flavor that will enhance your muffins. You can swap some ingredients if needed. Here are some ideas: - Use coconut oil instead of vegetable oil for a richer taste. - Replace granulated sugar with maple syrup for a unique flavor. - Try whole wheat flour for a healthier option. - Use dairy-free chocolate chips for a vegan version. These substitutions let you customize the muffins to your taste. To make the best pumpkin chocolate chip muffins, gather your ingredients. You need canned pumpkin puree, sugars, eggs, and spices. Make sure you have chocolate chips too. Preheat your oven to 350°F (175°C). Line your muffin tin with paper liners or grease it lightly. 1. In a large bowl, mix the pumpkin puree, vegetable oil, brown sugar, and granulated sugar. Whisk them until smooth. 2. Add in the eggs and vanilla extract. Continue whisking until everything blends well. 3. In another bowl, combine the flour, baking soda, baking powder, cinnamon, nutmeg, ginger, and salt. Whisk these dry ingredients together thoroughly. 4. Slowly add the dry mix to the wet ingredients. Stir gently until just combined. Don’t overmix. 5. Fold in the semi-sweet chocolate chips and nuts if you decided to use them. Make sure they spread evenly in the batter. 6. Fill each muffin cup about three-quarters full with the batter. 7. Place the muffin tin in the oven. Bake for 18 to 20 minutes. Check with a toothpick to ensure they are done. 8. Once cooked, let the muffins cool in the tin for about five minutes. Then, move them to a wire rack to cool completely. - Use room temperature eggs for better mixing. - Don’t skip greasing the muffin tin or using liners. This helps with easy removal. - Avoid overmixing the batter to keep the muffins light and fluffy. - Keep an eye on the oven. Each oven may bake differently. Test for doneness a few minutes early. One common mistake is overmixing the batter. This can make the muffins tough. Mix just until the dry and wet ingredients combine. Another mistake is not measuring ingredients correctly. Use measuring cups and spoons for accuracy. Be sure to pack the brown sugar tightly in the cup. Lastly, avoid opening the oven too soon. This can cause the muffins to sink. Wait until at least 18 minutes before checking. To keep muffins moist, use canned pumpkin puree. This adds a rich texture and flavor. Adding oil helps too; it keeps the muffins soft. You can also add an extra egg for more moisture. Make sure to measure your ingredients correctly. Don't skip the spices either; they enhance the flavor. Finally, remove the muffins once a toothpick comes out clean but still moist. Let the muffins cool in the pan for about 5 minutes. This helps them hold their shape. After that, transfer them to a wire rack. This allows air to circulate and cool them completely. For serving, dust with powdered sugar or add whipped cream. Serve them warm for the best taste. A decorative platter with mini pumpkins adds a nice touch. Enjoy these treats with a warm drink to complete the fall experience! {{image_2}} You can make these muffins healthier without losing flavor. Use applesauce instead of oil. It cuts fat and adds moisture. You can also swap brown sugar for coconut sugar. This gives sweetness with fewer calories. For a gluten-free version, try almond flour or oat flour. Both work well in this recipe. Add spices to change the taste. Mix in a teaspoon of allspice for warmth. A dash of cloves can add a nice kick. Want crunch? Toss in some chopped walnuts or pecans. They give a lovely texture. You can even use white chocolate chips instead of semi-sweet. This will give a sweeter taste. For egg-free muffins, use flax eggs. Mix one tablespoon of ground flaxseed with three tablespoons of water. Let it sit for a few minutes to thicken. If you need a nut-free recipe, skip the nuts entirely. Use sunflower seed butter instead of nut butter if you want a spread. These changes help everyone enjoy your treats! To keep your pumpkin chocolate chip muffins fresh, store them in an airtight container. This will help keep moisture in and prevent them from drying out. Place a piece of parchment paper in the container to absorb extra moisture. Keep them at room temperature for a few days. If you want them to last longer, consider refrigerating them. You can freeze your muffins for later enjoyment! Let them cool completely before freezing. Wrap each muffin individually in plastic wrap. Then, place them in a freezer-safe bag or container. Make sure to label the bag with the date. Muffins can stay fresh in the freezer for up to three months. To enjoy your muffins warm, you can reheat them easily. For a quick method, pop them in the microwave for about 15-20 seconds. If you prefer a crispy top, use an oven. Preheat it to 350°F (175°C) and heat for about 5-10 minutes. Enjoy them fresh, and they will taste like they just came out of the oven! To make these muffins gluten-free, swap all-purpose flour for a gluten-free blend. Many brands offer a cup-for-cup option. Look for one that contains xanthan gum, as it helps with texture. Make sure your baking powder and baking soda are also gluten-free. This way, you keep the taste while avoiding gluten. Yes, you can use fresh pumpkin. Start by roasting a small pumpkin until tender. Scoop out the flesh and blend it until smooth. You will need about one cup of fresh puree, just like the canned version. Fresh pumpkin gives a nice flavor and adds a homemade touch. These muffins pair well with warm drinks. Consider serving them with coffee, tea, or hot cocoa. They also taste great with a spread of cream cheese or butter. You can even enjoy them with a scoop of vanilla ice cream for a sweet treat. You’ve learned how to make tasty Pumpkin Chocolate Chip Muffins. We covered key ingredients and their brands, plus swaps for your needs. You now have clear steps for baking, along with tips for avoiding common mistakes. Don't forget about variations for health and flavor! Proper storage ensures freshness, while our FAQs handle your concerns. With these insights, you can create muffins that impress and satisfy. Enjoy your baking adventures!

Pumpkin Chocolate Chip Muffins Delightful Fall Treat

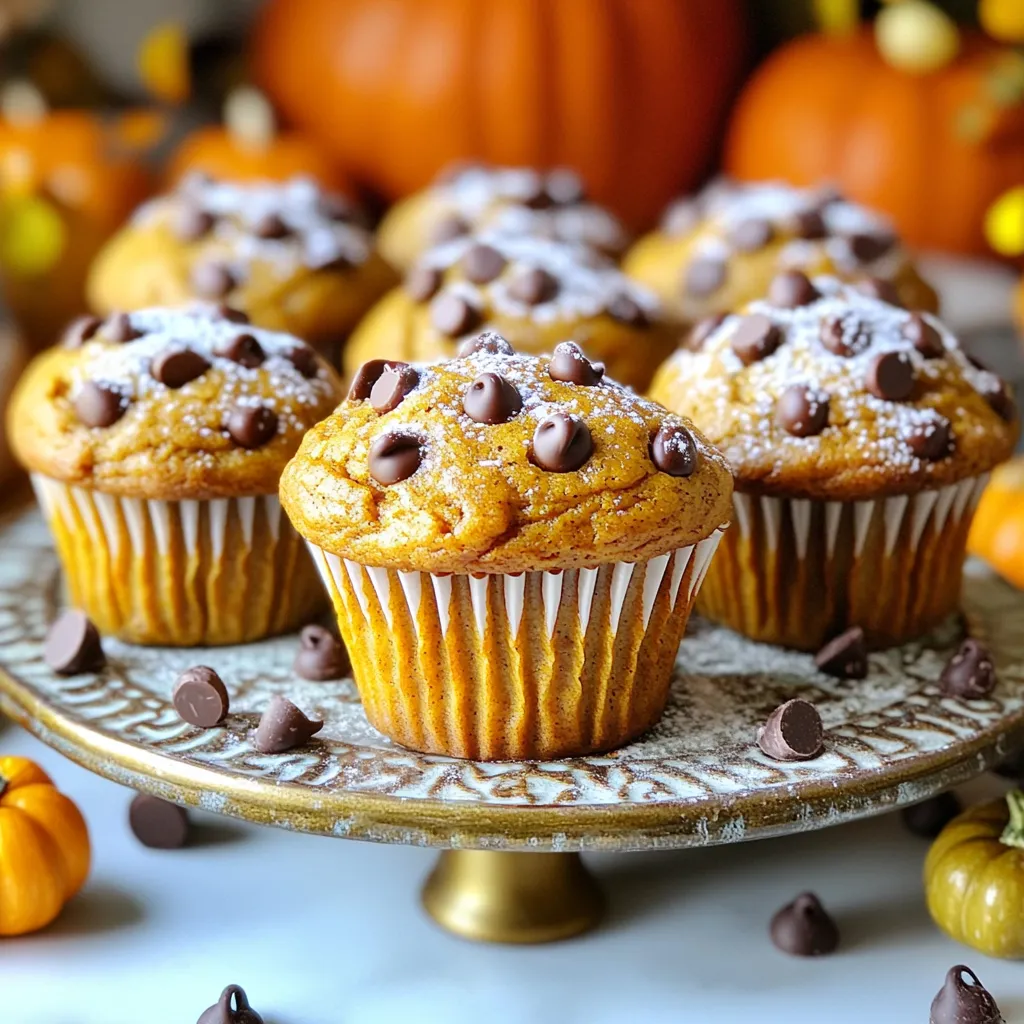
Fall is here, and it’s time to indulge in Pumpkin Chocolate Chip Muffins! These moist and sweet treats combine the

To make delicious sheet-pan shrimp fajitas, you need some key ingredients: - 1 lb large shrimp, peeled and deveined - 1 red bell pepper, sliced - 1 green bell pepper, sliced - 1 medium red onion, sliced - 3 tablespoons olive oil These fresh veggies and shrimp form the base of your dish. The bright colors make it look great on the table. The right seasonings can elevate your fajitas. Here’s what to use: - 2 teaspoons chili powder - 1 teaspoon cumin - 1 teaspoon garlic powder - 1 teaspoon smoked paprika - Salt and pepper to taste These spices add depth and warmth. They really bring out the shrimp's flavor. You can also add some tasty extras to your meal: - Juice of 1 lime - Fresh cilantro, chopped (for garnish) - Warm tortillas (for serving) These toppings will add freshness and a zesty kick. Warm tortillas make for a perfect wrap for your fajitas! First, gather all your ingredients. You need large shrimp, bell peppers, and onion. Here’s what to do: - In a large bowl, mix the shrimp, sliced red and green bell peppers, and onion. - Drizzle three tablespoons of olive oil over the mix. - Add two teaspoons of chili powder, one teaspoon of cumin, one teaspoon of garlic powder, and one teaspoon of smoked paprika. - Season with salt and pepper to taste. - Toss everything well until the shrimp and veggies are coated in spices and oil. Now, it’s time to cook. 1. Preheat your oven to 400°F (200°C). 2. Spread the shrimp and vegetable mix evenly on a sheet pan. Make sure they are in a single layer. 3. Bake for 15 to 20 minutes. Check halfway through and toss the mixture. 4. The shrimp should turn pink and the veggies should be tender when done. When the dish is ready, take it out of the oven. - Squeeze the juice of one lime over the shrimp and veggies. - Serve the fajitas hot with warm tortillas. - Don’t forget to garnish with chopped fresh cilantro for that burst of flavor! To cook shrimp just right, watch the time. Bake for 15-20 minutes. Look for pink shrimp. Pink means they are done. They should be firm and opaque. If they look gray or bend too much, they are not cooked. Toss them halfway through cooking for even heat. This avoids overcooking some shrimp while others are still raw. Use fresh ingredients for big flavor. Start with quality shrimp. Add colorful bell peppers and onions for crunch. Use olive oil to help spices stick. Mix chili powder, cumin, garlic powder, and smoked paprika for a tasty blend. Adjust seasoning to your taste. Don’t forget to add salt and pepper. Lime juice at the end brightens the dish. Serve your fajitas on a wooden board or bright platter. Warm tortillas make each bite better. Add lime wedges and extra cilantro for a fresh touch. You can also include toppings like avocado or salsa. Make it a fun meal by letting everyone build their own fajitas. This brings joy to the table! {{image_2}} To give your shrimp fajitas a spicy kick, use more chili powder or add fresh jalapeños. You could also try a spicy hot sauce. Mix one tablespoon of hot sauce with the olive oil before tossing it with the shrimp and veggies. This will give your meal a nice heat that pairs well with the sweetness of the peppers. You can easily make these fajitas vegetarian. Replace shrimp with a mix of hearty veggies like zucchini, mushrooms, and corn. Use the same spices to keep the flavor. You can also add black beans for protein. This option is colorful and just as tasty. Serve it in warm tortillas or over rice for a filling meal. If you want to switch up the main protein, consider chicken, beef, or tofu. For chicken, cut boneless breasts into strips. For beef, flank steak works well; slice it thinly against the grain. Tofu should be pressed and cubed. Use the same spices and cook time. Each protein brings its own flavor, but the process stays the same. Enjoy experimenting with these options! To keep your leftover sheet-pan shrimp fajitas fresh, place them in an airtight container. Make sure to store them in the fridge. They taste best within three days. If you want to store them longer, put them in the freezer. This way, they can last up to three months. Just remember to separate the shrimp from the tortillas for best results. When you're ready to enjoy the leftovers, heat them in the oven or microwave. For the oven, preheat it to 350°F (175°C). Place the fajitas in an oven-safe dish and cover them with foil. Heat for about 10-15 minutes until warm. If using a microwave, put them in a microwave-safe bowl and cover it. Heat in short bursts of 30 seconds until hot. Be careful not to overcook the shrimp; they can become tough. Meal prepping shrimp fajitas is easy and fun. You can chop the veggies and season the shrimp ahead of time. Store them separately in containers. When you are ready to cook, just toss everything onto a sheet pan. This makes dinner quick and simple. You can also double the recipe and freeze half for a busy night. Enjoy easy meals without the hassle! You can use chicken or tofu instead of shrimp. For chicken, cut it into bite-sized pieces. Cook it the same way as shrimp. Tofu gives a nice texture. Use firm or extra-firm tofu. Be sure to press it to remove extra water. Shrimp are done when they turn pink and are firm to the touch. They should curl into a C shape. This takes about 15 to 20 minutes in the oven. If you have a meat thermometer, the inside should reach 145°F. Yes, you can! Prep the shrimp and veggies a few hours ahead. Keep them in the fridge until you are ready to cook. You can also cook the dish and store leftovers. Keep them in an airtight container for up to three days. In this blog post, we explored how to make delicious sheet-pan shrimp fajitas. We covered essential ingredients, cooking steps, and tips for perfect shrimp. You learned about fun variations and how to store leftovers. Remember, with a few simple changes, you can enjoy different flavors and even vegetarian options. I hope this guide helps you create tasty meals that everyone will love. Now it’s time to gather your ingredients and start cooking!

Sheet-Pan Shrimp Fajitas Flavorful and Easy Meal

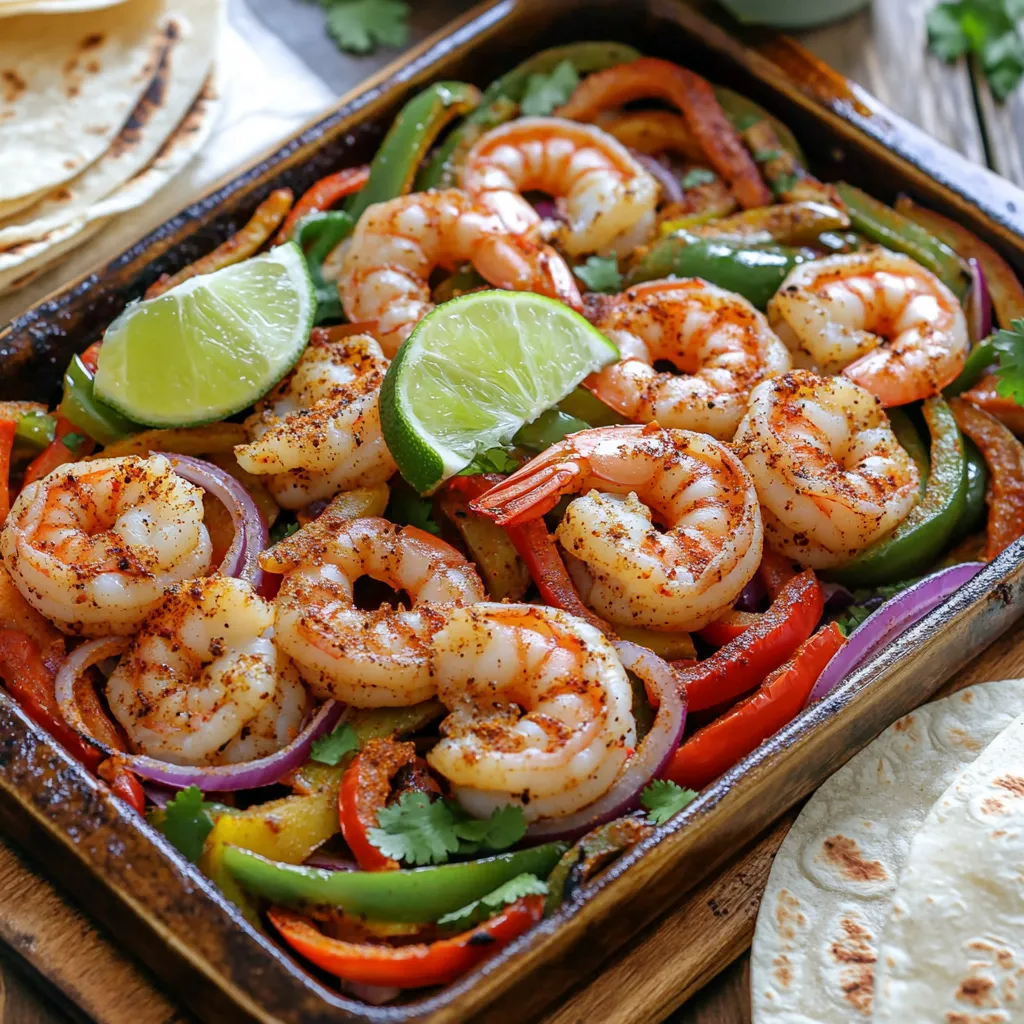
Craving a quick and tasty meal? Look no further than Sheet-Pan Shrimp Fajitas. This dish is not only packed with

To make these tasty sesame garlic noodles, gather these key ingredients: - 8 oz (225 g) noodles (preferably udon or spaghetti) - 3 tablespoons sesame oil - 4 cloves garlic, minced - 1 tablespoon fresh ginger, grated - 1/4 cup soy sauce (low sodium if preferred) - 2 tablespoons rice vinegar - 1 tablespoon honey or maple syrup - 1 teaspoon chili flakes (adjust to taste) - 2 green onions, finely chopped - 1 tablespoon sesame seeds (toasted for extra flavor) - Fresh cilantro leaves, for garnish You can elevate your dish with these optional ingredients: - 1 cup mixed vegetables (bell peppers, broccoli, or snap peas) Adding vegetables not only boosts flavor but also adds color and nutrients. If you have dietary needs, consider these substitutions: - Swap regular soy sauce with tamari for gluten-free noodles. - Use agave syrup instead of honey for a vegan option. - Try zucchini noodles for a low-carb version. These swaps help you enjoy the dish while keeping it aligned with your dietary choices. Start by boiling a big pot of water. Add a pinch of salt to the water to enhance flavor. Once the water bubbles, add 8 oz of noodles. You can use udon or spaghetti. Cook them according to the package directions. You want them to be al dente, which means firm but tender. When done, drain the noodles and set them aside. Next, grab a small bowl. In this bowl, whisk together the soy sauce, rice vinegar, honey, grated ginger, and chili flakes. Mix well until everything is blended. This sauce gives the noodles a rich flavor. Set the bowl aside for now; you will use it soon. Now, heat 3 tablespoons of sesame oil in a large pan or wok over medium heat. Add 4 cloves of minced garlic. Stir it for 1-2 minutes until it smells great. Be careful not to let it burn. If you want to add veggies, toss in 1 cup of mixed vegetables at this point. Stir-fry them for 3-4 minutes until they are just tender. Add the drained noodles to the pan. Toss the noodles well to coat them with the garlic and oil. This step is key for flavor. Pour the prepared sauce over the noodles. Stir quickly to coat them evenly. Cook everything together for another 2-3 minutes until it is hot and the flavors mix well. Take the pan off the heat. Sprinkle chopped green onions and toasted sesame seeds on top. You can also add fresh cilantro leaves for extra flavor. Give it a light toss to mix everything. Now your noodles are ready to serve! To make great noodles, choose udon or spaghetti. These noodles hold the sauce well. Cook them until they are al dente. This means they should be firm but not hard. Drain them and rinse with cold water to stop cooking. You can boost the flavor of your dish easily. Add more garlic for a stronger taste. If you like heat, increase the chili flakes. For a tangy twist, try adding lime juice. Mixing in some fresh veggies like bell peppers or broccoli will add color and crunch. Do not overcook your noodles; they will become mushy. Avoid burning the garlic when sautéing. It can turn bitter if cooked too long. Remember to toss the noodles well with the sauce to coat evenly. Lastly, skip the garnish and your dish may look plain. Always add those finishing touches! {{image_2}} You can easily make Sesame Garlic Noodles vegetarian or vegan. Use vegetable broth instead of chicken broth. Replace honey with maple syrup for a vegan option. Add more veggies like carrots or spinach. These extra ingredients boost flavor and nutrition. For added protein, try tofu or chicken. If using tofu, press it first to remove moisture. Cut it into cubes, then sauté until golden. For chicken, slice it thin and cook it until no longer pink. Add protein to the pan after sautéing garlic for a tasty meal. Want to spice things up? Add more chili flakes or a dash of sriracha. For a citrus twist, squeeze fresh lime or lemon juice over the noodles before serving. You can also add a splash of orange juice for a sweet and tangy flavor. These changes can make the dish more exciting. After you enjoy your sesame garlic noodles, store leftovers in an airtight container. Let them cool to room temperature first. This prevents condensation, keeping the noodles fresh. Place the container in the fridge. These noodles stay good for about three to four days. To reheat, use a skillet for the best taste. Add a splash of water or sesame oil to the pan. Heat over medium until warmed through. Stir often to avoid sticking. You can also use the microwave. Place noodles in a bowl with a little water. Cover with a damp paper towel and heat in short bursts, stirring in between. You can freeze sesame garlic noodles for longer storage. Place cooled noodles in a freezer-safe bag or container. Remove as much air as possible. They can last up to three months. When you're ready to eat, thaw them overnight in the fridge. Reheat as described above. Yes, you can use many types of noodles. Udon and spaghetti work well. You can also try rice noodles or soba if you prefer. Just cook them according to package directions. To make this dish gluten-free, use gluten-free noodles. Look for rice noodles or gluten-free pasta. Use tamari instead of soy sauce. This keeps the flavor and makes it safe for gluten-free diets. These noodles pair well with many dishes. Try serving them with grilled chicken, tofu, or shrimp. You can also add a side salad or steamed vegetables for a balanced meal. Yes, you can prepare this dish ahead. Cook the noodles and sauce, then store them separately. When ready to eat, heat them together in a pan. This keeps the noodles fresh and tasty. To adjust the heat, change the chili flakes. Add more for a spicy kick, or use less for a mild flavor. You can also add fresh chili or hot sauce if you want. Adjust to suit your taste! Sesame garlic noodles are simple yet packed with flavor. We covered key ingredients and various substitutions to fit your needs. I shared step-by-step instructions to help you cook perfect noodles every time. Helpful tips let you avoid common mistakes. Plus, I included tasty variations for everyone. These noodles are not just a meal; they’re a canvas for your creativity. Enjoy making this dish your own!

Savory Sesame Garlic Noodles Quick and Easy Dish

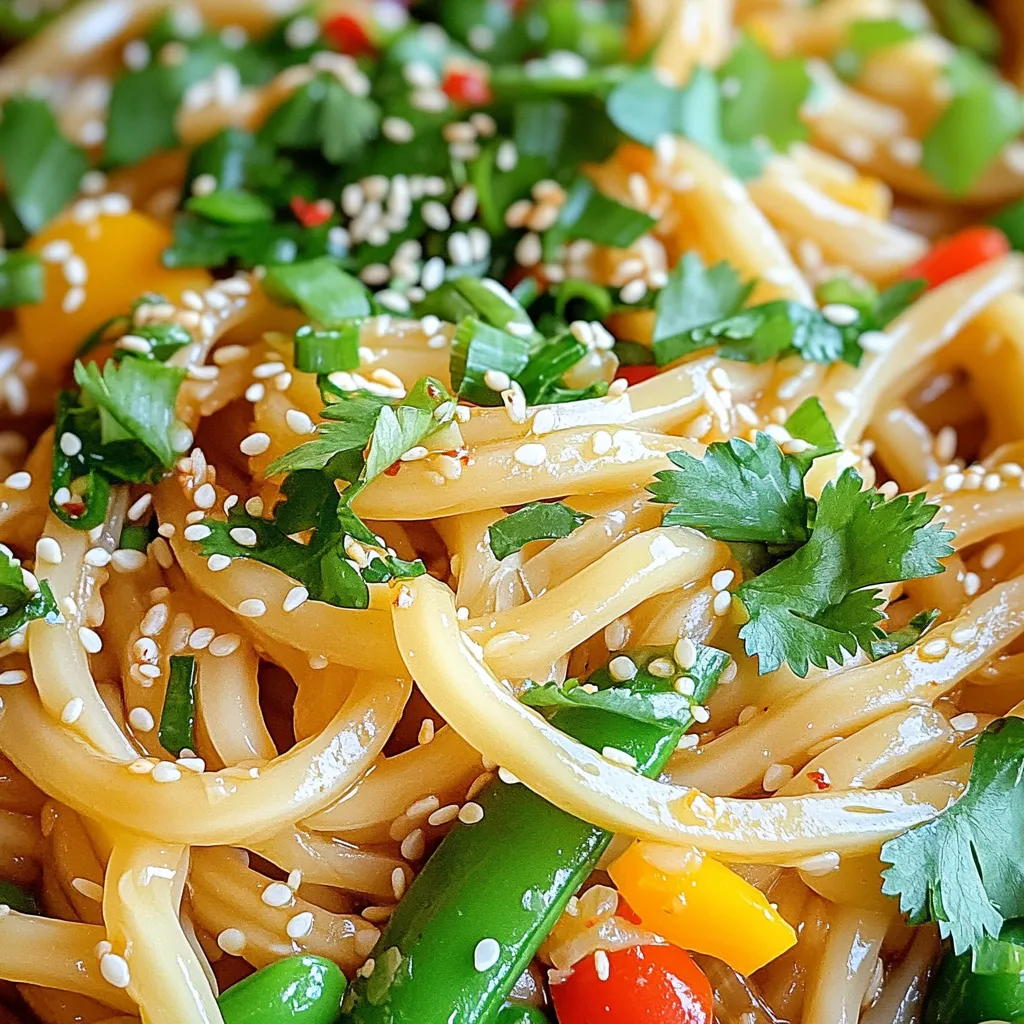
Looking for a quick and yummy meal? You’ll love these Savory Sesame Garlic Noodles! This dish is packed with flavor

To make Maple Pecan Sweet Potatoes, you need: - 4 medium sweet potatoes, peeled and cubed - 1/2 cup pecans, chopped - 1/4 cup pure maple syrup - 3 tablespoons unsalted butter, melted - 1 teaspoon ground cinnamon - 1/2 teaspoon nutmeg - Salt and pepper to taste - Chopped fresh parsley for garnish (optional) To prepare this dish, gather these tools: - A large pot for boiling - A large mixing bowl - A whisk for mixing - A baking sheet lined with parchment paper - A sharp knife and cutting board Each serving of Maple Pecan Sweet Potatoes has: - Calories: 250 - Protein: 3g - Carbohydrates: 40g - Dietary Fiber: 5g - Sugars: 12g - Fat: 10g - Saturated Fat: 4g - Sodium: 50mg These delicious sweet potatoes give you a tasty and healthy side dish. The maple syrup adds sweetness, while the pecans add crunch. Enjoy this dish at your next meal! Start by peeling and cubing four medium sweet potatoes. Make sure the pieces are even for cooking. Next, bring a large pot of salted water to a boil. Add the sweet potatoes and cook for about 10 to 15 minutes. You want them tender but not mushy. Once done, drain the sweet potatoes and set them aside. In a large mixing bowl, combine 3 tablespoons of melted unsalted butter and 1/4 cup of pure maple syrup. Add in 1 teaspoon of ground cinnamon, 1/2 teaspoon of nutmeg, salt, and pepper to taste. Whisk these ingredients together until they blend well. This mixture will give flavor to the sweet potatoes. Spread the cooked sweet potatoes in a single layer on a parchment-lined baking sheet. Pour the maple mixture over the sweet potatoes. Gently fold to coat them evenly. Now, sprinkle 1/2 cup of chopped pecans on top. Bake in a preheated oven at 400°F for 25 to 30 minutes. Stir the sweet potatoes halfway through to ensure even cooking. They should turn caramelized and golden brown. Once baked, let them cool for a few minutes before serving. Optionally, you can garnish with fresh parsley for a lovely touch. When you choose sweet potatoes, look for ones that are firm and smooth. Avoid those with soft spots or blemishes. The best sweet potatoes have a deep orange color. This means they are sweeter and more flavorful. Size matters too; medium sweet potatoes are ideal for this recipe. To cook sweet potatoes well, boil them in salted water. Cut them into cubes and boil for 10-15 minutes. You want them tender but not mushy. Test by poking with a fork. Once cooked, drain them and let them sit for a few minutes. This step helps them absorb flavors later. Adding spices can boost the taste of your sweet potatoes. Besides cinnamon and nutmeg, try a pinch of ginger for warmth. You can also mix in a splash of orange juice for brightness. For crunch, consider tossing in some chopped walnuts or almonds along with the pecans. Each ingredient adds a new layer of flavor. {{image_2}} You can easily make this dish vegan. Instead of unsalted butter, use coconut oil. This swap keeps the sweet and nutty flavor. Simply melt 3 tablespoons of coconut oil and replace the butter in the recipe. The coconut oil adds a lovely richness. Plus, it pairs well with sweet potatoes and maple syrup. While pecans are classic, you can mix in other nuts. Try walnuts, almonds, or even pumpkin seeds. Each nut adds a unique crunch and flavor. Chop them and sprinkle them over the sweet potatoes just like the pecans. This change gives your dish extra texture and nutrition. You can change the spices to suit your taste. Try adding a pinch of cayenne pepper for heat. Or you can add ground ginger for a warm, spicy flavor. If you like a sweeter touch, add more cinnamon. These simple swaps create new flavor profiles and keep your dish exciting. To store leftover maple pecan sweet potatoes, place them in an airtight container. Make sure they cool first. Keep them in the fridge for up to three days. This helps maintain their flavor and texture. If you have a lot, consider dividing them into smaller containers. This way, you can take out just what you need. Reheat sweet potatoes in the oven for the best results. Preheat your oven to 350°F (175°C). Spread the sweet potatoes on a baking sheet. Cover them with foil to keep them moist. Heat for about 15-20 minutes, or until warmed through. You can also use a microwave. Place them in a microwave-safe dish and cover. Heat in short bursts, checking often, until they are hot. You can freeze these sweet potatoes for later. Allow them to cool completely before freezing. Place them in a freezer-safe container or bag. Make sure to remove as much air as possible. They can last up to three months in the freezer. When ready to eat, thaw them in the fridge overnight. Then, reheat them as described above. Enjoy the same great taste, even after weeks! Yes, you can use canned sweet potatoes. However, fresh sweet potatoes taste best. Canned sweet potatoes are often softer. This can change the texture of your dish. If you choose canned, drain and rinse them first. Then, mix them with the maple pecan coating. Bake them as directed, but reduce cooking time. This will help avoid mushy sweet potatoes. Maple pecan sweet potatoes pair well with many dishes. You can serve them with roasted chicken or turkey. They also go great with glazed ham. For a vegetarian option, try them with stuffed peppers. A fresh green salad balances the sweetness too. Serve these sweet potatoes for holidays or family dinners. They add a lovely touch to any meal. To adjust cooking time, consider the size of your dish. If you double the sweet potatoes, use a larger baking sheet. Make sure they are in a single layer. Larger amounts may need a few extra minutes in the oven. Check for doneness by piercing with a fork. Aim for a golden brown color for the best flavor. This blog post covered how to make delicious maple pecan sweet potatoes. We discussed the key ingredients, kitchen tools, and their nutrition facts. I provided step-by-step instructions, tips for the perfect texture, and ideas for flavor variations. Remember, selecting the best sweet potatoes can boost your dish. Proper storage keeps leftovers fresh. I hope you feel ready to try this recipe and enjoy your meal!

Maple Pecan Sweet Potatoes Delightful Side Dish

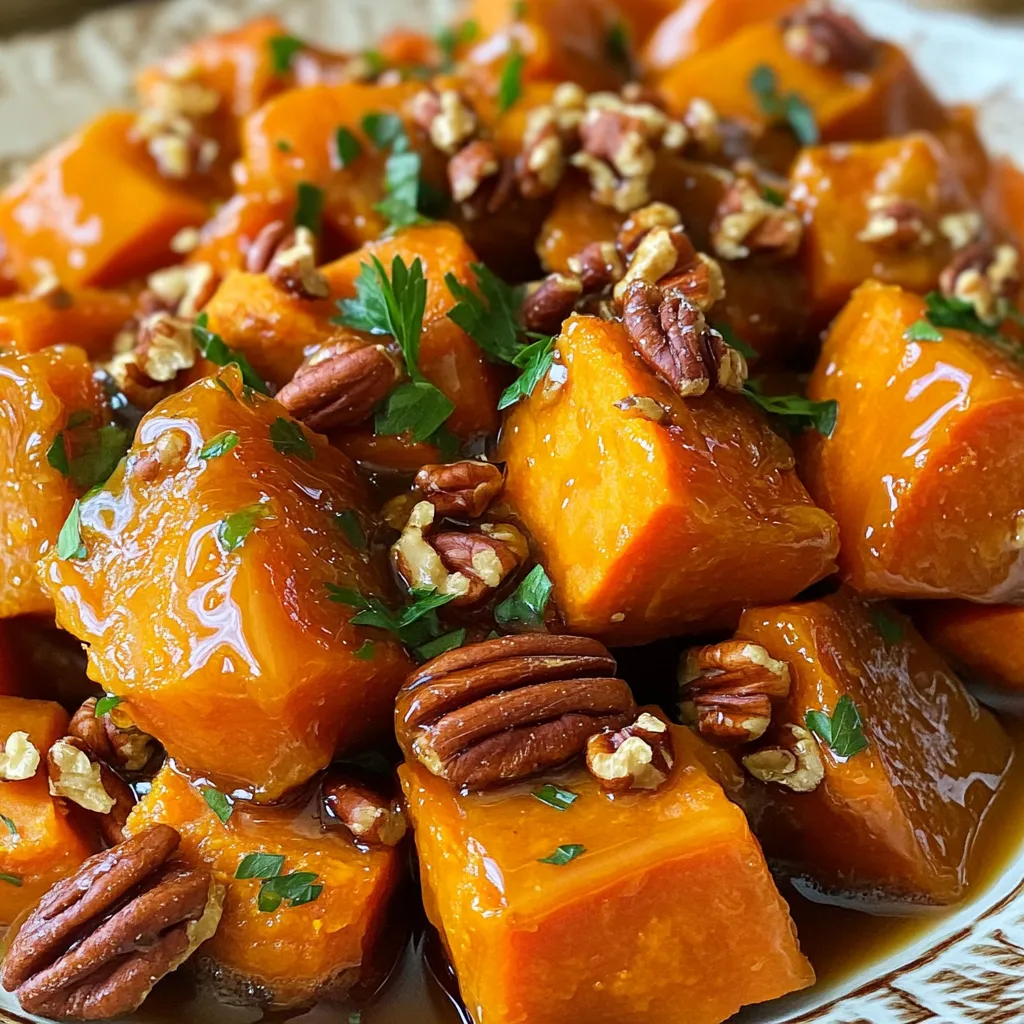
Are you looking for a mouthwatering side dish that will impress your guests? Maple Pecan Sweet Potatoes are the answer!

- 4 boneless, skinless chicken breasts - 1/2 cup unsalted butter, softened - 1/2 cup buttermilk - 2 tablespoons garlic powder - 1 tablespoon onion powder - 1 tablespoon smoked paprika - 1 teaspoon cayenne pepper (optional for heat) - 1 teaspoon salt - 1 teaspoon black pepper - 2 tablespoons fresh parsley, chopped (for garnish) - Lemon wedges (for serving) The recipe calls for four chicken breasts. Each breast should be boneless and skinless for best results. You will need a half cup of unsalted butter. Make sure it is softened before mixing. Use half a cup of buttermilk to add creaminess. For spices, measure two tablespoons of garlic powder and one tablespoon of onion powder. Use one tablespoon of smoked paprika for flavor depth. If you like heat, add one teaspoon of cayenne pepper. You will also need one teaspoon each of salt and black pepper. Finally, chop two tablespoons of fresh parsley for garnish. You can serve the chicken with lemon wedges for an extra zing. If you don’t have buttermilk, mix one cup of regular milk with one tablespoon of vinegar. Let it sit for five minutes to thicken. For the butter, you could use olive oil, but the flavor will change. If you want less spice, skip the cayenne pepper. You can also use skin-on chicken thighs for a richer taste. If you prefer a milder flavor, reduce the garlic powder. For a fresh twist, try fresh herbs like basil or cilantro instead of parsley. {{ingredient_image_1}} Start by gathering your ingredients. In a mixing bowl, combine these items: - 1/2 cup unsalted butter, softened - 1/2 cup buttermilk - 2 tablespoons garlic powder - 1 tablespoon onion powder - 1 tablespoon smoked paprika - 1 teaspoon cayenne pepper (if you want heat) - 1 teaspoon salt - 1 teaspoon black pepper Mix all the ingredients well. You want a smooth, creamy marinade. This mix will give your chicken great flavor. Now, grab 4 boneless, skinless chicken breasts. Place them in a resealable plastic bag or shallow dish. Pour the marinade over the chicken. Make sure every piece is coated well. Seal the bag or cover the dish. Put it in the fridge for at least 2 hours. For the best taste, let it marinate overnight. You can cook your chicken in two ways: grilling or baking. If grilling, preheat your grill to medium-high heat (about 375°F/190°C). When ready, take the chicken out of the marinade. Let any extra marinade drip off and save it for basting. Grill the chicken for 6-7 minutes on each side. Make sure the chicken reaches an internal temperature of 165°F (75°C). Baste with the leftover marinade while cooking for extra flavor. If you prefer baking, place the marinated chicken on a baking sheet. Bake at the same temperature, checking for doneness after 20 minutes. After cooking, let the chicken rest for 5 minutes. This helps keep it juicy. Garnish with chopped fresh parsley and serve with lemon wedges for a fresh taste. Enjoy your Texas Roadhouse Style Butter Chicken! Marinating is key for great flavor. Use a resealable bag or dish. The butter mix should cover each chicken piece well. For best results, marinate overnight. This lets the flavors soak in deeply. If short on time, two hours still works well. Cooking at the right temperature is important. Aim for medium-high heat, about 375°F (190°C). This heat cooks the chicken evenly. It keeps the meat juicy while giving it a nice char. Use a meat thermometer to check for doneness. The chicken should reach 165°F (75°C) inside. To get those beautiful grill marks, make sure the grill is hot. Place the chicken on the grill and don’t move it for the first 3-4 minutes. This allows the grill to sear the meat. Rotate the chicken 90 degrees to create crosshatch marks. Flip the chicken after the first side has cooked well. Enjoy your perfectly grilled butter chicken! Pro Tips Marinate Longer: For the best flavor, marinate the chicken overnight. This allows the spices to penetrate the meat thoroughly. Adjust Spice Levels: If you prefer a milder dish, omit the cayenne pepper or reduce the amount. You can always add hot sauce later if desired. Check Doneness: Use a meat thermometer to ensure the chicken reaches an internal temperature of 165°F (75°C) for safe consumption. Rest Before Slicing: Let the chicken rest for at least 5 minutes after grilling. This helps the juices redistribute, keeping the meat moist. {{image_2}} To make your butter chicken spicier, add more cayenne pepper. Start with 1 teaspoon. Adjust to your taste. If you want even more heat, try adding chopped jalapeños. You can also use a spicy hot sauce in the marinade. This adds a nice kick and extra flavor. For a milder dish, skip the cayenne pepper. You can also reduce the garlic powder and smoked paprika. Kids often enjoy less intense flavors. Try adding honey for a touch of sweetness. This helps balance the spices and makes the dish appealing to young eaters. Butter chicken pairs well with rice or mashed potatoes. Try serving it with warm bread, like naan or rolls. A fresh salad can add color and crunch. Consider a simple green salad with lemon dressing. For extra zest, serve lemon wedges on the side. This enhances the dish and adds brightness. After cooking, let your butter chicken cool down a bit. Place it in an airtight container. You can store it in the fridge for up to four days. Make sure to keep it sealed tight. This helps keep it fresh and prevents any odd smells. When you're ready to eat, just take it out, and you're good to go! If you want to save some for later, you can freeze it. Let the chicken cool completely first. Place it in a freezer-safe container or a resealable bag. It can stay in the freezer for about three months. Just remember to label it with the date. This way, you know when to use it before it loses flavor. When you're ready to enjoy your frozen butter chicken, take it out and let it thaw in the fridge overnight. If you need to heat it quickly, you can use the microwave. Heat it on medium power for about 2-3 minutes, stirring halfway. Check to make sure it's hot all the way through. You can also reheat it on the stove. Just place it in a pan over low heat. Stir occasionally until it's warm. Enjoy your delicious meal again! Texas Roadhouse Style Butter Chicken is a rich and creamy dish. It uses a flavorful marinade made from butter, buttermilk, and spices. The chicken absorbs these tasty flavors, making it juicy and delicious. It's perfect for gatherings or a simple family dinner. You can serve it with lemon wedges for an extra zing. Yes, you can use chicken thighs instead of breasts. Thighs are juicier and add more flavor. They also cook well with the marinade. Just make sure to adjust the cooking time as they may need a little longer. Aim for the same internal temperature of 165°F. To know if the chicken is fully cooked, use a meat thermometer. Insert it into the thickest part of the chicken. It should read 165°F. If you don’t have a thermometer, cut the chicken. The meat should be white with no pink inside. Yes, you can make this dish in advance. Marinate the chicken overnight for the best flavor. Cook it the next day when you're ready to eat. You can also prepare the marinade and store it in the fridge for up to three days. You can serve butter chicken with rice or warm naan bread. Both soak up the tasty sauce well. For a fresh touch, add a side salad or steamed veggies. Lemon wedges are great to brighten the flavors, too. We covered the key ingredients for butter chicken, including measurements and substitutions. I shared step-by-step instructions for marinating and cooking using different methods. You learned tips for perfecting your dish, plus tasty variations and storage advice. Remember, cooking is fun and you can always try new things. Enjoy making your butter chicken tasty and satisfying, no matter how you serve it!

Texas Roadhouse Style Butter Chicken Simple Delight

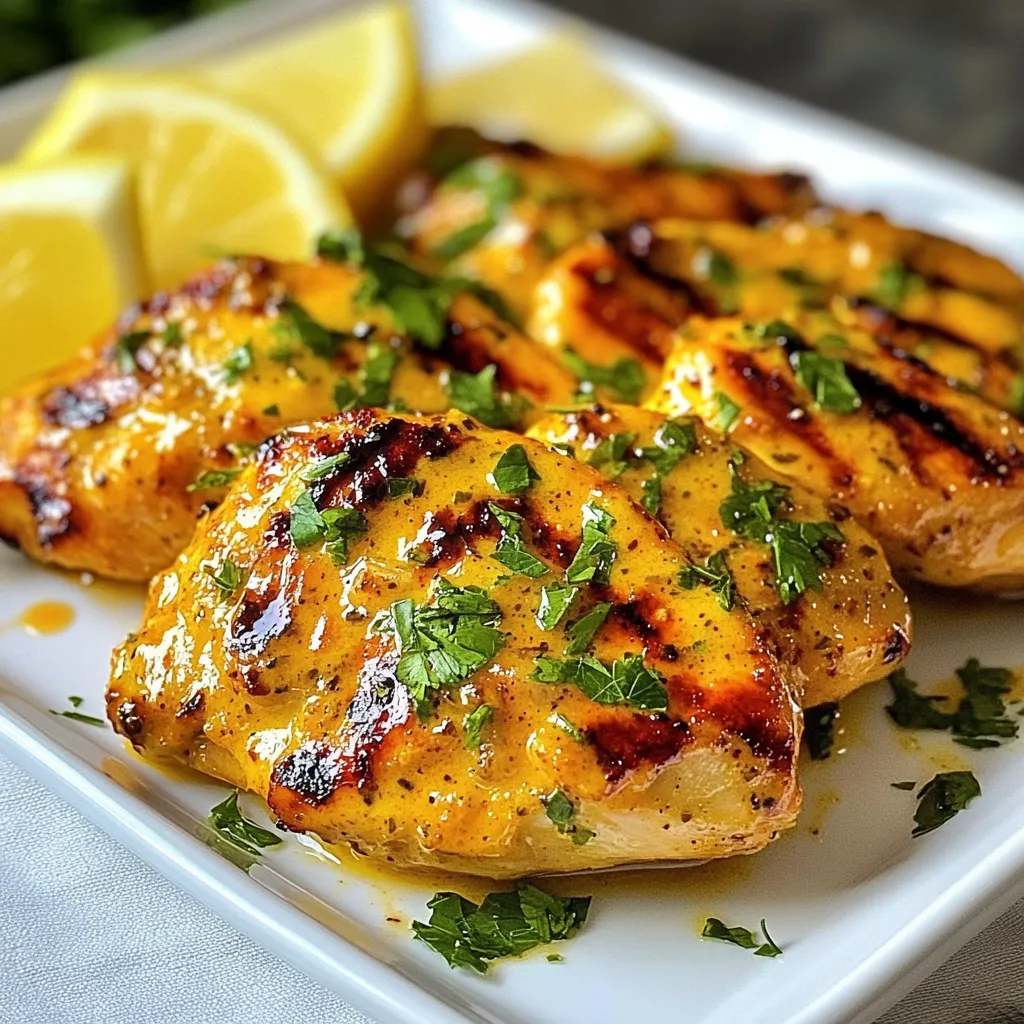
If you crave a dish that’s both tasty and simple, you’re in the right spot! Texas Roadhouse Style Butter Chicken

To create Air Fryer Honey Garlic Brussels Sprouts, gather these items: - 1 lb Brussels sprouts, trimmed and halved - 3 tablespoons honey - 2 tablespoons soy sauce (or tamari for gluten-free) - 3 cloves garlic, minced - 1 tablespoon olive oil - Salt and pepper to taste - 1 teaspoon sesame seeds (for garnish) - 2 green onions, sliced (for garnish) You can switch things up with these optional ingredients: - Chili flakes for heat - Balsamic vinegar for tanginess - Maple syrup instead of honey This dish serves four people. Each serving has: - Calories: 150 - Protein: 3g - Carbohydrates: 27g - Fat: 5g - Fiber: 4g - Sugar: 8g These numbers can change based on ingredient swaps. Enjoy these tasty sprouts while staying mindful of your nutrition! 1. Start by trimming the ends off the Brussels sprouts. 2. Cut each sprout in half. This helps them cook better and get crispy. 3. In a big bowl, mix honey, soy sauce, minced garlic, olive oil, salt, and pepper. Whisk until all blend well. 4. Toss the halved Brussels sprouts in the honey garlic mix. Make sure every piece gets coated. 1. Preheat your air fryer to 375°F (190°C). This makes them crispier. 2. Place the coated Brussels sprouts in the air fryer basket. Keep them in one layer. 3. If needed, cook in batches so they do not crowd each other. 4. Air fry for 12-15 minutes. Shake the basket halfway through to help them crisp up evenly. 5. When golden brown and crispy, take them out. Transfer to a serving dish. 6. Garnish with sesame seeds and sliced green onions for a tasty finish. - Make sure the Brussels sprouts are dry before coating. This helps them crisp up. - Do not overcrowd the air fryer. Sprouts need space to cook evenly. - Shake the basket halfway through cooking. This helps them brown nicely on all sides. - If you want extra crunch, cook them a minute or two longer. Just keep an eye on them! For my air fryer honey garlic Brussels sprouts, I preheat the air fryer to 375°F (190°C). This temperature helps the sprouts crisp up nicely. I cook them for about 12-15 minutes. Halfway through, I shake the basket to cook them evenly. Overcrowding can lead to soggy Brussels sprouts. I always arrange them in a single layer. If you have a lot, cook in batches. This way, each sprout gets enough hot air for that crispy texture. If you need a swap for honey, try maple syrup or agave syrup. For soy sauce, tamari works well for gluten-free diets. Coconut aminos can also be a great choice. These options keep the flavors strong and delicious. {{image_2}} You can change up the taste of your honey garlic Brussels sprouts by adding spices. Try adding red pepper flakes for heat. A little chili powder can also give a nice kick. If you enjoy warmth, add a dash of cumin or smoked paprika. These spices make the dish more exciting and flavorful. They add depth to the honey and garlic mix, making each bite special. This recipe is already quite flexible for vegetarians. To make it vegan, simply use maple syrup instead of honey. The soy sauce can remain as is, or you can use tamari for gluten-free needs. This keeps the sweet and savory balance intact. You can also add some tofu or tempeh for extra protein. Both options work well and keep it plant-based while still being delicious. If you have allergies or dietary needs, there are easy swaps. For those avoiding soy, try coconut aminos instead of soy sauce. It offers a similar taste without the allergens. If you're looking to cut sugar, use a sugar-free honey alternative. You can also substitute olive oil with avocado oil for a higher smoke point. These changes will not alter the great taste of the dish, making it friendly for everyone. After enjoying your delicious air fryer honey garlic Brussels sprouts, you may have some left. To keep them fresh, place the sprouts in an airtight container. Store them in the fridge for up to three days. Make sure they cool down before sealing the container. When you want to enjoy your leftovers, the best way to reheat them is in the air fryer. Preheat your air fryer to 350°F (175°C). Place the sprouts in the basket and heat for about 5-7 minutes. This method keeps them crispy and delicious. You can also use the oven, but the air fryer is my favorite for this dish. If you have more Brussels sprouts than you can eat, freezing is a great option. First, blanch the halved sprouts in boiling water for 3 minutes. Then, cool them in ice water for another 3 minutes. Drain and dry them well. Place the sprouts in a freezer bag, removing as much air as you can. They will stay fresh for up to three months. When ready to eat, just air fry them straight from the freezer. You should air fry Brussels sprouts for 12 to 15 minutes. Start at 375°F (190°C). Shake the basket halfway through. This helps them cook evenly. You want them golden brown and crispy. Yes, you can use frozen Brussels sprouts. Just thaw and drain them first. Pat them dry with a paper towel. This helps remove excess moisture. Moisture can make them soggy instead of crispy. Honey garlic Brussels sprouts pair well with many dishes. Try them with grilled chicken or salmon. They also go great with rice or quinoa. For a vegetarian option, serve them with tofu or a grain salad. To reduce bitterness, try these tips: - Trim the ends and remove any yellow leaves. - Soak halved sprouts in cold water for 30 minutes. - Blanch them in boiling water for 2-3 minutes before air frying. These methods can help improve their taste. You learned about making crispy air fryer Brussels sprouts. We explored key ingredients, cooking steps, and delicious variations. You now have tips to avoid overcrowding and simple storage tips for leftovers. Try the optional spices or vegetarian swaps for more flavor. Remember, cooking is fun, and with practice, you'll get it just right. Enjoy your tasty, healthy dish and share it with friends. Your next meal can be full of great flavor and nutrition!

Air Fryer Honey Garlic Brussels Sprouts Delight

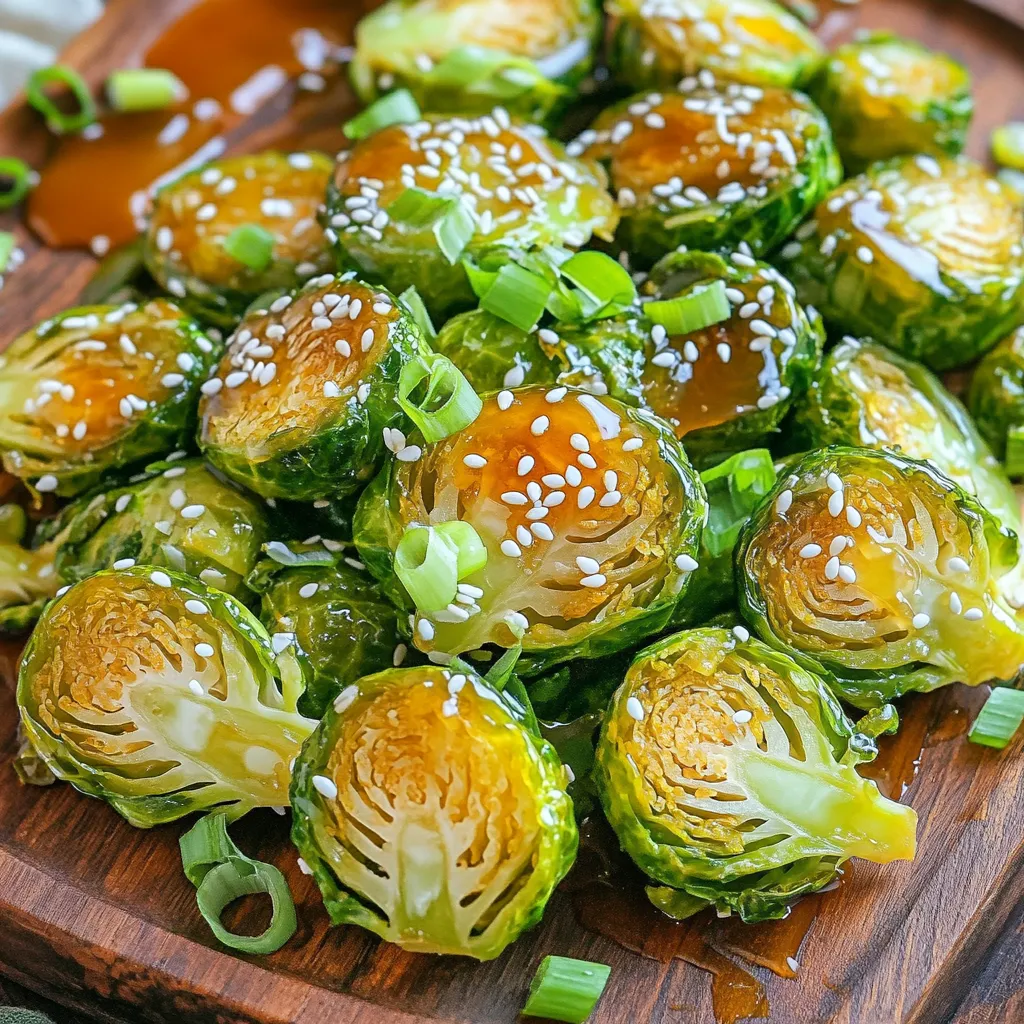
If you’re looking for a tasty side dish that’s quick and easy, you’ve found it! My Air Fryer Honey Garlic

- 1 cup rolled oats - 1/2 cup pumpkin puree - 1 scoop vanilla protein powder - 1/2 teaspoon baking powder - 1 teaspoon pumpkin spice - 1/2 teaspoon cinnamon - 2 eggs - 1/2 cup milk (dairy or non-dairy) - 1 tablespoon maple syrup (optional) - Pinch of salt - Cooking spray or oil for the skillet These pancakes pack a punch! Each serving has about: - Calories: 200 - Protein: 10 grams - Carbs: 30 grams - Fats: 5 grams - Fiber: 4 grams This makes them a great meal for any time of day. - Rolled oats: They give fiber and help keep you full. - Pumpkin puree: It adds vitamins and minerals like vitamin A. - Vanilla protein powder: This boosts protein and aids muscle growth. - Baking powder: It helps the pancakes rise and stay fluffy. - Pumpkin spice: This spice mix adds flavor and warmth. - Cinnamon: It gives a sweet taste and helps with blood sugar. - Eggs: They are great for protein and healthy fats. - Milk: This adds creaminess and calcium. - Maple syrup: It sweetens the mix for a treat (optional). - Salt: It enhances all the flavors. - Cooking spray/oil: It keeps pancakes from sticking to the skillet. Each ingredient brings something special to these Protein Pumpkin Pancakes! To make protein pumpkin pancakes, start by gathering all your ingredients. You need rolled oats, pumpkin puree, protein powder, baking powder, pumpkin spice, cinnamon, eggs, milk, maple syrup, and salt. This recipe uses a blender, making the process quick and simple. 1. Make Oat Flour: Place the rolled oats in your blender. Blend them until they turn into a fine flour. 2. Mix Ingredients: Add pumpkin puree, protein powder, baking powder, pumpkin spice, cinnamon, eggs, milk, and a pinch of salt to the oat flour. If you want, pour in the maple syrup. Blend until everything is smooth. 3. Let Batter Rest: Allow the batter to sit for 5-10 minutes. This helps it thicken. 4. Preheat Skillet: Heat a non-stick skillet over medium heat. Lightly grease it with cooking spray or oil. 5. Pour Batter: Use a 1/4 cup to pour pancake batter onto the skillet for each pancake. 6. Cook First Side: Cook for 2-3 minutes. Look for bubbles forming on the surface. The edges should start to look set. 7. Flip Pancakes: Carefully flip each pancake. Cook for another 1-2 minutes until they turn golden brown. 8. Repeat: Continue with the rest of the batter. Add more oil to the skillet as needed. 9. Serve: Serve the pancakes warm with toppings like yogurt, sliced bananas, or extra maple syrup. - Check the Heat: Make sure your skillet is hot enough before pouring the batter. If it's too cool, pancakes won’t cook well. - Don’t Overmix: Blend just enough to combine. Overmixing can make the pancakes tough. - Use Fresh Ingredients: Make sure your baking powder is fresh for the best rise. - Experiment with Toppings: Try adding nuts, seeds, or fruits for extra flavor and texture. - Stack High: For a great presentation, stack the pancakes and add a sprinkle of pumpkin seeds and cinnamon on top. Drizzle with maple syrup for a sweet finish. To boost the taste of your protein pumpkin pancakes, try these tips: - Add a splash of vanilla extract for sweetness. - Mix in chopped nuts or chocolate chips for texture. - Experiment with flavored protein powder, like chocolate or cinnamon. These small changes can make a big difference in flavor. If you have leftover pancakes, store them properly: - Let them cool completely. - Place them in an airtight container. - Keep them in the fridge for up to three days. This way, you can enjoy them later without losing freshness. Toppings can elevate your pancakes. Here are some of my favorites: - Greek yogurt for creaminess. - Sliced bananas for natural sweetness. - A drizzle of maple syrup for extra flavor. - A sprinkle of pumpkin seeds for crunch. Get creative and mix different toppings to find your perfect match! {{image_2}} You can easily make these pancakes gluten-free. Use gluten-free rolled oats to make oat flour. Check the label to ensure they are certified gluten-free. The rest of the ingredients work well without any changes. This keeps your meal tasty and safe for those who cannot eat gluten. To make these pancakes vegan, swap out the eggs and milk. Use 1/4 cup of unsweetened applesauce for each egg. You can use any non-dairy milk, like almond or oat milk. This keeps the pancakes light and fluffy while staying plant-based. Feel free to play with flavors! Add chocolate chips or nuts to the batter. You can also mix in different spices, like nutmeg or ginger. If you want a sweeter taste, add more maple syrup. Top your pancakes with fresh fruit or yogurt for extra flavor. After making your protein pumpkin pancakes, let them cool first. Place them in an airtight container. Store them in the fridge for up to three days. This keeps them fresh and tasty. For longer storage, you can freeze your pancakes. Stack them with parchment paper in between each pancake. Place them in a freezer-safe bag or container. They will stay good for up to three months. Just remember to label the bag with the date. When you’re ready to eat your pancakes, you can reheat them easily. For the microwave, place a pancake on a plate and heat for about 30 seconds. If you prefer a crispy texture, use a skillet. Heat on medium for a few minutes until warm. Enjoy them with your favorite toppings! Yes, you can use other protein powders. Choose one that blends well. Whey, casein, or plant-based powders work great. Just keep in mind that flavors may change. A chocolate protein powder can add a fun twist! To make the pancakes fluffier, you can use a bit more baking powder. You can also whip the egg whites separately. Fold them into the batter gently. This adds air and makes the pancakes rise better. Letting the batter rest longer can help too. Enjoy pumpkin pancakes warm with tasty toppings. I love adding yogurt or sliced bananas. Drizzling maple syrup on top makes it sweet and fun. You can also sprinkle pumpkin seeds or nuts for crunch. Each bite becomes a tasty treat! This blog post covered key ingredients for tasty pancakes, including their benefits and nutrition. I provided step-by-step cooking instructions, tips for better flavor, and ways to store leftovers. You can even try gluten-free or vegan options. Explore ideas to customize flavors and find answers to common questions. Enjoy making pancakes that suit your taste. You have the tools to create delicious meals for any occasion. Now, it’s your turn to get cooking and enjoy these wonderful treats!

Protein Pumpkin Pancakes Quick and Tasty Recipe

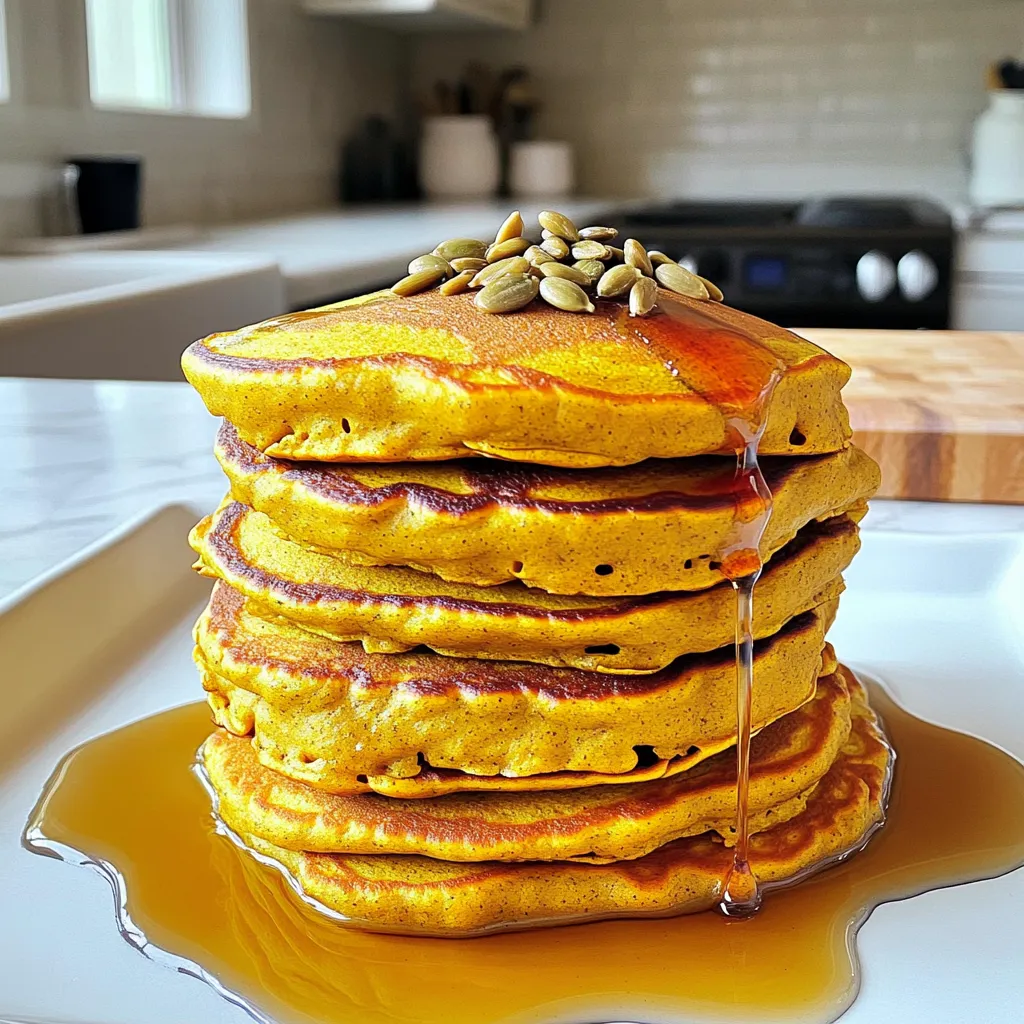
Looking for a tasty way to pack in some protein? Try my Protein Pumpkin Pancakes! They’re quick to make and

- 1 cup cooked pumpkin puree - 1 cup rolled oats - 1/2 cup all-purpose flour - 1/2 cup brown sugar, packed - 1/4 cup granulated sugar - 1/2 cup coconut oil, melted (or unsalted butter) - 1 large egg - 1 teaspoon vanilla extract - 1 teaspoon baking powder - 1 teaspoon ground cinnamon - 1/2 teaspoon ground nutmeg - 1/4 teaspoon ground ginger - 1/4 teaspoon salt - 1/2 cup chocolate chips or walnuts (optional) Let’s talk about the ingredients. The pumpkin puree gives these cookies a soft, moist texture. You can use canned pumpkin or cook your own fresh pumpkin. Both work well. The rolled oats add chewiness. If you want a gluten-free option, try using certified gluten-free oats. For the flour, all-purpose is my go-to. However, you can swap it for whole wheat flour for a nuttier taste. The sugars add sweetness and a slight caramel flavor. If you prefer less sugar, reduce the granulated sugar. Coconut oil adds a hint of tropical flavor. You can also use unsalted butter if you want a richer taste. The egg holds everything together. For a vegan option, you can use a flax egg instead. Now, let’s spice things up! You can add chocolate chips or walnuts for extra flavor and texture. Chocolate chips give a sweet touch. Walnuts add crunch and a nutty taste. You might also consider adding raisins or dried cranberries for a fruity twist. If you want even more spice, add chopped ginger or a pinch of cloves. Choose what you love! Start by preheating your oven to 350°F (175°C). This is key for even baking. While the oven heats, line a baking sheet with parchment paper. This helps prevent the cookies from sticking. In a large bowl, mix the cooked pumpkin puree, melted coconut oil, brown sugar, granulated sugar, egg, and vanilla extract. Use a whisk to blend everything until it’s smooth. This mixture adds moisture and flavor to your cookies. In another bowl, combine the rolled oats, all-purpose flour, baking powder, cinnamon, nutmeg, ginger, and salt. Stir these dry ingredients well. This step helps to evenly distribute the spices throughout the dough. Gradually add the dry mix to the wet ingredients. Stir gently until just combined. If you want to add chocolate chips or walnuts, fold them in now. This adds a fun twist to your cookies. Using a tablespoon or cookie scoop, drop rounded balls of dough onto the prepared baking sheet. Make sure to leave space between each ball. They will spread slightly while baking. Bake the cookies in your preheated oven for 12-15 minutes. Look for golden brown edges and set centers. Once baked, let them cool on the baking sheet for about 5 minutes. This helps them firm up before moving them to a wire rack to cool completely. Enjoy your delightful chewy treats! To make your pumpkin oatmeal cookies chewy, use cooked pumpkin puree. It adds moisture and a soft bite. Make sure to measure your oats correctly. Too many oats can make your cookies dry. Mixing the wet and dry ingredients is key. Combine them just until they mix. Overmixing can make the cookies tough. One common mistake is skipping the cooling time. Letting cookies cool on the sheet helps them firm up. If you forget, they may break apart when you try to move them. Another issue is not preheating the oven. Baking at the right temperature ensures even cooking. Lastly, don't pack your brown sugar too tightly. This can make your cookies too sweet and dense. Use measuring cups for dry ingredients and a liquid measuring cup for wet. This keeps your ratios right. When measuring flour, scoop it with a spoon into the cup. Then level it off with a knife. This prevents adding too much flour. For sticky ingredients like pumpkin, use a rubber spatula. It helps get every bit out of the bowl. Always read your recipe twice before you start. This will help you gather all your ingredients and tools. {{image_2}} You can easily make gluten-free pumpkin oatmeal cookies. Just swap the all-purpose flour for a gluten-free blend. Look for one that works well in baking. This change keeps the cookies soft and chewy. When you do this, check the flour's texture. You want it to be fine. Also, make sure your oats are labeled gluten-free. To make vegan pumpkin oatmeal cookies, replace the egg with a flaxseed meal. Mix 1 tablespoon of flaxseed with 3 tablespoons of water. Let it sit for about 5 minutes. This will act as your binder. Use melted coconut oil, as it is a great substitute for butter. These cookies stay moist and tasty without any animal products. Want to make your cookies extra special? Add some mix-ins! Try these options: - 1/2 cup of chocolate chips - 1/2 cup of chopped walnuts - 1/4 cup of dried cranberries - 1/4 cup of shredded coconut You can also add spices. A pinch of cloves or allspice works well. If you want a hint of citrus, add a teaspoon of orange zest. These tweaks create unique flavors in every bite. Experiment and find your favorite mix! To keep your pumpkin oatmeal cookies fresh, store them in an airtight container. This will help them stay soft and chewy. You can use a cookie jar or a plastic container with a tight lid. Place a slice of bread in the container. It adds moisture and keeps the cookies from drying out. Store at room temperature for up to a week. Freezing cookies is easy. First, let the cookies cool completely. Then, place them in a single layer on a baking sheet. Freeze them for about two hours. Once frozen, move them to a freezer bag. Squeeze out the air and seal it tight. Label the bag with the date. You can freeze the cookies for up to three months. These cookies last about one week at room temperature. If you freeze them, they can last for three months. When you're ready to enjoy them, let them thaw in the fridge or at room temperature. To reheat, place them in the oven at 350°F (175°C) for about 5-7 minutes. This will help them regain their soft texture. Enjoy your delightful chewy treats! Yes, you can use fresh pumpkin. Just cook and puree it. Make sure to drain excess water. This keeps your cookies from getting too wet. To make chewy cookies, add more oats. You can also use less flour. Bake them just until the edges are golden. Let them cool on the baking sheet to firm up. Yes, you can use unsalted butter or vegetable oil. Both work well in this recipe. They give a nice flavor and texture, too. If your cookies are dry, add a splash of milk or water. You can also place a slice of bread in the container. This helps keep cookies moist. Yes, these cookies freeze well. Store them in an airtight container. You can freeze them for up to three months. Just thaw them in the fridge before enjoying. This guide covered everything you need for perfect pumpkin oatmeal cookies. We explored ingredients, measurements, and fun add-ins. You learned step-by-step baking instructions, tips for texture, and how to store your cookies. Remember, whether you choose gluten-free or vegan options, the joy of baking lies in experimenting. With these tips in mind, you can create delicious cookies that everyone will love. Enjoy your baking journey!

Pumpkin Oatmeal Cookies Delightfully Chewy Treat

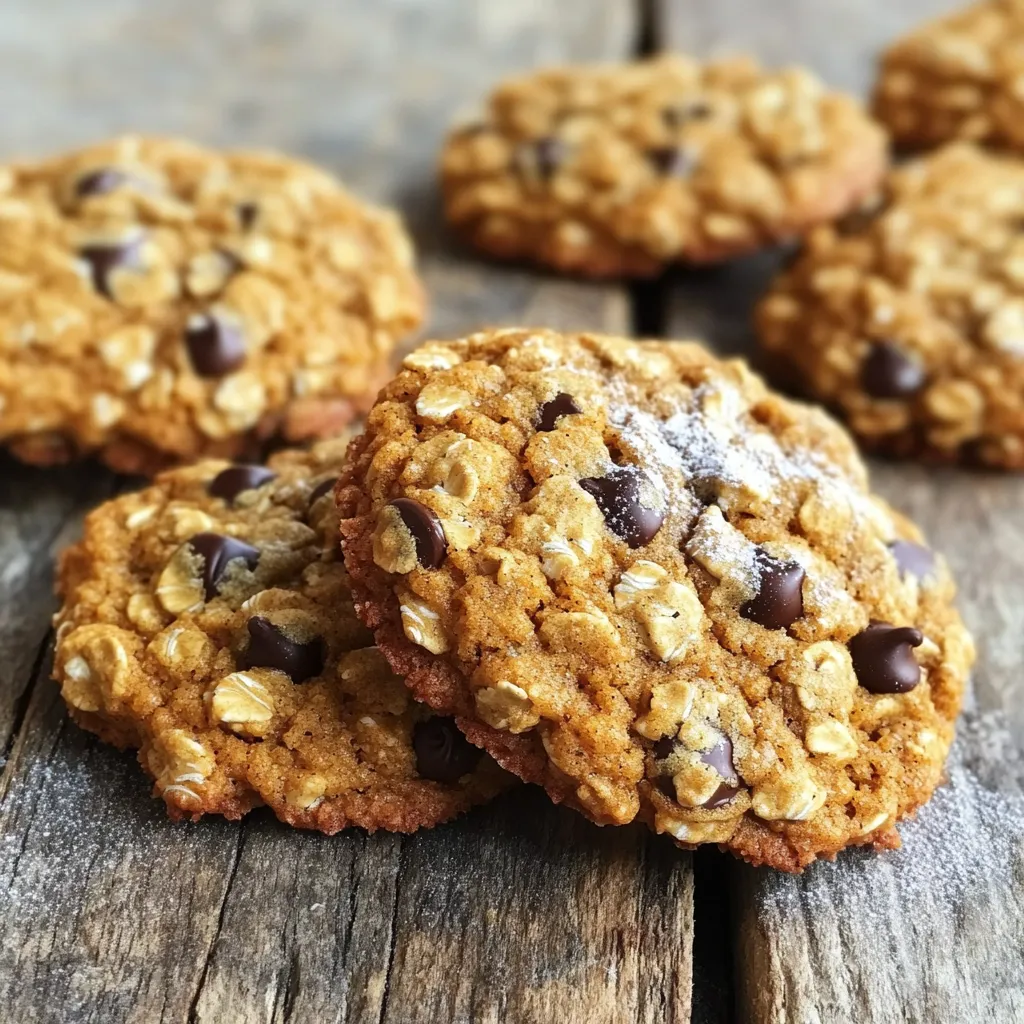
Welcome to the world of Pumpkin Oatmeal Cookies! If you crave a chewy treat that celebrates fall flavors, you’re in

- 1 pound large shrimp, peeled and deveined - 4 tablespoons unsalted butter, melted - 4 cloves garlic, minced - 1 lemon, zested and juiced - 1 teaspoon chili flakes (optional) - ½ teaspoon smoked paprika - 2 cups cherry tomatoes, halved - 1 cup asparagus, trimmed and cut into 2-inch pieces - 8 oz linguine or spaghetti, broken in half - Salt and pepper to taste - Fresh parsley, chopped, for garnish The ingredients in this dish create a burst of flavor. First, you want fresh, large shrimp. They bring a juicy, tender bite that pairs well with garlic. You need unsalted butter, which adds richness and allows you to control salt. Garlic is a must. Minced garlic gives a strong aroma and taste that enhances the dish. A fresh lemon brings bright acidity. You can use both the zest and juice for full flavor. Optional items like chili flakes add heat, while smoked paprika can bring a subtle smokiness. Cherry tomatoes add sweetness and juicy texture. Asparagus adds color and crunch. For the pasta, I recommend linguine or spaghetti. Break the pasta in half for easier mixing. Don’t forget salt and pepper. They help balance the dish. Lastly, fresh parsley makes a lovely garnish, adding color and freshness. With these ingredients, you build layers of flavor. Each bite is a delightful mix of taste and texture, making this dish a true winner. 1. Preheat your oven to 400°F (200°C). This step is key for even cooking. Line a large sheet pan with parchment paper. It makes cleaning up easy later. 2. Mix the garlic butter marinade. In a large bowl, combine the melted butter, minced garlic, lemon zest, lemon juice, chili flakes (if you like heat), smoked paprika, and a good pinch of salt and pepper. Stir it all well to blend the flavors. 3. Marinate the shrimp. Add the large shrimp to the bowl. Toss them in the garlic butter mixture until they are well coated. Let the shrimp sit for about 10 minutes. This helps them soak up all that tasty flavor. 1. Spread the vegetables on the sheet pan. Place the halved cherry tomatoes and trimmed asparagus evenly over the parchment. Drizzle with a bit of olive oil, then add salt and pepper. Toss them around to coat them well. 2. Position the shrimp and pasta. Create a space in the center of the pan for the marinated shrimp. Then, sprinkle the broken linguine around the shrimp and vegetables. This setup allows all the flavors to blend while baking. 1. Bake the dish. Place the sheet pan in your preheated oven. Bake for 12-15 minutes. Check the shrimp; they should turn pink and opaque. The pasta should be al dente. 2. Finishing touches. Once cooked, take the pan out and let it cool for a few minutes. Garnish with freshly chopped parsley. This adds color and freshness to your dish. Marinating shrimp makes a big difference. Letting them sit in the garlic butter mix for about 10 minutes helps them soak up the flavor. If you like some heat, add chili flakes. Adjust the amount to fit your taste. You can also try smoked paprika for a smoky touch. Cooking pasta just right is key. Make sure it is al dente before adding it to the sheet pan. This means it should still have a bit of bite. Using parchment paper is a smart choice. It helps with easy cleanup and keeps the dish from sticking. Presentation can make your dish pop. You can serve it right on the sheet pan for a casual feel. If you want something fancier, plate the shrimp and pasta individually. Drizzle some extra lemon juice on top for a fresh touch. This makes the dish look bright and appetizing. {{image_2}} You can easily swap the shrimp for other seafood. Try scallops, fish, or crab. Each adds a new flavor. Mixing in extra veggies can also boost this dish. Add bell peppers, zucchini, or even broccoli for more nutrients. If you need a gluten-free option, use gluten-free pasta. There are many brands available that taste great. For a lower-calorie dish, reduce the butter. You can use just two tablespoons and still get great flavor. Add fresh herbs like basil or thyme for a unique twist. You can also try spices like lemon pepper or cayenne for extra heat. These small changes can make your dish stand out. After enjoying your Garlic Butter Shrimp Scampi, store any leftovers in a sealed container. This keeps the dish fresh and tasty. You can keep it in the fridge for up to three days. Make sure it cools down before sealing to avoid moisture build-up. If you want to save the dish for later, freezing works well! Place the cooled shrimp scampi in an airtight container or freezer bag. It will stay good in the freezer for about two months. When you're ready to eat, take it out and thaw it in the fridge overnight. To heat, place your thawed dish in a pan over low heat. Stir gently until warmed through. You can also use the microwave for quick reheating. Just be careful not to overcook the shrimp. Enjoy your delicious meal again! How do I know when the shrimp are done cooking? You can tell shrimp are done when they turn pink and opaque. This usually takes about 12-15 minutes in the oven. When done, they will curl slightly. Make sure not to overcook them, as they can become tough. Can I make this recipe ahead of time? Yes, you can prep the garlic butter and marinate the shrimp ahead of time. Just keep them in the fridge. When you're ready to cook, spread the veggies and shrimp on the sheet pan and bake. This makes meal prep easy! What can I use instead of linguine? If you want a change, you can use spaghetti, fettuccine, or even gluten-free pasta. You can also skip the pasta and serve the shrimp and veggies over rice or quinoa for a different twist. What to do if the pasta is overcooked? If your pasta is overcooked, it gets mushy. To fix this, you can try to dry it out in a pan on low heat. Stir it gently. Add a bit of olive oil to help it regain some texture. But, watch it closely so it doesn't burn! Can I use frozen shrimp in this recipe? Yes, you can use frozen shrimp. Just thaw them before marinating. A quick way is to put them in a bowl of cold water for about 15 minutes. Drain and pat dry before using in the recipe. What sides go well with shrimp scampi? Shrimp scampi pairs well with a fresh green salad or garlic bread. You can also serve it with a side of steamed broccoli or a light vegetable medley. These sides add color and balance to your meal. This dish combines fresh shrimp, garlic, and pasta for a simple, tasty meal. We explored ingredients, preparation, baking, and easy tips. You can swap seafood, try gluten-free pasta, or customize flavors. Store leftovers properly for later enjoyment. Cooking at home is fun and rewarding. I hope this recipe inspires you to create your own delicious shrimp scampi. Enjoy every bite!

Garlic Butter Shrimp Scampi Sheet Pan Delight

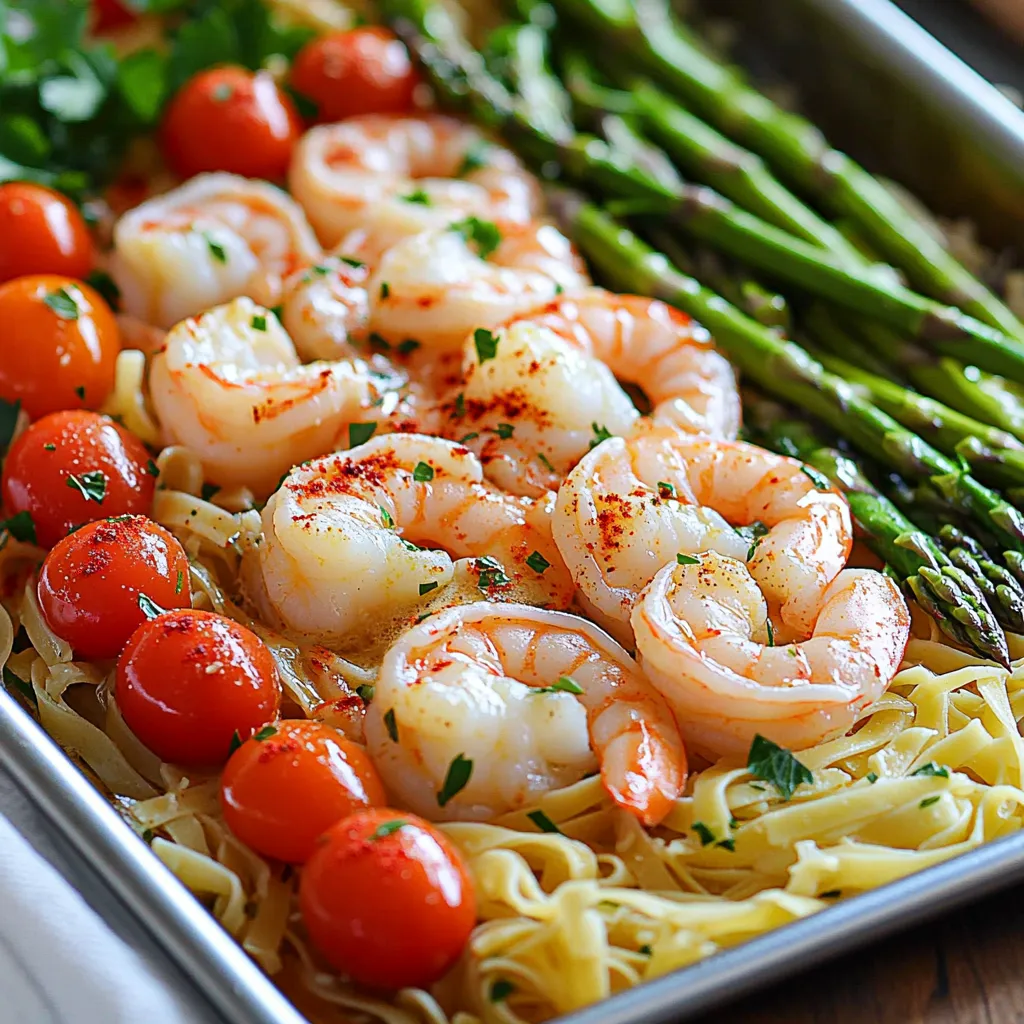
Are you ready to make a quick and easy dinner that bursts with flavor? My Garlic Butter Shrimp Scampi Sheet

Older posts
Newer posts
← Previous Page1 … Page11 Page12 Page13 … Page144 Next →

dsad

© 2025 So Yum Recipes • Built with GeneratePress

Our Policies

  • Copyright Policy
  • Cookie Policy
  • GDPR Policy
  • Privacy Policy
  • Disclaimer
  • Terms Of Use

More Information

  • Home
  • About
  • Contact
  • Appetizers
  • Dessert
  • Dinner
  • Drinks
©2025, So Yum Recipes About Back To Top