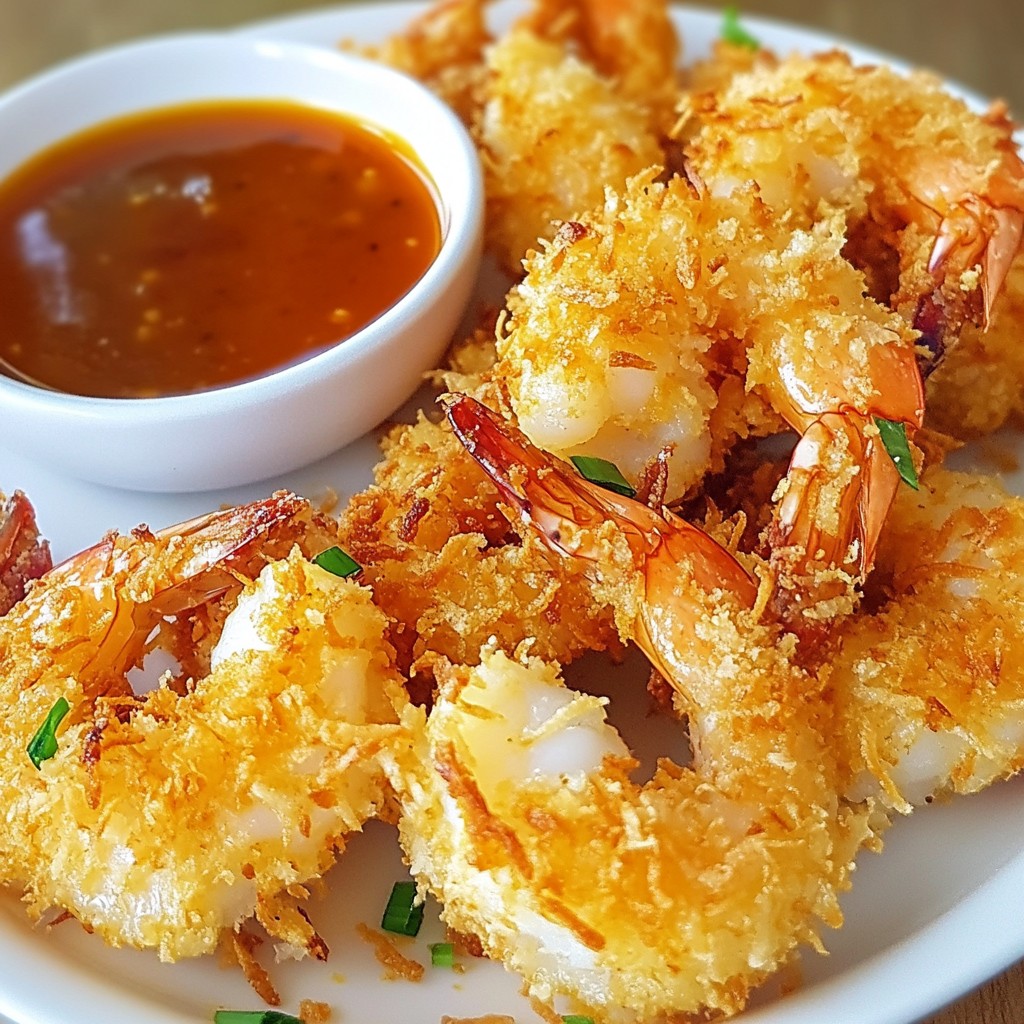
Ready to elevate your snack game? This Air Fryer Coconut Shrimp recipe is a crispy and tasty delight. With juicy shrimp coated in coconut and panko, you’ll have a delicious treat in no time. Plus, it’s healthier than deep frying! I’ll walk you through the simple steps, tips, and variations to make this dish a hit. Let’s get cooking and impress your family and friends!
Why I Love This Recipe
- Delicious Flavor Combination: The sweet coconut pairs perfectly with the savory shrimp, creating a delightful balance of flavors.
- Healthier Cooking Method: Using an air fryer reduces the oil needed for frying, making this dish a healthier option without sacrificing crispiness.
- Quick and Easy Preparation: With a total time of just 25 minutes, this recipe is perfect for a weeknight dinner or a last-minute gathering.
- Customizable Dipping Sauce: Serve with sweet chili sauce or your favorite dip to enhance the flavor and cater to your taste preferences.
Ingredients
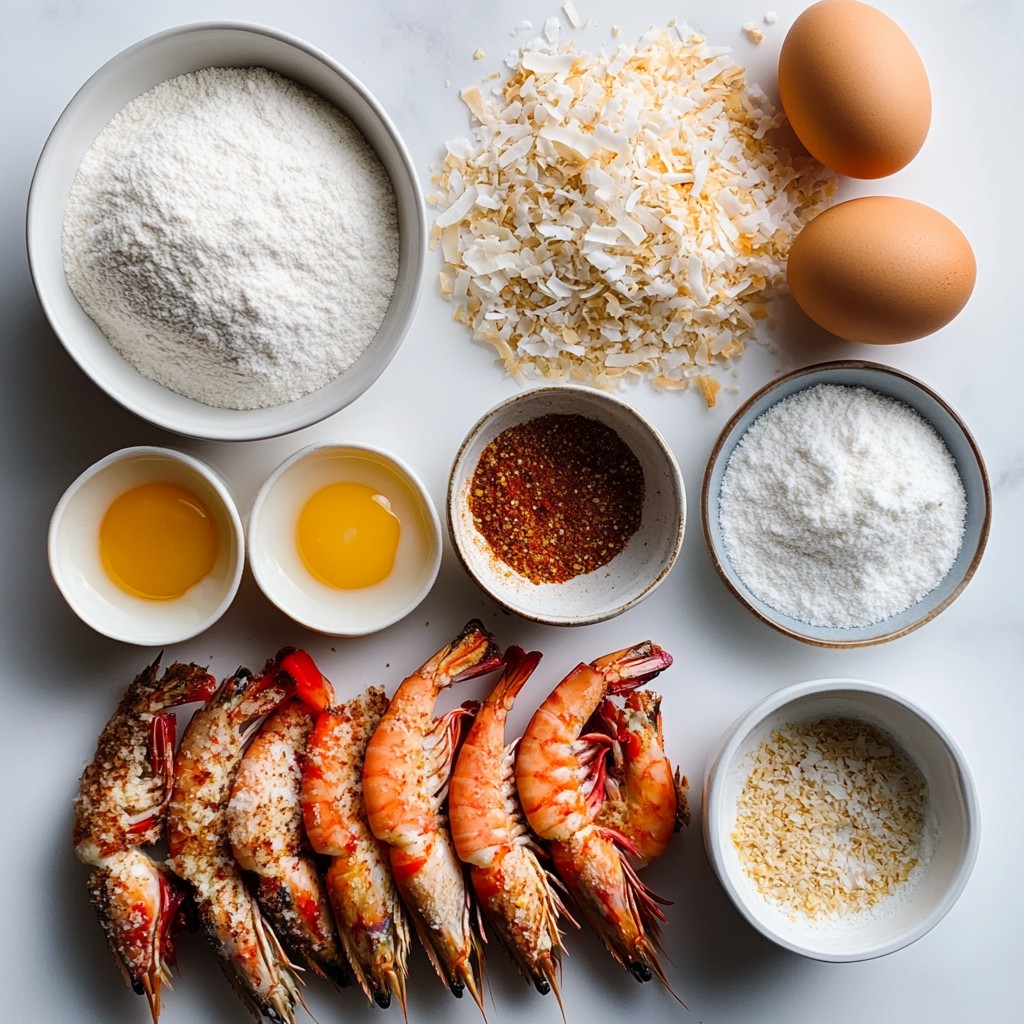
To make Air Fryer Coconut Shrimp, gather these tasty ingredients:
- 1 pound large shrimp, peeled and deveined
- 1 cup shredded coconut (sweetened or unsweetened)
- 1 cup panko breadcrumbs
- 2 large eggs
- 1/2 cup all-purpose flour
- 1 teaspoon garlic powder
- 1 teaspoon paprika
- 1/2 teaspoon salt
- 1/2 teaspoon black pepper
- Cooking spray
- Sweet chili sauce (for dipping)
These ingredients create a crunchy outer layer and a juicy shrimp inside. The shrimp give you protein, while the coconut adds sweetness. Panko breadcrumbs create a great crunch. Garlic powder and paprika bring flavor to each bite.
You can choose sweetened coconut for a hint of extra sweetness or unsweetened if you prefer. This recipe is simple but packed with taste. Each item plays a role in making this dish a delight.
Step-by-Step Instructions
Preheat the Air Fryer
Start by preheating your air fryer. Set it to 375°F (190°C) and let it run for about 5 minutes. This step is key for getting that perfect crunch.
Prepare the Dredging Stations
Next, gather your ingredients and set up three shallow dishes. In the first dish, mix together 1/2 cup of flour, 1 teaspoon of garlic powder, 1 teaspoon of paprika, 1/2 teaspoon of salt, and 1/2 teaspoon of black pepper. In the second dish, beat 2 large eggs until they are well blended. In the third dish, combine 1 cup of shredded coconut and 1 cup of panko breadcrumbs.
Coat the Shrimp
Now it’s time to coat the shrimp. Take each peeled and deveined shrimp and dip it into the flour mixture first. Make sure it’s fully covered. Next, dip the shrimp into the beaten eggs, allowing any excess to drip off. Finally, roll the shrimp in the coconut and panko mixture until it is completely coated. This creates a crunchy outer layer.
Air Fry the Shrimp
Arrange the breaded shrimp in a single layer in the air fryer basket. Do not overcrowd them; you want air to circulate freely. Lightly spray the shrimp with cooking spray to help them crisp up nicely. Air fry for 8-10 minutes, flipping them halfway through. When they are golden brown and crispy, they are ready to eat.
Serving Suggestions
Once the shrimp are done, take them out of the air fryer. Serve them hot with sweet chili sauce for dipping. This sauce adds a touch of sweetness and a little heat, making the shrimp even more delicious. Enjoy your crispy coconut shrimp!
Tips & Tricks
Achieving the Perfect Crispiness
To get that perfect crunch, you need to coat your shrimp well. Start by dredging the shrimp in the flour mix. This helps the egg and coating stick. After that, dip the shrimp in the eggs. Finally, roll them in the coconut and panko mix. The more even the coating, the crispier they will be. Don’t rush this step!
Recommended Cooking Spray
Using cooking spray is key for crispiness. After placing the shrimp in the air fryer, spray them lightly. This will enhance the golden brown color and crunch. I prefer using avocado oil spray. It has a high smoke point and adds a nice flavor.
Shrimp Size Considerations
When choosing shrimp, go for large ones. Large shrimp cook evenly and stay juicy. If the shrimp are too small, they can dry out quickly. Look for shrimp that are about 16-20 per pound. This size holds the coating well and gives a satisfying bite.
Ensuring Even Cooking
To ensure even cooking, arrange the shrimp in a single layer. Avoid stacking them on top of each other. If your air fryer is small, cook them in batches. Flip the shrimp halfway through to cook both sides evenly. This helps achieve that nice, crispy texture all around.
Pro Tips
- Use Fresh Shrimp: For the best flavor and texture, opt for fresh shrimp rather than frozen. If using frozen, ensure they are fully thawed and patted dry before breading.
- Don't Skip the Cooking Spray: A light mist of cooking spray helps the coconut shrimp achieve that golden-brown crispiness. Be generous but don't overdo it!
- Variate the Dipping Sauce: While sweet chili sauce is a great choice, try serving with mango salsa or a spicy aioli for a different flavor profile.
- Batch Cooking: If you're making a large quantity, air fry in batches to ensure even cooking and prevent overcrowding, which can lead to soggy shrimp.
Variations
Coconut Shrimp with Spices
You can add spices to make your coconut shrimp pop. Try mixing in a pinch of cayenne pepper for heat. You could also add dried herbs like oregano or thyme. This will give your shrimp a unique twist. Play with flavors until you find your favorite mix!
Using Different Dipping Sauces
While sweet chili sauce is great, you can try other dips too. A tangy mango salsa pairs well with the shrimp's crunch. You might also enjoy a creamy cilantro-lime sauce. Each sauce brings out different flavors, so feel free to explore!
Gluten-Free Version
You can make this dish gluten-free easily. Use gluten-free flour instead of all-purpose flour. Choose gluten-free panko breadcrumbs as well. This way, everyone can enjoy the crispy goodness without worry. Your guests will love the change, and you can feel good serving it!
Storage Info
How to Store Leftovers
To store your leftover coconut shrimp, let them cool first. Place them in an airtight container. You can keep them in the fridge for up to 2 days. Make sure to layer them with parchment paper to avoid sticking.
Reheating Instructions
When you're ready to enjoy your leftovers, preheat your air fryer to 350°F (175°C). Place the shrimp in the basket, leaving space between each piece. Heat them for about 5-7 minutes. This will help them stay crispy.
Freezing Coconut Shrimp
If you want to freeze coconut shrimp, first let them cool down completely. Place them in a single layer on a baking sheet. Freeze for 1 hour. Once frozen, transfer them to a freezer-safe bag. They can last for up to 3 months. When you're ready to eat, cook them from frozen in the air fryer at 375°F (190°C) for about 10-12 minutes.
FAQs
Can I use frozen shrimp for this recipe?
Yes, you can use frozen shrimp. Just make sure to thaw them first. Place the shrimp in a bowl of cold water for about 15-20 minutes. Once thawed, pat them dry with a paper towel. This step helps the coating stick better.
What can I substitute for Panko breadcrumbs?
If you don’t have Panko, use regular breadcrumbs. You can also crush some crackers or cornflakes. These will give a nice crunch too. Just keep in mind that the texture may change slightly.
How do I know when the shrimp is done cooking?
Your shrimp is done when it turns pink and firm. It should also be golden brown on the outside. You can cut one open to check if it's opaque inside. The cooking time is usually 8-10 minutes.
Is it possible to make this recipe without an air fryer?
Yes, you can fry the shrimp in oil instead. Heat oil in a pan over medium heat. Fry the shrimp for 2-3 minutes on each side until golden. This method gives a nice crispy texture too.
Can I prepare the shrimp in advance?
You can prepare the shrimp ahead of time! Bread the shrimp and place them in the fridge for up to 2 hours. Just remember to cook them fresh for the best taste and texture.
We covered how to make crispy coconut shrimp in an air fryer. You learned about ingredients, preparations, and cooking tips. There are options for variations and storage too. This dish is easy and fun to make. Whether you enjoy it with sweet chili sauce or variations, it’s a hit. With these steps, you can impress anyone. Make this recipe your own, and enjoy every bite!