
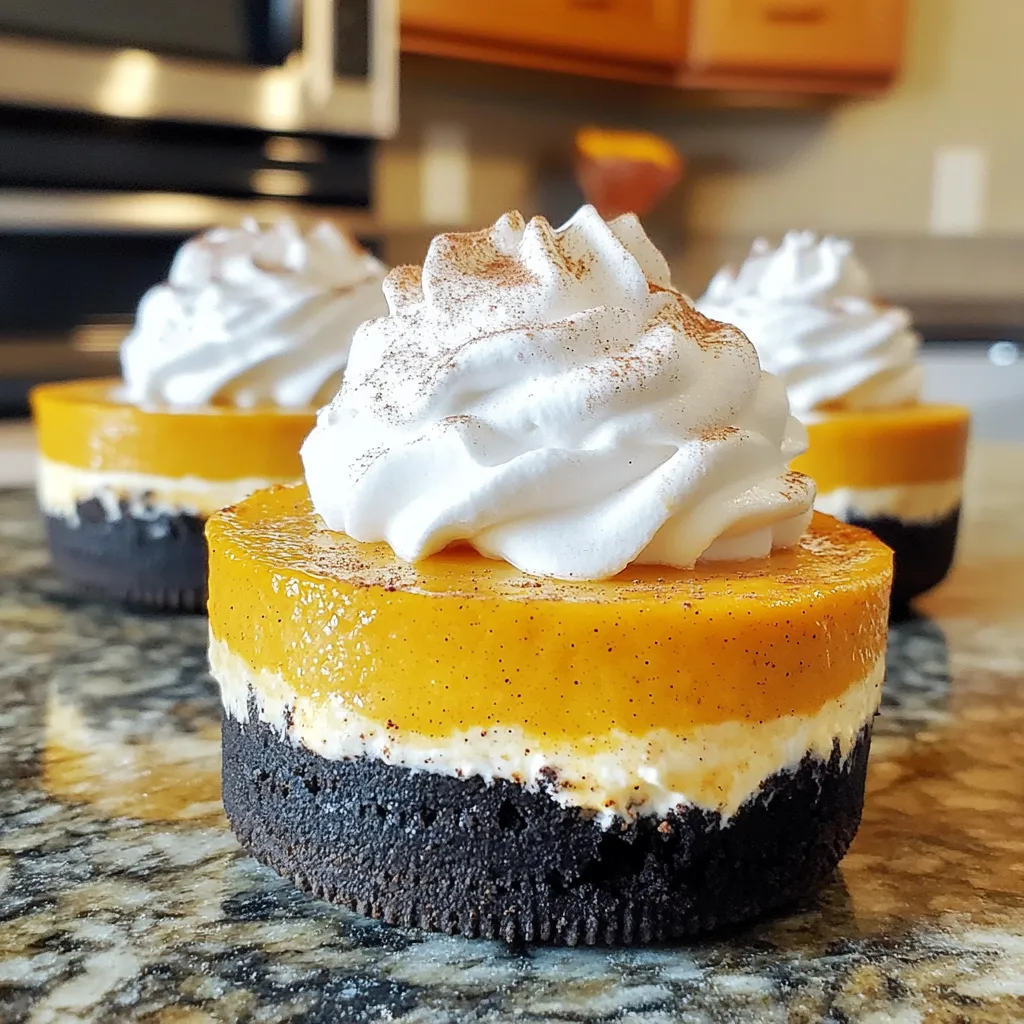
Are you ready for a sweet fall treat? These no-bake Oreo Pumpkin Cheesecake Cups combine creamy pumpkin goodness with crunchy Oreo crust. Perfect for any gathering or simply to enjoy at home, this dessert is easy to make and fun to share. Follow along as I guide you through each step to create these delightful cups that are sure to impress everyone. Let’s dive in and whip up this tasty autumn favorite!
Ingredients
To make the Oreo Pumpkin Cheesecake Cups, you will need the following ingredients:
– 1 (15 oz) can pumpkin puree
– 8 oz cream cheese, softened
– 1/2 cup powdered sugar
– 1 teaspoon vanilla extract
– 1 teaspoon ground cinnamon
– 1/2 teaspoon ground nutmeg
– 1/4 teaspoon ground ginger
– 1 cup whipped cream (store-bought or homemade)
– 16 Oreo cookies (finely crushed)
– Pumpkin spice or cocoa powder for garnish
Each ingredient plays a key role. The pumpkin puree gives a rich flavor and creamy texture. Cream cheese adds that smoothness we love in desserts. Powdered sugar sweetens the mix and keeps it fluffy. The vanilla extract brings warmth, while spices like cinnamon, nutmeg, and ginger add warmth and depth.
Whipped cream is crucial for lightness. The crushed Oreo cookies create a delightful crust that balances the creamy filling. Lastly, the optional toppings like pumpkin spice or cocoa powder enhance the look and taste. These ingredients blend to create a fun and tasty treat that is perfect for fall or any time you crave something sweet.
Step-by-Step Instructions
Preparation Steps
1. Start by mixing the cream cheese and powdered sugar. Take an 8 oz block of softened cream cheese. Place it in a bowl. Add 1/2 cup of powdered sugar. Use an electric mixer to beat them together. Mix until smooth and creamy.
2. Now, it’s time to incorporate the pumpkin puree and spices. Open a 15 oz can of pumpkin puree. Add it to the cream cheese mixture. Also, add 1 teaspoon of vanilla extract, 1 teaspoon of ground cinnamon, 1/2 teaspoon of nutmeg, and 1/4 teaspoon of ginger. Blend everything until it is well mixed and smooth.
3. Finally, fold in the whipped cream. Use 1 cup of whipped cream, either store-bought or homemade. Gently fold it into the pumpkin mixture with a spatula. Be careful not to deflate the whipped cream. This step adds lightness to the cheesecake.
Assembling the Cups
1. Create the Oreo crust layer. Take 16 Oreo cookies and crush them into fine crumbs. You can use a food processor or place them in a bag and crush with a rolling pin. Place some of the crumbs at the bottom of each cup. This will form a nice crust.
2. Next, add the pumpkin cheesecake filling layers. Spoon a layer of the pumpkin mixture over the Oreo crust. Fill the cups about halfway.
3. Now, finalize the assembly. Add another layer of crushed Oreos on top of the cheesecake filling. Then, add a final layer of the pumpkin cheesecake filling. Leave some space at the top of the cups for garnish.
Chilling and Serving
1. Chilling time is very important. Cover the cups with plastic wrap or lids. Chill them in the refrigerator for at least 2 hours. This helps the layers set properly.
2. For serving, sprinkle some pumpkin spice or cocoa powder on top. This adds a nice touch. You can also add a dollop of whipped cream for extra flair. Enjoy these delightful cups with family and friends!
Tips & Tricks
Expert Tips for Best Results
– Ensuring cream cheese is at room temperature: Before you start, let the cream cheese sit out. Softened cream cheese blends better into the mix. This helps create a smooth texture.
– How to fold whipped cream properly: When you add whipped cream, use a spatula. Gently lift and fold the mixture. This keeps the fluffiness and lightness of the cream.
Common Mistakes to Avoid
– Not chilling long enough: Give your cheesecake cups time to chill. Two hours is a must. This helps them set well and taste better.
– Overmixing the filling: Mix just until combined. Overmixing can make the filling too dense. A light touch keeps it creamy and delicious.
Garnishing Ideas
– Other topping options besides pumpkin spice: Try cocoa powder for a chocolate twist. You can also use crushed Oreos for extra crunch.
– Presentation tips: Use clear cups to show off the layers. A sprinkle of cinnamon or some chocolate shavings can make it look fancy.
Variations
Flavor Variations
You can change the flavor of your Oreo pumpkin cheesecake cups by using different cookies. Try using chocolate mint Oreos for a fresh twist. You can also use golden Oreos if you want a lighter taste. Each type of cookie gives a new fun flavor.
You can also use flavored whipped cream. Think about adding a bit of cinnamon or pumpkin spice to your whipped cream. This small change adds a nice touch to the dessert. You can even use flavored whipped toppings from the store if you want to save time.
Dietary Adjustments
If you need a gluten-free option, use gluten-free Oreos. They taste great and keep the dessert just as yummy. You can also make this treat vegan. Use vegan cream cheese and coconut whipped cream. The pumpkin puree makes it moist and delicious, just like the original.
Serving Suggestions
Pair these cheesecake cups with warm drinks like apple cider or chai tea. They balance the sweet and spicy flavors perfectly. You can also serve them with other desserts, like brownies or cookies, for a fun dessert platter.
For seasonal ideas, serve these cups at fall parties or Thanksgiving gatherings. They look great on dessert tables and are easy to grab. The bright colors also add to the fun autumn vibe!
Storage Info
Proper Storage Techniques
To store leftovers, place your Oreo pumpkin cheesecake cups in an airtight container. This keeps them fresh and tasty. If you don’t have a container, cover the cups with plastic wrap. Make sure it is tight to avoid air getting in.
For refrigeration, glass or plastic containers work well. Choose ones that fit the cups snugly. This helps prevent spills and keeps the layers intact.
Shelf Life
These cheesecake cups can last in the fridge for about 3 to 5 days. Always check for signs of spoilage. If you see any mold or if they smell off, it’s best to toss them.
Freezing Instructions
You can freeze these cheesecake cups! To freeze, wrap each cup in plastic wrap and then place them in a freezer-safe bag. This protects them from freezer burn.
When you’re ready to enjoy them, move the cups to the fridge to thaw overnight. This keeps the texture nice and creamy. Avoid thawing them at room temperature to help maintain their taste and quality.
FAQs
What can I substitute for cream cheese?
You can use Greek yogurt or mascarpone cheese instead of cream cheese. These options give a creamy texture. Greek yogurt adds a tangy flavor. Mascarpone is rich and smooth. You can also use vegan cream cheese for a dairy-free treat. Just remember to keep the same amount you need in the recipe.
Can I use homemade whipped cream?
Yes, you can use homemade whipped cream! To make it, whip heavy cream until soft peaks form. Add a little sugar and vanilla for sweetness. This will give your cheesecake cups a fresh taste. Just be gentle when folding it into your pumpkin mixture. You want to keep it light and fluffy.
How long do I need to chill the cheesecake cups?
You need to chill the cheesecake cups for at least 2 hours. This time helps the layers set and flavors blend. If you can chill them longer, that’s even better! Just make sure they are covered well in the fridge. This way, they stay fresh and tasty for serving.
This blog post showed you how to make delicious pumpkin cheesecake cups. We covered the key ingredients, step-by-step instructions, and helpful tips to avoid mistakes. You learned about variations and proper storage methods too.
Remember, chilling is key for the best taste. With your new skills, you can impress anyone. Enjoy making these treats for yourself and others!

