Latest & Greatest

browse recipes

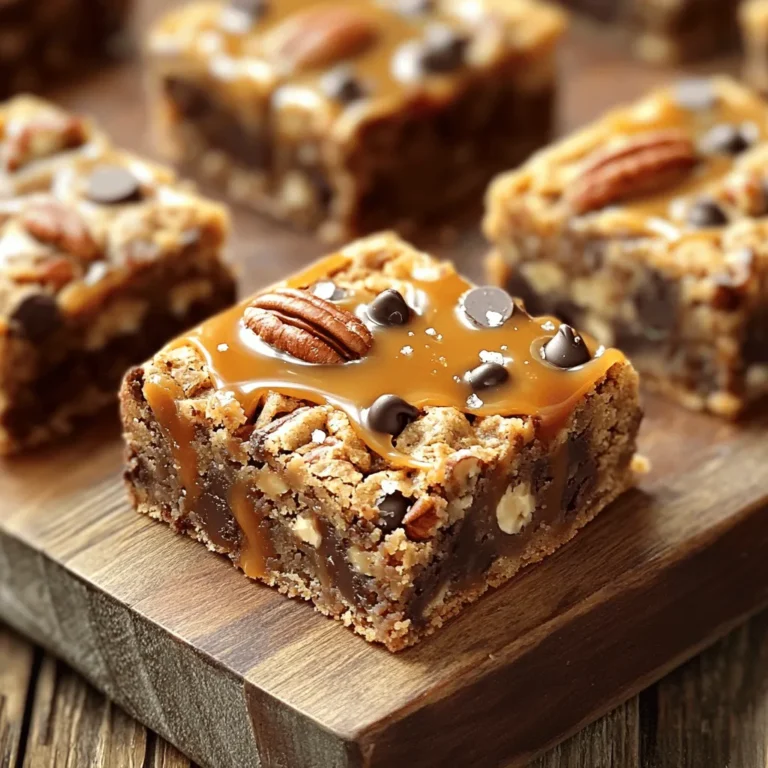
To make S'mores Dessert Nachos, gather these ingredients: - 1 large flour tortilla: This acts as the base. You can use a whole wheat tortilla for a healthier option. - 1 tablespoon butter, melted: This helps the tortilla crisp up nicely in the oven. You can replace it with coconut oil for a dairy-free choice. - 1 cup mini marshmallows: These create that classic s'mores flavor. If you want a vegan option, choose vegan marshmallows. - 1/2 cup chocolate chips: Use semi-sweet or milk chocolate for rich flavor. Dark chocolate is also a great choice for a more intense taste. - 1/4 cup crushed graham crackers: This adds crunch and that s'mores vibe. You can swap this with crushed cookies for a twist. - 1/4 cup caramel sauce (optional): This gives a sweet, gooey touch. You can skip it if you prefer a lighter treat. - Fresh strawberries or banana slices: Use these for garnish. They add color and freshness. You can also use other fruits like raspberries or kiwi. With these ingredients, you're ready to whip up a fun and tasty treat! If you're curious about the full recipe, check out the section above. 1. Preheat the oven and prepare the tortilla First, set your oven to 350°F (175°C). While it heats, take one large flour tortilla and brush one side with melted butter. This helps the tortilla get nice and crispy. Place the tortilla on a baking sheet, butter side up. 2. Baking the tortilla for crispiness Bake the tortilla for about 5 minutes. You want it to start turning golden. This step makes it crunchy and ready for toppings. 1. Layering chocolate and marshmallows Once the tortilla is baked, sprinkle 1/2 cup of chocolate chips evenly over the surface. Then, add 1 cup of mini marshmallows on top of the chocolate. The heat will melt the chocolate and fluff up the marshmallows. 2. Final baking for the perfect finish Return the baking sheet to the oven. Bake for another 3-5 minutes. Watch the marshmallows closely. They should be fluffy and golden brown. Lastly, let the nachos cool a bit. If you like, drizzle with caramel sauce and sprinkle 1/4 cup of crushed graham crackers on top. Slice into wedges and serve warm. For the full recipe, check out the details above. Enjoy making these delicious S’mores Dessert Nachos! To make your tortilla crispy, brush it with melted butter. Bake it until golden, about five minutes. This step helps the tortilla stay crunchy under the toppings. If you want extra crispiness, bake it a bit longer. For golden, fluffy marshmallows, watch them closely. Once you add them, bake for three to five minutes. They should puff up and turn brown. Keep an eye on them to avoid burning. For a fun look, arrange the nachos in a bright bowl. Drizzle some extra caramel sauce on top. Add a side of whipped cream for dipping. Fresh fruits like strawberries or banana slices make a nice touch. You can also sprinkle more crushed graham crackers for added texture. For a festive feel, use colorful plates or napkins. Serve these tasty nachos at parties or family gatherings. They are sure to impress your guests! For the complete recipe, refer to the Full Recipe section. {{image_2}} You can switch up the flavors in your S’mores Dessert Nachos. Try different types of chocolate for unique twists. Dark chocolate offers a rich taste. White chocolate adds a sweet creaminess. You can even mix them for a fun flavor blend. Adding extra toppings makes each bite special. Nuts like walnuts or pecans give a nice crunch. Fresh fruits like bananas or raspberries add a fruity touch. You can get creative with toppings. Just remember to balance the sweet with the savory. For those who need gluten-free options, use a gluten-free tortilla. This way, everyone can enjoy the treat. Just check the labels to be sure. If you want vegan alternatives, switch out the butter for coconut oil. Use dairy-free chocolate chips and skip the caramel sauce. You can still have a delicious dessert that fits your diet. Feel free to explore these variations and make the recipe your own. Check out the Full Recipe for more details on making these tasty nachos! To store your S’mores Dessert Nachos, keep them in an airtight container. This helps keep the flavors fresh. You can place parchment paper between layers to stop sticking. They will stay good in the fridge for up to two days. After this time, they may lose texture and flavor. When reheating, use the oven for best results. Preheat it to 350°F (175°C). Place the nachos on a baking sheet for even heat. Heat for about 5 to 7 minutes. This keeps the tortilla crispy and the marshmallows fluffy. Avoid using the microwave, as it can make the nachos soggy. Always check the nachos to make sure they are warm throughout. Enjoy your tasty treat again! How do I make S’mores Dessert Nachos without an oven? You can make these nachos on a stovetop. Just heat a skillet over medium heat. Place the buttered tortilla in the skillet. Cook for about 2-3 minutes until it gets crispy. Then, add chocolate chips and mini marshmallows. Cover with a lid for a few minutes. This helps the marshmallows melt and get fluffy. Can I prep these nachos in advance? Yes, you can prep some parts ahead of time. You can slice fruits and crush graham crackers a few hours before serving. Keep them in separate containers in the fridge. Assemble the nachos right before serving for the best taste and texture. What can I use as a chocolate substitute? If you want to skip chocolate, try using peanut butter or Nutella. You can also use caramel sauce for a sweeter flavor. Just make sure to adjust the amount to keep the balance. What is the best way to serve these nachos? Serve the nachos warm. Place them in a colorful bowl for a fun look. Drizzle extra caramel on top for a sweet touch. You can add whipped cream on the side for dipping. It makes the dish even more fun! Can I customize toppings for different preferences? Absolutely! You can change the toppings to fit your taste. Add sliced bananas or berries for a fruity twist. You can even sprinkle nuts for crunch. Just make it your own and have fun with it! In this article, we explored how to create delicious S’mores Dessert Nachos. We covered the essential ingredients, step-by-step preparation, and assembly methods. You learned helpful tips to perfect your dish, as well as fun variations and storage tips. Making these nachos is easy, and you can tweak them to suit your tastes. Enjoy experimenting with different flavors. Whether for a party or a treat, these nachos will impress everyone. Get ready for a tasty dessert adventure everyone will love!

S’mores Dessert Nachos Tasty and Fun Treat Idea

Get ready for a treat like no other with my S’mores Dessert Nachos! This fun dessert combines crispy tortillas, melty chocolate, and gooey marshmallows…

My Latest Desserts

My Latest Drinks

hey,

i’m !

I’m so happy you’re here!

I love creating dishes that bring joy to the table. I hope they bring the same joy to yours. Let’s enjoy this flavorful journey together.

Spicy Thai Noodles Flavorful and Easy to Prepare Dish

Welcome to the world of Spicy Thai Noodles, where flavor meets simplicity! You can whip up this delicious dish in no time, making it…

To make spicy Thai noodles, you need some key ingredients. These make the dish tasty and colorful. Here is a list of what you will use: - 8 oz rice noodles - 2 tablespoons vegetable oil - 3 cloves garlic, minced - 1 tablespoon fresh ginger, grated - 1 red bell pepper, thinly sliced - 1 cup snap peas, trimmed - 1 cup carrots, julienned - 1 cup bean sprouts - 3 tablespoons soy sauce - 2 tablespoons fish sauce (or soy sauce for a vegetarian option) - 1 tablespoon chili paste (adjust to taste) - 1 teaspoon brown sugar - 2 green onions, chopped - Fresh cilantro, for garnish - Lime wedges, for serving These ingredients give the noodles their bold flavors and vibrant colors. The rice noodles are the base, while the veggies add crunch and nutrients. You can make some swaps in this recipe. If you don’t have rice noodles, you can use egg noodles or even whole wheat noodles. For the fish sauce, a splash of soy sauce works great for a vegetarian version. If you can’t find snap peas, you can use green beans or broccoli. The garlic and ginger can be fresh or powdered. Using powdered will still add flavor, but fresh gives a better taste. The spice level is up to you. If you like it mild, use less chili paste. You can start with a half tablespoon and add more if you want more heat. Adding lime juice can also help balance the spice. For a mild dish, leave out the chili paste and add a touch of honey instead. This will give you a sweet and tangy flavor without the heat. Feel free to play with these options to make the dish your own! You can find the full recipe for Fiery Thai Noodle Delight in the earlier section. Start by boiling water in a big pot. Once it bubbles, add the rice noodles. Cook them as the package says, usually about 4 to 6 minutes. When they are soft, drain them and rinse under cold water. This stops the cooking. Set them aside for later. Now, heat the vegetable oil in a large skillet or wok over medium-high heat. Add minced garlic and grated ginger to the hot oil. Stir for about 30 seconds until you smell a nice aroma. Next, toss in the sliced red bell pepper, snap peas, and julienned carrots. Stir-fry these vegetables for 3 to 4 minutes. They should be tender but still a bit crispy. Add the cooked rice noodles to the skillet with the vegetables. In a small bowl, mix soy sauce, fish sauce, chili paste, and brown sugar. Pour this sauce over the noodles and vegetables. Toss everything together to coat well. Finally, stir in the bean sprouts and cook for another 1 to 2 minutes to heat through. Remove from heat and fold in the chopped green onions. Serve your dish hot, topped with fresh cilantro and lime wedges on the side for squeezing. For the full recipe, check out the details in the earlier section. To get the best noodle texture, use rice noodles. They cook quickly and soak up flavors well. Follow the package instructions closely. After boiling, rinse them in cold water. This stops cooking and keeps them firm. If they clump, toss them with a bit of oil. This keeps them separate and easy to stir. To make your dish pop, add fresh herbs like cilantro. Lime juice also brightens the dish. You can adjust the heat by adding more chili paste. For a twist, try using sesame oil instead of vegetable oil. It adds a nutty flavor that works well with the spices. Don’t forget to taste as you go! Adjust the soy, fish sauce, and sugar until it’s just right. A common mistake is overcooking the noodles. This can make them mushy. Always cook them to just al dente. Another mistake is not heating the oil enough. If your oil isn’t hot, the garlic and ginger won’t sizzle. This step is key for good flavor. Finally, don’t skip the garnish! It adds color and freshness to your dish. For the full recipe, check out the complete instructions above. {{image_2}} You can add protein to your spicy Thai noodles for extra flavor and texture. Chicken, tofu, and shrimp are great options. For chicken, use boneless pieces cut into strips. Cook them in the skillet before adding the vegetables. Tofu adds a nice crunch. Use firm tofu and sauté it until golden brown. Shrimp cooks quickly, so add it just after the vegetables. Each protein brings its unique taste to the dish. If you're vegetarian or vegan, you can easily modify this dish. Replace fish sauce with extra soy sauce or a vegan fish sauce. This keeps the savory taste without meat. Use tofu or tempeh for protein. You can also add more vegetables like mushrooms or zucchini for added nutrition. These swaps keep your meal tasty and satisfying. Feel free to experiment with vegetables. Broccoli, bell peppers, and bok choy all work well. Green beans and baby corn can also add color and crunch. Using a mix of colorful veggies makes your dish more appealing. Each vegetable adds a different taste and texture, making your spicy Thai noodles exciting every time you cook them. For the full recipe, check out Fiery Thai Noodle Delight . After enjoying your spicy Thai noodles, store any leftovers in an airtight container. Make sure to let the noodles cool down first. They can last in the fridge for up to three days. Keep any sauces separate if you like your noodles saucy. This way, they stay fresh and tasty. To reheat your noodles, use a skillet for the best results. Add a splash of water or oil to prevent sticking. Heat over medium heat, stirring gently. This helps keep the noodles soft. You can also use the microwave. Place the noodles in a bowl, cover them, and heat for one to two minutes. Stir halfway through for even heating. If you want to save some for later, freezing is a great choice. Place cooled noodles in a freezer-safe bag. Squeeze out the air and seal tightly. They can last for up to three months in the freezer. When ready to eat, thaw in the fridge overnight. Reheat as mentioned above. Enjoy your spicy Thai noodles any time! For the full recipe, check the section above. To make spicy Thai noodles less spicy, you can reduce the chili paste. Start with half a tablespoon instead of one. You can also add more sugar to balance the heat. Another way is to add more vegetables, which can dilute the spice. If you like creamy textures, try mixing in coconut milk. It tones down heat while adding a rich flavor. Yes, you can use different noodles. While rice noodles are best for this dish, you can try egg noodles or even whole wheat noodles. Each type of noodle gives a unique flavor and texture. Just remember to cook them according to their package instructions. This way, they blend well with the sauce and veggies. You can find the full recipe for Fiery Thai Noodle Delight in the recipe section above. This recipe shows you how to make a quick and tasty meal. It includes details on cooking times and all the ingredients you need. Enjoy preparing this flavorful dish! In this blog post, I covered key ingredients and their substitutions for the dish. I shared step-by-step instructions on how to cook rice noodles and sauté vegetables. Tips on achieving the perfect noodle texture and enhancing flavors were also included. We explored variations, like adding protein and adapting for vegans. Lastly, I provided important storage info for leftovers and answers to common questions. Cooking is fun and rewarding. With these tips, you can create delicious meals your way. Enjoy your cooking journey!